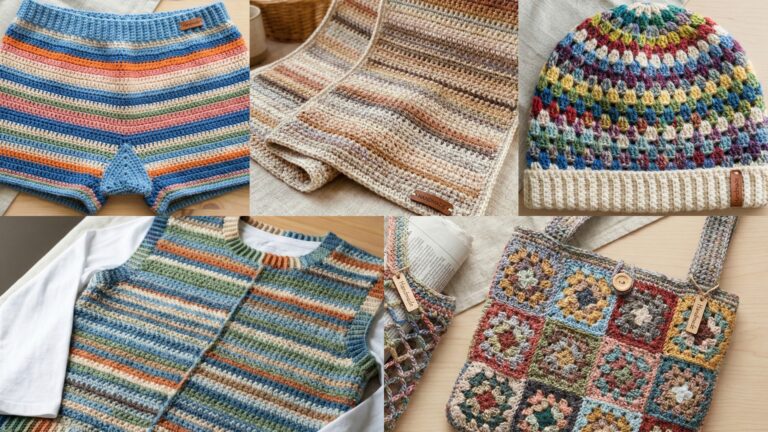
Crochet shorts are one of those handmade pieces that feel fun, fashionable, and surprisingly practical all at once. They are light enough for summer, stylish enough to wear as part of a full outfit, and creative enough to let you play with texture, color, and shaping in a way that feels exciting from start to finish. Whether you want something relaxed for beach days, cozy for lounging, or a little more polished for warm-weather styling, crochet shorts give you endless room to make them your own.
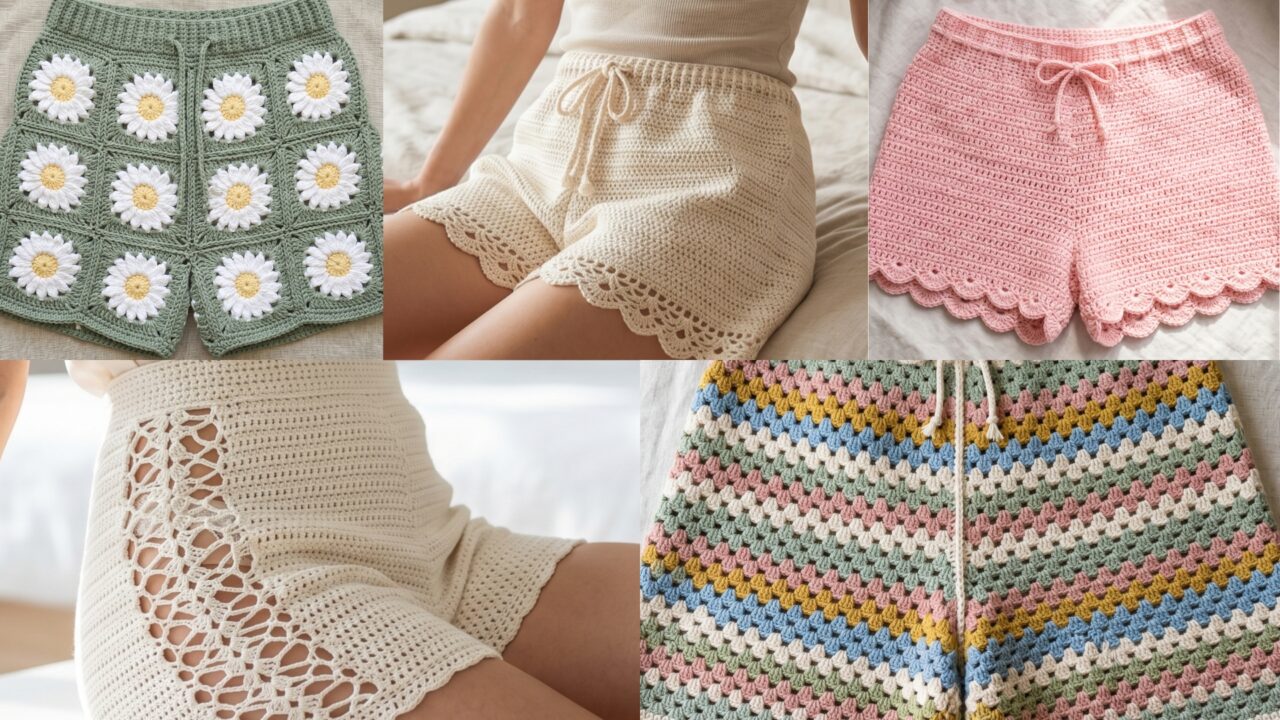
What makes crochet shorts especially appealing is how many different moods you can create from the same basic garment shape. A pair of oversized granny stripe shorts can feel casual and airy. Daisy granny square shorts bring a cheerful handmade charm. Scallop edge shorts feel soft and feminine. Peekaboo lace side cutout shorts add a trendy, flirty detail. Boxer-style lacy edge shorts feel playful and easy to wear. Each design offers a different take on warm-weather fashion, but all of them are satisfying projects for crocheters who want something wearable and stylish.
In this post, you will find five stylish crochet shorts patterns with detailed step-by-step guidance, helpful notes, and practical finishing tips. These designs are written to be easy to follow while still giving you enough detail to create a pair of shorts that fits well, looks polished, and feels comfortable in warm weather. If you love crochet garments that blend fashion and function, these shorts are a wonderful place to begin.
Quick Notes
Project type: Crochet shorts
Best for: Warm weather outfits, beachwear, loungewear, festival style, and handmade fashion
Skill level: Beginner to intermediate, depending on shaping and detail
Hook size: Usually 3.5 mm to 5.0 mm, depending on yarn weight and desired drape
Yarn weight: DK, sport, or lightweight cotton blends
Best yarn choice: Cotton or cotton blends for breathability and comfort
Finished size: Customizable to waist, hip, and inseam measurements
Time to complete: A few hours to a few days depending on size and stitch detail
Helpful stitches: Chain, slip stitch, single crochet, half double crochet, double crochet, granny stitch, shell stitch, lace stitches, increases, decreases, seaming, ribbing, drawstring or elastic waist finishing
Common Materials
Most crochet shorts use a similar set of supplies.
- Yarn in your chosen colors
- Crochet hook matched to the yarn
- Yarn needle
- Scissors
- Stitch markers
- Measuring tape
- Elastic or drawstring, optional for waistband
- Lining fabric, optional for comfort or coverage
- Blocking tools, optional
For shorts, yarn choice matters a lot because the fabric needs to feel comfortable, breathable, and flexible. Cotton yarn is often the best choice because it is soft, light, and easy to wear in warm weather. A yarn with a little drape helps the shorts move nicely, while a tighter stitch can improve coverage and durability.
1. Crochet Granny Stripes Oversized Shorts Pattern
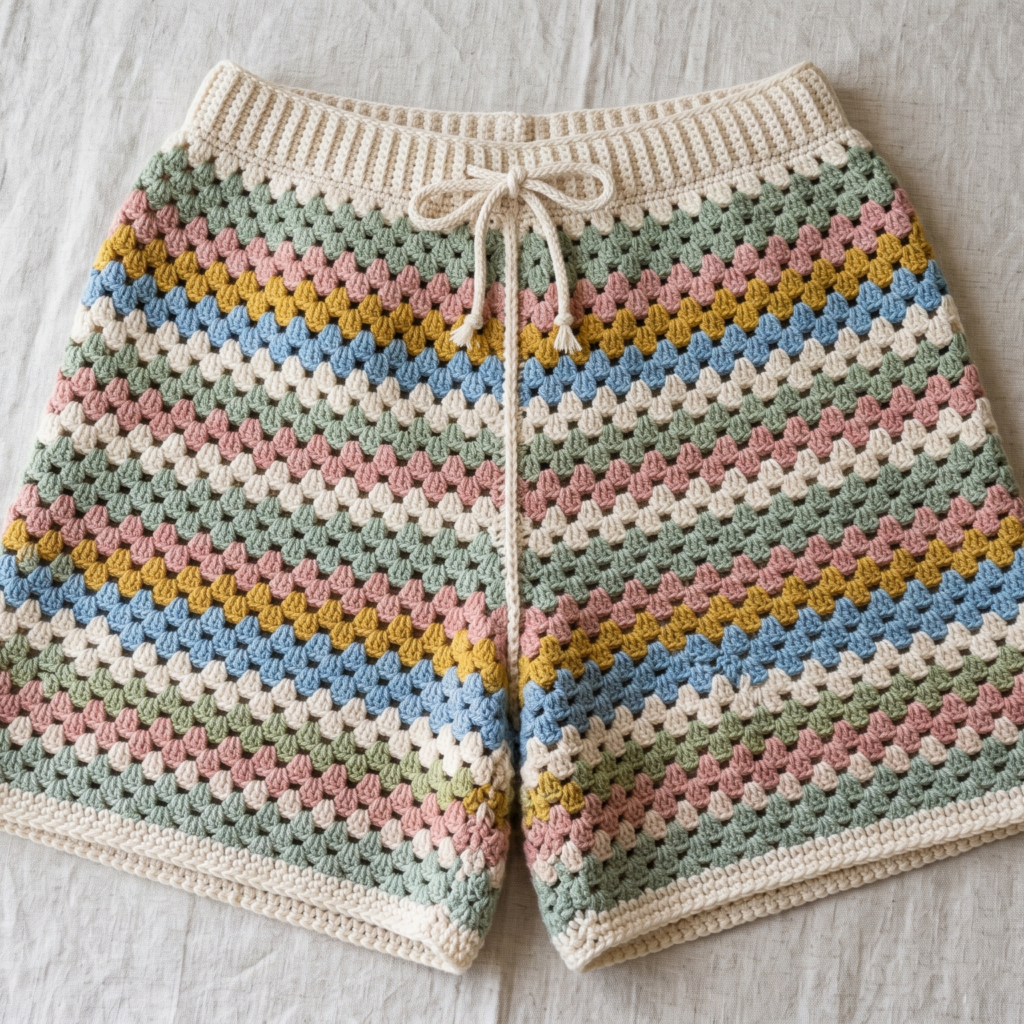
Granny stripe oversized shorts are relaxed, colorful, and very easy to style. They are perfect if you want a pair of shorts that feels casual and loose while still looking put together. The granny stripe stitch gives them a playful retro feel, and the oversized fit makes them extra comfortable for summer lounging or beachwear.
Step-by-step guide
Step 1: Take your measurements
Before starting, measure your waist, hips, rise, and desired short length. Oversized shorts still need to fit in the right places, especially at the waist and hips. Write down the measurements so you can refer to them as you crochet.
Good measurements help the shorts stay wearable.
Step 2: Choose your stripe colors
Pick a few colors that work well together. Granny stripes are beautiful when they use a mix of bright, soft, or earthy tones. If you want a more relaxed look, use muted colors. If you want a bold summer look, try a cheerful rainbow palette.
The stripe colors give the shorts their personality.
Step 3: Crochet the waistband
Start with a waistband that feels secure but comfortable. You can make it in ribbed stitches or use a sturdy foundation row that allows for stretch. Since these are oversized shorts, the waistband should help hold the fit in place without feeling tight.
A good waistband keeps the shorts secure.
Step 4: Work the body in granny stripes
Begin crocheting the main body using granny stripe rows. Keep the spacing even so the stripes look clean and balanced. The open texture of the granny stitch gives the shorts an airy, lightweight feel that is especially nice for warm weather.
The granny stripes create the relaxed handmade style.
Step 5: Shape the shorts legs
Once the body reaches the right height, divide the fabric to shape the two legs. Make sure the leg openings are evenly sized so the shorts hang properly. You may need to adjust the width slightly depending on how loose you want the fit to be.
The leg shaping turns the piece into actual shorts.
Step 6: Crochet the inseam
Join the front and back sections along the inner leg seam. This step gives the shorts their structure and helps them fit naturally on the body. Take your time so the seam is neat and comfortable.
A clean inseam improves the overall fit.
Step 7: Finish the leg openings
Add a border around each leg opening to make them look finished and help them hold their shape. A simple single crochet or ribbed edge works well. This can also help prevent stretching over time.
Step 8: Add waist ties or elastic
If needed, add a drawstring or elastic to the waistband so the shorts fit securely. This is especially useful for oversized shorts because it gives a little flexibility in wear.
Step 9: Block the shorts
Blocking can help the stripes sit evenly and improve the overall shape. Lay the shorts flat and smooth the fabric so the rows look polished.
Helpful tips
These shorts look especially fun in cheerful color combinations, but neutral stripes can also look beautifully relaxed. If you want a more polished feel, keep the waistband simple and the stripes evenly spaced. They are perfect for pairing with crop tops, tank tops, or swimwear.
2. Crochet Comfy Daisy Granny Square Shorts Pattern
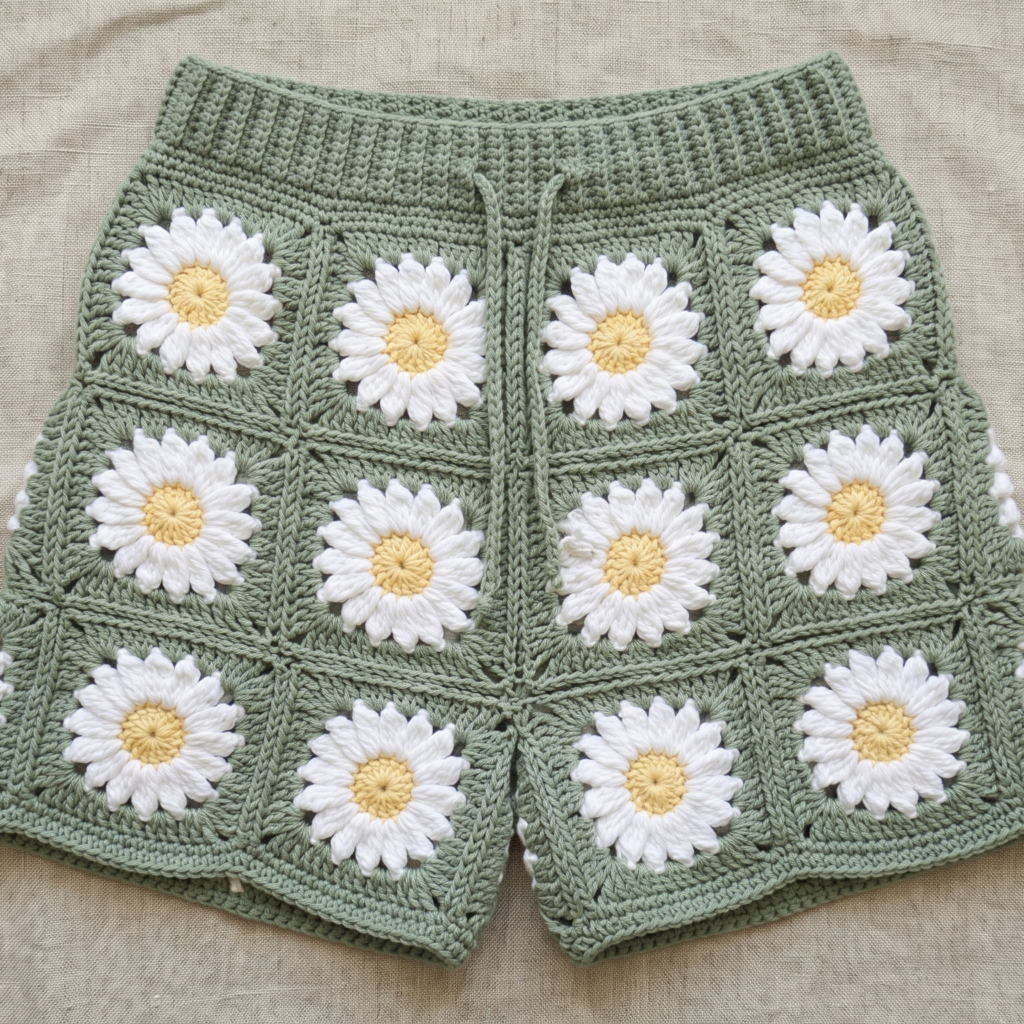
Comfy daisy granny square shorts are bright, cheerful, and full of handmade charm. The daisy motifs make them feel playful and sweet, while the granny square construction gives them a fun patchwork style. This is a lovely project if you want something that feels a little retro, a little cottagecore, and very wearable.
Step-by-step guide
Step 1: Choose your daisy colors
Pick a flower color, a center color, and a background color. Daisy motifs look especially lovely in white, yellow, cream, pink, or pastel tones. Since these shorts use motifs, the colors should feel coordinated and balanced across the whole pair.
The colors help the flowers stand out.
Step 2: Crochet the daisy granny squares
Make enough daisy granny squares to form the front and back of the shorts. Keep each square the same size so the shorts assemble neatly. If you want a more playful look, you can vary the flower centers slightly while keeping the outer squares consistent.
Uniform squares make assembly easier.
Step 3: Plan the layout
Lay out the squares before joining them so you can see how the shorts will fit together. Decide which squares will form the front panel, back panel, and waistband area. A careful layout helps the shorts look balanced and intentional.
Good planning makes the final shape cleaner.
Step 4: Join the squares into panels
Sew or crochet the squares together to create the shorts panels. Make sure the edges line up and the seams are secure. The granny square style works best when the motifs are joined neatly and the shapes are even.
The joining stage gives the shorts structure.
Step 5: Shape the waist and hips
Once the panels are assembled, adjust the top section so the waist fits comfortably. You may need to add a few extra rows or a stronger waistband section. The shorts should sit securely without feeling too snug.
A well-shaped waist makes the shorts more wearable.
Step 6: Create the leg openings
Shape the bottom of the shorts into two leg openings. Make sure both sides are even and the length feels comfortable for warm-weather wear. You can keep them a little longer for a relaxed fit or shorten them for a more summery style.
Step 7: Add a waistband
Finish the top with a ribbed waistband, drawstring casing, or elastic band. This helps the shorts stay up and feel comfortable while wearing them. A secure waistband is especially important with motif-based shorts.
Step 8: Finish the edges
Add a border around the leg openings and waistband if needed. A clean border can help unify the squares and make the shorts feel more polished. It also helps the finished garment look more boutique-made.
Helpful tips
Daisy granny square shorts look especially lovely in pastel or cottage-inspired palettes. If you want a more modern version, use only two or three colors and keep the layout clean. These shorts pair beautifully with simple tops because the motifs already make a statement.
3. Crochet Scallop Edge Shorts Pattern
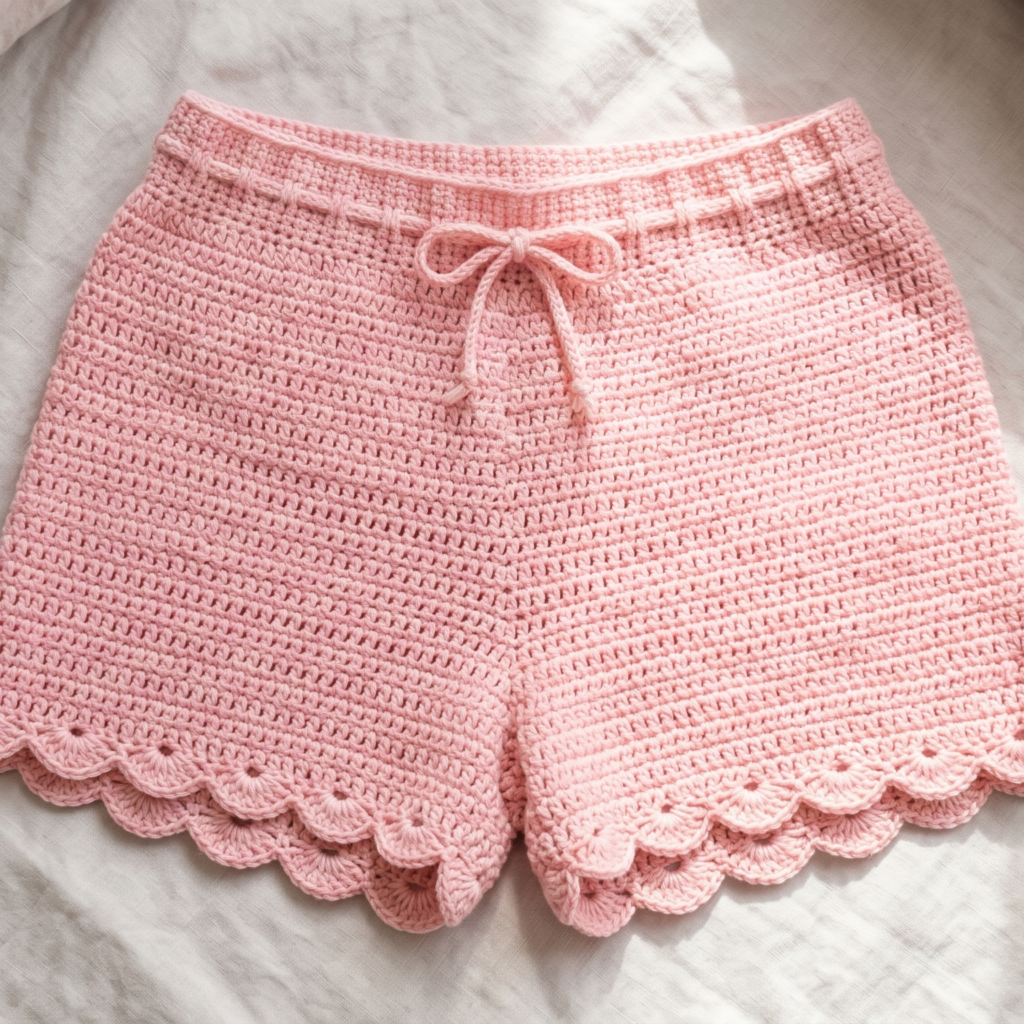
Scallop edge shorts feel soft, feminine, and elegant. The scalloped finish adds a delicate detail that makes the shorts feel boutique-made without being overly complicated. This design is a great choice if you want a pair of shorts that looks polished and a little romantic.
Step-by-step guide
Step 1: Choose a soft yarn
Pick a yarn that drapes nicely and feels comfortable against the skin. Cotton blends and lightweight yarns are especially good for scallop edge shorts because they help the textured edge sit nicely without becoming stiff.
The yarn should support the soft silhouette.
Step 2: Measure the body
Take waist, hip, and inseam measurements before starting. Because this style often has a fitted or semi-fitted shape, it is important to know exactly how wide and long you want the shorts to be.
A careful fit makes the shorts flattering.
Step 3: Crochet the waistband
Begin with a waistband that fits snugly but comfortably. You can use ribbing, elastic, or a drawstring casing depending on the style you prefer. The waistband should feel secure because it anchors the whole garment.
The waistband provides the structure.
Step 4: Build the main body
Work the shorts body in simple rows or rounds using a stitch pattern that keeps the fabric smooth. You want the scallop edge to be the decorative highlight, so the body should remain clean and balanced.
A simple body helps the scallops shine.
Step 5: Shape the leg openings
Divide the shorts into leg sections once the body reaches the right height. Make sure both leg openings are even and that the shaping feels comfortable. The fit should be soft and slightly flattering rather than overly tight.
Step 6: Add the scallop edge
At the bottom of each leg opening, crochet a scalloped border. This can be done with shells or fan stitches. Keep the scallops evenly spaced and sized so they frame the legs neatly.
The scallop edge gives the shorts their charm.
Step 7: Finish the seams and waistband
Check the inseam and waistband carefully. Secure any loose stitches and make sure the shorts sit comfortably on the waist and hips. A neat finish will help the scallops feel even more polished.
Step 8: Block if needed
Blocking can help the scallops open and sit more neatly. It also helps the leg openings keep their shape, which is especially useful for decorative hems.
Helpful tips
Scallop edge shorts look beautiful in cream, blush, pale blue, or any soft pastel shade. If you want them to feel more fashion-forward, use a rich solid color and keep the scallops simple. This style is lovely for summer styling, vacations, and feminine handmade outfits.
4. Crochet Peekaboo Lace Side Cutout Shorts Pattern
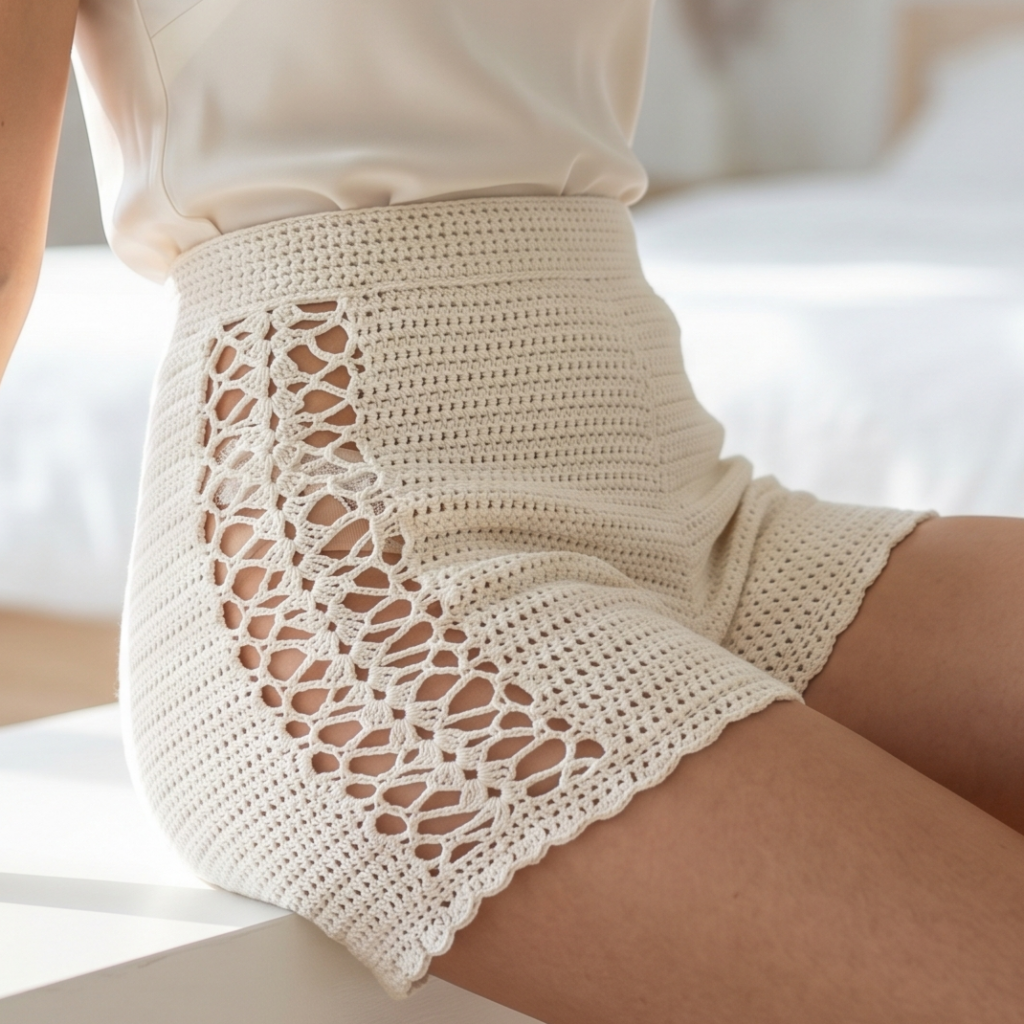
Peekaboo lace side cutout shorts are trendy, playful, and a little flirty. The side cutouts add visual interest, while the lace gives the shorts a delicate and airy feel. This is a great pattern if you want something that feels more fashion-forward and a little bolder than a basic summer short.
Step-by-step guide
Step 1: Choose a comfortable yarn
Since this design has open details, choose yarn that feels soft and smooth on the skin. Cotton blends are a great option because they are breathable and hold shape well. You want the shorts to feel light, but not flimsy.
The yarn should support both comfort and style.
Step 2: Measure the fit carefully
Take waist, hip, and thigh measurements before starting. Side cutout shorts need a precise fit because the cutouts change how the garment sits on the body. Make sure you know exactly how much coverage you want.
A careful fit is essential for cutout designs.
Step 3: Crochet the waistband and upper body
Start with a secure waistband, then work the upper section of the shorts in a fabric that provides coverage. The front and back should feel supportive before you add the open lace sections. Keep the stitch pattern even and neat.
The upper body provides structure.
Step 4: Add the side cutout panels
Create side openings or lace panels where the peekaboo details will appear. These sections can be worked with chain spaces, mesh, or open lace stitches. Keep the openings symmetrical so the shorts look balanced.
The side cutouts are the main style feature.
Step 5: Crochet the lower body
Continue the shorts below the cutout section, making sure the body remains comfortable and secure. The lower half should feel well shaped and should not pull against the lace.
Step 6: Shape the leg openings
Once the shorts reach the right length, form the leg openings and finish them neatly. A clean edge will help balance the open side details.
Step 7: Reinforce the lace areas
Because cutout sections can stretch, make sure the lace is sturdy enough to wear. Reinforce the seams around the openings if needed so the shorts stay comfortable and durable.
Step 8: Finish with a smooth border
A neat border around the waist and leg openings will make the shorts look polished. Blocking may also help the lace lie flat and make the cutout sections more defined.
Helpful tips
These shorts look especially stylish in neutral tones, black, beige, or soft pastels. If you want the cutouts to feel more dramatic, use a high-contrast lace color. If you want a softer version, keep the lace subtle and the overall shape relaxed.
5. Crochet Boxer Lacy Edge Shorts Pattern
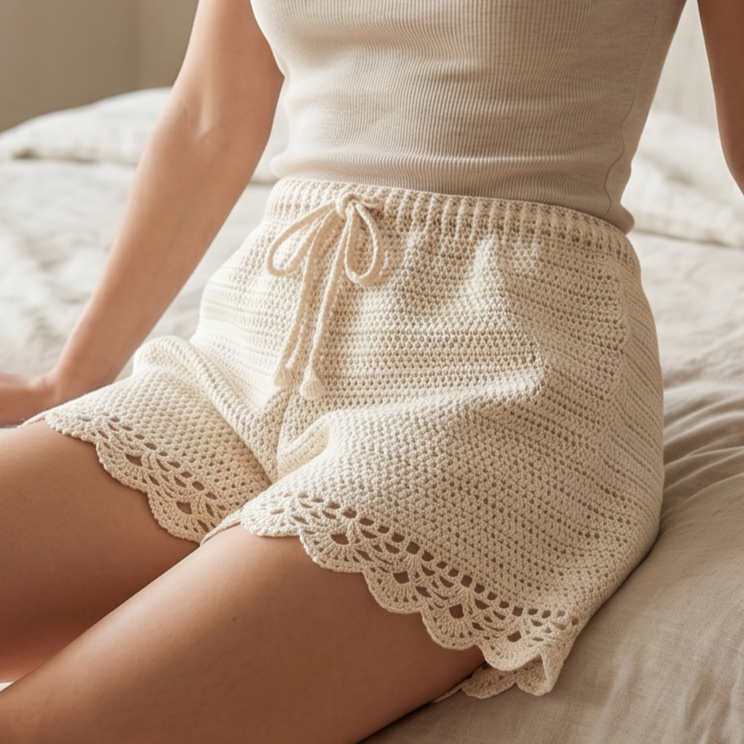
Boxer lacy edge shorts feel relaxed, easy to wear, and slightly playful. They combine a comfortable boxer-style fit with a lacy border that makes them look more stylish than basic lounge shorts. This is a wonderful pattern if you want something casual but still chic.
Step-by-step guide
Step 1: Pick a soft everyday yarn
Choose a yarn that feels light and comfortable enough for lounging or warm-weather wear. Cotton or cotton blends are ideal because they are breathable and hold shape well. The yarn should allow the shorts to feel relaxed without stretching out too much.
The yarn sets the comfort level.
Step 2: Measure for a relaxed fit
Boxer-style shorts are meant to feel loose and easy, but they still need the right proportions. Measure the waist, hips, and desired length. Decide whether you want a short lounge style or something slightly longer.
The fit should feel comfortable and casual.
Step 3: Crochet the waistband
Start with a soft waistband that fits securely but not tightly. You can use a drawstring, elastic, or ribbed section depending on how much stretch you want. The waistband should stay in place without squeezing.
The waistband gives the shorts their shape.
Step 4: Work the shorts body
Crochet the main body using a simple stitch pattern that creates a smooth, relaxed fabric. Because the shorts are boxy in style, the body should feel loose and comfortable. Keep the stitches even and soft.
The body gives the shorts their lounge feel.
Step 5: Shape the inseam and leg openings
Divide the shorts into two legs and shape the inseam neatly. The leg openings should feel comfortable and easy to move in. Since this is a relaxed style, the legs can stay slightly loose.
Step 6: Add the lacy edge
Crochet a lace or scalloped border along the bottom of each leg opening. This gives the boxer shorts a feminine, stylish touch that balances the casual shape. Keep the lace simple so it complements the relaxed design.
The lace edge is what makes the shorts special.
Step 7: Finish the waistband and seams
Check the waistband fit and sew any seams securely. Make sure the lace edge sits evenly and does not curl too much. A tidy finish will help the shorts feel polished.
Step 8: Block gently
A light block can help the lace edge open and the fabric sit nicely. This is especially useful if the body has a slight curl or the lace needs a more defined shape.
Helpful tips
Boxer lacy edge shorts look especially cute in soft neutrals, dusty pink, cream, or light blue. They are great for lounging at home, styled summer outfits, or a softer everyday look. If you want them to feel more boutique-inspired, keep the lace border neat and delicate.
Conclusion
Crochet shorts are a wonderful way to combine comfort, creativity, and summer style in one handmade project. They can be relaxed or polished, decorative or simple, bold or soft depending on the stitch patterns, colors, and shaping choices you make. That versatility is what makes them so fun to create and so enjoyable to wear.
These five shorts patterns each bring something different. The granny stripe oversized shorts feel casual and colorful. The daisy granny square shorts are cheerful and handmade. The scallop edge shorts are feminine and polished. The peekaboo lace side cutout shorts feel trendy and fashion-forward. The boxer lacy edge shorts are relaxed with a stylish touch. Together, they show just how much variety you can create with a simple pair of shorts.
Whether you are making them for a beach day, a festival, lounging, or a handmade wardrobe piece, these patterns are a lovely place to start. With the right yarn, a comfortable fit, and neat finishing, your crochet shorts can become one of the most stylish things you wear all summer long.