Pink crochet accessories have a charm that is hard to resist. They feel soft, romantic, playful, and effortlessly aesthetic, which makes them perfect for gifts, everyday wear, or simply adding a sweet handmade touch to your style. Unlike larger projects that can take weeks to complete, accessories are often small enough to finish quickly, yet they still allow plenty of room for creativity through texture, shaping, and delicate finishing details.
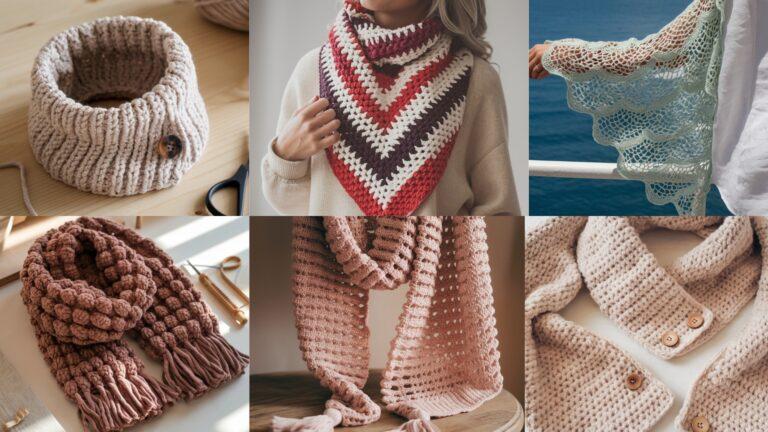
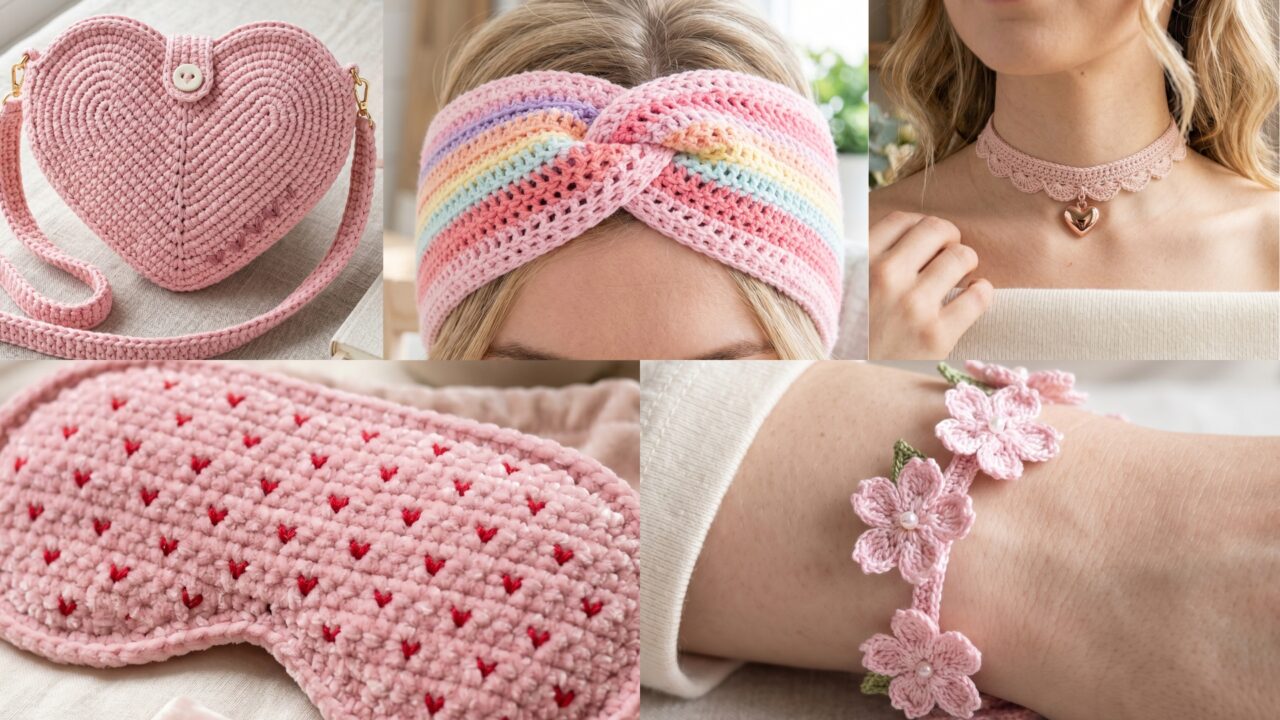
What makes pink accessories especially appealing is how versatile they can be. A scallop choker with a heart pendant can feel dainty and elegant. A heart-inspired crossbody bag brings in a cute statement look. A sakura bracelet feels floral and delicate. A velvet heart stitch sleep mask offers cozy comfort with a soft, dreamy finish. A rainbow lace knit headband blends pretty texture with a cheerful aesthetic. Each piece is small, stylish, and fun to make, but all of them can become treasured handmade items.
In this post, you will find five must-try crochet pink accessory patterns with detailed step-by-step guidance, helpful notes, and finishing tips. These designs are written to be easy to follow while still giving you enough detail to create polished accessories that look beautiful and feel special. If you love making small items that are practical, giftable, and full of personality, these patterns are a lovely place to start.
Quick Notes
Project type: Crochet accessories
Best for: Gifts, aesthetic styling, everyday wear, small handmade keepsakes, and seasonal accessories
Skill level: Beginner to intermediate, depending on detail and shaping
Hook size: Usually 1.5 mm to 4.0 mm depending on yarn weight and desired delicacy
Yarn weight: Lace weight, fingering, sport, DK, or soft velvet yarn depending on the project
Best yarn choice: Cotton, cotton blends, soft acrylic, or velvet yarn for texture and comfort
Finished size: Small to medium accessory sizes, customizable by pattern
Time to complete: A few hours or less per accessory
Helpful stitches: Chain, slip stitch, single crochet, half double crochet, double crochet, shell stitch, lace stitches, increases, decreases, simple motif joining, embroidery, and edging
Common Materials
Most crochet pink accessories can be made with similar supplies.
- Pink yarn in one or more shades
- Crochet hook suited to the yarn
- Yarn needle
- Scissors
- Stitch markers
- Small beads, buttons, or pendants
- Elastic, chain, or clasp hardware depending on the item
- Optional lining, stuffing, or felt backing for structured pieces
For accessories, yarn choice matters a lot because the item should feel soft, light, and comfortable. Pink yarn is especially lovely because it naturally gives a sweet, feminine feel, but you can choose anything from blush and dusty rose to bubblegum or soft pastel pink depending on the mood you want.
1. Crochet Scallop Choker with a Heart Pendant Pattern
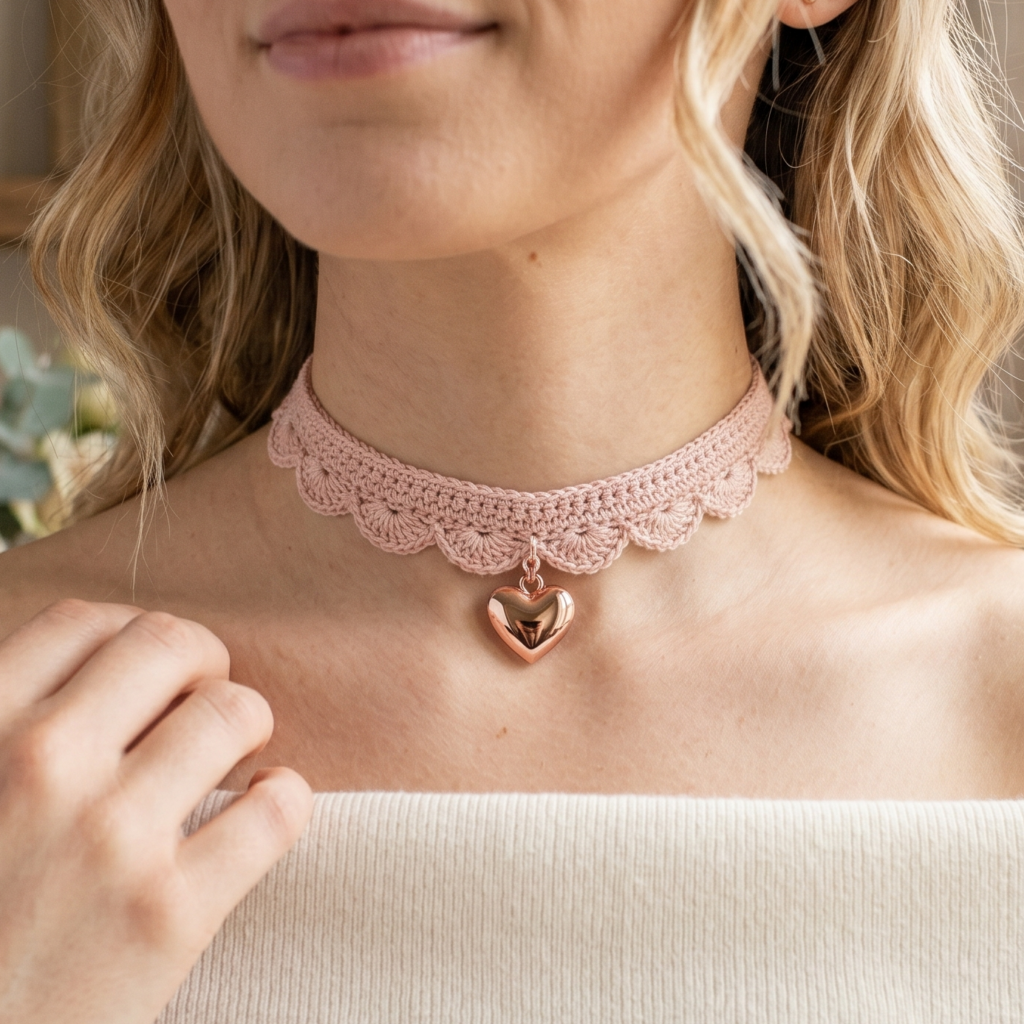
A scallop choker with a heart pendant feels dainty, romantic, and very aesthetic. It is the kind of accessory that can instantly elevate a simple outfit while still remaining handmade and personal. The scalloped texture adds elegance, and the heart pendant gives it a sweet finishing touch.
Step-by-step guide
Step 1: Choose your pink shade
Start by selecting a pink yarn that matches the style you want. Soft blush and dusty rose feel delicate and subtle, while brighter pink creates a bolder statement. Since this is a choker, the color should complement the neckline and feel comfortable against the skin.
The pink tone sets the whole mood.
Step 2: Measure the neck
Before crocheting, measure the neck circumference where the choker will sit. You want the fit to be snug but comfortable. Because chokers are worn close to the skin, accurate sizing matters more than usual.
A good fit makes the choker wearable.
Step 3: Crochet the base band
Begin with a narrow foundation chain and work a slim band using single crochet or half double crochet. Keep the stitches even so the band lays flat. This simple base will support the more decorative scalloped edge.
The band creates the structure of the choker.
Step 4: Add the scallop edging
Crochet a scalloped border along the lower edge of the band. Shell stitches or fan stitches work beautifully here. Keep each scallop the same size so the choker looks polished and balanced.
The scallops give the choker its elegant look.
Step 5: Shape the heart pendant
Crochet a small heart separately or use a simple heart appliqué pattern. Keep it compact so it feels delicate and light. A tiny heart pendant works best because it sits nicely at the center without overwhelming the choker.
The heart is the focal point of the design.
Step 6: Attach the heart pendant
Sew the heart carefully to the center of the choker, or attach it with a tiny loop so it hangs softly. Make sure it is positioned neatly and securely. The pendant should feel intentional and centered.
The placement makes the design feel polished.
Step 7: Finish the clasp or closure
Decide whether you want a button closure, tie closure, or clasp-style finish. A small button and loop can look especially pretty for a handmade choker. Make sure the back is smooth and comfortable.
Step 8: Weave in all ends
Check the choker carefully and hide all loose ends so it feels soft when worn. Since it sits against the neck, neat finishing is especially important.
Helpful tips
This choker looks especially lovely in blush, ivory-pink, or soft rose. If you want it to feel more romantic, add a tiny pearl bead to the heart or the closure. It is a beautiful accessory for gifting or dressing up simple outfits.
2. Crochet Heart Inspired Crossbody Bag Pattern
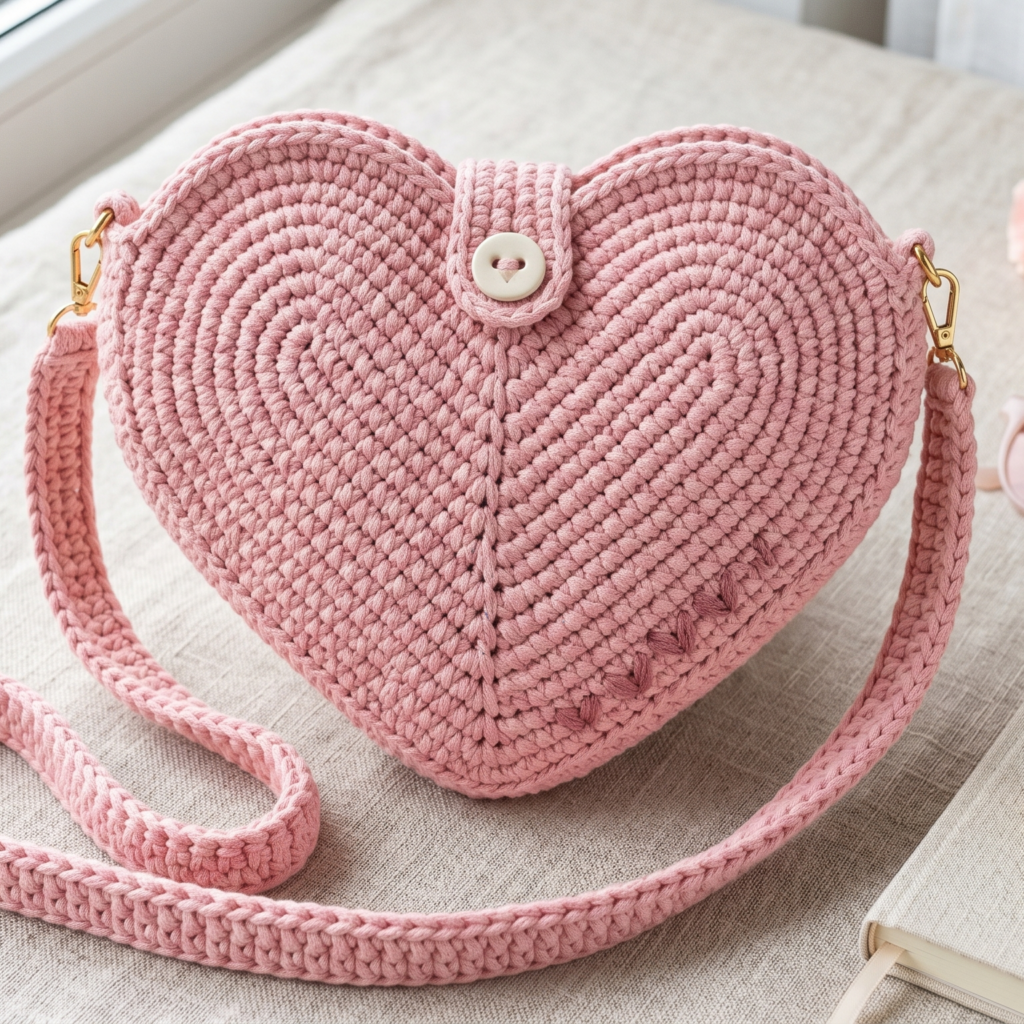
A heart-inspired crossbody bag is playful, cute, and full of personality. It is a statement accessory that feels stylish but still very handmade. The heart shape makes it especially appealing for gifts, festivals, or anyone who loves soft aesthetic pieces with a fun twist.
Step-by-step guide
Step 1: Decide on the heart shape
Choose whether you want a full heart-shaped bag or a square or rounded bag with heart motifs. A full heart silhouette is bolder, while heart appliqués give a softer aesthetic. Decide which style fits your skill level and the look you want.
The shape defines the bag’s personality.
Step 2: Choose a structured pink yarn
Because bags need shape, choose a yarn that is sturdy but still soft. Cotton yarn is a great choice for holding the heart shape. Pick a pink shade that feels cheerful and stylish, such as pastel pink, bubblegum pink, or dusty rose.
The yarn needs to support structure and style.
Step 3: Crochet the front and back panels
Make two matching heart-shaped panels or two panels with heart details. Keep them the same size so the bag closes evenly later. If you are making a full heart bag, take your time shaping both sides carefully.
Matching panels make the assembly easier.
Step 4: Add heart details or texture
If your bag is not already heart-shaped, add hearts using appliqué, embroidery, or textured stitches. A few heart accents can make the design feel much more special. Keep the placement balanced so the decoration feels intentional.
The heart detail is what makes the bag stand out.
Step 5: Join the bag pieces
Sew the front and back together along the edges, leaving the top open. Make sure the seams are neat and sturdy because this will be a functional bag. If you want extra durability, add a lining inside.
The joining stage gives the bag its shape.
Step 6: Crochet or attach the strap
Make a long crossbody strap using a sturdy stitch or use a ready-made strap if you prefer. The strap should be secure enough for everyday wear. Reinforce the attachment points carefully because bags are handled often.
A good strap makes the bag practical.
Step 7: Add the closure
Choose a zipper, snap, button flap, or tie closure depending on the style you want. A zipper works best for a more secure bag, while a flap can feel more decorative. Keep the closure neat and centered.
Step 8: Shape and block
Once finished, shape the bag gently so the heart form looks even. If needed, lightly block the piece or press it into shape so the structure feels polished.
Helpful tips
This bag looks especially beautiful in soft pink with cream, white, or red accents. If you want a more trendy version, use a slightly muted pink and keep the heart details simple. It is a great accessory for anyone who loves cute fashion with a handmade twist.
3. Crochet Sakura Bracelet Pattern
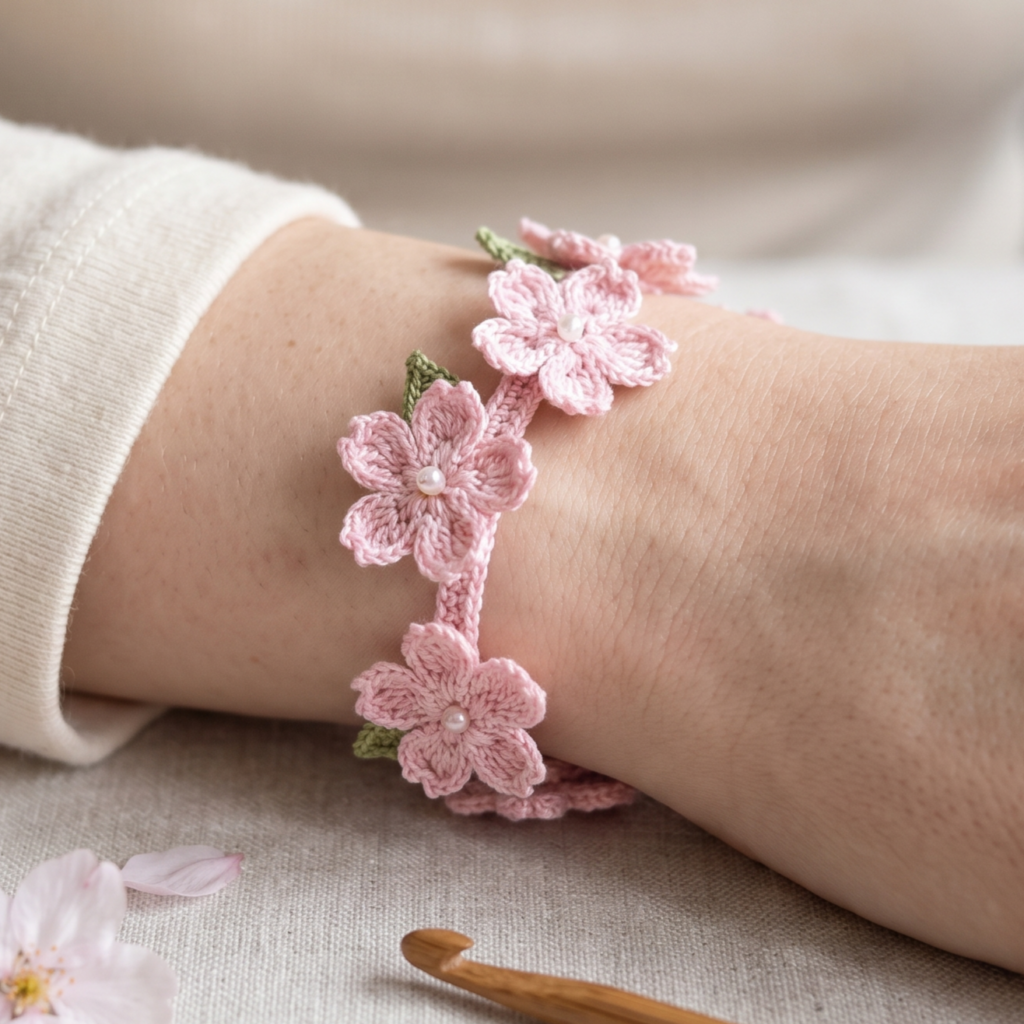
A sakura bracelet feels delicate, floral, and graceful. Inspired by cherry blossoms, it is a lovely accessory that feels both pretty and light. The pink floral details make it especially charming for spring or for anyone who loves subtle handmade jewelry.
Step-by-step guide
Step 1: Select soft floral pinks
Choose a range of pink shades that feel like blossoms. Pale blush, soft pink, and a slightly darker pink work beautifully together. You can also add a tiny bit of green if you want small leaf accents.
The colors should feel floral and airy.
Step 2: Measure the wrist
Before crocheting, measure the wrist carefully so the bracelet fits comfortably. Because bracelets are small and close-fitting, the size should be accurate. Keep in mind whether you want a snug fit or a slightly looser band.
A good fit is key for a bracelet.
Step 3: Crochet the bracelet band
Create a thin band using single crochet or lace-like chain spaces. Keep it delicate so the bracelet feels light on the wrist. The band should support the sakura motifs without becoming bulky.
The band is the foundation of the bracelet.
Step 4: Make the sakura flowers
Crochet tiny flower motifs separately, using petal stitches or small five-petal blossom shapes. Keep them small so they sit neatly on the bracelet. A few blossoms are enough to give the design a soft spring feel.
The flowers are the signature detail.
Step 5: Attach the blossoms
Sew the sakura flowers onto the band at even intervals or cluster them near the center. Make sure they are secured firmly so they do not shift when worn. A delicate pattern of blossoms often looks best.
The placement shapes the bracelet’s look.
Step 6: Add small bead details
If desired, place a tiny bead or French knot in the center of each blossom. This adds detail without making the bracelet heavy. Keep embellishments very small so the bracelet stays comfortable.
Step 7: Finish the closure
Use a button, loop, clasp, or tie to close the bracelet. Keep the closure neat and smooth so it does not scratch or irritate the wrist.
Step 8: Block gently
A light block can help the bracelet lie flat and keep the blossoms even. This is especially useful if the petals curl slightly.
Helpful tips
Sakura bracelets look lovely in blush pink, pale pink, and cream. If you want a more elegant version, keep the flowers tiny and use a simple band. This is a beautiful gift for spring, parties, or anyone who loves floral accessories.
4. Crochet Velvet Heart Stitch Sleep Mask Pattern
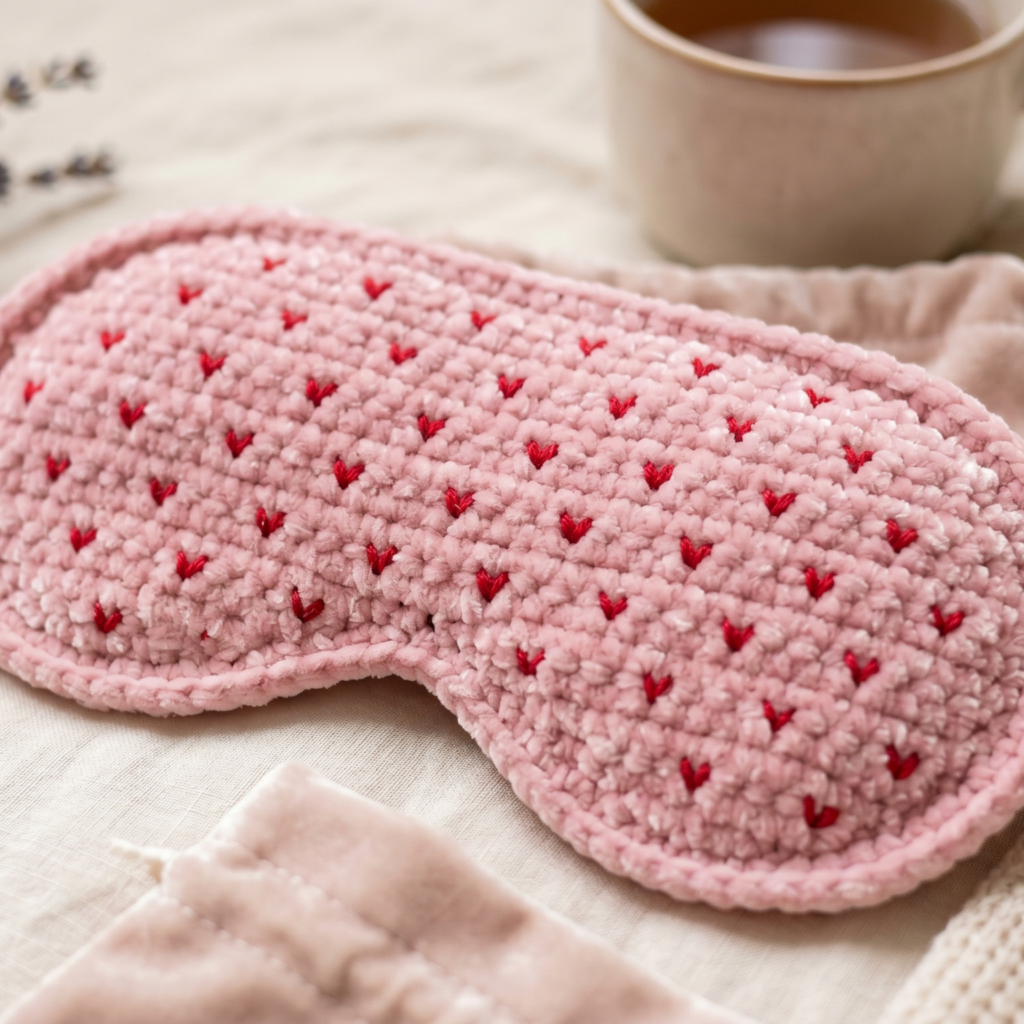
A velvet heart stitch sleep mask is cozy, soft, and perfect for self-care gifts. The velvet yarn gives it a plush luxurious feel, while the heart stitch adds a sweet decorative texture. It is a lovely project if you want something practical that also feels pampering and cute.
Step-by-step guide
Step 1: Choose a soft velvet yarn
Pick a plush velvet yarn in a soft pink shade. The yarn should feel smooth against the skin and comfortable over the eyes. A pastel or dusty pink works especially well for a sleep mask because it feels relaxing and gentle.
The yarn needs to feel cozy and soothing.
Step 2: Measure the face area
Before you begin, measure the width and height of the area the mask will cover. You want it to be wide enough to block light without feeling too large or heavy. The shape should follow the curve of the face comfortably.
A good size makes the mask practical.
Step 3: Crochet the main mask shape
Begin with an oval or gently curved rectangle using a tight stitch. The body of the mask should feel smooth and dense enough to hold its shape. Keep the stitches even and soft.
The base gives the mask structure.
Step 4: Add the heart stitch texture
Work the heart stitch pattern across the front of the mask. This gives it a sweet, decorative surface. Keep the hearts evenly spaced so the texture feels balanced rather than crowded.
The heart texture is what makes the mask special.
Step 5: Crochet the backing
Make a second piece for the back of the mask, ideally in the same soft yarn or a smoother lining material. The back should feel comfortable against the skin and help the mask sit softly on the face.
The backing adds comfort.
Step 6: Add a lining if needed
If you want extra comfort or better light blocking, line the inside with soft fabric. This is optional, but it can make the sleep mask feel more luxurious and effective.
Step 7: Add the strap
Attach an elastic strap or a soft crochet tie to hold the mask in place. The strap should be adjustable or stretchy enough to stay comfortable during sleep. Make sure the attachment is secure and smooth.
Step 8: Finish and shape
Sew the front and back pieces together neatly and check the edges carefully. If needed, lightly shape the mask so it curves comfortably around the eyes and nose.
Helpful tips
This mask makes a beautiful self-care gift. If you want to make it even more giftable, pair it with a matching scrunchie or small pouch. Velvet yarn in pink or blush gives it a dreamy, boutique-like finish.
5. Crochet Rainbow Lace Knit Headband Pattern
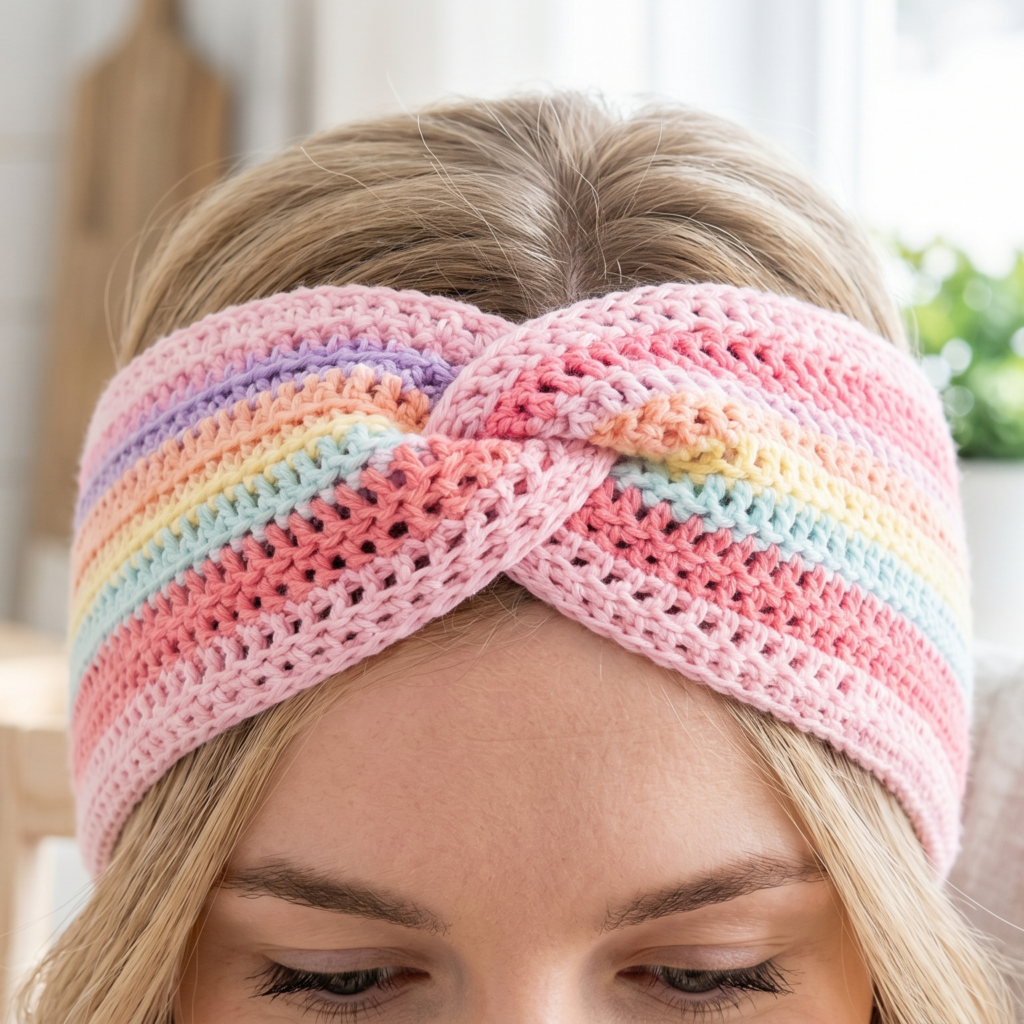
A rainbow lace knit headband feels cheerful, delicate, and full of personality. The lace keeps it airy and stylish, while the rainbow color changes make it fun and eye-catching. It is a wonderful accessory if you want something colorful but still light enough for everyday wear.
Step-by-step guide
Step 1: Choose your rainbow palette
Pick a set of pink-based rainbow colors or soft pastel rainbow tones. If you want the headband to stay pink-focused, use blush, rose, lavender, and pale coral with small accents. The palette should feel bright but balanced.
The rainbow colors give the headband charm.
Step 2: Measure the head circumference
Measure where the headband will sit so it fits comfortably. Because lace stretches slightly, the band should be shaped carefully. You want a snug fit that does not slip but still feels soft.
A good fit keeps the headband wearable.
Step 3: Crochet the base band
Begin with a foundation band using a lace-like knit look or open stitch pattern. Keep the stitches even and light so the headband feels breathable. The base should support the color changes and lace texture.
The base creates the structure.
Step 4: Work the lace pattern
Crochet the lace pattern across the band. This can be done with chain spaces, shell-like motifs, or a knit-inspired stitch pattern. The lace should feel delicate and airy rather than dense.
The lace is the main decorative feature.
Step 5: Add the rainbow color sections
Change colors gradually or in soft bands across the headband. Keep transitions neat so the rainbow effect feels smooth and intentional. You can make the colors bold or pastel depending on your style.
The color changes make the headband playful.
Step 6: Shape the twist or join
If the design includes a twist front, shape it carefully before sewing the ends together. Make sure the twist sits naturally and does not feel bulky. If there is no twist, keep the seam neat and hidden.
The shaping gives the accessory its final look.
Step 7: Finish the edges
Add a small border if needed to clean up the edges and make the headband sit evenly. Keep the finishing simple so the lace and rainbow colors remain the focus.
Step 8: Block lightly
Blocking helps the lace open and the colors settle neatly. It can make the final piece look more polished and professional.
Helpful tips
This headband is beautiful in pastel rainbow colors, but it also looks lovely in pink-based color families. If you want a more subtle everyday piece, keep the rainbow soft and the lace delicate. It is a lovely accessory for casual wear, gifting, or aesthetic styling.
Conclusion
Crochet pink accessories are a wonderful way to combine sweetness, style, and handmade charm in small wearable pieces. They are quick to make, easy to personalize, and perfect for gifting because they feel thoughtful and special without requiring a huge time commitment. That balance of beauty and practicality is what makes them so enjoyable to create.
These five patterns each bring a different mood. The scallop choker with a heart pendant feels dainty and romantic. The heart-inspired crossbody bag is playful and bold. The sakura bracelet is floral and delicate. The velvet heart stitch sleep mask is soft and luxurious. The rainbow lace knit headband is cheerful and light. Together, they show how much variety you can create with pink yarn and a little creativity.
If you love accessories that look aesthetic, feel personal, and make lovely gifts, these patterns are a beautiful place to start. With the right yarn, neat finishing, and a touch of pink charm, each one can become a favorite handmade piece that feels special every time it is worn or gifted.