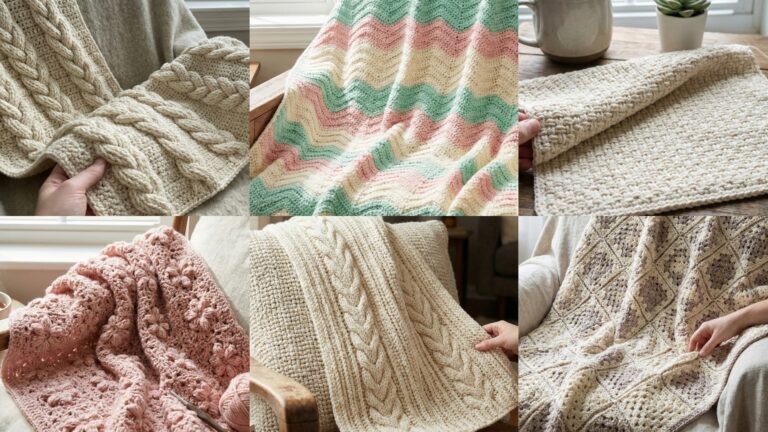
Scrap yarn is one of the best things to have in your crochet stash because it turns leftover bits into something useful, colorful, and fun. Instead of letting those small yarn ends sit in a basket forever, you can use them to create quick projects that feel rewarding from the very first stitch. Scrap yarn projects are especially satisfying because they usually do not require a huge amount of planning, and they let you experiment with color combinations you might not normally try in a larger piece.
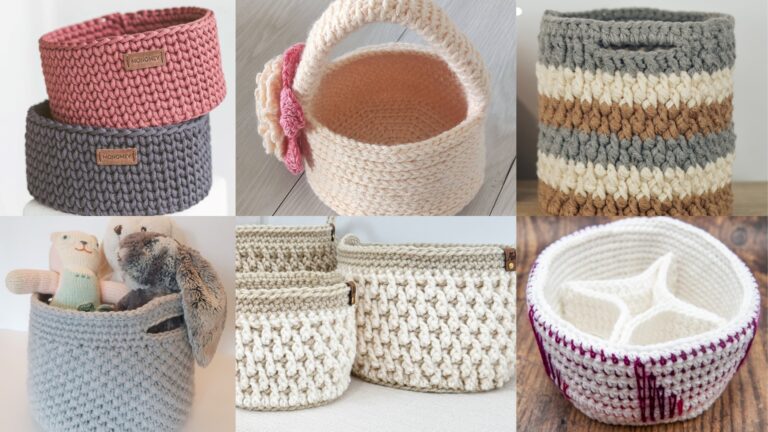
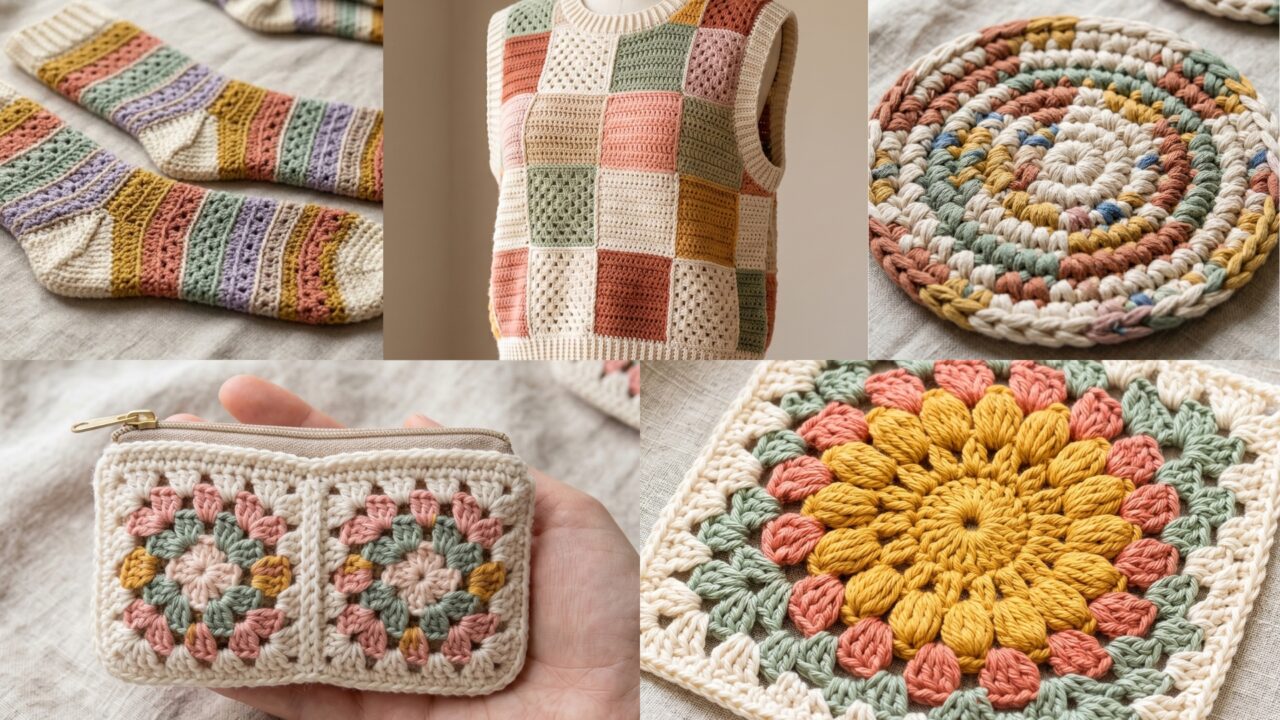
What makes scrap yarn projects so appealing is that they are practical and creative at the same time. You can use leftovers from blankets, garments, accessories, and small motifs to make new items that feel fresh and handmade. A sunburst granny square can become the start of a bigger project or a decorative piece on its own. A colorful cozy vest turns mixed yarn into wearable art. A tiny zipper pouch gives small scraps a useful purpose. A rag rug coaster makes even the shortest yarn leftovers matter. And granny stripe socks let you turn many little colors into something cozy and unique.
In this post, you will find five quick crochet scrap yarn projects that you can finish in a day, along with detailed step-by-step guidance, helpful notes, and finishing tips. These projects are chosen because they are fast, fun, and ideal for using up yarn odds and ends without feeling overwhelming. If you want to turn scraps into something beautiful before the day is over, these ideas are a great place to start.
Quick Notes
Project type: Scrap yarn crochet projects
Best for: Using leftover yarn, quick makes, gifts, home items, and wearable accessories
Skill level: Beginner to intermediate, depending on shaping and joining
Hook size: Usually matched to the yarn, but smaller hooks often help keep scrap projects neat
Yarn weight: Mixed yarn scraps, ideally kept similar within each project
Best yarn choice: Cotton, acrylic, cotton blends, or any stash yarn that works well together
Finished size: Small to medium projects, depending on design
Time to complete: A few hours or less per project, usually within one day
Helpful stitches: Chain, slip stitch, single crochet, half double crochet, double crochet, granny stitch, increases, decreases, color changes, joining, edging, shaping, and sewing
Common Materials
Most scrap yarn projects use the same basic supplies.
- Leftover yarn in coordinating or mixed colors
- Crochet hook suited to the yarn weight
- Yarn needle
- Scissors
- Stitch markers
- Measuring tape
- Buttons or zipper, depending on the project
- Stuffing for pouch-style or plush-style projects
- Optional lining or backing fabric for a few projects
For scrap yarn projects, yarn choice matters less than in a large garment because you are often using what you already have. Still, it helps to group yarns by similar thickness so the final piece feels balanced. If you want a more polished look, choose scraps with similar fiber content or use one yarn weight for the whole project.
1. Crochet Sunburst Granny Square Pattern
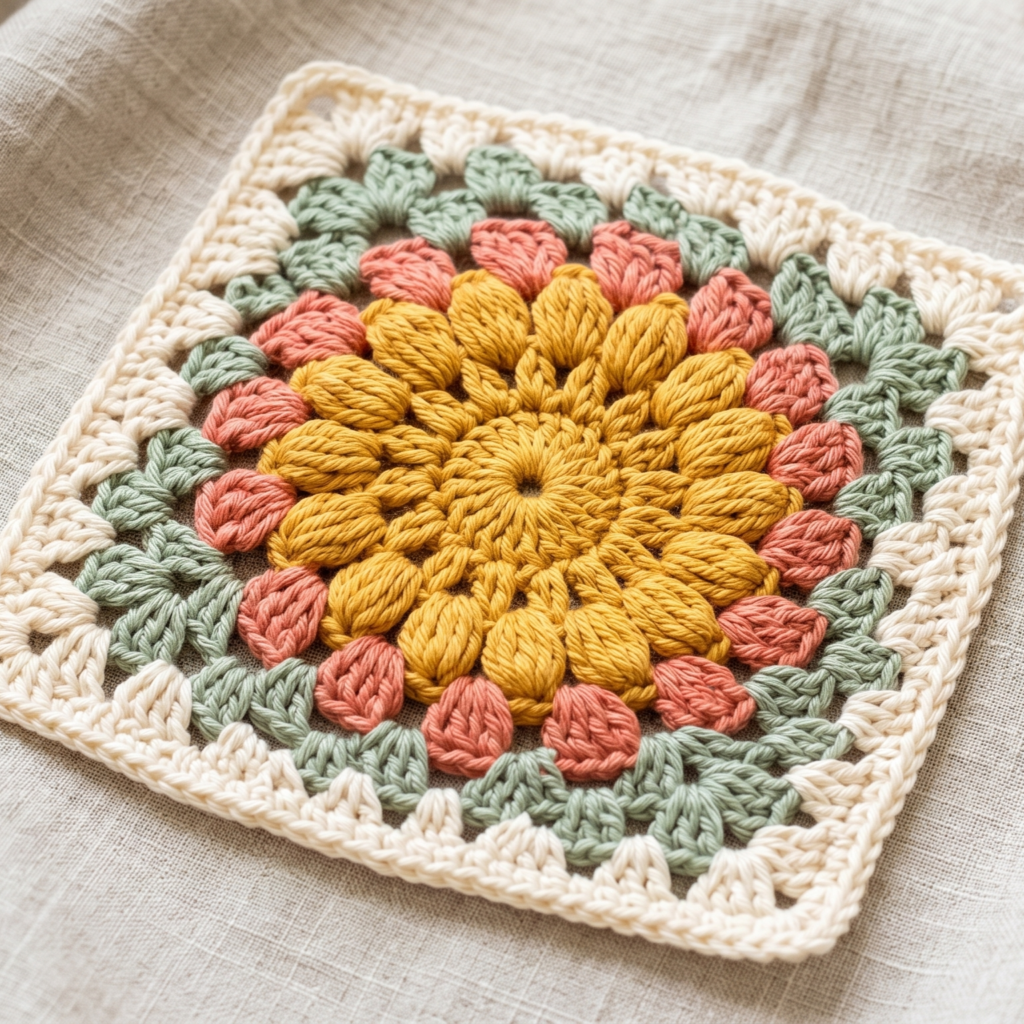
A sunburst granny square is one of the most versatile scrap yarn projects because it is colorful, fast, and easy to turn into something bigger later. It has a bright, cheerful look that works beautifully for blankets, bags, pillows, or even as a standalone mini project. This is an excellent choice when you want to use several small yarn leftovers at once.
Step-by-step guide
Step 1: Choose your scrap yarn colors
Pick a few coordinating scraps for the center, petals, and outer rounds. Sunburst squares look especially lovely when the colors feel balanced, but they do not need to match perfectly. In fact, a mix of similar tones can make the square feel more playful and handmade.
The colors create the sunburst effect.
Step 2: Start with a magic ring
Make a magic ring and begin with a small center circle. This tiny center is what anchors the square. Keep the stitches tight and even so the square begins with a clean base.
A neat center makes the whole square look more polished.
Step 3: Crochet the sunburst petals
Use puff stitches, clusters, or shell-like groups to form the petals around the center. Each petal should be evenly spaced so the circle looks full and balanced. This round is the most decorative part of the square.
The petals give the square its signature sunburst look.
Step 4: Add the square corners
After the flower-like center is complete, begin shaping the square by adding corner spaces. Work evenly in four positions around the motif so the circle becomes a square. This is what transforms the flower into a granny square.
The corners turn the motif into a usable square.
Step 5: Build the outer rounds
Continue crocheting around the square using a basic granny stitch or simple border rounds. You can use another scrap color for each round or keep the outside in one solid color. A few rounds are usually enough to make the square usable for many projects.
The outer rounds frame the center beautifully.
Step 6: Keep the edges straight
Since scrap yarn can vary a little in thickness, check your edges as you go. If the square begins to curl or stretch oddly, adjust your tension or choose a smaller hook. A straight edge is especially important if you plan to join multiple squares later.
Step 7: Finish and block
Weave in the yarn ends carefully and lightly block the square so it lays flat. This helps the petals open and the corners sit neatly. A blocked sunburst square looks much more refined.
Helpful tips
This is a perfect project for using up small amounts of yarn from other projects. If you make several squares, you can later turn them into a bag, cardigan, or blanket. For a more modern look, choose a limited palette of two to four colors and repeat them across multiple squares.
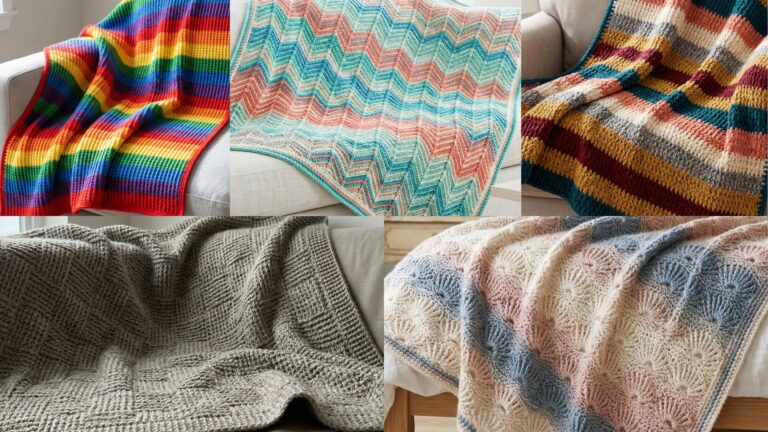
2. Crochet Colorful Cozy Vest Pattern

A colorful cozy vest is a fantastic scrap yarn project because it lets you combine many small yarn pieces into something wearable and eye-catching. It is a great way to turn leftover yarn into a garment that feels playful, practical, and full of personality. Since vests are smaller than sweaters, they are also more realistic to complete in a day if the design stays simple.
Step-by-step guide
Step 1: Plan your color layout
Before you begin, sort your yarn scraps by color family or by how much yarn you have left. Decide whether you want a rainbow effect, a soft pastel look, or a more earthy patchwork style. A clear color plan helps the vest feel intentional rather than random.
The color layout gives the vest its style.
Step 2: Measure for fit
Take your bust, shoulder, and length measurements so the vest fits comfortably over shirts or dresses. Since this is a cozy layered piece, it should have enough room to move without feeling oversized in the wrong places.
A good fit makes the vest wearable.
Step 3: Crochet the front and back panels
Work the front and back panels in simple rows or blocks of color. You can use one stitch throughout and switch colors every few rows to keep the design simple and quick. This is one of the easiest ways to use scrap yarn in a garment.
Simple panels make the project more manageable.
Step 4: Add texture or stripe variety
If you want more visual interest, change the stitch pattern slightly between sections. For example, you could use double crochet rows in one section and granny stitch rows in another. Keep the changes small enough that the vest still feels cohesive.
Texture variation helps the vest look boutique-made.
Step 5: Shape the armholes and neckline
Once the panels reach the right size, shape the armholes and neckline. Keep the cuts smooth and balanced so the vest sits comfortably on the body. A simple crew neckline or V-neck both work well for a casual cozy style.
Step 6: Join the panels
Sew or crochet the shoulders and sides together, leaving room for the armholes. Make sure the seams are neat because the patchwork look can become messy if the joins are uneven. A clean seam will help the vest look polished.
Step 7: Finish the edges
Add borders around the neckline, armholes, and bottom hem. A neat border helps unify all the different scrap colors. If you want the vest to feel extra cozy, use a simple ribbed border.
Step 8: Block and shape
Lightly block the vest so the panels lie flat and the edges even out. This is especially helpful when using mixed scraps, since different yarns may behave a little differently.
Helpful tips
This project works best when your scraps have similar thickness. You can go bold with rainbow stripes or soft with muted earth tones. A cozy vest becomes much easier to wear when the colors feel balanced and the fit is relaxed but neat.
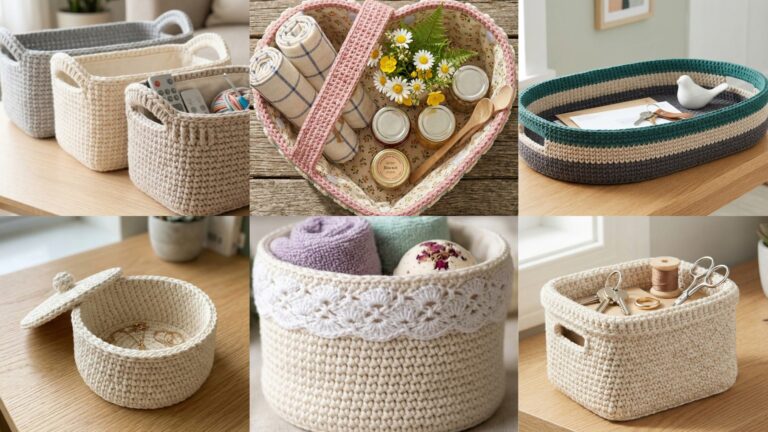
3. Crochet Tiny Granny Square Zipper Pouch Pattern
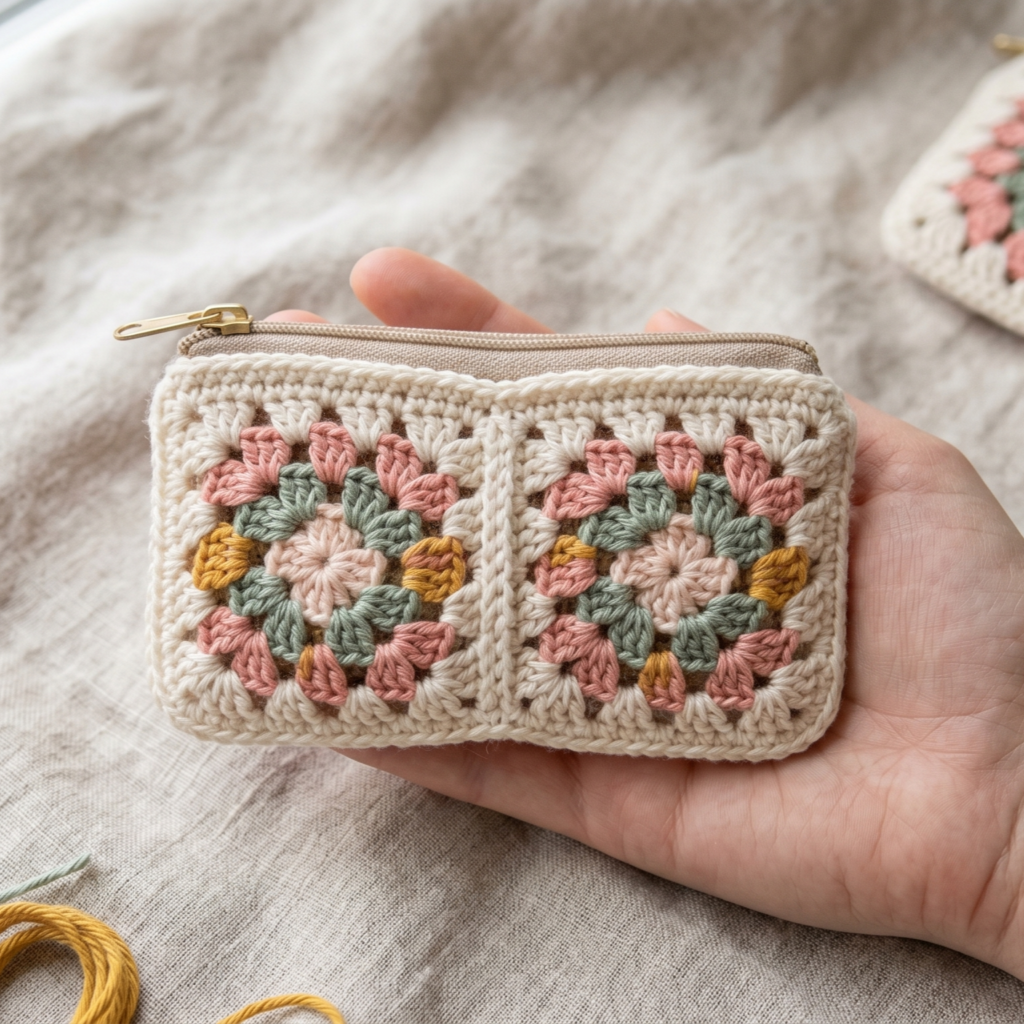
A tiny granny square zipper pouch is one of the quickest and most practical scrap yarn projects you can make. It is small enough to finish in a day and useful enough to keep or gift. You can use it for coins, earbuds, stitch markers, lip balm, or tiny everyday essentials.
Step-by-step guide
Step 1: Pick your scrap colors
Choose a few small yarn leftovers that work well together. Tiny pouches are perfect for experimenting with bright combinations because the scale is small. A little color contrast can make the pouch look cheerful and fun.
The colors help the pouch feel unique.
Step 2: Crochet two small granny squares
Make two matching granny squares that are large enough to form the front and back of the pouch. Keep the size consistent so the pouch closes neatly. If you want a more decorative look, use slightly different color arrangements for each square.
The squares give the pouch its shape.
Step 3: Square the edges
If the granny squares are slightly uneven, add a final border round to make them more uniform. This is especially useful for a zipper pouch because even edges make assembly much easier.
A neat shape helps the zipper sit better.
Step 4: Add lining if desired
For a more polished pouch, add a simple fabric lining before attaching the zipper. This can help the pouch hold small items better and keep the inside cleaner. It is optional, but it gives the pouch a more finished feel.
Lining improves durability and appearance.
Step 5: Sew in the zipper
Attach the zipper to one side of the pouch carefully. Take your time so the zipper sits straight and opens smoothly. A clean zipper installation makes a tiny pouch feel much more professional.
The zipper is the functional center of the project.
Step 6: Join the sides
Sew the remaining sides together, making sure the front and back squares align well. A neat seam is important because a small pouch does not have much room for mistakes.
Step 7: Weave in all ends
Because tiny pouches get handled often, weave in each yarn tail securely. This keeps the pouch sturdy and helps it last longer.
Step 8: Press and shape
Gently press the pouch into shape and make sure the zipper moves easily. The final result should be compact, colorful, and ready for daily use.
Helpful tips
This is a great project for using very small yarn leftovers that are not enough for larger items. You can make several at once in different color themes for gifts or craft fair stock. A set of matching pouches often sells especially well because they are practical and cute.
4. Crochet Rag Rug Coaster Pattern
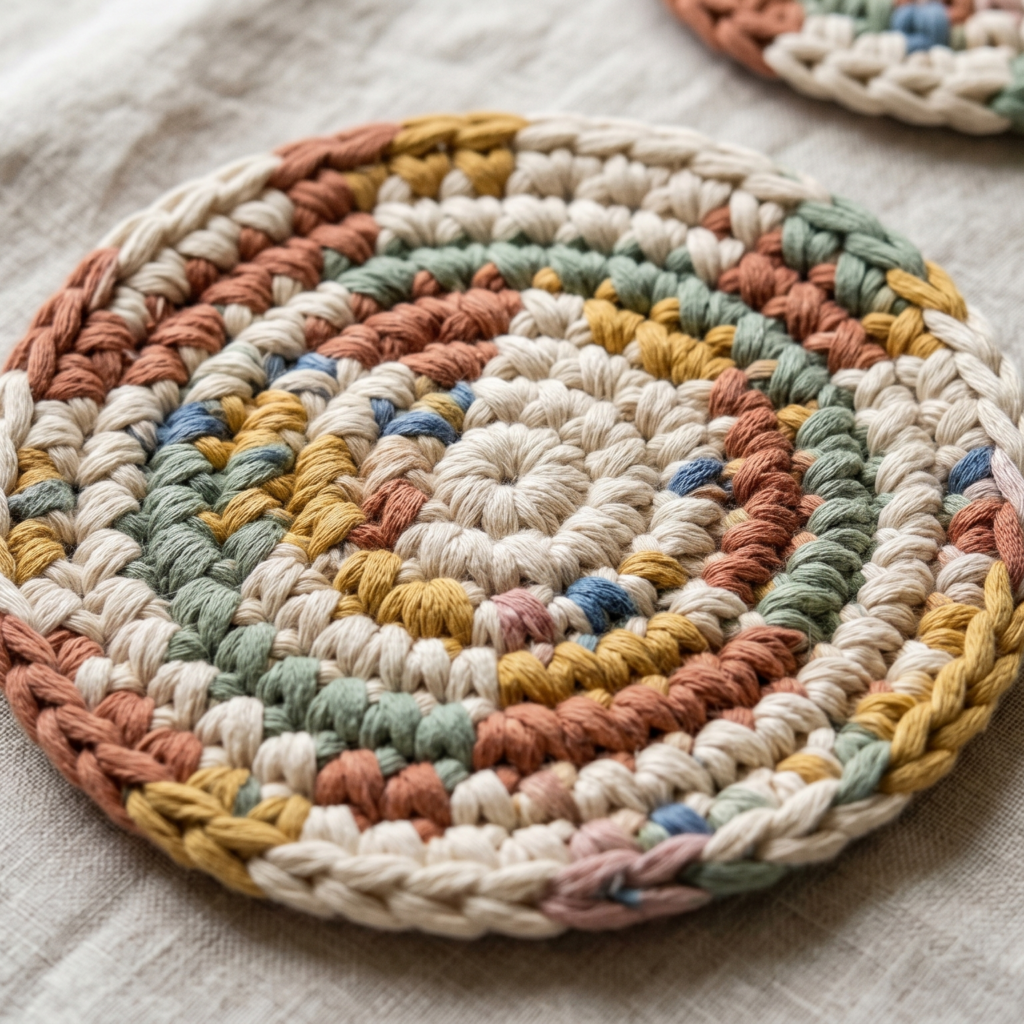
A rag rug coaster is a perfect scrap yarn project because it uses short lengths of leftover yarn and turns them into something sturdy and useful. The texture feels cozy and handmade, and the size makes it a fast project that can be finished in a day with very little planning.
Step-by-step guide
Step 1: Sort your scrap lengths
Collect yarn scraps of similar thickness and cut or arrange them into manageable pieces. Rag rug coasters work best when the yarn is a mix of scraps that can be joined smoothly. If needed, make mini yarn bundles from leftover ends.
The scraps become the raw material for the coaster.
Step 2: Start the center
Begin with a magic ring or small circle in a sturdy yarn. This will form the center of the coaster. Because the project is small, a tight center gives the coaster better shape and helps it stay flat.
A solid center creates a stable base.
Step 3: Build the rag rug texture
Crochet in a dense stitch, changing yarn scraps as you go. The texture should feel thick and cushioned, almost like a tiny woven mat. Use a stitch that keeps the coaster firm, such as single crochet or half double crochet.
The texture is what makes it feel like a rug.
Step 4: Keep color changes playful
One of the best things about a rag rug coaster is that it can be colorful without needing to match perfectly. Mix scraps in a balanced way so the coaster feels lively but not too chaotic. Random color changes often look charming in this style.
The color mix gives the coaster its handmade character.
Step 5: Shape the round or oval
Continue increasing evenly until the coaster reaches the size you want. A round shape is classic, but an oval or slightly irregular rag-rug style can also look beautiful. Keep the edges neat enough that the coaster sits flat.
Step 6: Add a simple border
If you want a tidier finish, add a final border in one of the scrap colors or a neutral tone. This helps the coaster look intentional and gives the edges a finished look.
Step 7: Block lightly
If the coaster curls, flatten it gently by hand or with a light block. This helps it sit better under cups and glasses.
Helpful tips
Rag rug coasters are great for scrap yarn because they use lots of little pieces efficiently. They also make lovely gifts as a set of four or six. If you want a more cohesive look, keep all scraps in a similar color family.
5. Crochet Granny Stripe Socks Pattern
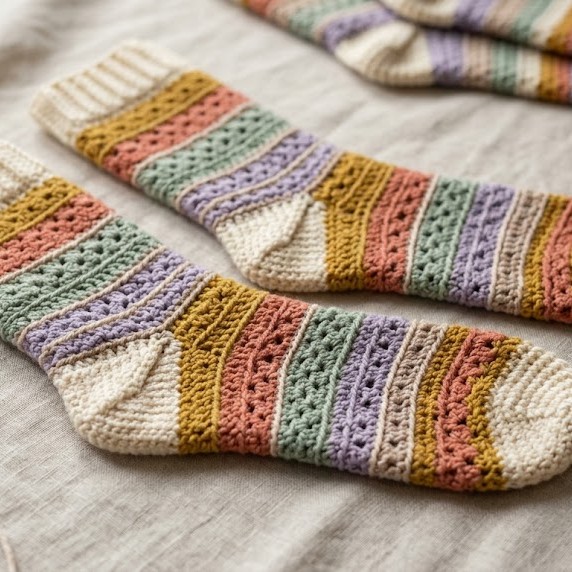
Granny stripe socks are a fun and colorful way to use up yarn scraps while making something cozy and wearable. They have a relaxed handmade feel and are perfect if you love striping patterns and want to combine multiple colors into one project. Since socks are smaller than many garments, they are an excellent way to use leftover yarn in a practical form.
Step-by-step guide
Step 1: Choose coordinating scrap colors
Pick small yarn leftovers that work well together in stripes. You can choose bright rainbow colors, soft pastels, or earthy shades. Since the stripe pattern is the focus, the colors can be playful but should still feel balanced when repeated.
The stripes create the visual appeal.
Step 2: Measure the foot
Before starting, measure the foot length and ankle width so the socks fit comfortably. Crochet socks need a snug fit to avoid slipping. A good measurement will help you decide how many stripe rows to make for the leg and foot sections.
A proper fit matters for wearable socks.
Step 3: Crochet the cuff
Start with a stretchy cuff in a ribbed or snug stitch. This helps the sock stay up and gives the top a comfortable fit. You can work the cuff in one color or use a couple of stripes for a more decorative beginning.
The cuff keeps the sock in place.
Step 4: Work the granny stripe leg
Begin the granny stripe repeat for the leg section. Change colors every few rows or according to the size of your scraps. The stitch repeat creates a cheerful, textured stripe pattern that is easy to customize.
The stripe pattern is the star of the sock.
Step 5: Shape the heel
When you reach the heel section, use a heel-shaping method that works with your pattern. Keep the color transitions tidy so the sock remains visually balanced. Heel shaping is the most technical part, but it is worth taking your time.
The heel gives the sock its fit.
Step 6: Continue the foot section
After the heel, continue the stripe pattern along the foot. Keep the stitches snug enough for a good fit but not too tight. If you have very small scraps, the foot section is a great place to use them up.
Step 7: Shape the toe
Decrease gradually at the toe and close it neatly with a yarn needle. A smooth toe seam makes the sock more comfortable to wear. This is important if you want a finished pair that feels good all day.
Step 8: Make the second sock
Repeat the same process for the second sock. You can match the stripes closely or let them differ a little for a more handmade look. Either way, the socks should feel balanced in size and fit.
Helpful tips
Scrap yarn socks are especially fun when the stripes tell a little color story. You can make each pair look bold and unique, or keep them soft and coordinated. If you want a more polished finish, use scraps with similar fiber and weight so the socks feel consistent.
Conclusion
Scrap yarn projects are some of the best ways to turn leftovers into something useful and beautiful. They help you make the most of every bit of yarn while giving you the joy of completing quick, satisfying makes in just one day. That combination of practicality and creativity is what makes them so rewarding.
These five projects each give scrap yarn a different purpose. The sunburst granny square feels bright and versatile. The colorful cozy vest turns leftovers into wearable art. The tiny granny square zipper pouch is practical and giftable. The rag rug coaster makes scraps useful in a sturdy everyday item. The granny stripe socks bring color and comfort together in a cozy wearable piece. Together, they show just how much you can make from the yarn you already have.
Whether you are trying to clear out your stash, make quick gifts, or simply enjoy the fun of mixing colors, these scrap yarn projects are a great place to start. With a little planning and a handful of leftovers, you can create something that feels completely new and surprisingly polished.