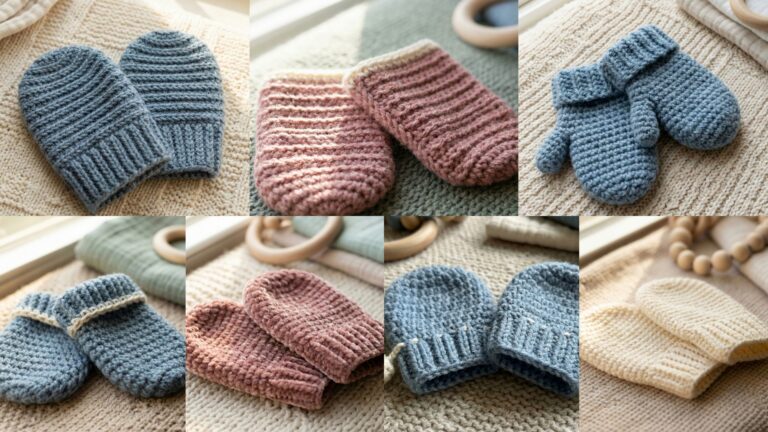
Crochet earrings are one of the most satisfying small projects you can make because they are quick, lightweight, and incredibly stylish. In less time than it takes to finish a larger accessory, you can turn a little bit of yarn into something that feels delicate, handmade, and completely personal. They are perfect for gifting, selling at craft fairs, or simply adding a unique touch to your own wardrobe.
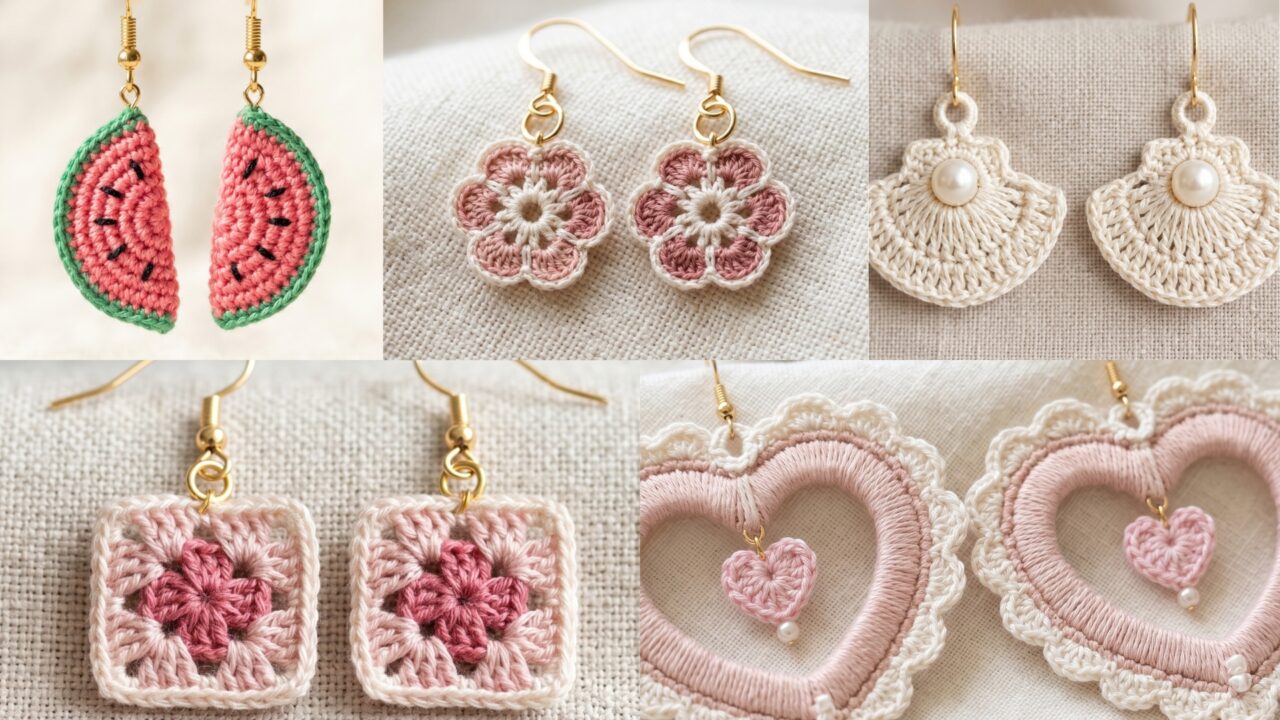
What makes crochet earrings especially fun is how much style you can create with such a tiny project. A pearl shell earring feels soft and elegant. A mini pink granny square earring has a playful retro charm. A coquette heart lacy hoop earring looks romantic and feminine. An African flower appliqué earring feels colorful and artistic. A watermelon slice earring is bright, cheerful, and full of summer energy. Each pair is small enough to finish quickly, but each one still has enough personality to feel special.
In this post, you will find five crochet earring patterns that are easy to make, beginner-friendly, and designed to be completed in under an hour. Each section includes step-by-step guidance, helpful notes, and finishing tips so your earrings come out neat, lightweight, and ready to wear.
Quick Notes
Project type: Crochet earrings
Best for: Gifts, craft fairs, everyday wear, summer accessories, and small handmade items
Skill level: Beginner to intermediate
Hook size: 1.5 mm to 3.0 mm depending on yarn weight
Yarn weight: Crochet thread, lace weight, fingering weight, or very lightweight cotton
Best yarn choice: Cotton thread or fine cotton yarn for crisp stitch definition and light wear
Finished size: Usually 1 to 3 inches depending on design
Time to complete: About 20 to 60 minutes per pair
Helpful stitches: Magic ring, chain, slip stitch, single crochet, double crochet, half double crochet, picot, shell stitch, color changes, appliqué shaping
Common Materials
Most crochet earrings can be made with a small set of supplies.
- Lightweight yarn or crochet thread
- Small crochet hook
- Yarn needle
- Scissors
- Earring hooks, studs, hoops, or jump rings
- Small pliers, optional
- Starch or fabric stiffener, optional for shape
- Beads or pearls, optional
- Small amount of fabric glue, optional for securing details
For earrings, lightness matters a lot. They should be cute enough to catch attention but not so heavy that they feel uncomfortable. Thin yarn and small hooks help the stitches stay neat, and a little stiffening can help some designs keep their shape better.
1. Crochet Pearl Shell Earrings Pattern
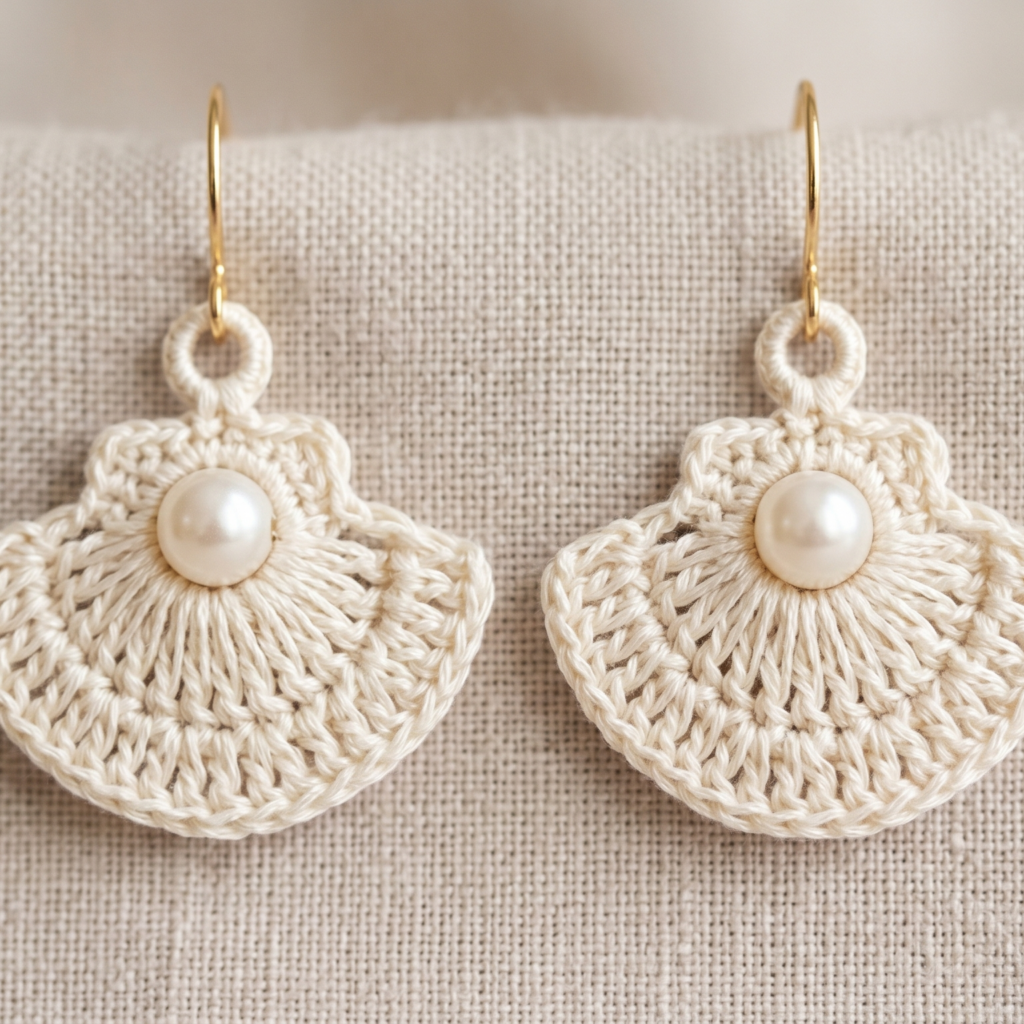
Pearl shell earrings feel soft, elegant, and timeless. They combine the graceful shape of a shell stitch with a tiny pearl detail, creating a pair of earrings that looks refined without being difficult to make. They are a lovely choice for dressier outfits, bridal gifts, or elegant everyday wear.
Step-by-step guide
Step 1: Choose a soft, elegant yarn
Select a fine yarn or crochet thread in a color that feels delicate and polished. Cream, ivory, blush, or soft white all work beautifully for pearl shell earrings. Since the pearl is the star detail, the yarn should stay subtle and graceful.
The yarn color sets the overall mood of the earrings.
Step 2: Start with a small center
Begin with a magic ring or small chain loop. This will create the base where the shell shape grows from. Keep the center tight and neat because earrings look best when the stitches are crisp and small.
A clean center helps the shell shape form nicely.
Step 3: Crochet the shell shape
Work a small shell stitch motif by placing several stitches into one space to form a fan shape. Keep the shell small enough for the earring to remain lightweight. You can make one shell per earring or layer a few small shells depending on the style you want.
The shell shape is the main decorative feature.
Step 4: Keep the shape balanced
Make sure both earrings match in size and curve. Because earrings are small, even tiny differences in stitch count can be noticeable. If needed, make a second sample and compare them before finishing the pair.
Symmetry helps the earrings look polished.
Step 5: Add the pearl detail
Sew a small pearl bead to the center or lower edge of the shell. You can use a tiny round bead, a faux pearl, or a pearl-colored button if you want a softer, handmade look. Keep the pearl small so it complements the shell rather than overpowering it.
The pearl adds elegance and shine.
Step 6: Stiffen if needed
If the shell feels too soft or floppy, lightly starch it or apply fabric stiffener. This can help the shell hold its shape and make the earrings look more finished. Be careful not to over-stiffen, since the earrings should still feel light.
Shape support can improve the final look.
Step 7: Add the earring loop
Create a small top loop or attach a jump ring so the shell can hang from the earring hook. Make sure the attachment is secure and centered. The loop should be neat enough that it doesn’t distract from the shell shape.
A secure loop keeps the earrings wearable.
Step 8: Finish the pair
Trim and weave in all ends carefully. Check that the pearls are secure and both earrings hang evenly. Once attached to the hooks, the pair should feel light, graceful, and ready to wear.
Helpful tips
These earrings look especially beautiful in ivory or blush with pearl centers. If you want a more formal version, use a slightly stiffer finish. If you want a softer look, keep the shell small and delicate.
2. Crochet Mini Pink Granny Square Micro Earrings Pattern
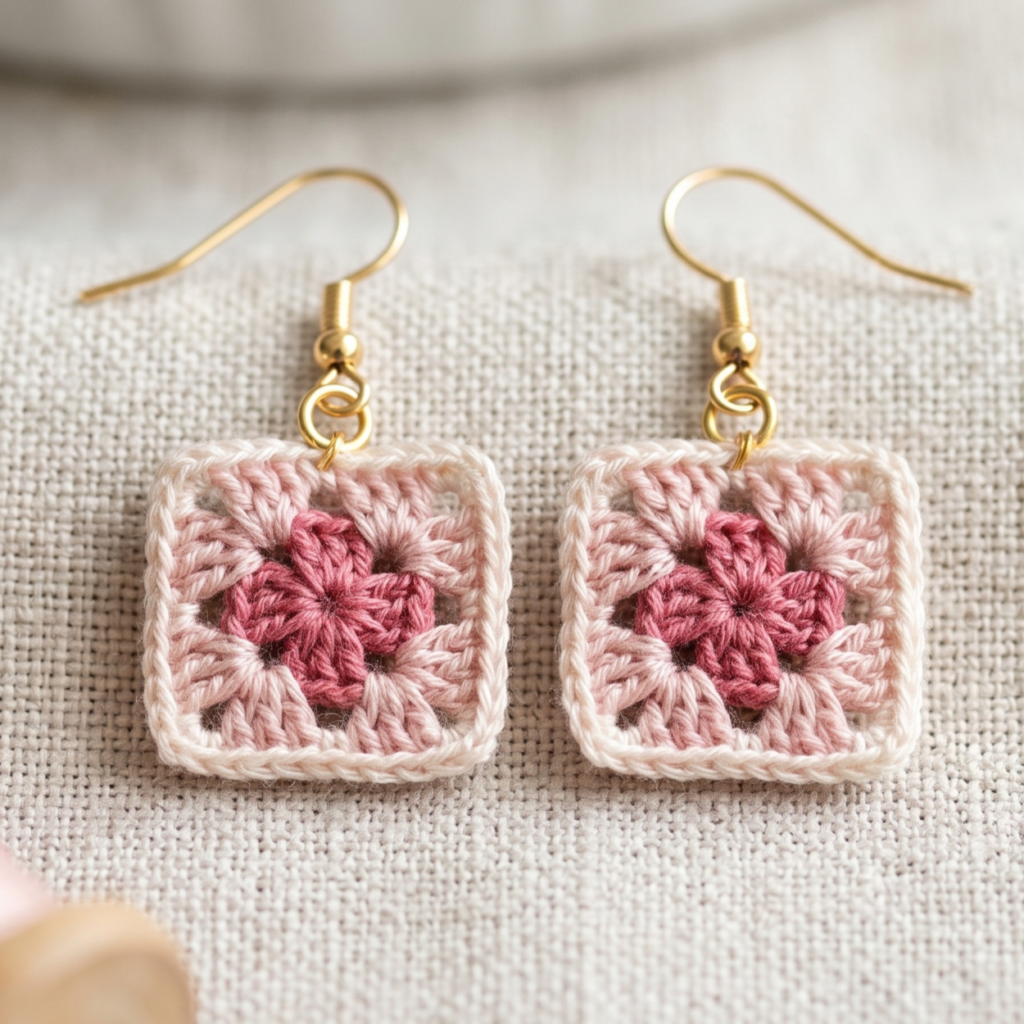
Mini pink granny square earrings are cute, trendy, and full of retro charm. They are a wonderful way to use leftover yarn and create something playful that still feels stylish. Because they are micro-sized, they are quick to make and perfect for a fast handmade accessory.
Step-by-step guide
Step 1: Pick your pink shades
Choose one or more shades of pink for the mini squares. Light pink, blush, rose, and dusty pink all work well. You can keep the square monochrome or use a slightly darker center with a lighter border for contrast.
The pink palette gives the earrings their sweet personality.
Step 2: Crochet a tiny center square
Begin with a small magic ring or chain loop and create a compact granny square foundation. Since the earrings are micro-sized, the square should stay small and tidy. Keep your stitches tight so the shape remains crisp.
A tiny square makes the earrings lightweight.
Step 3: Add the granny rounds
Work one or two rounds of granny stitch clusters around the center. Keep the corners sharp enough to read as a square, but not so large that the piece becomes bulky. The goal is a small and balanced motif.
The granny stitch creates the classic look.
Step 4: Keep the square even
Because the motif is so small, check that all four sides are balanced. If one side looks longer or looser, you may want to remake it or adjust the tension slightly. Even tiny differences are visible at micro size.
A balanced square looks cleaner.
Step 5: Add a border if needed
If you want the square to feel slightly more polished, add one tiny border round in a contrasting pink or white. This can help the square pop and give it a more finished look without adding too much weight.
Step 6: Stiffen lightly
A very light stiffening can help the square stay flat and keep its corners visible. This is especially useful if you want the earrings to look neat when worn. Let them dry completely before handling.
Step 7: Attach the earring finding
Create a small loop at the top corner or stitch a jump ring through the square. Attach the earring hook so it hangs neatly. Make sure both earrings face the same direction.
Step 8: Finish the pair
Weave in ends and compare both squares side by side. A matching pair is especially important for micro earrings because even small differences are noticeable.
Helpful tips
These earrings are especially cute in pastel pink and white. If you want a more modern look, use one shade of pink and keep the square tiny and crisp. They are a great quick make for gift sets or craft fairs.
3. Crochet Coquette Heart Lacy Hoop Earrings Pattern
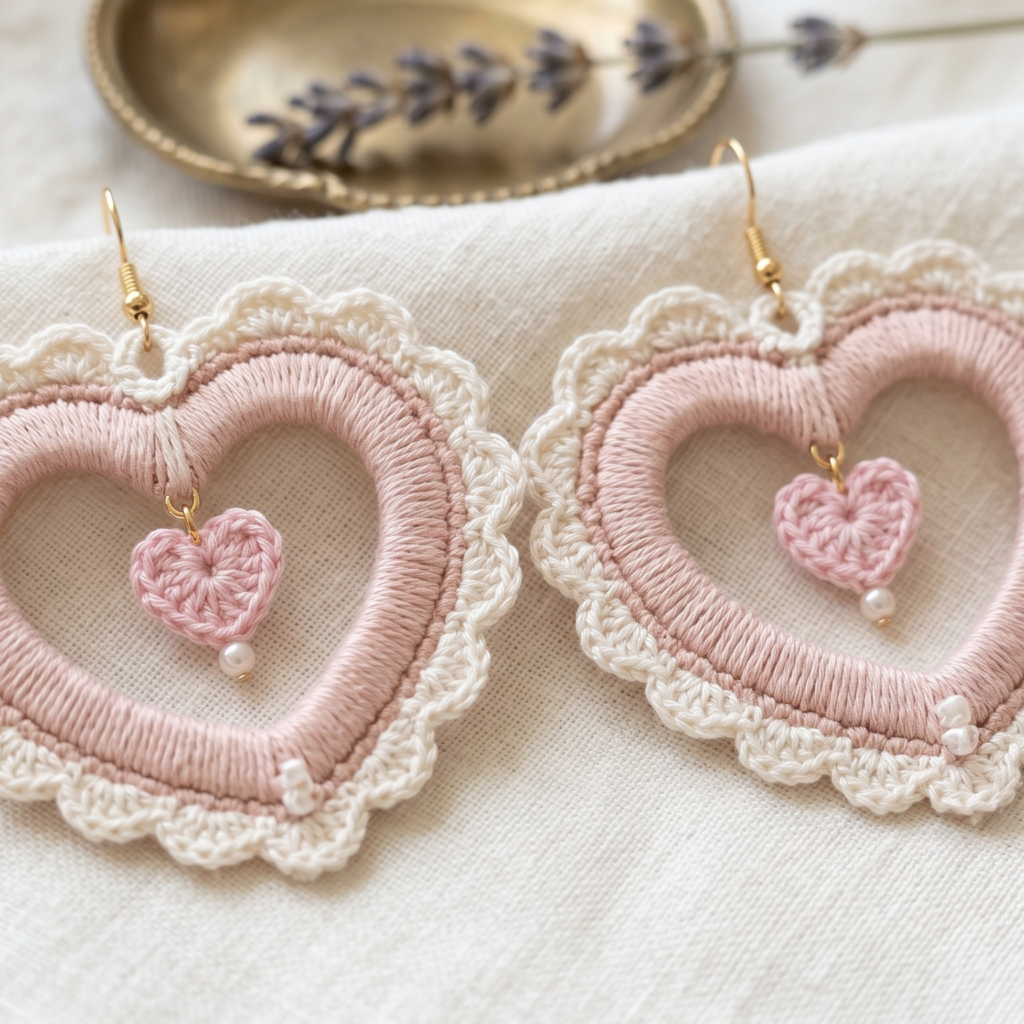
Coquette heart lacy hoop earrings feel soft, romantic, and very on-trend. They combine a delicate heart motif with a lacy hoop shape that makes them look elegant and feminine. This is a lovely choice if you want earrings that feel pretty without being too heavy.
Step-by-step guide
Step 1: Choose a romantic yarn color
Pick a color that feels soft and dreamy. White, blush, baby pink, pale red, or cream all work beautifully for coquette-style earrings. The color should enhance the delicate heart shape and lace texture.
The yarn should feel light and feminine.
Step 2: Crochet the hoop base
Begin with a small circular or teardrop-shaped hoop foundation. This will be the frame for the heart design. Keep the stitch count even so the hoop stays balanced and round or softly oval.
The hoop creates the earring shape.
Step 3: Add the lacy texture
Work a lace pattern along the hoop using chain spaces or tiny open stitches. This creates a delicate look that feels airy and romantic. Keep the lace pattern even so it doesn’t become too loose.
The lace gives the earrings their softness.
Step 4: Crochet the heart motif
Make a small heart appliqué separately or work it into the design as a central feature. Keep the heart petite so it remains elegant. A tiny heart inside or below the hoop feels very coquette and sweet.
The heart is the standout detail.
Step 5: Attach the heart to the hoop
Sew the heart neatly to the hoop or attach it as a dangling feature. If you want a more playful look, let it hang slightly below the hoop. If you want a cleaner look, place it centered within the hoop.
The placement changes the style.
Step 6: Add a small decorative detail
A pearl bead or tiny picot edge can make the earrings feel even more romantic. Use embellishments sparingly so the lace remains the focus. A very small detail is often enough.
Step 7: Stiffen if necessary
Because lace can be soft, you may want to lightly stiffen the hoop so it holds its shape. This will help the heart and lace sit neatly without curling too much.
Step 8: Attach the hook
Add a small top loop or jump ring to connect the crochet piece to the earring hook. Make sure the loop is secure and centered so the earrings hang properly.
Helpful tips
These earrings are lovely in pink and white, but they also look gorgeous in cream or soft red. If you want them to feel more wearable for everyday style, keep the hoop small. If you want a dressier look, add a tiny pearl accent.
4. Crochet African Flower Appliqué Earrings Pattern
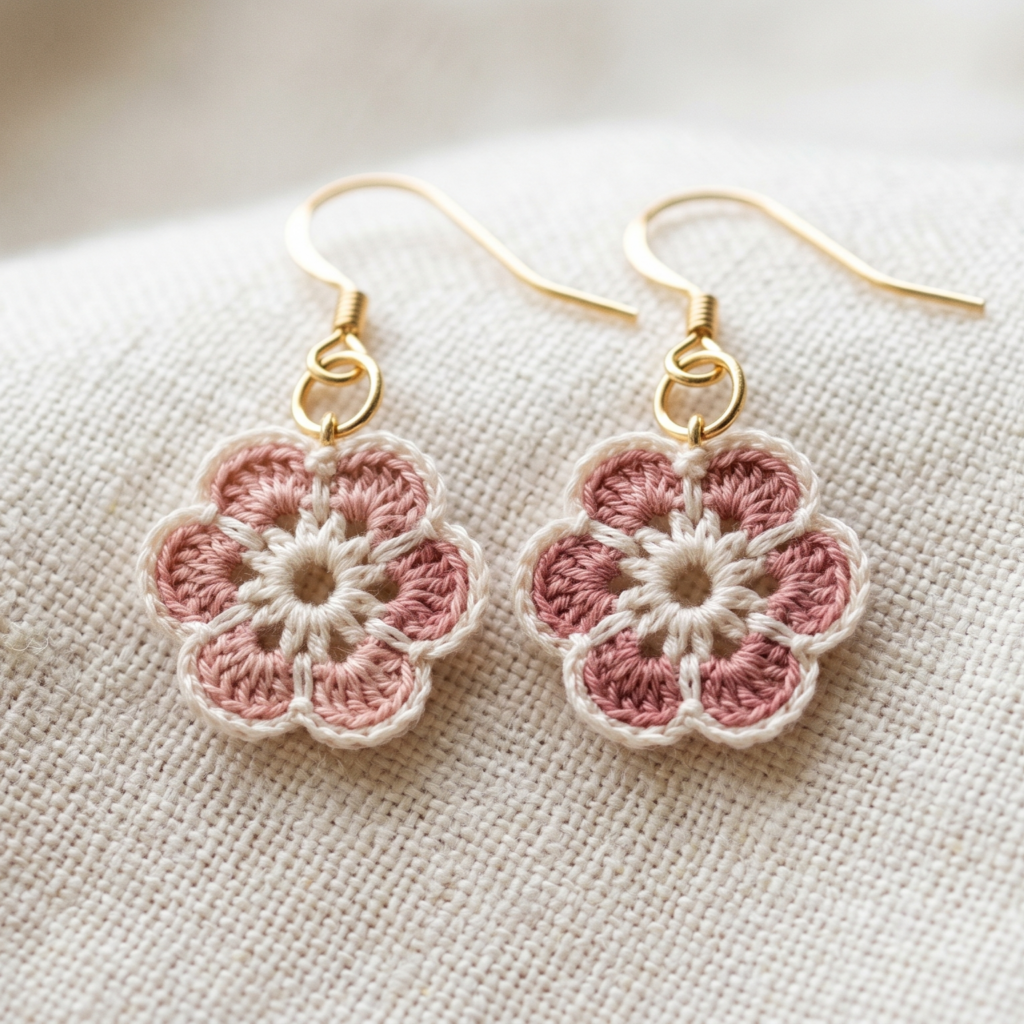
African flower appliqué earrings are artistic, colorful, and full of texture. They are perfect if you want something that feels handcrafted and slightly more unique. Because the motif is small, you can make them quickly while still enjoying a beautiful layered flower shape.
Step-by-step guide
Step 1: Choose your flower colors
Decide on a color combination that feels balanced and beautiful. You can use pinks, soft neutrals, or a mix of bright and pastel shades depending on the mood you want. Since this motif is flower-based, a thoughtful palette makes a big difference.
Color choice gives the flower its character.
Step 2: Start the center ring
Begin with a small magic ring and build the center of the African flower motif. Keep the center compact so the petals will spread neatly around it. This little center is the anchor for the entire earring.
A neat center helps the flower stay symmetrical.
Step 3: Crochet the petal rounds
Work the petal rounds outward from the center. African flower motifs usually have layered sections that create a rich, geometric-floral look. Keep the stitches consistent so the petal edges stay crisp and balanced.
The petals are the main decorative feature.
Step 4: Keep the motif small
Because these are earrings, the motif should remain compact. If the flower gets too large, it may feel heavy. Aim for a size that is noticeable but still very light and comfortable to wear.
Small motifs work best for earrings.
Step 5: Add a border if needed
If the edges feel slightly uneven, add a small border round around the motif. This can sharpen the shape and help the earring look more polished. A border also gives you a good spot to add the hanging loop.
Step 6: Lightly stiffen the motif
A little stiffening can help the flower sit flat and stay visible. This is useful for detailed motifs because it keeps the design neat. Let it dry fully before assembling.
Step 7: Attach the earring hook
Create a small top loop or use a jump ring to attach the motif to the hook. Make sure the attachment point is secure and centered so the earring hangs properly.
Step 8: Compare the pair
Lay both earrings flat and compare them to ensure they match in size and shape. Since floral motifs can shift slightly, a final check is always helpful.
Helpful tips
African flower earrings look lovely in pink, cream, and rose combinations, but they can also be bold and colorful if you want a statement accessory. They are especially great for craft fairs because the motif feels artistic and memorable.
5. Crochet Watermelon Slice Earrings Pattern
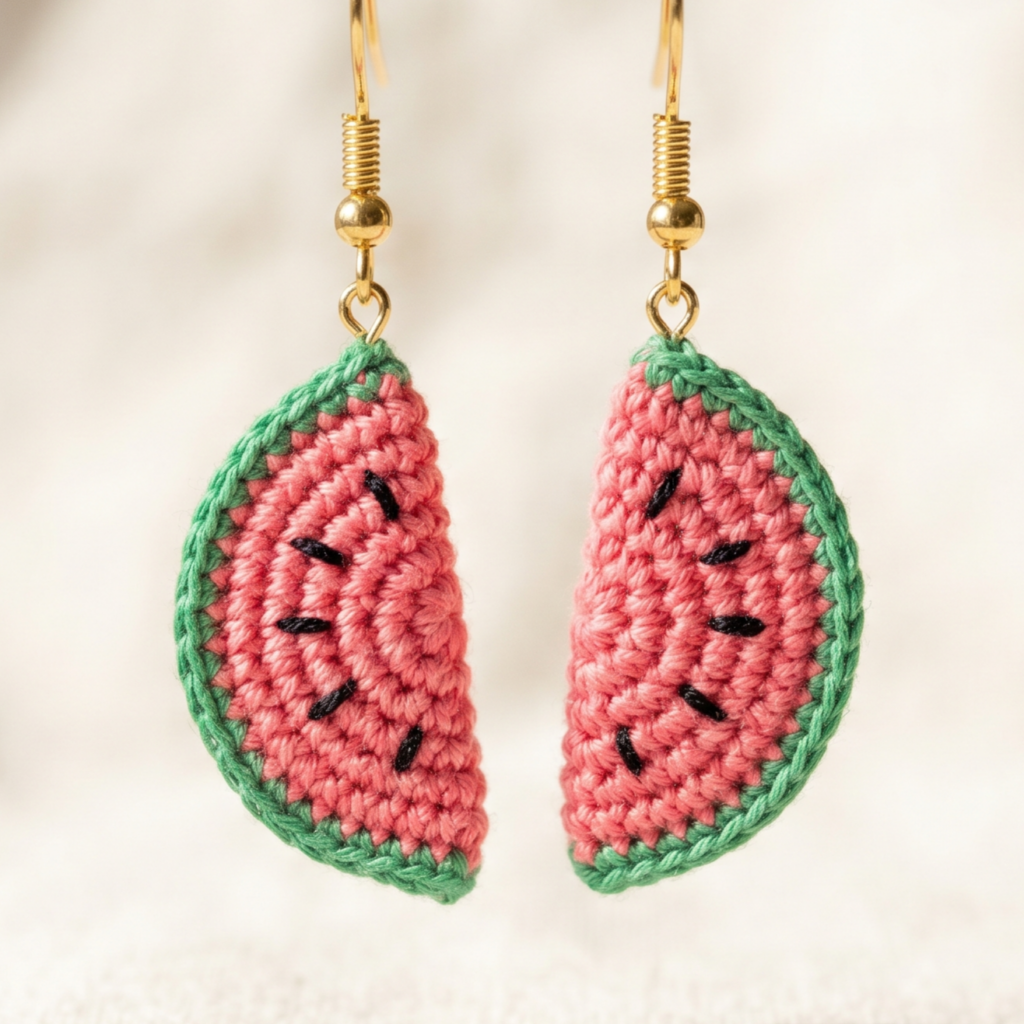
Watermelon slice earrings are playful, fresh, and perfect for summer. They are a great way to add a cheerful pop of color to your accessory collection. Because the shape is simple and recognizable, they are also quick to make and easy to sell.
Step-by-step guide
Step 1: Pick your watermelon colors
Choose pink or red for the fruit, green for the rind, and a tiny bit of black for the seeds. The contrast between the colors is what makes the earrings instantly read as watermelon slices.
The colors are what make the design fun.
Step 2: Crochet the slice shape
Start with a small semicircle or wedge shape using the pink or red yarn. Keep it compact so the earrings stay lightweight. The shape should be simple and clean, like a tiny fruit slice.
The slice shape is the main foundation.
Step 3: Add the rind
Work a narrow green border along the curved edge or outer side of the slice. This creates the recognizable rind and gives the earrings a finished look. Keep the border thin so the earrings remain light.
The rind makes the watermelon clear.
Step 4: Add seed details
Use tiny black stitches or small embroidered dots to make the seeds. Keep them minimal because too many seeds can crowd the design. A few small seeds are enough to make the slice feel complete.
The seeds add playful detail.
Step 5: Shape the pair evenly
Since the earrings are small, it is important to make both slices the same size and angle. A matching pair will look much more polished. Check that the green border and seed placement are similar on both sides.
Step 6: Stiffen lightly if needed
If the slices curl at all, lightly stiffen them so they stay flat. This helps the earrings hang better and look more finished.
Step 7: Add the attachment loop
Sew or crochet a tiny top loop for the jump ring or hook. Make sure the attachment is secure and positioned so the slice hangs straight.
Step 8: Finish the pair
Weave in the yarn ends carefully and compare the earrings side by side. The final result should feel bright, cute, and perfect for warm weather.
Helpful tips
Watermelon earrings are especially fun in bright pink and green, but pastel fruit versions can also be adorable. They make a great summer market item because they are colorful, small, and easy to wear.
Conclusion
Crochet earrings are one of the best small projects to make when you want something fast, fun, and stylish. They are quick enough to finish in under an hour, but they still feel thoughtful and handmade, which makes them great for gifts, sales, or simply adding something special to your own accessory collection.
These five patterns each bring a different mood. The pearl shell earrings feel elegant and timeless. The mini pink granny square earrings are cute and retro. The coquette heart lacy hoops are romantic and feminine. The African flower appliqué earrings are artistic and colorful. The watermelon slice earrings are bright and playful. Together, they show how much personality you can fit into a tiny pair of earrings.
If you love making small accessories that are easy to customize and fun to wear, these crochet earring patterns are a wonderful place to start. With the right yarn, a small hook, and a bit of creativity, you can make earrings that feel unique, lightweight, and beautifully handmade.