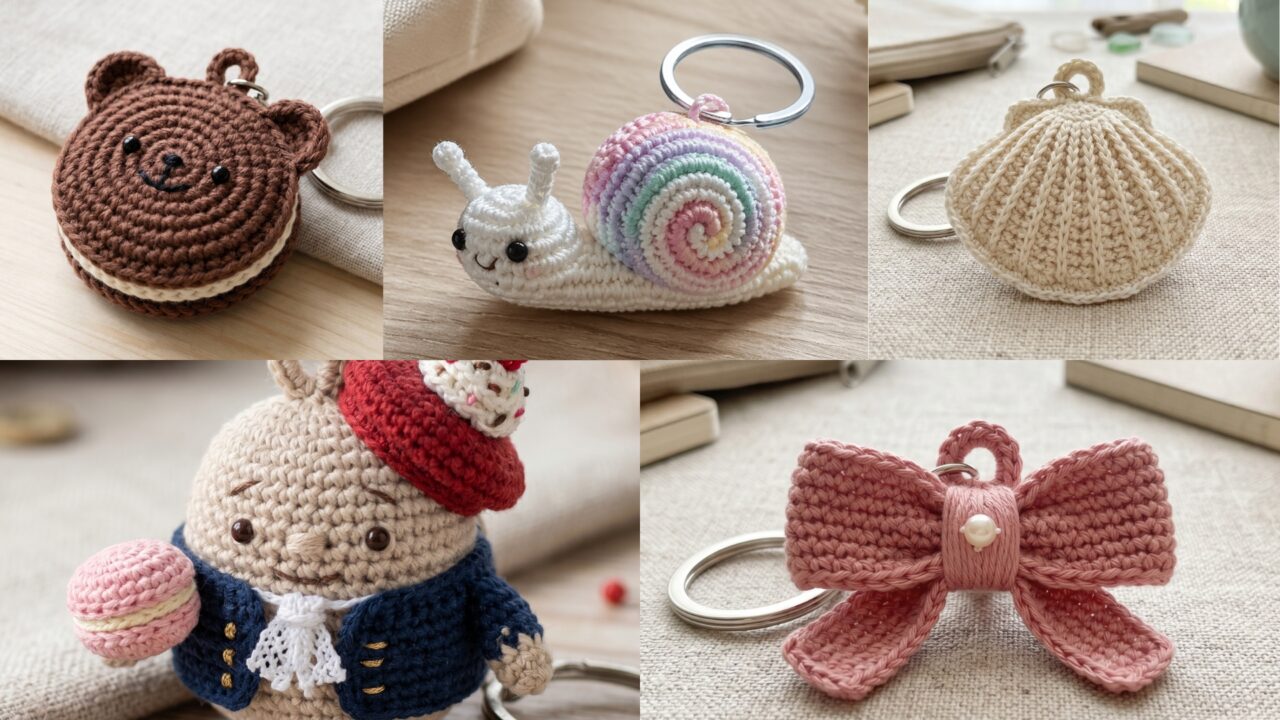
Crochet mini amigurumi keychains are one of the most enjoyable small projects you can make because they are quick, cute, and incredibly giftable. They take very little yarn, they are fun to customize, and they are the kind of handmade item that almost always gets a positive reaction. Whether you want to stock your craft fair table, make a thoughtful little present, or add charm to your own keys, bags, or zippers, mini keychains are a perfect choice.
What makes these tiny projects especially appealing is how much personality they can hold. A bear Oreo cookie keychain feels playful and sweet. A mini ribbon bow keychain is simple and elegant. A shell keychain adds a soft coastal touch. A sweet musketeer keychain feels whimsical and collectible. A candy stripes snail plush keychain brings in color and charm. Each one is small enough to finish quickly, but each one has its own little story and style.
In this post, you will find five fun crochet mini amigurumi keychain patterns with detailed step-by-step guidance, helpful notes, and finishing tips. These designs are written to be easy to follow while still helping you create polished keychains that look neat, durable, and ready to sell or gift.
Quick Notes
Project type: Crochet mini amigurumi keychains
Best for: Selling, gifting, craft fairs, bag charms, zipper pulls, and everyday accessories
Skill level: Beginner to intermediate
Hook size: Usually 1.75 mm to 3.5 mm depending on yarn weight
Yarn weight: Fingering, sport, DK, or lightweight cotton
Best yarn choice: Cotton yarn for crisp detail or plush yarn for a softer look
Finished size: Usually 1.5 to 4 inches depending on the design
Time to complete: About 20 minutes to 2 hours per keychain
Helpful stitches: Magic ring, single crochet, increase, decrease, slip stitch, color changes, stuffing, embroidery, appliqué, sewing pieces together, and attaching hardware
Common Materials
Most mini keychains use the same basic supplies.
- Yarn in your chosen colors
- Small crochet hook
- Yarn needle
- Scissors
- Polyester fiberfill stuffing
- Stitch markers
- Safety eyes or embroidery thread
- Keychain rings, lobster clasps, or swivel hooks
- Optional felt, beads, or tiny decorative details
For mini keychains, stitch tension matters a lot because the project is small and needs to hold its shape well. A smaller hook and tighter stitches usually help the finished piece look cleaner and more durable. Cotton yarn is especially good for keychains because it gives clear stitch definition and can handle everyday use.
1. Crochet Bear Oreo Cookie Keychain Pattern
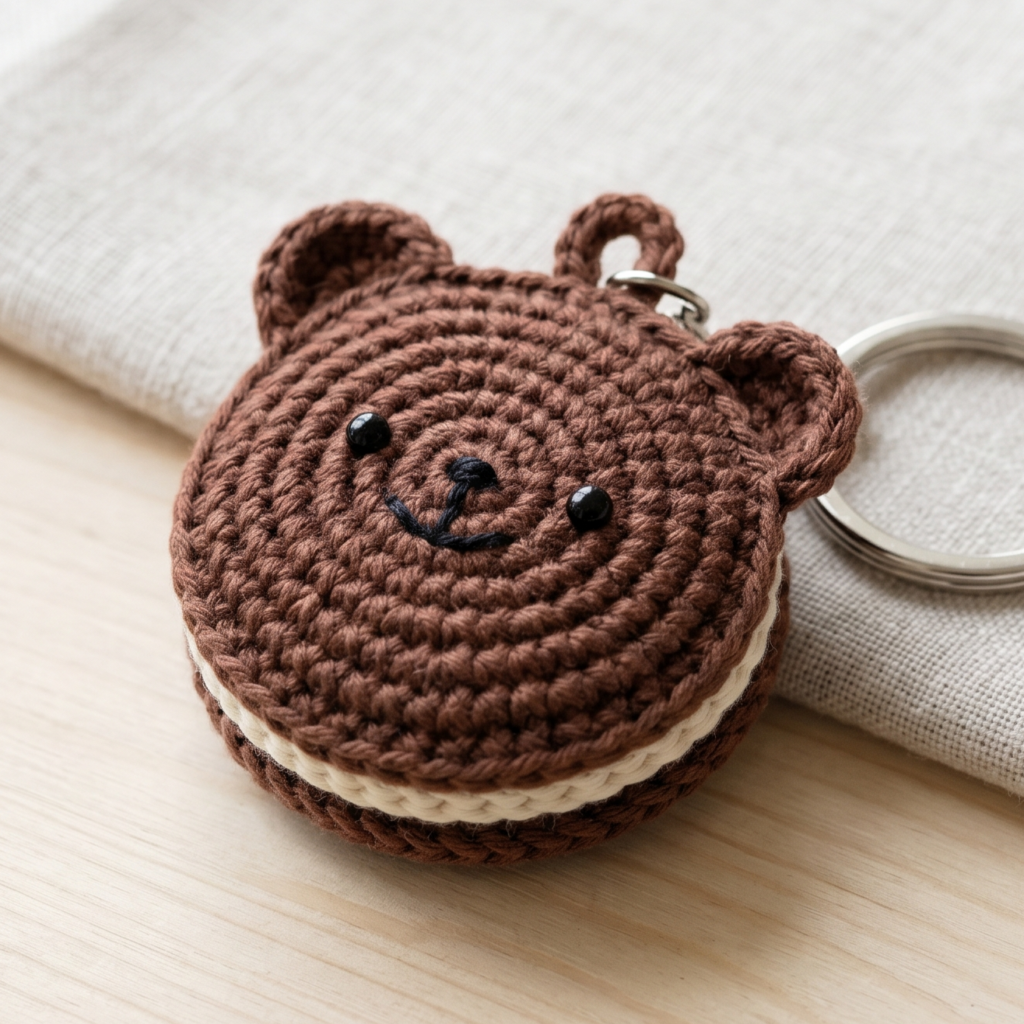
A bear Oreo cookie keychain is adorable, quirky, and very giftable. It combines a sweet dessert theme with a tiny bear face, which makes it feel both playful and unique. This is the kind of keychain that stands out at craft fairs because it looks handmade, cute, and just a little unexpected.
Step-by-step guide
Step 1: Choose your cookie colors
Start with a chocolate brown, cream, or beige yarn for the cookie layers. You can make the “cookie” part darker and the filling part lighter to create that Oreo-inspired look. For the bear face, use a matching brown or a slightly softer shade so the features stay visible.
The colors create the cookie theme.
Step 2: Crochet the round cookie shapes
Begin by making two small round pieces that will represent the cookie layers. Keep the circles neat and compact so the keychain stays small and lightweight. If you want a thicker cookie look, you can lightly stuff the center later.
The round shapes form the keychain base.
Step 3: Add the filling layer
Use a lighter color to create the filling between the cookie layers. This can be a separate crochet round or a sewn-in layer depending on your style. Keep the filling small and even so the design stays clean and recognizable.
The filling gives the cookie its signature look.
Step 4: Crochet the bear face
Make a tiny bear face or head appliqué using a small circular shape with ears. Keep the ears rounded and proportionate to the face. The bear should be simple and soft, not too detailed, because the keychain is tiny.
The bear face is the character detail.
Step 5: Add facial features
Use embroidery thread or tiny safety eyes to make the eyes and nose. A small stitched nose and a gentle smile can make the keychain feel friendly and sweet. Keep the face minimal so it fits the scale of the project.
The face gives the keychain personality.
Step 6: Assemble the cookie and bear
Sew the bear face onto the front of the cookie shape or attach it to the center of the filled cookie. Make sure the placement is balanced so it feels like one cohesive charm rather than separate parts.
The assembly brings the theme together.
Step 7: Lightly stuff if desired
If you want a more plush keychain, add a tiny amount of stuffing between the cookie layers. Keep it very light so the keychain does not become too bulky. A slightly puffy shape can make it feel extra cute.
Step 8: Attach the keychain ring
Securely attach a small loop or keychain ring at the top. Reinforce the attachment well because this is a piece that will be handled often. A strong loop will make the keychain last longer.
Step 9: Finish and shape
Weave in all ends carefully and adjust the face and cookie layers until they sit evenly. The final piece should feel playful, soft, and ready to clip onto keys or bags.
Helpful tips
This keychain looks especially cute in chocolate brown and cream. If you want to make it more market-friendly, you can create different “flavor” versions in pastel colors while keeping the same bear cookie shape. It is a charming small item that tends to catch attention quickly.
2. Crochet Mini Ribbon Bow Keychain Pattern
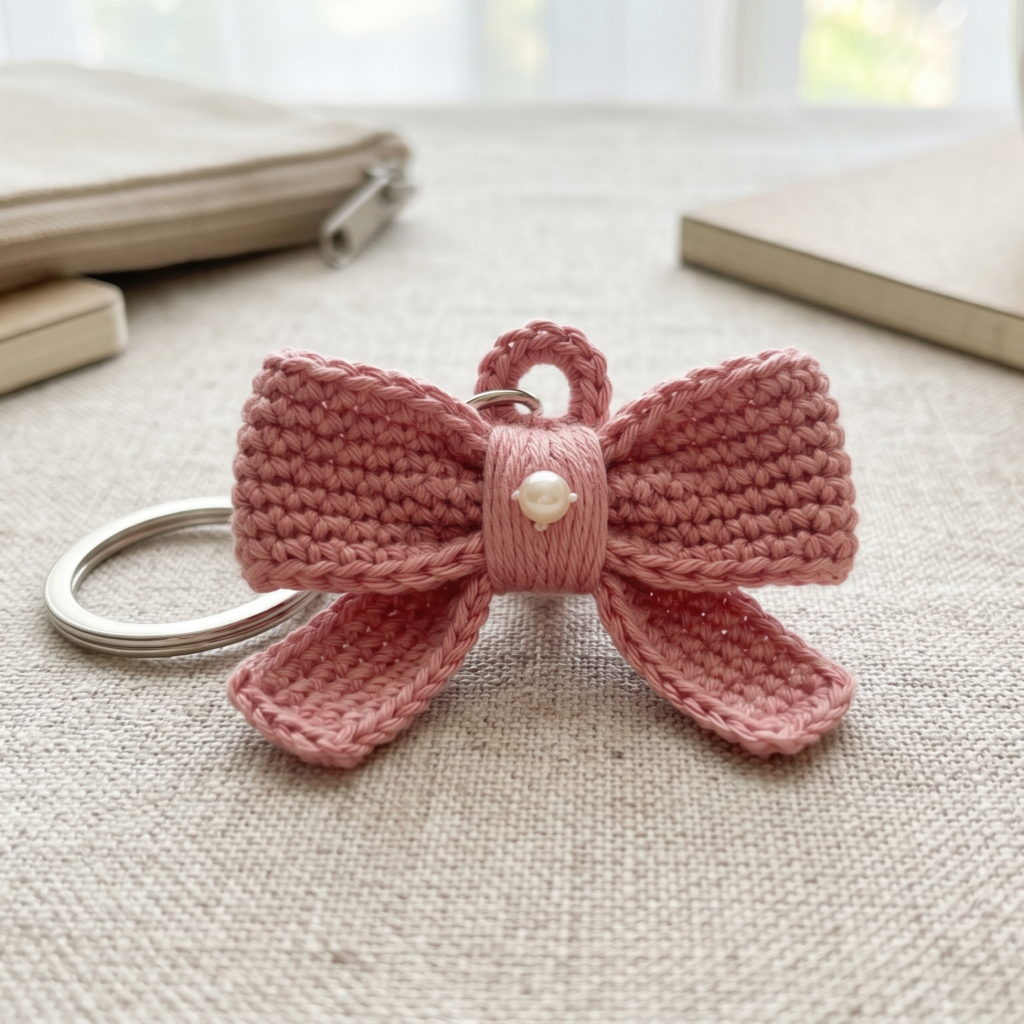
A mini ribbon bow keychain is simple, elegant, and easy to love. It is a perfect project if you want something delicate and stylish that can be made quickly in different colors. Because the shape is small and classic, it works beautifully as a gift or as a subtle accessory for bags and pouches.
Step-by-step guide
Step 1: Pick a pretty yarn
Choose a yarn color that matches the style you want. Pink, cream, red, black, pastel blue, or soft lavender all work beautifully for a ribbon bow. Fine yarn or thread creates a more delicate look, while slightly thicker yarn makes the bow feel fuller.
The yarn gives the bow its style.
Step 2: Crochet the bow rectangle
Start by making a small rectangle that will become the bow loops. Keep your stitches even and neat so the shape folds cleanly. The rectangle does not need to be large; the charm of this project comes from its small, tidy proportions.
The rectangle is the base of the bow.
Step 3: Fold the shape into a bow
Once the rectangle is complete, fold the ends inward to form a bow shape. Pinch the center tightly and make sure both sides are symmetrical. This is the stage where the piece begins to look like a ribbon bow.
The folding creates the bow silhouette.
Step 4: Secure the center
Wrap yarn tightly around the center and sew through it several times to hold the bow in place. The center should feel strong and neat. This small detail makes a big difference in the final appearance.
The center holds the shape together.
Step 5: Shape the loops
Adjust the loops with your fingers until they sit evenly. The bow should feel soft and balanced, not twisted or lopsided. If needed, reshape it slightly before attaching the hardware.
The loops define the charm’s look.
Step 6: Add an optional center detail
You can sew on a tiny bead, pearl, or contrasting yarn wrap in the middle. This adds a more finished and decorative touch. Keep the embellishment small so it does not overpower the clean bow shape.
The center accent adds a refined look.
Step 7: Attach the keychain ring
Create a small loop at the back or top of the bow for attaching the ring. Make sure the connection is secure enough for daily use. Because the bow is small, the attachment should stay hidden as much as possible.
Step 8: Finish the edges
Trim and weave in all ends carefully. Shape the bow one more time so both sides are even. The finished piece should feel graceful, simple, and polished.
Helpful tips
Mini ribbon bows are great for craft fairs because they are quick to make and easy to sell in sets. You can make them in matching colors or a whole rainbow of shades. They look lovely on bags, zippers, and gift wrap too.
3. Crochet Shell Keychain Pattern
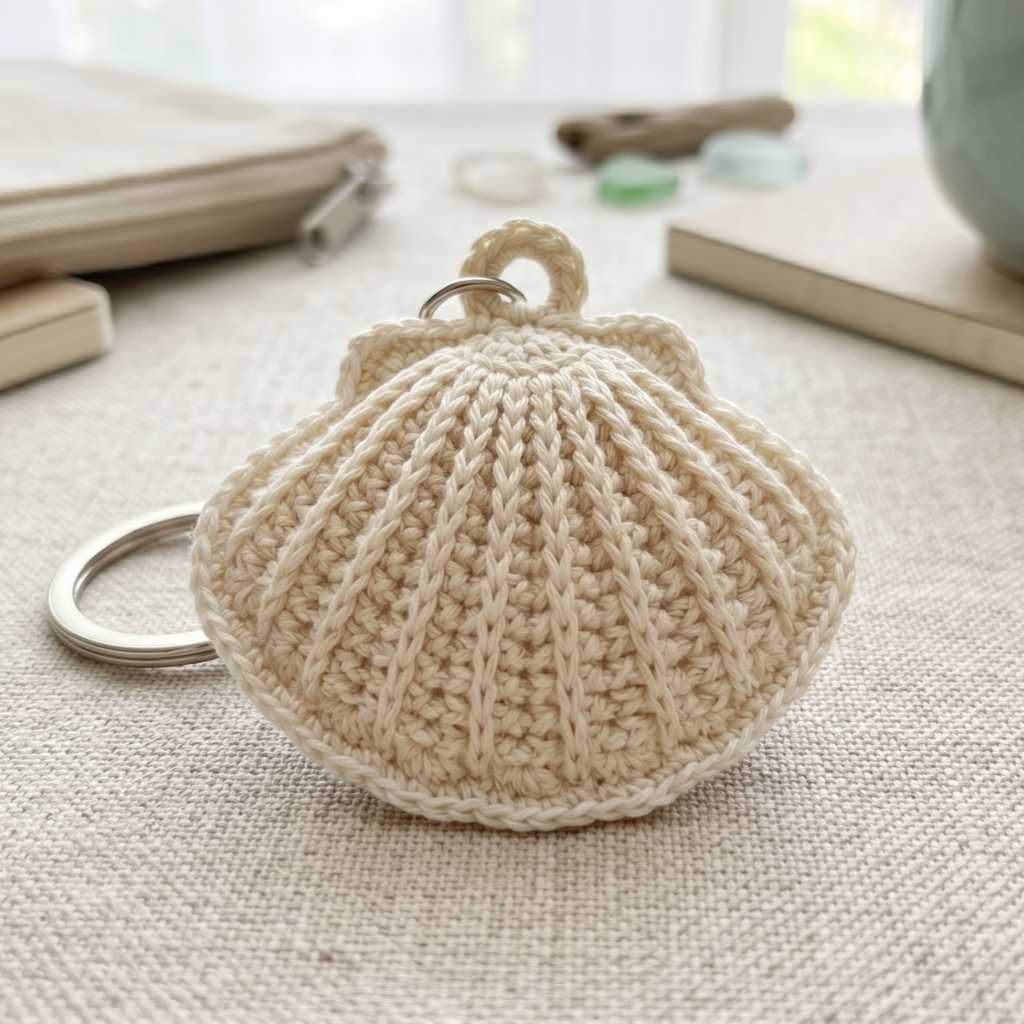
A shell keychain feels soft, elegant, and slightly coastal. It is a lovely choice if you want a design that is quick to make but still has a polished and decorative look. The shell shape gives the charm a graceful curve that stands out beautifully on bags or key rings.
Step-by-step guide
Step 1: Choose coastal or soft colors
Pick a color palette that feels ocean-inspired or airy. Cream, blush, pale blue, seafoam, lavender, or soft beige all work beautifully. A shell keychain often looks best in a single solid color because the shape itself is the star.
The colors help set the mood.
Step 2: Start the shell center
Begin with a small magic ring or narrow foundation and build the shape outward. The shell can be made as a fan, curved appliqué, or small structured motif depending on the style you prefer. Keep the design compact because the keychain should stay light.
The center gives the shell its structure.
Step 3: Shape the shell ridges
Use stitch groupings or simple raised sections to suggest shell ridges. Keep them even and balanced so the shell reads clearly. The texture should feel delicate and organic rather than bulky.
The ridges give the shell character.
Step 4: Keep the shell rounded
Make sure the outer curve is smooth and symmetrical. Shell shapes look best when the sides are even and the bottom curves naturally. If one side feels heavier, adjust the stitch count slightly.
The rounded shape makes the charm elegant.
Step 5: Add a subtle border if desired
You can finish the shell with a tiny border in the same color or a soft contrast shade. This can help sharpen the outline and make the shell look more polished. Keep the border thin so it does not distract from the form.
Step 6: Lightly stiffen if needed
A shell charm often benefits from a little stiffening because it helps the shape stay crisp. You can use starch or fabric stiffener very lightly. Let it dry completely before adding the hardware.
Step 7: Attach the loop
Sew a small loop or ring attachment at the top of the shell. Reinforce it well so the keychain hangs securely. The attachment should be neat and not interfere with the shell shape.
Step 8: Final shape and finish
Smooth the shell with your fingers and compare it to a second one if you are making a pair. The finished charm should feel light, decorative, and easy to wear.
Helpful tips
Shell keychains look especially beautiful in pearl-like tones, soft coral, or seafoam shades. They are a lovely option for summer collections, beach-themed gift sets, or coastal-inspired accessories.
4. Crochet Sweet Musketeer Keychain Pattern
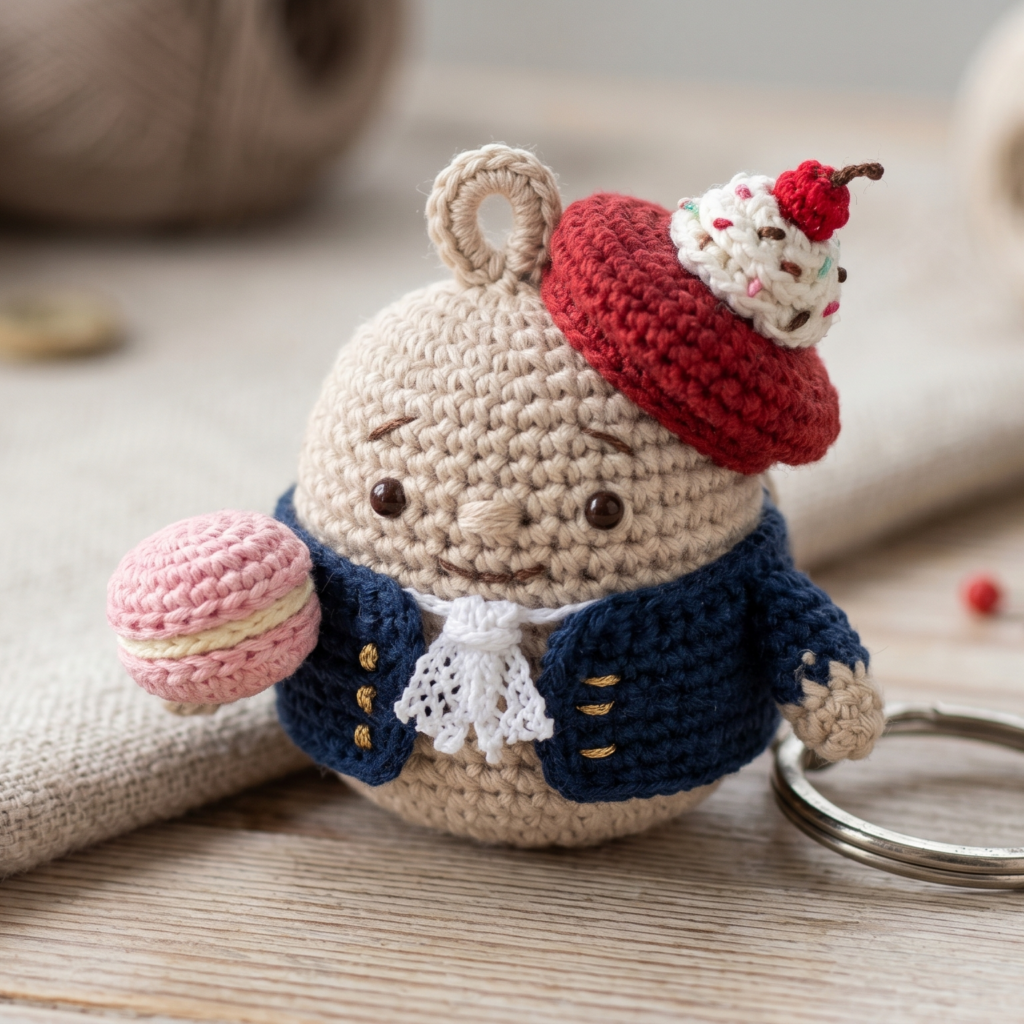
A sweet musketeer keychain is a playful, character-inspired project that feels fun, charming, and full of personality. This type of keychain is especially appealing if you love tiny amigurumi characters with a cute and collectible feel. It is a great pattern for gifting because it feels unique and memorable.
Step-by-step guide
Step 1: Plan the character colors
Choose colors for the body, costume, and small accents. Since this is a sweet character style, soft colors, classic tones, or playful pastels all work well. Decide whether you want the character to feel bold, soft, or whimsical.
The colors define the character.
Step 2: Crochet the body
Start with a small rounded amigurumi body. Keep it compact and firm so it holds its shape on a keychain. The body can be oval or slightly rounded depending on the style you want. Use tight stitches to keep stuffing hidden.
The body gives the character its base.
Step 3: Add the costume or mask details
Crochet or embroider the costume features that give the musketeer style. This might include a small hat, mask, scarf, or decorative outfit section depending on your design. Keep the pieces tiny and neatly shaped.
The costume details make the character special.
Step 4: Make the face
Use small safety eyes or embroidery to create a sweet expression. A tiny nose or smile can make the character feel warm and friendly. Because the piece is small, a simple face often works best.
The face gives the charm personality.
Step 5: Add arms, feet, or accessory pieces
If your version includes tiny limbs or decorative pieces, crochet them separately and sew them on securely. Keep them compact so the keychain remains lightweight and easy to carry.
The small details complete the look.
Step 6: Stuff lightly and shape
Add a small amount of stuffing to the body so it feels firm but still soft. A keychain should be durable, but not overly bulky. Shape the character carefully so all features sit evenly.
The stuffing supports the amigurumi form.
Step 7: Attach the keychain ring
Add a reinforced loop or secure hardware at the top of the character. Because this is a small plush-style keychain, the attachment should be very strong. Reinforce the top with several stitches.
Step 8: Finish neatly
Weave in all loose ends, smooth the costume details, and make sure the character sits well. The finished keychain should feel cute, sturdy, and ready to gift or sell.
Helpful tips
This style is especially good for people who enjoy character crochet and collectible-style pieces. If you want to make several for a market, try varying the colors slightly so each one feels like a unique little character.
5. Crochet Candy Stripes Snail Plush Keychain Pattern
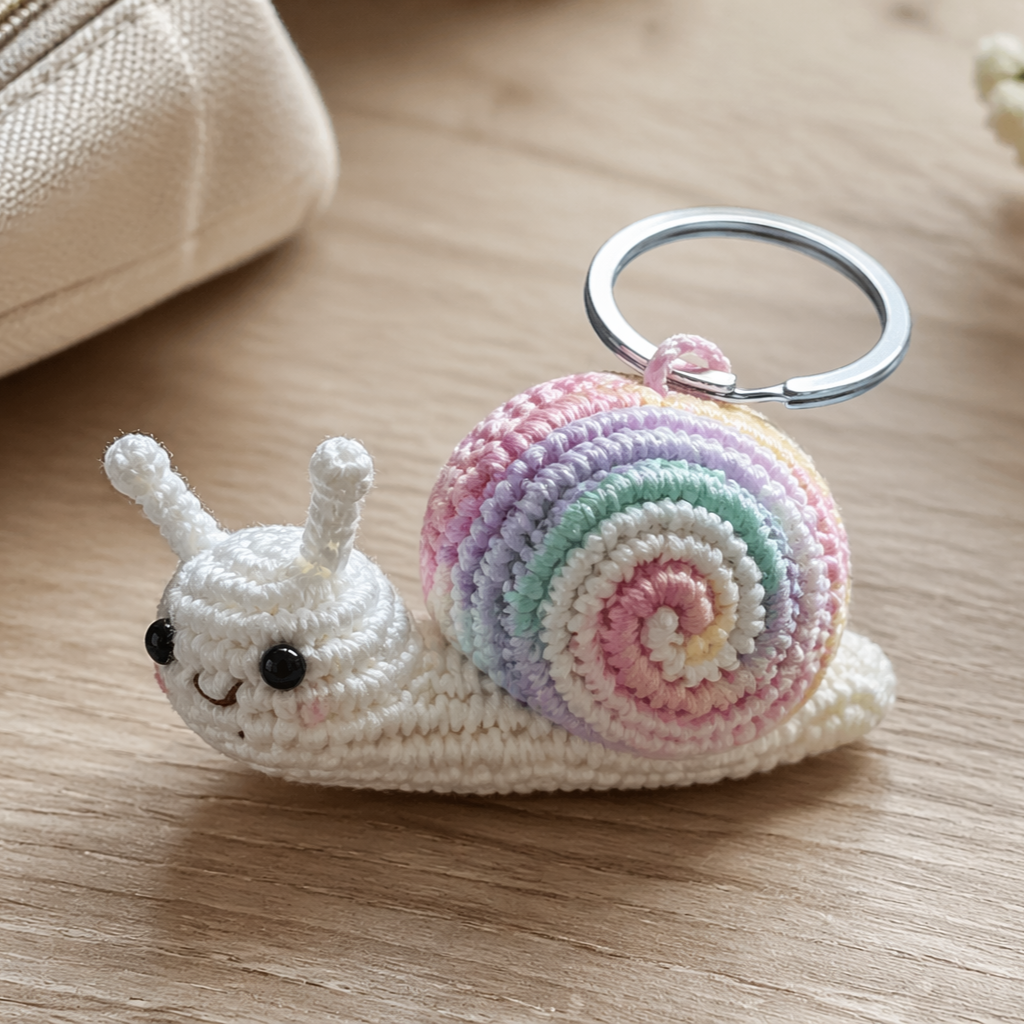
A candy stripes snail plush keychain is whimsical, colorful, and full of charm. The snail shape is already adorable, and the candy stripe shell makes it even more eye-catching. This is a fun pattern if you want something playful that also lets you use bright colors and soft curves.
Step-by-step guide
Step 1: Choose bright candy colors
Select colors that feel cheerful and sweet. Pink, mint, yellow, lilac, cream, and peach all work beautifully for candy stripes. The shell is the perfect place to play with multiple colors, while the snail body can stay simple and neutral.
The colors give the snail its candy look.
Step 2: Crochet the snail body
Start with a small, elongated body shape using single crochet in the round. The body should be rounded at one end and slightly tapered at the other. Keep the body compact so the keychain remains small and lightweight.
The body gives the snail its shape.
Step 3: Crochet the shell
Make the snail shell separately, using a circular or spiral shape. This is where the candy stripes will go. Keep the shell small and smooth so it fits well with the body and does not overpower the design.
The shell is the main decorative feature.
Step 4: Add the candy stripes
Use alternating yarn colors to create candy-like stripes around the shell. Keep the stripes neat and evenly spaced so the pattern reads clearly. Bright contrasting stripes make the shell feel playful and fun.
The stripes create the candy effect.
Step 5: Attach the shell to the body
Sew the shell securely onto the top of the snail body. Position it so it looks balanced and natural. This is one of the most important steps because it gives the snail its recognizable silhouette.
The shell and body together create the snail shape.
Step 6: Add the antennae
Crochet two tiny antennae and attach them to the front of the body. Keep them thin and slightly curved so they look soft and cute. The antennae help the snail feel finished and expressive.
The antennae add personality.
Step 7: Add facial features
Use tiny safety eyes or embroidery for the eyes and mouth. A gentle smile or sleepy expression works especially well. Keep the face small so it fits the scale of the keychain.
The face brings the snail to life.
Step 8: Attach the keychain ring
Add a strong loop or hardware to the top of the body or shell, depending on the design. Reinforce it carefully so the keychain can handle daily use.
Step 9: Final shape and check
Adjust the shell, antennae, and body until everything sits neatly. The final piece should feel playful, colorful, and cute enough to make people smile.
Helpful tips
Candy stripe snails are especially lovely for craft fairs because they are colorful and memorable. You can make them in pastel candy colors for a softer look or in bold rainbow shades for a more vibrant style. They also make sweet little gifts for all ages.
Conclusion
Mini amigurumi keychains are some of the best crochet projects for anyone who wants something quick, cute, and useful. They are small enough to finish in a short time, but they still feel special because each one can be customized with colors, textures, and tiny character details. That balance of simplicity and personality is what makes them so fun to make and so easy to gift or sell.
These five patterns each bring something different. The bear Oreo cookie keychain feels sweet and playful. The mini ribbon bow keychain is classic and elegant. The shell keychain has a soft coastal charm. The sweet musketeer keychain adds character and whimsy. The candy stripes snail plush keychain is colorful and fun. Together, they show how much variety you can create with just a little yarn and a small hook.
If you love tiny crochet projects that are satisfying to finish and lovely to carry, these keychain patterns are a beautiful place to start. With the right yarn, neat stitching, and thoughtful finishing, each one can become a small handmade treasure that is fun to gift, easy to sell, and delightful to keep.