Crochet plant covers are a beautiful way to add warmth, texture, and handmade charm to your home. They are a simple project with a big visual payoff, which makes them perfect if you want to refresh a shelf, windowsill, desk, or plant corner without buying new decor. A well-made crochet plant cover can turn an ordinary nursery pot into something that feels soft, stylish, and thoughtfully decorated.
What makes crochet plant covers especially lovely is how flexible they are. You can make them cozy and rustic, bright and playful, clean and modern, or soft and textural depending on the stitch pattern and colors you choose. Because they are usually small to medium-sized projects, they are also a great way to use up leftover yarn while creating something useful and attractive.
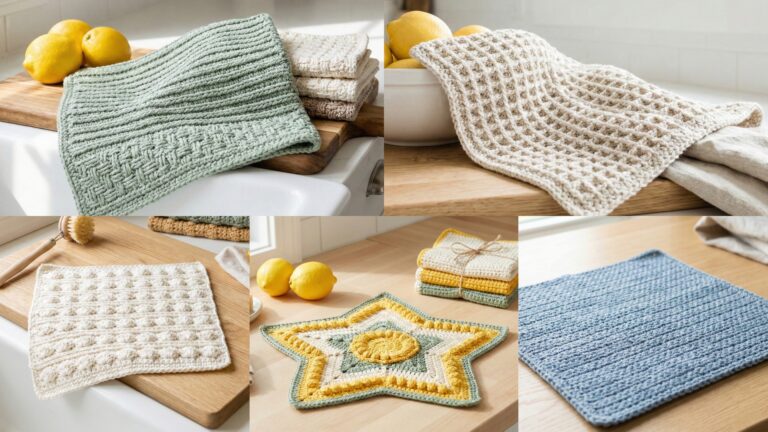
In this post, you will find five crochet plant cover patterns with detailed step-by-step guidance, helpful notes, and finishing tips. These designs are written to be easy to follow while still giving you enough detail to make plant covers that look polished and fit beautifully around pots. If you enjoy home decor projects that are quick, creative, and practical, these plant covers are a wonderful place to begin.
Quick Notes
Project type: Crochet plant covers
Best for: Home decor, gift plants, shelf styling, desk decor, and pot refresh projects
Skill level: Beginner to intermediate, depending on stitch detail
Hook size: Usually 3.0 mm to 5.5 mm, depending on yarn weight and pot size
Yarn weight: Cotton, cotton blends, DK, or light worsted yarn
Best yarn choice: Cotton yarn for structure, easy washing, and crisp stitch definition
Finished size: Customizable to fit small, medium, or large nursery pots
Time to complete: A few hours to a day depending on size and stitch pattern
Helpful stitches: Chain, slip stitch, single crochet, double crochet, half double crochet, granny stitch, V-stitch, shell stitch, increase, decrease, color changes, joining, and edging
Common Materials
Most crochet plant covers use the same basic supplies.
- Yarn in your chosen colors
- Crochet hook suited to the yarn
- Yarn needle
- Scissors
- Measuring tape
- Stitch markers
- Optional lining or stiffener if needed
- A plant pot to measure against
For plant covers, yarn choice matters a lot because the cover should hold its shape but still feel soft and flexible. Cotton yarn is usually the best choice because it gives a neat finish and can be adjusted more easily around the pot. If you want a slightly softer drape, a cotton blend can also work nicely.
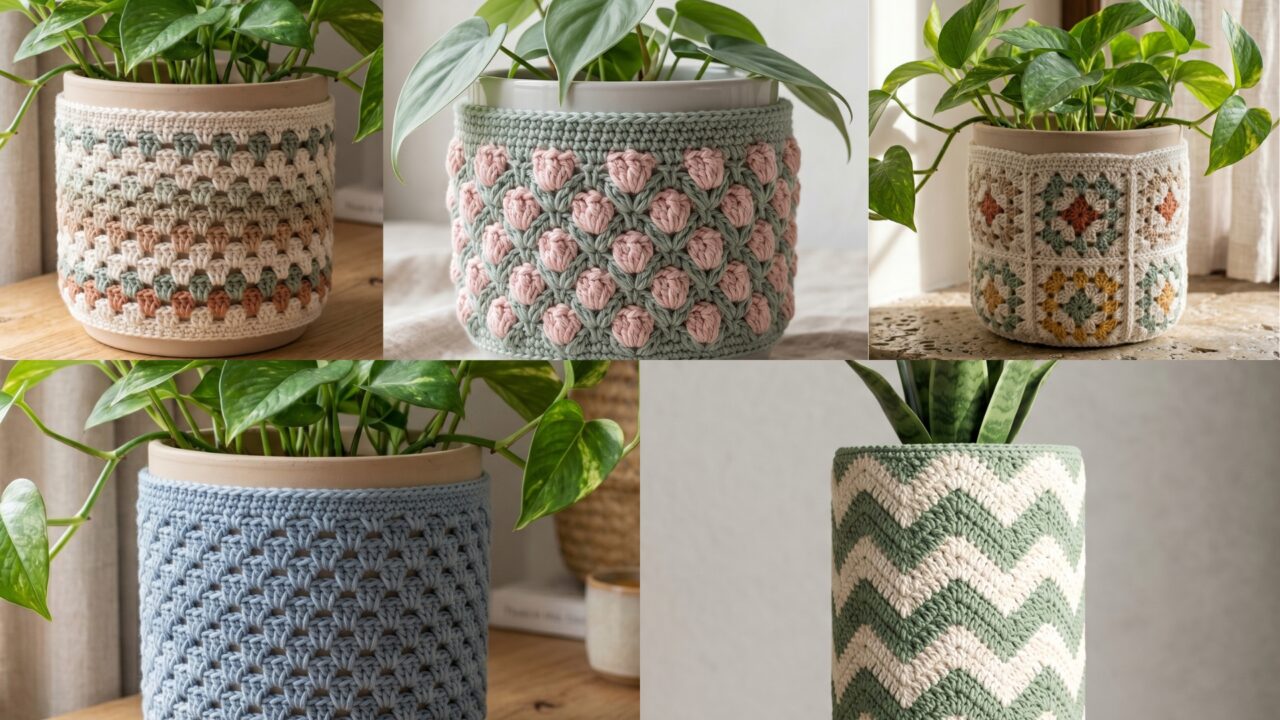
1. Crochet Granny Stitch Plant Cover Pattern
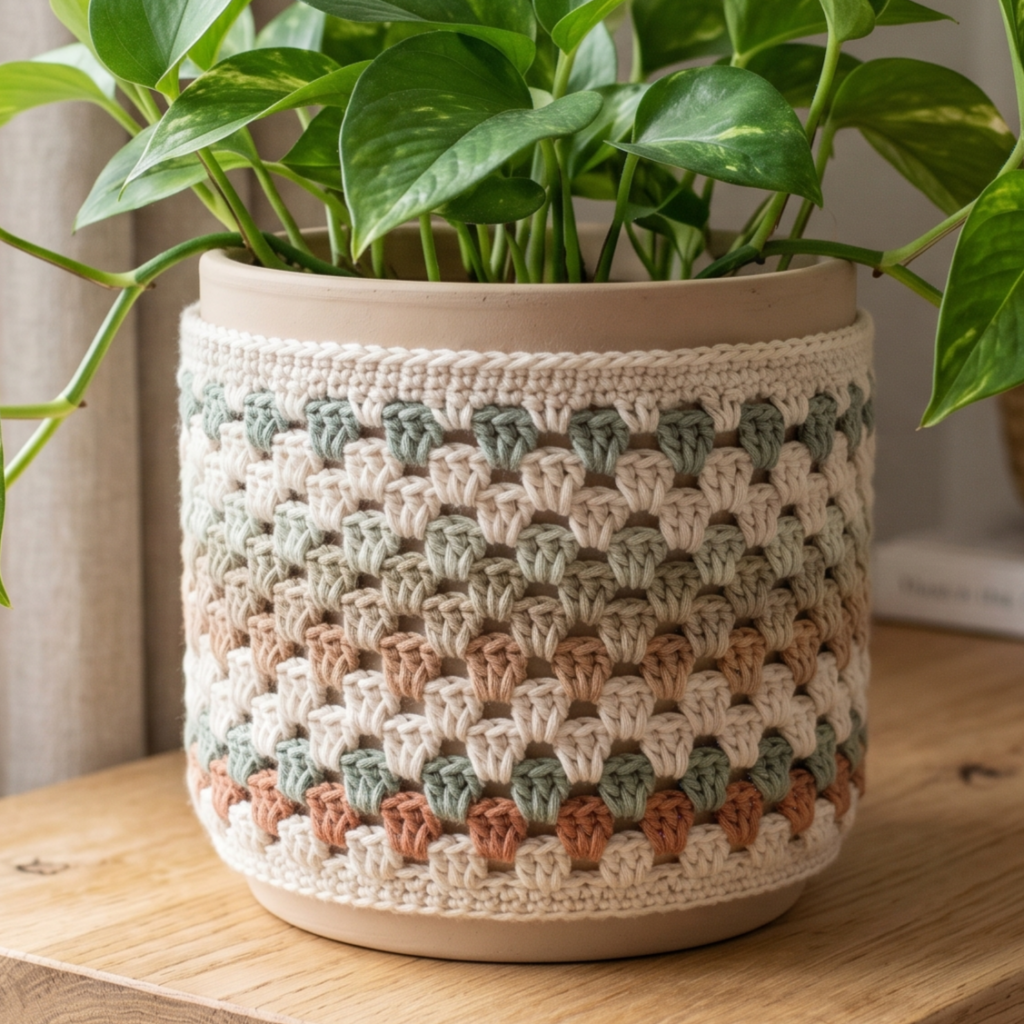
A granny stitch plant cover is classic, cozy, and easy to customize. The open stitch texture gives it a relaxed handmade feel, while the familiar granny clusters make it quick and satisfying to work. It is a great pattern if you want a cover that feels a little rustic but still polished enough for modern home decor.
Step-by-step guide
Step 1: Measure your pot
Before starting, measure the height and circumference of the pot you want to cover. This will help you figure out how wide and tall the cover should be. Since plant covers need to fit snugly without being too tight, accurate measurements are important.
A good fit helps the cover sit neatly on the pot.
Step 2: Choose your yarn colors
Select one color for a clean look or several colors if you want a striped or layered effect. Granny stitch looks beautiful in both neutral and colorful palettes. If you want a calming home decor piece, choose earth tones, cream, or muted green.
The colors set the style of the plant cover.
Step 3: Crochet the base circle
Start with a flat circle using single crochet or double crochet increases. This will become the bottom of the plant cover. Keep the circle flat and even so it matches the base of the pot properly.
A flat base gives the cover structure.
Step 4: Build the sides upward
Once the base reaches the right size, stop increasing and work the sides upward in rounds. This will form the sleeve that wraps around the pot. Keep the stitches consistent so the sides grow straight and smooth.
The sides give the cover its shape.
Step 5: Add the granny stitch pattern
Begin crocheting granny stitch clusters around the body of the cover. Keep the clusters evenly spaced so the texture looks balanced. The openwork creates a lovely airy effect that makes the plant cover feel light and decorative.
The granny stitch is the main visual feature.
Step 6: Keep the fit snug
As you work upward, check the cover against the pot. It should fit comfortably without slipping around too much. If the fabric feels too loose, you can tighten your tension or use a smaller hook for the next one.
A snug fit helps the cover stay in place.
Step 7: Finish the top edge
Add a clean border around the top opening. A simple single crochet edge works well, but you can also add a slightly decorative finish if you want the top to stand out more. Keep the border even so the pot opening looks polished.
The top edge is the final frame for the design.
Step 8: Weave in ends and test the fit
Tuck in all loose ends carefully and slide the cover onto the pot to make sure it sits properly. If needed, make slight adjustments to the top edge or length. The finished cover should look neat and feel secure.
Helpful tips
This plant cover looks especially lovely in natural tones, soft greens, or terracotta-inspired shades. If you want a more playful version, use color changes between rows. It is a great project for beginner crocheters because the repeat is simple and the result is charming.
2. Crochet V-Stitch Plant Cover Pattern
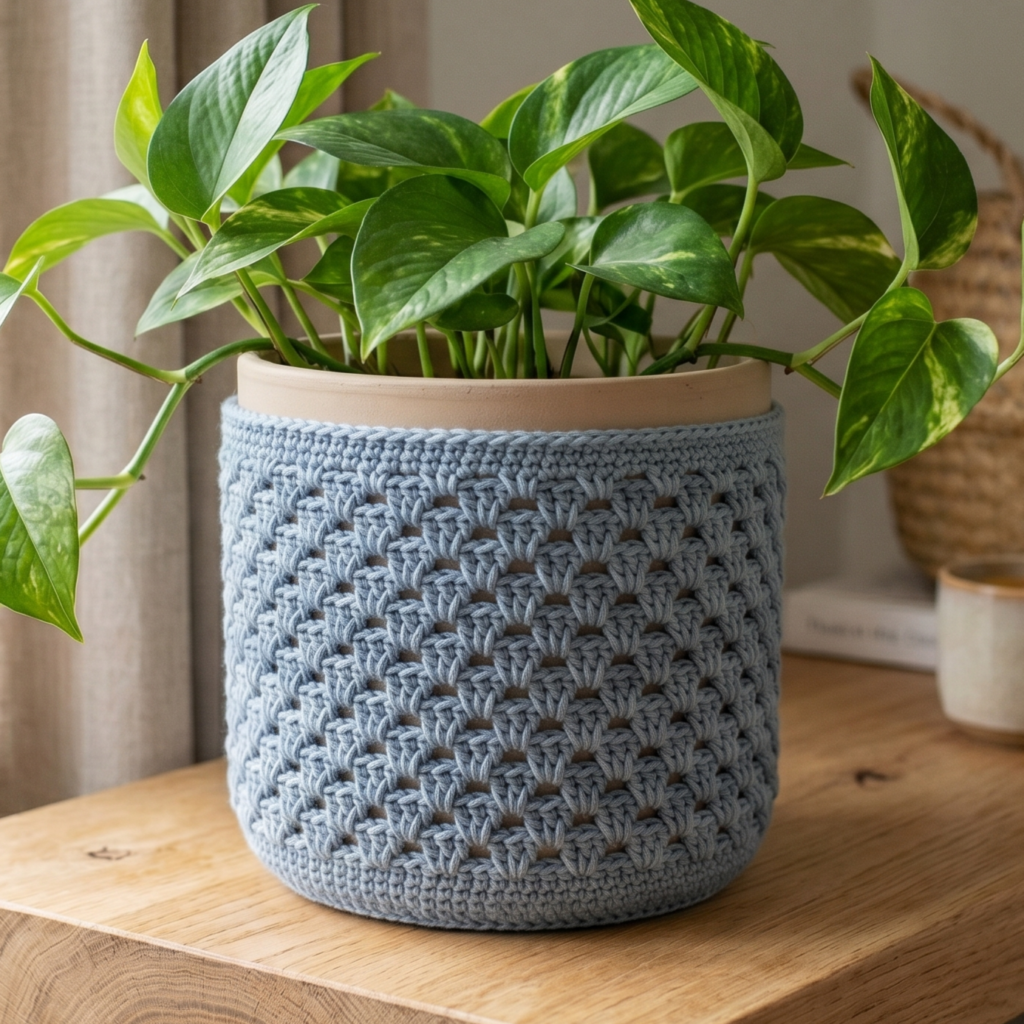
A V-stitch plant cover feels airy, textured, and slightly more modern. The repeating V shape creates a clean visual rhythm that looks especially nice on a shelf or windowsill. It is a lovely option if you want something light, pretty, and easy to pair with many types of home decor.
Step-by-step guide
Step 1: Measure the pot
Start by measuring the diameter and height of the pot. V-stitch plant covers often have a soft drape, so getting the right fit is important. The cover should fit the pot closely enough to stay in place but not so tight that it distorts the stitch pattern.
A correct fit helps the V-stitch sit beautifully.
Step 2: Pick a yarn with nice stitch definition
Choose cotton yarn or another yarn that shows stitch lines clearly. Since the V-shape is the main feature, the yarn should let the pattern stand out. Solid colors or soft tonal shades work especially well here.
The yarn should highlight the texture.
Step 3: Crochet the base
Create a flat circular or slightly oval base for the plant cover. This base will support the rest of the piece, so keep it even and flat. Use increases carefully so the base matches the width of the pot.
The base creates the foundation.
Step 4: Start the side rounds
Once the base is the right size, crochet upward in even rounds without increasing. This will create the vertical body of the cover. Keep the sides smooth so the pot cover fits neatly.
The side rounds form the sleeve.
Step 5: Add the V-stitch repeat
Begin working the V-stitch pattern around the cover. Keep the V’s evenly spaced and consistent in height. The open spaces between stitches give the cover a light, decorative look.
The V-stitch is the main pattern element.
Step 6: Watch the tension
Because V-stitch is more open than denser stitches, tension matters a lot. If the cover becomes too loose, it may stretch too much around the pot. Keep your stitches consistent so the cover keeps its shape.
Even tension helps the cover stay neat.
Step 7: Continue until the cover reaches the desired height
Work until the plant cover is tall enough to cover the pot the way you want. You can make it just high enough to hide the plastic container, or a little taller for a more decorative effect.
Step 8: Finish with a neat top border
Add a clean border around the top edge to frame the pattern. A simple border can help keep the top from stretching and make the piece look more finished. A narrow picot or single crochet edge works beautifully.
Step 9: Final check
Slide the cover onto the pot and check that it sits properly. The V-stitch should be visible and balanced all the way around. If the top edge feels too open, lightly block or adjust the border.
Helpful tips
This cover looks beautiful in sage, cream, blush, or dusty blue. If you want a very modern look, choose one solid neutral shade. If you want a softer decorative style, use a pastel or muted color.
3. Crochet Granny Square Plant Cover Pattern
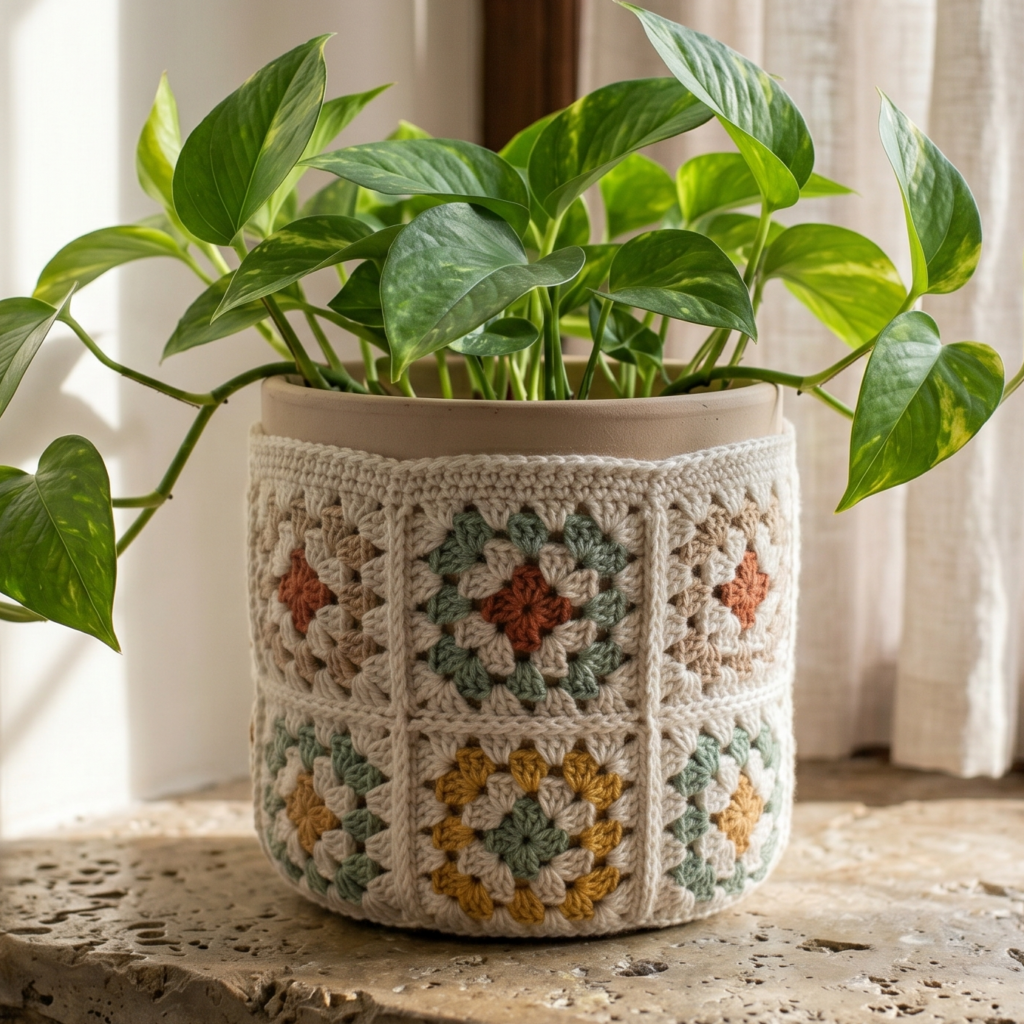
A granny square plant cover feels classic, colorful, and full of handmade personality. It is a wonderful project if you enjoy motif-based crochet and want something that looks creative without being too complicated. The squares give it a patchwork feel that is especially charming in cozy home decor spaces.
Step-by-step guide
Step 1: Measure the pot
Before making the squares, measure the height and circumference of the pot. This will help you determine how many granny squares you need and how large they should be. Planning ahead makes assembly much easier.
Good planning helps the squares fit neatly.
Step 2: Choose your square colors
Pick one color scheme or several complementary shades. Granny square plant covers are perfect for using small yarn leftovers. You can go bold and colorful or soft and earthy depending on your space.
The colors give the cover its personality.
Step 3: Crochet the granny squares
Make enough granny squares to wrap around the pot. Keep them the same size so they line up evenly. If you want a more uniform look, use the same border color on each square. If you want a patchwork feel, vary the centers or middle rounds.
The squares are the building blocks of the cover.
Step 4: Arrange the layout
Lay the squares out before joining them so you can see how they will fit around the pot. This helps you decide where each square should go and whether you need additional half squares or border panels.
A thoughtful layout makes assembly easier.
Step 5: Join the squares together
Sew or crochet the squares into a tube or wrap-around shape. Make sure the seams are neat and even. The more carefully the squares are joined, the more polished the final piece will look.
The joining stage creates the body of the cover.
Step 6: Check the fit on the pot
Wrap the joined squares around the pot and make sure they fit properly. If the piece feels too loose, add an extra border round or tighten the seams. The cover should sit securely without sagging.
A proper fit makes the piece useful.
Step 7: Add a top edge
Finish the top with a clean border to smooth out the opening. This helps the cover look complete and keeps the edges from curling. A simple edging usually works best because the squares already create visual interest.
Step 8: Weave in all ends carefully
Because motif projects can have several yarn tails, take your time with finishing. Hide all loose ends securely so the cover stays neat and durable.
Helpful tips
This plant cover is especially lovely in a mix of neutrals and greens, but it also works beautifully as a bright color-blocked accent piece. If you want a more modern look, use just three coordinated shades and a simple border.
4. Crochet Tulip Stitch Plant Cover Pattern
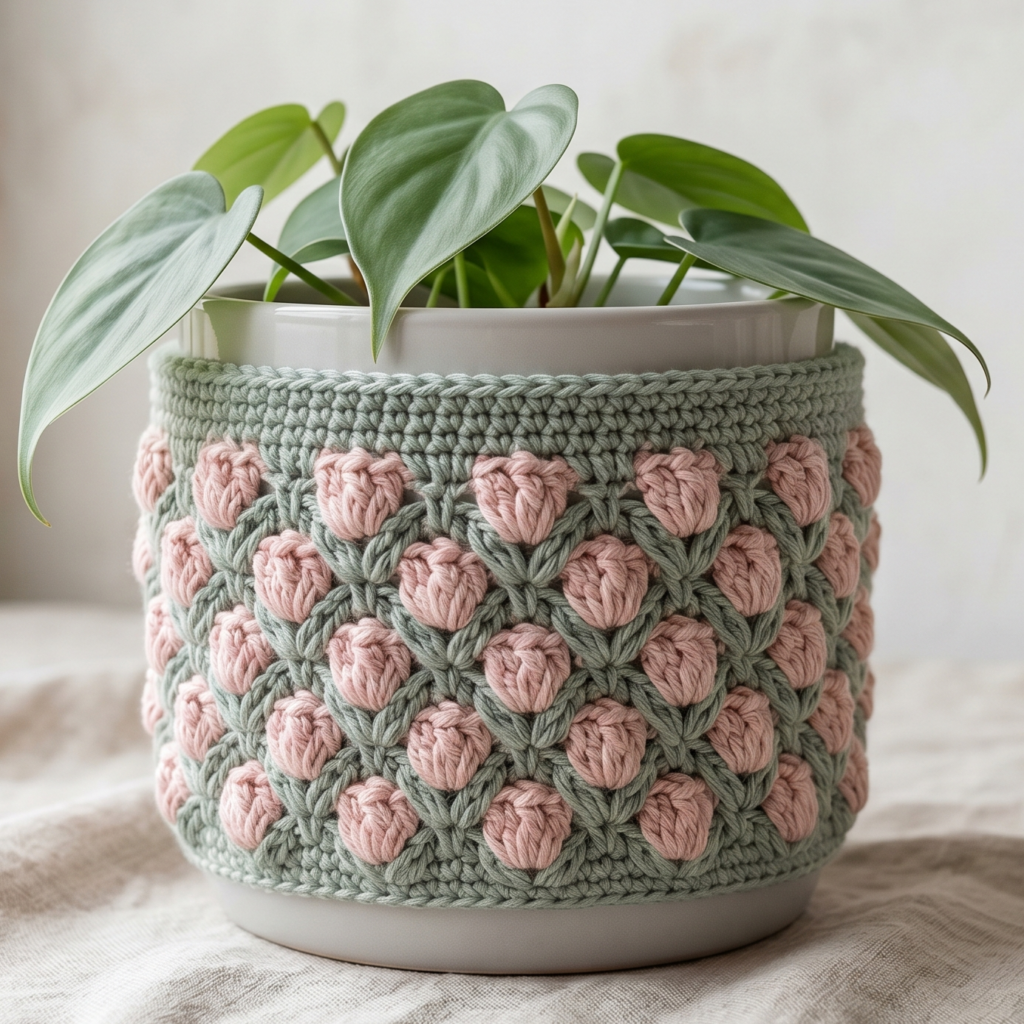
A tulip stitch plant cover feels soft, elegant, and slightly floral. The stitch pattern creates a lovely textured effect that feels fresh and decorative. It is a great choice if you want your plant cover to feel a little more delicate and stylish.
Step-by-step guide
Step 1: Choose a floral-inspired yarn color
Pick a soft color that supports the tulip look. Shades like blush, sage, ivory, lavender, or light terracotta can all work well. Since the stitch has a floral feel, a gentle color usually enhances the look.
The color should support the soft floral style.
Step 2: Measure the pot
Take measurements of the pot’s height and width. Tulip stitch can create a textured fabric, so it is important to know how much room you need. The cover should fit securely without stretching the pattern too much.
A proper measurement helps the stitch sit well.
Step 3: Crochet the base
Begin with a flat circular base using increases. Keep it even and flat so the pot sits securely inside. This base will support the textured body that comes next.
The base gives the cover its structure.
Step 4: Build the sides upward
Once the base is the right size, stop increasing and work the body upward in rounds. Keep the tension steady so the sides stay smooth. This gives the tulip stitch space to show clearly.
The body forms the main sleeve.
Step 5: Add the tulip stitch repeat
Begin the tulip stitch pattern around the body of the cover. Keep the repeat even so the floral texture stays balanced. The stitch should look soft and layered, giving the cover a romantic handmade feel.
The tulip stitch is the highlight of the design.
Step 6: Keep the rows straight
Because tulip stitch has visual texture, it is important to keep the rows aligned. If the cover begins to tilt, check your stitch count. Straight rows help the floral texture look more polished.
Step 7: Finish the top border
Add a neat border around the top opening. This will frame the stitch pattern and help keep the edge from stretching. A simple edging is often enough because the tulip stitch already adds a decorative touch.
Step 8: Test the fit and shape
Place the cover onto the pot and check how the texture sits. It should feel snug and even. If needed, lightly block or reshape the top edge so the piece looks clean.
Helpful tips
This plant cover looks especially beautiful in muted pink, dusty green, or creamy white. If you want a very soft, elegant version, keep the color palette gentle and the stitch texture consistent. It is a lovely choice for decorative indoor plants.
5. Crochet Zig Zag Plant Cover Pattern
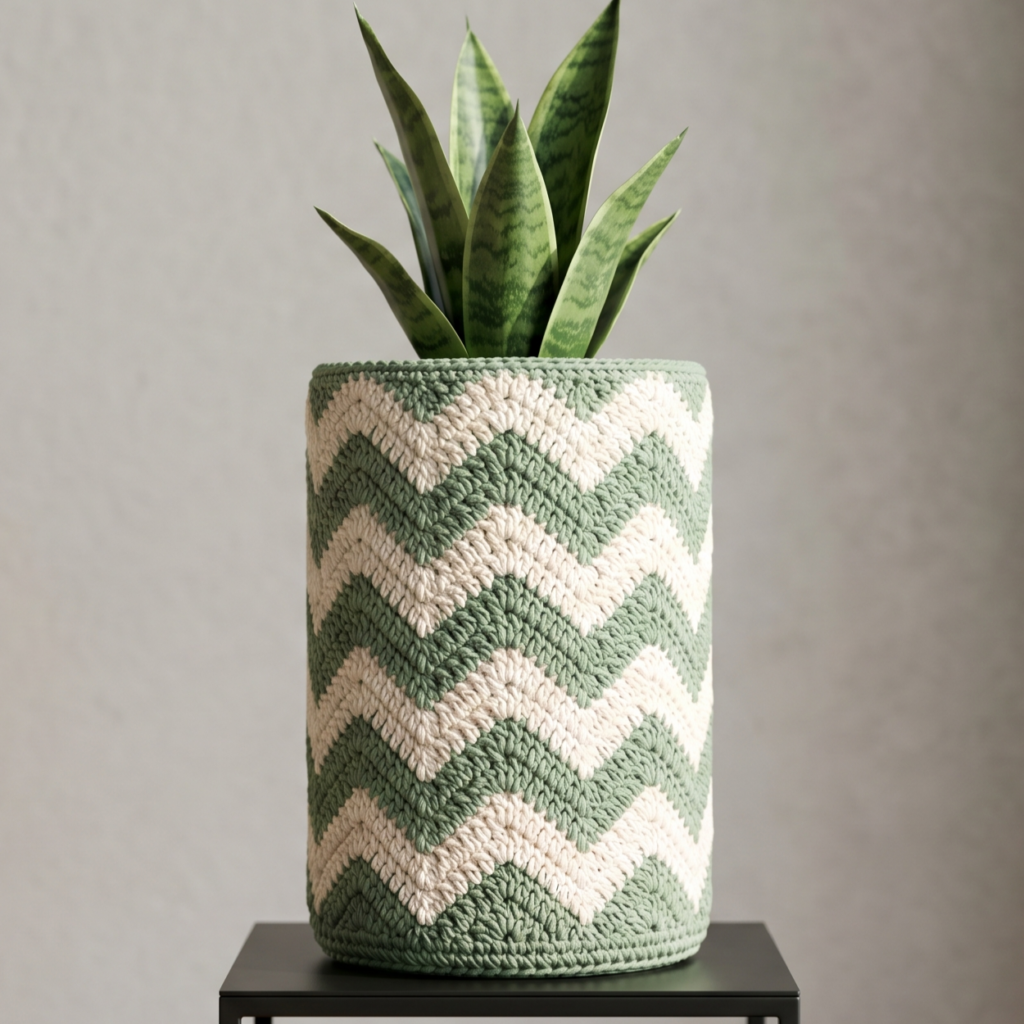
A zig zag plant cover feels bold, modern, and full of movement. The repeating peaks and dips of the pattern create a lively texture that can brighten a room and add a fresh graphic touch to your decor. It is a great choice if you want something more playful and contemporary.
Step-by-step guide
Step 1: Pick a strong color pairing
Choose one or two colors that make the zig zag pattern stand out. You can use contrasting colors for a dramatic effect or tonal shades for a softer modern look. The pattern becomes more visible when the colors are clearly defined.
The colors make the zig zag effect pop.
Step 2: Measure the pot
Before you begin, measure the circumference and height of the pot. Zig zag stitch can shift visually if the size is too tight or too loose, so make sure you know exactly how much room you need.
Good measurement keeps the pattern balanced.
Step 3: Crochet the base circle
Create a flat base that matches the bottom of the pot. Keep it smooth and even, with careful increases so the circle does not ripple. This will support the body of the cover.
A flat base gives the cover a neat foundation.
Step 4: Build the body upward
Work the sides of the plant cover in even rounds. Keep the rows consistent so the zig zag pattern remains clean once you start it. The body should fit the pot closely enough to stay in place.
The body creates the main sleeve.
Step 5: Add the zig zag pattern
Begin the zig zag repeat around the cover. Keep the peaks and valleys even so the design looks sharp and balanced. The pattern should feel graphic and lively, giving the cover a modern edge.
The zig zag is the key design feature.
Step 6: Keep the pattern aligned
Watch the stitch count carefully as you work. Zig zag patterns can shift if you miss a stitch, so check often to keep the peaks aligned. The more consistent the count, the cleaner the design will look.
Alignment helps the pattern stay bold.
Step 7: Continue until the cover is the right height
Work upward until the cover reaches the desired pot height. Make sure the zig zag pattern remains consistent from the bottom to the top. If the piece begins to flare or narrow, adjust the tension.
Step 8: Finish the top edge
Add a simple border around the top opening to clean up the edge. This helps the pattern feel complete and keeps the cover from stretching too much. A plain edging works especially well with a bold stitch pattern.
Step 9: Fit and adjust
Place the cover onto the pot and check that it sits evenly. If needed, lightly reshape the edge or block the piece so the zig zags look crisp and the cover feels secure.
Helpful tips
This cover looks especially striking in bold contrast colors like cream and green, navy and white, or pink and ivory. If you want a softer version, use muted shades or ombré yarn. The zig zag shape gives the cover a lively and modern feel.
Conclusion
Crochet plant covers are such a lovely way to make everyday decor feel more personal and handmade. They are practical, quick to make, and surprisingly effective at transforming a plain pot into a decorative piece. That balance of usefulness and style is what makes them so satisfying to create.
These five plant cover patterns each bring something different. The granny stitch cover feels classic and cozy. The V-stitch cover is airy and modern. The granny square cover is colorful and patchwork-inspired. The tulip stitch cover feels soft and floral. The zig zag cover brings bold graphic movement. Together, they show how much variety you can create with one simple idea.
Whether you are refreshing your own plant shelf or making handmade gifts for plant lovers, these patterns are a beautiful place to start. With the right yarn, careful shaping, and a neat finish, your crochet plant cover can become a small but striking piece that elevates any space.