Crochet pencil pouches are one of those small projects that feel simple at first but end up being surprisingly satisfying to make. They are practical, quick to finish, and endlessly customizable, which makes them a perfect choice for beginners who want something useful and cute at the same time. A handmade pencil pouch can hold pens, pencils, markers, makeup brushes, crochet hooks, or small everyday essentials, so it is a project that is not only fun to create but also genuinely useful in daily life.
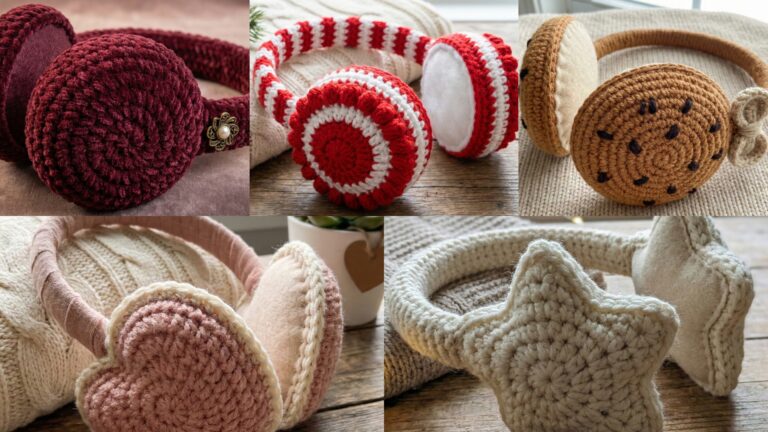
What makes crochet pencil pouches especially enjoyable is how much personality you can add to a small accessory. A bobble stitch pouch feels textured and playful. Candy stripes create a bright, cheerful look. A checked pouch with a strawberry appliqué feels sweet and nostalgic. A mosaic brick stitch pouch in pink feels modern and eye-catching. A flowers tapestry pouch adds a charming handmade touch. Each one is beginner-friendly in spirit, but still interesting enough to keep you excited from the first stitch to the final finish.
In this post, you will find five easy crochet pencil pouch patterns with detailed step-by-step guidance, helpful tips, and finishing notes. Each design is written to be easy to follow while still helping you create a pouch that looks neat, works well, and feels special. If you want a beginner project that is useful, giftable, and fun to customize, these pencil pouches are a lovely place to start.
Quick Notes
Project type: Crochet pencil pouches
Best for: School supplies, makeup storage, hooks and notions, gifts, and craft fair items
Skill level: Beginner to intermediate
Hook size: Usually 2.5 mm to 4.0 mm depending on yarn weight and desired firmness
Yarn weight: Cotton, cotton blends, sport, or lightweight acrylic yarn
Best yarn choice: Cotton yarn for structure, durability, and easy washing
Finished size: Small to medium pouch size, customizable by need
Time to complete: A few hours or less per pouch
Helpful stitches: Chain, slip stitch, single crochet, half double crochet, double crochet, bobble stitch, tapestry crochet, mosaic crochet, color changes, increases, decreases, zipper or button closure, and simple seaming
Common Materials
Most pencil pouches can be made with the same basic supplies.
- Yarn in your chosen colors
- Crochet hook suited to the yarn
- Yarn needle
- Scissors
- Stitch markers
- Zipper, button, or drawstring closure
- Optional fabric lining for extra durability
- Optional embroidery thread, beads, or appliqués for decoration
For pouches, yarn choice matters a lot because the piece needs to be sturdy enough to hold its shape. Cotton yarn is usually the best choice because it is durable, neat, and easy to wash. A smaller hook than usual can also help keep the stitches tighter so the pouch feels firm and secure.
1. Crochet Bobble Stitch Pencil Pouch Pattern
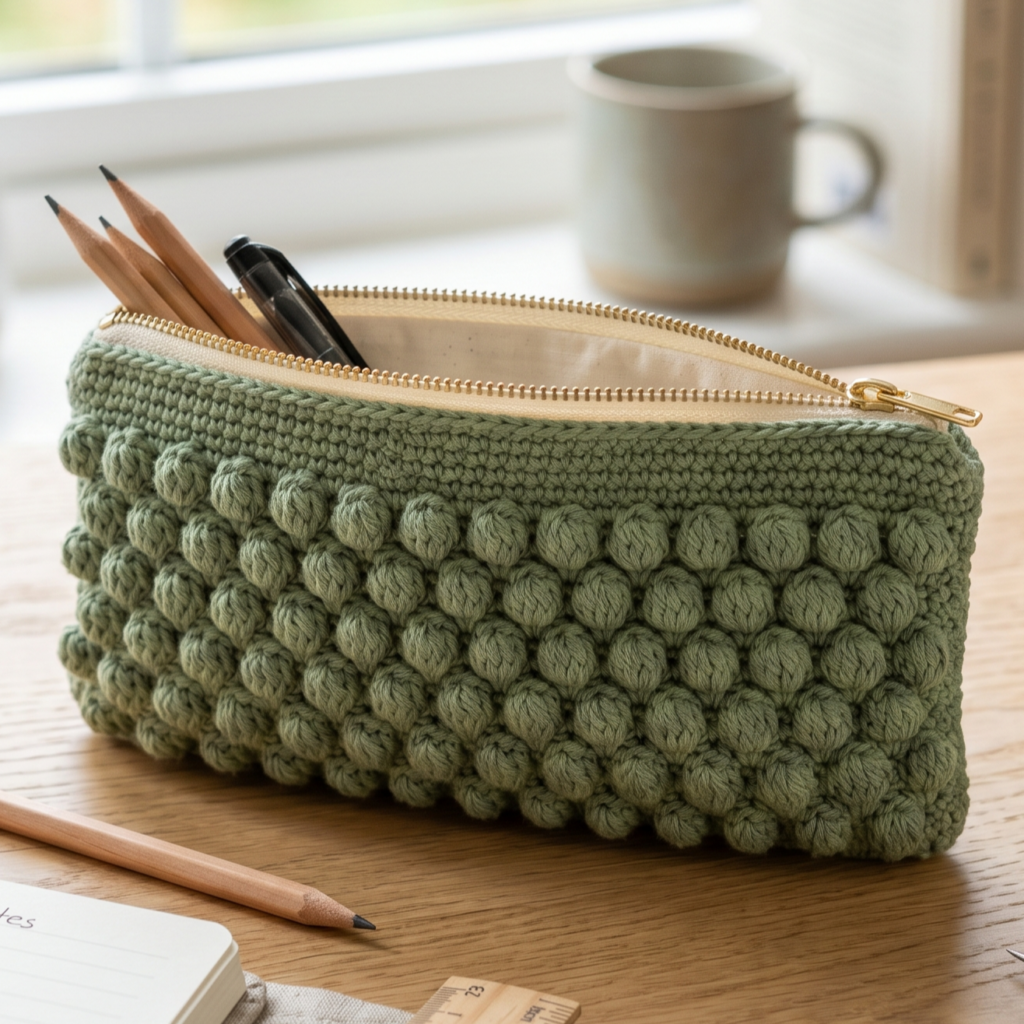
A bobble stitch pencil pouch is playful, textured, and full of personality. The raised bobble texture makes the pouch feel fun and tactile, while the compact shape keeps it practical for everyday use. This is a great beginner project if you want something that looks more detailed without being too difficult.
Step-by-step guide
Step 1: Choose a firm yarn
Start with cotton or a cotton blend in a color you love. Since the bobble stitch already adds texture, a solid color often works best because it lets the stitch pattern stand out. Soft pastels, neutrals, or bright school-friendly colors all work well.
The yarn sets the personality of the pouch.
Step 2: Measure the pouch size
Decide how long and wide you want the pencil pouch to be. If you want it for pens and pencils, make sure it is long enough to fit standard school supplies comfortably. You can check the length against a ruler or one of your pencils before you begin.
A proper size makes the pouch more useful.
Step 3: Crochet the base rectangle
Begin with a foundation chain and work rows of single crochet or half double crochet to create the pouch base. Keep the rectangle neat and even because the bobble stitch will be added as the decorative feature on top of the basic shape.
A clean base keeps the pouch sturdy.
Step 4: Add the bobble stitch pattern
Once the base is complete, begin working the bobble stitch rows. Keep the bobbles evenly spaced so the pouch looks balanced and the texture feels intentional. Bobbles add a cheerful raised effect, but they should not make the pouch too bulky.
The bobble texture is the main visual feature.
Step 5: Keep the sides straight
As you continue, check that your edges remain straight. A pencil pouch needs to be shaped like a neat rectangle so it closes properly. If the fabric begins to pull inward or flare out, adjust your tension or row count.
Straight sides help the pouch hold its shape.
Step 6: Make the back panel
Crochet a second rectangle for the back of the pouch or continue in the round depending on how you prefer to assemble it. Keep the second panel the same size as the first so the pouch closes cleanly.
Matching panels make assembly easier.
Step 7: Add the closure
Sew in a zipper, or create a fold-over flap with a button closure if you prefer. A zipper often works best for pencil pouches because it keeps small items secure. Make sure the closure sits neatly along the top edge.
A secure closure makes the pouch practical.
Step 8: Line or finish the pouch
If you want a sturdier pouch, add a fabric lining. This is especially helpful if the pouch will be used often. If you prefer a crochet-only finish, just weave in all ends neatly and press the pouch into shape.
Helpful tips
This pouch looks especially cute in one main color with a contrasting zipper. If you want a more playful style, use bright yarn or alternating bobble rows. It is a great beginner project because the shape is simple, but the texture makes it feel special.
2. Crochet Candy Stripes Pencil Pouch Pattern
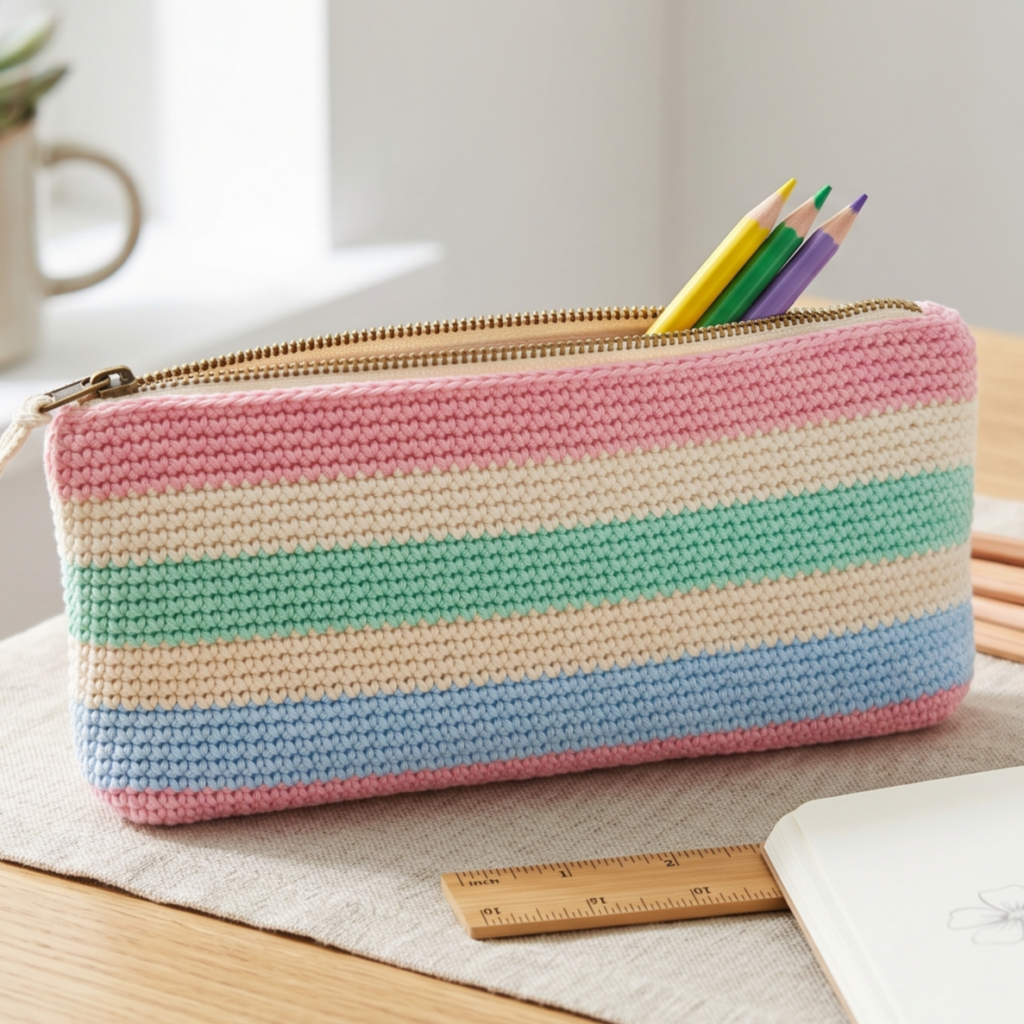
A candy stripes pencil pouch feels cheerful, colorful, and easy to love. The striped design gives it a fun and youthful look, while the simple structure makes it an excellent beginner pattern. It is a great choice for school supplies, gifts, or stash-busting leftover yarn.
Step-by-step guide
Step 1: Pick your stripe colors
Choose two or more colors that look fresh and playful together. Candy-inspired combinations like pink and white, red and cream, mint and white, or bright rainbow stripes all work beautifully. The stripes should feel fun but still balanced.
The colors create the candy-like effect.
Step 2: Decide on stripe width
Before you begin, choose how wide each stripe should be. Narrow stripes feel delicate and detailed, while wider stripes feel bold and simple. Consistent stripe width helps the pouch look polished.
Stripe width gives the design its rhythm.
Step 3: Crochet the foundation rectangle
Start with a basic rectangle using single crochet or half double crochet. Keep the rows even and neat so the stripes will line up cleanly. This simple foundation is the base for the colorwork.
A tidy base supports the stripe pattern.
Step 4: Change colors carefully
At the end of each stripe row, switch yarn colors neatly. Keep the joins smooth so the stripes look crisp. If you are carrying yarn along the side, make sure it stays hidden or neat enough to be covered later.
Clean color changes make the pouch look professional.
Step 5: Keep the rows even
As you work up the pouch, make sure the rows stay the same height. Uneven tension can make the stripes look wavy. If you want a perfectly balanced pouch, take your time with each color change.
Even rows help the stripes stay clean.
Step 6: Make the back panel
Crochet a matching back panel or continue in the round if you prefer. The stripes should line up well with the front so the pouch looks complete from both sides. If you want a surprise detail, you can make the back in a different striped sequence.
Matching panels keep the pouch neat.
Step 7: Add the closure
Choose a zipper, button, or drawstring finish. A zipper is the easiest way to keep pencils secure, but a button flap can give the pouch a more handmade and decorative feel.
The closure finishes the pouch functionally.
Step 8: Finish the edges
Weave in ends carefully and press the pouch lightly into shape. If the stripes are bold, a plain border in one of the colors can help frame the design nicely.
Helpful tips
Candy stripe pouches are wonderful for using up leftover colors. If you want a softer look, try pastel stripes. If you want a fun school-friendly pouch, choose bright cheerful colors that stand out in a backpack.
3. Crochet Checked Pencil Pouch with a Strawberry Appliqué Pattern
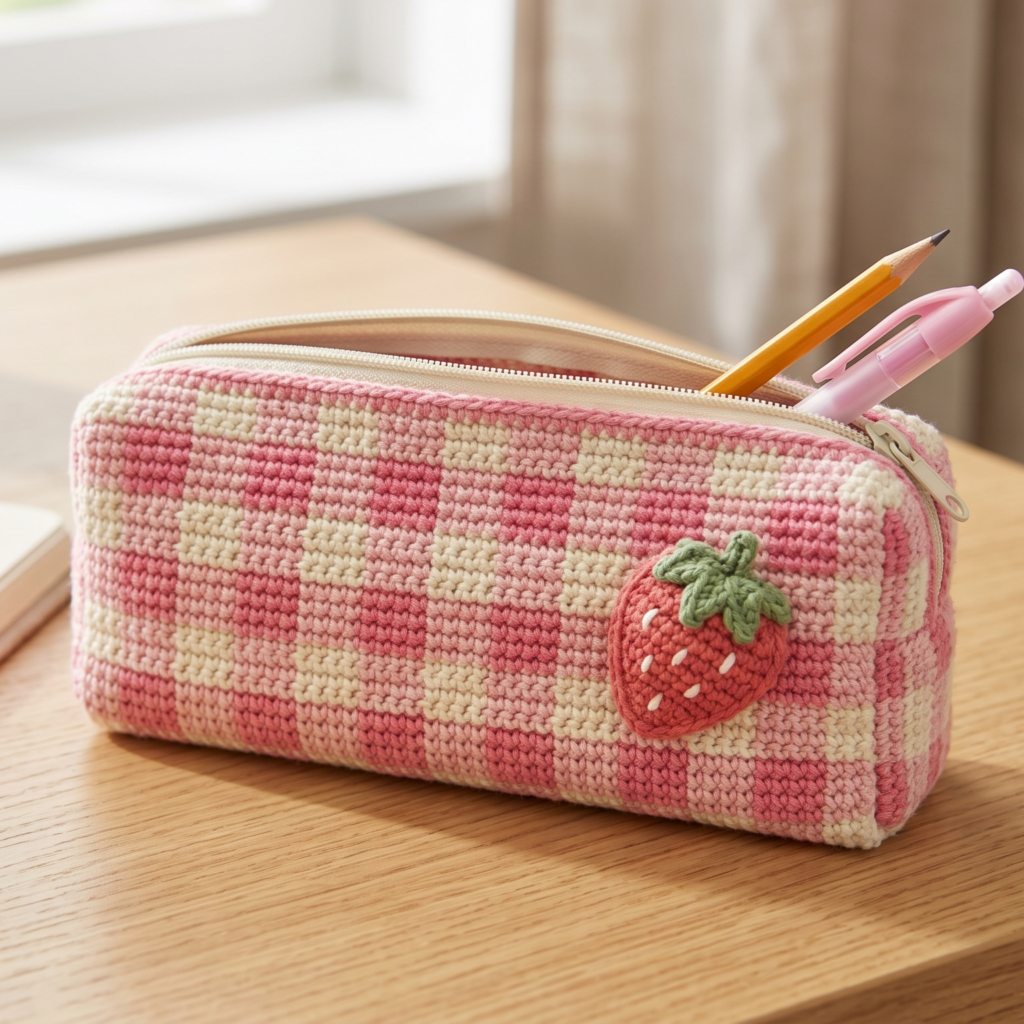
A checked pencil pouch with a strawberry appliqué feels sweet, nostalgic, and slightly vintage. The checked pattern gives it a neat, structured look, while the strawberry appliqué adds a cute focal point that makes the pouch feel handmade and charming. This is a lovely project if you want a pouch with a little extra personality.
Step-by-step guide
Step 1: Choose your checked colors
Pick two colors that contrast well for the checkered base. Soft pink and cream, red and white, or pastel green and white all work nicely. The strawberry appliqué can use pink, red, green, and a tiny bit of white or darker thread for the details.
The colors help the pouch feel sweet and coordinated.
Step 2: Crochet the pouch rectangle
Start with a rectangular base in the checkered pattern. Keep the squares or blocks even so the design remains tidy. A crochet checker pattern looks best when the color changes are crisp and deliberate.
The checker pattern gives the pouch structure.
Step 3: Keep the fabric firm
Because the pouch needs to hold its shape, use tight stitches and a smaller hook if needed. This is especially helpful for checkered pieces because the pattern is more visible when the stitches are neat and close together.
A firm fabric helps the pouch stay upright.
Step 4: Crochet the strawberry appliqué
Make a small strawberry separately using red or pink for the fruit and green for the leafy top. Add tiny seed details with embroidery or darker yarn. Keep the appliqué compact so it fits nicely on the pouch.
The strawberry is the decorative focal point.
Step 5: Attach the strawberry
Sew the strawberry appliqué onto the front of the pouch, placing it in a spot where it is clearly visible. A centered placement often works beautifully, but you can also put it near one corner for a playful look.
The appliqué makes the pouch feel special.
Step 6: Make the back panel
Crochet a matching or coordinated back panel. The back can be plain or checked depending on the style you want. If you want the front to stand out more, a simple back panel can be a lovely contrast.
Step 7: Join the panels
Sew the front and back together or work in the round if that suits your design better. Make sure the edges line up so the pouch has a clean rectangle shape. Take your time with the seams because neat finishing matters a lot in a pouch.
Step 8: Add zipper or closure
Add a zipper, button, or flap closure. A zipper is especially useful for school supplies because it keeps everything secure. If you want a softer look, a button closure can be very sweet.
Step 9: Weave in ends and shape
Trim loose yarns and press the pouch into shape. If needed, add a lining for extra strength and a smoother inside finish.
Helpful tips
This pouch is especially lovely in pink or red tones. If you want a more modern look, use a muted checkered palette and keep the strawberry small and simple. It is an adorable option for gifts or small stationery accessories.
4. Crochet Mosaic Brick Stitch Pink Stitch Pencil Pouch Pattern
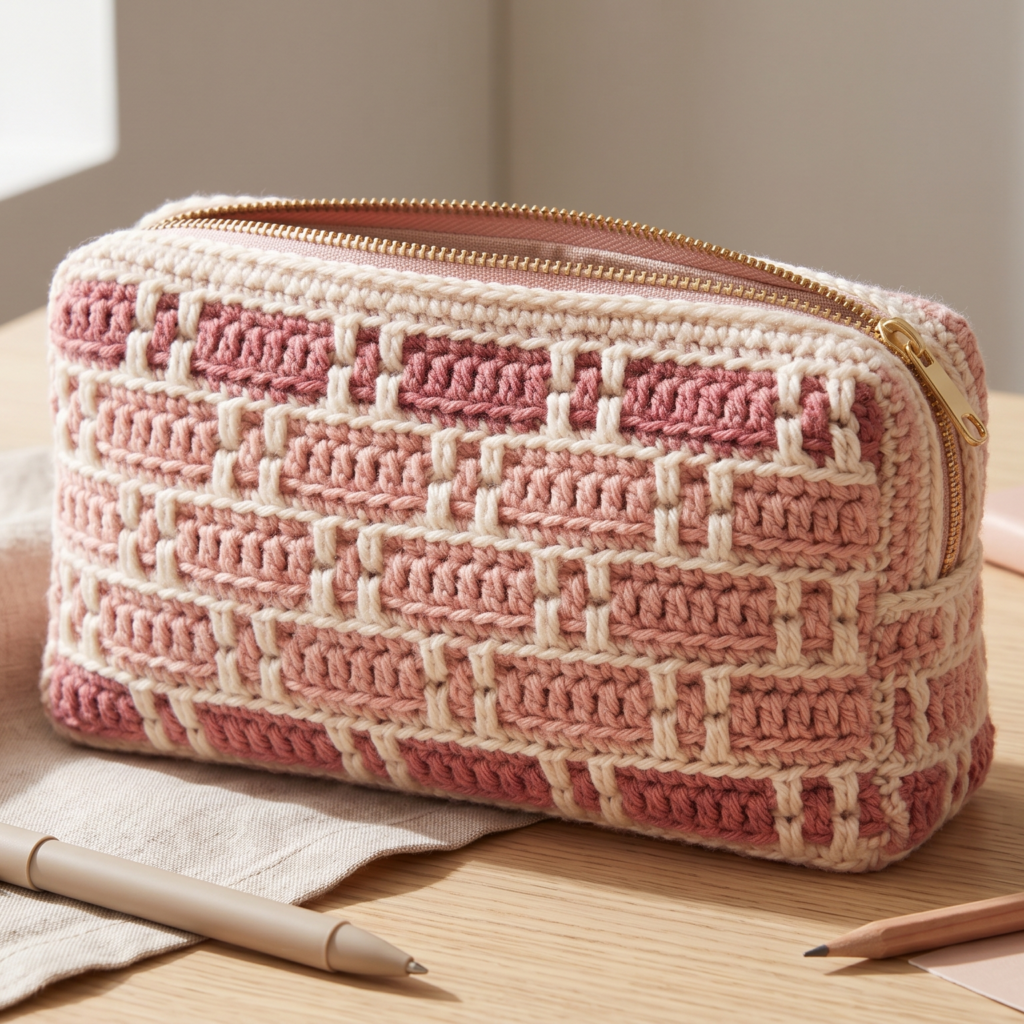
A mosaic brick stitch pencil pouch feels modern, textured, and a little more graphic. The brick-like pattern creates a structured surface that looks impressive but is still accessible for beginners. Using pink shades makes the pouch feel soft and stylish at the same time.
Step-by-step guide
Step 1: Choose your pink tones
Pick one main pink color and one or two supporting shades. Light pink, dusty rose, blush, or deeper rose tones all work beautifully. Because mosaic and brick-style stitches create visual blocks, the colors should feel balanced and easy to see.
The pink tones define the look of the pouch.
Step 2: Crochet the base rectangle
Start with a simple rectangle using a firm stitch that will support the mosaic design. Keep the edges straight because the pattern will look best on a tidy foundation. Make sure the size is appropriate for pencils, pens, or brushes.
The rectangle gives the pouch its shape.
Step 3: Learn the mosaic brick repeat
Begin the mosaic brick stitch pattern, following the row or chart repeat carefully. This stitch gives the appearance of overlapping bricks or structured blocks, creating a neat and stylish texture. Work slowly at first so the repeat becomes familiar.
The mosaic brick pattern is the focal point.
Step 4: Keep the color blocks even
As you move through the stitch repeat, make sure the color sections remain consistent. The effect will look most polished when the blocks line up clearly. Clean colorwork is especially important in mosaic designs.
Even blocks make the pattern read well.
Step 5: Maintain a firm tension
Since the pouch needs structure, keep the tension tight enough to create a sturdy fabric. Mosaic stitches can sometimes loosen if the tension changes, so check your work often. A firm piece will also help the pouch keep its shape better.
Firm stitches help the pouch function well.
Step 6: Make the back panel or continue around
If you are making separate front and back panels, crochet a matching back piece. If you prefer working in the round, continue the mosaic pattern around the pouch body. Keep the transitions neat and symmetrical.
Step 7: Add the closure
Finish the pouch with a zipper, button, or fold-over top. A zipper works especially well for this style because the structured fabric pairs nicely with a clean closure. Choose hardware that matches the pink tones if possible.
Step 8: Finish the edges
Weave in all yarn ends carefully and line the pouch if needed. A light blocking can help the brick pattern sit more evenly and make the pouch feel more polished.
Helpful tips
This pouch looks especially beautiful in blush, rose, and cream combinations. If you want a very modern aesthetic, use only two shades and keep the blocks clean and simple. It is a great pattern if you enjoy geometric texture and want a more boutique-looking accessory.
5. Crochet Flowers Tapestry Pencil Pouch Pattern

A flowers tapestry pencil pouch feels pretty, creative, and full of handmade charm. The tapestry style lets you create floral motifs directly in the fabric, which gives the pouch a polished and artistic look. This is a beautiful choice if you want a project that feels decorative but still practical.
Step-by-step guide
Step 1: Pick your floral colors
Choose a background color and one or more flower colors. Soft pinks, creams, greens, and lavenders work especially well for floral designs. Since tapestry crochet is about clear shapes, the colors should contrast enough for the flowers to stand out.
The colors create the flower design.
Step 2: Plan your floral chart
Before starting, sketch or follow a small flower chart. Tapestry crochet works best when you know where each color change will happen. A simple repeat pattern is perfect for beginners because it keeps the design manageable.
A clear chart makes the project easier.
Step 3: Crochet the base rectangle
Start with a firm rectangle using the background color. This gives the tapestry design a clean canvas. Keep the stitches even and tight so the color changes stay neat.
A tidy base supports the floral motif.
Step 4: Begin the tapestry pattern
Work the flower design by changing colors as needed. Carry the unused yarn inside the stitches or along the back neatly so the pouch stays smooth. Keep the tension consistent so the flowers look crisp and easy to see.
The tapestry pattern gives the pouch its character.
Step 5: Keep the flowers balanced
Make sure the flower shapes stay even and do not become distorted. Since the pouch is small, the floral motif should be clear but not overcrowded. A repeated flower pattern or a few scattered blooms both work beautifully.
Balanced flowers make the pouch feel polished.
Step 6: Crochet the back panel
Either crochet a matching tapestry back or make a simple coordinating back panel. If you want the front to be the star, a plain back can be a nice choice. Keep the size consistent with the front.
Step 7: Join the pouch
Sew the front and back together neatly along the sides and bottom. Make sure the floral front remains centered and the seams are even. A clean join helps the pouch look much more professional.
Step 8: Add the closure
Attach a zipper or other closure at the top. Because tapestry crochet can be decorative and a little denser, a zipper often feels like the best practical choice. It keeps the pouch secure while preserving the design.
Step 9: Finish the inside
Weave in ends carefully and line the pouch if you want a smoother interior. This is optional, but it can make the pouch feel more polished and sturdy.
Helpful tips
This pouch looks especially lovely in soft floral palettes, but you can also make it feel more modern with muted background shades and bold flower colors. It is a great project for spring gift sets, stationery lovers, or anyone who enjoys pretty handmade storage pieces.
Conclusion
Crochet pencil pouches are such rewarding projects because they are practical, quick, and fun to personalize. They give you a chance to practice stitch texture, colorwork, shaping, and finishing without the time commitment of a large garment. That makes them perfect for beginners who want something useful and satisfying to complete.
These five pencil pouch patterns each bring something different. The bobble stitch pouch feels playful and textured. The candy stripes pouch is bright and cheerful. The checked pouch with a strawberry appliqué feels sweet and nostalgic. The mosaic brick stitch pink pouch is modern and graphic. The flowers tapestry pouch is pretty and artistic. Together, they show how much style you can create in a small handmade accessory.
If you want a beginner-friendly project that looks useful and charming, these pencil pouch patterns are a beautiful place to start. With the right yarn, careful shaping, and neat finishing, your crochet pouches can become lovely everyday items that are as practical as they are cute.