Crochet charms are one of the easiest and most satisfying small projects you can make because they are quick, cute, and endlessly customizable. A tiny handmade charm can instantly add personality to a bag, keychain, phone strap, pouch, zipper pull, or gift wrap. They are small enough to finish fast, but they still give you the fun of experimenting with shapes, textures, beads, and decorative details.
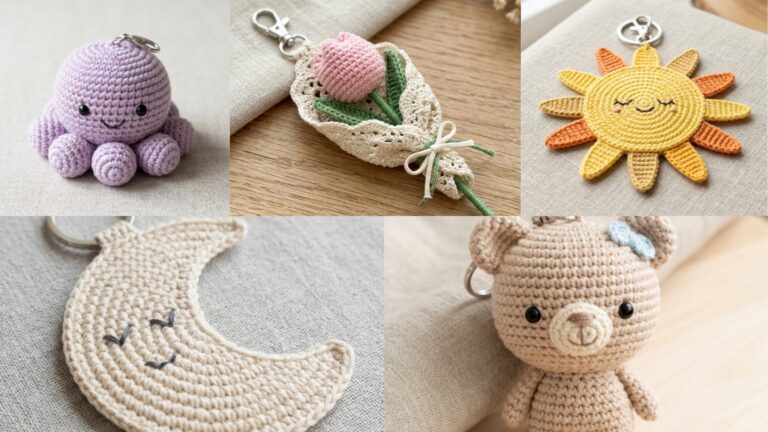
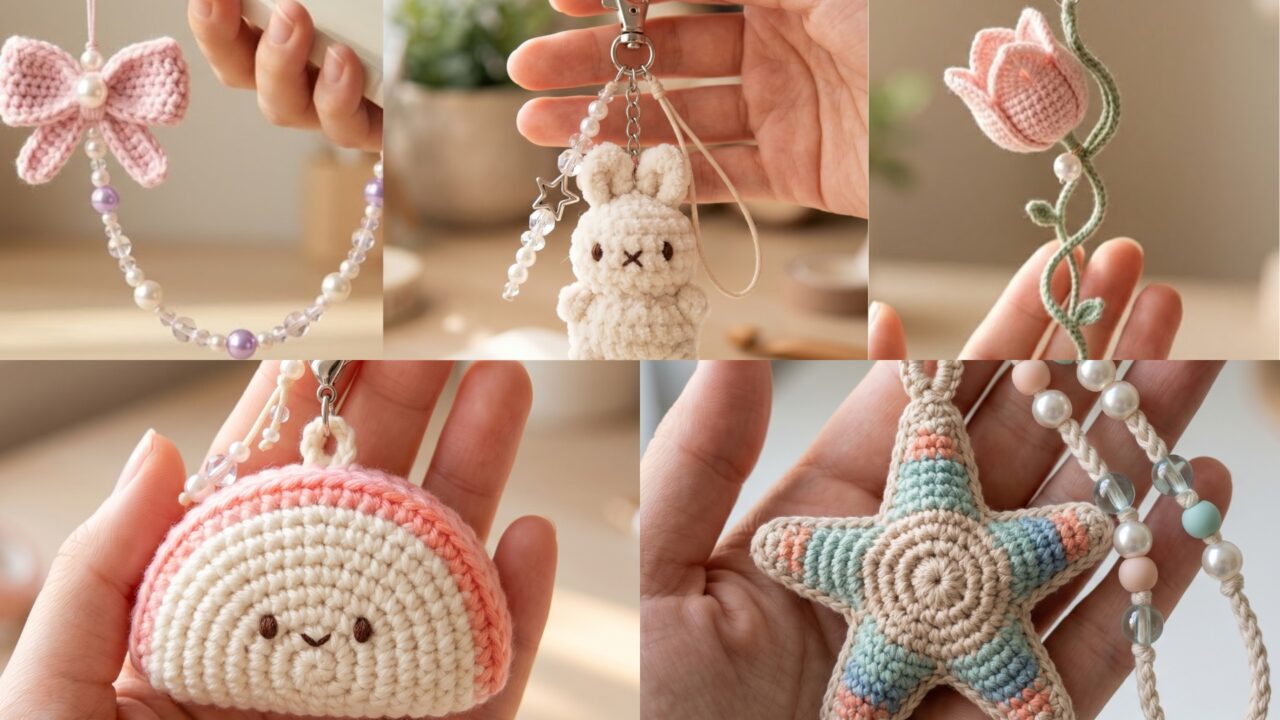
What makes crochet charms especially appealing is how much style you can pack into such a tiny piece. A beaded Miffy-inspired charm feels playful and sweet. A fish cake aesthetic charm brings in a trendy, foodie-inspired look. A tulip pearl charm feels soft and elegant. A bow charm is classic and feminine. A starfish charm adds a coastal touch that feels fresh and modern. Each one is small, but each one can make a big statement when attached to your favorite accessories.
In this post, you will find five trendy crochet charm patterns with detailed step-by-step guidance, helpful notes, and finishing tips. These designs are written to be easy to follow while still giving you enough detail to create polished charms that look stylish and feel handmade in the best way. If you love small projects that are fun to make and easy to personalize, these charms are a wonderful place to begin.
Quick Notes
Project type: Crochet charms
Best for: Bags, keychains, phone straps, gifts, zipper pulls, and aesthetic accessories
Skill level: Beginner to intermediate
Hook size: Usually 1.5 mm to 3.5 mm depending on yarn weight
Yarn weight: Crochet thread, lace weight, fingering, or lightweight cotton
Best yarn choice: Cotton thread or fine cotton yarn for crisp detail and light wear
Finished size: Usually 1 to 3 inches depending on the design
Time to complete: About 20 minutes to 1 hour per charm
Helpful stitches: Magic ring, chain, single crochet, half double crochet, double crochet, slip stitch, increase, decrease, embroidery, bead attachment, appliqué shaping, and light stiffening
Common Materials
Most crochet charms can be made with the same basic supplies.
- Lightweight yarn or crochet thread
- Small crochet hook
- Yarn needle
- Scissors
- Small stuffing for plush-style charms, optional
- Beads, pearls, or decorative accents
- Jump rings, keychain rings, or charm hooks
- Fabric stiffener or starch, optional
- Small safety eyes or embroidery thread, optional
- Felt backing, optional for firmer appliqué charms
For charms, the finish matters a lot because the piece needs to be small, neat, and durable. Thin yarn and tight stitches help the shape stay crisp. If you want the charm to keep its form, a little stiffening can make a big difference, especially for floral, bow, or starfish designs.
1. Crochet Miffy Beaded Charm Pattern
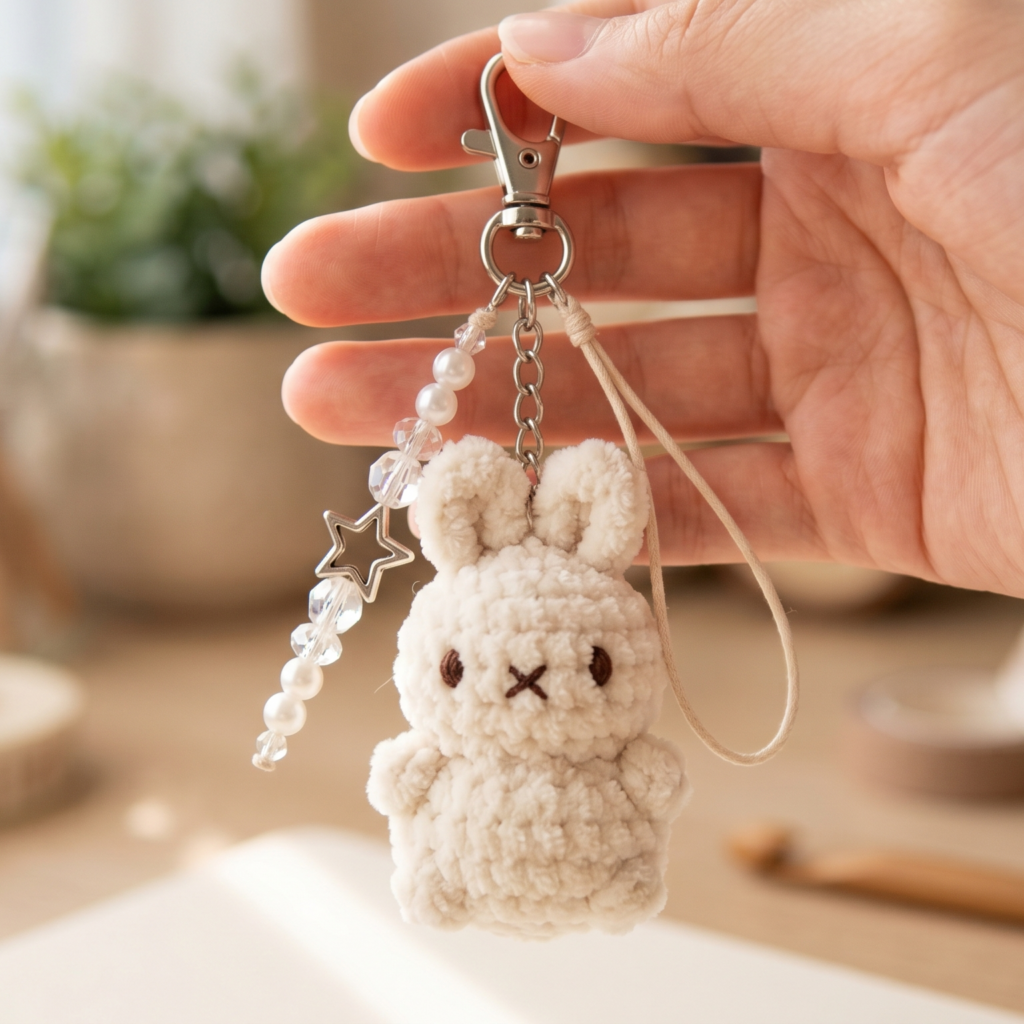
A Miffy beaded charm feels sweet, minimal, and very trendy. It has a soft aesthetic look that works beautifully on bags, pouches, and keychains. The little bead detail adds a polished touch and helps the charm feel a little more special than a plain appliqué.
Step-by-step guide
Step 1: Choose your color palette
Start with a soft base color such as white, cream, blush, or pastel pink. Miffy-inspired charms often look best in simple colors because the shape and facial details become the focus. If you want the charm to feel more modern, you can use a muted neutral palette.
The colors set the soft, aesthetic mood.
Step 2: Crochet the main head shape
Begin with a small oval or rounded shape using single crochet in the round. The head should be clean and compact, with a smooth silhouette that resembles a bunny face. Keep the stitches tight so the shape stays neat.
A rounded head gives the charm its identity.
Step 3: Shape the ears
Make two long, narrow bunny ears separately or as part of the same piece depending on your style. The ears should be soft and slightly rounded at the tips. Make sure both ears are the same size so the charm looks balanced.
The ears are the most recognizable feature.
Step 4: Add the face
Use embroidery thread to create tiny eyes and a simple mouth. Miffy-style charms usually look best with minimal facial features, so keep the expression small and clean. A tiny nose or mouth is enough to give the charm personality.
The simple face keeps it sweet and modern.
Step 5: Add the beaded detail
Attach a small bead or a cluster of tiny beads near the charm, either around the attachment point or as a decorative accent near one ear. The bead should feel elegant and not too heavy. It adds a pretty finished touch.
The beads make the charm feel more polished.
Step 6: Lightly stuff if desired
If you want a puffier charm, add a small amount of stuffing to the head. Keep it very light so the charm stays flat enough for everyday use. Some versions work beautifully as a flat appliqué too.
A little shape can make the charm feel more finished.
Step 7: Add the hanging loop
Create a small loop at the top or sew on a jump ring so the charm can be attached to a keychain or bag. Make sure the loop is secure because small accessories are handled often.
The loop is essential for wearability.
Step 8: Finish and shape
Weave in all ends, check the ear symmetry, and smooth the charm with your fingers. If needed, lightly stiffen it so it keeps a crisp shape. The finished charm should feel neat, adorable, and ready to clip onto anything.
Helpful tips
This charm looks especially lovely in ivory or blush with tiny pearl or bead accents. If you want a more collectible look, make a few with slightly different bead placements or ribbon colors. It is a great little charm for gift sets or aesthetic accessory collections.
2. Crochet Fish Cake Aesthetic Charm Pattern
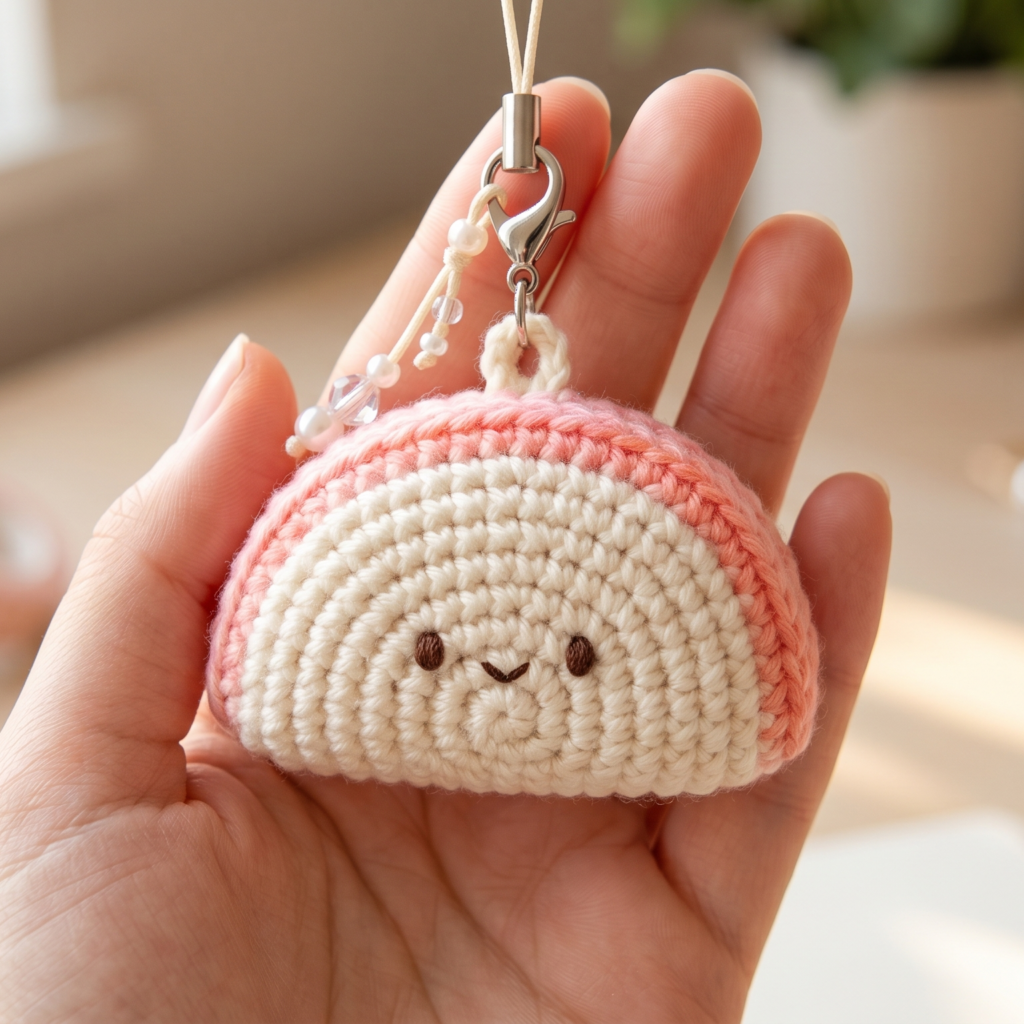
A fish cake aesthetic charm is playful, trendy, and a little unexpected in the best way. It fits beautifully into cute internet-inspired fashion and makes a fun statement on bags or phone straps. Because of its unique shape, it is an especially eye-catching charm for craft fairs or online shops.
Step-by-step guide
Step 1: Pick playful colors
Choose colors that feel fresh and aesthetic. Soft pink, cream, peach, pale coral, mint, and lavender all work beautifully. You can make the charm look more realistic or more whimsical depending on the palette you choose.
The colors help set the trendy vibe.
Step 2: Crochet the main fish cake shape
Start with a small oval or curved rectangular shape that resembles a fish cake slice or rounded snack form. Keep the shape smooth and neat so it is easy to recognize. A compact shape works best for a charm.
The body is the base of the design.
Step 3: Add layered color details
If the design uses stripes or sections, crochet or embroider subtle color changes across the piece. A pale center with a slightly darker edge can give it a fish cake-inspired look. Keep the details soft and aesthetic rather than overly busy.
The color layers make the charm interesting.
Step 4: Shape the edges
Round the corners gently so the charm has a cute snack-like silhouette. A soft edge is more appealing for this style than a rigid one. Keep the proportions even all the way around.
Smooth shaping gives it a polished look.
Step 5: Add tiny face details
If you want a character-inspired version, embroider little eyes and a tiny mouth. Keep the face minimal so the charm still feels trendy and simple. If you prefer a more aesthetic piece, leave the face off and focus on the shape.
The face adds personality if desired.
Step 6: Crochet or attach a backing
If the charm feels too soft or thin, add a second layer or felt backing to help it hold its shape. This can also make it look cleaner from the back if it will hang visibly on a bag.
A backing helps the charm last longer.
Step 7: Add the hanging loop
Attach a small loop, clasp, or ring to the top edge. Reinforce it well so the charm stays secure when clipped onto accessories.
The attachment is what makes it practical.
Step 8: Finish the shape
Smooth out the charm and check that the edges are even. If needed, lightly block it so it stays flat and neat. The finished piece should feel playful, modern, and easy to pair with cute accessories.
Helpful tips
This charm looks especially nice in pastel pink and cream or soft coral and ivory. If you want it to feel more collectible, make several in different soft color combinations. The fish cake theme is unique and perfect for anyone who loves aesthetic handmade accessories.
3. Crochet Tulip Pearl Charm Pattern
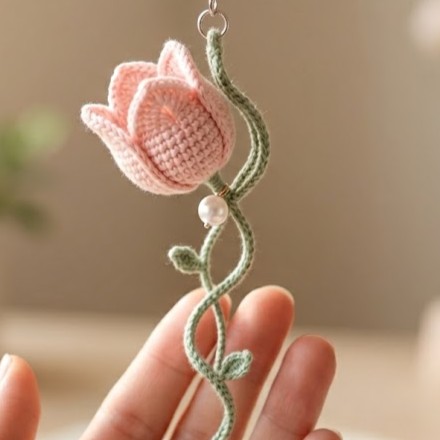
A tulip pearl charm feels delicate, elegant, and feminine. It is a beautiful choice if you want a floral charm with a little extra sophistication. The tulip shape gives it a soft springtime feel, while the pearl detail adds a classic finishing touch.
Step-by-step guide
Step 1: Select floral colors
Choose a tulip color such as pink, red, lavender, or soft yellow, and pair it with green for the stem or leaves. If you want a softer look, blush and sage are lovely together. The palette should feel fresh and floral.
The colors help define the tulip look.
Step 2: Crochet the tulip bloom
Start by making the flower head with a small cup-like or petal-shaped form. Tulips usually have a simple, elegant shape, so keep the bloom compact and slightly rounded. Make sure the stitches are even and tidy.
The bloom is the heart of the charm.
Step 3: Add the stem
Crochet a thin green stem to hold the flower. The stem should be narrow enough to feel delicate but sturdy enough to support the bloom and pearl detail. Keep it simple so it complements the flower rather than distracting from it.
The stem gives the charm structure.
Step 4: Add leaves if desired
You can make one or two tiny leaves and attach them near the stem. This helps the charm feel more complete and floral. Keep the leaves small and neat so they do not overwhelm the tulip.
The leaves add a natural touch.
Step 5: Attach the pearl
Sew a small pearl bead at the center of the bloom or near the top where the flower meets the stem. This tiny detail makes the charm feel graceful and polished. Keep the pearl proportionate to the charm size.
The pearl gives the charm its elegant finish.
Step 6: Stuff or shape lightly
If the tulip feels too flat, add a tiny bit of stuffing to the bloom. If you prefer a more delicate look, keep it flat and shape it with your hands. Either version can be beautiful as long as it stays neat.
The shape should stay soft and balanced.
Step 7: Add the hanging loop
Attach a small loop or ring at the top of the stem. Make sure it is secure and well hidden so the flower remains the focus of the design.
The loop makes the charm easy to attach.
Step 8: Finish and refine
Check the petal shape, pearl placement, and stem alignment. Once everything is secure, your tulip pearl charm should feel delicate, elegant, and ready to wear.
Helpful tips
This charm looks especially lovely in soft pink with a white pearl and green stem. If you want a more luxurious look, use a faux pearl or tiny bead with a subtle shine. It is a beautiful accessory for spring styling or gift bundles.
4. Crochet Bow Charm Pattern
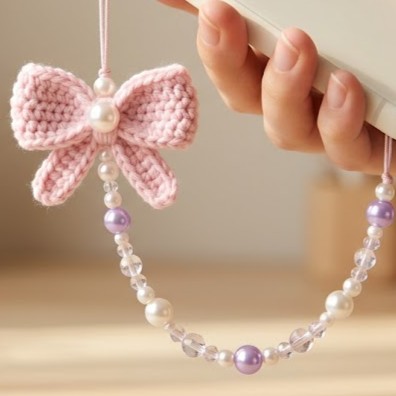
A crochet bow charm is classic, pretty, and endlessly useful. It is one of those accessories that never really goes out of style because it works in so many different colors and sizes. Whether you want it sweet, minimal, bold, or romantic, a bow charm always feels charming.
Step-by-step guide
Step 1: Pick your bow yarn
Choose a yarn color that matches the style you want. Pink, cream, red, black, and pastel shades all work beautifully. A finer yarn will create a more delicate charm, while a slightly thicker thread can make the bow feel fuller.
The yarn determines the bow’s mood.
Step 2: Crochet a rectangle
Start by crocheting a small rectangle that will become the bow loops. Keep the stitch tension even so the piece stays neat and uniform. The rectangle should be long enough to fold into a bow but not too wide.
The rectangle is the bow’s foundation.
Step 3: Fold the bow shape
Once the rectangle is complete, fold it into the bow form by bringing the ends inward. Pinch the center tightly so the loops look balanced. This stage gives the charm its iconic shape.
The folding creates the bow silhouette.
Step 4: Secure the center
Wrap yarn tightly around the center to hold the bow in place. Sew through the middle a few times so the shape stays firm. The center wrap should be neat and smooth.
The center gives the bow its finished look.
Step 5: Shape the loops
Adjust both sides of the bow so they sit evenly. Fluff them a little with your fingers until the shape looks balanced and symmetrical. The bow should feel soft but tidy.
The loops define the charm’s style.
Step 6: Add embellishments if desired
You can sew on a tiny pearl bead, a small button, or a contrasting yarn wrap in the center. Keep the decoration simple because the bow itself is already the focus.
A tiny detail can make it feel more special.
Step 7: Add the hanging loop
Create a loop at the back or top of the bow so it can be attached to a ring or clasp. Make sure it is strong enough for daily use.
The loop makes the charm functional.
Step 8: Finish and adjust
Check the symmetry one final time and trim any loose ends. The bow should look crisp, cute, and ready to dress up anything it is attached to.
Helpful tips
Bow charms are perfect in pink, white, or soft red, but they also look beautiful in black or gold for a more modern aesthetic. If you want to sell them, make several in different sizes so buyers can choose the look they like best.
5. Crochet Star Fish Charm Pattern

A star fish charm feels fresh, coastal, and playful. It is a lovely accessory for summer, beach-inspired styles, or anyone who likes ocean motifs. The star shape gives it a fun silhouette that stands out beautifully on bags and keychains.
Step-by-step guide
Step 1: Choose seaside colors
Pick colors that feel coastal and bright. Sandy beige, coral, seafoam, pale blue, and soft white all work beautifully. If you want a more whimsical feel, try pastel ocean tones.
The colors set the beach-inspired theme.
Step 2: Crochet the center shape
Start with a small center and work outward into five arms or points. Keep the body balanced so each arm is similar in size. A neat central shape helps the starfish look polished and recognizable.
The center anchors the star shape.
Step 3: Shape each arm
Work the arms carefully so they taper naturally. The points should be soft rather than sharp, which gives the charm a more realistic starfish look. Make sure all five arms are even.
The arms are the defining feature.
Step 4: Add texture
You can use stitches that create a slightly bumpy or textured surface to resemble a starfish’s natural look. Keep the texture subtle so the charm remains lightweight and wearable.
Texture gives the charm extra character.
Step 5: Add color accents
If desired, use a second color for the tips or center of the starfish. A slightly darker or lighter tone can make the design feel more dimensional. Keep the accents balanced so the charm stays simple.
The color variation adds interest.
Step 6: Lightly stuff or shape
If you want a more dimensional charm, add a small amount of stuffing. If you prefer a flat charm, keep it unstuffed and shape it by hand. Either version can work well depending on your style.
The shape should stay neat and balanced.
Step 7: Attach the loop
Add a strong loop at the top so the charm can be clipped to a keychain or bag. Reinforce the top carefully because the starfish will hang from this point.
The loop is what makes it practical.
Step 8: Finish and refine
Smooth the points, check the symmetry, and secure all ends. The finished charm should feel playful, coastal, and easy to wear.
Helpful tips
Starfish charms look beautiful in beach-inspired palettes like coral and cream or seafoam and sand. If you want a softer look, use pastel colors and a tiny pearl or bead accent. They are perfect for summer accessory collections or gift sets.
Conclusion
Crochet charms are such a satisfying project because they are quick, creative, and easy to personalize. They let you experiment with tiny shapes and decorative details without needing a lot of time or yarn. That makes them perfect for adding a handmade touch to your everyday accessories or for making thoughtful little gifts.
These five charm patterns each bring something different. The Miffy beaded charm feels sweet and minimal. The fish cake aesthetic charm is trendy and playful. The tulip pearl charm is soft and elegant. The bow charm is classic and versatile. The starfish charm feels coastal and bright. Together, they show how much personality you can fit into a tiny handmade piece.
If you love small projects that are fast to make and fun to customize, these crochet charm patterns are a beautiful place to begin. With the right yarn, careful stitching, and neat finishing, each one can become a stylish little accessory that adds charm to bags, keys, pouches, and gifts.