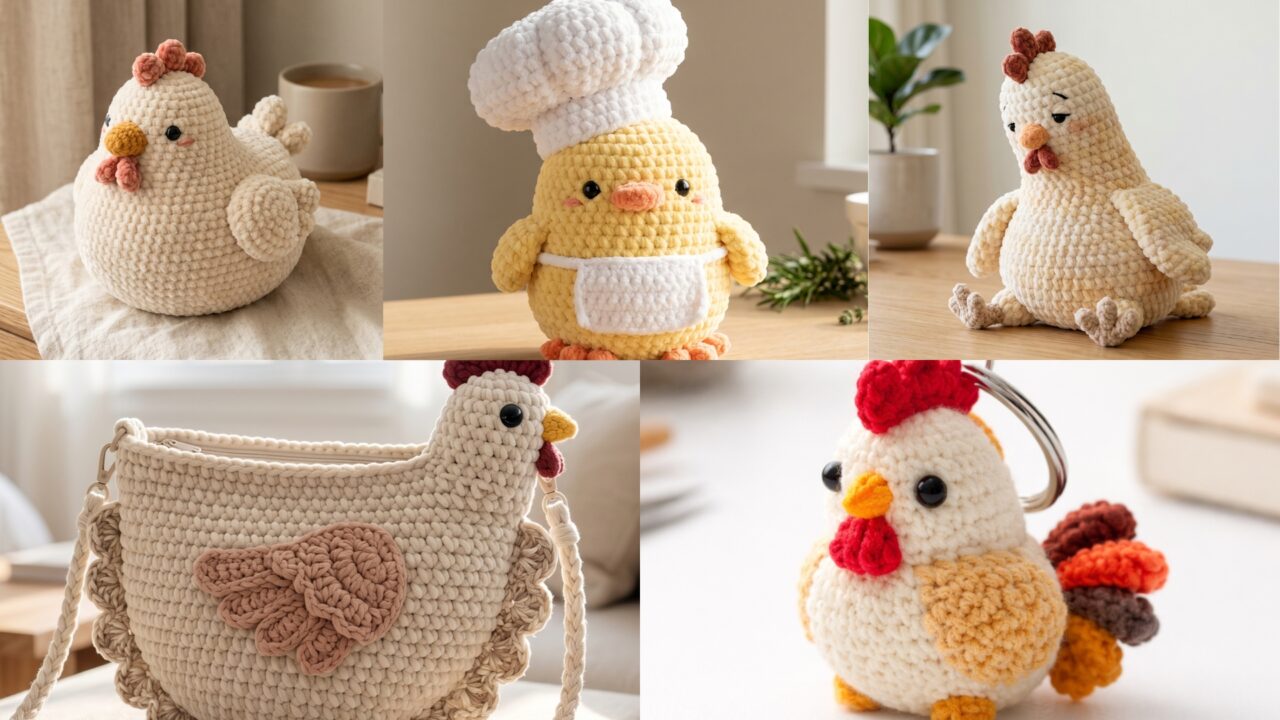
Crochet chicken projects are some of the most delightful makes you can add to your collection because they are playful, charming, and full of personality. Chickens have become surprisingly popular in handmade gift shops and craft fair tables because they feel funny, lovable, and instantly recognizable. Whether they are made as plushies, keychains, or statement accessories, chicken-themed crochet items have a way of making people smile right away.
What makes crochet chicken projects especially fun is how flexible they are. You can make them cute and chubby, soft and silly, tiny and useful, or bold and whimsical depending on the style you want. A chicken amigurumi can become a comforting desk companion. A rooster keychain can be a quick and affordable market item. A slopy chicken plush can feel wonderfully squishy and handmade. A “chief” chicken plush can have a funny personality and stand out in a display. A chicken-inspired crossbody bag can become a quirky statement piece for someone who loves unique accessories.
In this post, you will find five crochet chicken project patterns with detailed step-by-step guidance, helpful notes, and finishing tips. Each design is written to be easy to follow while still giving you enough detail to create something polished, giftable, and market-ready. If you want projects that are adorable, memorable, and fun to make, these chicken ideas are a perfect place to start.
Quick Notes
Project type: Crochet chicken projects
Best for: Gifts, craft fairs, farmers’ markets, nursery decor, keychains, plushies, and novelty accessories
Skill level: Beginner to intermediate, depending on shaping and assembly
Hook size: Usually 2.0 mm to 4.0 mm for amigurumi and small accessories, larger for bag projects
Yarn weight: Cotton, sport weight, DK, or plush yarn depending on the project
Best yarn choice: Cotton for crisp details, plush yarn for soft toys, sturdy yarn for accessories
Finished size: Small to medium plush or accessory size, customizable by pattern
Time to complete: A few hours to a couple of days depending on the project
Helpful stitches: Magic ring, single crochet, increase, decrease, slip stitch, color changes, stuffing, appliqué, sewing pieces together, sturdy strap or hardware attachment
Common Materials
Most crochet chicken projects use a similar set of supplies.
- Yarn in your chosen colors
- Crochet hook suited to the yarn
- Yarn needle
- Scissors
- Polyester fiberfill stuffing
- Stitch markers
- Safety eyes or embroidery thread
- Optional felt for details
- Optional keychain rings or bag hardware
- Optional lining fabric or stiffener for bag projects
For chicken projects, yarn choice matters a lot because the shape and personality depend on clean stitch definition or soft plush texture. Cotton yarn is excellent for amigurumi details and accessories because it keeps shapes tidy. Plush yarn is great for chubby stuffed chickens because it adds a cozy finish. For bags, choose a firmer yarn so the accessory holds its shape well.
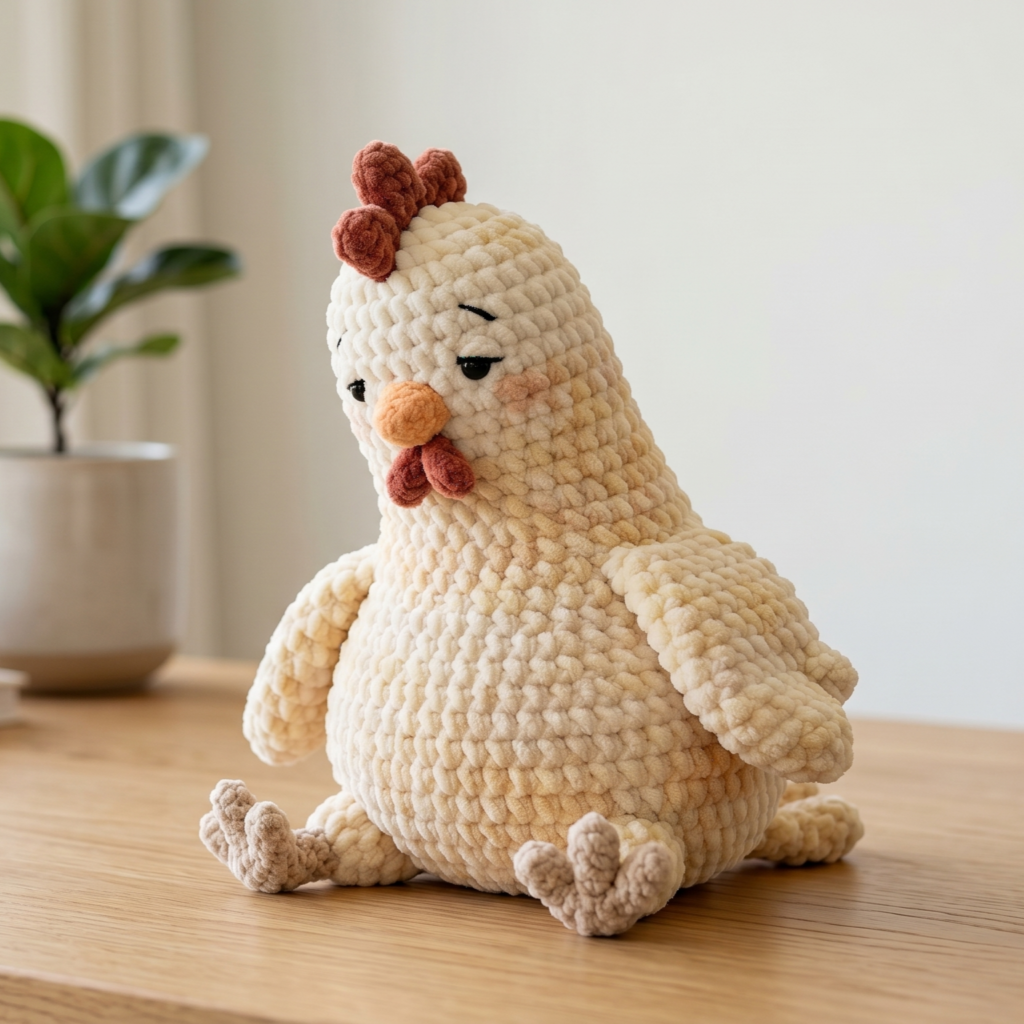
1. Crochet Emotional Support Chubby Chicken Amigurumi Pattern
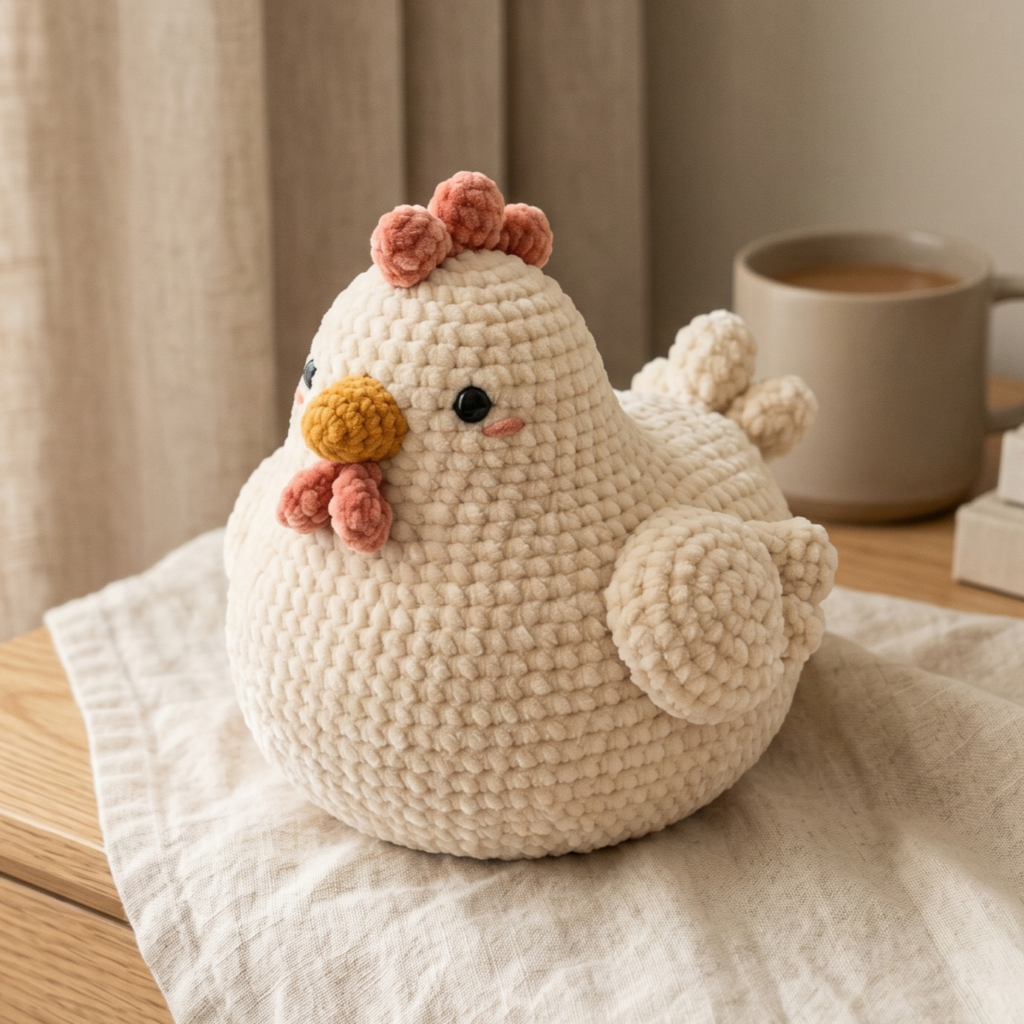
An emotional support chubby chicken amigurumi is one of those projects that feels instantly comforting. It is cute, round, soft, and a little silly in the best way. These kinds of plushies are especially popular because they are not just decorative; they feel like a tiny handmade companion that can sit on a desk, shelf, or bedside table and bring a little joy.
Step-by-step guide
Step 1: Choose soft, cheerful colors
Start by deciding on a color palette for your chicken. Classic white, cream, and yellow are always charming, but pastel shades can make the chicken feel softer and more modern. You can also add orange for the beak and feet. Choose colors that make the chicken feel comforting and friendly.
The colors help set the chicken’s mood.
Step 2: Crochet the round body
Begin with a magic ring and work a round or oval body using single crochet in the round. The body should be plump and chubby, with a shape that feels huggable and soft. Keep the stitches tight so the stuffing does not show through.
The body gives the chicken its emotional-support charm.
Step 3: Shape the head
You can make the head as part of the body or as a slightly defined top section. Keep it rounded and smooth so the chicken looks soft and snuggly. A gently rounded top gives the plush a sweet and simple silhouette.
The head shape makes the plush feel friendly.
Step 4: Make the beak
Crochet a tiny beak in orange or a warm yellow-orange shade. Keep it small and centered on the face. A tiny beak can make the chicken look sweet, while a slightly more pointed beak can give it a more classic chicken look.
The beak adds personality.
Step 5: Crochet the comb and wings
Add a small comb on top of the head and tiny wings on each side of the body. The comb can be made with simple little petal-like shapes, and the wings can be rounded or leaf-shaped. Keep them soft and compact so they match the chubby body.
The comb and wings finish the chicken shape.
Step 6: Stuff the body lightly
Add stuffing gradually so the chicken feels round and firm but still soft to squeeze. Chubby chickens look best when they are full and plush, but not overstuffed. You want them to feel comforting, not rigid.
Soft stuffing helps the chicken stay cuddly.
Step 7: Add the face
Use safety eyes or embroidery to create the eyes, and add a tiny mouth if you want more expression. A small happy face can make the chicken feel like a true emotional support plush. Blush cheeks are optional but very cute.
A small face gives the chicken its personality.
Step 8: Attach all details securely
Sew the wings, comb, beak, and feet on carefully. Make sure the pieces are evenly placed so the chicken looks balanced from every angle. Clean assembly matters a lot in small plushies.
Secure stitching helps the plush last longer.
Step 9: Final shaping
Fluff the body with your hands and adjust the wings and comb if needed. The finished chicken should feel round, comforting, and ready to sit happily anywhere.
Helpful tips
This chicken plush looks especially adorable in cream, soft yellow, or pastel tones. If you want it to feel even more giftable, add a tiny scarf, bow, or embroidered heart. These plushies are excellent for craft fair tables because they are funny, comforting, and impossible not to notice.
2. Crochet Small Rooster Keychain Pattern
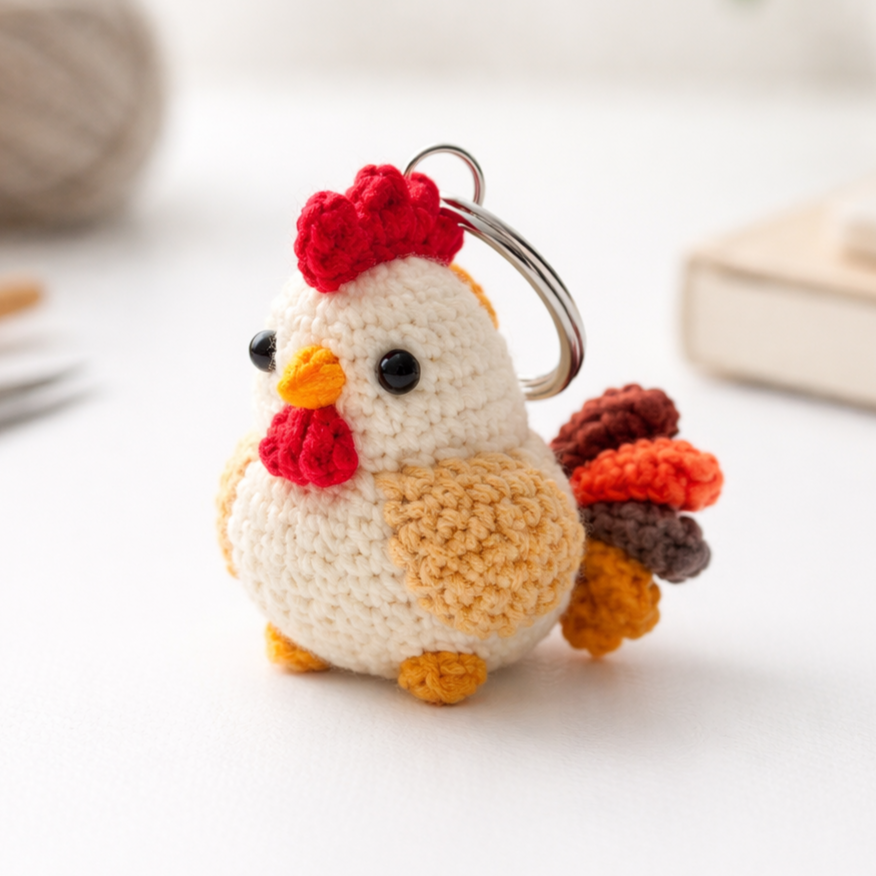
A small rooster keychain is a great quick project because it is tiny, colorful, and easy to sell. Roosters have a strong personality, which makes them perfect for small novelty items that stand out on a craft fair display or in an online listing. Since this design is compact, it can also be finished relatively quickly.
Step-by-step guide
Step 1: Pick bright rooster colors
Choose colors that feel lively and bold. Red, orange, yellow, brown, black, and white all work beautifully for a rooster. A rooster keychain should feel cheerful and easy to recognize, so the color contrast is important.
The colors help the rooster stand out.
Step 2: Crochet the body
Start with a small oval or rounded body using tight single crochet stitches. The body should be compact and balanced because the keychain must be light and small. Keep the shape slightly plump so it feels cute rather than sharp.
A rounded body gives the rooster its silhouette.
Step 3: Add the tail feathers
Crochet a few tiny feather shapes in contrasting colors. These can be made as small pointed loops or fan-like pieces. The tail is one of the most recognizable parts of a rooster, so keep it colorful and visible.
The tail adds flair and movement.
Step 4: Make the comb and wattle
Create a tiny comb for the top of the head and a small wattle for under the beak. These details give the rooster its unmistakable personality. Keep them small enough for a keychain but clear enough to read as rooster features.
The head details define the character.
Step 5: Crochet the beak and feet
Use a small orange or yellow beak and tiny flat feet if desired. Since this is a keychain, the feet can be very simple. The goal is to keep the piece lightweight while still giving it a completed look.
The small features complete the design.
Step 6: Add safety eyes or embroidery
Use tiny safety eyes or embroidered eyes to finish the face. Make the expression simple and slightly alert, which suits the rooster personality well. A minimal face works best for such a small piece.
A small face keeps the keychain neat.
Step 7: Attach the keychain ring
Sew a strong loop at the top or attach the keychain hardware through a reinforced point. Since the rooster will be handled often, make sure the top attachment is very secure.
A strong top attachment is essential.
Step 8: Finish and trim
Weave in all yarn ends carefully and trim any loose fibers. Make sure the tail feathers and comb are secure before listing or gifting the keychain. The final piece should feel bright, sturdy, and fun.
Helpful tips
Rooster keychains do especially well at markets because they are small, affordable, and very recognizable. If you want multiple versions, try different rooster color schemes so buyers can choose their favorite. Bright, happy colors tend to attract the most attention.
3. Crochet Slopy Chicken Plush Amigurumi Pattern
A slopy chicken plush amigurumi is all about soft charm and slightly playful shape. The name suggests a relaxed, gently slouched silhouette that makes the chicken feel extra huggable and whimsical. This kind of plush is perfect if you want something that feels a little different from a classic round chicken.
Step-by-step guide
Step 1: Choose a soft plush yarn
Pick a yarn that feels cozy and forgiving, such as plush or chenille yarn. The soft texture will help the slopy chicken feel more relaxed and cuddly. Use a color palette that feels warm and easy to love, such as cream, butter yellow, or soft beige.
The yarn helps define the plush feel.
Step 2: Crochet the main body
Start with a rounded body shape, but slightly elongate it so the chicken feels a little slouched rather than perfectly round. The form should still be cute and soft, but the slight angle or relaxed posture gives it personality.
The body shape is what makes it “slopy.”
Step 3: Shape the head gently
Make the head a soft rounded section that sits slightly forward or tilted. The head should look relaxed and sweet, not stiff or upright. A slightly asymmetrical placement can actually add to the charm.
The head position creates the laid-back look.
Step 4: Add the beak and comb
Crochet a tiny beak and a soft comb for the top. Keep both details compact because the slopy shape is already the main feature. You want the chicken to feel playful and a little floppy, not crowded with too many features.
The small details keep the design balanced.
Step 5: Make short wings and feet
Create tiny wings and little feet that support the chicken’s slouched posture. The wings can rest naturally at the sides, and the feet can be slightly wide so the plush sits steadily. Keep them soft and simple.
The limbs help reinforce the relaxed pose.
Step 6: Stuff softly
Add stuffing lightly so the plush keeps its shape but still feels relaxed and squishy. Do not overfill it; a slopy chicken should feel soft and gently slouched, not overly firm.
Soft stuffing supports the posture.
Step 7: Attach everything carefully
Sew the head, wings, feet, beak, and comb into place. Make sure the plush sits in a balanced way even if the body feels a bit relaxed. Small adjustments in sewing can make a huge difference.
Careful assembly keeps the shape intentional.
Step 8: Add the face
Use safety eyes or embroidery to give the chicken a calm, sweet expression. A small smile or soft eyes can make it feel especially comforting and handmade.
Step 9: Final pose
Once finished, gently shape the chicken into its relaxed sitting position. The final plush should look soft, cuddly, and a little silly in the most lovable way.
Helpful tips
This plush works especially well in plush yarn because the softness enhances the relaxed shape. If you want it to feel even more adorable, add tiny embroidered blush or a miniature accessory like a scarf. It is a fantastic gift item for people who love soft quirky plushies.
4. Crochet Chick The Chef Amigurumi Plush Pattern
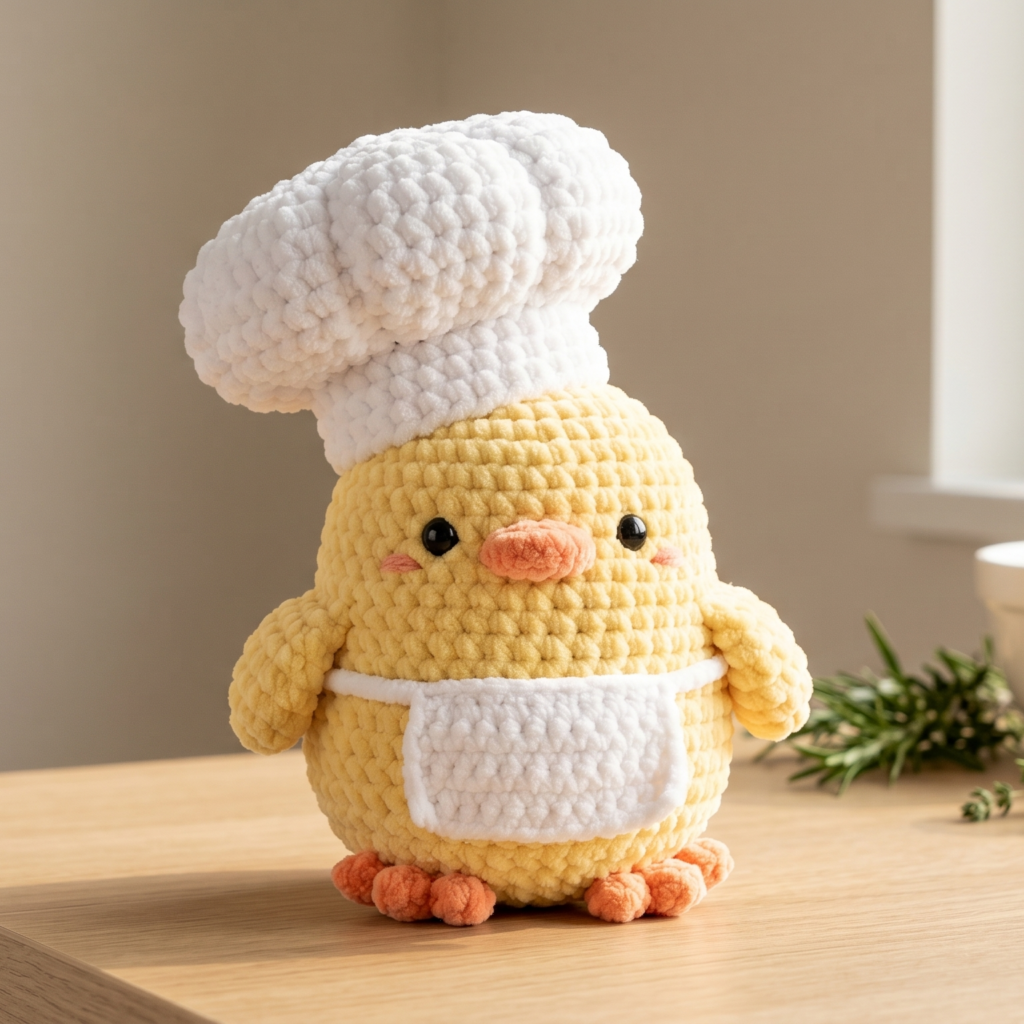
A “Chick the Chef” amigurumi is a cute, food-themed character plush that feels like a tiny kitchen mascot. It has a playful chef identity, with soft handmade charm and a slightly humorous, storybook personality—perfect for gifts, décor, or market displays.
Step-by-step guide
Step 1: Choose a chef-inspired color palette
Pick warm, food-friendly tones:
- Soft yellow (chick body)
- White (chef hat + apron)
- Orange (beak + feet)
- Optional red (scarf or apron detail)
Velvet or chenille yarn works best for a plush, bakery-soft texture.
Step 2: Crochet the rounded body
Create a compact, slightly oval body.
Keep it firm and upright so the chick feels like a confident little chef standing in a kitchen.
Stuff evenly to maintain a stable base.
Step 3: Shape the head
Make a smooth, rounded head that sits neatly on top of the body.
Keep proportions cute and slightly oversized for a chibi chef look.
Attach securely so it feels like one unified character.
Step 4: Add chef hat (signature feature)
Crochet a small puffy chef hat (toque):
- White fluffy crown shape
- Slightly oversized and soft
- Can tilt slightly for extra cuteness
This replaces the comb and defines the “chef” identity.
Step 5: Wings and feet
- Small rounded wings resting gently at the sides
- Short orange feet for balance
- Feet slightly spread so it stands confidently like it’s “running the kitchen”
Step 6: Stuff firmly but softly
Use firm stuffing for structure but keep the plush squishy.
It should feel stable like a standing mascot, not floppy.
Step 7: Add face details
- Small black safety eyes or embroidered eyes
- Tiny orange beak
- Optional soft blush under eyes for extra charm
- Expression: cheerful, slightly proud, like a chef who just finished cooking
Step 8: Optional chef accessories
To enhance personality:
- Mini crochet apron
- Tiny spoon or spatula accessory
- Small embroidered “badge” on chest
Step 9: Final shaping
Adjust posture so the chick stands upright and balanced.
The final plush should feel like a cute kitchen boss ready to cook tiny imaginary meals.
Helpful tips
This plush is especially good for markets because character items often attract attention quickly. You can make several with slight variations in accessories or expressions. That gives buyers options and makes your display feel more interesting.
5. Crochet Chicken Inspired Crossbody Bag Pattern
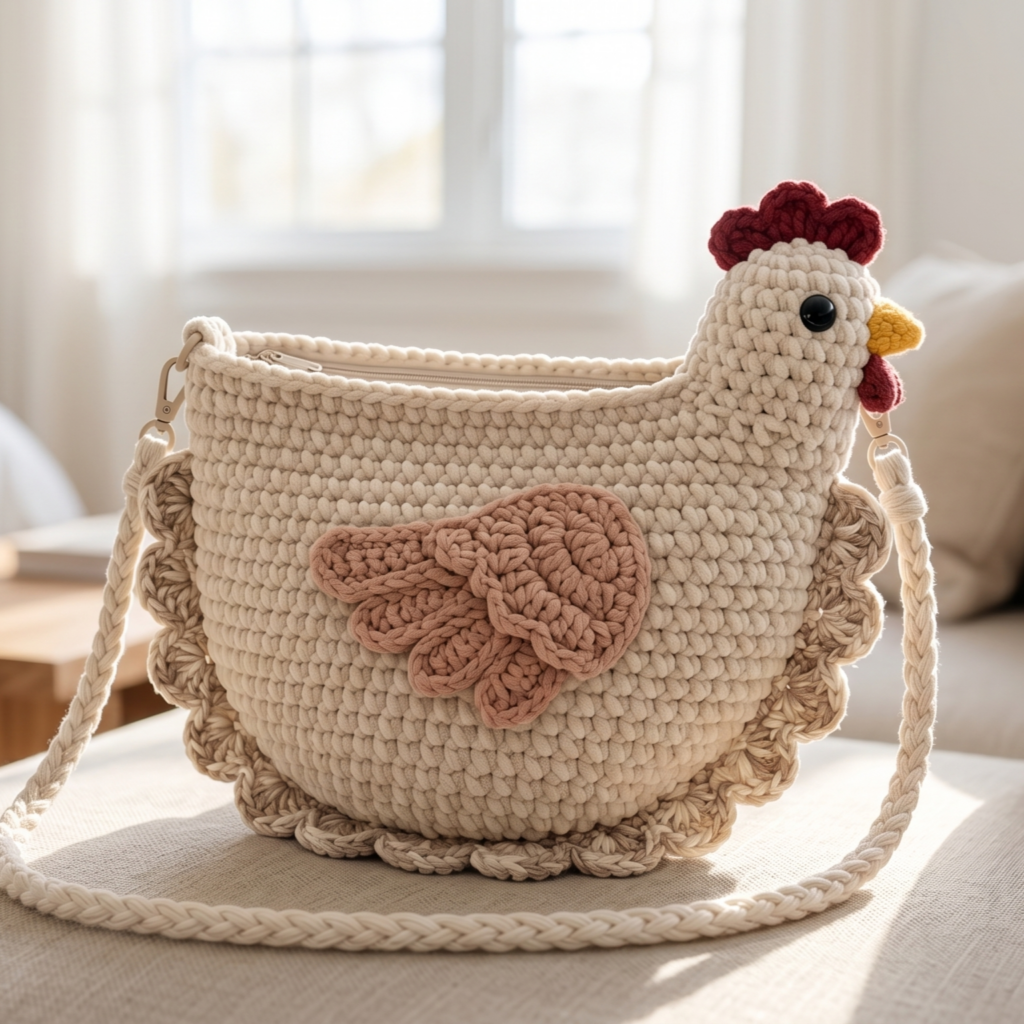
A chicken-inspired crossbody bag is a standout project that combines novelty and function. It is the kind of item people notice right away because it feels playful, original, and a little quirky. This is a fantastic project if you want to make something that can be worn and talked about.
Step-by-step guide
Step 1: Plan the bag shape
Decide whether you want the bag to look like a chicken body, a rounded chicken face, or a more stylized chicken-inspired shape. A simple rounded silhouette usually works best for function. Keep the design cute and wearable rather than overly complicated.
The shape determines the bag’s personality.
Step 2: Choose sturdy yarn
Pick a yarn that can hold the shape of the bag well. Cotton yarn or a strong cotton blend is ideal because it gives structure and clear stitch definition. Since this is a functional accessory, sturdiness matters a lot.
The yarn needs to support everyday use.
Step 3: Crochet the main front and back panels
Start by making two panels that will form the bag. If you want a chicken face or motif on the front, add that detail to one panel. Keep the back simple or coordinated. The panels should be the same size for easy assembly.
The panels form the structure of the bag.
Step 4: Add chicken features
Crochet a comb, beak, wings, or tiny feet details if desired. These can be appliquéd onto the front panel to give the bag a chicken look. Keep the features playful and balanced so they do not make the bag too bulky.
The details make the bag instantly recognizable.
Step 5: Join the panels
Sew the front and back together along the sides and bottom. If you want the bag to last longer, add a lining inside. That will help keep the shape and protect the contents.
The joining stage gives the bag its form.
Step 6: Attach the strap
Make a long crossbody strap or attach a ready-made strap. The strap should be sturdy enough to support the bag when worn. Reinforce the attachment points carefully because bags get used often.
A secure strap is important for functionality.
Step 7: Add the closure
Choose a zipper, snap, or flap closure depending on how secure you want the bag to be. A zipper works best for a practical bag, while a flap can feel more whimsical and decorative.
Step 8: Finish and shape
Weave in all ends and shape the bag so it sits evenly. Make sure the decorative features are secure and that the bag opens and closes smoothly. The final piece should feel fun, usable, and memorable.
Helpful tips
This bag is a perfect market item because it combines novelty with function. If you want it to sell well, keep the design clean and comfortable to wear. A playful chicken bag can become a true statement piece when made neatly.
Conclusion
Crochet chicken projects are so enjoyable because they combine humor, cuteness, and creativity in a way that feels fresh and memorable. Whether you are making plushies, keychains, or accessories, chicken-themed crochet items have a lot of charm and tend to stand out in a crowd. They make people smile, and that is one of the best things a handmade item can do.
These five patterns each offer something different. The emotional support chubby chicken is soft and comforting. The small rooster keychain is quick and market-friendly. The slopy chicken plush feels relaxed and cuddly. The chick the chief plush has character and personality. The chicken-inspired crossbody bag turns a fun idea into a wearable statement piece. Together, they show just how creative and versatile chicken-themed crochet can be.
If you are looking for crochet projects that feel fun to make and even more fun to gift or sell, these patterns are a lovely place to begin. With the right yarn, careful shaping, and thoughtful finishing, each one can become a handmade favorite that brings personality and joy wherever it goes.