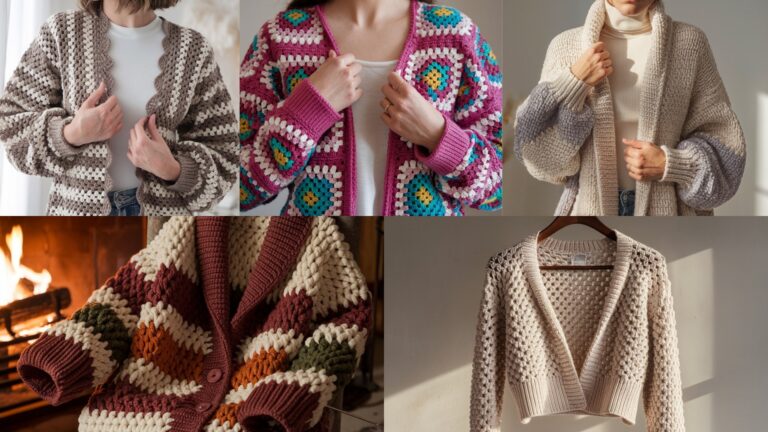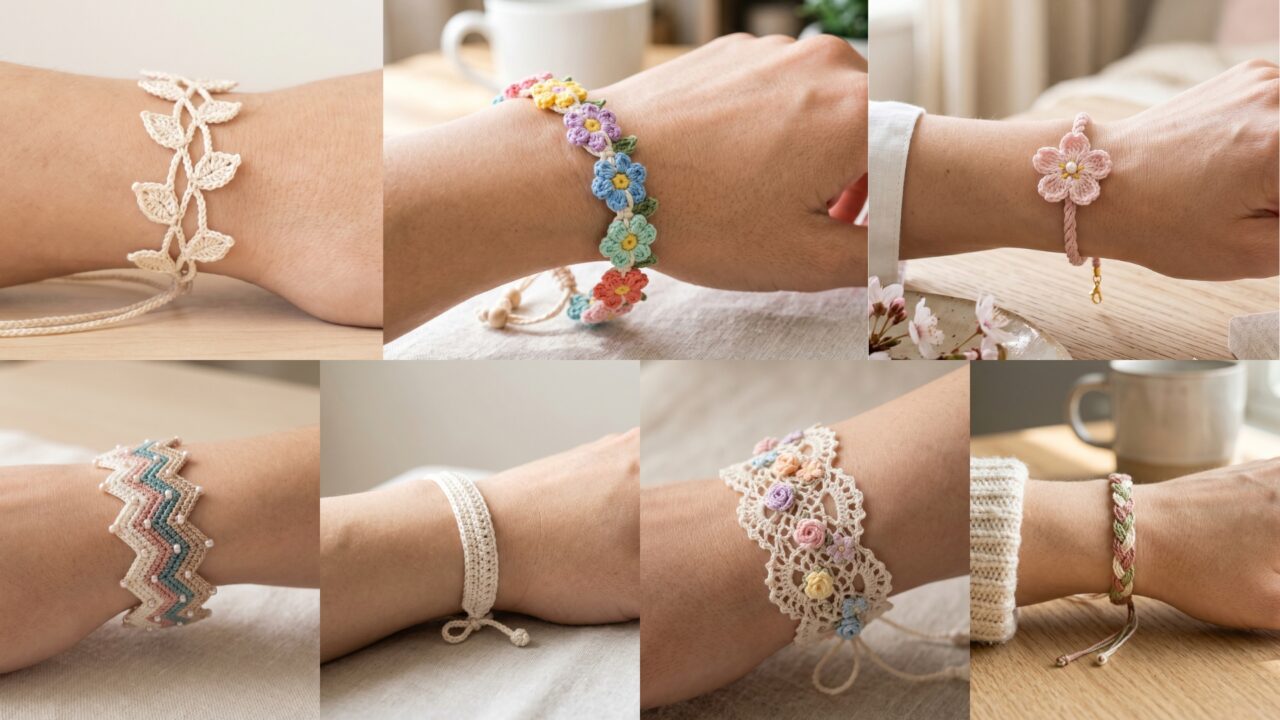
Crochet friendship bracelets are small projects with a lot of heart. They are quick to make, easy to personalize, and meaningful to give. Unlike larger crochet pieces, bracelets give you the chance to try creative stitches, colors, and textures without needing a big time commitment. That makes them perfect for handmade gifts, matching friendship sets, party favors, or even small items to sell at craft fairs.
What makes crochet friendship bracelets especially lovely is how much style they can hold in such a small space. A simple bracelet can be delicate and lacy, bright and cheerful, bold and colorful, or soft and romantic. You can keep them minimal for everyday wear or make them more decorative with flowers, beads, braids, and textured stitches. Each design in this collection has its own personality, so you can choose the one that best fits your style or the friend you are making it for.
These seven bracelet patterns are designed to be fun, wearable, and easy to understand. Each section includes a clear skill level, suggested size, materials, and a step-by-step guide so you can follow along with confidence. If you want a handmade gift that feels thoughtful, pretty, and personal, crochet friendship bracelets are a wonderful place to begin.
Quick Notes
- Friendship bracelets should be lightweight and comfortable to wear.
- Thin cotton thread or fine yarn usually gives the best results.
- Keep the bracelet flexible so it sits nicely on the wrist.
- Closure style matters; ties, loops, or buttons should be easy to fasten.
- Small decorative details look best when they are secure and not bulky.
- Making a matching set is a lovely way to turn one pattern into a friendship gift.
- If you want a more polished finish, block the bracelet lightly before wearing or gifting it.
Common Materials
Most crochet friendship bracelets can be made with a few simple supplies:
- Crochet thread, embroidery floss, or lightweight yarn
- Small crochet hooks, usually 1.5 mm to 3.5 mm depending on material
- Yarn needle
- Scissors
- Beads, if the pattern uses them
- Stitch markers, optional
- Small buttons or toggles, optional
- Measuring tape, optional
Best Yarn Choices
For friendship bracelets, thinner materials usually work best. Crochet thread gives a delicate, crisp finish. Embroidery floss is great for colorful, lightweight designs. Fine cotton yarn works well if you want something a little thicker and softer.
1. Crochet Cord Sakura Bracelet Pattern
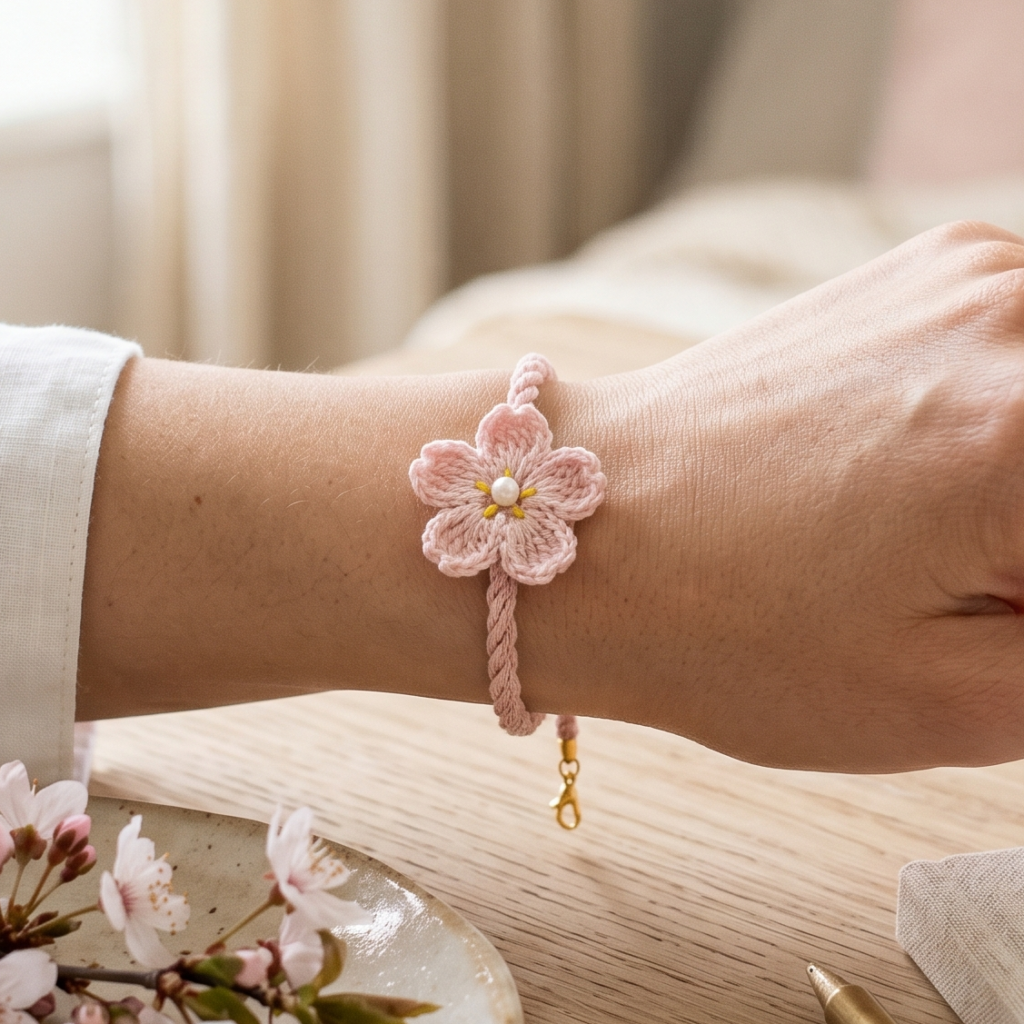
The crochet cord sakura bracelet is delicate, graceful, and inspired by the beauty of cherry blossoms. “Sakura” designs often feel soft and romantic, which makes this bracelet perfect for spring gifts, special occasions, or anyone who loves floral details. The cord base keeps the bracelet simple and wearable, while the sakura-inspired accent adds a beautiful handmade touch.
Skill Level
Beginner to intermediate
Suggested Size
Adjustable, usually 6 to 8 inches long
Materials
- Fine pink or blush crochet thread
- Small amount of green or white thread for details
- Small crochet hook
- Yarn needle
- Scissors
- Optional tiny bead for the flower center
Step-by-Step Guide
1. Start with a simple cord foundation
Begin by crocheting a long, thin cord that will form the bracelet base. This can be made with chain stitches, slip stitches, or a slim cord-style stitch. Keep it flexible and even so it sits comfortably on the wrist.
2. Measure the bracelet length
Wrap the cord around the wrist or measure an existing bracelet to make sure the length is right. Leave extra room for a tie or closure if needed. A bracelet that is too tight will be uncomfortable, so a little ease is helpful.
3. Create the sakura flower accent
Make a small cherry blossom motif separately or directly onto the cord. The flower usually has five rounded petals and a soft, layered shape. Keep the petals small so they stay proportional to the bracelet.
4. Add a center detail
A small bead, knot, or embroidered dot can be used as the center of the flower. This tiny detail makes the sakura motif feel more finished and visually balanced.
5. Attach the flower to the cord
Sew the flower securely onto the bracelet cord. Place it near the center for a classic look or slightly off-center for a more modern style. Make sure the stitching is flat and comfortable against the skin.
6. Finish the bracelet ends
You can leave the ends long for tying, add loops for a closure, or finish with small knots. If you want the bracelet to be adjustable, tie-style ends are often the easiest option.
7. Weave in loose ends carefully
Since bracelets are worn often, make sure all ends are hidden and secure. Trim any extra thread neatly.
Helpful Tips
- Use soft pinks, white, or pale coral for a true sakura feel.
- Keep the flower small so the bracelet remains lightweight.
- A little blocking can help the petals open and lay flat.
- This pattern looks beautiful in matching friendship sets with slightly different flower colors.
Why This Pattern Works Well
The sakura bracelet is soft, elegant, and meaningful. It is a lovely choice when you want a friendship bracelet that feels delicate and thoughtful.
2. Crochet Braid Bracelet Pattern
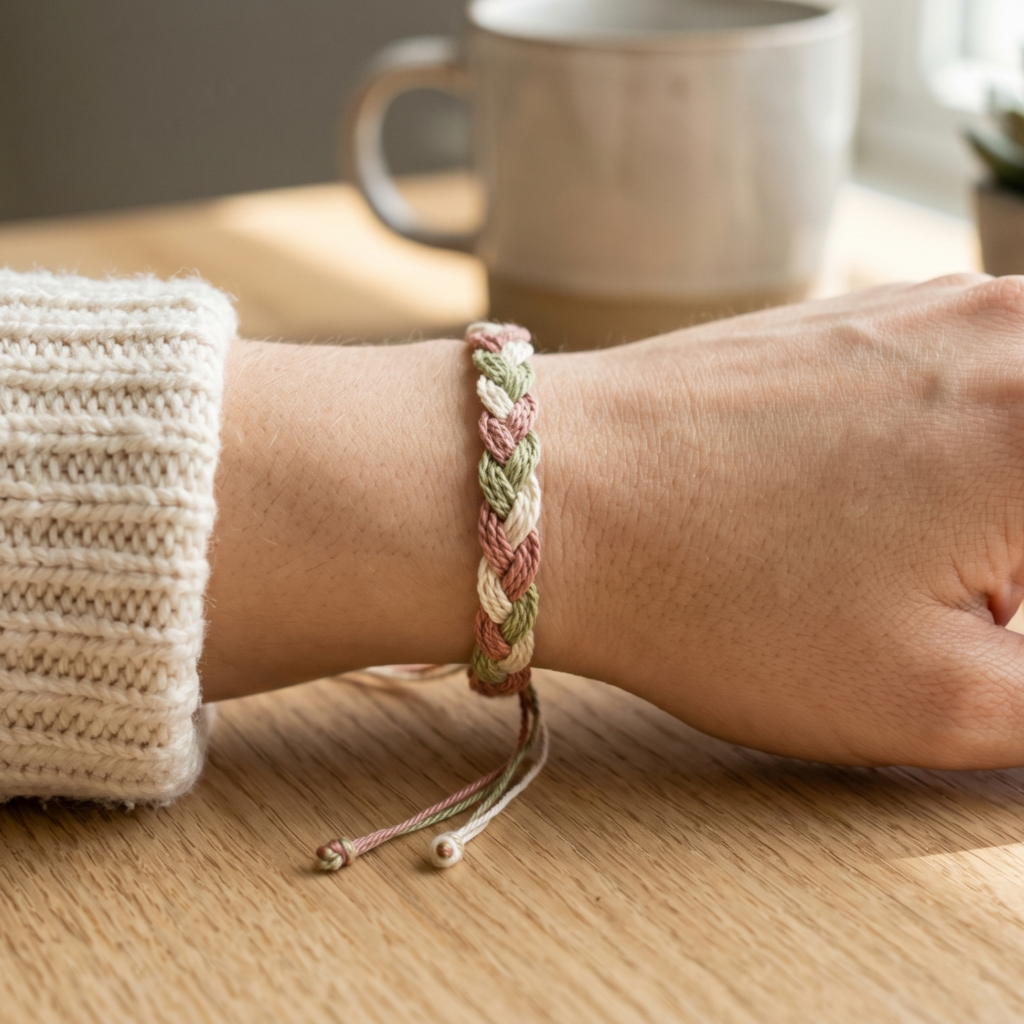
The crochet braid bracelet has a classic, textured look that feels stylish and easy to wear. Braids work especially well for friendship bracelets because they feel symbolic, connected, and handmade. This design is simple enough for beginners but still has enough visual interest to feel special.
Skill Level
Beginner
Suggested Size
6 to 8 inches, adjustable with ties
Materials
- Fine yarn, crochet thread, or embroidery floss
- Small crochet hook
- Yarn needle
- Scissors
Step-by-Step Guide
1. Choose your braid colors
Pick two or three colors that look good together. Traditional friendship bracelet colors work beautifully, but you can also choose soft neutrals, pastels, or bold contrasting shades.
2. Crochet three long cords
Make three slim cords of equal length. These will form the braid. Keep them consistent in thickness so the braid looks neat and even.
3. Secure the cords at one end
Join the three cords together at one end with a knot or a small stitch. This gives you a stable starting point for braiding.
4. Braid the cords evenly
Cross the outer cords over the center cord one at a time to create the braid. Keep the braid firm but not too tight. A loose braid looks softer, while a tighter braid feels more structured.
5. Check the bracelet length
Continue braiding until the bracelet reaches the wrist size you want. Remember to leave room for ties or a closure if needed.
6. Secure the far end
Finish the braid with another knot or secure stitch so it does not unravel. Trim any extra ends evenly if you want a tidy finish.
7. Add closure options
You can leave the braid ends as ties, attach a button loop, or sew the ends together depending on the style you want.
Helpful Tips
- Make the cords equal in length before braiding.
- Use bright colors for a playful friendship look.
- A braided bracelet looks especially nice when made in a few matching shades.
- This is a great beginner project because it is simple and fast.
Why This Pattern Works Well
The braid bracelet is versatile, easy to wear, and perfect for sharing. It has a handmade charm that feels both casual and meaningful.
3. Crochet Woodland Whispers Lacy Bracelet Pattern
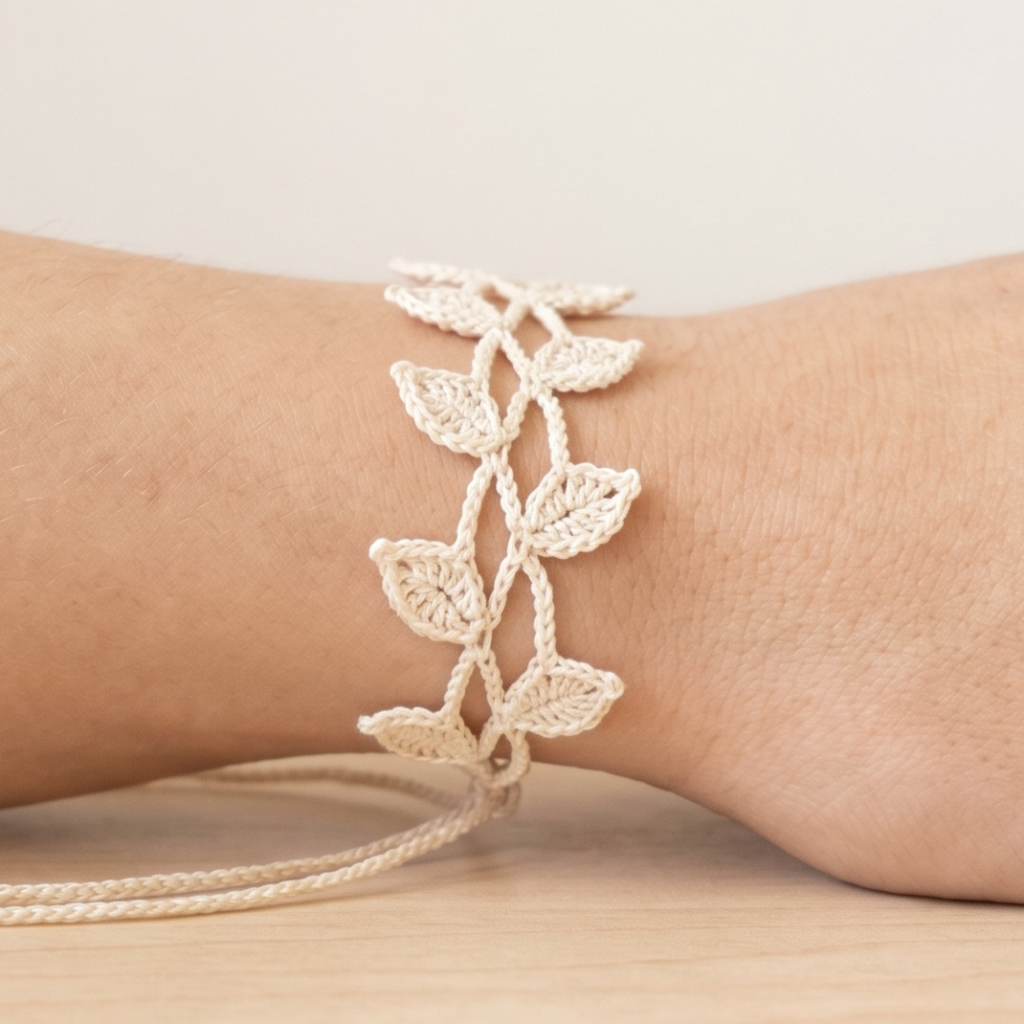
The crochet woodland whispers lacy bracelet is soft, dreamy, and nature-inspired. It often uses openwork stitches that feel light and airy, almost like tiny leaves or forest vines woven into a bracelet. This design is especially lovely if you enjoy delicate accessories with a slightly whimsical feel.
Skill Level
Intermediate
Suggested Size
About 6 to 8 inches long, with adjustable ties if desired
Materials
- Fine cotton thread or lightweight yarn
- Small crochet hook
- Yarn needle
- Scissors
- Optional small beads for woodland detail
Step-by-Step Guide
1. Start with a narrow foundation
Create a slim base chain for the bracelet. Since this is a lacy design, the base should be delicate and flexible rather than thick or stiff.
2. Work the lace repeat
Use open stitches such as chains, skips, shells, or small clusters to build the lacy pattern. The goal is to create a flowing, airy design that feels light on the wrist.
3. Keep the spacing consistent
Lacy bracelets look best when the openings are even. Try to keep your chain spaces and stitch groups balanced so the bracelet stays visually smooth.
4. Add woodland-inspired shapes
You can make tiny leaf-like sections, vine curls, or little petal shapes within the lace pattern. These details give the bracelet a natural, forest-inspired look.
5. Continue the pattern across the wrist length
Repeat the lace sequence until the bracelet reaches the right size. Measure often because openwork can stretch slightly depending on yarn type.
6. Finish the edges neatly
A simple border or edge stitch can help frame the lace and keep the bracelet from curling too much. Keep the edging light so it does not overpower the design.
7. Add the closure or ties
Lacy bracelets look beautiful with thin tie ends or small loops. A delicate fastening keeps the style soft and elegant.
Helpful Tips
- Cotton thread shows lace stitches clearly and holds shape well.
- Green, cream, and brown tones create a woodland feel.
- Add tiny beads sparingly if you want a more magical look.
- Blocking is especially helpful for openwork designs.
Why This Pattern Works Well
This bracelet feels soft, romantic, and a little enchanting. It is a beautiful choice for someone who loves nature-inspired handmade accessories.
4. Crochet Colorful Flower Bracelet Pattern
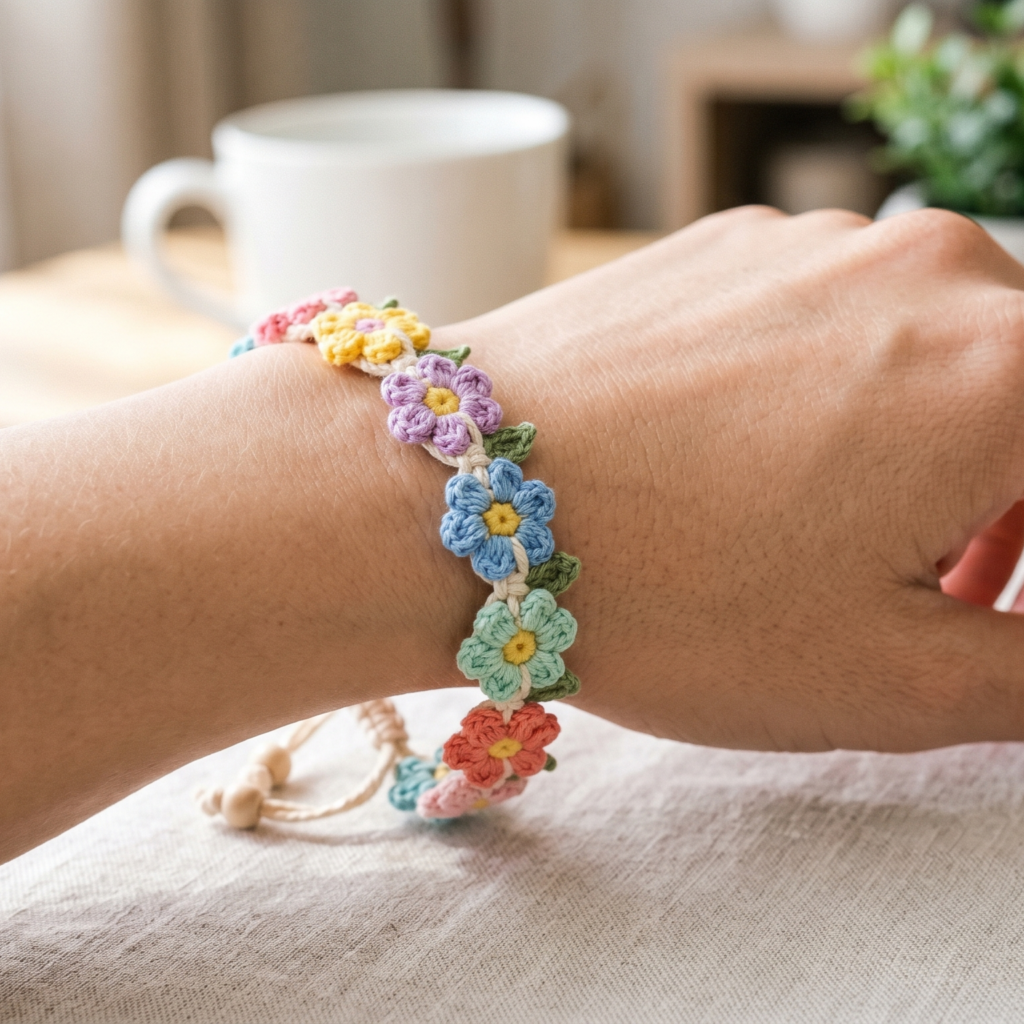
The crochet colorful flower bracelet is cheerful, bright, and full of personality. It is a fun way to combine small floral motifs with a wearable bracelet design. This pattern works especially well for friendship gifts because you can mix colors in creative ways and make each bracelet feel unique.
Skill Level
Beginner to intermediate
Suggested Size
6 to 8 inches, adjustable
Materials
- Small amounts of yarn in multiple colors
- Small crochet hook
- Yarn needle
- Scissors
Step-by-Step Guide
1. Decide on your flower style
Choose whether you want one large flower, several tiny flowers, or a repeating floral pattern. Smaller flowers are easier to wear and more comfortable for bracelets.
2. Make the bracelet base
Create a simple chain or narrow cord to act as the bracelet foundation. This base should be lightweight enough to support the flowers without feeling bulky.
3. Crochet the flower motifs
Make the flowers separately or directly onto the bracelet. Use petal stitches or layered loops to form each flower. Keep them small so they remain practical on the wrist.
4. Choose a color layout
You can make each flower a different color, repeat two or three colors, or create a rainbow effect. Friendship bracelets are especially fun when colors reflect the personalities of the people wearing them.
5. Attach the flowers securely
Sew each flower onto the base carefully. Make sure the stitches hold well and the flowers lie flat enough to be comfortable.
6. Add leaves or tiny accents
If desired, add a leaf or two between flowers to give the bracelet a more garden-like look. Keep these accents small so the bracelet does not become too crowded.
7. Finish with ties or loops
Since this is a friendship bracelet, a tie closure often works best. It keeps the design simple and makes the bracelet easy to adjust.
Helpful Tips
- Use bright, happy colors for a playful look.
- Keep the flowers small so the bracelet stays wearable.
- Make a matching set with different flower combinations for friends.
- Cotton yarn gives the flowers a clean, crisp shape.
Why This Pattern Works Well
This bracelet is colorful, cheerful, and full of charm. It is a wonderful way to make a small handmade gift feel personal and special.
5. Crochet Janice Bracelet Pattern

The crochet Janice bracelet pattern has a clean, classic feel that can be dressed up or down. Depending on the stitch choice, it can look simple and elegant or textured and decorative. It is a great option if you want a bracelet pattern that feels timeless and easy to match with different outfits.
Skill Level
Beginner to intermediate
Suggested Size
About 6 to 8 inches long
Materials
- Fine cotton thread or lightweight yarn
- Small crochet hook
- Yarn needle
- Scissors
- Optional button or tie closure
Step-by-Step Guide
1. Begin with a slim chain
Start with a foundation chain that will become the bracelet’s width or length, depending on how the pattern is constructed. Keep it neat and even.
2. Build the main stitch pattern
The Janice bracelet often works well with a simple repeated stitch sequence. You can use single crochet, half double crochet, chain spaces, or small textured sections. The goal is to create something elegant without making it too thick.
3. Keep the bracelet narrow
Since this is a wrist accessory, the bracelet should remain slim and comfortable. Make sure the stitches do not crowd too closely together.
4. Add texture if desired
If you want a more decorative look, use small stitch clusters or alternating stitches to create light texture. This gives the bracelet more visual interest while keeping it wearable.
5. Measure for fit
Wrap the bracelet around the wrist to check the length. Adjust by adding or removing rows if needed.
6. Add closure options
You can finish the bracelet with ties, a button loop, or a small clasp-style closure. Choose the option that feels easiest and most comfortable.
7. Weave in the ends
Hide all yarn tails neatly so the bracelet looks polished and feels smooth when worn.
Helpful Tips
- Use one solid color for a clean, elegant finish.
- Soft neutrals make the bracelet feel versatile.
- Add a small button if you want a more finished style.
- This pattern is easy to adapt into matching gift sets.
Why This Pattern Works Well
The Janice bracelet is simple, graceful, and easy to personalize. It works beautifully for anyone who wants a friendship bracelet that feels understated and lovely.
6. Crochet Flower Cuff Bracelet Pattern
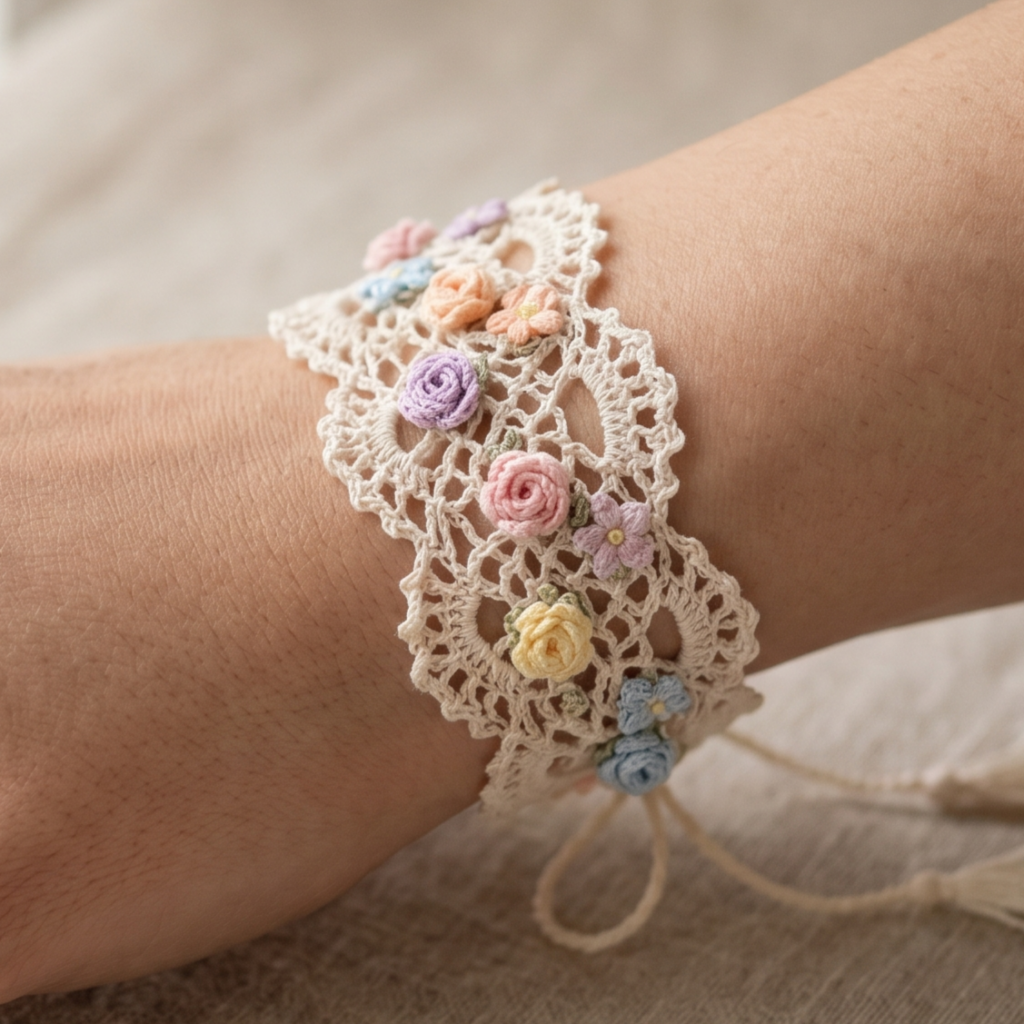
The crochet flower cuff bracelet is bold, pretty, and decorative. It wraps around the wrist like a soft cuff, with flowers adding a special handmade touch. This style feels more like a fashion bracelet than a delicate string bracelet, which makes it a great choice if you want something a little more noticeable.
Skill Level
Intermediate
Suggested Size
About 6 to 7.5 inches around, depending on cuff width
Materials
- Lightweight yarn or cotton thread
- Crochet hook suited to your yarn
- Yarn needle
- Scissors
- Optional buttons or snap closure
Step-by-Step Guide
1. Create the cuff base
Begin by crocheting a narrow strip that will wrap around the wrist. This strip should be firm enough to hold its shape but soft enough to wear comfortably.
2. Work the cuff length
Continue crocheting the strip until it reaches the correct wrist measurement. Leave a small amount of extra room for the closure.
3. Add flower motifs
Make small flowers separately or directly on the cuff. These flowers can be placed in a row, centered on the cuff, or grouped in a small cluster.
4. Attach the flowers firmly
Sew each flower securely to the cuff. Because cuffs are worn often, the flowers should be attached well so they do not shift or come loose.
5. Finish the cuff edges
Add a simple border or edge stitch to keep the cuff neat. This can help the bracelet feel more polished and structured.
6. Add the closure
Buttons, snaps, or a tie closure can all work depending on the style you want. Make sure the cuff can be fastened easily and comfortably.
7. Check the fit
Try the cuff around the wrist to make sure it sits comfortably without being too tight. Adjust the closure placement if needed.
Helpful Tips
- Use small flowers if you want the cuff to stay wearable.
- Make the cuff in a neutral color and the flowers in bright colors for contrast.
- A cotton blend gives good shape without feeling too stiff.
- This bracelet works well as a statement accessory or a special handmade gift.
Why This Pattern Works Well
The flower cuff bracelet feels elegant, creative, and a little dressy. It is a lovely option when you want something handmade that stands out a bit more.
7. Crochet Chevron Beaded Bracelet Pattern
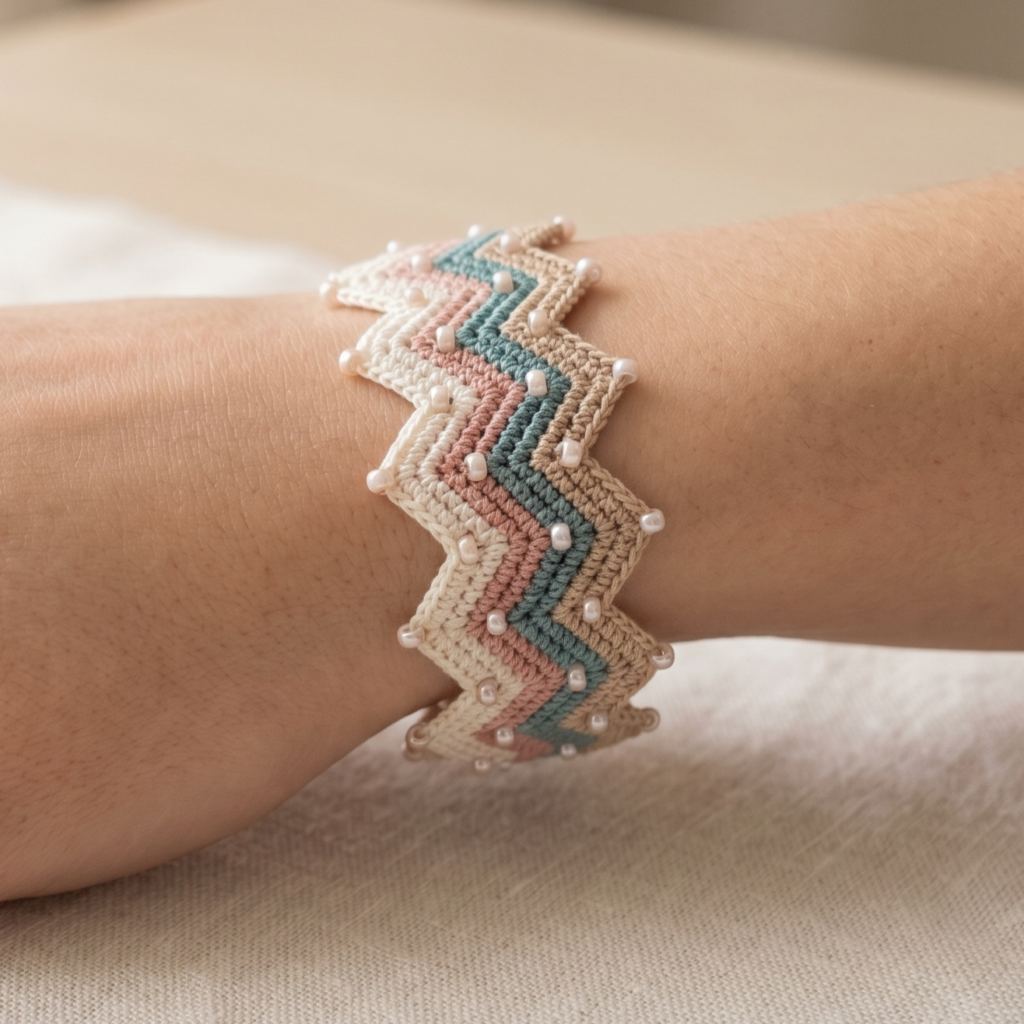
The crochet chevron beaded bracelet is stylish, textured, and eye-catching. Chevron shapes give the bracelet a modern zigzag look, while beads add a touch of sparkle or detail. This pattern is perfect if you want a bracelet that feels a little more polished and decorative while still being easy to share with friends.
Skill Level
Intermediate
Suggested Size
6 to 8 inches long
Materials
- Fine yarn or crochet thread
- Small crochet hook
- Beads with holes large enough for your yarn
- Yarn needle
- Scissors
Step-by-Step Guide
1. Plan the chevron design
Before you begin, decide how wide and deep you want the zigzag pattern to be. A smaller chevron is more delicate, while a bolder zigzag feels more modern.
2. String the beads if needed
If your pattern uses beads throughout the bracelet, string them onto the yarn before crocheting. This makes it easier to place them exactly where you want them.
3. Start the foundation row
Create a slim foundation chain or cord. Then begin the stitch pattern that forms the chevron. The shape is usually created by increases and decreases placed in a repeating sequence.
4. Add the beads into the pattern
Place beads at selected points in the zigzag design. You can add them at the peaks, valleys, or center sections to highlight the chevron shape.
5. Keep the pattern balanced
Chevron bracelets need careful stitch counting so the shape stays symmetrical. Keep the left and right sides even so the bracelet looks clean and intentional.
6. Finish the bracelet length
Continue the repeat until the bracelet fits the wrist comfortably. Leave room for closure or ties as needed.
7. Secure the ends
Weave in all ends carefully and make sure the beads are attached securely. The bracelet should be smooth and comfortable against the skin.
Helpful Tips
- Use small, lightweight beads so the bracelet remains comfortable.
- Choose bead colors that complement the yarn.
- Bright thread with metallic beads can create a festive look.
- This pattern looks especially nice in a coordinated set of friendship bracelets.
Why This Pattern Works Well
The chevron beaded bracelet feels modern, stylish, and just a little bit fancy. It is a beautiful handmade piece that still keeps the friendship bracelet feel.
Conclusion
Crochet friendship bracelets are small projects, but they carry a lot of meaning. They are a lovely way to make something by hand for someone you care about while also creating a wearable piece that feels personal and thoughtful. Because they are quick to make, they are perfect for gifts, matching sets, or relaxing crochet sessions when you want a finished project without a big time commitment.
Each of these seven patterns offers a different style. The sakura bracelet feels soft and floral. The braid bracelet is classic and easy. The woodland lacy bracelet brings a delicate natural charm. The colorful flower bracelet adds cheerful personality. The Janice bracelet gives you a simple and elegant everyday option. The flower cuff bracelet makes a bolder statement. The chevron beaded bracelet adds texture and sparkle.
The best part is how easy these bracelets are to customize. You can change the colors, adjust the size, add or remove embellishments, and make each one match the person who will wear it. That is what makes friendship bracelets so special. They are simple, but they carry care, creativity, and connection in every stitch.