Crochet flower appliques are one of the easiest ways to add charm, color, and personality to almost any handmade project. A small flower can completely change the look of a hat, bag, blanket, cardigan, pillow, headband, or even a simple gift wrap. They are quick to make, easy to customize, and wonderful for using up leftover yarn. Best of all, they let you create something beautiful without needing a large time commitment.
What makes flower appliques so appealing is how flexible they are. You can make them soft and delicate, bold and colorful, realistic or whimsical. A flower applique can be as simple as a tiny accent or as detailed as a layered centerpiece. That means you can use the same basic idea in many different ways and still get a fresh result each time.
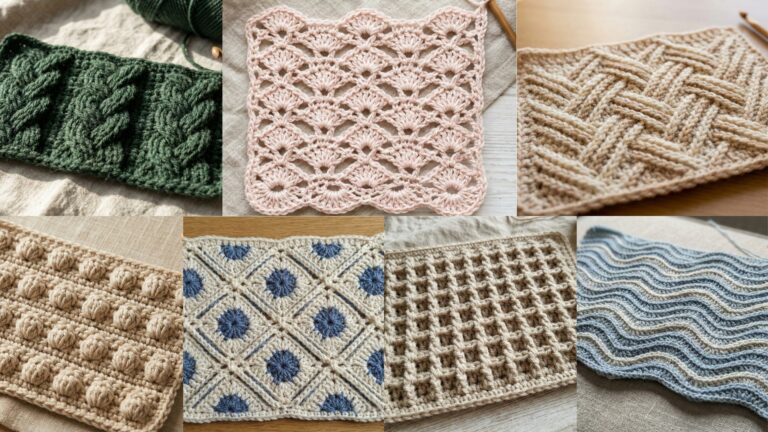
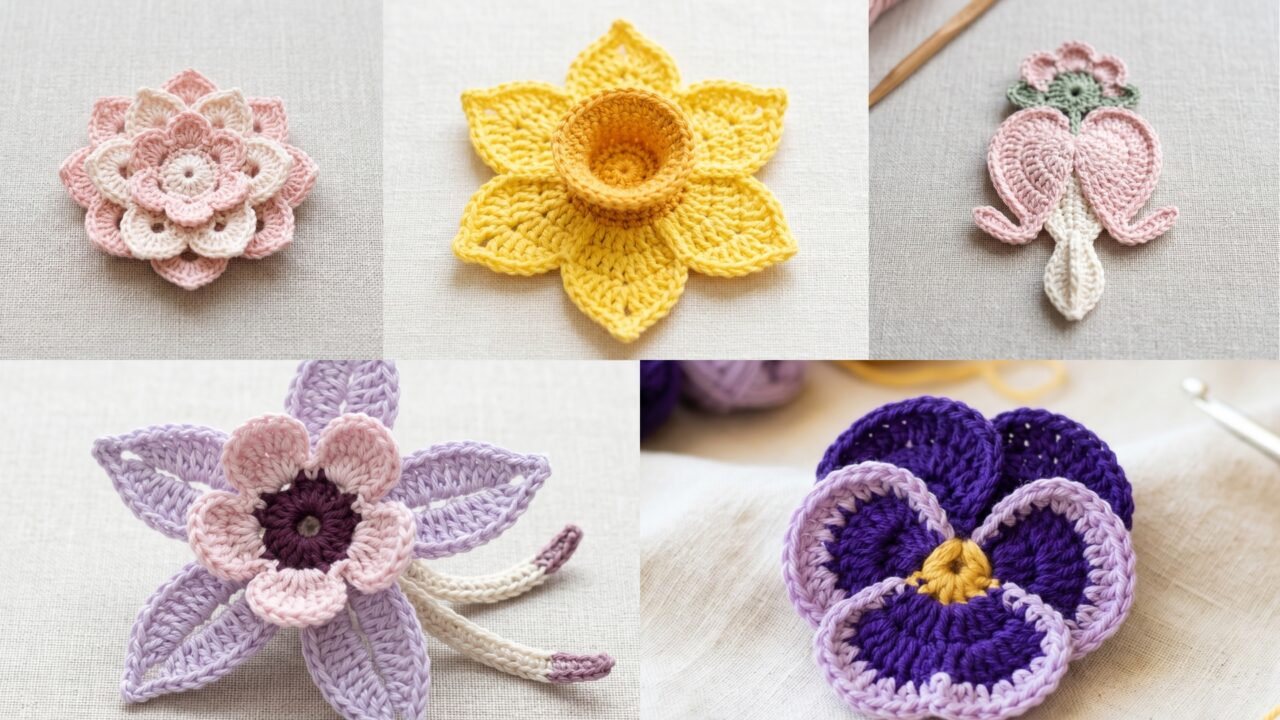
In this collection, you will find five cute crochet flower applique patterns that are perfect for hats, bags, blankets, and other handmade projects. Each design includes a clear skill level, materials, size guidance, and a step-by-step guide so you can follow along easily. Whether you are decorating something already finished or adding flowers to a project as you go, these appliques are a lovely way to make your crochet feel more personal and polished.
Quick Notes
- Flower appliques work best when they are kept lightweight and not too bulky.
- Cotton yarn gives crisp petal definition, while softer yarns create a gentler look.
- Small appliques can be made quickly from yarn scraps.
- Blocking is optional, but it helps petals lay flat and look more even.
- Secure all ends carefully if the applique will be sewn onto something that gets frequent use.
- You can sew, slip stitch, or lightly stitch flowers onto finished items.
- Try making a few extras so you can choose the best-looking flower for your project.
Common Materials
Most crochet flower appliques can be made with these supplies:
- Lightweight yarn, cotton yarn, or crochet thread
- Crochet hook sized to match your yarn
- Yarn needle
- Scissors
- Stitch markers, optional
- Measuring tape, optional
- Small buttons, beads, or centers, optional
- Fabric glue only if appropriate for your project, though sewing is usually better
Best Yarn Choices
Cotton is usually the best choice because it holds the shape of the petals well. Acrylic works nicely for soft, colorful appliques. Crochet thread is great for delicate, fine floral details.
1. Crochet Pansy Flower Applique Pattern
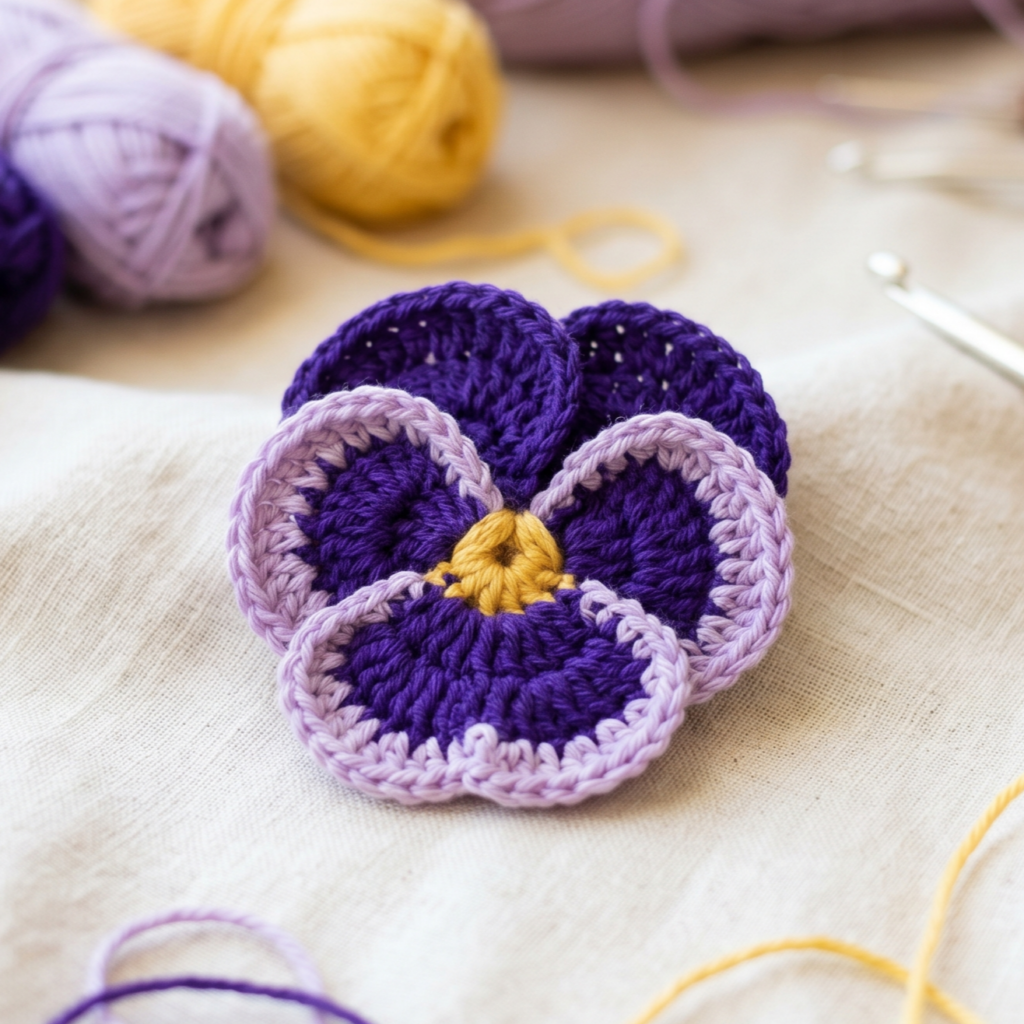
The crochet pansy flower applique is a sweet and graceful design that feels both classic and cheerful. Pansies are known for their layered petals and soft, rounded shape, which makes them especially lovely for appliques. This pattern is ideal if you want a flower that looks detailed without being too complicated to make. It works beautifully on hats, baby blankets, tote bags, and spring-themed items.
Skill Level
Beginner to intermediate
Suggested Size
About 2.5 to 4 inches wide, depending on yarn and hook size
Materials
- Small amounts of yarn in 2 to 3 colors
- Crochet hook suited to your yarn
- Yarn needle
- Scissors
Stitch Ideas Used
- Magic ring or chain ring
- Chain
- Single crochet
- Half double crochet
- Double crochet
- Slip stitch
- Picot, optional for detail
Step-by-Step Guide
1. Start with the flower center
Begin with a magic ring or small chain ring. The center of the pansy should be neat and secure because it acts as the anchor for all the petals. Use a color that will stand out against the outer petals, such as yellow, dark purple, or deep brown.
2. Build the first round of petals
Pansies usually have a layered look, so start by forming one or two small petals in the center. These petals may be made with short chains and a few stitches worked back into the ring. Keep them rounded rather than sharply pointed.
3. Add the larger outer petals
The outer petals are what give the pansy its signature shape. These petals are usually wider and slightly longer than the inner ones. Use a combination of double crochet, half double crochet, and chain spaces to create a soft fan-like petal.
4. Shape each petal carefully
Pansy petals often look best when they are slightly uneven in a natural way. Do not worry if they are not perfectly identical. Real pansies have a charming irregularity that adds to their beauty.
5. Layer the color sections
If you are using multiple colors, switch between shades to mimic the natural look of a pansy. A dark center with lighter petal edges often looks especially pretty. You can also use contrasting tones for a more decorative, stylized flower.
6. Reinforce the center
Once the petals are complete, make sure the center feels secure. A small extra stitch or a tiny embroidered detail can help define the middle and make the flower look more finished.
7. Block and shape the petals
If the petals curl, gently block the applique or press it into shape with your fingers while it is still slightly damp. This helps the flower look open and tidy.
Helpful Tips
- Use at least two colors for a classic pansy look.
- Make a few practice flowers if you want to perfect the petal shape.
- Keep the center compact so the petals stand out more clearly.
- Sew the applique on with small, hidden stitches for a neat finish.
Why This Pattern Works Well
The pansy applique feels delicate, cheerful, and timeless. It is a beautiful choice for spring accessories or anything that needs a soft floral accent.
2. Crochet Bleeding Heart Flower Applique Pattern
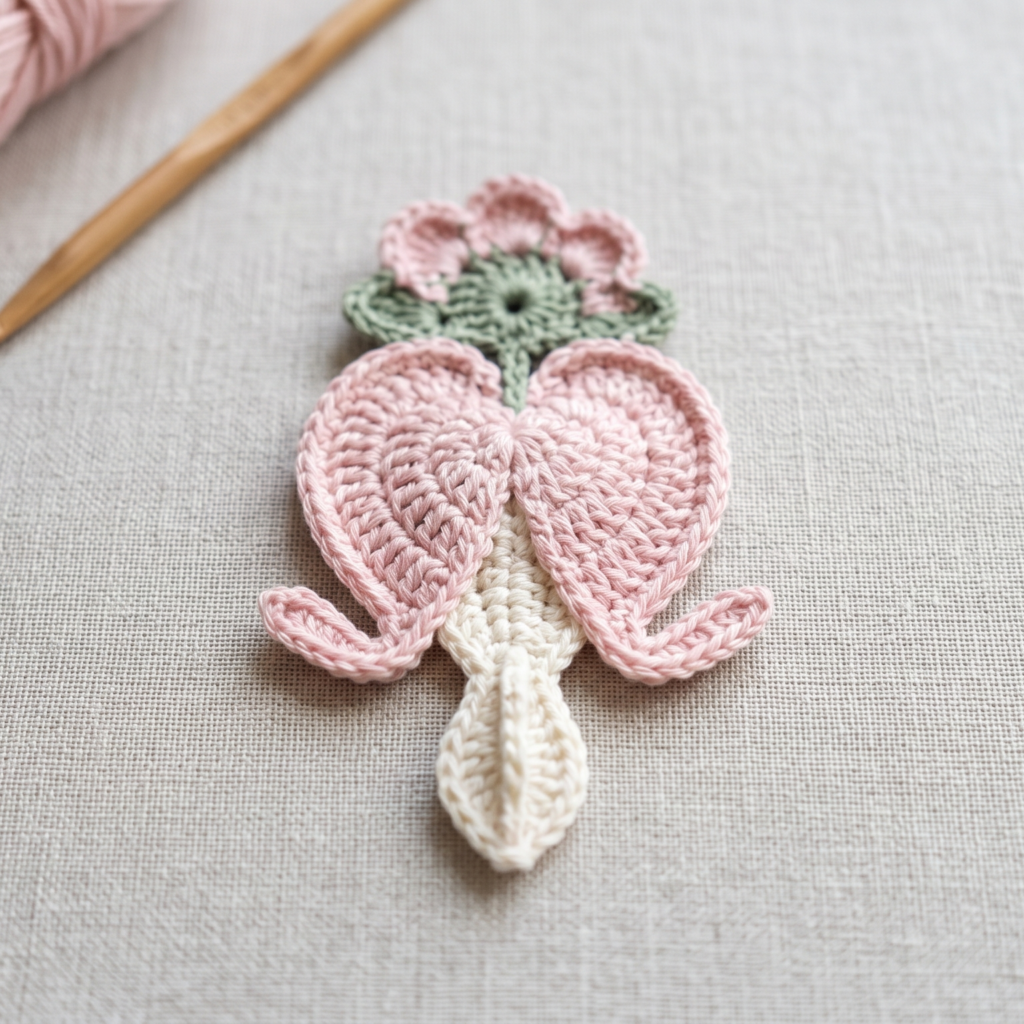
The crochet bleeding heart flower applique is elegant, romantic, and a little whimsical. The real flower has a very distinctive hanging shape, and that makes this applique especially unique. It is a wonderful choice if you want a floral motif that feels graceful and a little more unusual than a standard blossom. This flower looks lovely on shawls, blankets, garden-inspired bags, and decorative home items.
Skill Level
Intermediate
Suggested Size
About 2 to 4 inches long, depending on how long you make the hanging section
Materials
- Lightweight yarn in pink, white, and green or other flower colors
- Crochet hook suited to your yarn
- Yarn needle
- Scissors
Stitch Ideas Used
- Magic ring or chain ring
- Chain
- Single crochet
- Half double crochet
- Double crochet
- Slip stitch
- Picot or small loop details, optional
Step-by-Step Guide
1. Begin with the flower base
Start with a small center ring or foundation circle. This forms the top portion of the bleeding heart flower. Keep the center tight and tidy so the petals will sit neatly around it.
2. Create the upper petals
The bleeding heart flower usually begins with small rounded petals near the top. These petals should feel soft and slightly curved. Use short chain sections and simple stitch groups to build the petal shapes around the center.
3. Add the hanging heart shape
The most recognizable feature of a bleeding heart flower is the dangling bottom section. To create this, work a small rounded or teardrop shape below the upper petals. Keep the bottom rounded and slightly pointed to mimic the natural flower.
4. Shape the stem-like lower detail
Some bleeding heart appliques include a tiny hanging line or narrow section that helps connect the heart shape to the top. This detail makes the flower feel more realistic and helps balance the design.
5. Add the outer color details
If you are using more than one color, place a lighter color in the heart section and a darker or greener tone in the leaves or center. This helps the applique resemble the real flower and makes the petals stand out.
6. Add optional leaves
Small leaves can be added at the base or side of the flower. These are not always necessary, but they help frame the flower and make the applique feel more complete.
7. Finish and shape gently
Because this flower has a hanging section, it is important to shape it gently after finishing. Smooth the top petals and bottom heart section so the design hangs in a balanced way.
Helpful Tips
- Keep the hanging section small enough so it does not become too heavy.
- A pink and green combination creates a classic bleeding heart look.
- Use cotton yarn if you want the shape to stay crisp.
- Sew the applique down through the center and lower section to keep it secure.
Why This Pattern Works Well
The bleeding heart applique feels elegant and special. It is perfect for projects that need a floral accent with a soft, romantic personality.
3. Crochet Lotus Flower Applique Pattern
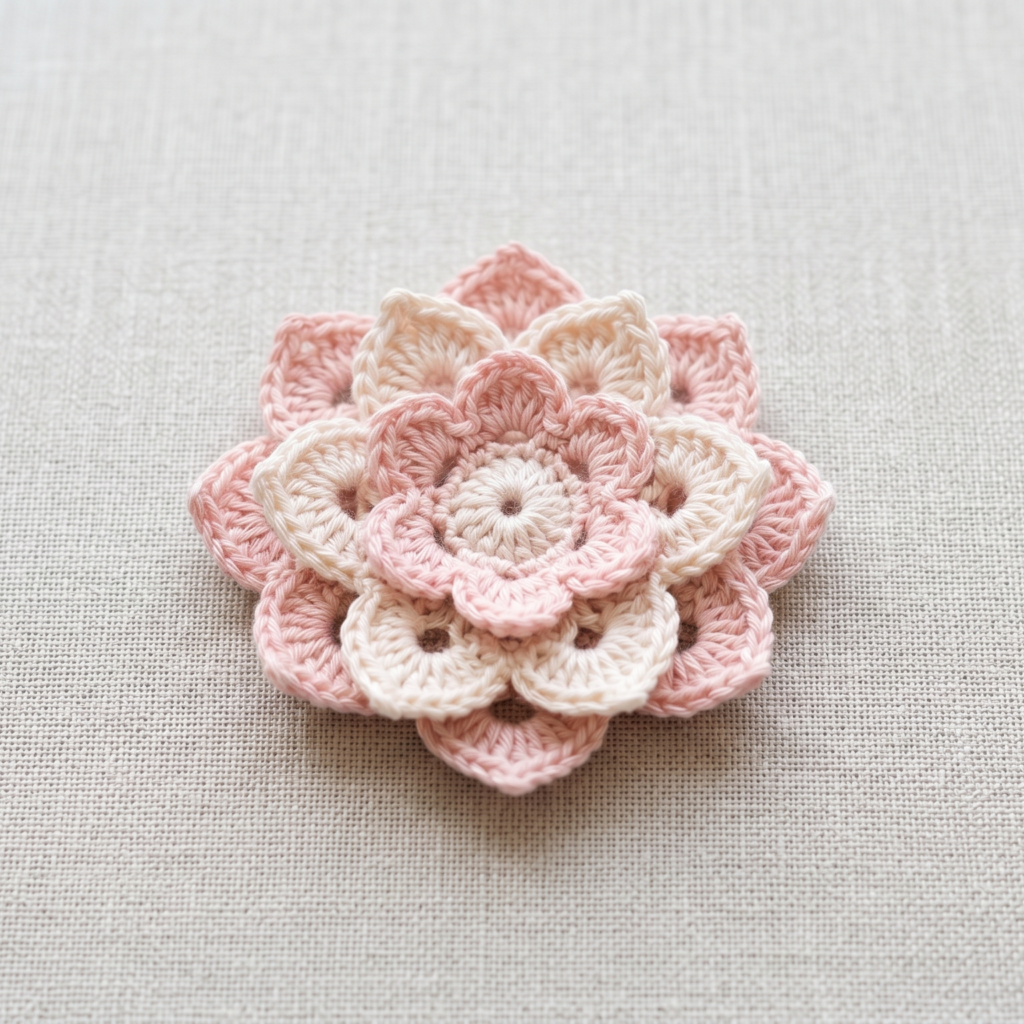
The crochet lotus flower applique is calm, beautiful, and highly decorative. Lotus flowers are known for their layered petals and symmetrical shape, which make them especially stunning in crochet form. This design works very well on blankets, meditation pillows, bags, and special handmade gifts. It can be made simple or detailed depending on how many petal layers you want to include.
Skill Level
Intermediate
Suggested Size
About 3 to 5 inches wide
Materials
- Lightweight yarn in soft pink, white, cream, or pastel shades
- Crochet hook suited to your yarn
- Yarn needle
- Scissors
- Stitch markers, optional
Stitch Ideas Used
- Magic ring or chain ring
- Chain
- Single crochet
- Half double crochet
- Double crochet
- Treble crochet, optional for taller petals
- Slip stitch
Step-by-Step Guide
1. Start with the center circle
Create a small center ring to hold the base of the lotus. The center should stay compact because the lotus flower is built outward in layered petals. A neat center helps the flower look balanced.
2. Make the first layer of petals
The first layer is usually the smallest and closest to the center. These petals are often short and rounded, creating the foundation for the larger petals that come later. Work evenly around the circle so the flower remains symmetrical.
3. Add the second layer
The second layer should sit just behind or between the first petals. These petals are usually longer and slightly more open. Use taller stitches such as double crochet or treble crochet if you want the petals to rise more dramatically.
4. Build the outer petals
The outer layer is what gives the lotus its full, graceful look. These petals are usually the widest and tallest. Keep the petal tips soft and rounded so the flower feels natural and open.
5. Balance the symmetry
A lotus looks best when the petals are arranged in even sections around the center. Take your time counting and spacing each petal so the applique does not tilt to one side.
6. Shape the petals after finishing
Once the flower is complete, gently shape the petals with your fingers. You can also block the flower lightly to help the petals hold their open position.
7. Add a center detail if desired
A small embroidered center, bead, or stitch cluster can make the lotus feel more finished. Keep the center simple so it does not overpower the petals.
Helpful Tips
- Soft pastel colors give the lotus a peaceful, elegant look.
- Use a slightly smaller hook if you want firmer petals.
- Layering is what makes this flower look special, so do not rush the petal sections.
- It looks beautiful on solid-colored backgrounds where the petal shape can stand out.
Why This Pattern Works Well
The lotus applique has a calm, graceful beauty that feels thoughtful and artistic. It is an excellent choice for decorative crochet projects that need a more refined floral touch.
4. Crochet Columbine Flower Applique Pattern
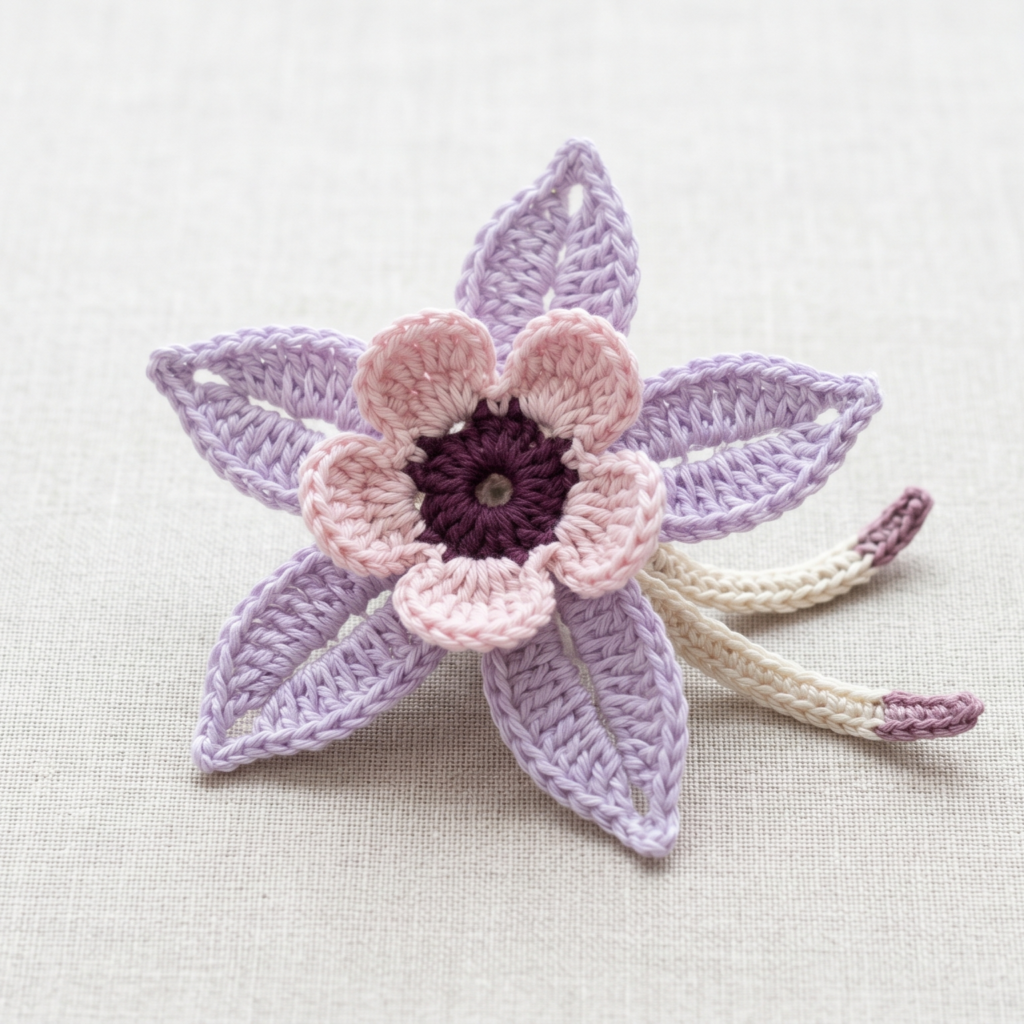
The crochet columbine flower applique is delicate and distinctive, with a shape that feels airy and a little whimsical. Columbines are known for their unique petal structure, which makes them a wonderful flower to crochet if you want something less common than a rose or daisy. This applique is especially lovely for nature-inspired bags, blankets, children’s items, and spring projects.
Skill Level
Intermediate
Suggested Size
About 2.5 to 4 inches wide
Materials
- Fine or lightweight yarn in 2 to 3 colors
- Crochet hook suited to your yarn
- Yarn needle
- Scissors
Stitch Ideas Used
- Magic ring or chain ring
- Chain
- Single crochet
- Half double crochet
- Double crochet
- Treble crochet, optional for long petals
- Slip stitch
Step-by-Step Guide
1. Make the center of the flower
Begin with a small ring for the columbine center. This keeps the flower compact and gives you a solid base for the hanging and upward petals.
2. Work the inner petal section
Columbines often have central petals that are smaller and more enclosed. Use short stitch groups to create these petals first. They should sit close to the center and create the flower’s core shape.
3. Add the longer outer petals
The outer petals of a columbine often extend outward or downward in a way that feels light and graceful. Use taller stitches and chain spaces to give these petals their flowing shape.
4. Create the spurred detail
One of the most recognizable features of a columbine flower is the spurred petal shape. To mimic this, work a narrow looped or pointed section that extends from the base of the flower. Keep it neat and slightly curved so it looks natural.
5. Balance the petals
Because columbines have a unique shape, it is important to keep each section balanced. The flower should feel full without becoming crowded. Check your work from time to time to make sure the petals are distributing evenly.
6. Add color variation
Columbines often look beautiful in two-tone or contrasting color combinations. Try a dark center with lighter petals or a brighter spur with softer outer petals. This adds depth and makes the applique more visually interesting.
7. Finish the shape and secure the ends
Once the applique is complete, gently shape the petals and weave in all ends carefully. If needed, lightly block the flower so it lies neatly.
Helpful Tips
- Use different colors for the petals and spur to highlight the unique shape.
- Keep the petals light and airy rather than dense.
- This pattern looks lovely with muted garden-inspired colors.
- Sew it onto a project with small hidden stitches so it stays flat.
Why This Pattern Works Well
The columbine applique is elegant, unusual, and full of natural charm. It is a great choice when you want a flower that feels artistic and a little more unique.
5. Crochet Daffodil Flower Applique Pattern
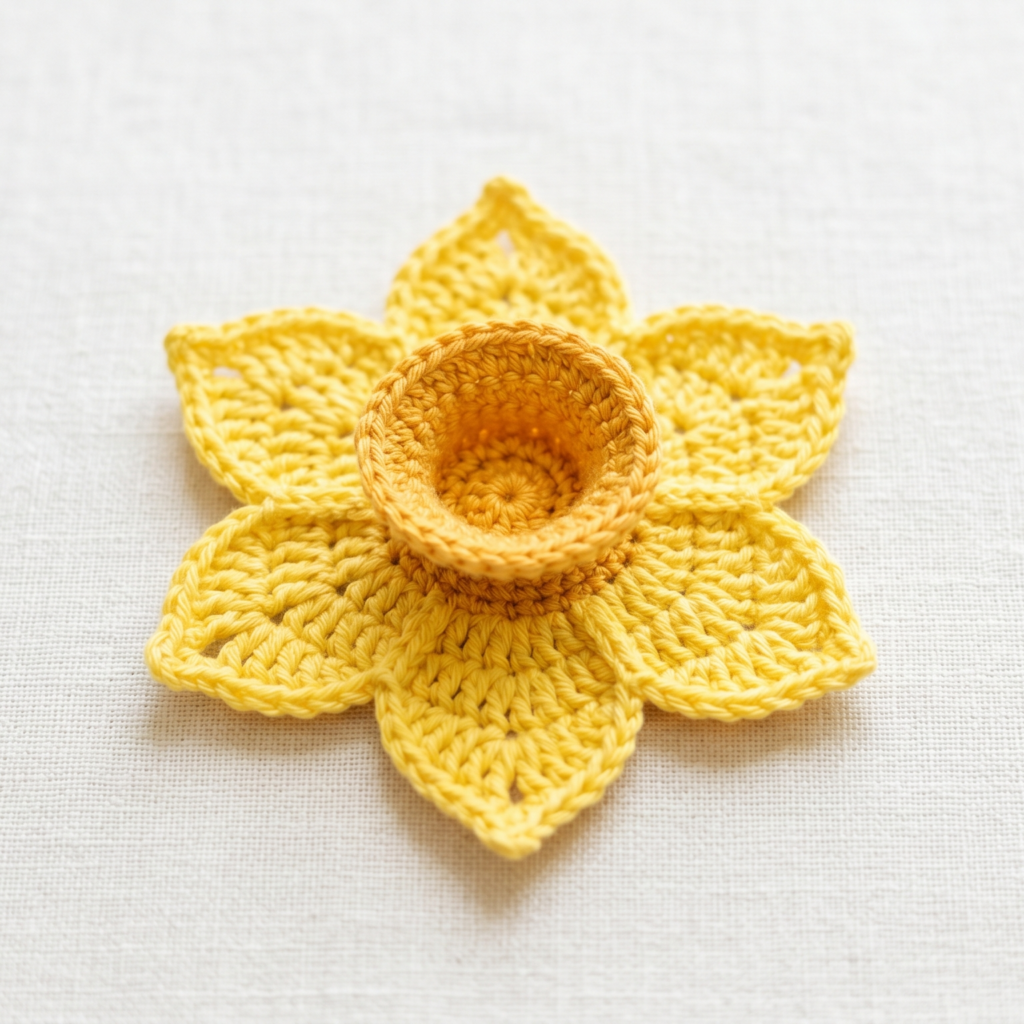
The crochet daffodil flower applique is bright, cheerful, and instantly recognizable. Daffodils are often associated with spring, sunshine, and fresh beginnings, which makes them wonderful for seasonal projects. Their trumpet center and layered petals create a flower that feels joyful and bold without being too difficult to make.
Skill Level
Beginner to intermediate
Suggested Size
About 3 to 4.5 inches wide
Materials
- Yellow, white, cream, or orange yarn
- Crochet hook suited to your yarn
- Yarn needle
- Scissors
- Optional stitch marker
Stitch Ideas Used
- Magic ring or chain ring
- Chain
- Single crochet
- Half double crochet
- Double crochet
- Slip stitch
- Picot, optional for petal shaping
Step-by-Step Guide
1. Start with the center trumpet
The daffodil’s trumpet is the heart of the flower. Begin with a small ring and crochet a short tube or rounded cone shape. This should stand out from the petals and form the recognizable middle of the daffodil.
2. Shape the trumpet opening
Once the center is formed, widen the top slightly so it opens outward. This gives the applique the classic daffodil look. Keep the opening neat and symmetrical.
3. Create the outer petals
Work the outer petals around the base of the trumpet. Daffodils usually have six petal sections, so divide the shape evenly around the center. The petals should be slightly pointed or softly rounded depending on the style you prefer.
4. Keep the petals even
Because daffodils are symmetrical, try to keep each petal similar in size. Count carefully so the flower remains balanced. If one petal looks too large, adjust the others to match.
5. Add color contrast
A classic daffodil often uses a yellow outer flower with an orange center, but you can also use cream and gold, white and yellow, or pastel spring colors. The contrast between the center and petals helps the flower stand out beautifully.
6. Shape and flatten the applique
Once the flower is complete, gently arrange the petals so they lie evenly around the trumpet. If the petals curl, lightly shape them with your fingers or block them to improve the final look.
7. Secure everything well
Weave in all ends and make sure the trumpet center is firmly attached. Since this applique has dimension, secure stitching is especially important if it will be used on a bag or blanket.
Helpful Tips
- Bright yellow gives a classic spring daffodil look.
- An orange trumpet center adds beautiful contrast.
- Keep the petals soft and not too stiff.
- This flower looks especially nice in groups on blankets or tote bags.
Why This Pattern Works Well
The daffodil applique feels sunny, happy, and full of seasonal charm. It is a lovely way to bring a little spring brightness into your crochet projects.
Conclusion
Crochet flower appliques are such a wonderful way to add detail, color, and character to your handmade work. They are small enough to make quickly, but they can have a big visual impact on hats, bags, blankets, and many other projects. Whether you prefer the gentle look of a pansy, the romantic shape of a bleeding heart, the graceful layering of a lotus, the unique structure of a columbine, or the cheerful brightness of a daffodil, each flower brings its own special charm.
These applique patterns are also a great way to practice shaping, layering, and color placement without the pressure of a large project. You can make them in matching sets, combine them into floral arrangements, or use just one flower as a simple accent. Because they are so flexible, they work beautifully for personal projects, gifts, and decorative finishing touches.
The best part about crochet flower appliques is that they let you turn ordinary items into something memorable and handmade. A plain hat becomes sweeter. A simple bag becomes more personal. A blanket becomes more beautiful. With just a few stitches, you can add warmth, style, and a touch of nature to almost anything you make.