A crochet scarf is one of the most rewarding projects you can make, no matter your skill level. It is practical, personal, and endlessly customizable, which means you can turn a simple rectangle of stitches into something stylish, cozy, and completely your own. Scarves are also ideal for both beginners and experienced crocheters because they can be as simple or as detailed as you want. You can keep them soft and minimal, make them bold and textured, or add colorwork, fringe, and decorative stitches for extra personality.
What makes crochet scarves so special is that they are useful in every season. A lightweight scarf can be a beautiful accessory in spring or fall, while a thick, bulky scarf becomes a warm favorite in winter. They also make thoughtful handmade gifts because they feel personal without requiring a huge time commitment. If you are looking for projects that are enjoyable to make and lovely to wear, scarves are always a great choice.
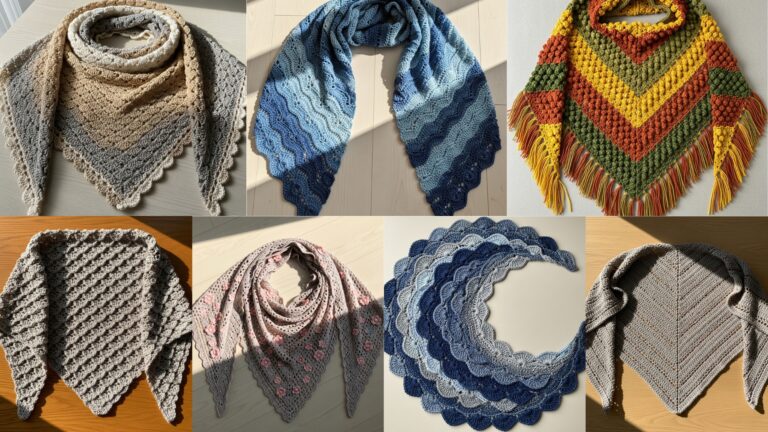
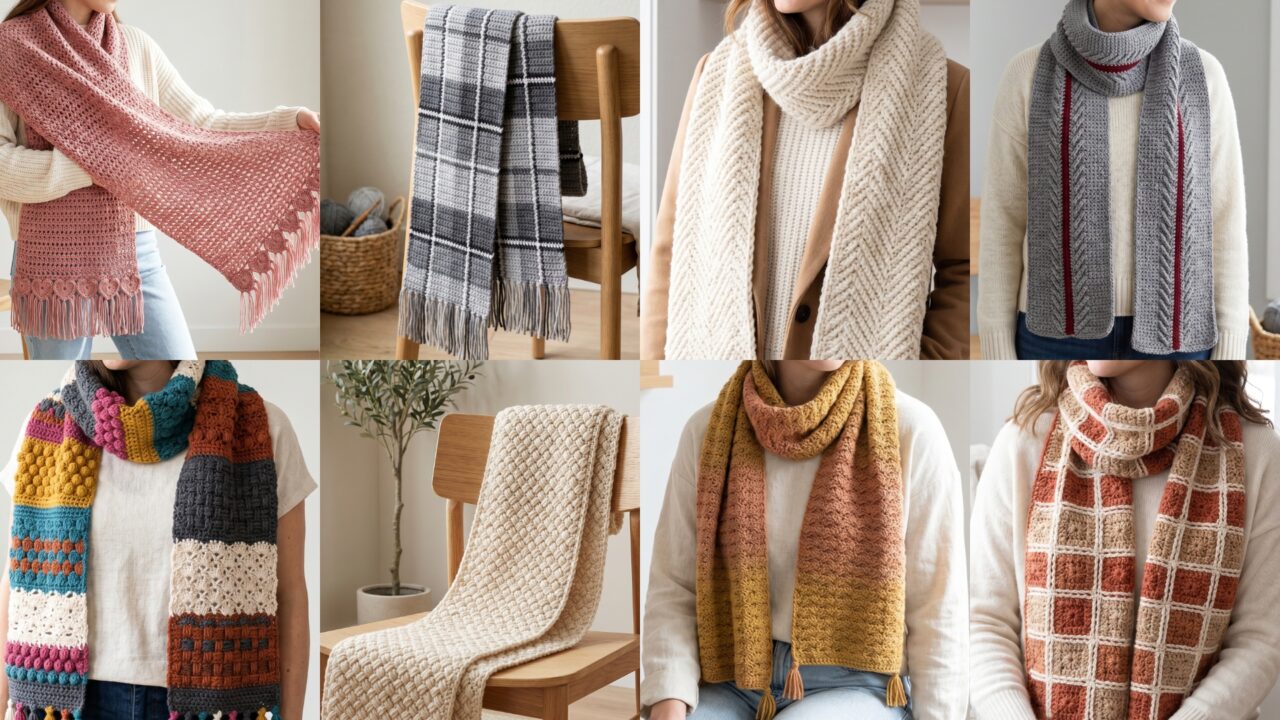
In this collection, you will find eight beautiful crochet scarf patterns that can be made at home with confidence. Each one has a different style, texture, and feel, so you can choose the design that best fits your taste, your wardrobe, or the person you are making it for.
Quick Notes
Before you begin, here are a few helpful things to keep in mind:
- Scarf length and width are easy to adjust, so do not worry if you want a different size.
- The yarn you choose will strongly affect the drape, warmth, and texture.
- Always make a small swatch if you want to test the stitch pattern before starting the full scarf.
- Some stitch patterns are more stretchy than others, so keep that in mind when planning size.
- Blocking can help scarves look straighter and more polished.
- Fringes, tassels, and borders can completely change the final look.
- If the scarf is for gifting, choose yarn that feels soft against the skin.
Common Materials
Most crochet scarf patterns can be made with these supplies:
- Yarn in the weight recommended for the design
- Crochet hook sized to match the yarn
- Yarn needle
- Scissors
- Measuring tape
- Stitch markers, optional
- Blocking mats and pins, optional
- Fringe maker or cardboard, optional for fringe patterns
Best Yarn Choices
For scarves, the best yarn depends on the look you want. Wool and wool blends are warm and cozy. Acrylic is affordable and easy to care for. Cotton gives a crisp finish, while blends with alpaca or bamboo can create a soft, luxurious drape.
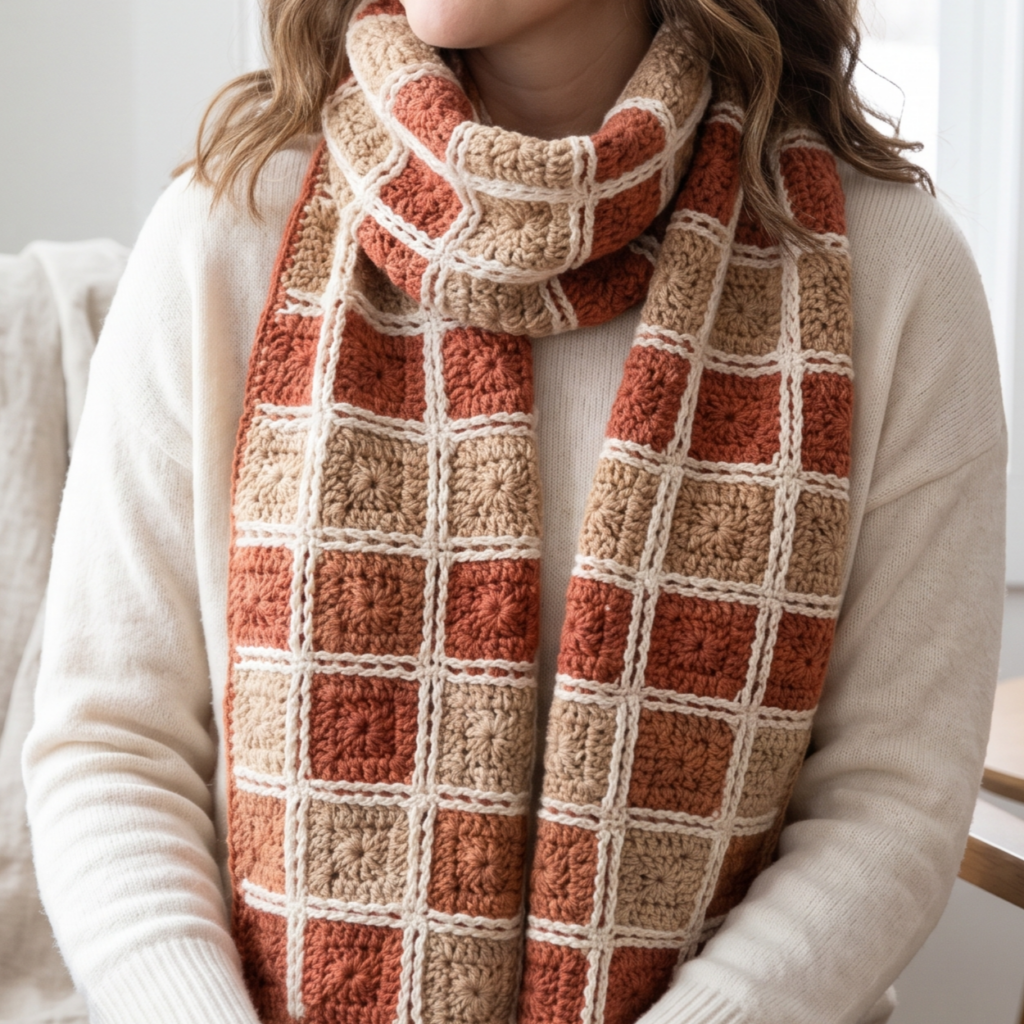
1. Crochet Gray Shades Tartan Scarf Pattern
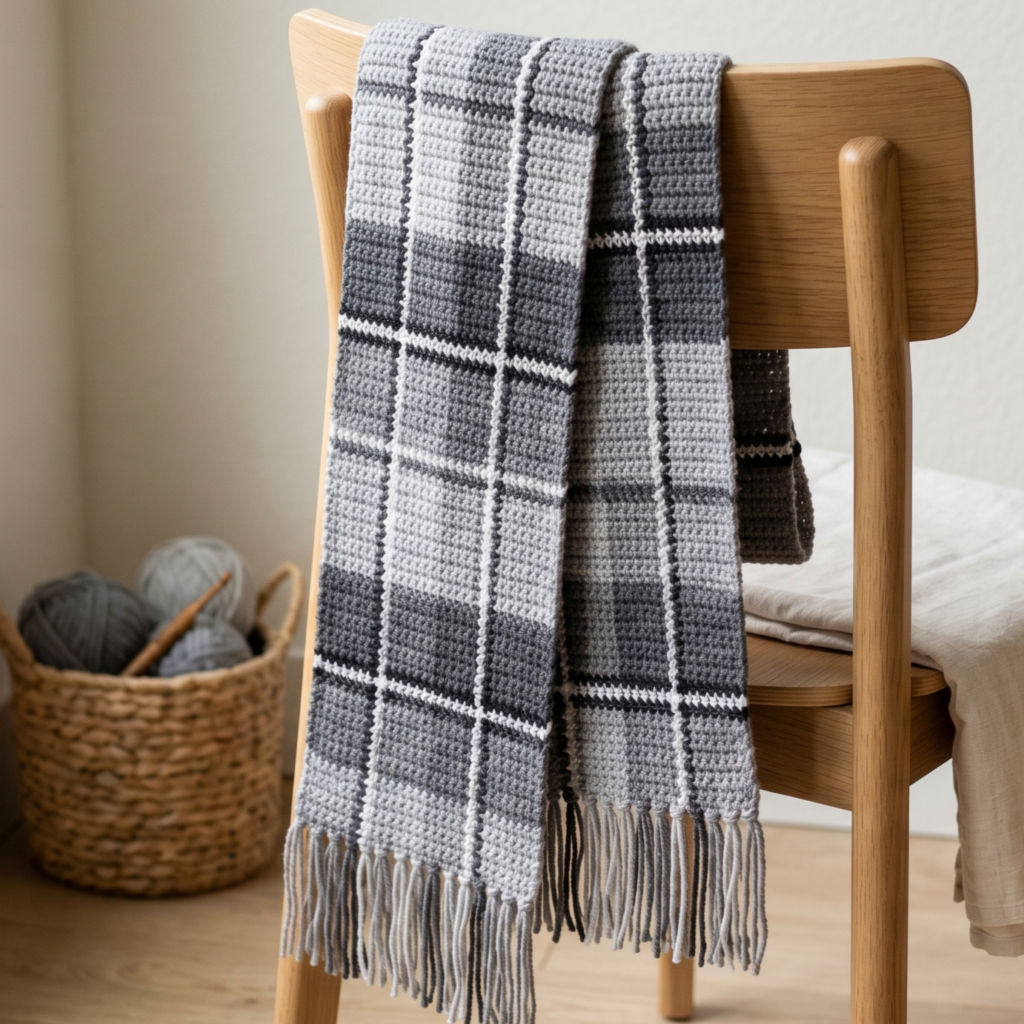
The gray shades tartan scarf is a timeless design with a classic, structured look. Tartan patterns are elegant, familiar, and stylish, and the use of gray tones gives the scarf a modern, versatile feel. This is a wonderful scarf if you want something neutral that goes with almost everything while still having strong visual interest.
Skill Level
Beginner to intermediate
Suggested Size
About 60 to 70 inches long and 8 to 12 inches wide
Materials
- Worsted weight yarn in several gray shades, plus white or black if desired
- Crochet hook suited to your yarn
- Yarn needle
- Scissors
- Measuring tape
Step-by-Step Guide
1. Choose your gray palette
Start by selecting two to four shades of gray. You can use light gray, medium gray, charcoal, and white for a classic tartan effect. The contrast between shades helps create the plaid-like structure.
2. Decide on your stripe layout
Before you begin crocheting, plan where each stripe will go. Tartan patterns often rely on repeated bands of color, so sketching the layout or making a small sample can be very helpful. Wider base sections with thinner accent stripes often look the most balanced.
3. Crochet the base scarf panel
Work the scarf in rows using a stitch pattern that lies flat and shows the color changes clearly. Single crochet, half double crochet, or double crochet all work well. Keep your edges straight so the tartan pattern stays neat.
4. Add horizontal and vertical stripe effects
Depending on the method you use, the tartan look can be created by alternating colors in both rows and sections. You may work wide blocks of one shade and then add thinner lines of another color across them. Keep the spacing consistent for the most polished look.
5. Maintain even tension
Because tartan patterns depend on clean lines, even tension is very important. If your stitches are too loose or too tight in different sections, the pattern may look uneven. Try to keep each color section consistent.
6. Repeat the color sequence
Continue the pattern until the scarf reaches your desired length. The repeated bands are what make the tartan design feel structured and classic.
7. Finish the scarf edges
You can keep the edges simple or add a narrow border to frame the pattern. A clean border helps make the tartan look more finished and refined.
Helpful Tips
- Use contrasting gray tones so the plaid effect stands out.
- Blocking helps straighten the edges and sharpen the color blocks.
- Keep the stitch pattern simple so the tartan design remains the focus.
- A fringe in matching gray shades can make the scarf look even more classic.
Why This Pattern Works Well
The gray shades tartan scarf is elegant, versatile, and easy to wear. It feels timeless while still looking modern, making it perfect for everyday use.
2. Crochet Moss Stitch Zipper Scarf Pattern
The moss stitch zipper scarf is a beautiful combination of texture and practicality. Moss stitch creates a smooth, woven-like surface, while the zipper element adds a modern twist. This scarf feels clean, cozy, and slightly unexpected, which makes it a great option if you want a more contemporary handmade accessory.
Skill Level
Beginner to intermediate
Suggested Size
About 60 to 72 inches long and 6 to 10 inches wide
Materials
- Medium weight yarn
- Crochet hook suited to your yarn
- Yarn needle
- Scissors
- Zipper, if making a true zipper closure detail
- Measuring tape
Step-by-Step Guide
1. Plan the scarf structure
Decide whether the zipper element will be decorative, functional, or integrated into the scarf ends. Some versions use a zipper-like design effect in the stitch texture, while others add an actual zipper as part of a pocket or closure. Planning ahead helps you decide the construction method.
2. Begin with a chain foundation
Make a foundation chain in the width you want for the scarf. Moss stitch works best when the stitch count is even and matches the repeat. Keep the chain loose enough that the scarf does not curl.
3. Work the moss stitch rows
Moss stitch is created by alternating chain spaces and single crochet stitches. This produces a clean, textured fabric that looks simple but refined. Continue the rows evenly, making sure your edges stay straight.
4. Add the zipper detail
If you are using a zipper as part of the design, attach it carefully to one end or side of the scarf. This might be decorative, functional, or part of a fold-over design depending on the pattern style you choose. Stitch it on securely so it lies flat.
5. Continue the scarf length
Repeat the moss stitch pattern until the scarf is long enough. Moss stitch naturally creates a flexible fabric, so it drapes well and feels comfortable to wear.
6. Finish the edges neatly
Because the moss stitch is so clean and structured, a simple edge often works best. You can add a small single crochet border or leave it as is for a minimalist finish.
7. Check the zipper placement
If your scarf includes an actual zipper feature, make sure it opens and closes smoothly and does not pull on the fabric. Reinforce the stitching if needed.
Helpful Tips
- Cotton or cotton blend yarn gives moss stitch a crisp, woven look.
- Keep the stitches even so the texture remains smooth.
- Choose a zipper color that complements the yarn.
- This design works especially well in neutral or monochrome shades.
Why This Pattern Works Well
The moss stitch zipper scarf feels modern and practical. It has a clean texture with just enough detail to make it interesting, while still being easy to wear with many outfits.
3. Crochet V-Stitch Heart Fringes Scarf Pattern
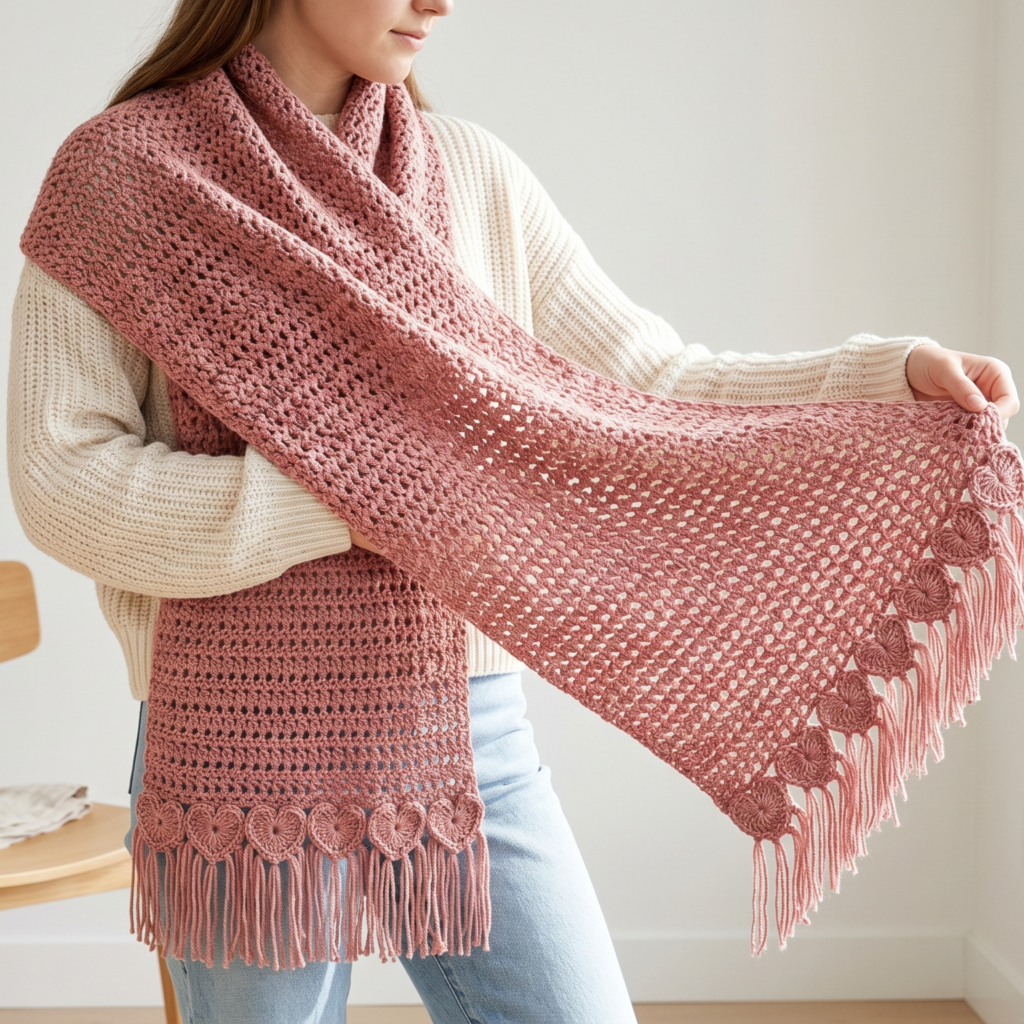
The V-stitch heart fringes scarf is playful, romantic, and full of charm. V-stitch creates open, flowing texture, while heart accents and fringes bring a sweet, decorative touch. This scarf is perfect if you want something soft and feminine with a handmade feel that stands out.
Skill Level
Beginner to intermediate
Suggested Size
About 60 to 70 inches long and 7 to 10 inches wide
Materials
- Lightweight or medium weight yarn
- Crochet hook suited to your yarn
- Yarn needle
- Scissors
- Measuring tape
- Fringe material or matching yarn for fringe
Step-by-Step Guide
1. Start with the foundation chain
Create a chain that suits the width of the scarf. The V-stitch repeat usually requires the chain count to match a pattern multiple, so check the stitch sequence before you begin.
2. Crochet the first V-stitch row
The V-stitch is formed by placing two stitches into one space with a chain between them. This creates an open, airy look that works beautifully in scarves. Keep the spacing even so the pattern remains balanced.
3. Add heart accents
Some designs place small heart motifs along the scarf or within the stitch pattern. These can be made separately and sewn on, or worked into the design using color and shape changes. Keep the hearts small enough that they do not overpower the scarf.
4. Continue the V-stitch repeat
Repeat the pattern row by row until the scarf reaches the desired length. V-stitch grows quickly, which makes this a satisfying project when you want visible progress.
5. Add fringe at the ends
Once the scarf is finished, attach fringe to one or both ends. Fringe adds movement and makes the scarf feel more decorative. Cut the strands evenly and attach them in consistent groups for a polished result.
6. Shape the scarf gently
Because V-stitch is open and flexible, it can benefit from light blocking. This helps the scarf lie flat and makes the hearts and fringe look more intentional.
7. Secure all embellishments
If the heart details are added separately, make sure they are sewn on firmly. Since scarves are worn often, the details should stay secure.
Helpful Tips
- Pastels or soft reds make the heart details stand out beautifully.
- Fringe looks best when it is trimmed evenly.
- Use a lighter yarn if you want the scarf to feel delicate.
- Blocking helps the V-stitch show its shape more clearly.
Why This Pattern Works Well
The V-stitch heart fringes scarf is sweet, airy, and eye-catching. It is a lovely choice for gifts or for anyone who likes romantic handmade accessories.
4. Crochet Bean Stitch Scarf Pattern
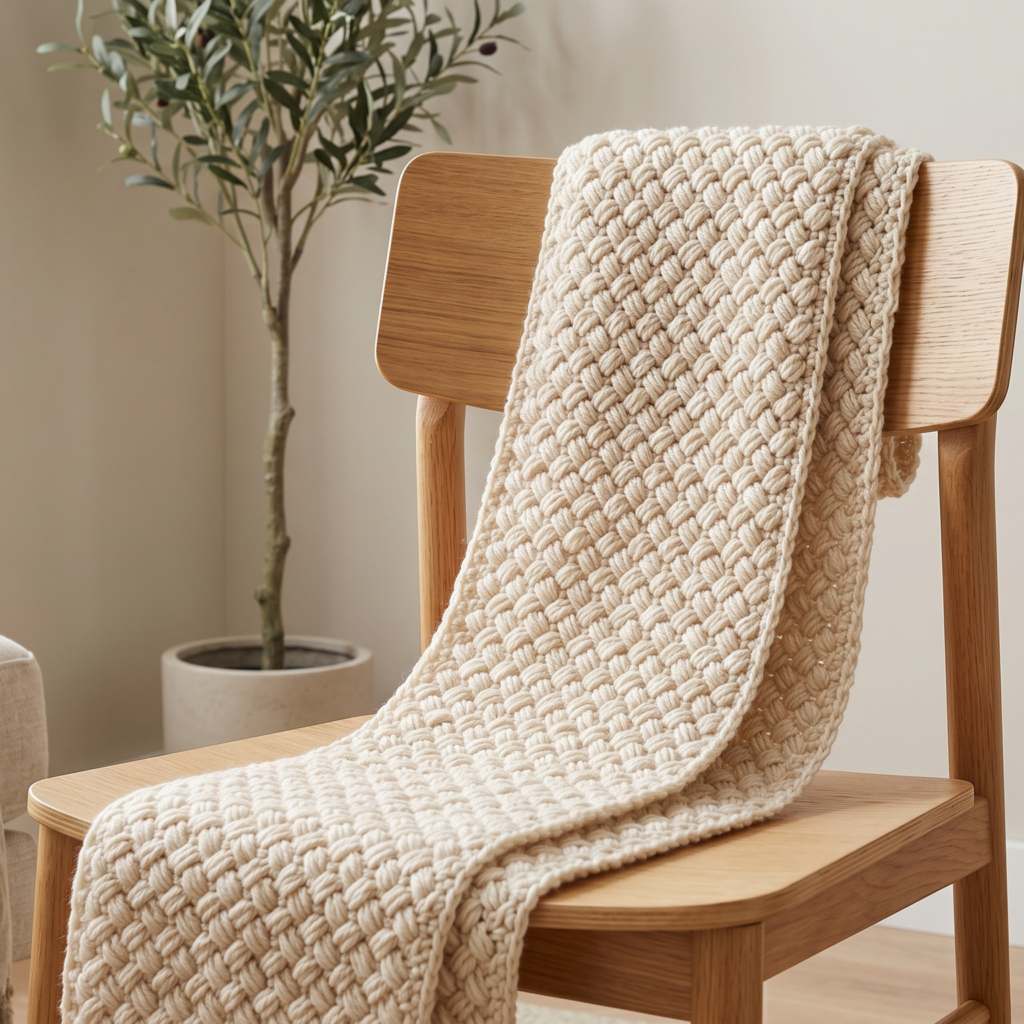
The bean stitch scarf is all about texture. Bean stitch creates a soft, slightly raised surface that feels cozy and visually rich. This makes it a great option if you want a scarf that looks more detailed without requiring complex shaping. It is warm, stylish, and satisfying to crochet.
Skill Level
Intermediate
Suggested Size
About 60 to 72 inches long and 7 to 10 inches wide
Materials
- Medium weight yarn
- Crochet hook suited to your yarn
- Yarn needle
- Scissors
- Measuring tape
Step-by-Step Guide
1. Make a foundation chain
Start with a chain that matches the width you want. Since the bean stitch can create a slightly dense fabric, it is important to make the foundation chain loose enough for comfortable drape.
2. Work the first row
Begin with a row of simple stitches such as single crochet or half double crochet. This gives the bean stitch a stable base.
3. Build the bean stitch texture
The bean stitch is created by drawing up several loops in the same stitch or space before closing them together. This produces a rounded, plush texture that adds depth to the scarf.
4. Keep the pattern consistent
The bean stitch works best when repeated evenly across each row. Try to maintain the same spacing so the texture looks balanced from one end of the scarf to the other.
5. Continue until the scarf is long enough
Repeat the bean stitch rows until you reach the desired length. Because the stitch is textured and dense, the scarf will feel warm and cozy.
6. Add a simple border
A simple border can help the edges look neat. Single crochet or half double crochet borders work especially well because they frame the texture without competing with it.
7. Finish and block if needed
If the scarf curls slightly, give it a light blocking. This helps smooth the edges and improve the final drape.
Helpful Tips
- Use a soft yarn because the bean stitch creates a thicker texture.
- Solid colors show the stitch pattern most clearly.
- Keep your tension even so the texture stays consistent.
- This stitch is great if you want a scarf that feels warm and substantial.
Why This Pattern Works Well
The bean stitch scarf is cozy, textured, and visually interesting. It is an excellent choice for cold weather and for anyone who enjoys a richer handmade look.
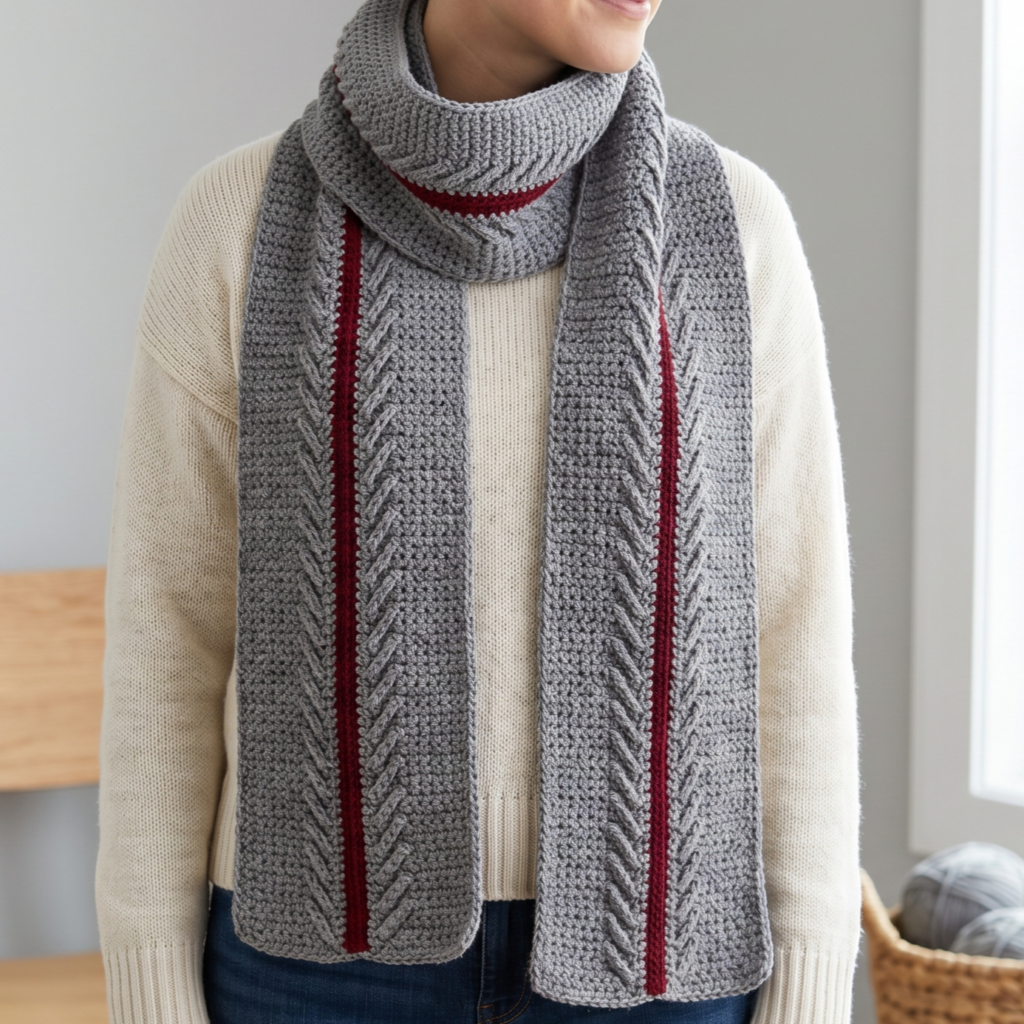
5. Crochet Bulky Herringbone Stitch Scarf Pattern
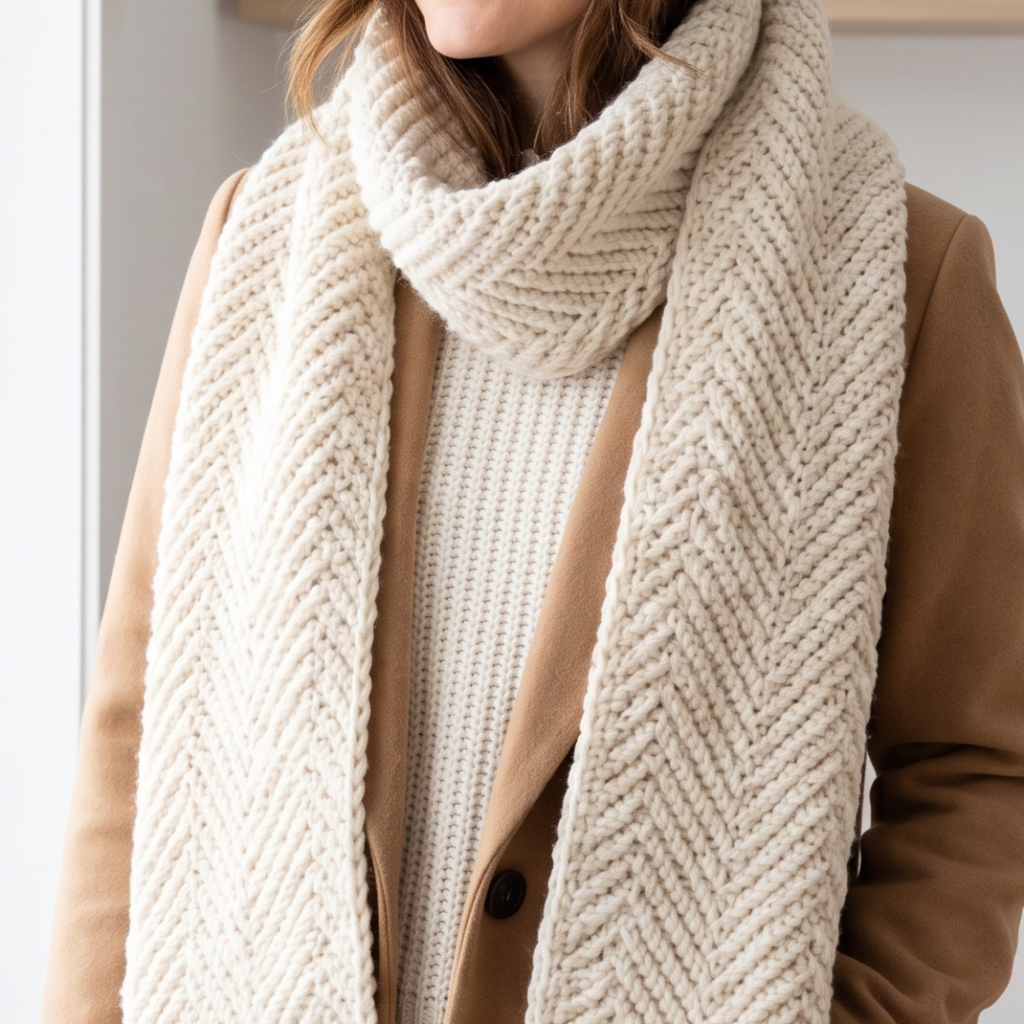
The bulky herringbone stitch scarf is warm, modern, and beautifully structured. Herringbone stitch creates a subtle diagonal texture that looks clean and sophisticated, and when worked in bulky yarn, it becomes extra cozy and quick to make. This pattern is perfect if you want a scarf that feels luxurious and winter-ready.
Skill Level
Intermediate
Suggested Size
About 60 to 70 inches long and 8 to 10 inches wide
Materials
- Bulky weight yarn
- Crochet hook suited to bulky yarn
- Yarn needle
- Scissors
- Measuring tape
Step-by-Step Guide
1. Choose a bulky yarn
Because this scarf is designed to feel thick and warm, choose a bulky or super bulky yarn. This will help the herringbone stitch stand out while also making the scarf work up faster.
2. Start with a foundation chain
Make a chain that suits the width of your scarf. Keep it loose enough so the scarf does not become too stiff. A slightly relaxed foundation helps bulky scarves drape better.
3. Work the herringbone stitch rows
The herringbone stitch creates a slanted, interlocked look that feels smooth and modern. Work each row carefully and keep the stitch direction consistent. The texture should look neat and slightly angled.
4. Maintain even tension
Bulky yarn can sometimes make stitches feel tight or uneven, so keep your tension steady. This will help the scarf stay soft and wearable rather than overly rigid.
5. Continue until the scarf is long enough
Because the yarn is bulky, the scarf may grow quickly. Continue until you have the length you want, checking occasionally so the piece does not become too heavy.
6. Add a border if desired
A small border can help balance the thickness of the scarf. You might use a simple single crochet edging or leave the sides clean for a minimalist finish.
7. Finish the ends neatly
Weave in all loose ends carefully. Since bulky scarves are often worn frequently, secure finishing is very important.
Helpful Tips
- Choose a soft bulky yarn so the scarf stays comfortable.
- Neutral colors highlight the diagonal herringbone texture.
- This pattern is perfect for cold weather gifts.
- Keep the scarf width moderate so it does not feel too heavy.
Why This Pattern Works Well
The bulky herringbone scarf feels polished and warm. It has a modern texture and a cozy weight that makes it ideal for winter layering.
6. Crochet Block Stitch Scarf Pattern
The block stitch scarf is bright, structured, and full of visual rhythm. Block stitch uses repeating stitch groups and open spaces to create a grid-like look that feels both classic and modern. It is a lovely pattern if you want a scarf with a strong color story or a neat geometric effect.
Skill Level
Beginner to intermediate
Suggested Size
About 60 to 72 inches long and 7 to 10 inches wide
Materials
- Two or more colors of yarn
- Crochet hook suited to your yarn
- Yarn needle
- Scissors
- Measuring tape
Step-by-Step Guide
1. Pick your color combination
Block stitch looks especially nice when the colors contrast well. You can choose bright shades for a playful scarf or neutral tones for something more understated.
2. Start the base row
Begin with a foundation chain and work the first row of stitches that will support the block pattern. Keep the chain count even and aligned with the stitch repeat.
3. Build the first block row
Block stitch is made by creating little square-like sections separated by chain spaces. These groups form the block appearance and give the scarf its distinctive structure.
4. Change colors cleanly
If you are using multiple colors, switch them at the right point in the row so the blocks look neat. Clean color changes make the pattern much more polished.
5. Keep the blocks even
The beauty of block stitch comes from consistency. Make sure the squares or block sections are the same size across the scarf. This creates a balanced and professional-looking result.
6. Repeat the pattern
Continue the block stitch repeat until the scarf reaches your desired length. The repeating sections make this a relaxing project once you get used to the rhythm.
7. Finish with a tidy edge
A clean border or simple fringe can finish the scarf beautifully. Keep the finishing details in line with the geometry of the pattern.
Helpful Tips
- Use at least two colors to make the blocks stand out.
- Block stitch works well with leftovers from other projects.
- Keep the stitch groups consistent for the clearest pattern.
- This scarf looks especially nice in color-blocked combinations.
Why This Pattern Works Well
The block stitch scarf is structured, attractive, and easy to personalize. It is a great project for anyone who likes organized color patterns and a clean finish.
7. Crochet Maximalist Scarf Pattern
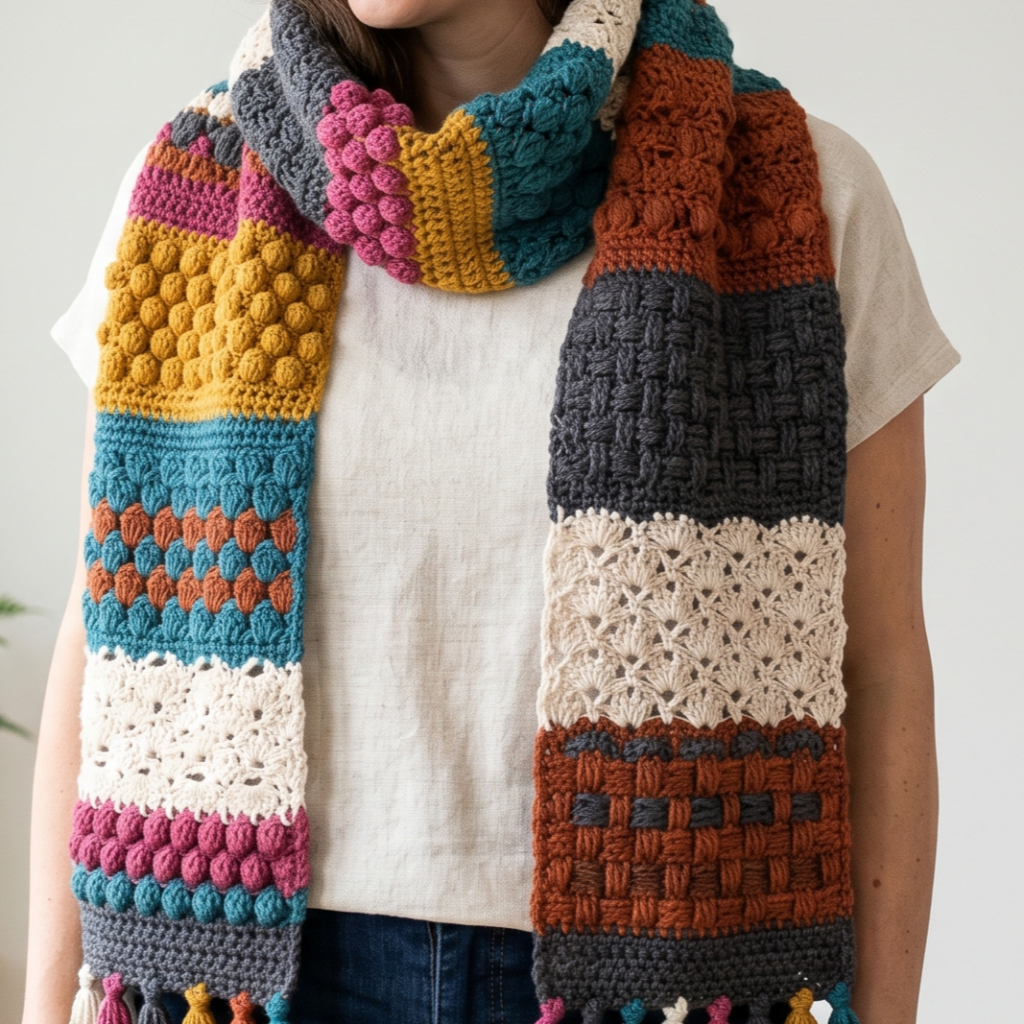
The maximalist scarf is bold, expressive, and full of personality. Instead of being subtle, this design celebrates color, texture, and pattern all at once. It is perfect if you love standout accessories that feel artistic and creative. A maximalist scarf can include bright colors, mixed stitches, fringe, motifs, or layered texture.
Skill Level
Intermediate
Suggested Size
Variable, often 60 to 75 inches long and 8 to 12 inches wide
Materials
- Multiple yarn colors in coordinating or contrasting shades
- Crochet hook suited to your yarn
- Yarn needle
- Scissors
- Measuring tape
- Optional fringe, beads, or motif pieces
Step-by-Step Guide
1. Plan your visual style
A maximalist scarf works best when you decide on the overall feel first. You might want bold rainbow stripes, patchwork sections, chunky texture, or a combination of different stitch patterns. Planning keeps the design energetic without becoming chaotic.
2. Choose your yarn mix
Select colors and textures that work well together. You can mix bold brights, jewel tones, earthy shades, or even metallic accents depending on the mood you want. Try to keep one or two elements consistent so the scarf still feels intentional.
3. Build the scarf in sections
Many maximalist scarves work best when crocheted in distinct sections. You might alternate stripes, motifs, textured blocks, or decorative panels. This keeps the scarf exciting from end to end.
4. Combine stitches thoughtfully
You can mix simple and textured stitches to create contrast. For example, one section might use block stitch, another might use bobbles, and another might use open lace. The variety is what makes the scarf feel bold and expressive.
5. Add decorative details
Fringe, tassels, motifs, or layered embellishments all fit well in a maximalist design. Add them carefully so the scarf stays wearable and not too heavy.
6. Balance the composition
Even a bold scarf needs some balance. Try to repeat colors or textures at intervals so the piece feels cohesive rather than random.
7. Finish with confidence
Weave in ends securely and block the scarf if needed. A maximalist design can have many details, so clean finishing helps it look polished instead of crowded.
Helpful Tips
- Use a repeating color theme to unify the scarf.
- Do not overload every section with too many details.
- Keep the scarf soft enough to wear comfortably.
- This is a wonderful project for using bold leftovers creatively.
Why This Pattern Works Well
The maximalist scarf is fun, fearless, and full of style. It is perfect for someone who loves creative crochet pieces that make a statement.
8. Crochet Easy One Row Repeat Scarf Pattern
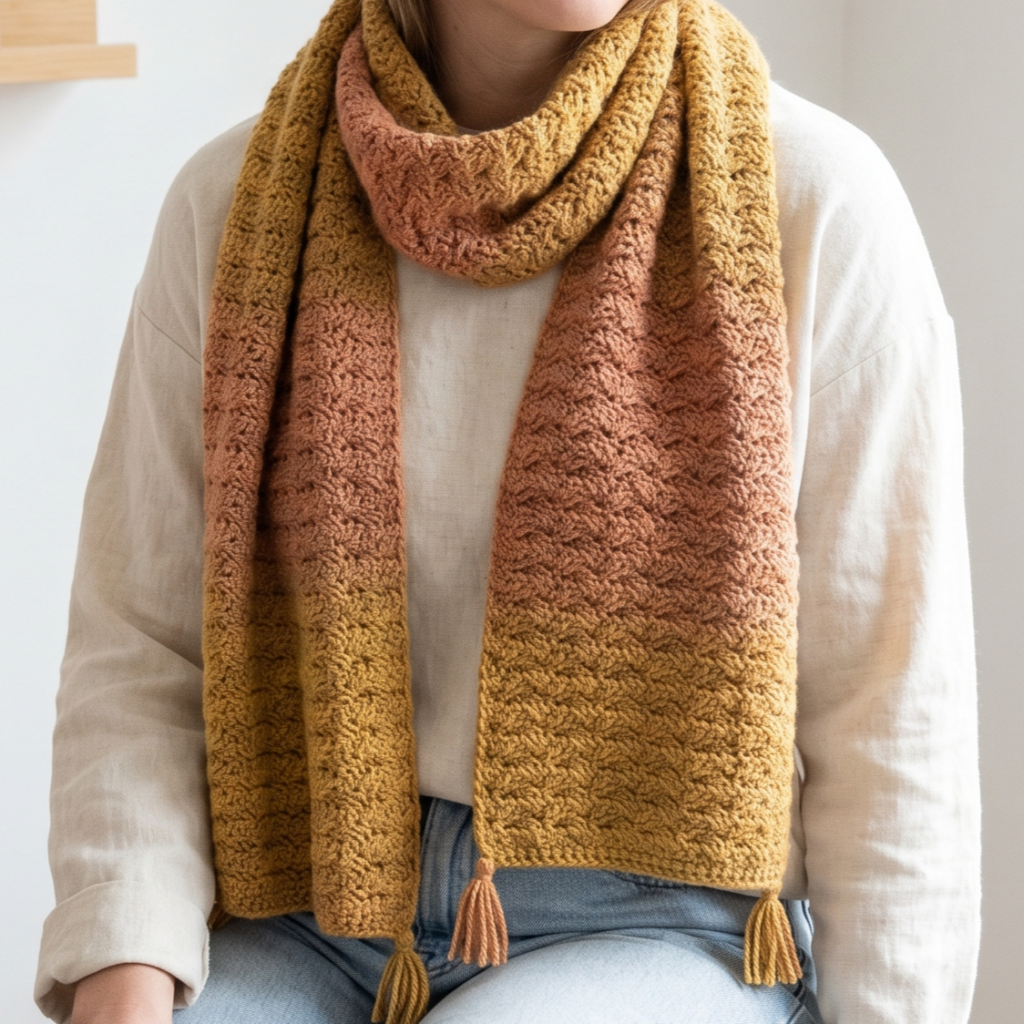
The easy one row repeat scarf is one of the best patterns for relaxing crochet. It is simple, rhythmic, and beginner-friendly, which makes it ideal if you want a project you can enjoy without having to follow a complicated stitch chart. This kind of scarf is also wonderful for travel crochet or evening projects because the repetition becomes second nature very quickly.
Skill Level
Beginner
Suggested Size
About 60 to 72 inches long and 6 to 10 inches wide
Materials
- Medium weight or lightweight yarn
- Crochet hook suited to your yarn
- Yarn needle
- Scissors
- Measuring tape
Step-by-Step Guide
1. Start with the foundation chain
Make a chain that matches the width you want for the scarf. Keep the chain loose enough so the edges do not pull in. Since this pattern is repetitive, a neat start helps the rest of the scarf go smoothly.
2. Work the first row
Choose the row pattern you will repeat throughout the scarf. This might be a simple stitch sequence such as one row of single crochet, half double crochet, double crochet, or a textured repeat. The key is that you will use the same row over and over.
3. Repeat the same row
Continue repeating the same row until the scarf reaches your desired length. The charm of this pattern is in its simplicity. Once the rhythm is established, the scarf grows quickly and predictably.
4. Keep the edges even
Because the pattern is simple, uneven edges are easier to notice. Count your stitches carefully and keep your tension steady to preserve a straight shape.
5. Add color changes if desired
Even a one-row repeat scarf can become more interesting with color changes. You can alternate colors every few rows or use a gradient yarn for a soft, blended effect.
6. Finish the ends
Add a border, fringe, or simply fasten off cleanly. This pattern looks beautiful in its simplest form, so you do not need to overcomplicate the finishing.
7. Block if needed
If the scarf curls or feels uneven, a light blocking can help straighten it and improve the drape.
Helpful Tips
- This is a great pattern for beginners or for stress-free crochet.
- Use soft yarn so the simple stitch pattern feels cozy and wearable.
- Add fringe if you want a little extra style.
- The repeat makes it easy to crochet while watching TV or chatting.
Why This Pattern Works Well
The easy one row repeat scarf is simple, soothing, and reliable. It is a wonderful choice when you want a beautiful scarf without needing to think too much about the stitch pattern.
Conclusion
Crochet scarves are such satisfying projects because they blend comfort, style, and creativity in one simple piece. They are practical enough to wear often, beautiful enough to gift, and flexible enough to suit nearly any skill level. Whether you prefer clean neutrals, bold textures, subtle stitch work, or colorful statement pieces, there is a scarf pattern here that can fit your style.
These eight designs each bring something different to the table. The gray shades tartan scarf feels classic and refined. The moss stitch zipper scarf adds a modern twist. The V-stitch heart fringes scarf is soft and romantic. The bean stitch scarf offers cozy texture. The bulky herringbone scarf gives you warmth and structure. The block stitch scarf brings organized color and rhythm. The maximalist scarf lets creativity shine. And the easy one row repeat scarf is perfect for relaxing, beginner-friendly crochet.
The best part is how customizable scarves are. You can make them longer, wider, brighter, softer, simpler, or more detailed depending on what you need. That makes each scarf a chance to create something useful that also reflects your personality and style.
No matter which pattern you start with, the joy of making a crochet scarf comes from the process itself. Row by row, it becomes something warm, wearable, and handmade with care.