Crochet beanies are one of the most satisfying projects you can make when the weather starts to turn cold. They are practical, cozy, and fast enough to feel rewarding without being overwhelming. A handmade beanie also has a special kind of charm that store-bought hats cannot match. You can make it soft and simple, bold and textured, fitted or slouchy, neutral or colorful. That flexibility is what makes crochet beanies such a favorite project for fall and winter.
What makes beanies especially enjoyable is how much style they can hold in a small, wearable shape. A hat can look classic and clean, or it can become a statement piece with colorwork, cables, textured stitches, or modern stripes. You can make them for yourself, for gifts, or for markets, and they are always useful. If you are looking for a project that is cozy, fashionable, and fun to work on, these crochet beanie patterns are a great place to start.
Quick Notes
- Always make a gauge swatch if you want the beanie to fit well.
- Hat fit depends on yarn, hook size, and tension, so do not skip measurements.
- Soft, warm yarns work best for fall and winter beanies.
- Most beanies are worked from the top down or bottom up, so read the construction first.
- Ribbed brims help hats fit more securely.
- Blocking can improve shape, especially for textured beanies.
- Keep color changes neat if the pattern uses stripes or split sections.
Common Materials
Most crochet beanie patterns can be made with these supplies:
- Yarn in the recommended weight for the pattern
- Crochet hook sized to match your gauge
- Yarn needle
- Scissors
- Stitch markers
- Measuring tape
- Pom-pom maker, optional
- Blocking mats and pins, optional
Best Yarn Choices
For beanies, warm and comfortable yarn is important. Wool and wool blends are excellent for winter. Acrylic is affordable and easy to care for. Cotton is less common for very warm hats, but it can work for lighter beanies. A soft blend often gives the best balance of warmth, stretch, and comfort.
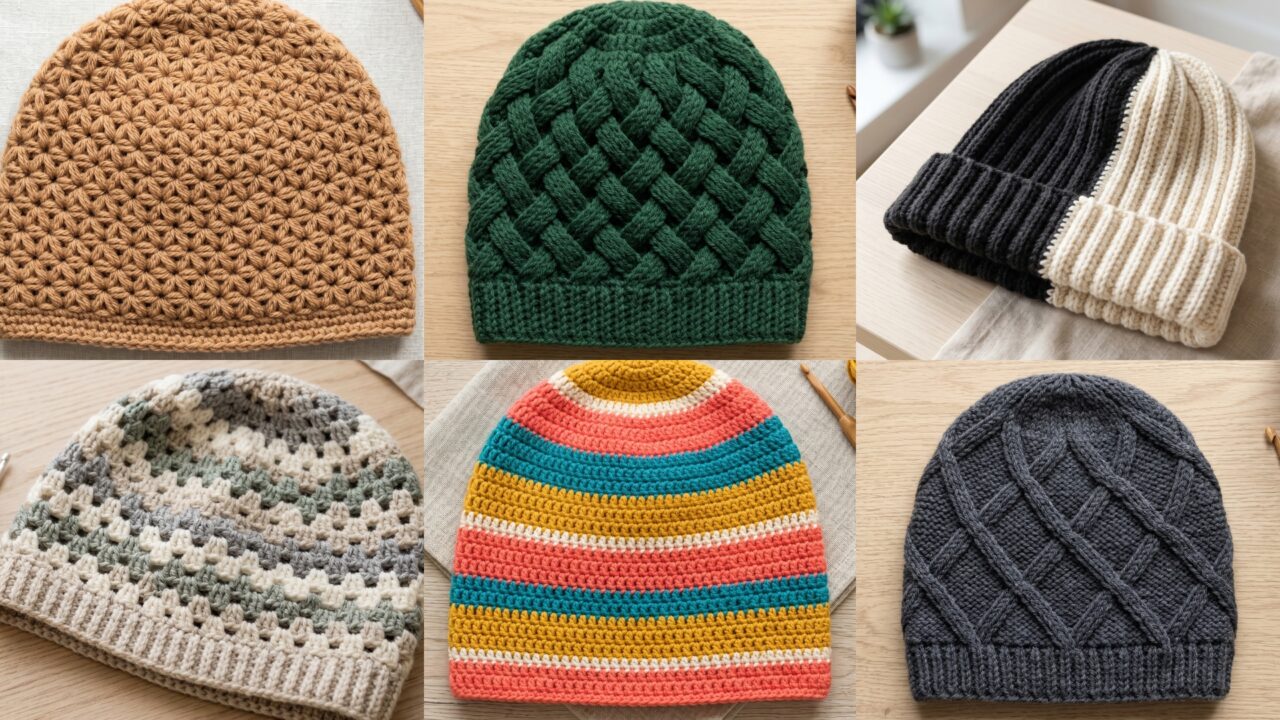
1. Crochet Split Color Ribbed Beanie Pattern
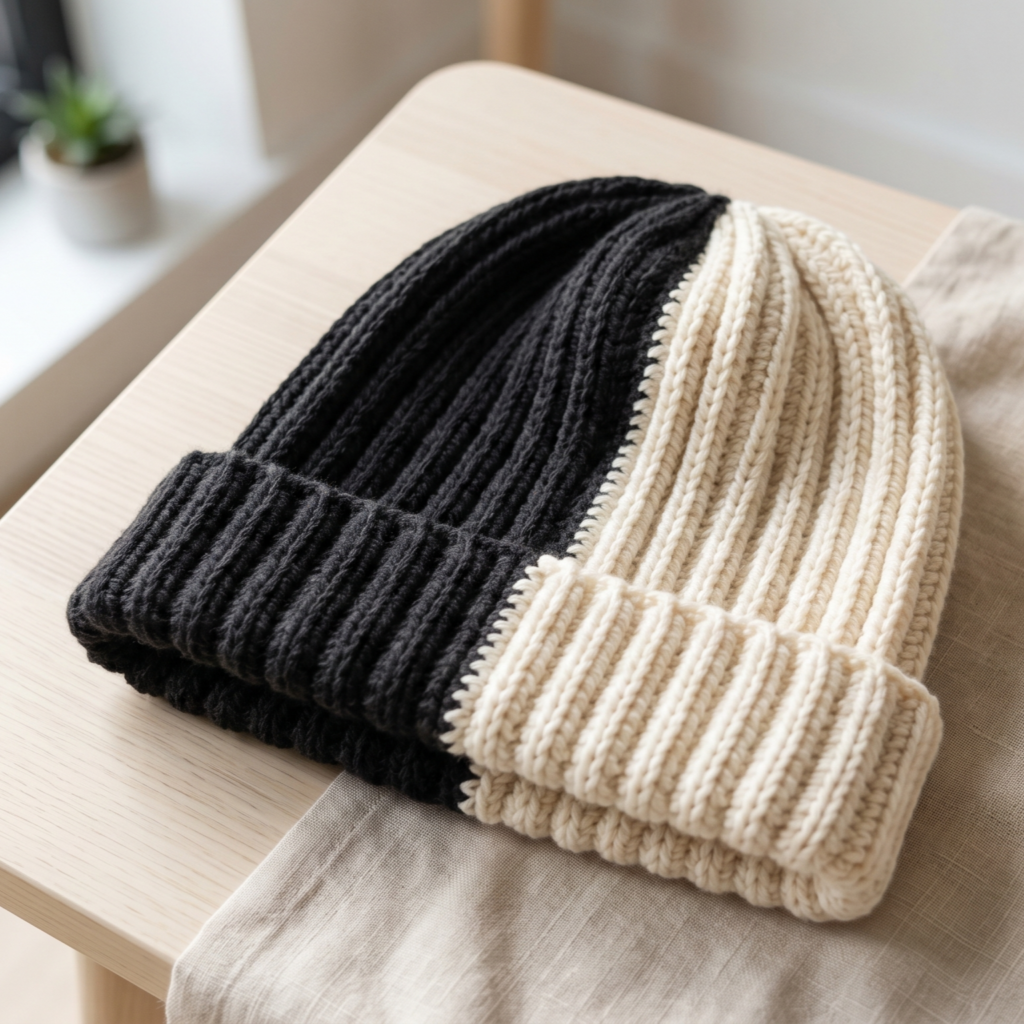
The crochet split color ribbed beanie is a modern, stylish hat that feels clean and bold. The ribbed texture gives the beanie a snug, comfortable fit, while the split color design adds a fresh visual twist. This is the kind of beanie that looks simple at first glance but feels fashionable and carefully made.
Skill Level
Beginner to intermediate
Suggested Size
Adult small to large, adjustable by increasing the crown and length
Materials
- Medium weight yarn in two contrasting or coordinating colors
- Crochet hook suited to your yarn
- Yarn needle
- Scissors
- Stitch markers
- Measuring tape
Step-by-Step Guide
1. Choose your color pairing
Pick two colors that work well together. You can go for high contrast, such as black and cream, or choose softer combinations like rust and beige. The split color effect will stand out more if the two shades are clearly different.
2. Make a gauge swatch
Because ribbed beanies need to fit the head comfortably, crochet a small swatch before starting. This will help you determine whether your stitches are stretching enough and whether the beanie will fit securely.
3. Start the ribbed band
Most ribbed beanies begin with a brim made from back loop only stitches or a post-stitch rib. Work the band around the head circumference, keeping it snug but not tight. This band forms the base of the hat and helps it stay in place.
4. Join the ribbing into a tube
Once the brim is the correct length, join the short ends together to create a circle. Make sure the seam is neat and straight so the beanie sits comfortably.
5. Build the crown section
After the brim, continue crocheting upward to shape the main body of the hat. If the pattern uses a split color design, this is where you can begin changing colors so the hat appears divided into two distinct sections.
6. Shape the top
Decrease gradually at the crown until the opening closes. Keep the decreases even so the top of the beanie does not look lumpy. A smooth crown makes the hat look polished and professional.
7. Finish and weave in ends
Secure all loose ends and check the color join carefully. If needed, lightly block the hat so the ribbing relaxes and the shape looks clean.
Helpful Tips
- Use a stretchy stitch for the ribbing so the beanie is easy to wear.
- Keep the split line neat if you want a sharp color division.
- Add a pom-pom if you want a playful finish.
- A slightly smaller hook can help the ribbing hold its shape better.
Why This Pattern Works Well
The split color ribbed beanie is stylish, practical, and easy to wear with almost anything. It has a modern look while still offering the cozy fit that makes beanies so useful.
2. Crochet Granny Stitch Beanie Pattern
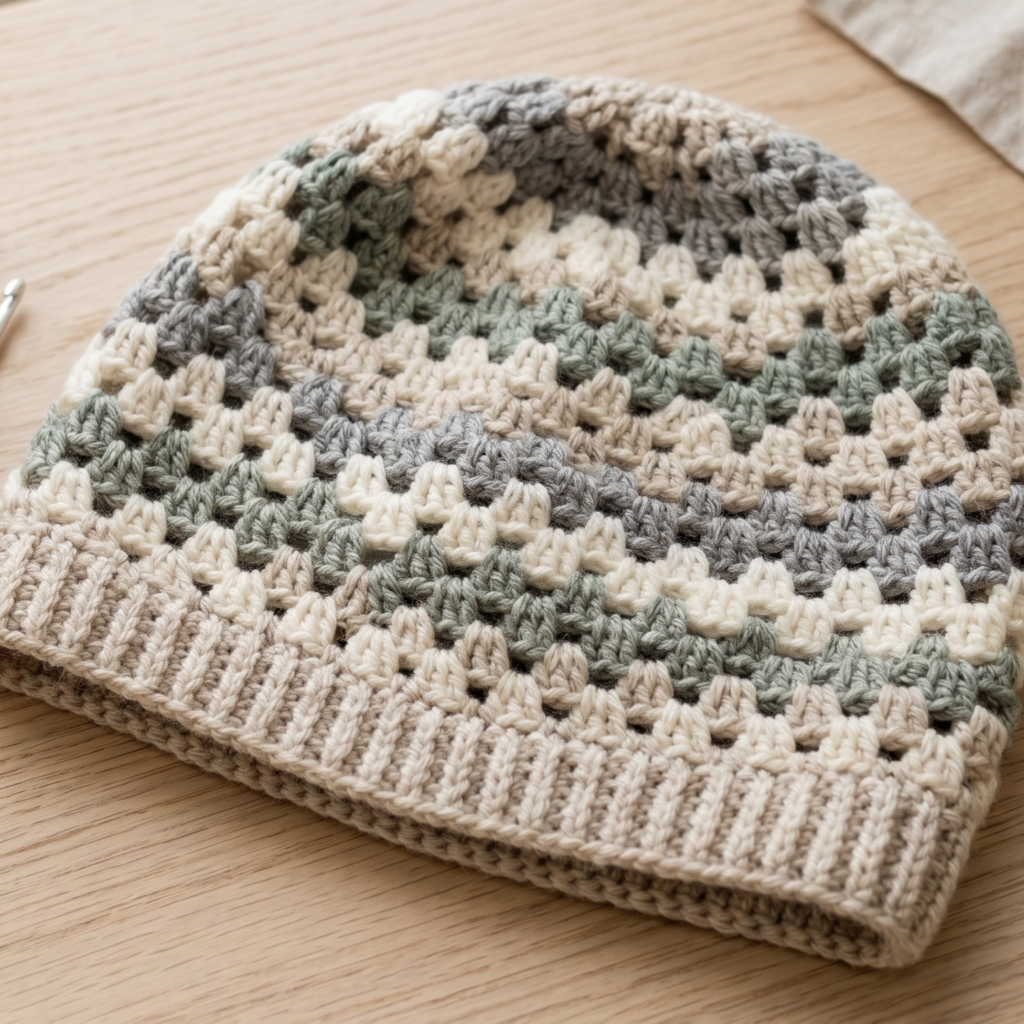
The crochet granny stitch beanie brings a classic crochet look into a fashionable winter accessory. Granny stitch is airy, textured, and visually appealing, which makes it a great choice if you want a hat that feels handmade in the best possible way. It works especially well with color changes, so you can make a beanie that is soft and subtle or bright and playful.
Skill Level
Beginner to intermediate
Suggested Size
Adult or youth sizes, depending on crown and height measurements
Materials
- Yarn in one or more colors
- Crochet hook suited to your yarn
- Yarn needle
- Scissors
- Stitch markers
- Measuring tape
Step-by-Step Guide
1. Decide on the fit
Before beginning, decide whether you want a fitted beanie or a slouchy one. This will affect both the crown size and the length of the body. A gauge swatch will help you understand how wide your crown should be.
2. Start with the crown
Many granny stitch beanies begin with a flat or slightly rounded crown. Work increases in the center until the crown reaches the correct diameter for the wearer’s head. This forms the top of the hat.
3. Begin the granny stitch rounds
Once the crown is complete, start working the granny stitch repeat around the hat body. Granny stitch is usually formed by clusters of double crochet stitches separated by chain spaces. This gives the hat its open, textured appearance.
4. Keep the stitch spacing even
The open spaces are part of the charm of granny stitch, but they should still be balanced. Try to keep the clusters and chain spaces consistent so the beanie looks neat.
5. Add color changes
Granny stitch beanies look especially nice with color changes. You can use stripes, solid rounds, or alternating bands. If you want a classic feel, use soft neutrals. If you want something bolder, use bright yarns or rainbow sections.
6. Work the hat height
Continue the granny stitch rounds until the beanie is tall enough. For a close-fitting beanie, stop at the right head height. For a slouchier style, add extra rounds before finishing.
7. Finish the edge
You can end with a simple border, a ribbed brim, or a neat single crochet round. The finish should frame the granny stitch texture without overwhelming it.
Helpful Tips
- A solid crown can help the beanie sit better on the head.
- Use a smaller hook if you want less stretch or more structure.
- Colorful yarn works beautifully with the granny stitch layout.
- Blocking helps the crown and body lay more evenly.
Why This Pattern Works Well
The granny stitch beanie feels nostalgic and modern at the same time. It is a great way to use color creatively while still making something warm and wearable.
3. Crochet Star Stitch Beanie Pattern
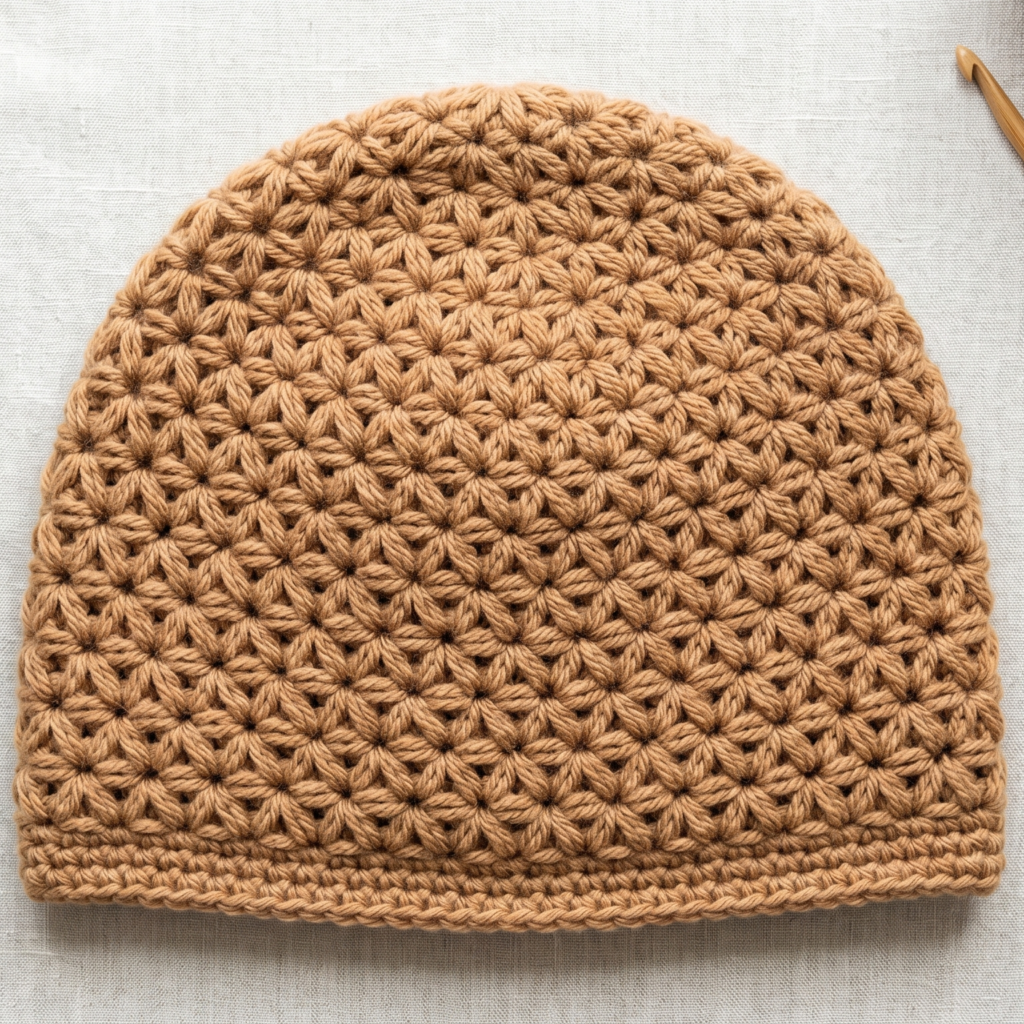
The crochet star stitch beanie is textured, unique, and eye-catching. Star stitch creates a beautiful woven surface that looks more complex than it actually is once you get into the rhythm. This hat is perfect if you want a beanie that feels a little more special and detailed.
Skill Level
Intermediate
Suggested Size
Adult medium, adjustable by gauge and hat height
Materials
- Soft worsted or light bulky yarn
- Crochet hook suited to your yarn
- Yarn needle
- Scissors
- Stitch markers
- Measuring tape
Step-by-Step Guide
1. Learn the star stitch rhythm
Before starting the full beanie, practice the star stitch on a small swatch. This will help you understand how the loops are drawn up and how the stitch repeat works. Once the motion feels natural, the beanie becomes much easier.
2. Begin the crown
Work a crown section that fits the head size. You may start from the top and increase outward in rounds, or use a pattern that transitions into star stitch after a foundation section. Keep the crown flat and even.
3. Move into the star stitch body
After the crown, begin the star stitch repeat around the beanie body. The texture will begin to appear as soon as the rows build up. Keep your loops even so the stars stay distinct.
4. Maintain consistent tension
Star stitch looks best when the loops are not too tight or too loose. Balanced tension helps the beanie keep its shape and makes the texture stand out clearly.
5. Continue to the desired height
Work the star stitch body until the beanie reaches the depth you want. The textured surface gives the hat a cozy, handmade feel that works especially well for winter wear.
6. Add a neat brim
A ribbed or single crochet brim works well with this texture. It helps the beanie fit securely and gives the bottom edge a clean finish.
7. Finish the top if needed
If your pattern starts from the brim upward instead of the crown downward, close the crown carefully with even decreases. Make sure the top sits smooth and rounded.
Helpful Tips
- A solid color shows the star stitch texture best.
- Use a lighter yarn than you might expect if the stitch feels too dense.
- Keep the loops consistent so the stars remain visible.
- This pattern looks especially good in earthy or jewel tones.
Why This Pattern Works Well
The star stitch beanie feels rich and textured without being overly complicated. It is a beautiful choice if you want a hat that feels cozy, modern, and memorable.
4. Crochet Celtic Weave Stitch Beanie Pattern
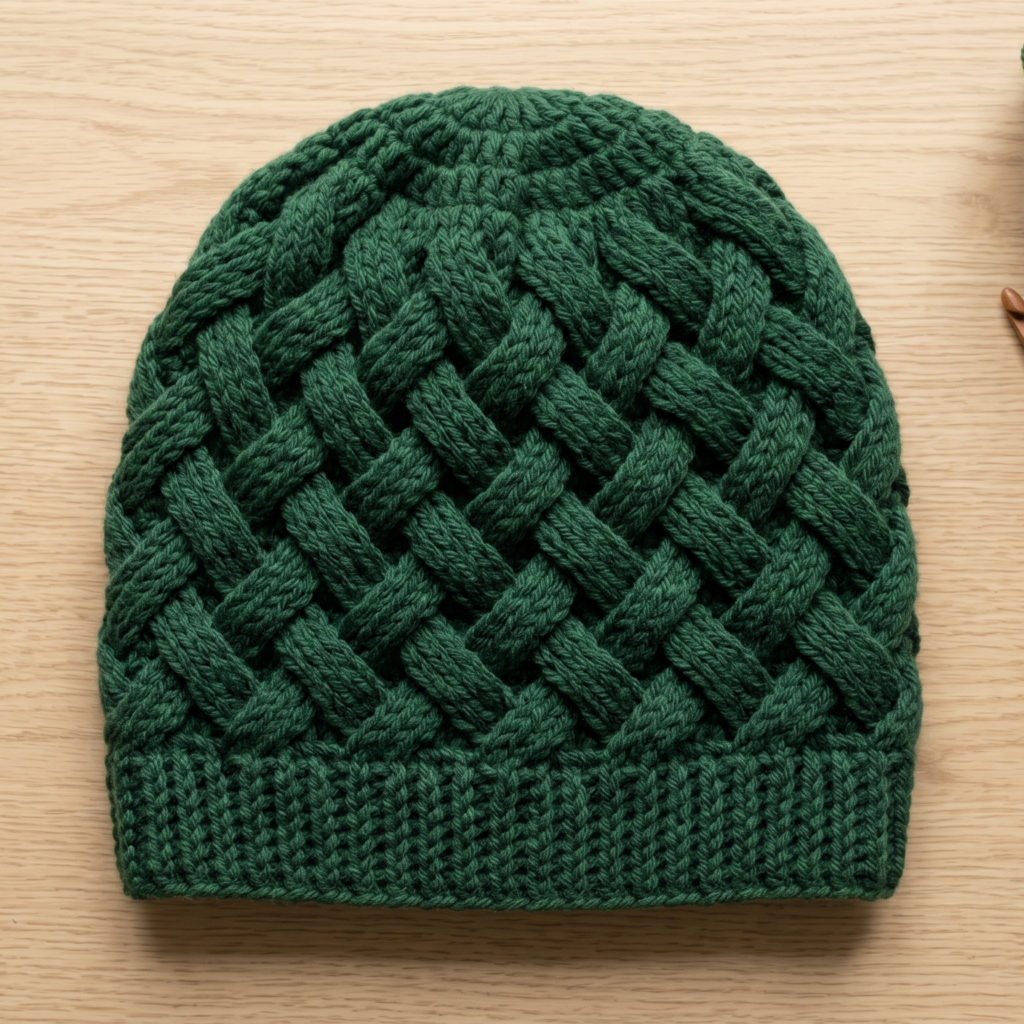
The crochet Celtic weave stitch beanie is bold, richly textured, and full of visual depth. Celtic weave stitches create a braided, woven look that feels classic and elegant. This is the kind of beanie that looks intricate and impressive, making it perfect for anyone who loves detailed crochet work.
Skill Level
Intermediate to advanced
Suggested Size
Adult medium to large, adjustable by crown shaping and length
Materials
- Medium or worsted weight yarn
- Crochet hook suited to your yarn
- Yarn needle
- Scissors
- Stitch markers
- Measuring tape
Step-by-Step Guide
1. Practice the weave stitch
Celtic weave stitch can be tricky at first, so it helps to work a small swatch before starting the hat. This will help you understand the direction of the post stitches and how the woven pattern develops.
2. Make the base of the beanie
Start with a crown or brim, depending on the construction style. The base should fit well before the weave pattern begins. A good fit at the start makes the final beanie much more comfortable.
3. Work the Celtic weave section
Begin the woven stitch pattern around the body of the hat. This usually involves front post and back post stitches crossing over one another to create the braided effect. Work slowly and follow the pattern carefully so the weave stays aligned.
4. Keep your rows even
Because the stitch is textured and directional, uneven rows will be noticeable. Pay attention to stitch count and row placement so the woven pattern stays crisp.
5. Continue until the body reaches the right height
The Celtic weave section should continue until the hat is tall enough for the chosen style. This texture is thick and cozy, so it naturally creates a warm winter beanie.
6. Add a brim if needed
If your design does not already include a brim, add one at the end. A ribbed brim helps balance the texture and gives the beanie a secure fit.
7. Finish carefully
Weave in the ends securely and shape the hat gently. Because the stitch pattern is dense and textured, a light blocking can help open the weave and improve the finished look.
Helpful Tips
- Use a smooth yarn so the woven texture is easy to see.
- Dark solid colors highlight the cables beautifully.
- Take your time with stitch placement.
- A smaller hook can help the hat hold its shape.
Why This Pattern Works Well
The Celtic weave beanie is elegant, bold, and beautifully textured. It gives a luxurious handmade feel that stands out in colder weather.
5. Crochet Diamond Cable Beanie Pattern
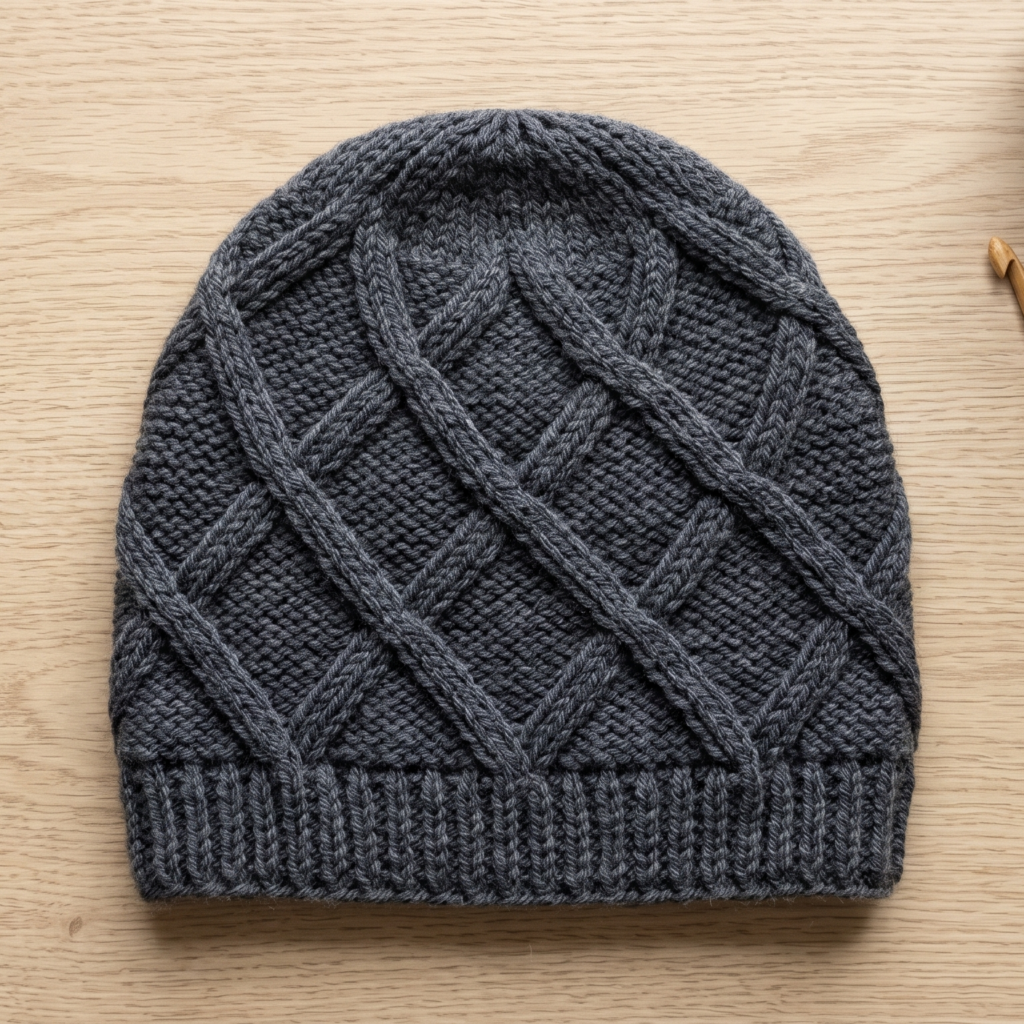
The crochet diamond cable beanie is structured, fashionable, and full of texture. Diamond cable patterns create a striking raised design that feels polished and classic. This beanie is ideal if you want a winter hat that looks a little more refined and detailed.
Skill Level
Intermediate to advanced
Suggested Size
Adult sizes, adjustable with gauge and crown measurements
Materials
- Worsted weight or bulky yarn
- Crochet hook suited to your yarn
- Yarn needle
- Scissors
- Stitch markers
- Measuring tape
Step-by-Step Guide
1. Understand the cable repeat
Before beginning, make sure you understand how the diamond cable pattern works. Cable stitches usually involve working around posts in a specific order to create the raised crossing lines that form the diamond shape.
2. Begin with the base
Create the beanie base with either a brim-first or crown-first method. The diamond cable texture will sit on the main body of the hat, so the base should be even and properly sized.
3. Start the cable sections
Work the cable repeats carefully across the hat body. These sections will gradually form the diamond shapes. Keep the crossing lines tidy and consistent so the design looks smooth.
4. Keep the pattern symmetrical
Diamond cables depend on balance. Try to place each cable section evenly around the hat so the finished beanie looks polished. Good spacing helps the pattern stand out.
5. Continue the texture upward
Repeat the pattern until the beanie reaches the desired height. The texture should remain balanced from the lower section to the crown.
6. Shape the crown
Decrease the top of the beanie gradually, making sure the cable pattern transitions smoothly. Try not to disrupt the texture too suddenly.
7. Add the finishing edge
A ribbed brim or simple border works well with this design. It gives the hat structure and helps the cables remain the main visual focus.
Helpful Tips
- Use a yarn with clear stitch definition.
- Blocking can help the cables look sharper.
- Keep your stitch counts exact so the diamond pattern stays aligned.
- Neutral colors or rich jewel tones work especially well.
Why This Pattern Works Well
The diamond cable beanie feels luxurious and classic. It is a strong choice if you want a winter hat that looks detailed and refined.
6. Crochet Sassy Stripes Beanie Pattern
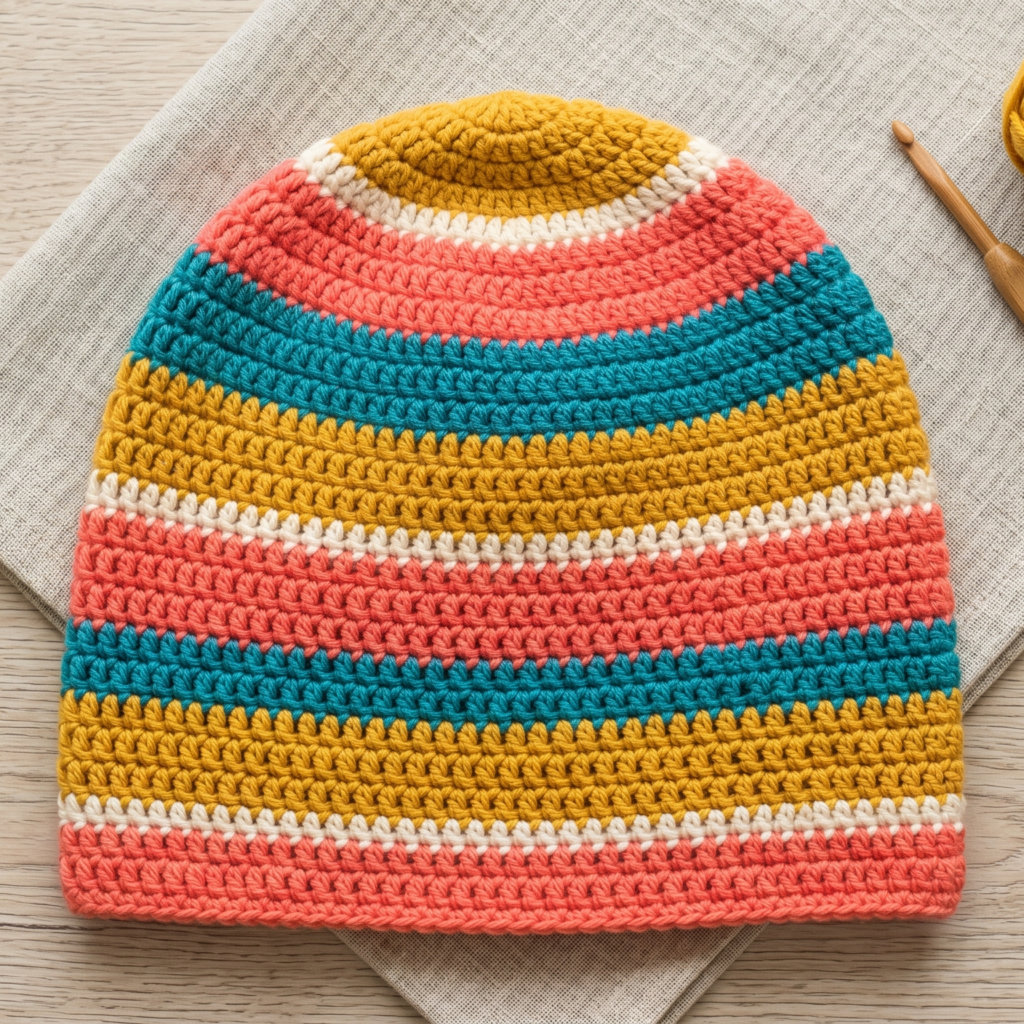
The crochet sassy stripes beanie is playful, colorful, and full of personality. Stripes are an easy way to make a beanie feel fun and modern, and when combined with a confident color palette, they create a hat that really stands out. This pattern is great for anyone who likes bright accessories or wants to use leftover yarn in an eye-catching way.
Skill Level
Beginner to intermediate
Suggested Size
Adult small to large, adjustable by row count and hat height
Materials
- Yarn in two or more colors
- Crochet hook suited to your yarn
- Yarn needle
- Scissors
- Stitch markers
- Measuring tape
Step-by-Step Guide
1. Choose your stripe colors
Pick colors that feel bold, fun, or stylish. You can make high-contrast stripes for a louder look or softer tonal stripes for a more subtle feel. The stripe sequence is what gives the beanie its personality.
2. Make the brim or crown
Start with a brim or crown foundation, depending on the construction style you prefer. Make sure the beginning fits the head comfortably, since the stripes will only look good if the hat fits well.
3. Crochet the stripe rows
Work rows of your chosen stitch and change colors at regular intervals. Keep the stripes even and consistent for a clean design. The stripe pattern can be wide, narrow, random, or repeated in a set rhythm.
4. Maintain neat color changes
When switching colors, join the new yarn carefully so the stripe lines remain smooth. Tidy color changes make the hat look much more polished.
5. Build the body height
Continue the stripe sequence until the hat is tall enough. You can make the hat fitted or slouchy depending on how much length you add.
6. Shape the crown
Once the body is the right height, decrease toward the top. Keep the stripe alignment in mind so the crown looks even and intentional.
7. Add the finishing details
Finish the brim with a ribbed edge, add a pom-pom, or keep it simple. The finishing touches should match the overall style of the stripes.
Helpful Tips
- Use colors with good contrast if you want the stripes to pop.
- Make your stripe changes on the same row count for a tidy look.
- A simple stitch pattern helps the colorwork shine.
- This is a great pattern for using leftover yarn in a stylish way.
Why This Pattern Works Well
The sassy stripes beanie is fun, modern, and easy to personalize. It is a lively project that lets you turn simple color changes into a bold winter accessory.
Conclusion
Crochet beanies are such a rewarding project because they combine warmth, style, and practicality in one simple garment. They are quick enough to make as gifts, useful enough to wear every day, and flexible enough to suit all kinds of fashion tastes. Whether you prefer modern color blocking, rich texture, classic stitch work, or playful stripes, there is a beanie style here that can fit your wardrobe perfectly.
These six patterns each bring a different feel. The split color ribbed beanie is clean and modern. The granny stitch beanie is colorful and classic. The star stitch beanie adds rich texture. The Celtic weave beanie feels elegant and detailed. The diamond cable beanie brings a polished, luxurious look. And the sassy stripes beanie is bold and expressive.
The best part about crocheting beanies is how customizable they are. You can change the fit, the yarn, the colors, and the finishing details to make each one truly your own. That means every hat can become a reflection of your style and your creativity.
No matter which pattern you choose first, the joy is in making something warm, wearable, and handmade with care. A crochet beanie is more than a winter accessory. It is a cozy piece of craft you can enjoy making and wearing all season long.