Crochet headbands are one of the best small projects to make when you want something useful, pretty, and fast to finish. They are the kind of accessory that can be worn every day, given as a thoughtful handmade gift, or made in matching sets for friends and family. Because headbands are small, they work up quickly and give you a chance to play with color, texture, and stitch patterns without committing to a large project.
The best part about crochet headbands is how wearable they are. A good headband should be soft, foldable, bendable, and comfortable enough to tie at the back, so it fits a variety of head sizes. That makes them practical as gifts too, because the tie-back style gives a little flexibility and makes sizing much easier. Whether you want something sweet and delicate or bold and modern, a crochet headband can be styled to suit almost anyone.
In this collection, you will find five quick crochet headband patterns that are perfect for gifts and everyday wear. Each pattern is designed to be flexible, soft, and tie-back friendly, so they can be folded, adjusted, and worn comfortably. These projects are ideal if you want something small but satisfying to make, and each one includes a detailed step-by-step guide to help you create a beautiful handmade accessory.
Quick Notes
- These headbands are designed to be foldable, bendable, and tied at the back for easy wear.
- Keep the fabric soft enough to twist, fold, or bend without feeling stiff.
- Cotton yarn, bamboo blends, and soft acrylics work well for comfort.
- Make the tie sections long enough to adjust for different head sizes.
- A lighter stitch pattern is usually more comfortable around the head.
- If you want extra flexibility, avoid making the band too thick or bulky.
- Blocking can help the headband lie flat and improve the final shape.
Common Materials
Most crochet headbands can be made with a few simple supplies:
- Lightweight yarn, cotton yarn, or soft acrylic yarn
- Crochet hook sized to match your yarn
- Yarn needle
- Scissors
- Measuring tape
- Stitch markers, optional
- Small buttons or beads, optional for decoration
- Blocking mat and pins, optional
Best Yarn Choices
For headbands, the yarn should feel soft against the skin and be flexible enough to bend and tie. Cotton works beautifully for structure and definition. Soft acrylic is cozy and easy to care for. Bamboo or cotton-blend yarns are also lovely when you want a smooth, lightweight finish.
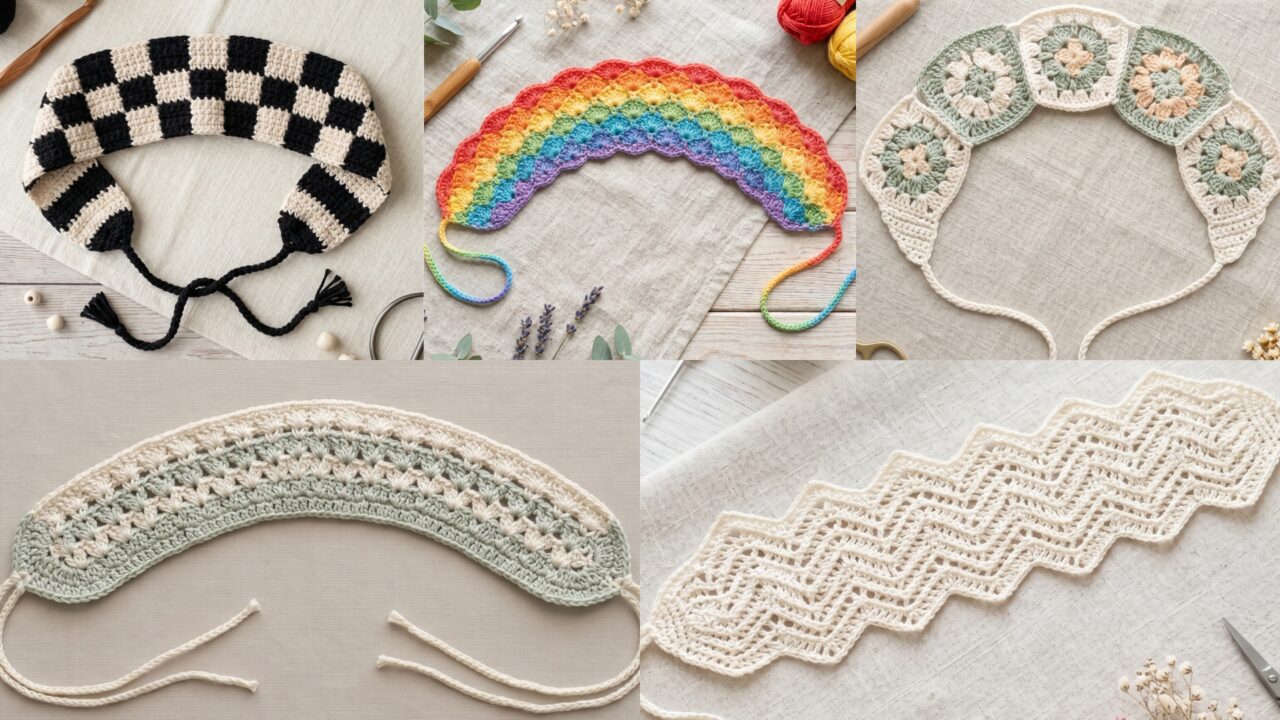
1. Crochet Shell Stitch Rainbow Headband Pattern
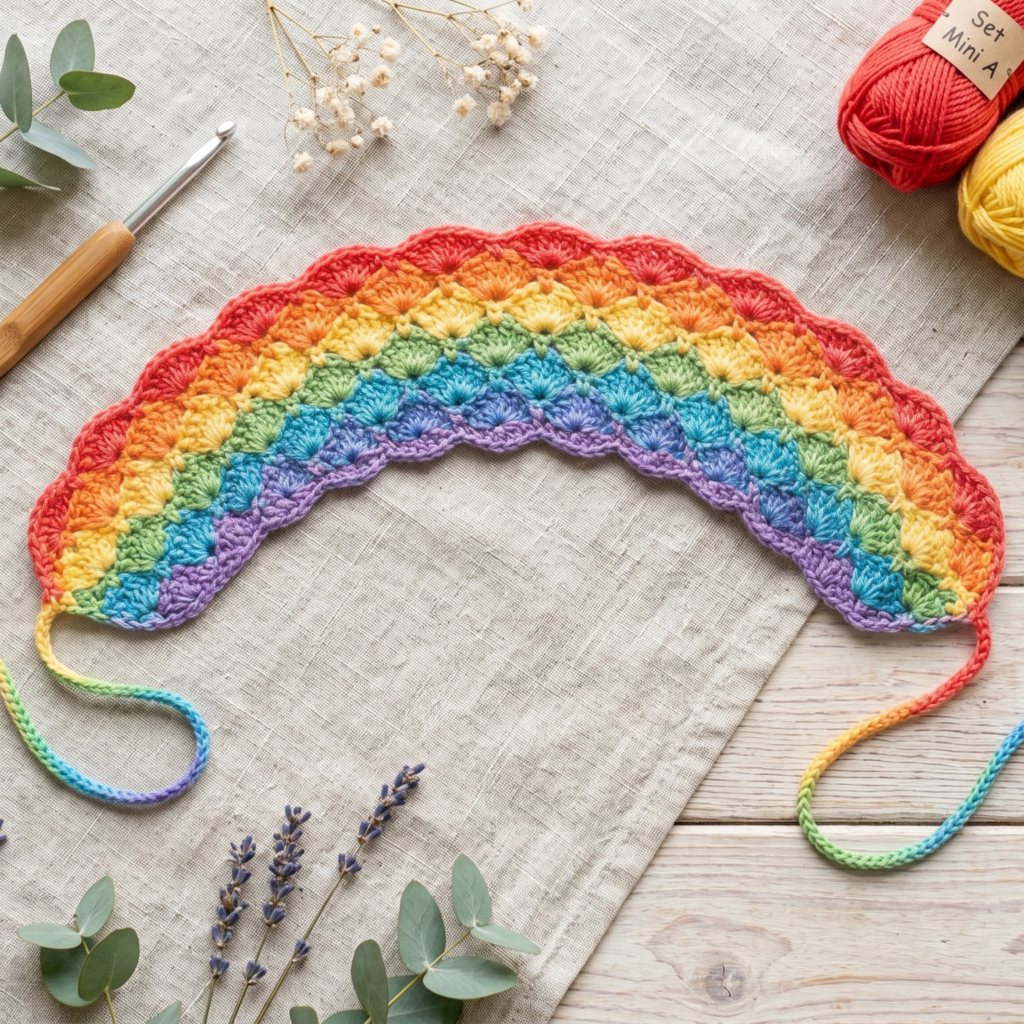
The crochet shell stitch rainbow headband is cheerful, colorful, and full of charm. Shell stitch creates a soft scalloped texture that feels delicate and decorative, while rainbow colors make the headband playful and eye-catching. This is a beautiful gift idea for someone who loves bright accessories with a handmade touch.
Skill Level
Beginner to intermediate
Suggested Size
Adjustable tie-back headband, one size fits most
Materials
- Lightweight yarn in rainbow colors or 4 to 6 coordinating shades
- Crochet hook suited to your yarn
- Yarn needle
- Scissors
- Measuring tape
Step-by-Step Guide
1. Plan the color sequence
Before you begin, decide how you want the rainbow to flow. You can use classic rainbow colors, soft pastel rainbow shades, or a more muted boho palette. Since this headband is tie-back and bendable, the colors can be playful without making the piece too heavy.
2. Start with the main band foundation
Make a long foundation chain that will wrap comfortably around the head and tie at the back. The band should be long enough to fit around the head plus extra length for tying. Since this headband is adjustable, you do not need to worry about perfect sizing at the start.
3. Work the shell stitch row
Shell stitch is usually made by placing several stitches into the same space to create a fan-like shape. Work the shells evenly across the band so the texture appears smooth and balanced. Keep the pattern soft and flexible so the headband can bend comfortably.
4. Change colors gradually
If you are using rainbow shades, change colors in a smooth sequence as you work. You can switch after every few rows or create a stripe-by-stripe rainbow effect. Make sure your joins are neat so the color transitions look tidy.
5. Keep the band narrow enough to fold
Because this headband should be bendable and easy to tie, avoid making it too wide or too stiff. A moderate width works best because it gives enough decoration without losing comfort.
6. Add simple tie ends
At both ends of the headband, create long chain ties or narrow cord ties. These ties should be soft and flexible so they can be adjusted easily. Make them long enough to allow a secure knot at the back of the head.
7. Finish and weave in ends
Once the headband is complete, weave in all loose ends carefully. If needed, lightly block the band so the shell stitches open nicely and the headband lies flat.
Helpful Tips
- Use soft rainbow shades if you want a more subtle gift.
- Keep the ties slim so they do not compete with the shell texture.
- A cotton yarn gives the shell stitch a crisp, clean shape.
- This pattern looks beautiful on children and adults alike because the tie-back style is adjustable.
Why This Pattern Works Well
The shell stitch rainbow headband feels bright, feminine, and easy to wear. It is a lovely gift because the tie-back design makes it flexible, and the colorful shell texture gives it a cheerful handmade look.
2. Crochet Checkered Headband Pattern
The crochet checkered headband has a modern, stylish feel with a classic pattern twist. Checkered designs are bold and visually interesting, and when worked into a soft tie-back headband, they create a fun accessory that feels both trendy and practical. This is a great choice if you want something that stands out without being too complicated.
Skill Level
Beginner to intermediate
Suggested Size
Adjustable tie-back headband, one size fits most
Materials
- Two contrasting yarn colors
- Crochet hook suited to your yarn
- Yarn needle
- Scissors
- Measuring tape
Step-by-Step Guide
1. Pick your color combination
Choose two colors that contrast clearly. Classic options include black and white, cream and brown, or pink and red. Since the pattern depends on contrast, the colors should be easy to distinguish from each other.
2. Decide on the check size
Before crocheting, decide whether you want small checks or larger blocks. Smaller checks give the headband a more detailed look, while larger checks feel bold and graphic. This is especially helpful when planning the width of the band.
3. Start the foundation chain
Make a chain long enough to wrap around the head comfortably with extra length for tying. Keep the chain flexible because the headband needs to bend and fold naturally.
4. Build the checkered pattern
Work the checkered design row by row, alternating colors in a neat rhythm. Keep your color changes consistent so the squares look even. If the checks are too irregular, the pattern will lose its clean look.
5. Keep the band soft and flexible
Because this headband is meant to be bendable, do not make the stitches too tight. The fabric should stay soft enough to fold and tie without feeling rigid.
6. Add the tie-back ends
Finish each end with chain ties or narrow cord ties in one of the colors from the pattern. These ties should be long enough to secure the headband at the back without slipping.
7. Neaten the edges
If the sides feel uneven, add a simple border or carefully weave in the edges so the band feels smooth. A neat finish makes the checkered pattern look more polished.
Helpful Tips
- Use yarns with similar thickness so the checks stay even.
- Keep the color joins tidy for a cleaner effect.
- This pattern looks especially nice in black and cream or soft neutral combinations.
- A medium width works best so the pattern stays visible but still comfortable.
Why This Pattern Works Well
The checkered headband is stylish, modern, and easy to customize. It makes a great gift because the tie-back style is adjustable and the bold design feels fashionable without being overcomplicated.
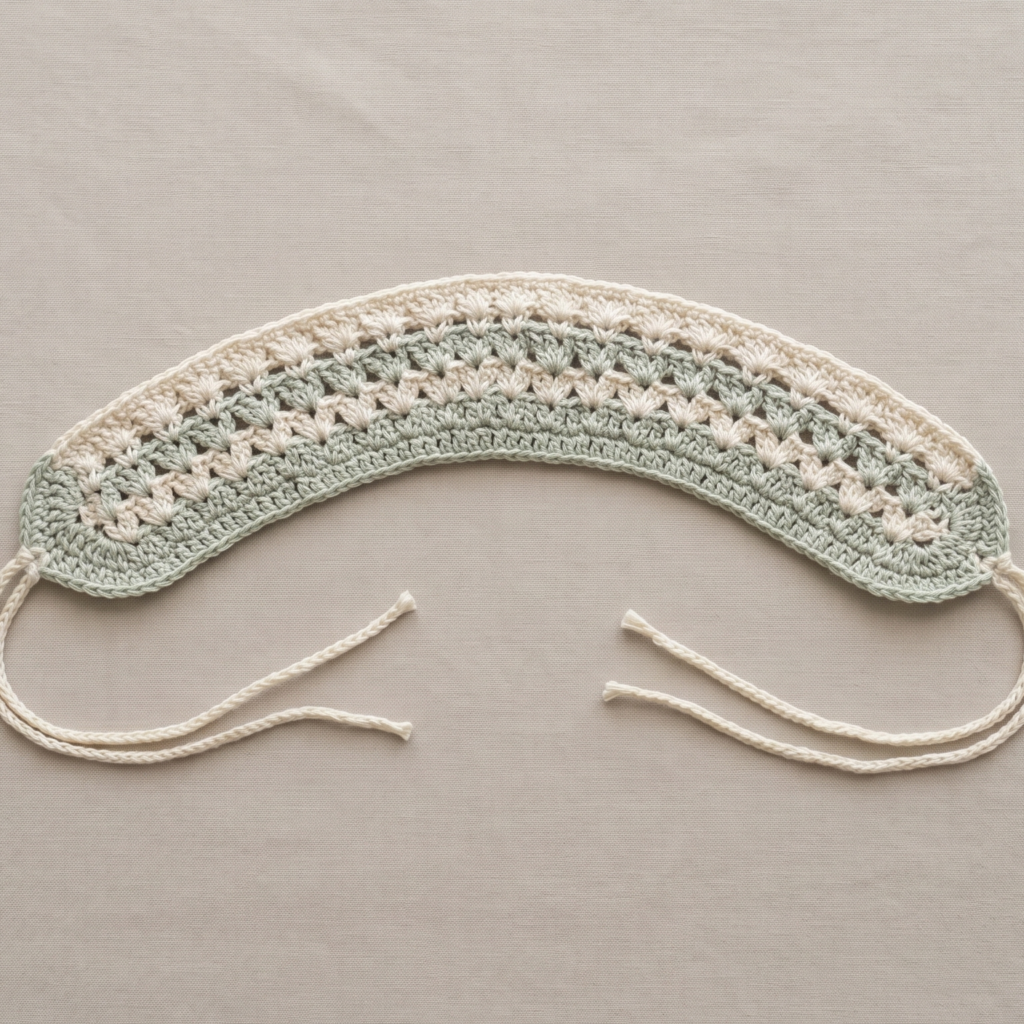
3. Crochet Clover Granny Square Headband Pattern

The crochet clover granny square headband is sweet, playful, and full of classic crochet charm. Granny square motifs give the headband a nostalgic handmade feel, while the clover-inspired details make it feel special and decorative. It is a lovely choice if you want a cheerful accessory with a soft vintage style.
Skill Level
Beginner to intermediate
Suggested Size
Adjustable tie-back headband, one size fits most
Materials
- Lightweight yarn in 2 to 4 colors
- Crochet hook suited to your yarn
- Yarn needle
- Scissors
- Measuring tape
Step-by-Step Guide
1. Make the granny square motif
Begin by crocheting a small granny square or clover-inspired square motif. This will become the decorative center of the headband. Keep the motif small enough so it remains comfortable and light.
2. Add clover-inspired shaping
If you want the clover effect to show more clearly, use soft green tones or rounded petal-like details within the square. The shape should feel floral or leafy without becoming too bulky.
3. Create the headband strip
Attach the granny square to a crocheted strip that extends toward the ties. The strip should be narrow, soft, and flexible so it can bend easily around the head.
4. Make the band adjustable
Since this is a tie-back headband, add long ties at both ends. These ties make the fit adjustable and help the headband stay in place. Keep them lightweight and comfortable.
5. Balance the motif placement
Place the granny square in the center or slightly off-center depending on the style you want. Center placement creates a balanced look, while off-center placement feels more playful and modern.
6. Finish the edges neatly
If needed, add a small border around the square or along the strip to help everything feel more polished. Keep the edging simple so the motif remains the focus.
7. Block lightly if necessary
A light block can help the square lay flat and improve the shape of the headband. This is especially useful if the motif curls or looks uneven.
Helpful Tips
- Use soft colors for a gentle, gift-friendly look.
- Keep the square small so the headband stays bendable.
- A green and cream combination works beautifully for a clover-inspired feel.
- This style is especially nice when made in matching sets.
Why This Pattern Works Well
The clover granny square headband feels cheerful, handmade, and nostalgic in the best way. The tie-back design makes it adjustable, while the square motif gives it a sweet decorative centerpiece.
4. Crochet Chevron Lace Headband Pattern
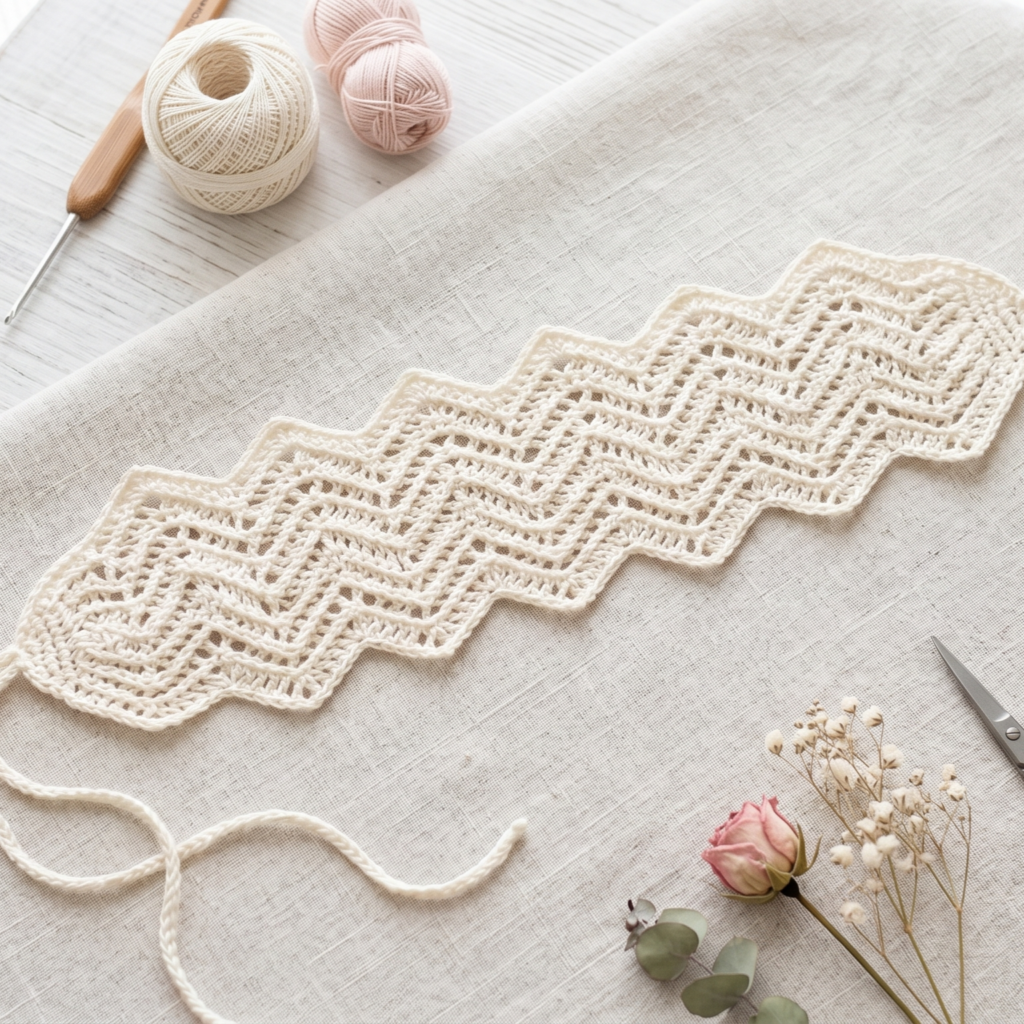
The crochet chevron lace headband is elegant, light, and easy to wear. Chevron lace creates a soft zigzag flow that looks delicate and modern at the same time. This pattern is ideal if you want a headband that feels airy and graceful, while still being flexible enough to fold and tie comfortably at the back.
Skill Level
Intermediate
Suggested Size
Adjustable tie-back headband, one size fits most
Materials
- Fine or lightweight yarn
- Crochet hook suited to your yarn
- Yarn needle
- Scissors
- Measuring tape
Step-by-Step Guide
1. Choose a delicate yarn
Chevron lace looks best when the yarn has good stitch definition and enough softness to drape well. Fine cotton or lightweight blends work beautifully. The yarn should feel light so the headband remains comfortable.
2. Start with the foundation chain
Make a long chain that will fit around the head and leave enough room for ties. Since this headband should be bendable, the chain should stay relaxed and not too tight.
3. Work the chevron lace pattern
Create the chevron effect by using increases and decreases or chain spaces that form a zigzag flow. For the lace aspect, keep the stitch pattern open and airy. The result should feel delicate rather than dense.
4. Keep the width moderate
A chevron lace headband should be wide enough to show the pattern but not so wide that it becomes stiff. The best headbands are soft enough to fold and adjust easily.
5. Add tie-back ends
Finish both sides with narrow ties or cord-style ends. These ties make the headband adjustable and allow it to fit different head sizes. Keep the ties flexible so they are easy to knot.
6. Smooth the edges
Because lace patterns can curl, add a small border if needed or lightly block the headband to shape it. This will help the zigzag pattern stay neat and balanced.
7. Check the fit
Try the headband on or wrap it around a measuring tape to make sure the ties and center section feel comfortable. Adjust the length if necessary.
Helpful Tips
- Pastel colors make the lace pattern feel soft and romantic.
- Blocking is especially helpful for lace designs.
- Keep the ties narrow so they do not overpower the delicate center.
- This pattern works beautifully as a gift because it feels elegant and versatile.
Why This Pattern Works Well
The chevron lace headband is pretty, lightweight, and adjustable. It has enough detail to feel special, while still being soft and practical for everyday wear.
5. Crochet Dainty Country Headband Pattern
The crochet dainty country headband has a soft, charming, and slightly rustic feel. It is the kind of accessory that looks sweet and effortless, making it perfect for casual outfits or thoughtful gifts. Because it is designed to be foldable, bendable, and tie-back friendly, it wears comfortably while still feeling decorative.
Skill Level
Beginner
Suggested Size
Adjustable tie-back headband, one size fits most
Materials
- Soft cotton, cotton blend, or light acrylic yarn
- Crochet hook suited to your yarn
- Yarn needle
- Scissors
- Measuring tape
Step-by-Step Guide
1. Choose a soft color palette
Country-style headbands often look best in soft neutrals, faded florals, dusty pinks, sage, cream, or light blue. A gentle color palette helps the headband feel dainty and easy to pair with many outfits.
2. Start the band foundation
Make a chain long enough to fit around the head with extra room for tying. The foundation should be soft and flexible because this headband needs to bend and sit comfortably.
3. Work a simple dainty stitch pattern
Use a light stitch repeat such as small clusters, tiny shells, or an easy lace-like pattern. The goal is to create a feminine, delicate look without making the band too thick or stiff.
4. Keep the band narrow and soft
A dainty country headband should feel light and airy. Keep the width moderate so the band folds naturally and does not press too hard against the head.
5. Add tie-back ends
Create long ties at both ends so the headband can be adjusted easily. This also helps the headband stay secure while still feeling soft and bendable.
6. Add subtle embellishment if desired
If you want a little extra charm, you can add a tiny flower, a bow, or a small textured detail near one side of the band. Keep it subtle so the headband stays delicate and wearable.
7. Finish neatly
Weave in all ends carefully and lightly block the headband if needed. A gentle block can help the stitches settle into a pretty, even shape.
Helpful Tips
- Keep embellishments small so the headband stays comfortable.
- Cotton yarn works especially well for a clean country look.
- Soft pastels or creamy neutrals create the most dainty effect.
- A simple tie-back style makes it easy to gift without worrying about size.
Why This Pattern Works Well
The dainty country headband is sweet, flexible, and easy to wear. It is a lovely handmade gift because the adjustable tie-back style makes it practical for different people and head sizes.
Conclusion
Crochet headbands are such a lovely project because they are quick, useful, and full of charm. They let you create something beautiful in a short amount of time while also making a gift that feels personal and thoughtful. The fact that these headbands are foldable, bendable, and tied at the back makes them even more practical because they can fit comfortably and adjust to different head sizes.
These five patterns each bring a different style. The shell stitch rainbow headband is cheerful and colorful. The checkered headband feels modern and bold. The clover granny square headband has a classic handmade charm. The chevron lace headband is delicate and elegant. And the dainty country headband feels soft, sweet, and timeless.
The best part is how easy these headbands are to personalize. You can change the colors, adjust the width, simplify the stitch pattern, or add tiny decorative details to match the person wearing it. That is what makes them such wonderful gifts. They are small enough to make quickly, but special enough to feel meaningful.
A handmade headband is more than just an accessory. It is a little piece of comfort, style, and care, tied neatly at the back and ready to wear with ease.