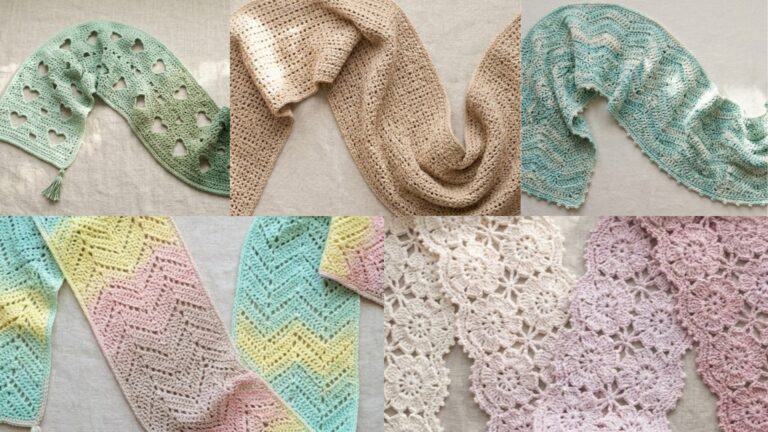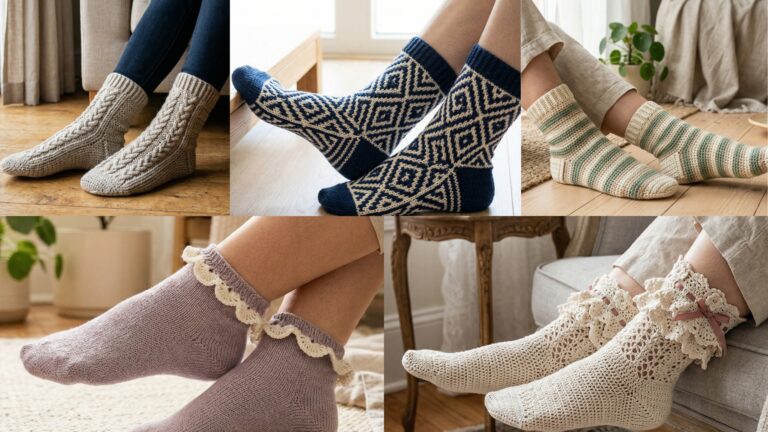
Light layers are summer’s best friend — a pretty crochet cardigan keeps you covered from sun and AC without overheating. Below you’ll get a friendly intro that covers yarn choices, measuring, basic cardigan construction options, and a clear example of stitch–to–size math. Then you’ll get six full cardigan designs (materials, skill level, gauge guidance, and long step-by-step instructions you can follow start-to-finish). Each design includes fit notes, variations, and styling tips so you can make a wearable piece you’ll actually wear all season.
Quick Intro — yarn, hooks, sizing, construction approaches, and a quick stitch math example
Yarn & hook picks for summer
- Cotton / cotton-blend (sport → DK): breathable, crisp stitch definition, holds shape well — ideal for lacy or textured summer cardigans.
- Linen or linen blends: excellent drape and cool to the touch; stitches look relaxed. Use slightly smaller hook than label to keep the fabric tidy.
- Bamboo / rayon blends: silky drape, beautiful for dressier cardigans.
- Avoid heavy wool or bulky yarn for summer cardigans unless you want a very lightweight open mesh in a bulky yarn (unusual).
Suggested hooks: 3.5–5.5 mm depending on yarn and how open you want the fabric. If you want more drape, go up 0.5–1.0 mm.
Measurements to take (do this first)
- Bust/chest (fullest point)
- Upper bust or high bust (just under arms) — helpful for yoke/strap garments
- Shoulder width (tip to tip)
- Upper arm circumference (for sleeve fit)
- Desired cardigan length (e.g., crop, hip, mid-thigh)
These let you choose ease. For lightweight summer covers aim for 0–3 in positive ease over bust for a fitted look, 3–6 in for relaxed.
Construction approaches (which to choose)
- Top-down in the round (raglan or yoked): try on as you go, no seaming, easy to add length and shape sleeves. Favorite for custom fit.
- Bottom-up in the round: start at hem and work up; good for fitted waists and skirts but you must estimate hip shaping.
- Panel + seam (back + 2 fronts + sleeves): straightforward, great for colourwork or when you want a flat layout.
- Motif assembly (granny/flowers): decorative and modular, perfect for boho/coquette vibes.
Gauge & stitch math (digit-by-digit example)
Always make a 4″ swatch in the exact stitch pattern, blocked as you will wear it. Measure stitches per inch (spi) and rows per inch (rpi).
Example: you want a cardigan with a back width of 16 inches (that’s the finished back panel). Your swatch in the stitch shows 16 stitches = 4 inches. Compute stitches needed for 16 inches:
- First calculate stitches per inch: 16 ÷ 4 = 4 stitches per inch.
- Multiply by desired width: 4 × 16 = ?
- 4 × 10 = 40
- 4 × 6 = 24
- 40 + 24 = 64 stitches.
So you’d need 64 foundation stitches (or the nearest multiple required by your stitch pattern) to get ~16″ back width.
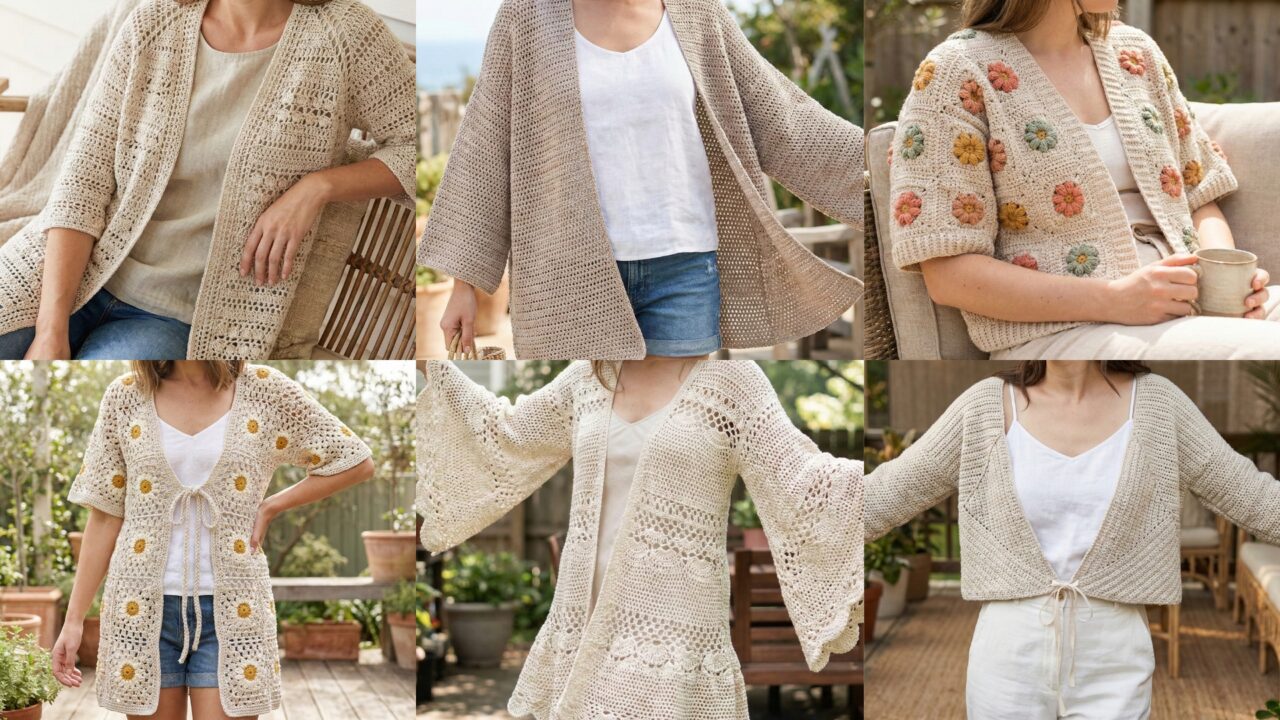
1. Crochet Lightweight Lace Cardigan Pattern
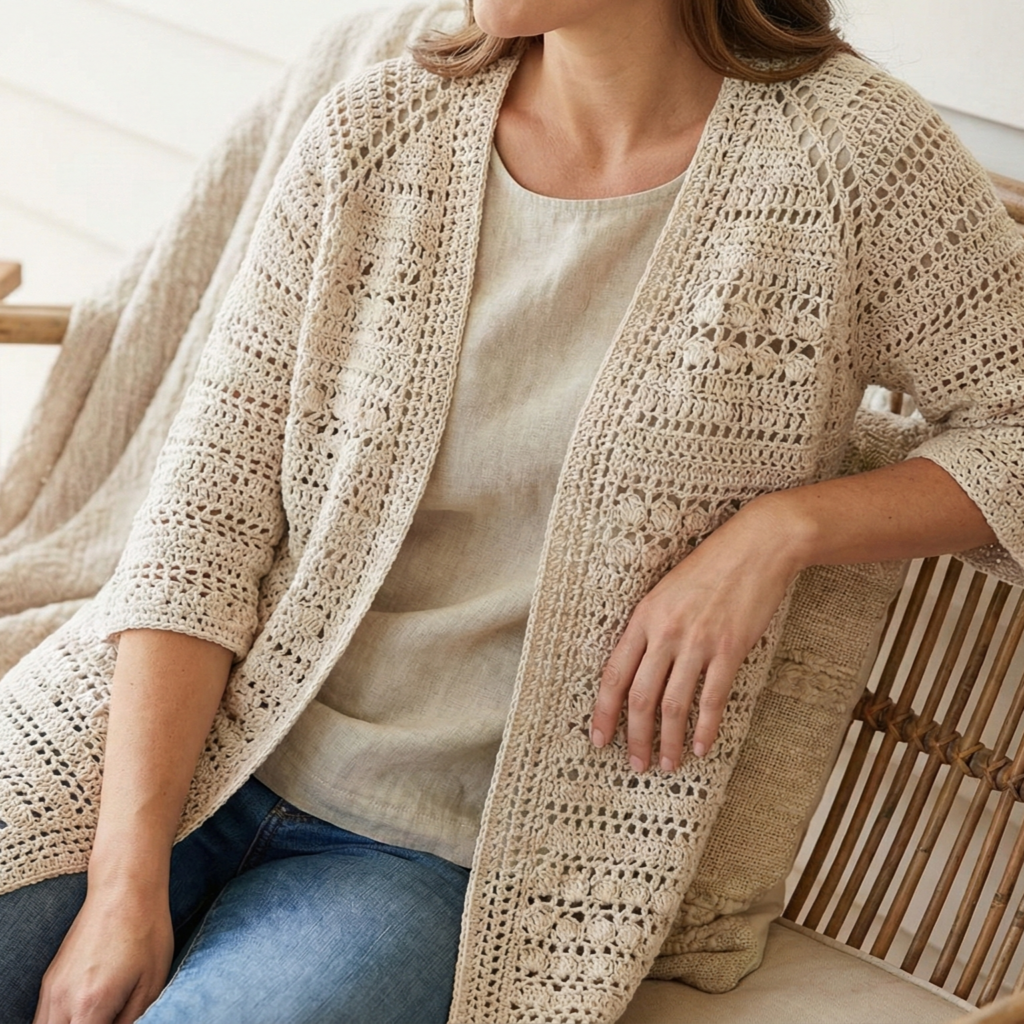
A drapey, openwork cardi that’s basically a wearable shawl — perfect for breezy evenings and beach cover-ups.
Skill level: confident beginner → intermediate
Style: open front, longline (hip length)
Sample sizes: instructions are written to scale — make back width using the gauge math above and grade by adding/subtracting repeats.
Materials
- Sport or DK cotton or bamboo blend — ~800–1,200 yd (depends on length & size).
- Hook: 4.0–5.0 mm for lacy drape.
- 1 stitch marker, tapestry needle.
Stitch palette
- lacy shell rows (e.g., dc shell = 5 dc in same st), chain arches, simple mesh rows.
Construction overview
Worked top-down raglan style so you can try on as you go. Yoke is lacy mesh; body and sleeves are worked in the round (sleeves set in after raglan shaping) or worked top-down in one piece with underarm separation.
Step-by-step
- Neckline & yoke set-up (top-down raglan)
- Make a small starting chain to form the neckband base: ch 60 if you want a roomy neckline (adjust by gauge). Join to a loop if starting in the round or work flat and seam later. For raglan, you’ll work a rectangular yoke: ch foundation across the back/shoulders/fronts to form the yoke circumference, or try this simpler method: work a long chain to become the back neck edge and work lacy rows increasing at raglan points (see raglan increases below).
- Raglan shaping (lacy)
- Decide four raglan points (left front, left sleeve, back, right sleeve, right front). On a top-down raglan you make increases at those 4 corners every RS row: for lacy cardigan use dc, ch1, dc increase clusters at raglan points to keep openness. Example raglan increase row: work your lace repeat across; at raglan point do (dc, ch1, dc); continue pattern; repeat on each corner. This increases fabric and forms sleeve openings naturally.
- Work yoke to desired depth
- Continue raglan increase rows until the yoke depth (shoulder to underarm) equals your measurement (e.g., 8–10 in depending on sleeve placement). Try on to check — raglan is forgiving.
- Separate body & sleeves
- Place sleeve stitches on holders or waste yarn when you’ve formed the underarm openings. Continue body in your lace pattern in the round (or flat) to desired length (hip or mid-thigh). Work evenly, keeping shells aligned.
- Sleeves
- Put sleeve sts back on your hook and work in the round downward in lace pattern; taper slightly if you prefer by decreasing 2 sts every 4–6 rounds until desired sleeve length/width. For short summer sleeves, stop after 4–6 in.
- Neck & front finishing
- Add a simple edging (1–2 rounds sc or a small picot round) for tidy front edges. Option: make a narrow tie band by crocheting a long I-cord or chain and slip-stitch to make a thin belt.
- Blocking
- Block gently to open shells and even rows — cotton benefits from wet blocking and pinned shaping.
Variations & styling
- Shorten to a cropped length for festival wear.
- Use a 2-color gradient for an ombré lace look.
- Add shell scallop hem for extra romance.
2. Crochet Boxy Blooms Cardigan Pattern
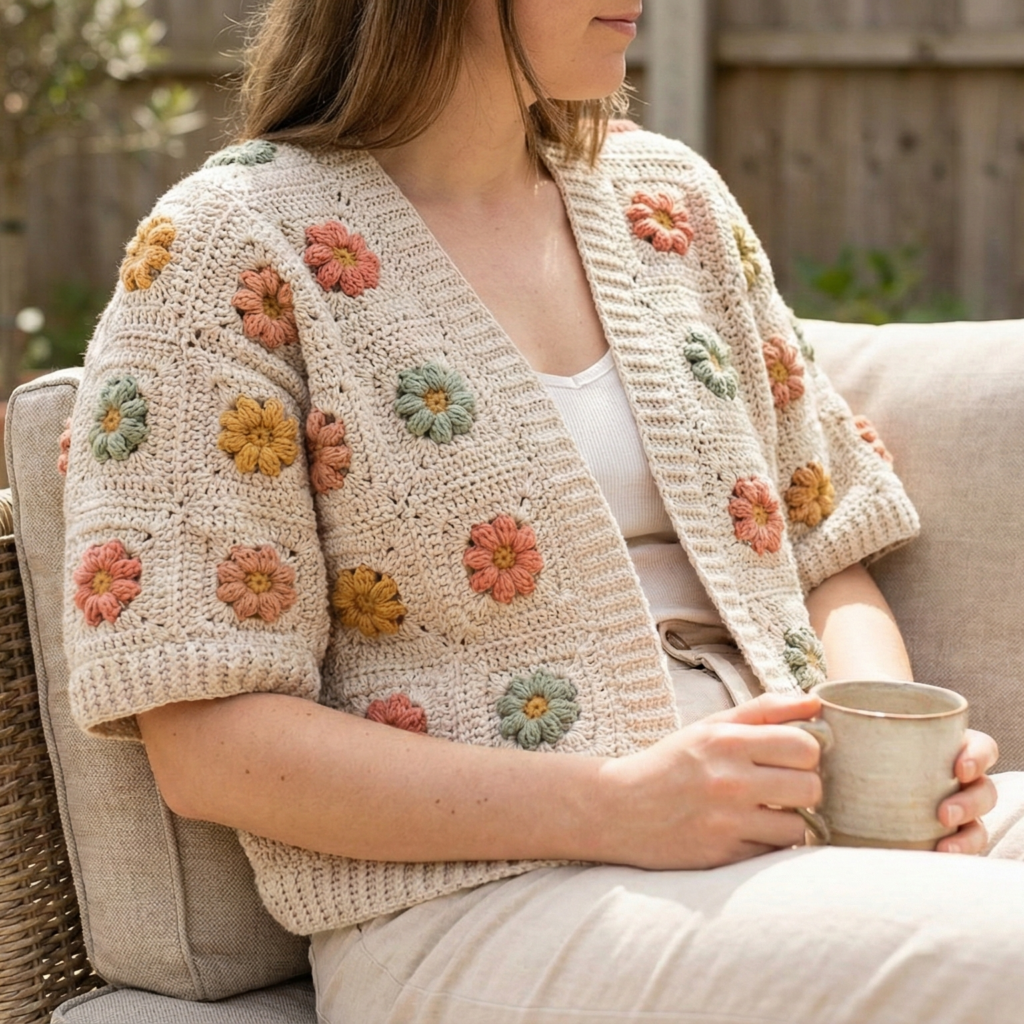
A relaxed, boxy silhouette covered with surface-appliquéd or crocheted floral motifs. Short sleeves make it summer-friendly.
Skill level: intermediate (motifs + assembly)
Style: boxy crop or hip length with short sleeves
Materials
- DK cotton in main color + small amounts of 3–5 accent colors for flowers — ~700 yd.
- Hook: 4.0 mm.
- 2–3 buttons (optional), tapestry needle.
Stitch palette
- simple sc/hdc ground for boxy panels; granny-style or layered flower motifs worked separately and sewn on.
Construction overview
Make two front panels, one back panel, and two short sleeves as rectangles, then sew together. Make small floral motifs and sew them on after blocking.
Step-by-step
- Measure & chain
- Decide finished panel widths. For a boxy cardigan, the front + back are often equal: e.g., for bust 36″ and 4″ ease → total width 40″ → back = 20″, each front = 10″. Compute starting chain for each panel: if gauge = 4 sc/in then back chain = 20 × 4 = 80 sc foundation.
- Crochet panels
- Work each panel in sc or hdc rows until desired height (for short boxy cardigan, body height ~18–20″ from shoulder to hem; for cropped, 14–16″). Make two front panels half the back width, and two sleeve rectangles (width = upper arm + ease; height = short sleeve length, e.g., 6–7″).
- Seam panels
- Fold and seam shoulders: attach fronts to back at shoulder seam leaving neck opening (collar width typically 6–8″). Seam sides, leaving armhole openings. Insert sleeves: seam sleeve rectangles into armhole openings and seam underarm.
- Make motifs
- Small layered flower (example): MR; Round 1: ch2, 10 dc in MR — join. R2: ch3, sl st around for loops; R3: in each ch3 loop work (sc, hdc, 3 dc, hdc, sc). Make 12–24 flowers depending on size; block and flatten if needed.
- Applique
- Pin motifs across front and back panels in a pleasing scatter. Sew through the center and a few petal points, using small stitches so the flower edges are free and 3-D.
- Finishing
- Add a narrow band around neck/front edges (sc rounds) and optional button closure at bustline. Weave ends, block lightly.
Variations & styling
- Make granny-square flowers instead and join into panels for full boho aesthetic.
- Use tonal flowers for a subtle texture or bright contrasting flowers for statement.
3. Crochet Kimono Cardigan Pattern
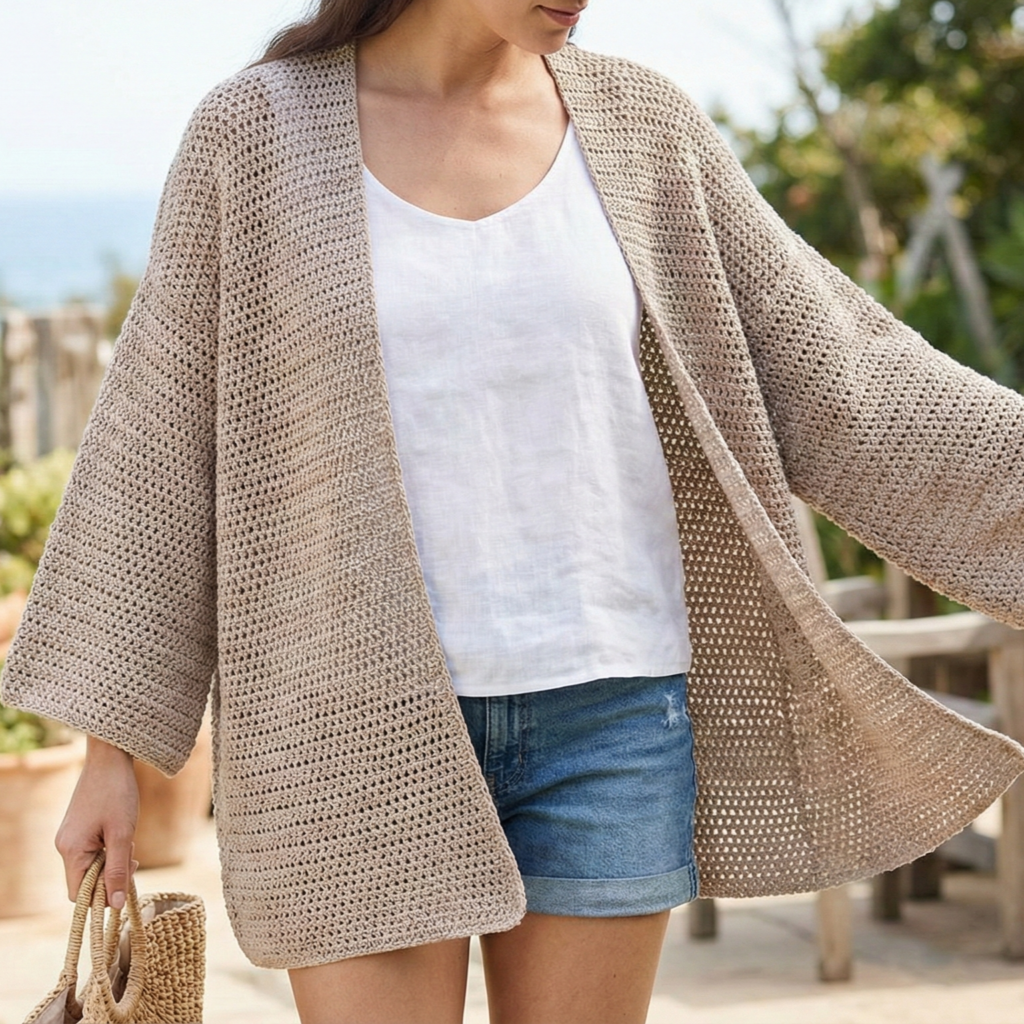
An easy, zero-seam kimono with wide sleeves — airy and drapey; perfect for layering over tanks and swimsuits.
Skill level: confident beginner
Style: open front, kimono sleeves, straight panels
Materials
- DK or light worsted cotton — ~700–1,100 yd depending on length.
- Hook: 4.5–5.5 mm for relaxed drape.
Stitch palette
- simple dc or v-stitch for fast, open fabric; optional shell edging.
Construction overview
Made from three simple rectangles: back + two fronts that are seamed at the shoulders and sides to create kimono sleeves. Alternatively work as two long panels and fold to form sleeves.
Step-by-step
- Decide sizing
- Kimono width is generous; finished chest width = your bust + desired framing ease + sleeve overlap. Many kimonos are one-size but use measurements: if bust 36″ and you want a boxy 44″ overall, back panel could be 20″ wide and each front 12″ wide.
- Crochet rectangles
- Back panel: chain foundation to corresponding width (e.g., 20″ × spi). Work in chosen stitch to desired length (hip or midi). Front panels: chain for width (e.g., 12″ each) and work same length (or slightly shorter if you want high-low hem).
- Form sleeves
- Seam the back and fronts together along shoulder seams leaving wide sleeve openings (e.g., seam 8–10″ for each shoulder to create the arm opening). Then seam side seams starting under sleeve area down to hem, leaving sleeve openings of desired height.
- Optional collar & edging
- Work one or two rounds of dc (or shell) around the entire front opening and neckline for crisp finish. For a kimono look, add a narrow belt or tie loops inside.
- Finishing
- Block lightly to straighten edges; a gentle steam will relax the fabric into perfect drape.
Variations & styling
- Add tassels to the hem for boho vibes.
- Make short kimono as a summer shrug.
4. Crochet Butterfly Queen Lace Cardigan Pattern
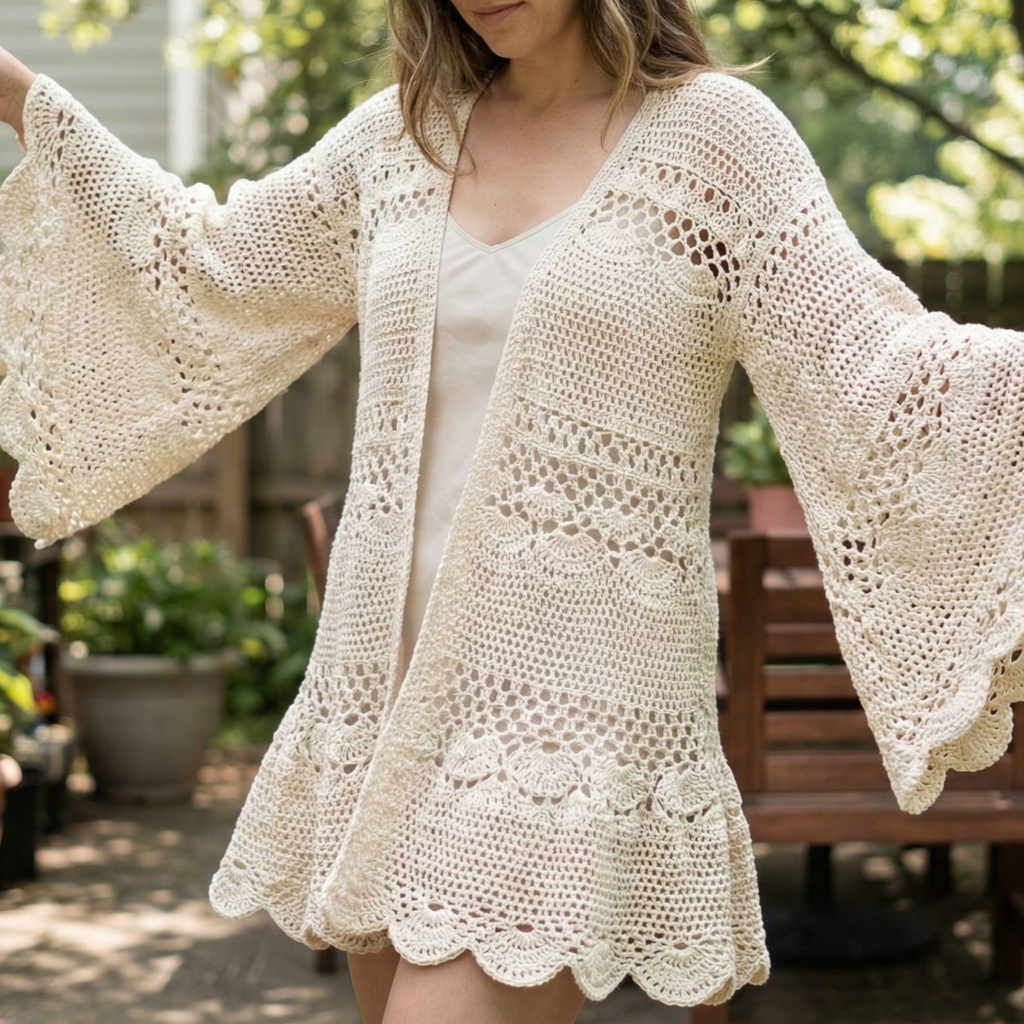
A dramatic lace cardigan with flared, butterfly-style sleeves — romantic and ethereal.
Skill level: intermediate → advanced (lace charts + shaping)
Style: longline, wide butterfly sleeves, open front
Materials
- Fingering → DK yarn in cotton, linen or bamboo for good lace definition — ~1,000–1,500 yd depending on length.
- Hook: 3.5–4.5 mm for lace clarity.
Stitch palette
- a repeating lace motif (e.g., fan + mesh + eyelet columns), large scallop hem for wings.
Construction overview
A top-down yoke that transitions into a wide flared body and ultra-wide sleeves shaped by strategic increases; the hem forms the butterfly wings.
Step-by-step
- Start with a shallow yoke
- Begin with a small neckband chain joined, work several rows of lace to form a yoke. Increase evenly to add for shoulders and the opening of the sleeves using a formula: increase at sleeve splits and at side seams to set the wide silhouette.
- Divide for body & sleeves
- After yoke depth, separate the front body sts, sleeve sts and back body sts by placing sleeve sts on holders/waste yarn. Continue body in the round (open front, so work two fronts flat) for length; work sleeves later.
- Flare for butterfly hem
- Once armscyes are set, work increases into the body every X rows by adding extra lace repeats so the hem gets much wider than shoulder width. That dramatic flare becomes the wings.
- Sleeves
- Pick up sleeve sts and work outwards, adding increases every few rows to create the wide butterfly sleeve that drapes like wings. Keep length to elbow or full wrist depending on style.
- Edging
- Work a large scalloped shell border along hem and sleeve edges (e.g., sc, skip 1, 9 dc shell, sc around) to finish the winged outline.
- Blocking
- Heavy blocking is mandatory for this style — pin wing tips wide to reveal scallops and open lace.
Variations & styling
- Make a short version (capelet) for evening wear.
- Use variegated yarn for magical color movement across wings.
5. Crochet Tie Front Boho Daisy Cardigan Pattern
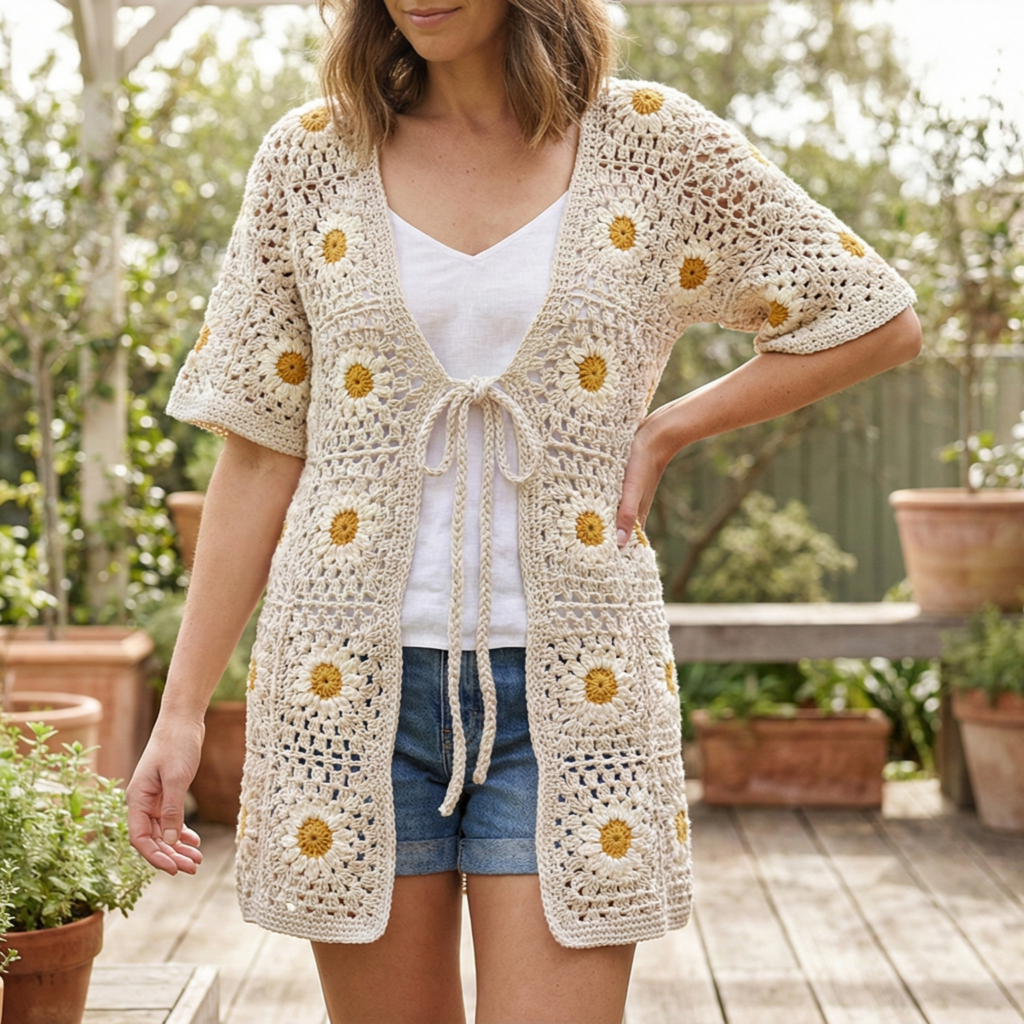
A mid-length boho cardi with daisy motif panels and a casual tie-front — charming over dresses and shorts.
Skill level: intermediate (motifs + panel joining)
Materials
- DK cotton in main color + contrast for daisies — ~800–1,200 yd.
- Hook: 4.0 mm.
Stitch palette
- granny-flower daisies, mesh background for panels, simple sc bands.
Construction overview
Work two front panels and a back from daisy motifs joined in strips, or make a mesh body and applique daisy rows. Add a simple tie band rather than buttons.
Step-by-step
- Make daisy motifs
- Daisy (small): MR, ch2, 12 dc in ring (petal base) — R2: in each dc make ch3, sl st to form petal loops; R3 in each loop make (sc, hdc, 3 dc, hdc, sc) for petals. Make motifs in a grid to equal panel size: e.g., 4 across × 4 down per panel.
- Join motifs into panels
- Join-as-you-go into neat panels (2 fronts + back). Block motifs for uniformity before joining.
- Add mesh background
- If you want less heavy motif coverage, join motifs with mesh rows (dc/ch1 grid) to add open fabric between daisies.
- Tie band
- Pick up stitches along front edges and work a 2–3″ wide ribbing or sc band; at waist level work two long i-cord ties (or crochet chains reinforced with sc) and attach them to fronts so the cardigan ties at waist.
- Sleeves
- Make short or elbow sleeves by adding rows of motifs or a few rounds of mesh; simple flared cuffs look great.
- Finish
- Weave in ends and lightly block. Tie front into a bow or knot.
Variations & styling
- Use bright pops of color in daisy centers for playful panels.
- Make tie ends long for a relaxed boho knot.
6. Crochet Crossed Triangle Cardigan Pattern
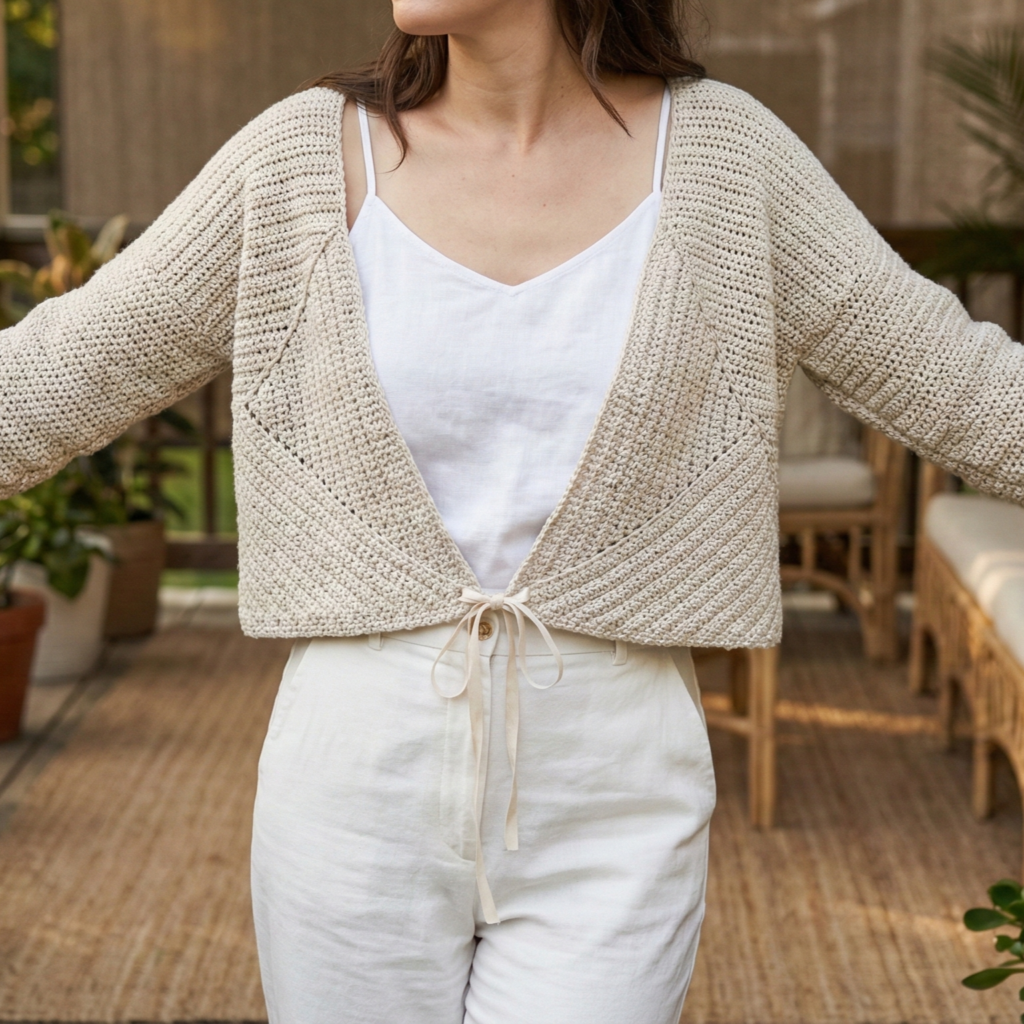
A modern, triangle-panel cardigan with crossed front panels that tie or button — clean lines and airy texture.
Skill level: confident beginner → intermediate
Style: cropped or hip length with crossed front panels
Materials
- DK cotton or linen blend — ~700–1,000 yd.
- Hook: 4.0–5.0 mm.
Stitch palette
- simple v-stitch (dc-ch-dc) or textured half double rows for body; crossed panels created by shaping diagonal decreases.
Construction overview
Work a back rectangle, then make two identical right-angled triangular front panels that are seamed to the back and cross over to form the front. Alternatively work top-down with short rows to shape triangles.
Step-by-step
- Back panel
- Chain width for back (e.g., 16″ × spi). Work rectangles to desired center-back length (e.g., 18″ for hip length).
- Front triangle panels
- Make two right triangles starting from one bottom corner: ch to create long base, then decrease one stitch at the start/end of rows to form a triangle slope. Work until triangle height matches back length. Create mirror image for other side.
- Join
- Seam the long triangle base edges to front edges of back panel leaving armholes; cross triangles over each other so left panel overlaps right and vice versa (choose closings).
- Ties or buttons
- Make narrow ties and attach inside edges to tie across, or add small hidden buttons on the inner corner and outer shoulder to secure crossed overlay.
- Sleeves
- Add short cap sleeves by stitching underarm openings with a few rounds of sc, or make long sleeves by picking up stitches along armhole and working in the round.
- Finish
- Add a neat edging around the crossed fronts to hide raw edges and give structure.
Variations & styling
- Make a cropped version with wide tie for a bralette layer.
- Use colorblocks along triangle edges for graphic effect.
Finishing tips common to all cardigans
- Try on as you go (especially top-down): easier to adjust fit and length while you still can.
- Edge stability: lightweight yarn can curl — add a small band of BLO hdc or a sewn fabric facing if you want crispness.
- Seams: mattress stitch (whipstitch invisibly) yields neat joins for panels.
- Buttons & ties: for summer looks, ties or small toggle closures keep the design light. If using buttons, reinforce the buttonband with interfacing or a narrow band of linen stitched inside.
- Blocking: always block lacy patterns to open motifs. For linen blends, wet block or steam carefully.
- Care: cotton and blends: machine wash gentle or hand wash; reshape on a flat surface to dry.
conclusion
All six designs are meant to be approachable and wearable:
- Lightweight Lace Cardigan — the versatile, throw-on layer for cool evenings.
- Boxy Blooms (Short Sleeves) — easy to sew up and super cute with floral appliqués.
- Kimono Cardigan — the easiest quick build; huge impact with minimal shaping.
- Butterfly Queen Lace Cardigan — dramatic and heirloom-worthy; perfect if you love lace and blocking.
- Tie Front Boho Daisy Cardigan — floral, cheerful and great for festival style.
- Crossed Triangle Cardigan — modern, architectural and flattering with wrap style.