Cozy, chic, and endlessly customizable — crocheted sweaters are wardrobe makers. Whether you want a knitting-look ribbed pullover, an oversized slouchy, or a perforated mosaic cardigan for layering, this collection gives you seven full sweater concepts you can actually wear. Each pattern below includes: a clear description, skill level, recommended yarns and hook sizes, suggested gauge and finished measurements, sizing notes, very detailed step-by-step construction guidance (how to make and shape body pieces and sleeves), finishing and blocking tips, and easy variations so you can make each design your own.
I’ve written these as practical, adaptable sweater blueprints — you can follow them exactly or personalize length, ease, and color. If you’d like one converted into a printable pattern card or a sizing chart with precise stitch counts for S/M/L/XL, tell me which one and I’ll generate it next.
Quick common notes (applies to all patterns)
- Terminology: US crochet terms used (sc, hdc, dc, tr, sl st, ch).
- Sizing approach: I give garment measurements and shaping instructions so you can customize fit. If you want step-by-step stitch counts for specific sizes (XS–4XL), I can provide them on request.
- Yarn suggestions: Wool/merino blends for warmth and structure; acrylic/merino for easy care; cotton or cotton blends for summer-friendly sweaters. Yarn weight recommendations appear per pattern.
- Hook: Use the hook recommended for the yarn and check gauge — most garments require losing/adding a hook size to get the right fabric.
- Gauge: Always make a 4″ × 4″ (10 cm × 10 cm) swatch in the stitch pattern and measure. Adjust hook if your swatch is off.
- Ease: “Positive ease” means the garment is larger than your body by a few inches for a relaxed fit; “negative ease” is skintight (rare for crochet). I recommend 2–6″ positive ease for sweaters (2″ for fitted, 4–6″ for easy/oversized).
- Construction methods: I describe common construction options: worked flat (back + two fronts + sleeves), worked in the round (body tube + set-in or drop sleeves), and top-down raglan. Choose whichever you prefer; raglan/top-down is excellent for custom fit as you can try it on as you go.
Abbreviations (US)
- ch = chain
- sk = skip
- sc = single crochet
- hdc = half double crochet
- dc = double crochet
- tr = treble (UK double)
- blo / flo = back/front loop only
- st(s) = stitch(es)
- rep = repeat
- sk = skip
- RS = right side, WS = wrong side
- inc = increase (work 2 sts in same st)
- dec = decrease (sc2tog or dc2tog depending on stitch)
- RS = right side, WS = wrong side
1. Crochet Knit-Look Ribbed Sweater Pattern
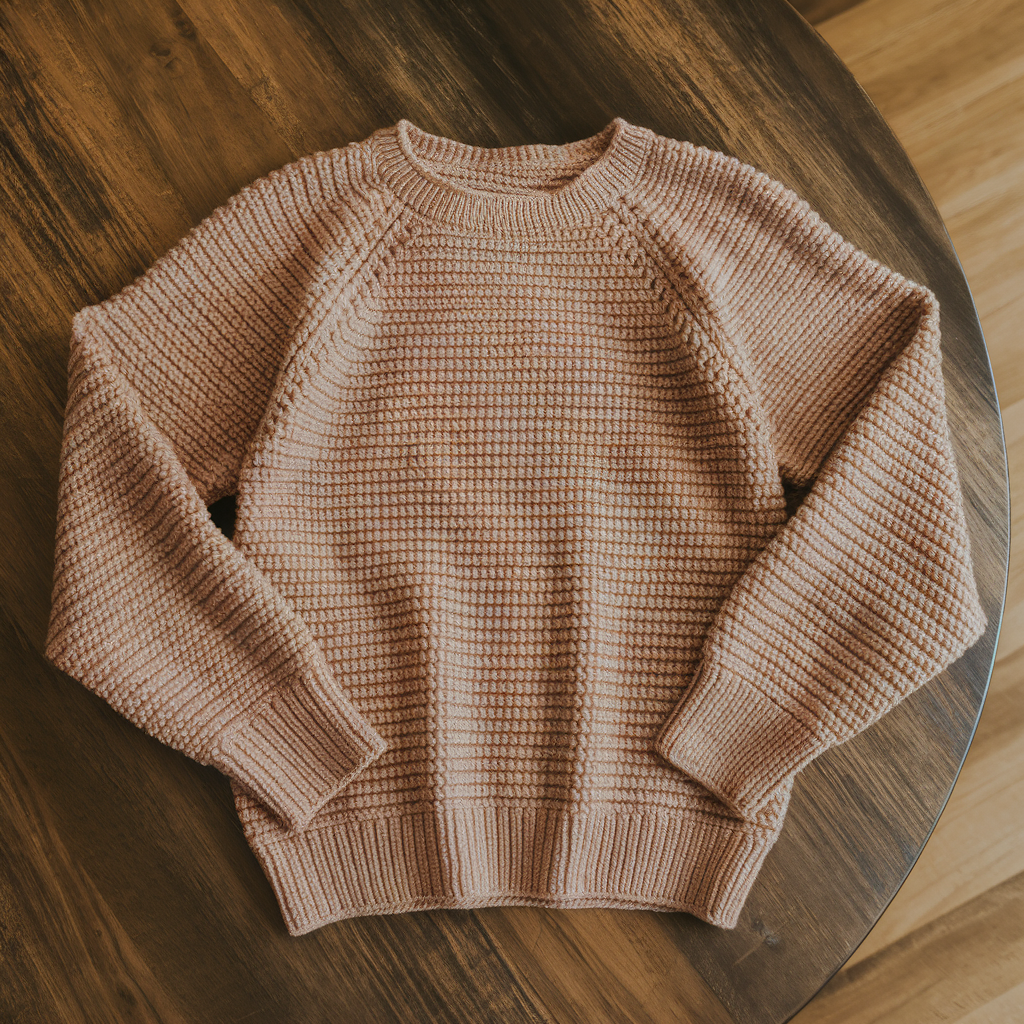
Style: A sweater that reads like knit ribbing — vertical ribs, fitted body, luxe texture. Great for workwear or layered looks.
Skill level: Intermediate (ribbing techniques such as front/back post stitches or Suzette/faux-knit variations)
Yarn & hook
- Yarn: Worsted/aran weight (category 4) wool or wool-blend, 900–1400 yds depending on size and sleeve length.
- Hook: 4.5–5.5 mm (use size to achieve rib stitch gauge).
- Notions: tapestry needle, stitch markers, measuring tape, blocking mats.
Gauge (example)
- 16–18 sts × 22–24 rows = 4″ in rib pattern (adjust by changing hook).
Construction overview
- Worked flat in pieces: Back and two fronts using a rib stitch (front-post/back-post dc or Suzette/faux-Knit), set-in sleeves or drop-shoulder for simplicity; seamed and edged.
Stitch choice for knit look
- Option A — FPdc/BPdc rib: Row 1 ground row of dc. Row 2: FPdc around previous row’s dc to create raised ribs; BPdc for recessed ribs. Repeat rows.
- Option B — Suzette stitch + slipped ridges: Suzette (sc/hdc pairs) creates a subtle pebble; slip-stitch vertical ridges create a knitted look.
Step-by-step (sample: relaxed fitted pullover)
- Measurements & planning
- Decide finished bust circumference = your bust + desired ease (e.g., 36″ bust + 3″ ease = 39″ finished).
- Measure desired body length from shoulder to hem (e.g., 22″).
- Make swatch
- Work 6″ × 6″ in chosen rib stitch. Count sts/rows. Calculate stitches needed for the front/back pieces: stitches_per_4in × (desired_width_in_inches / 4).
- Back panel
- Chain foundation to match back width (measured across back = finished_bust / 2 minus front overlap if buttoned; e.g., for 39″ finished, back = ~19.5″).
- Work rib stitch in rows until armhole depth: typically 8–10″ from hem for adult sizes (measure from hem up). End on WS or RS to match symmetry.
- Armhole shaping: Bind off or stop working a set number of stitches at each side to form armhole slope (e.g., remove 3–4 sts gradually over 3–4 rows) then continue straight to shoulder height. For a smooth edge, work a shallow bound-off: dec at edges 1 st every other row until armhole depth reached.
- Front panels (make two)
- Work same width as half front (for a pullover, each front = finished_bust/4). If you want a crewneck, keep the front close to back shaping; for lower neck or V, shape neckline: after working to desired neck height, divide work and work shoulder pieces separately, decreasing at center neck edge to round the neckline.
- Sleeves
- Set-in sleeve: measure armhole depth and create a sleeve cap by decreasing at both ends to form a dome that fits armhole curve. Start with wrist circumference (e.g., 8–10″), work straight until you reach underarm increase rounds increasing evenly until sleeve width at the top matches the armhole circumference divided by 2. For simpler construction, do drop shoulder sleeves: make a rectangle the desired sleeve length and seam to body with less shaping.
- Work sleeve length desired (e.g., 18″ for long sleeve). For cuff, switch to 1–2 sizes smaller hook and work tighter ribbing for 1.5–2″ to hug wrist.
- Assembly
- Block pieces lightly to measurements. Pin shoulder seams and sew using mattress stitch. Set sleeves into armholes, align center top of sleeve with shoulder seam, then stitch. Sew side seams and sleeve seams in one long seam from hem to cuff for a tidy join.
- Add neckband: pick up stitches evenly around neckline and work 1–2″ of ribbing (FPdc/BPdc or sc in back loop) for a knitted-look collar. Bind off loosely.
- Finishing
- Weave in ends, steam-block entire garment into final shape. Stretch rib gently to set.
Variations & tips
- Make a cropped version: reduce length to 16–18″.
- Add a mock turtleneck by increasing neckband length to 3–4″.
- For a lighter sweater, use smaller yarn and a slimmer hook; tension will affect drape.
2. Crochet Pine Sweater Pattern

Style: Sweater with textured “pine” stitch panels — a dense, dimensional stitch that looks cable-like without cabling. Great for classic, slightly rustic looks.
Skill level: Intermediate (textured stitch repeats and panel joining)
Yarn & hook
- Yarn: Aran/worsted weight, 900–1400 yds.
- Hook: 4.5–5.5 mm.
The Pine stitch (brief)
- The pine stitch is built from combinations of hdc and dc with skipped sts to create deep V-shaped pockets that read like pine motifs. Common repeat: multiple of 6 + 2.
Construction options
- Use pine panels (front center or side panels) combined with plain stockinette-style sections (e.g., hdc rows) for breathability. Work sweater flat and seam, or work in the round for minimal seaming.
Step-by-step (pullover with pine center panel)
- Plan the layout
- Example: Center pine panel 10″ wide, side panels plain ribbing 15″ each = total bust width 40″. Use this to calculate foundation chain from your swatch.
- Sample pine panel
- Foundation: multiple of 6 + 2. Row 1: hdc across. Row 2: special pine row: sk 2, (dc, ch 1, dc) in next st, sk 2, hdc in next st repeat — this creates v-channels. Work several rows to create height. Adjust by changing stitch heights for deeper texture.
- Back
- Chain to back width and join/turn. Work side ribbing sections in chosen stitch (sc or hdc for density) and work center pine panel in motif — work them simultaneously by changing colors or holding yarns parallel. Continue until armhole depth reached; shape shoulders with short rows or binds-off.
- Front
- Mirror back; if you want crewneck, work full width; if boat or v-neck, shape accordingly by stopping pine panel earlier and decreasing center sts.
- Sleeves
- Work in pine stitch for cuffs and keep plain for body of sleeve; or add a horizontal pine stripe to match body.
- Assembly & finishing
- Seam carefully; block to open pine motif (it benefits from blocking to define V-channels). Pick up neck stitches and work ribbed neckline.
Variations
- Make the whole sweater in pine stitch for a heavy textured look — reduce sleeve ease if fabric thick.
- Use contrast-color pine panels for a retro sport-look.
3. Crochet Oversized Sweater Pattern
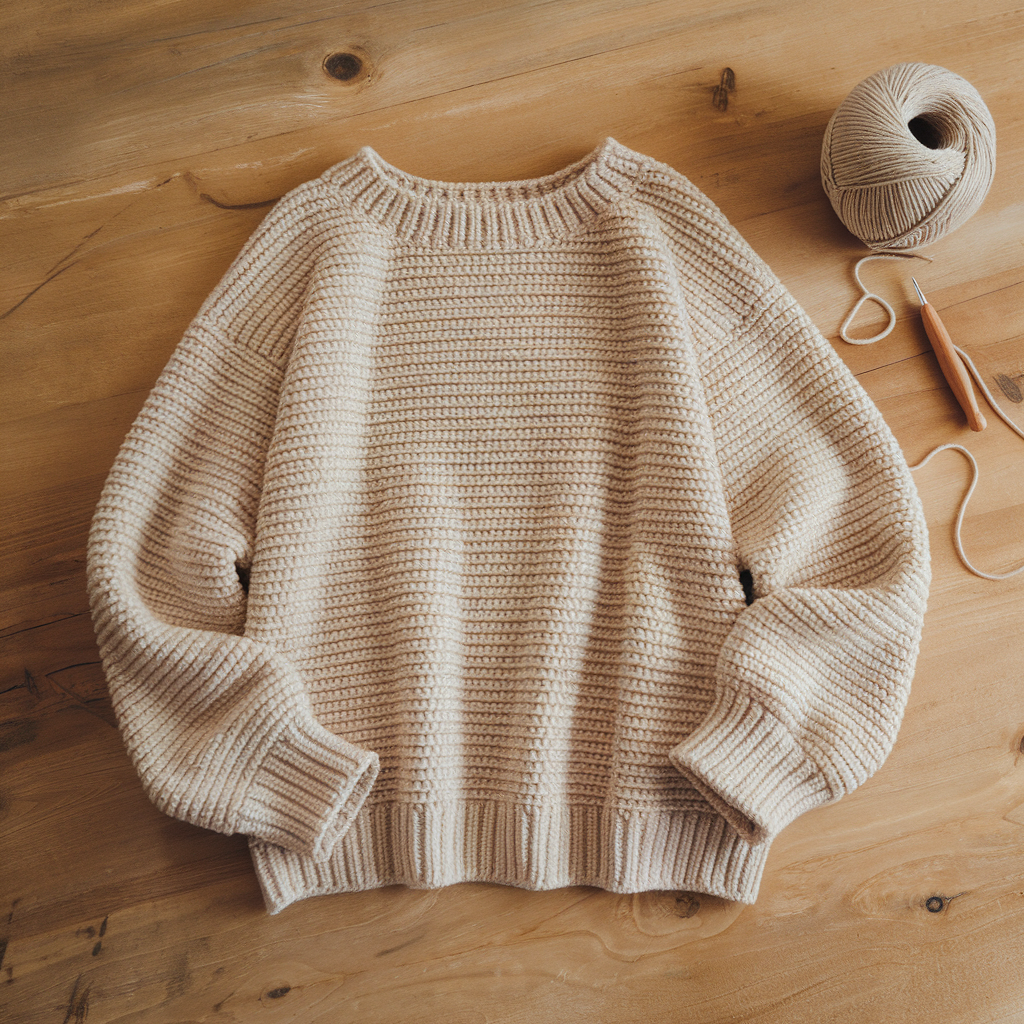
Style: The carefree oversized sweater — slouchy, roomy, cozy. Minimal shaping, perfect for beginners and rapid makes.
Skill level: Beginner–Easy
Yarn & hook
- Bulky (Category 5) or super bulky (6) yarn for fast makes, or worsted for a lighter oversized look.
- Hook: 6.5–9.0 mm for bulky; adjust with yarn.
Construction overview
- Simple boxy construction: work a large rectangle (body) and two sleeve rectangles, seam together for a drop-shoulder oversized silhouette. Optionally add a neckline rib and wide cuffs.
Step-by-step (boxy pullover)
- Decide finished dimensions
- Oversized means generous ease: choose finished bust 6–12″ larger than body. Example: desired finished bust 46″ for someone 38″ bust = 8″ positive ease.
- Make a 4″ swatch to determine stitches per inch in the selected stitch (e.g., dc or hdc).
- Body rectangle
- Chain to desired width (finished bust / 2 — this is half-body when folded). For a 46″ finished bust, half-body is 23″ chain foundation. Work rows in chosen stitch until desired body length (e.g., 26″ for a standard oversized hip length). Do not shape armholes or shoulders.
- Sleeves
- For drop-shoulder, make sleeves wide and short or long and roomy. Make a rectangle the length you prefer (e.g., 18″ long) and width equal to half arm-circumference plus seam allowance (e.g., for 16″ upper arm circumference, make sleeve width 9–10″).
- Seaming
- Fold body rectangle in half to form front and back. Place sleeves centered on fold and seam sides from cuff to hem leaving an armhole opening. Alternatively, place sleeves along fold and seam through sleeve and side in continuous seams.
- Neckline
- Pick up stitches around neckline and work 1–2″ ribbing in sc blo or FPdc/BPdc to create a soft collar. For very casual look, leave raw edge or add a wide band.
- Finishing
- Add wide cuffs by folding sleeve hem and sewing to create a double-layer cuff or by adding 2–3″ ribbing. Block gently if using natural fibers.
Variations & tips
- Add a deep high-low hem: front slightly shorter than back (2–4″).
- Add pockets by sewing two small rectangles onto front at hip level.
- For a hoodie, add a hood rectangle seamed to neckline.
4. Crochet Heart Granny Square Sweater Pattern
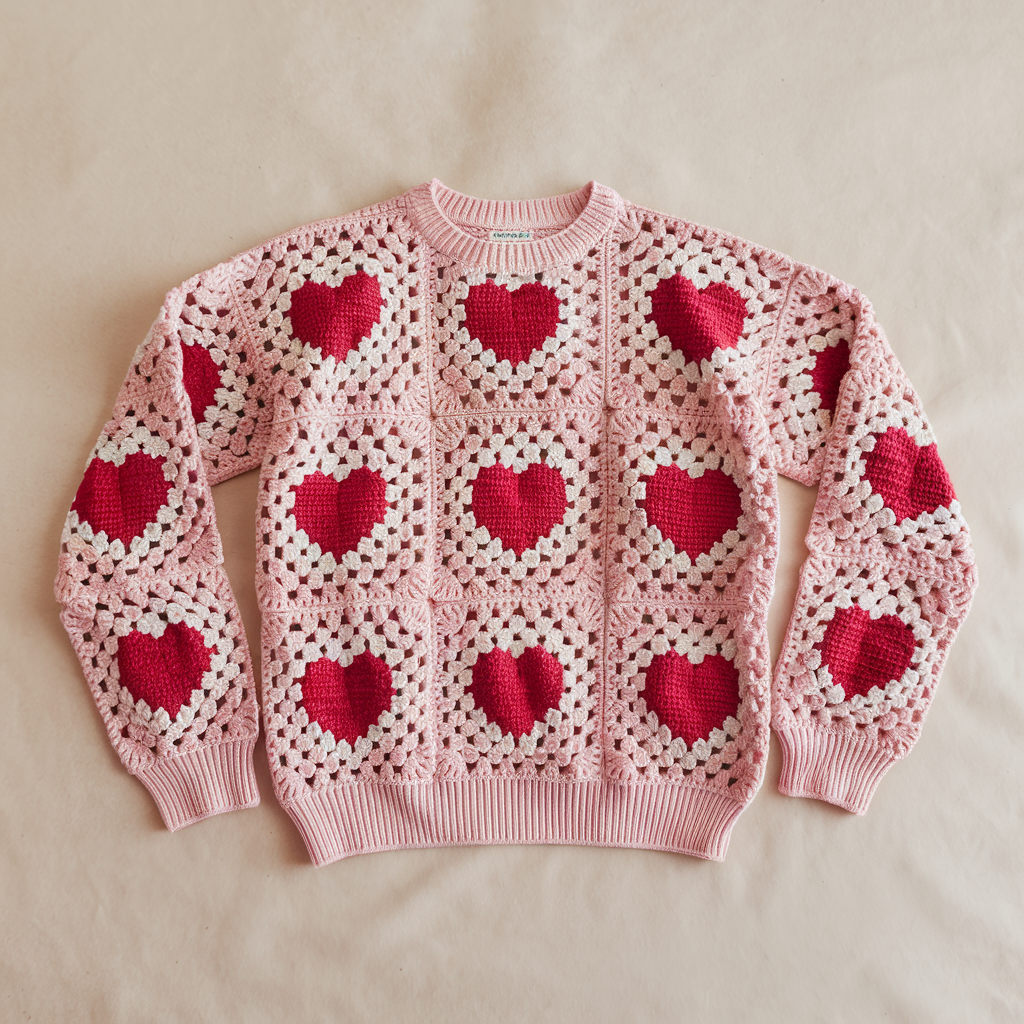
Style: Sweater made from granny squares — front panels built of heart-motif granny squares joined into a sweater — feminine, patchwork-y, great for scrap yarn.
Skill level: Beginner–Intermediate (granny squares and assembly)
Yarn & hook
- Worsted weight yarn (multiple colors) — total yardage depends on size and number of squares (estimate 1500–3000 yds depending on full sweater vs. accent panels).
- Hook: 4.0–5.0 mm.
Construction approach
- Make multiple heart granny squares (same finished size), join them into two large panels (front and back) and rectangles for sleeves, seam together, add neckband and cuffs. This modular method is forgiving and fun.
Step-by-step
- Square design & gauge
- Choose a heart granny square design (center heart in CC, rounds of granny to make square). Make a sample square and block to measure; typical finished square = 6–8″.
- Layout planning
- Determine number of squares across chest and down length. Example: for a 40″ finished bust and 8″ squares, you’ll need 5 squares across (5 × 8 = 40). Plan rows for front and back accordingly.
- Make squares
- Crochet the required number of squares (e.g., 30–40 squares depending on size). Keep color placement planned (center hearts alternate colors for a balanced look).
- Join squares
- Use join-as-you-go (JAYG) on the last round for seamless joins or whipstitch the squares together using back-loop seams for a flatter finish. Join into left front panel and right front panel individually with seam allowances for neckline if closing.
- Sleeves
- Make strips of squares to match sleeve length (can use smaller squares for sleeves) and seam into tubes. Alternatively, make rectangle sleeves by working squares joined lengthwise and seaming into a tube.
- Assembly
- Lay panels flat, seam shoulders with mattress stitch leaving neckline gap as planned. Attach sleeve tubes to armholes and seam side seams from hem to cuff. Reinforce join points.
- Neck & edging
- Pick up stitches around neckline and work an edging of sc rounds or rib (FPdc/BPdc) for 1–2″ to stabilize. Add a narrow border around cuffs and hem.
Finishing & styling
- Block the sweater after assembly to square and flatten the seams.
- For better drape, add a light fabric backing sewn into the inside if squares are stiff.
Variations
- Make a cardigan by building front panels as separate left/right rectangles and adding a button band.
- Use a granny square motif other than hearts (flowers, stars) for seasonal sweaters.
5. Crochet Cable Sweater Pattern
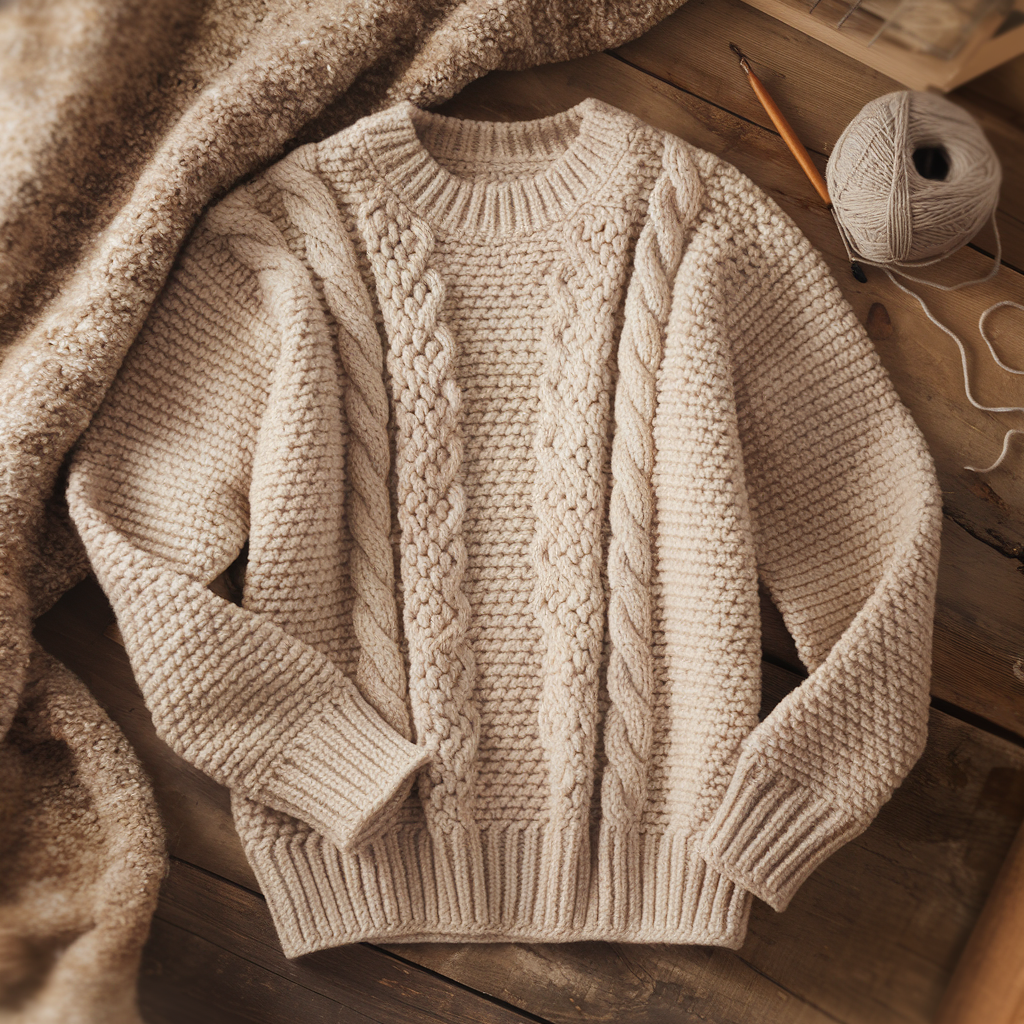
Style: Pullover embellished with raised cable panels — gives the illusion of knitted cables using post stitches or crossed dc/clusters.
Skill level: Advanced-Intermediate (cable shaping using post stitches or crossed stitches)
Yarn & hook
- Bulky or worsted weight wool for best cable definition.
- Hook: 5.0–6.5 mm (depending on yarn).
Cable techniques
- Post stitch cables: Work fpdc and bpdc crossing them every few rows to make cable twists.
- Crossed dc cables: Work a sequence of dc crossed over dc (skip stitches and work stitches out of order and then work the skipped stitches on subsequent rows) — this creates cable twists.
Construction & patterning
- Swatch cables
- Work a cable swatch so you understand twist counts. Typical cable panel width might be 6–10 sts with a twist every 6–8 rows.
- Layout
- Decide how many cable panels across body (e.g., center panel and two side panels) or vertical cables down front and sleeves. Mark placement on your schematic.
- Back & Front
- Work flat. On front, incorporate cable panels by substituting the stock-inette/hdc columns with the cable repeat. Keep stitch counts consistent by balancing increases/decreases when cables cross.
- Sleeves
- For a classic look, add a cable down sleeve center or small cables running the length.
- Shaping
- Since cables can tighten fabric, add a bit of extra stitch width in cable areas to preserve overall dimensions. Use short-row shaping at shoulders if needed for fit.
- Finishing
- After seaming, steam-block heavily (wool holds blocking well) to open the cables and relax the fabric. Pick up neckline and work ribbed border to anchor the neckline.
Variations
- Use a single large cable for a minimalist silhouette or multiple narrow cables for a fisherman-sweater effect.
- For contrast, work cable panels in a darker color while body is light.
6. Crochet Chunky Striped Sweater Pattern
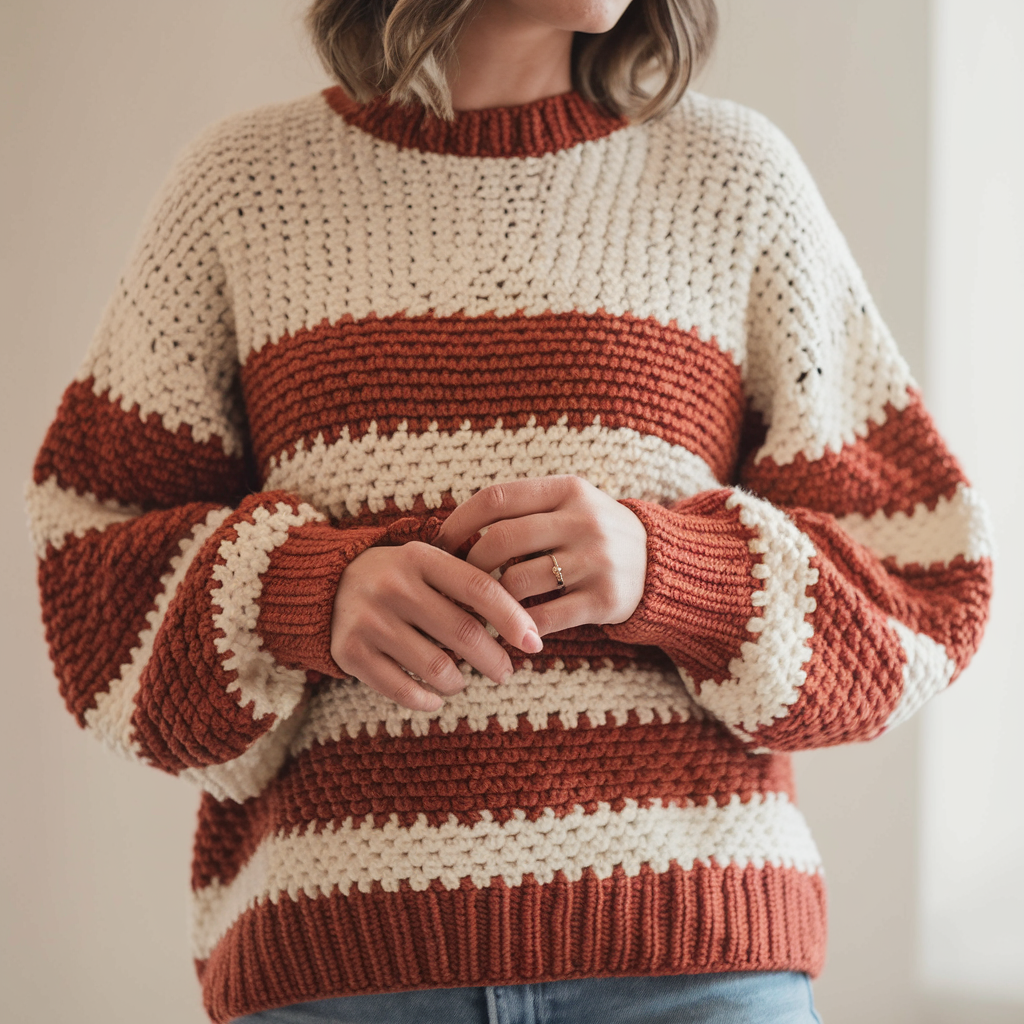
Style: Bold horizontal stripes in chunky yarn — fast to make, eye-catching, and perfect for casual weekend wear.
Skill level: Beginner–Easy
Yarn & hook
- Bulky or super bulky yarn in 2–4 colors.
- Hook: 8.0–10.0 mm depending on yarn and desired drape.
Construction overview
- Worked in single pieces (body in the round) or flat (rectangle), with stripes changed simply by fastening off or carrying yarn as preferred.
Step-by-step (easy in-the-round pullover)
- Decide stripe widths
- Example: stripe pattern 6 rows color A, 4 rows color B, repeat. Choose two contrast colors for strong graphics.
- Make a gauge and tube
- Work a foundation chain to match circumference and join to work in the round (or work a rectangle and seam). Work in dc or hdc for quick fabric. Alternate colors by cutting and joining or carrying yarn up side if only short floats.
- Armhole shaping
- If working in the round and you want set-in sleeves, stop the round and divide for front/back to work flat at the armholes and shape shoulders; or leave tube continuous and later cut an opening and add a bound edge (sc) — cutting is permanent; use seam if inexperienced.
- Sleeves
- For drop-shoulder, sleeves are simple tubes the same diameter as arm opening. For set-in, shape sleeve cap as previously described.
- Neck & trims
- Add wide ribbed neckline in contrasting color (pick up stitches and work FPdc/BPdc). Add cuffs and hem in the same or contrasting color.
Tips
- Carrying yarn up the side saves ends but adds thickness; consider making stripes with short floats and finishing by weaving in ends for neatness.
- Use a yarn converter app or ruler to approximate yardage: bulky sweaters use much less time and often less yardage than worsted for same gauge.
7. Crochet Mosaic Sweater Pattern
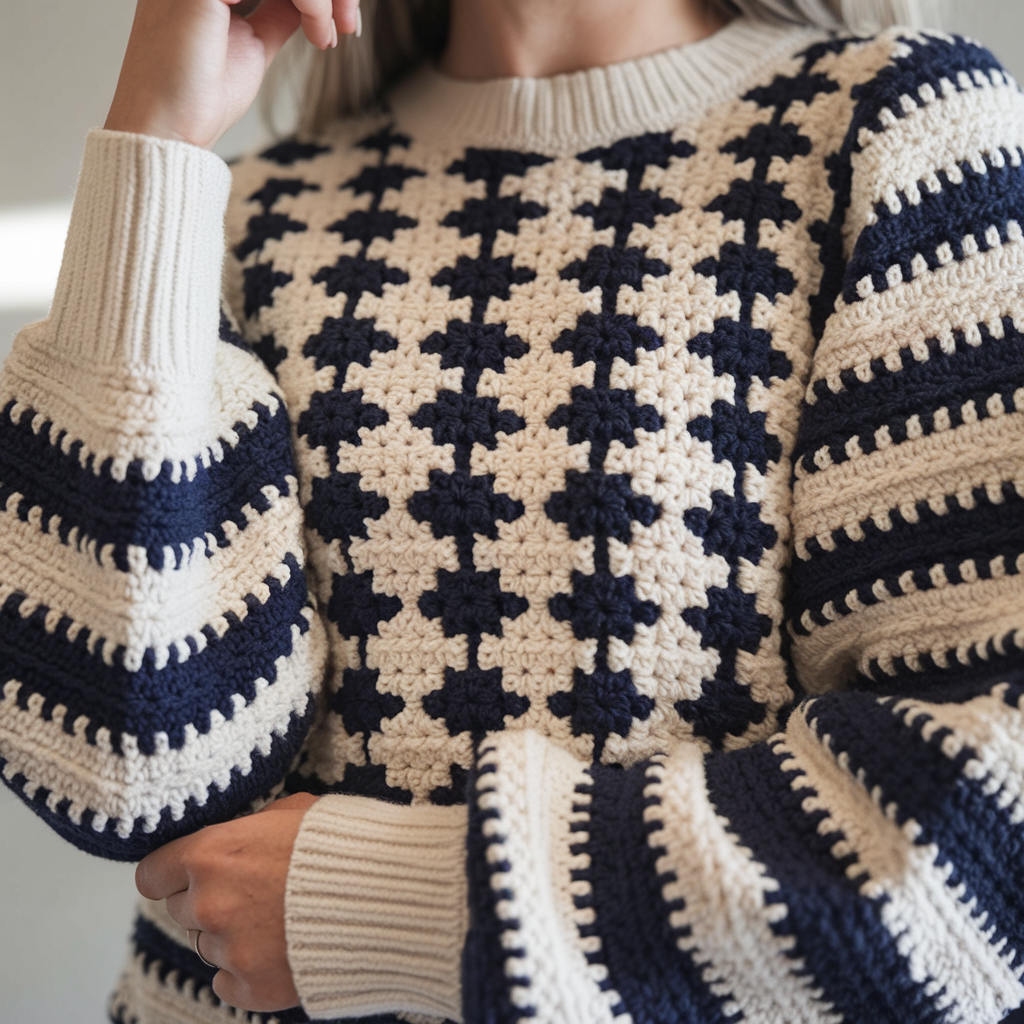
Style: Mosaic crochet sweater — crisp graphic colorwork (flowers, geometrics) without carrying many colors on a single row — works beautifully for cardigans or pullovers.
Skill level: Intermediate (mosaic technique and chart reading)
Yarn & hook
- Worsted weight in two to three colors (MC + motif colors).
- Hook: 4.0–4.5 mm.
Mosaic crochet overview
- Mosaic uses slip stitches and dc worked into the row below to create 1-color-per-row motifs. You’ll work rows in MC as background and separate rows in accent to build motifs; recommended to use charts for planning.
Construction approach
- Create a mosaic panel (front centerpiece or all-over motif). Work panels flat, assemble as standard sweater pieces.
Step-by-step (mosaic panel pullover front)
- Design the panel
- Choose a rectangular mosaic motif chart (width and height in repeats). Make a mosaic swatch to understand how many stitches per repeat and how many rows per motif.
- Work front
- Crochet bottom hem in MC plain rows, then start mosaic chart at the desired height. Work chart rows by switching color each row as indicated (one color per row). Remember that mosaic technique often uses dc in the stitch below or sl st in the stitch below to create motif blocks.
- Side panels
- For sweater sides, maintain MC plain fabric to balance the busy panel, or repeat mosaic in repeats to make an all-over effect (advanced).
- Sleeves & back
- Keep simple to let front panel shine; work sleeves in MC or with narrow mosaic stripes to tie colors together.
- Assembly
- Seam panels; add neckline and cuffs. Mosaic fabric is dense — ensure enough ease so the sweater is not too tight.
Variations
- Make a mosaic cardigan by splitting the front panel into left/right halves and adding button bands.
- Use small, high-contrast motifs for modern graphic looks or tonal palettes for subtle elegance.
Finishing, Blocking & Fit Adjustments (applies to all sweaters)
- Blocking: Essential. Wet or steam-block garments to measurements; pin seams and hem edges. Natural fibers benefit most.
- Weaving ends: Use a tapestry needle to bury ends in the same-direction of stitches; tie discreet knots if needed for security.
- Try-on and fit: For top-down or raglan constructions, try on as you go to adjust sleeve length, bust shaping, or neckline depth. For worked-flat sweaters, baste seams with large stitches to try-on before final seaming.
- Adjusting ease: If a pattern reads small, add side gussets or increase the number of stitch repeats across the body. If too large, reduce the number of rows before armhole shaping or use a smaller hook.
Yarn & Care Recommendations
- Everyday wear: Superwash merino or merino blends offer warmth + machine-wash convenience.
- Durability: Nylon blends add strength for heavy-use sweaters.
- Breathable summer sweaters: Use cotton-linen blends with lighter hooks.
- Care: Follow yarn label. Most wool blends need gentle hand-wash or cool machine on delicate and dry flat to avoid stretching.
Conclusion
Crochet sweaters are incredibly versatile — the stitch choice, yarn, and construction method determine whether you get a structured, refined garment or a cozy, slouchy favorite. These seven patterns cover that range: the Knit-Look Ribbed Sweater for a polished wardrobe staple; Pine and Cable Sweaters for classic texture lovers; the Oversized and Chunky Striped Sweaters for relaxed, quick makes; the Heart Granny Square Sweater for playful patchwork; and the Mosaic Sweater for crisp, graphic colorwork.
A few closing points to make your sweater successful:
- Always swatch in the stitch and yarn you’ll use for the garment. Crochet gauge is influenced strongly by stitch pattern.
- Try on early if your construction method allows it (top-down, raglan, or modular assembly makes fitting easier).
- Block pieces before final seaming to make them cooperate.
- Keep notes as you work (rows, shaping, counts) — they make repeat projects reproducible.