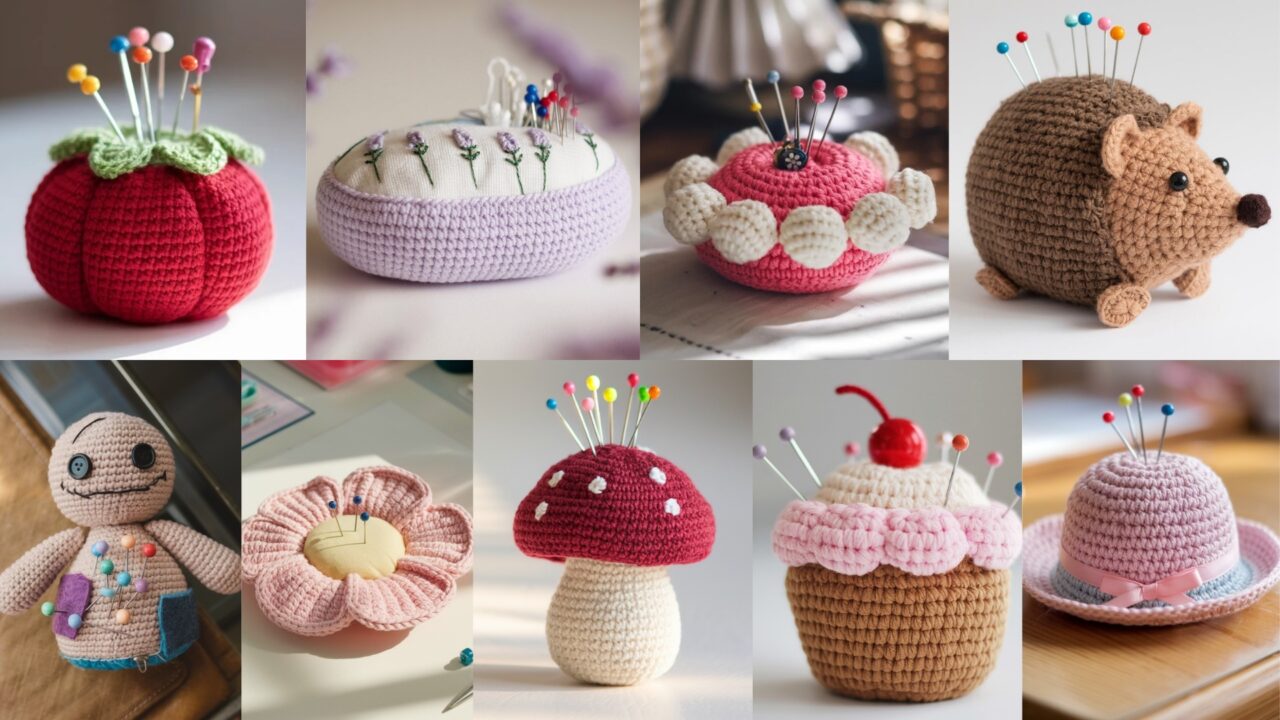
Pincushions are the unsung heroes of any crafty life — tiny, useful, and the only place you’re allowed to stab things on purpose. This post gives you nine finished, ready-to-use pincushion patterns that are cute, practical, and sized for adult use (not toys). Each pattern includes: skill level, materials, gauge guidance, finished size, a step-by-step crochet pattern, stuffing/weighting suggestions, finishing + care, and creative variations. I’ll be blunt where necessary: use an inner liner for any gritty weight filler, and don’t glue pins in place like a barbarian.
Quick universal notes before the sew-up:
- Abbreviations (US): ch, sc, hdc, dc, tr, sl st, st(s), MR = magic ring, inc = 2 sc in same st, dec = sc2tog, BLO/FLO = back/front loop only.
- Base yarn & hook I use for samples: worsted cotton (#4) and a 4.0 mm hook (gives a firm fabric that resists pin holes). Swap to DK for daintier pincushions or bulky for chunky looks.
- Suggested stuffing/weight: polyester fiberfill for fluff + optional glass seed beads or stainless steel shot in a sealed inner pouch for weight. Don’t use walnut shells if recipients may have nut allergies.
- Safety note: For weighted fillings (beads, shot), always use a separate tightly sewn inner fabric bag or a resealable pouch inside the pincushion so tiny beads can’t escape if the outer yarn wears.
- Gauge example (use your own swatch): 16 sc = 4″ → 4 sts/in. If I do arithmetic, I’ll show the digits so you can double-check.
Now the fun part: nine patterns, each ready to make tonight.
1. Crochet Tomato Pincushion Pattern
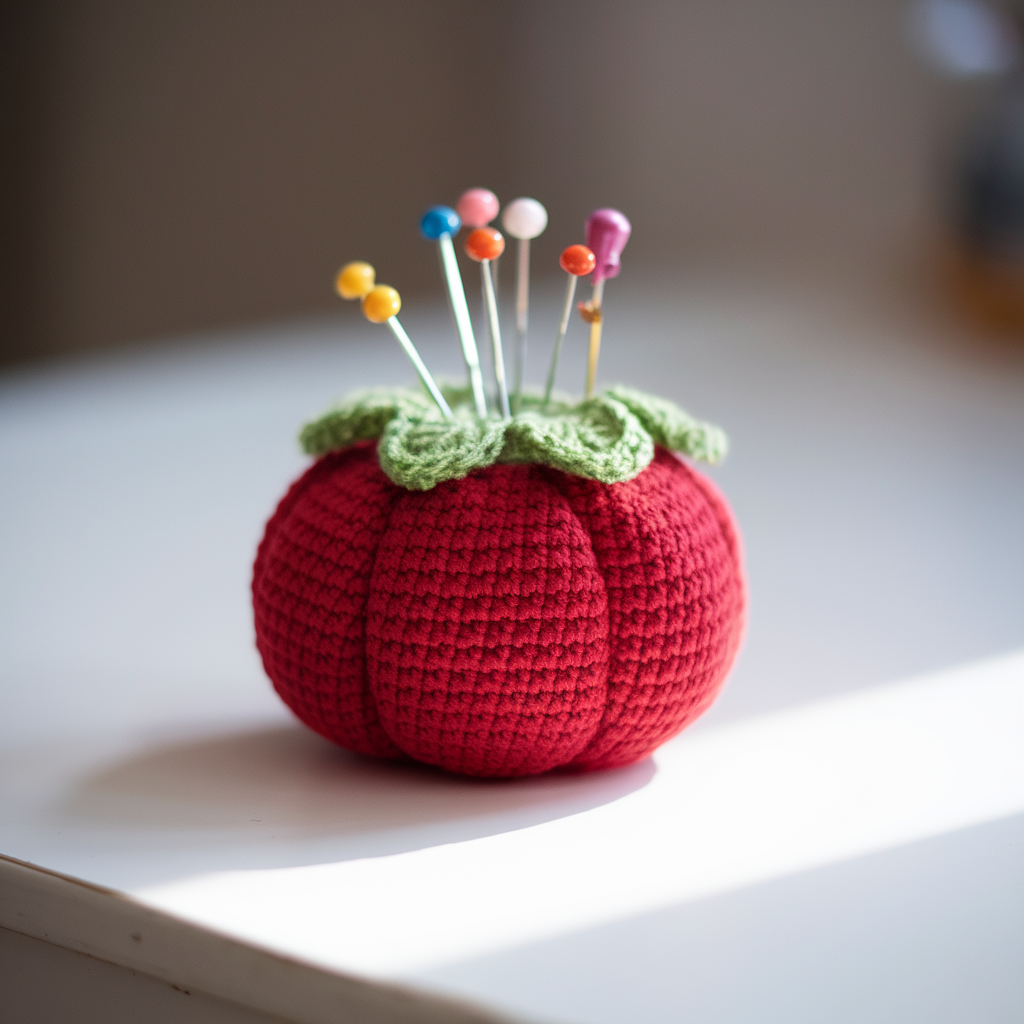
The classic dome pincushion with slices and a leafy top. Firm, practical, and endlessly photogenic.
Skill level: Confident Beginner
Materials: Cotton worsted #4, 4.0 mm hook, tapestry needle, small felt circle for base (optional), polyfill, optional small glass bead pouch for weight. Finished diameter ≈ 3.5″.
Why this works: dome shape holds pins upright and the leafy crown hides the sewing of the top.
Pattern (worked in continuous rounds; uses standard amigurumi increases — 6 increases each round)
- MR, R1: 6 sc in MR. (6)
- R2: inc in each st around → 6 × 2 = 12. (6 inc → 12)
- R3: sc1, inc around → pattern repeats: 6 inc → 18.
- R4: sc2, inc around → 24.
- R5: sc3, inc around → 30.
- R6: sc4, inc around → 36.
- R7: sc around 36 sc. (work 2–3 rounds even for height)
- R8: sc4, dec around → 30.
- R9: sc3, dec around → 24.
- R10: sc2, dec around → 18.
- R11: sc1, dec around → 12. Stuff firmly with polyfill and add inner pouch of beads/shot if weighting.
- R12: dec around → 6. Close magic circle or use yarn needle to close remaining hole. Weave ends.
Leaf crown (make 4–6)
- Ch6, sc back along chain, add tiny picot at tip (ch3, sl st into top), fasten off. Sew leaves to top center, covering the close. Add a small felt base cut to 3.25″ and sew inside for flat stability if you want.
Finishing & care: hand-wash if needed, reshape while damp. Keep inner weight pouch removable if you anticipate machine washing.
Variation: make mini-tomatoes in multiple colors for a decorative cluster on your sewing table.
2. Crochet Mushroom Pincushion Pattern
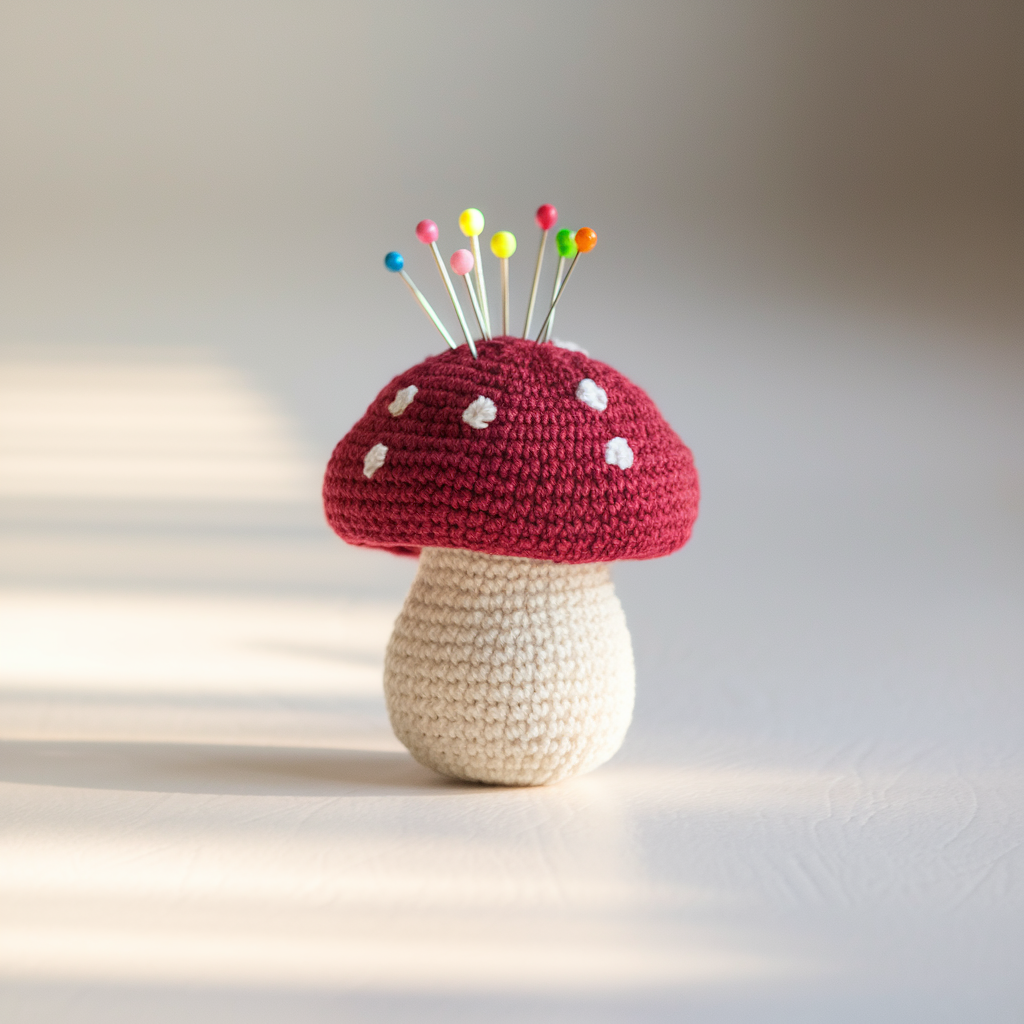
A round stem with a flat puff mushroom cap — friendly to hold and easy to make.
Skill level: Beginner
Materials: Cotton #4 in two colors (cap + stem), 4.0 mm hook, polyfill, optional small beads for base weight. Finished height ≈ 3.5–4″.
Construction — stem (tube)
- MR, R1: 6 sc. R2: inc each st → 12. R3–R8: sc around 12 sc for stem height (work 6 rounds). Fasten off leaving long tail to sew later. Don’t stuff much yet.
Cap (worked flat and shaped to dome)
- MR, R1: 6 sc in MR. (6)
- R2: inc → 12.
- R3: sc1, inc → 18.
- R4: sc2, inc → 24.
- R5: sc3, inc → 30.
- R6: sc4, inc → 36. Continue one more increase round if you want larger cap (optional). Fasten off.
Assembly
- Lightly stuff cap only at the center; sew cap to stem opening: fold slight seam in cap underside and stitch around stem top. For a weighted, stable mushroom, put a small pouch of beads into the bottom of the stem before closing. Sew felt circle inside base to protect surfaces.
Finishing: Embroider white spots on cap (French knots) or make tiny sewn-on circles. Hand wash only if using inner bead pouch.
3. Crochet Small Hat Pincushion Pattern
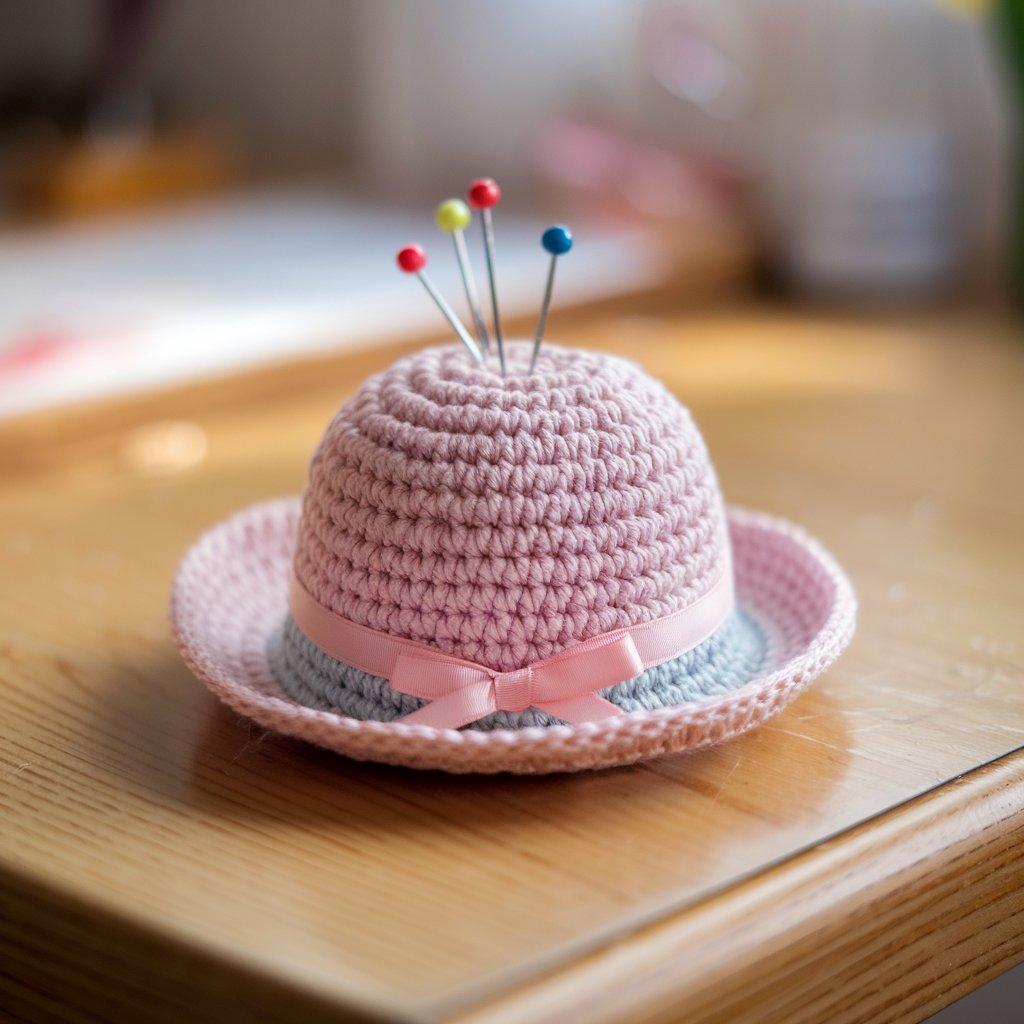
A tiny top-hat or beanie-shaped pincushion that sits upright like a decorative hat on your table.
Skill level: Confident Beginner
Materials: Cotton or acrylic #4, 4.0 mm hook, polyfill, small inner pouch for weight, 1 small decorative band (ribbon). Finished size ≈ 3″ diameter.
Pattern (brim + crown)
Brim:
- Ch 36, join to make a loop (avoid twist). R1: sc 36. R2: sc1, inc repeat → 54. R3: sc around 54 to stiffen brim (or add a round of sc in BLO for a cupped brim). Fasten off and set aside.
Crown (worked in rounds, starting with MR)
- MR, 6 sc. R2 inc → 12. R3 sc1 inc → 18. R4 sc2 inc → 24. R5 sc3 inc → 30. R6–R8 sc around 30 for crown height. Stuff lightly and sew crown to brim seam, adding inner felt if you want a flat stable base. Add ribbon around base for decoration.
Finishing: Sew a small felt circle inside the brim to distribute pins and protect surfaces.
4. Crochet Voodoo Doll Pincushion Pattern
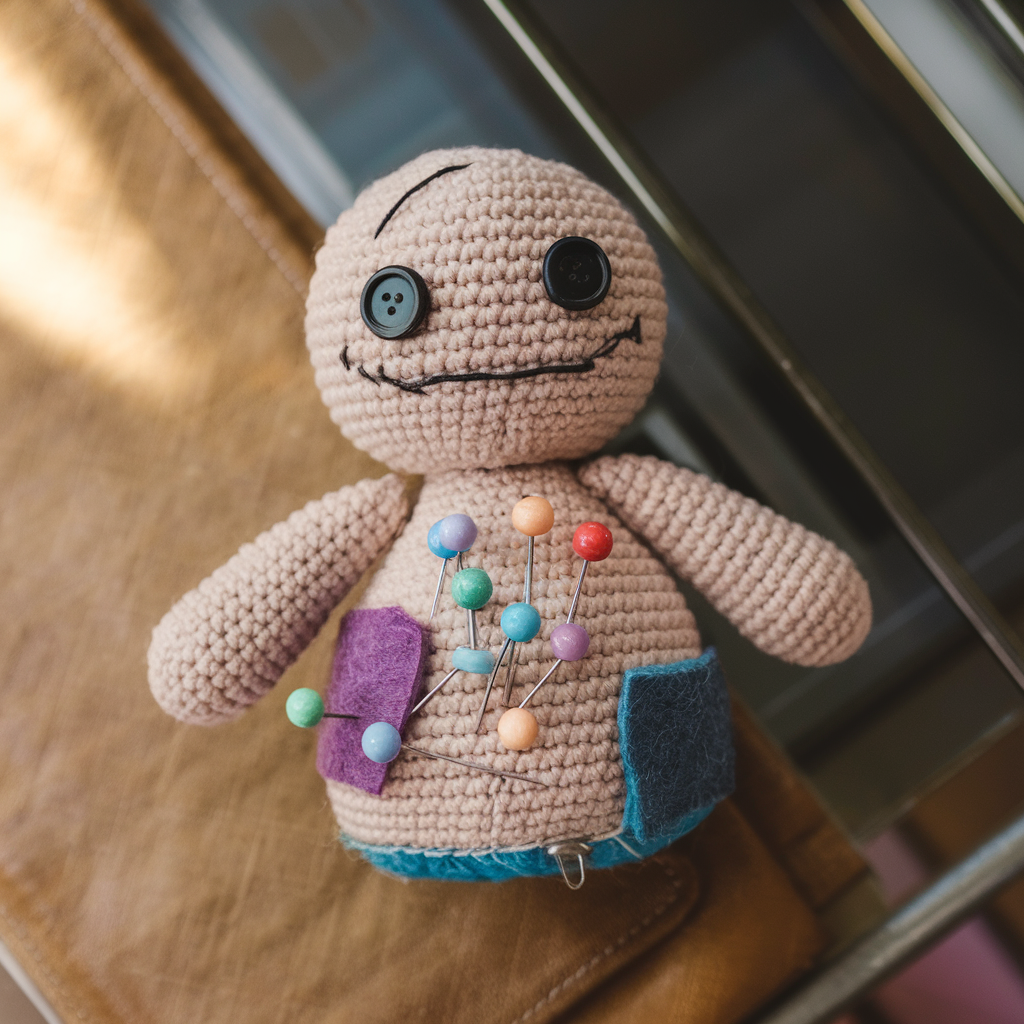
Playful rounded doll-shaped pincushion — useful surface area and perfect for the kitschy sewist.
Skill level: Intermediate (simple shaping + limbs)
Materials: Cotton #4, 4.0 mm hook, polyfill, small bit of black yarn for embroidered face + felt for backing. Finished size ≈ 3.5–4.5″ tall.
Pattern (body + head integrated)
Head & body (worked continuous rounds, increases then even rounds then decreases)
- MR, 6 sc. R2: inc → 12. R3: sc1, inc → 18. R4: sc2, inc → 24. R5: sc around 24 (head height round). R6: sc2, dec to start neck shaping → 18. R7–R9: sc around 18 (body torso). R10: sc1, inc → 24 (expanding for belly). R11–R14 sc around 24 to desired body length. R15: sc1, dec → 18. R16: dec around to 12; stuff and close.
Arms & legs (make 4 tiny tubes)
- MR, 6 sc in MR, work 6–8 rounds even, fasten off leaving tail. Flatten and sew to body securely.
Face & embellishments
- Embroider eyes, mouth, or stitch on tiny felt patches. For zone safety, don’t use glued beads where children have access.
Finishing: Add small loop of yarn at top for hanging, if desired.
5. Crochet Cherry Blossom Pincushion Pattern
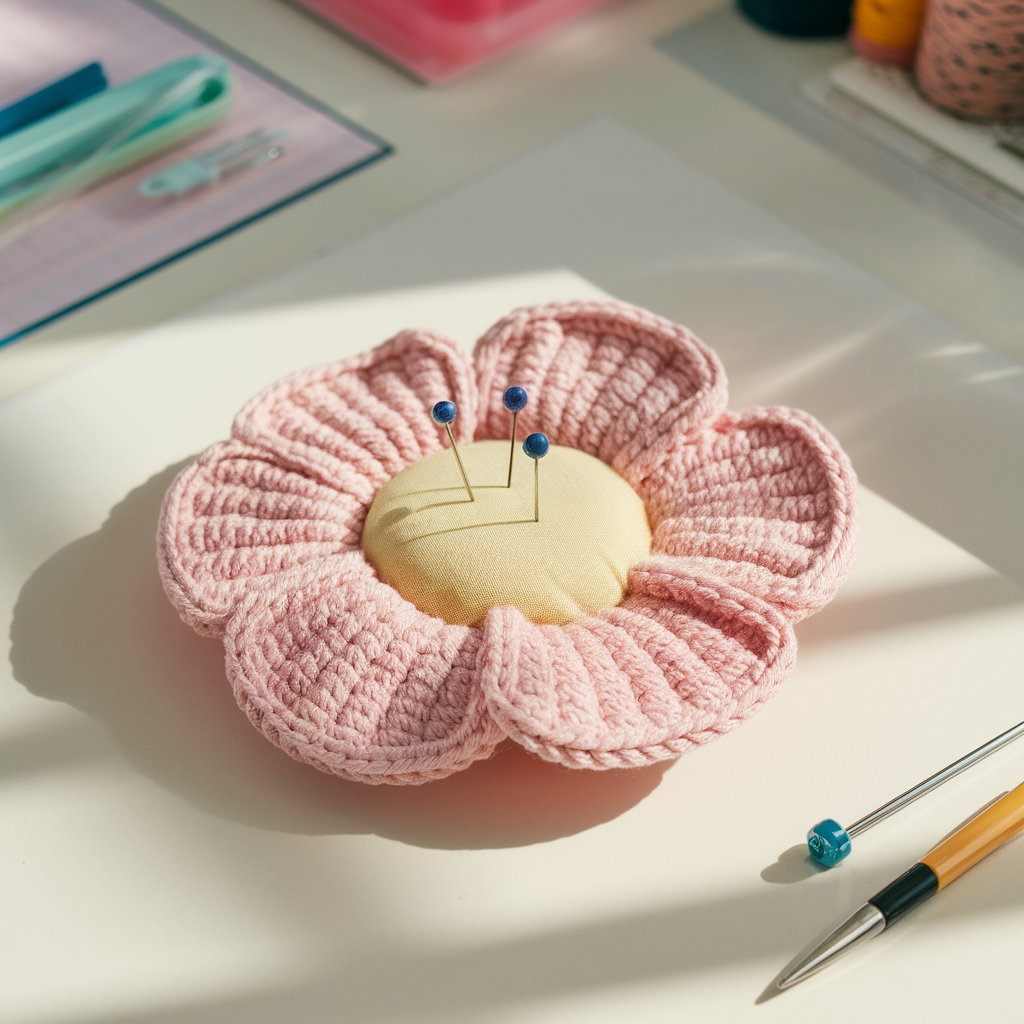
Flat, pretty blossom with a padded center — a firm flat disc is great on craft tables with less tipping risk.
Skill level: Confident Beginner
Materials: Cotton or cotton-blend #4 in blush/pink + contrasting center color, 4.0 mm hook, polyfill (thin), optional lavender sachet mix for scent. Finished diameter ≈ 4–4.5″.
Pattern (petal rounds)
- MR, ch1, 10 sc into MR. Join. (10)
- R2: ch3, sl st into next st around to make 10 ch-loops.
- R3: In each loop work (sc, hdc, 3 dc, hdc, sc) → 10 petals. Join.
- R4: sc around all petal tips to stabilize. Fasten off leaving long tail.
Padding & assembly
- Make a matching back disc (repeat R1–R2 but make the back plain). Place two discs RS together, stitch three-quarters around leaving a 1″ gap. Turn RS out, insert a thin cushion of polyfill (not too much — you want a flat, stable shape). Sew closed and topstitch a small decorative knot in center (yarn-wrapped button or sewn bead). Keep an inner lining pouch if you add scented materials (lavender) to protect yarn.
Finishing: Light steam block to open petals flat.
6. Crochet Hedgehog Pincushion Pattern
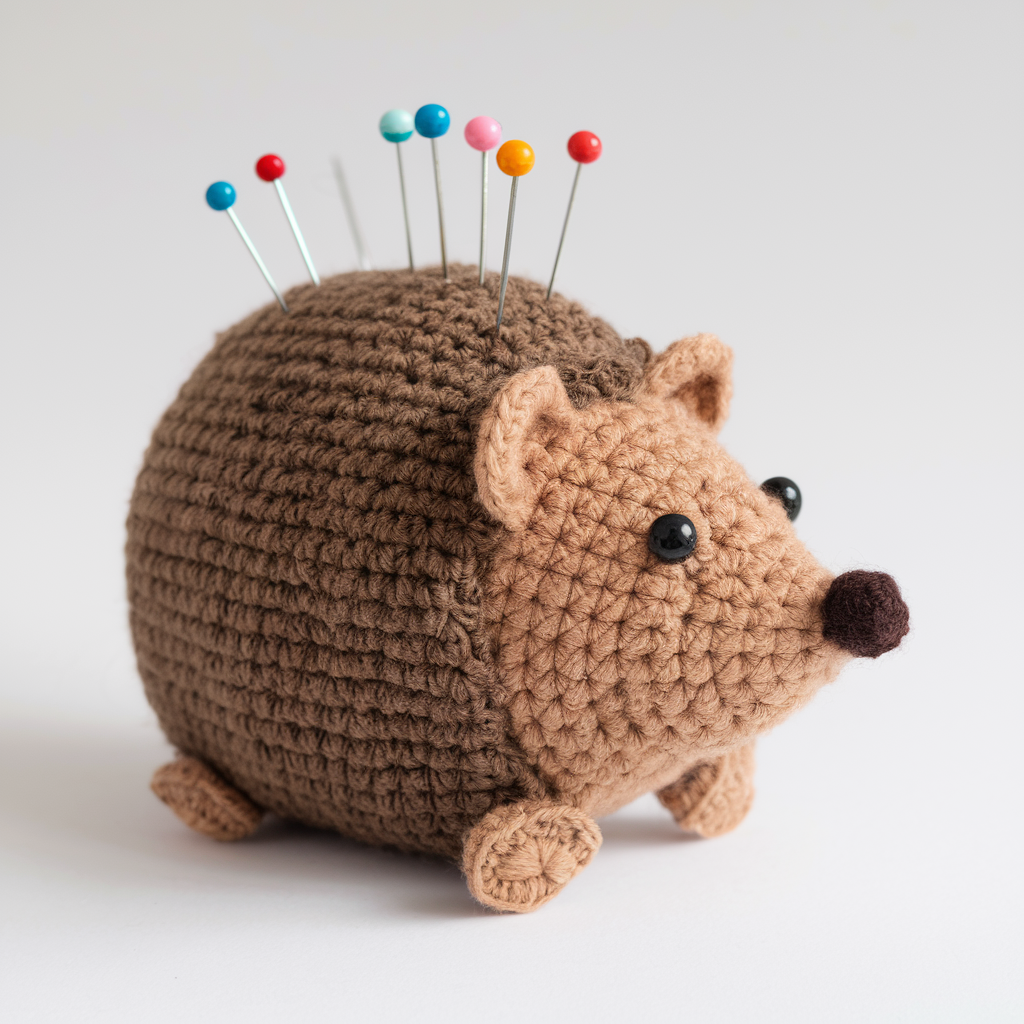
A hedgehog with looped “spines” — needles slip into loops and stay put; it’s adorable and practical.
Skill level: Intermediate (loop stitch technique)
Materials: Cotton #4 for body + contrasting yarn for spines (or same yarn using loop stitches), 4.0 mm hook, polyfill, inner bead pouch optional. Finished size ≈ 4″ long.
Pattern — body (oval)
- Ch 12, sc across, 3 sc in last ch, sc back across opposite side of chain, 3 sc in last ch — form oval base. Work 6 rounds even increasing at ends to maintain oval expansion until you reach ~3–4 rounds of even to create body height. Fasten off but leave yarn for joining.
Loop-stitch spines (worked over body rounds)
- Rejoin at head area, work loop stitch (yarn over long loop on hook, pull up long loop, finish sc around loop) across back in rows so that the loops point up like quills. Work several rounds of loop stitch to create dense spines. Fasten off and trim loop lengths slightly for uniform look if desired.
Finishing
- Sew felt eyes or embroider them. Stuff body firmly. Add small sewn feet and a felt nose. Include an inner pouch for weight. Keep loop length conservative; very long loops might catch pins oddly, so keep loops around ¾” long.
7. Crochet Daisy Pincushion Pattern

A circular center cushion with raised daisy petals — classic and clean.
Skill level: Confident Beginner
Materials: Cotton #4 bright center + white petals, 4.0 mm hook, polyfill. Finished diameter ≈ 3.5–4″.
Pattern (center + petal round)
Center disk:
- MR, 6 sc. R2 inc → 12. R3 sc1, inc → 18. R4 sc2, inc → 24. Work R5 sc around 24. Fasten off.
Petals (make 12–14 petals around center):
- Join white yarn into R5 space between centers and work chain-loop petals: ch6, sl st back in same point around to form loops. In each loop: (sc, hdc, 3 dc, hdc, sc) to make petal. Join.
Assembly: make a back disk in center color, sew front and back wrong-sides together leaving small opening, stuff lightly. Sew a button or French knot cluster in middle for contrast.
Finishing: Block petals to shape.
8. Crochet Cupcake Pincushion Pattern
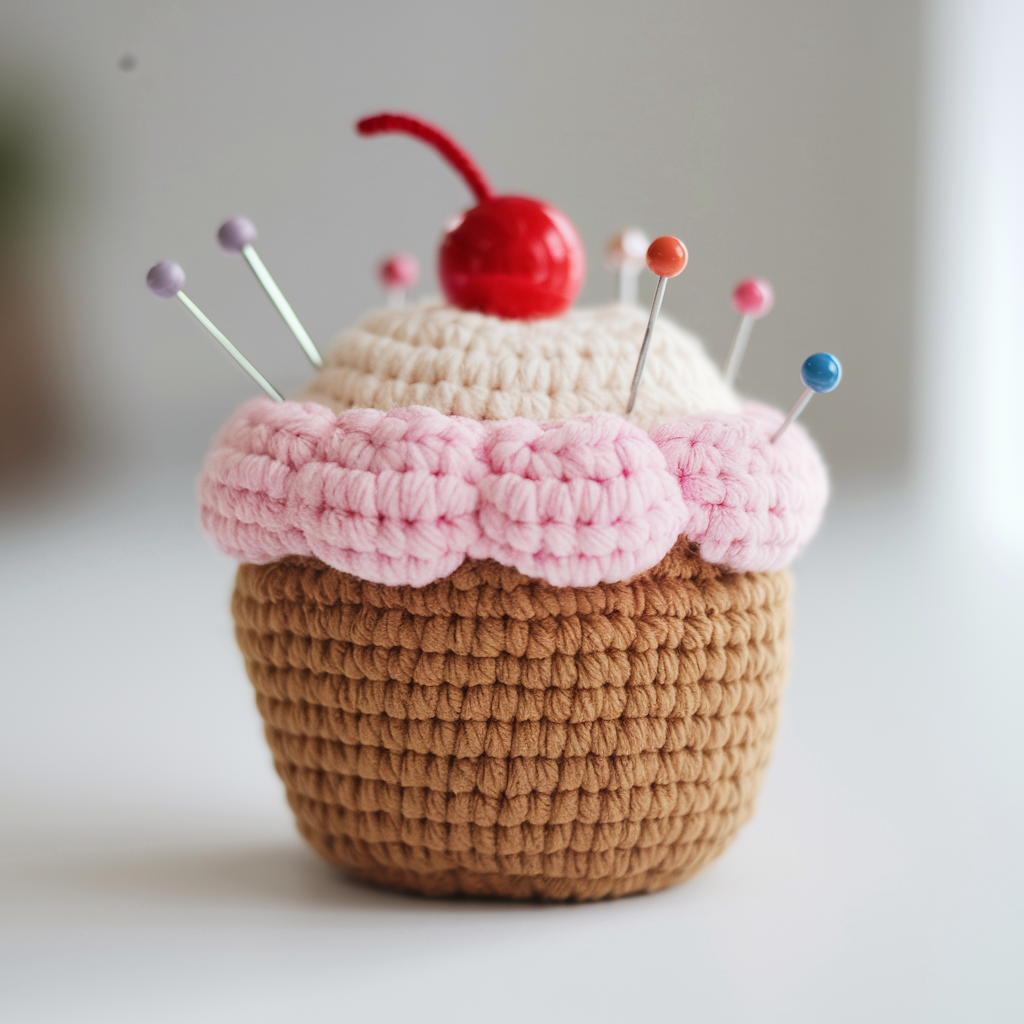
A squat base (cup) and a fluffy frosting top; you can stick pins into the frosting — adorable and functional.
Skill level: Beginner
Materials: Cotton #4 for base (cup color) + fluffy yarn or same cotton for “frosting”, 4.0 mm hook, polyfill, small bead pouch optional. Finished height ≈ 3.5–4″.
Pattern — base (cup)
- MR, 6 sc. R2: inc → 12. R3: sc1, inc → 18. R4–R6 sc around 18 to form base height. R7: sc1, dec around to narrow top slightly. Finish off and leave tail.
Frosting (worked as a domed puff)
- MR, ch1, 8 hdc into MR. R2: (hdc, puff stitch or bobble) across to make textured frosting; puff stitches = (YO, insert in st, pull up loop) ×3, YO pull through all loops, ch1 to close st. Work several rounds alternating puff and sc rows until frosting domes to your desired height. Sew frosting to base rim. Stir in a light sprinkle of beads (inside inner pouch) for weight if desired.
Decoration: sew a small red bead “cherry” on top (secure with multiple stitches) or embroidered sprinkles.
Finishing: Use inner lining if you plan to wash or if beads are used.
9. Crochet Lavender Pincushion Pattern
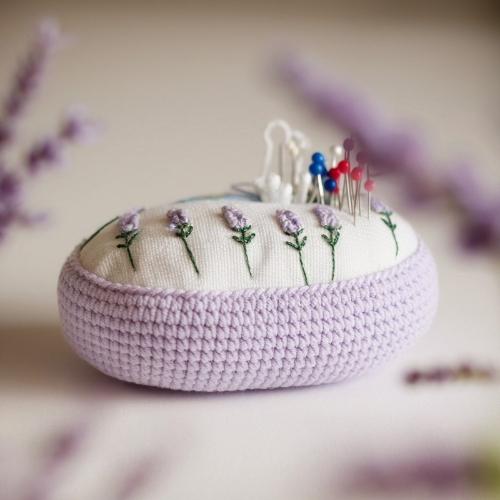
A flat oval sachet-style pincushion scented with lavender (or left unscented). Great for drawers and pincushion trays.
Skill level: Confident Beginner
Materials: DK or cotton-linen blend for breathable fabric, 3.5–4 mm hook, polyfill + dried lavender or scented sachet + inner pouch, felt backing optional. Finished size ≈ 4.5″ × 3.5″ oval.
Pattern (oval worked flat)
- Ch 20. R1: sc in 2nd ch from hook across (19 sc), ch1, turn.
- Work even rows of sc until piece measures about 3.5″ tall (use your rows/in to calculate how many rows). (If rows/in = 4, rows = 3.5 × 4 = 14 rows; compute: 3 × 4 = 12; 0.5 × 4 = 2; 12 + 2 = 14.)
- To make oval ends rounded, at ends of last row sc around short ends with increases: sc across sides and make 3 sc in final stitch to round corner then work back on other side so result forms an oval when seamed. (If unsure, make two rectangles, seam ends with short darts to round.)
Assembly & scent
- Make two identical ovals. Sew three-quarters closed, insert inner pouch containing dried lavender (or a small scented sachet) and some polyfill for shape (do not pack lavender alone as it will be loose). Finish sewing closed. Optional topstitch running stitch along center and tie off to create gentle tufting.
Care & safety: Dried lavender can fade; if allergic concerns exist avoid scented filler. Use essential-oil-infused cotton inside sealed inner pouch as alternative.
Final tips
- Weighting: For stable pincushions, put a small sealed pouch of glass seed beads, steel shot, or silica beads into the center before stuffing with polyfill. Use an inner fabric pouch — that’s non-negotiable.
- Durability: Use cotton yarn for longevity; acrylic will look fuzzy and may allow pin rust marks. If pins are rusty, clean/replace them — pins will stain even the best pincushion over time.
- Washing: Most cotton pincushions can be spot-washed. If you want machine-washable, remove bead pouch first and wash the outer crochet cover only (or make a removable cover).
- Stitch density: Use a hook that creates a fairly tight fabric so pins don’t poke right through to the stuffing or the filling pouch. If your gauge is loose, go down a hook size.
- Sewing the pin pouch: When you add a bead/shot pouch, stitch the pouch closed with ladder stitches and test by squeezing firmly to ensure no beads leak. Place the pouch at the center bottom for stability.
- Presentation idea: Bundle one pincushion with a small set of quality pins and a tiny embroidery thread kit — it’s the perfect gift for sewists.
Conclusion
There — nine adult-friendly pincushions that are actually useful and worth making. The difference between a good pincushion and a sad fluffball is a firm fabric, a small internal weight pouch (in its own sewn bag), and clean finishing. Pick a shape (tomato for classic, hedgehog for function, cupcake for whimsy), use the inner pouch trick for weight/washability, and make a set — pincushions are small, quick, and irresistible gifts.