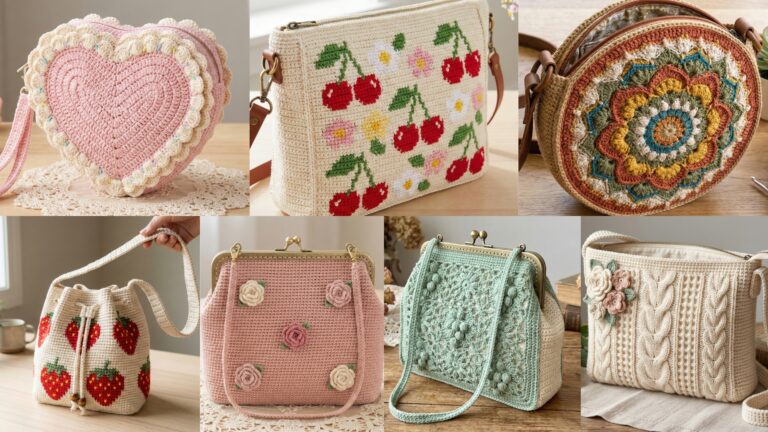
Crochet crossbody bags make perfect, personal gifts — they’re useful, portable, and let you show off color, texture, and creativity. Below are nine distinct, gift-ready crossbody bag patterns you can make and customize: from a pearl-strapped puff-flower clutch to a playful watermelon star bag, classic granny square styles, and delicate floral embroidery. For each design you’ll get: a clear description, skill level, exact materials, stitch list/abbreviations, a very detailed step-by-step construction guide (body, lining/closure, strap/finishing), and tips for finishing and gifting. Use these patterns as-is or mix-and-match elements (try the pearl strap on the sunburst bag, or the embroidered flowers on the herringbone design). Let’s get stitching!
Quick notes before you begin
• Gauge isn’t critical for most of these bags — crossbody bags are forgiving — but I include suggested gauge and finished sizes to help you.
• Use a yarn and hook combination that gives a fabric you like: firmer for structured bags, looser for slouchy summer styles.
• Lining the bag with fabric stabilizes it and looks polished — I include basic sewing steps where useful.
• Abbreviations are listed for each pattern where needed. If you’re new to any stitch called out, search that stitch tutorial or ask me for a quick demo.
1. Crochet Puff Flower Crossbody Bag with Pearl Strap Pattern
Description: A compact, feminine crossbody featuring a textured puff-flower front, a flap closure, and a delicate pearl beaded strap for an elegant gift.
Skill level: Intermediate (basic puff stitch experience + simple beadwork)
Finished size: ~8″ wide × 6″ high (bag body), strap drop ~22″ (adjust as desired)
Materials
- DK / light worsted weight yarn — 150–200 g (main color)
- Small amount contrasting yarn for flower center (optional)
- Crochet hook: 4.0 mm (or size to get fabric you prefer)
- Tapestry needle
- Scissors
- 60–80 small glass or acrylic pearls (pre-strung on beading wire or use separate pearls and thread)
- Lightweight cotton/linen for lining (~10″ × 10″)
- Sewing needle + thread or sewing machine
- Small magnetic snap (or button/loop)
- 1/4″ wide leather strap ends or jump rings (optional)
- Stitch markers
Stitches & Abbreviations
- ch = chain
- sc = single crochet
- hdc = half double crochet
- dc = double crochet
- puff = puff stitch (yarn over, insert, pull up loop; repeat 3–4 times, yarn over and draw through all loops — see notes)
- sl st = slip stitch
- RS = right side, WS = wrong side
Gauge
- 18 sc × 22 rows = 4″ in sc (optional gauge for structure reference)
Pattern (step-by-step)
1. Base panel (body back)
- Ch 31 (or chain to desired width — odd number).
- Row 1 (RS): sc in 2nd ch from hook and across (30 sc). Turn.
- Rows 2–22: ch1, sc across. Turn. (Adjust rows for desired height — I used 22 rows for ~6″ height.)
- Fasten off and weave ends.
2. Puff-flower front panel
You’ll work a textured panel with rows of puff clusters.
- Ch 31. Row 1: sc in 2nd ch from hook and across (30 sc). Turn.
- Row 2: ch2 (counts as hdc), skip 1 st, puff in next st; ch1; skip 1 st, hdc in next st — repeat across, ending with hdc. Turn.
- Row 3: ch1, sc across (pick up ch-1 spaces and top of puff stitches), turn.
- Repeat Rows 2–3 until front panel matches back panel height (about 22 rows). Finish with sc row for a neat edge. Fasten off.
Puff stitch tip: for a tidy puff, keep loops pulled to same height and complete the puff with a secure final yarn over and single crochet or hdc into last loop space if that helps stabilize.
3. Join body panels (side seams)
- Place RS together (front with puff side out). Using a continuous sc seam: starting at one side bottom, with RS together, insert hook through both loops of both panels and sc evenly up the side (about 22 sc). Repeat across top and other side, leaving top opening (or leave bottom seam closed and join sides only to make an open-top pouch you fold).
- Alternatively, seam with mattress stitch for invisible join on WS.
4. Flap
- With RS facing, attach yarn at top center of back panel and ch 1, sc across about 16–20 sts centered to create flap base (or pick up stitches across full width and shape flap).
- Row 1: ch1, sc across. Turn.
- Continue decreasing at both edges (sc2tog at ends) every other row until you form a pointed or rounded flap. For a rounded flap: sc across evenly for 6–8 rows then do shell stitches along edge (5 dc in one st, skip 2, sl st in next) for a scalloped finish.
- Attach magnetic snap to flap and corresponding snap to body (follow snap manufacturer instruction; reinforce with small backing felt circle).
5. Strap — pearl beaded
Option A (pearl chain):
- If you have pre-strung pearl chain: measure desired drop and attach ends to bag sides with jump rings or leather strap ends.
Option B (pearl & cord): - Thread pearls onto strong nylon beading thread long enough for strap + knots.
- Braid three cords (or crochet a chain) and intermittently add pearls: push a pearl to the working point, secure with a tiny knot or bead crimp, continue.
- Attach ends to side seam with reinforced stitching and metal strap ends.
Option C (yarn strap + pearl accents):
- Crochet a 6–8 mm wide strap: ch 6, join and work in rounds (hdc) until strap length reached. Fold strap ends, insert leather strap ends and rivet or sew.
6. Lining
- Cut fabric rectangle ~1/2″ smaller than bag inner dimensions. Fold and sew sides and bottom to make a pouch.
- Insert into bag and hand stitch top of lining inside bag, hiding seams. Reinforce snap area with extra fabric.
7. Finishing
- Weave in ends.
- Block lightly if needed to flatten puff texture.
- Add keychain charm or tassel at side for extra flair.
Finish tips & gift ideas
- Pack with tissue paper and a matching beaded bracelet.
- To make a sturdier gift, insert a thin piece of cardboard covered with fabric at base.
- For machine-washable option, use cotton yarn and a sewn-in wash bag.
2. Crochet Watermelon Inspired Star Shaped Crossbody Bag Pattern
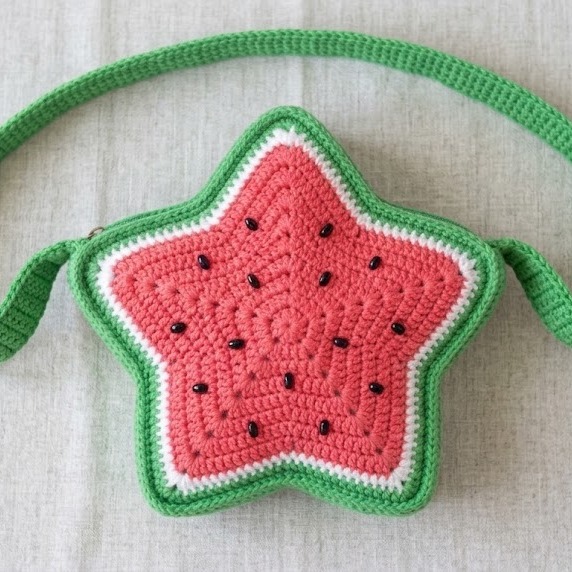
Description: A playful star-shaped crossbody inspired by watermelon colors — bright pink/red center, a green rind edge, and tiny “seed” beads sewn on. Great for kids or anyone who likes quirky accessories.
Skill level: Intermediate (shaping and working in rounds)
Finished size: Star diameter ~8–9″ from tip to tip
Materials
- Sport/DK yarn in watermelon pink/red, white (thin rind stripe), and green (rind)
- 3.5–4.0 mm hook
- Black seed beads (for seeds) or small French knots with black embroidery thread
- Tapestry needle, scissors
- Lining fabric (round/hexagon)
- Zipper or magnetic snap
- Strap: adjustable fabric strap or crocheted strap
- Optional: thin foam for structure
Stitches/Abbreviations
- ch, sc, hdc, dc, sl st, inc = increase (2 sc in same st), dec = sc2tog
- BLO = back loop only (for ridge effect)
- MR = magic ring
Pattern (step-by-step)
1. Make two star panels (front & back)
Each panel is a 5-point star worked in rounds; this version uses increases to create points.
- Start with MR, ch1. Round 1: 10 sc in MR. Pull tight. (10)
- Round 2: sc in next st, inc in next around. (15)
- Round 3: sc in next 2, inc around. (20)
- Continue rounds increasing evenly until you reach about 32–36 sts — this is the base circle before forming points. This creates the central circular “flesh”. Work in watermelon pink for about 6–8 rounds (to desired radius).
- Start shaping points: determine every 6–8 sts to form a point. For each point: ch1 turn and work short rows outward: (sc, hdc, dc, hdc, sc) increasing at center to create a triangular spike; join back to round with sl st. A more structured technique: after base rounds, switch to working in rows across a set of stitches to form a triangular tip, then rejoin. (There are many ways to create star points — choose the method that gives a symmetrical point count of 5).
- Repeat to make five points evenly spaced. Work back to join; fasten off.
- Make two identical panels.
Simpler alternative: use a 5-point star crochet chart/pattern (many grids exist) and adapt the yarn colors.
2. Colorwork (rind)
- With front panel RS up, join white yarn along the outermost round and work 1–2 rounds of sc in white for the thin rind stripe.
- Switch to green and work 2–4 rounds of sc to make the outer rind.
3. Join panels and attach zipper
- With RS together, align panels and use a zipper: sew zipper to one half of the star interior (hand or machine) before sewing sides together. Alternatively, use an invisible zipper sewn to the lining.
- To join panels with zipper: attach zipper to one panel edge with lining in place, then sew other panel to zipper.
If not using zipper: join with sc around, leaving top opening for flap closure and insert lining later.
4. Seed embellishment
- Sew black seed beads randomly into the pink center. Space evenly — about 10–20 small seeds depending on size. Secure with tight knots and hide ends on lining side.
5. Strap
- Make a simple long strap: ch 6, work in sc in rows making a flat strap of desired length (e.g., 120–150 chains long), fold and sew ends with strap connectors.
- For adjustable strap, attach D-rings and a slider, or use a store-bought adjustable crossbody strap.
6. Lining
- Because of the star shape, cut a lining in the same star shape (trace one panel) or use a circular lining that’s slightly smaller and sew pleats at the points to fit. Sew zipper onto lining, attach lining edges to zipper tape, then insert lined zipper bag into crochet panels and stitch lining top to top edge.
Finish tips & gift ideas
- Pair with a mini crochet coin pouch shaped like a watermelon wedge.
- For machine-washable kids’ version use acrylic yarn and secure beads well or substitute embroidered black kisses (French knots).
- Use bright coordinating ribbon on zipper pull.
3. Crochet Multi Colored Striped Sunburst Crossbody Bag Pattern
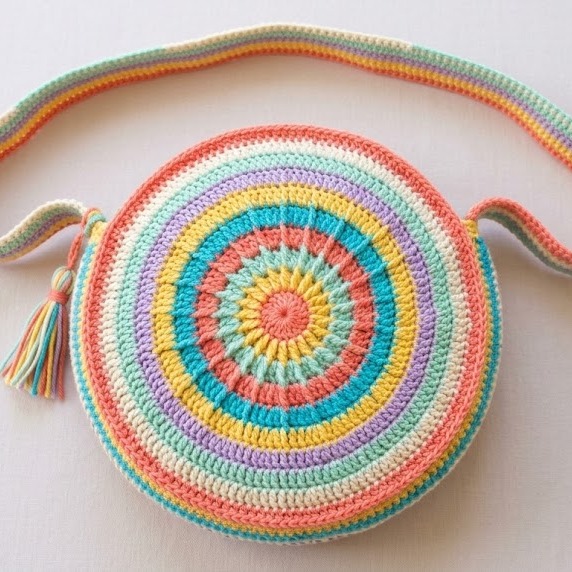
Description: A vibrant, round bag built from sunburst or “granny circle” motifs joined to make a small crossbody. Colorful stripes give a cheerful gift vibe.
Skill level: Beginner–Intermediate (granny round experience, joining motifs)
Finished size: ~9″ diameter
Materials
- Worsted weight yarn in 4–6 colors (about 50–75 g each depending on stripe frequency)
- 4.0 mm hook
- Tapestry needle, scissors
- Lining fabric (circular)
- Zipper or drawstring closure
- Strap: chain, cord, or crocheted strap
- Optional: button, tassel
Stitches/Abbreviations
- ch, sc, dc, tr (treble/dc3), sl st, hdc, shell (5 dc in same st)
- MR, st(s)
Pattern (step-by-step)
1. Sunburst center (make 1 big circle or several joined)
- MR, ch3 (counts as dc), work 11 dc into ring. Join to top of ch3. (12 dc)
- Round 2: ch3, skip 1 dc, dc in next around for spokes; or work alternating dc shells for rays. Work color changes every round to create stripes (fasten off and join new color each round, or carry color using tapestry carry for short runs).
- Continue rounds increasing evenly until you reach a 9″ circle (about 8–10 rounds depending on hook/yarn). Use a combination of dc and hdc to moderate flare.
Option B: Combine smaller sunburst motifs (6–7″) and join them edge-to-edge to form a hexagon/round bag.
2. Back panel
- Make an identical flat round for the back.
3. Side wall (gusset)
Option A (crochet a round side): Join yarn at edge of one panel and sc around with increases/decreases to make the side depth ~2.5–3″. Work even rounds until side reaches desired depth. Then join to back panel by scing through both layers.
Option B (make a continuous circle for sides): Create long strip by foundation sc to desired length and sew into a ring to join panels.
4. Closure
- Add zipper across the top diameter or leave a small flap and add a button loop. For a drawstring, add eyelets around top edge and weave cord.
5. Strap
- Use matching striped yarn to crochet a 1.5″ wide strap in hdc worked to length. Create an adjustable strap by adding a buckle or simply knotting at desired length. Attach to bag via sturdy stitches into side wall or attach to sewn D-rings.
6. Lining
- Cut a circular lining. Sew zipper to lining top, place lining inside bag and whipstitch lining top to the bag’s upper edge.
Finish tips & gifting
- Use complementary color for lining for a pop when bag is opened.
- Add a detachable pom-pom or tassel in contrasting color for a playful gift.
- For extra structure, insert a round piece of plastic canvas in the base before lining.
4. Crochet Granny Stitched Crossbody Bag Pattern

Description: A classic take using granny squares (or one large granny circle) assembled into a timeless crossbody bag — a great “beginner-friendly” gift and perfect for using leftover yarn.
Skill level: Beginner (granny stitch basics + simple assembly)
Finished size: Varies — typical 8–9″ wide × 6–7″ high (make larger by adding squares)
Materials
- Worsted weight yarn — small amounts of several colors (or one main color for tonal look)
- 4.0–4.5 mm hook
- Tapestry needle, scissors
- Lining fabric
- Button or snap
- Strap: chain or crocheted strap
- Stitch markers
Stitches & Abbreviations
- ch, sl st, dc, tr, shell (3 dc cluster often used in granny), sc
Pattern (step-by-step)
1. Make granny squares (example 6 squares)
Classic small granny:
- MR; Round 1: ch3 (counts as dc), 2 dc in ring, ch2, 3 dc, ch2 repeat 3 times, join. (4 clusters)
- Round 2: sl st to corner ch-2 space, ch3, 2 dc, ch2, 3 dc (corner made), then work 3 dc clusters between corners with ch1 spaces. Continue until square reaches ~4.5″ — choose size to form desired bag dimensions.
- Make 6 squares (4 for front/back/sides or 8 for larger bag). Use color changes in rounds to create stripes.
2. Layout & join
- Arrange squares: front, back, sides, bottom (or assemble two panels of 3 squares for front/back).
- Join squares using whipstitch or join-as-you-go method. For tidier seams, use slip-stitch join on RS or mattress stitch on WS.
3. Add lining and closure
- Cut lining pieces to match assembled shape plus 1/2″ seam allowance. Sew lining and leave top open.
- Insert lining into bag and hand stitch top seam. Add button/snap to front center; make loop on flap or crocheted chain loop to close.
4. Strap
- Make a simple strap by joining yarn at side seam and crocheting rows of sc until strap width desired, continuing until length reached. Fold and slip stitch ends into side seam and reinforce with stitching.
Finish tips
- Fringe or tassels at bottom corners add boho charm.
- Use a wooden or vintage button for a rustic gift aesthetic.
- When gifting, include a small note about the yarn leftovers used — people love the sustainability angle.
5. Crochet Herringbone Stitch Crossbody Bag Pattern
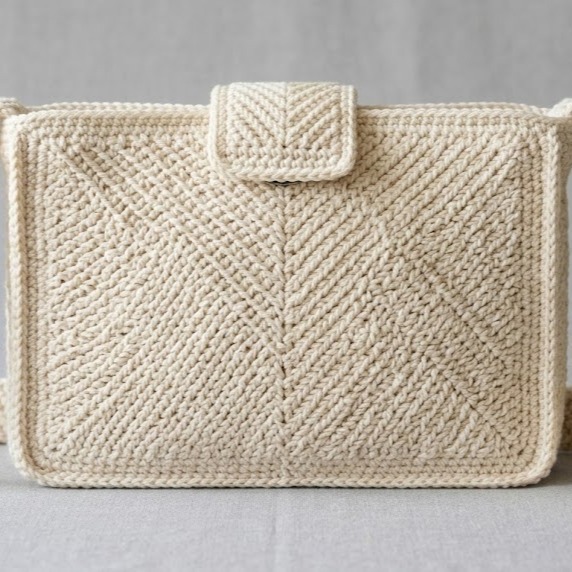
Description: A modern, dense fabric produced by the herringbone half-double crochet (hbhdc) stitch — excellent for structured bags and a chic, minimalist gift.
Skill level: Intermediate (hbhdc technique plus shaping)
Finished size: ~9″ wide × 6.5″ high × 2.5″ depth
Materials
- Aran / worsted weight yarn (150–200 g)
- Crochet hook 5.0 mm (hbhdc tends to be tight — go up if your fabric is stiff)
- Tapestry needle, scissors
- Zipper or flap with magnetic snap
- Lining fabric
- Strap hardware (D-rings) or crocheted strap
Stitches/Abbreviations
- ch, sc, hdc (half double crochet), hbhdc (herringbone hdc), sl st
- hbhdc: Insert hook into stitch, yarn over and pull up loop, yarn over and pull through first loop on hook, yarn over and pull through remaining loops — creates slanted texture.
Pattern (step-by-step)
1. Back panel
- Ch 31 (or desired width). Row 1: hbhdc in 2nd ch from hook and across. Turn.
- Rows 2–24: ch2 (counts as hbhdc), hbhdc across. Adjust rows for height. Fasten off.
2. Front panel (same as back)
Make identical panel.
3. Side gusset
- Make a long strip in hbhdc approx. 2.5″ high and as long as the perimeter of back panel where you’ll join (measure). Chain enough to reach perimeter if working flat, or sc around inside to make a round side.
- With RS together, join gusset to back panel with sc through both layers evenly. Then attach front panel.
4. Closure and flap (optional)
- For a flap closure: pick up stitches along the top edge and work hbhdc or sc reducing gradually to shape flap. Attach magnetic snap.
5. Strap
- For a sleek look, use a leather strap attached with D-rings set into the side gusset; otherwise, crochet a sturdy strap in hdc or hbhdc, about 1.5″ wide.
6. Lining
- Cut a rectangular lining with a boxed bottom matching the bag base. Attach zipper to lining, insert and sew in place.
Finish & care
- Because hbhdc creates dense fabric, this bag has natural structure — for extra formality, add a cardboard base covered in fabric.
- Recommend spot cleaning or gentle hand wash depending on yarn fiber.
6. Crochet Street Fair Boho Crossbody Bag Pattern
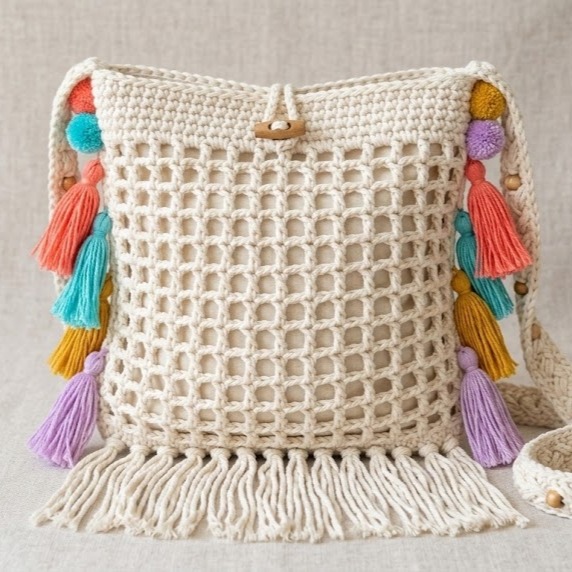
Description: A relaxed, boho crossbody with macramé-style netting, fringe, and colorful tassels — perfect for festivals, casual days out, or as a trendy gift.
Skill level: Beginner–Intermediate (mesh/netting + decorative finishing)
Finished size: ~8″ wide × 9″ high (including fringe)
Materials
- Bulky or worsted cotton yarn for a relaxed drape
- 5.0–6.0 mm hook
- Tapestry needle
- Fabric lining (optional)
- Wooden bead or toggle for closure
- Key tassels or pom-poms
- Strap: braided cord or wide crocheted strap
Stitches/Abbreviations
- ch, sc, dc, sl st
- mesh/net: ch-space patterns (e.g., dc, ch3, skip 2, dc)
Pattern (step-by-step)
1. Base (bottom)
- Ch 20. Row 1: sc in 2nd ch and across. Turn.
- Rows 2–4: sc across to make a firm base. For oval base, increase at ends and round off.
2. Mesh body
- Join yarn at base edge: Round 1: ch4 (counts as dc+ch1), dc in next st, ch1 around to create grid. Join.
- Round 2+: dc into next dc, ch3, skip the next ch-space to open a net-like structure. Continue rounds until bag height ~6″.
- For denser top, switch to dc or hdc for 2–3 rounds.
3. Fringe & tassels
- At bag bottom edge or around top rim, attach fringe by folding yarn strands and pulling through with a crochet hook. Make tassels from contrasting colors and attach to side seams or strap base.
4. Lining & closure
- Because the mesh is open, add a lining pouch: cut fabric to fit interior and slipstitch or hand sew the top seam. Add a drawstring through eyelets created with ch-spaces, or use a wooden bead toggle.
5. Strap
- For boho vibe, braid three long cords or crochet a wide strap in dc. Add wooden beads along strap for personality.
Finish tips
- Boho bags look intentional when uneven or asymmetrical elements (like a longer tassel) are included.
- Gift idea: include festival essentials like a tiny lip balm holder or sunglasses sleeve.
7. Crochet Simple Summer Aesthetic Crossbody Bag Pattern
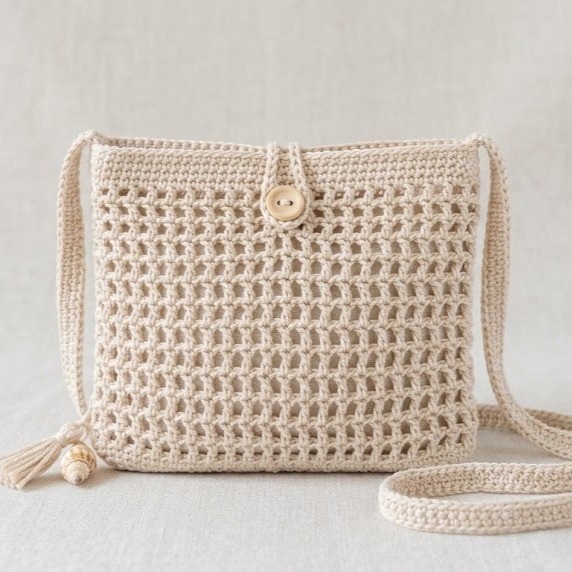
Description: Lightweight, airy, and minimal — a small summer crossbody in open stitches, perfect for warm-weather gifting.
Skill level: Beginner
Finished size: ~7″ wide × 6″ high
Materials
- Fingering or sport weight cotton yarn (50–100 g)
- Hook: 3.0–3.5 mm (or size recommended for yarn)
- Tapestry needle, scissors
- Long thin strap (chain strap or narrow crocheted strap)
- Small snap or button
- Lining optional
Stitches/Abbreviations
- ch, sc, dc, v-st (dc, ch1, dc), shell, sl st
Pattern (step-by-step)
1. Base
- Ch 30. Row 1: sc in 2nd ch from hook and across. Turn.
- Rows 2–4: sc across to form firm base.
2. Body (openwork)
- Row 1 (mesh): ch4 (counts as dc+ch1), skip 1, dc in next, ch1 across. Turn.
- Row 2: ch1, sc in each dc and ch-1 space to anchor and create a subtle texture. Turn.
- Repeat alternating mesh and anchoring rows until bag reaches 6″ height.
3. Top edging and closure
- Work 2 rows of sc along top for stability.
- Add a small flap or make a chain strap loop for a button closure.
4. Strap
- Use 1 or 2 plies of yarn held together and crochet or braid to desired length. Lightweight strap matches the summer aesthetic.
Finish tips
- Keep colors light and neutral (beige, cream, pastel) for a true summer aesthetic.
- Add a short tassel or a tiny conch shell charm to the strap for beach vibes.
8. Crochet Turnberry Crossbody Bag Pattern
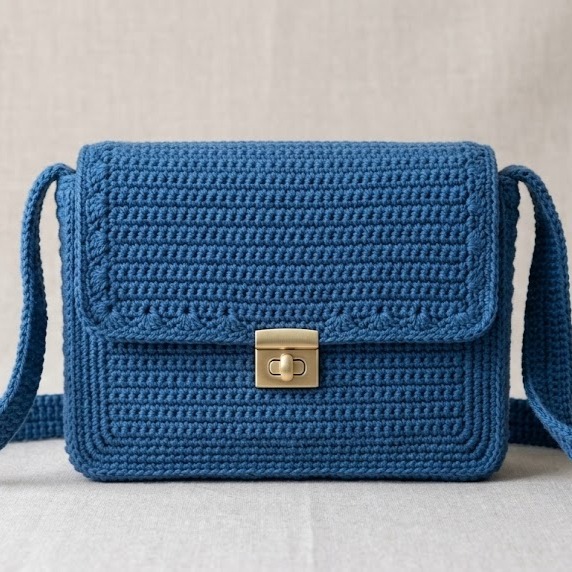
Description: A more structured, designer-inspired bag with a boxy silhouette, flap closure with button or clasp, and subtle stitch detail — the “Turnberry” here is a style name (not a place reference) meaning polished, tailored finish.
Skill level: Advanced beginner to intermediate (shaping + structured finishing)
Finished size: ~10″ wide × 7″ high × 3″ deep
Materials
- Smooth worsted or aran yarn (150–250 g)
- 4.5–5.0 mm hook
- Magnetic clasp or twist-lock hardware
- Lining fabric & interfacing
- Leather or faux leather strap (or crocheted strap with hardware)
- Stitch markers, tapestry needle, scissors
Stitches/Abbreviations
- ch, sc, hdc, sc2tog, dc, BLO, FLO (front/back loop only if used)
Pattern (step-by-step)
1. Bottom and base
- Create a rectangle for the base via foundation sc to a width of ~10″. Work 3–4 rows of sc to stabilize. This will be the bottom.
2. Sides & shaping
- From bottom, fold and pick up stitches along long edge: ch1, sc around base edge to form side panel, working increases at corners to round them. Work in rounds until side height ~4.5″ (this includes flap area later).
- For a boxier effect, work 2 rounds of BLO to create a neat ridge at the base where the body meets the bottom.
3. Body taper & flap
- Continue even rounds in hdc for a firm fabric until you reach top of body.
- For flap: place marker at center front, join and work rows back and forth to shape a structured flap using hdc or sc to keep it flat. Add a decorative row of dc or shell at edge.
4. Insert interfacing and lining
- Cut interfacing and lining matched to bag panels. Fuse interfacing to lining fabric pieces as required for shape retention. Sew lining together and topstitch clasp onto lining where flap meets bag. Attach lining to bag interior by hand stitching.
5. Hardware & strap
- Attach twist lock or magnetic clasp to flap and body (reinforce with leather patches inside lining).
- Attach leather strap with rivets or use D-rings and sew strap ends into side seams.
Finish tips
- Use a smooth yarn to make hardware pop.
- Topstitch the lining entrance for a crisp finish.
- For gifting, add a dust bag or small care card with washing instructions.
9. Crochet Cute Floral Embroidered Crossbody Bag Pattern
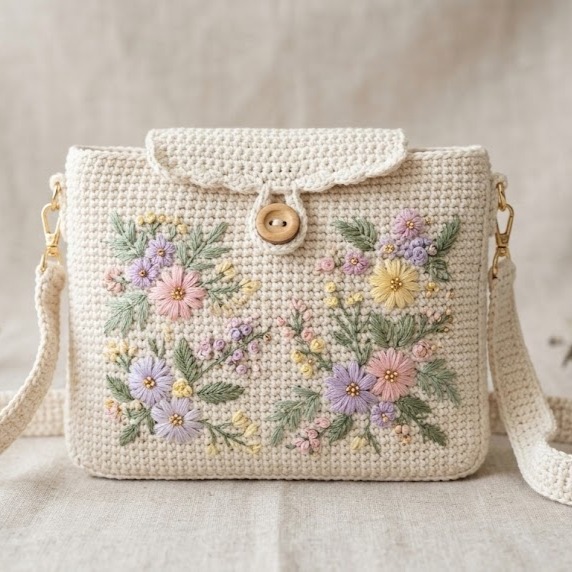
Description: A sweet, rectangular crossbody with simple embroidered floral motifs on a single-color background — classic, feminine, and ideal for special-occasion gifts.
Skill level: Intermediate (basic embroidery + surface crochet)
Finished size: ~8.5″ wide × 6″ high
Materials
- Sport/worsted yarn (main body color + small amounts for flowers)
- Hook 3.5–4.0 mm
- Embroidery thread or contrasting yarn for flowers (finer yarn gives detail)
- Embroidery needle, tapestry needle, scissors
- Lining fabric
- Snap/button and strap
Stitches/Abbreviations
- ch, sc, hdc, dc, sl st
- surface slip stitch for embroidery, or simple needle embroidery stitches (lazy daisy, French knot)
Pattern (step-by-step)
1. Bag body
- Ch 34. Row 1: sc in 2nd ch and across. Turn.
- Rows 2–18: sc across to form firm fabric (adjust rows to reach 6″ height). Make a matching back panel.
2. Assemble
- With RS together, sc down sides and across bottom to assemble tube.
3. Embroidery (before final assembly for ease)
- On front panel RS (before joining), plan floral placement with water-soluble pen or pins.
- Use simple embroidery stitches:
- Petals: lazy daisy (chain loop anchored with sl st).
- Centers: French knots or small beads.
- Leaves: fishbone stitch (straight satin-like).
- For a delicate look, use thinner embroidery floss and small stitches. For bolder, use contrasting yarn and larger motifs.
4. Add flap and closure
- Pick up stitches along top of front to work flap: ch1, sc across for flap width, shape tip as desired, and fasten off. Attach snap.
5. Lining & strap
- Sew lining with interfacing if you want a structured feel. Attach strap via side seams and reinforce.
Finish & gift tips
- Match embroidery thread color to a small accessory inside (like a thread-wrapped keychain) for a cohesive gift.
- Optionally, embroider the recipient’s initial discreetly on the flap for personalization.
Final finishing & care (applies across patterns)
- Weave in ends securely. Use a tapestry needle and bury ends inside stitches for durability.
- Block where appropriate. Light steam blocking helps even out stitches (check yarn care).
- Lining care. Use a matching fabric and, if desired, add interfacing for structure. Sew lining to zipper for neatness.
- Hardware attachment. Reinforce areas that will take stress (strap attachment points) with extra stitching or small leather patches.
- Gift presentation. Place in tissue paper inside a small box; add a care card (hand wash/dry flat or spot clean) and a personal note about what inspired the design.
Conclusion
These nine crochet crossbody bag patterns give you a huge range of giftable styles: the feminine Puff Flower with pearls, playful Watermelon Star, colorful Sunburst, timeless Granny, structured Herringbone and Turnberry designs, relaxed Street Fair boho, breezy Summer aesthetic, and the personalized Floral Embroidered bag. Pick the pattern that matches your recipient’s personality (classic, playful, boho, or polished), choose yarn and hardware thoughtfully, and finish with a neat lining and reinforced straps — those small details make a handmade gift feel professional and loved.