Vests are one of the most versatile handmade garments: they layer beautifully, translate easily between seasons, and can range from delicate lace to cozy, oversized warmth. Below you’ll find a single, practical introduction covering yarn choices, measuring and sizing, gauge, and construction options, followed by eight fully detailed patterns. Each pattern includes: skill level, materials, gauge example, step-by-step construction (with shaping and finishing), variations, fit tips, and care notes.
Read the introduction first — it contains fundamentals that apply to every vest — then jump to the pattern you want to make.
yarn, tools, measuring and construction basics
Yarn & hooks
- Lightweight / spring/summer vests: fingering to sport weight (cotton, linen, bamboo, cotton blends). These give drape and breathability. Typical hooks: 2.5–4.0 mm.
- All-purpose vests: DK/light worsted (cotton blends or light wool blends). Hooks: 3.5–4.5 mm.
- Cozy / cold-weather vests: worsted to bulky (wool, alpaca blends, chunky acrylic). Hooks: 4.5–8.0 mm depending on yarn.
- Choose fibers by season: cotton/linen for warm weather; wool/ alpaca blends for warmth and structure; blends for easy care.
Notions
Tapestry needle, stitch markers, measuring tape, blocking tools, buttons or closures (if any), light elastic or ribbing elastic (optional for shaping), and sewing thread for attaching trims or lining.
Measuring & sizing — practical method
Important measurements:
- Bust / chest circumference — around the fullest part of chest.
- High bust / underarm circumference — around ribcage just under arms.
- Shoulder-to-shoulder — across upper back from tip to tip.
- Back length — from base of neck to desired hem.
- Armhole depth — from shoulder point down to where you want the armhole to end.
Decide intended ease:
- Close-fitting: 0–2″ positive ease.
- Semi-fitted: 2–4″ ease.
- Oversized / relaxed: 4–8″+ ease.
Converting inches to stitches (digit-by-digit method):
- Make a swatch in your chosen stitch and measure stitches per inch (spi).
- Multiply target chest (finished) by spi.
- Example: target finished chest 40″ and gauge 4 sts/in → 40 × 4 = 160 stitches.
- Round to nearest multiple required by your stitch repeat.
Construction approaches
- Worked flat (panels) — classic: back + two front panels, seam at shoulders and sides. Good for colorwork and textured stitches.
- Worked in the round — seamless bodies; front openings added later; best for tubular stitches.
- Top-down — knit-like shaping; work yoke then split for body; great for raglan shaping or yoke motifs.
- Motif/ granny join — build from motifs (hexagon, granny squares) and join; quick visual impact.
- Seamless panels with set-in or drop shoulders — simple for beginner-friendly assembly.
Finishing
- Block pieces before seaming for accurate shaping.
- Add bands (ribbing, shell edging, picot) to necklines and fronts.
- Consider lining for open lace vests to prevent snagging and add structure.
- Add shoulder reinforcement or light interfacing if attaching heavy buttons.
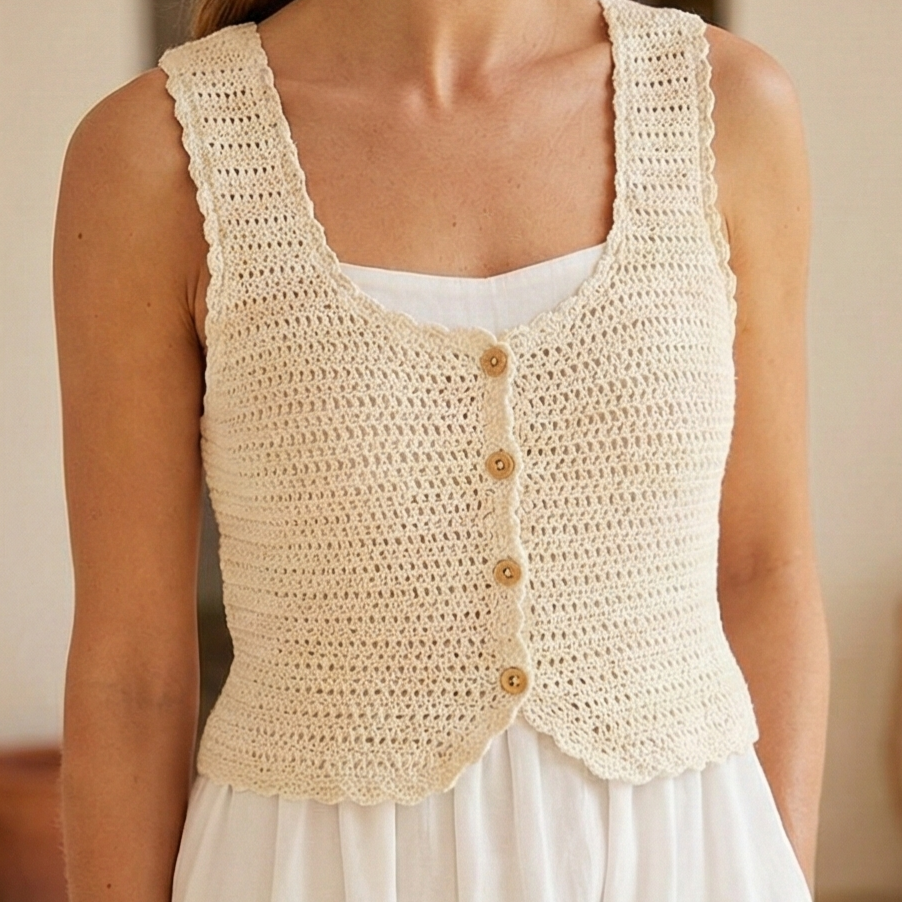
1. Crochet Seashell Vest Pattern
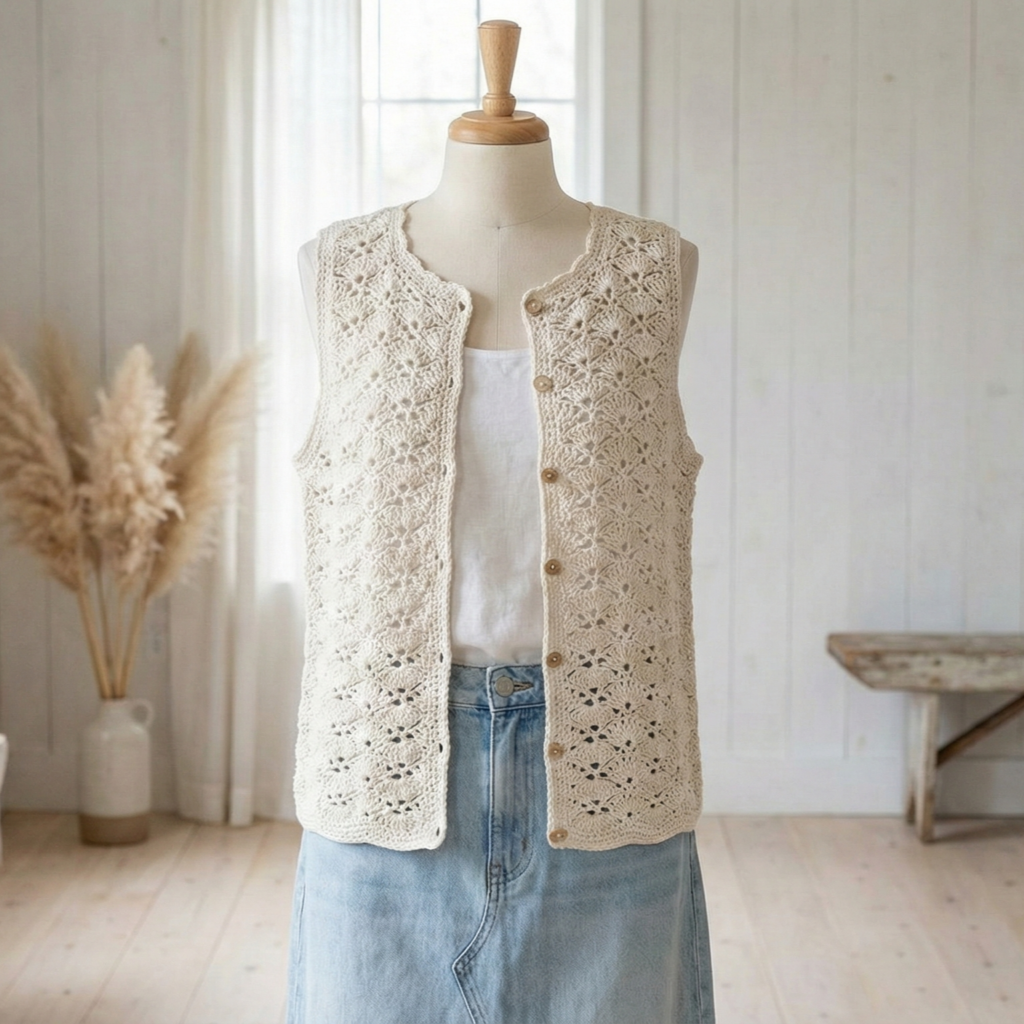
Style: Feminine, semi-fitted vest featuring a repeating seashell lace panel — great summer layering over tanks and dresses.
Skill level: Confident beginner — comfortable with shell stitch repeats and shaping.
Materials (sample adult M)
- Sport weight cotton or cotton blend — 600–800 yd (depends on length).
- Hook: 3.5 mm (adjust to get gauge).
- Stitch markers, tapestry needle, 3–6 small coconut or shell buttons (optional).
- Blocking pins.
Gauge example
- In shell stitch pattern: 18 sts × 10 rows = 4″ sq (this will vary by yarn; swatch to confirm).
Construction overview
Worked flat as three panels: back and two fronts. Shell lace pattern repeats across panels, with slight shaping at armholes and shoulders.
Step-by-step
Swatch & compute
- Work a 4″ swatch in the seashell repeat, blocked. Count spi and rpi. Use chest measurement + ease to compute total stitches.
Back panel
- Foundation chain: compute width = (target back width) × spi, rounded to a multiple of the shell repeat.
- Row 1: Set-up row in sc for a neat lower edge.
- Work shell lace repeat rows until panel length reaches desired back length minus shoulder height (e.g., back length 22″ → stop at 20″ for shoulder shaping).
- For armholes: on next rows bind off 4–6 sts each side (or place markers and leave stitches unworked) then continue each shoulder piece separately if shaping needed.
Front panels (make 2 mirrored)
- Each front panel width roughly half of front minus center opening. Work shell lace across.
- For neck shaping, when reaching appropriate height (measure on body), decrease 1 shell repeat at inner edge every other row 2–4 times to create gentle neckline slope.
Shoulders & seam
- Seam shoulder edges with mattress stitch leaving chosen shoulder width (e.g., 3–4″).
- Seam side seams from hem up to desired armpit height (leave armhole opening).
Neck & front edging
- Pick up stitches along front and neckline using smaller hook (3.25 mm). Work sc rounds or a 1×1 rib (sc in BLO alternating sc) for 6–8 rows. Add buttonband if using buttons (1×1 rib with buttonholes).
Finishing
- Block finished vest to shape, press lightly. Weave in ends. Sew buttons if desired.
Variations
- Make a cropped version by shortening body length; add fringe along hem for boho vibe.
- Work shell panels in two contrasting colors for horizontal stripes.
Fit tips
- If pattern seems too open, use a smaller hook for a denser fabric or add a light lining.
- For a more relaxed fit, add extra repeats at hip measurement.
Care
- Cotton: machine wash gentle, reshape and dry flat. Avoid tumble-dry if using delicate shells.
2. Crochet Checkered Vest Pattern
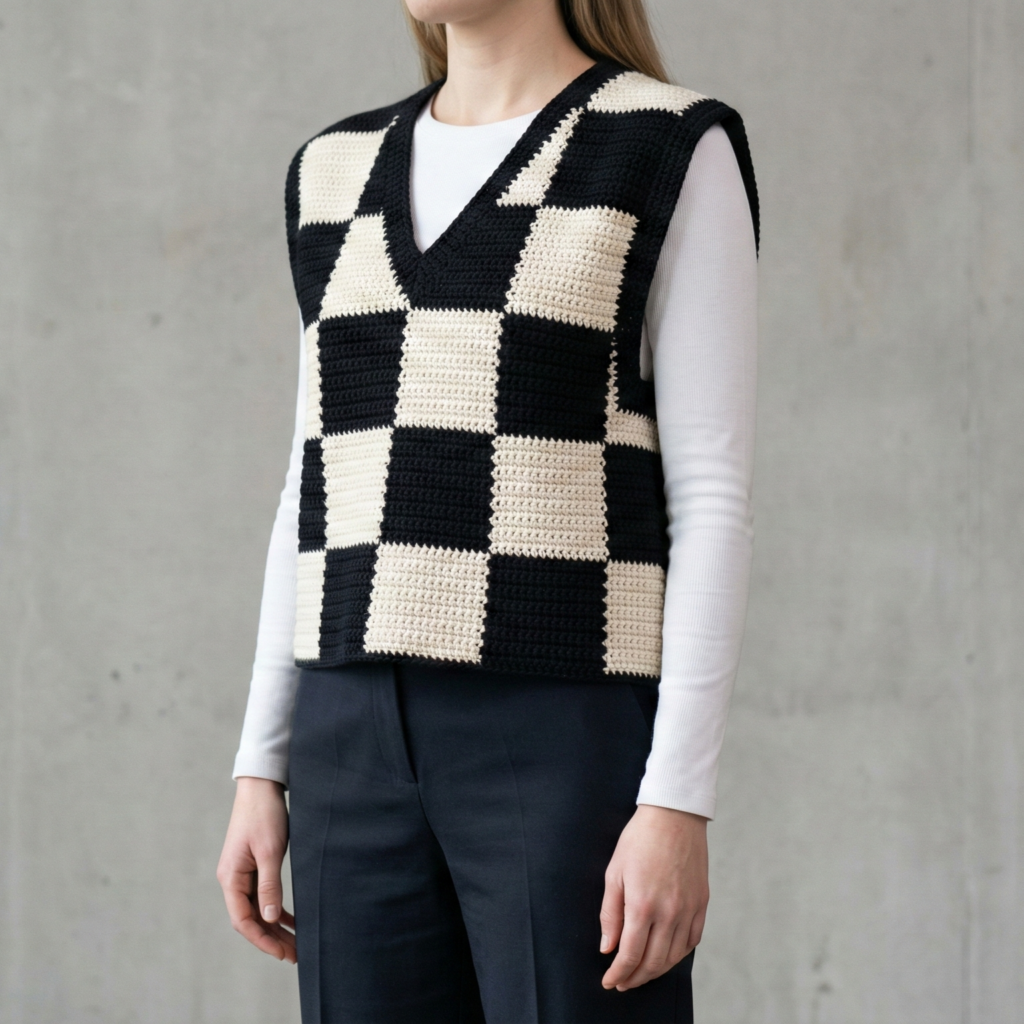
Style: Modern, geometric vest using a checkerboard texture. Works well in DK or worsted yarn and looks sharp with jeans or tailored pants.
Skill level: Intermediate — comfortable with colorwork or surface crochet; tapestry sc recommended.
Materials
- DK wool blend or cotton — two contrasting colors (A & B), ~800–1000 yd total.
- Hook: 4.0 mm for DK; use smaller for tighter fabric.
- Tapestry needle, blocking tools.
Gauge example
- Tapestry single crochet: 5 sc = 1″ in stitch density (swatch to confirm).
Construction overview
Worked flat in tapestry single crochet panels (back + two fronts) for a firm, structured fabric. Checkerboard uses blocks of 4×4 sc squares.
Step-by-step
Swatch & chart
- Swatch in tapestry sc with carrying float tension comfortable. Create a small chart mapping checkerboard blocks so front pieces align across the center.
Back panel
- Foundation chain: compute width to fit across back; chain count = width × spi (rounded to multiple of 4 for block alignment) + 2 for turning.
- Work tapestry sc rows following checkerboard chart until back measures desired length.
Front panels
- Each front width half the front minus center gap. Work tapestry sc repeating checkerboard pattern ensuring the blocks align with the back seams.
Armhole shaping
- When reaching armhole depth, bind off (or leave unworked) 3–6 stitches at each side and continue body to shoulder height. For more fitted armhole, decrease one stitch at each armhole edge every other row twice.
Shoulder seam & neck shaping
- Seam shoulders (e.g., 3–4″) using mattress stitch. For V-neck version decrease at center front edges every other row to form V shape, following block alignment carefully.
Edging and finishing
- Pick up stitches and work 6–8 rows sc or hdc along fronts and neckline; if you want a collar, add extended band that folds.
- Weave in floats from tapestry on WS or clip floats shorter than 4 sts and sew them down to avoid long floats.
Variations
- Use neutrals for a classic checkerboard or bold brights for a retro look.
- Add a small pocket crocheted in the checkerboard pattern and sewn onto one front panel.
Fit tips
- Tapestry sc fabric has little drape; introduce increases at the hip for comfort if needed.
- For narrow shoulders, decrease shoulder seam width or add short cap sleeves.
Care
- Wool blends: hand wash or gentle machine wash in cool water; block while damp.
3. Crochet Hexagon Lacy Vest Pattern
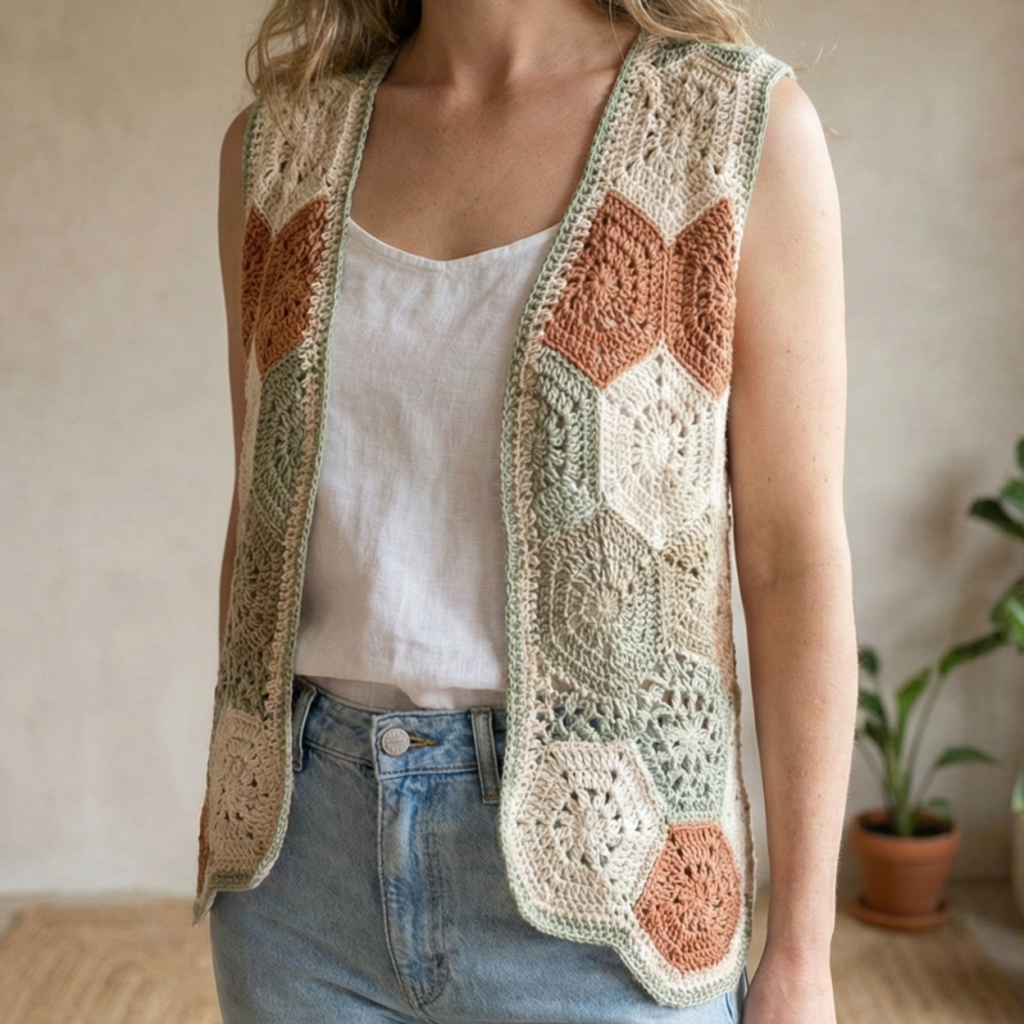
Style: Lightweight, motif-based vest assembled from lacy hexagon motifs — boho and visually striking.
Skill level: Confident beginner → intermediate (motifs and join-as-you-go)
Materials
- Sport or DK weight yarn (cotton or cotton blend) — ~700–900 yd depending on motif size and vest length.
- Hook: 3.25–3.75 mm.
- Blocking mats/pins, tapestry needle, optional lining.
Gauge & motif planning
- Make a pineapple or lacy hexagon motif; blocked diameter typically 3–4″. Plan number of hexagons across width (e.g., 3 motifs across * 5 rows tall). Adjust motif rounds for fit.
Construction overview
Make hexagon motifs, block, then join into panels and seam. Add edging to stabilize.
Step-by-step
Motif
- Work a classic lacy hexagon: central ring → rounds of chains and clusters forming six scalloped points. Block each motif to exact size using pins and steam or wet-blocking.
Layout
- Lay motifs on blocking board forming back and two front panels. For a vest with center front opening, plan motifs so center front has a straight motif edge or use half-motifs for a clean edge.
Joining
- Use join-as-you-go slip-stitch or whipstitch join. Join motifs row by row to make rectangles the size of front/back panels. For a sturdier join, join motifs with a 1–2 row sc border around entire assembled panel before final seams.
Seaming & armholes
- Seam shoulder motifs (align patterns) with invisible mattress stitch. Seam side edges leaving armhole openings per measurement.
Edging
- Add a solid sc border around armholes, front edges and hem to provide structure — 2–4 rounds. If you want a tie front, add small chain ties at front.
Lining (optional)
- To protect lenses and prevent stretching, sew a lightweight cotton lining into the shell; tack at side seams so it doesn’t shift.
Variations
- Use a palette of ombré motifs, or alternate motif types for a patchwork look.
- For a cozy fall version, make motifs in wool and crochet them together with a denser sc join.
Fit tips
- Motif vests tend to be breezy; block carefully to maintain shape. Add a second row of motifs at side seams for extra hip coverage if needed.
Care
- Hand wash motif vests to maintain block shape; reshape on drying board.
4. Crochet Lavender Granny Square Vest Pattern
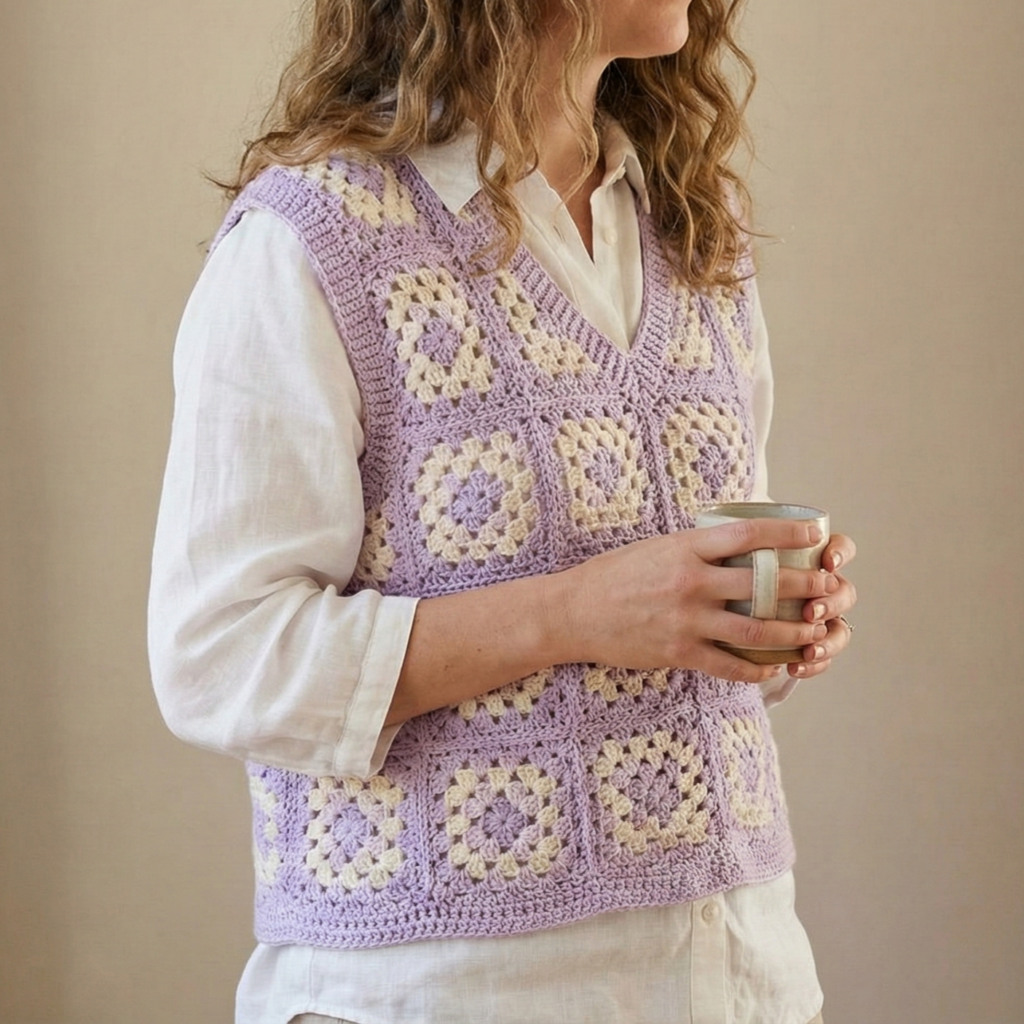
Style: Nostalgic granny-square vest with a lavender palette — playful and perfect for layering over blouses.
Skill level: Confident beginner (granny squares + join)
Materials
- DK cotton or acrylic in shades of lavender / neutrals — ~700 yd.
- Hook: 4.0 mm (or size for desired square size).
- Tapestry needle, blocking pins.
Gauge & squares
- Make a 5-round granny square in the chosen yarn; aim for square size ~3–4″ blocked. Decide layout (e.g., 4 squares across × 6 rows = rectangular back).
Construction overview
Make many granny squares, join into panels, add edging and armhole shaping.
Step-by-step
Squares
- Classic granny square: MR, (ch3, 2 dc, ch2, 3 dc) × 4 corners, join; continue rounds adding color changes until square reaches target size.
Layout & join
- Arrange squares for back and fronts on a flat surface. Join using whipstitch or join-as-you-go in a way that creates a flat seam; for a neat interior join, use mattress stitch.
Shaping
- For armholes, simply leave rows of squares unjoined at side seams for the depth of the armhole (e.g., remove 1–2 rows of squares), or on front panels create a V-neck by reducing number of squares in upper rows.
Edging
- Work a 2–3 round sc border around entire vest to unify color and provide structure. Add 1–2 rounds of reverse single crochet (crab stitch) for a refined finish.
Finishing touches
- Add small buttons or a ribbon tie at the front if you want closure options.
Variations
- Use solid-color rounds with a multi-colored center for visual interest.
- Make a sleeveless or cap-sleeve version by adding a small square-based cap.
Fit tips
- Granny squares add visual bulk; choose a size and layout with this in mind if you prefer a sleeker silhouette.
Care
- Machine wash gentle for acrylic; cotton may wrinkle—reshaping after wash keeps squares neat.
5. Crochet Maglia Mesh Vest Pattern
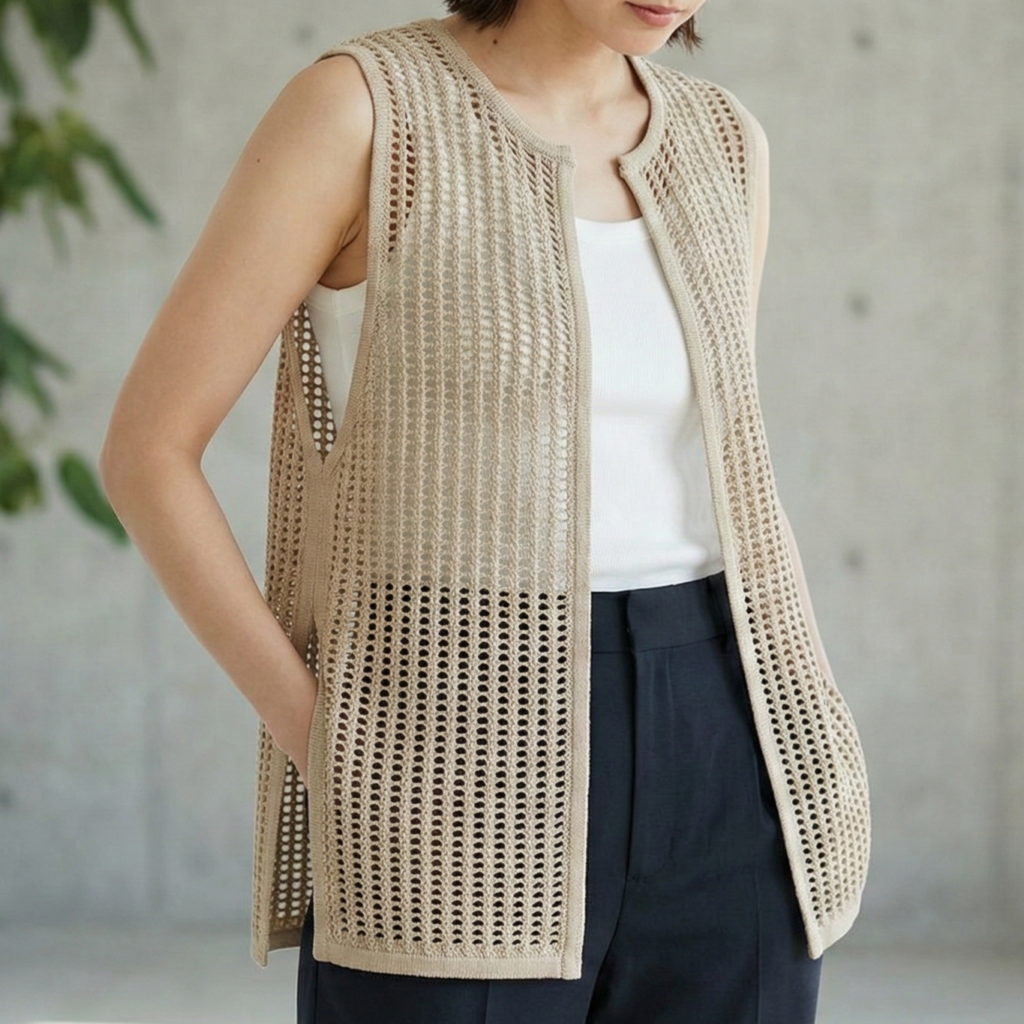
Style: Contemporary mesh vest with a clean, architectural look — “maglia” referencing open knit-like fabric, excellent for layering.
Skill level: Confident beginner — comfortable with mesh repeats and finishing.
Materials
- Sport or DK cotton-linen blend — ~650–850 yd.
- Hook: 3.5–4.5 mm.
- Stitch markers, tapestry needle.
Gauge example
- Mesh pattern: 5 mesh repeats = 4″ (swatch to confirm).
Construction overview
Worked in the round for seamless body to hip; split for armholes and optional front opening; or work flat as panels.
Step-by-step
Swatch & compute
- Make a 4″ sample in the mesh stitch (e.g., dc, ch2, skip 2). Calculate stitches per inch.
Body (seamless tube approach)
- Cast on foundation chain to form a ring that matches hip circumference (finished + ease). Join and work mesh rounds until reaching armhole level.
- Mark points for front opening or continue seamless for pull-over vest.
Armhole shaping
- To make armholes, divide for front and back. For a simple split-front vest, work flat across half the stitches in rows instead of rounds for each side and add an edging.
Yoke / neck
- If adding a collar, pick up stitches along neckline and work several rounds of denser stitch (hdc rows) to form a band; block for a crisp fold.
Hem & finishing
- Add a wider rib or shell hem: 6–8 rounds of hdc in BLO for a subtle hem and structural weight.
Variations
- Add a long waist tie picked up at side seams to close at front.
- Make a scalloped lower edge by adding shell stitches at hem.
Fit tips
- Mesh stretches over time; make final fabric slightly firmer by working 1–2 rounds of sc in BLO at the very end of the hem to stabilize.
Care
- Cotton-linen blends: machine wash gentle, reshape and dry flat to maintain mesh geometry.
6. Crochet Cozy Vest Pattern
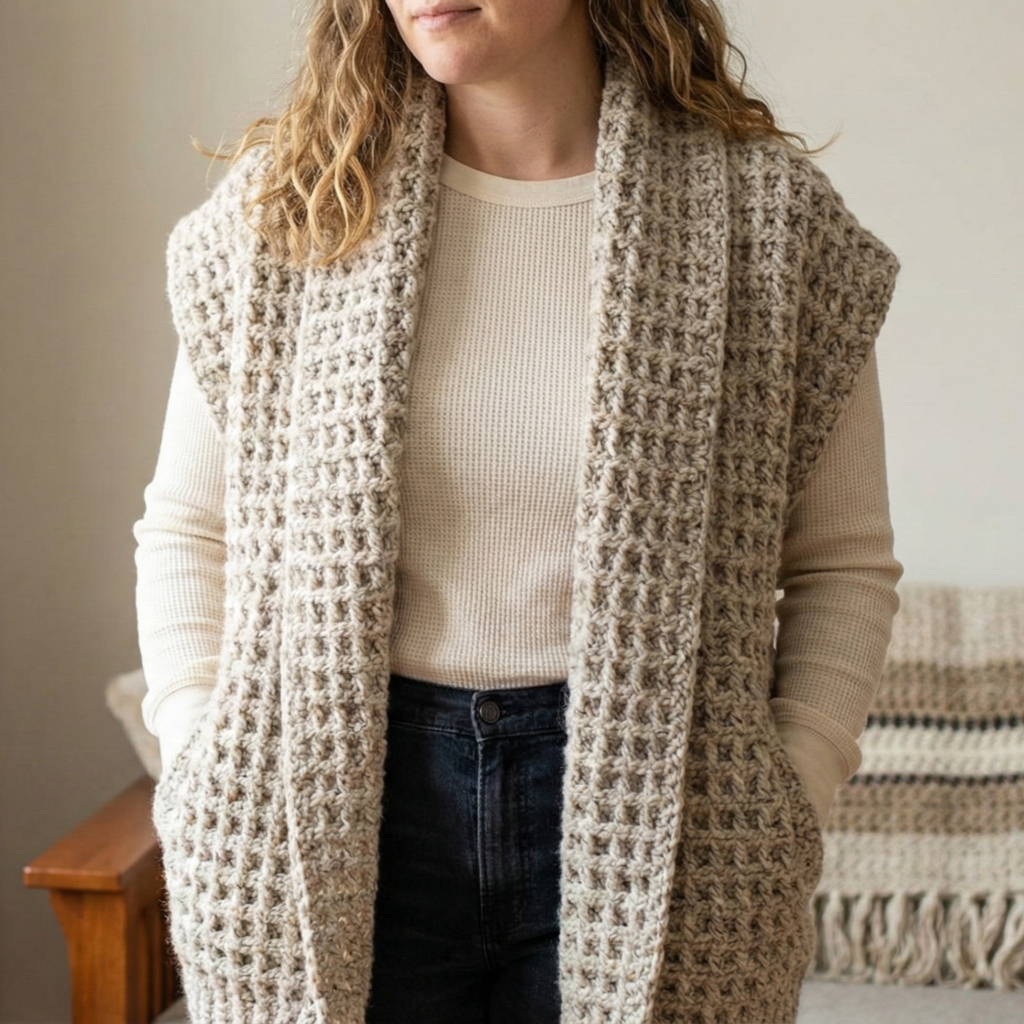
Style: Oversized, textural vest made in cozy stitches (cables, waffle or basketweave) — a fall/winter staple.
Skill level: Intermediate — post stitches and cable techniques.
Materials
- Worsted to bulky yarn (wool or wool-blend) — ~900–1200 yd depending on desired length and size.
- Hook: 5.5–8.0 mm depending on yarn weight.
- Cable needle optional if you prefer knitting-style cables (but crocheted post-stitch cables use hook-only technique).
Gauge example
- Dense textured stitch: 12 sts × 12 rows = 4″ (swatch to determine).
Construction overview
Worked flat as back + two fronts with heavy-texture panels. Side seams may be left open for drape.
Step-by-step
Swatch & stitch pattern
- Practice the chosen textured stitch: e.g., waffle (dc fpdc/pf combination) or faux cable (sets of fpdc/bpdc crossed to make cable). Measure spi.
Back panel
- Chain to match back width; work in texture pattern until desired back length minus shoulder shaping.
Front panels
- Each front is half-width plus overlap for closure if you want buttons. Work texture panels matching back.
Armhole shaping
- For cozy oversized style, minimal shaping is typical — simply stop the side seam at desired armhole depth and leave a wide opening.
Collar & closure
- Add a chunky shawl collar by picking up stitches along front and neckline and working several rows of texture in shorter repeats. Add large wooden buttons or leave open.
Finishing
- Block lightly (wool may relax). Weave ends and steam if necessary to even fabric.
Variations
- Add pockets worked as separate textured panels and seam to fronts.
- Make a hood by picking up along neckline and working in the round into a hood shape.
Fit tips
- Cozy vests are forgiving — adjust ease by adding/subtracting repeats. For a sleeker look, taper sides by decreasing a stitch every few inches.
Care
- Hand wash for pure wool or use gentle machine cycle for superwash yarns. Lay flat to dry.
7. Crochet Summer Waistcoat Vest Pattern
Style: Light, cropped waistcoat with defined waist shaping and tailored front — perfect for warm climates and layered over summer dresses.
Skill level: Intermediate — shaping and tailored seams.
Materials
- Lightweight linen or cotton-linen blend in DK — ~600–700 yd.
- Hook: 3.5–4.0 mm.
- Tapestry needle, small lightweight buttons or tie.
Gauge
- Example: 20 sc × 24 rows = 4″ in single crochet after blocking.
Construction overview
Worked as three panels with waist shaping (decreases/increases at waist), optional darts (by decreasing stitches), and a neat buttoned front.
Step-by-step
Measurements & shaping plan
- Measure bust and waist bust heights. Decide on waist shaping depth and where darts or decreases will sit.
Back panel
- Chain to upper back width. Work even until waist level, then begin shaping by decreasing 1 stitch each side every 8–10 rows until target waist width is reached; work a few rows even; increase back to hip width for flare if desired.
Front panels
- Work front panels with waist shaping mirror-image. Add button band on one side: pick up extra stitches or work additional columns in foundation.
Shoulder seam & side seams
- Seam shoulders and sides. Add small darts by tacking three vertical stitches at waistline on both front & back to create tailored fit rather than full shaping.
Neck & armhole finishing
- Work tidy 1–2 rounds of hdc or small scallop around armholes and neckline.
Button band & finishing
- If adding buttons, work a reinforced band: 6 rows of hdc with buttonholes spaced evenly. Sew buttons on matching positions.
Variations
- Add short peplum by increasing at waist for a flared bottom.
- Use contrasting trim on button bands for visual interest.
Fit tips
- For a polished look try to match vertical shaping on both front panels so buttons sit flat.
Care
- Linen blends: gentle wash, iron while damp for a crisp finish.
8. Crochet Argyle Boho Vest Pattern

Style: A modern take on argyle with boho texture — diamond colorblocks enhanced with lacy or textured stitches.
Skill level: Advanced beginner → intermediate (colorwork blocks and textured panels)
Materials
- DK yarn in three to four colors (main, contrast for diamonds, accent) — ~900 yd.
- Hook: 4.0 mm.
- Tapestry needle, blocking pins.
Gauge
- Example: 20 sts × 24 rows = 4″ in a basic stitch (swatch).
Construction overview
Work panels using intarsia or tapestry crochet to create diamond motifs; combine with textured vertical panels for boho charm.
Step-by-step
Argyle chart
- Design an argyle chart with diamonds sized to your stitch gauge. Each diamond often spans multiple rows and stitches — plan for body width and align diamond centers with bust points for flattering placement.
Back panel
- Chain to width and work across following the chart. Use intarsia blocks for large color areas (separate bobbins) or tapestry technique for small color areas. Make sure floats on the WS are manageable (catch floats every 4 sts).
Front panels
- Work mirrored front panels with half-diamond patterns aligning at the center front. If you want a V-neck argyle, shape center front accordingly by decreasing at the center.
Textured inserts
- Between diamond columns work vertical textured panels (herringbone, braid, or shell). This gives the boho look and reduces massive colorwork area.
Seaming & finishing
- Seam shoulder and side seams. Add edgings (rib or picot) for a neat final look. Block carefully to even diamonds.
Optional pockets
- Add small patch pockets with diamond motif echo.
Variations
- Make argyle subtle by using tonal shades rather than high contrast.
- Add fringe along hem for a pronounced boho finish.
Fit tips
- Colorwork can be stiff — choose slightly larger ease or softer yarns to avoid restricting movement.
Care
- Wash according to fiber specifics; colorwork may bleed—test a swatch first.
Conclusion
You now have eight well-detailed vest patterns spanning lace, motifs, texture, and colorwork. A few final practical tips to make your vest projects a success:
- Always swatch and block. Different stitch textures change gauge; blocking often alters both stitch width and height.
- Try on during construction. For tops with shaping it’s easier to tweak after partial assembly than to unravel a completed vest.
- Mind the drape. Fiber choice affects drape drastically. If you want structure choose cotton blends or wool; for flowy silhouettes use linen, bamboo, or viscose blends.
- Edge finishing matters. A tidy band can transform a homemade vest into a wearable, polished garment; pick a band that complements the vest’s style.
- Photographing for your blog: show vest flat (pattern detail), on a mannequin and styled on a person for scale; include close-ups of stitch texture and finishing seams.
- Care instructions: Add clear care notes per yarn type — e.g., “hand wash cold, reshape and lay flat to dry” for delicate fibers.