

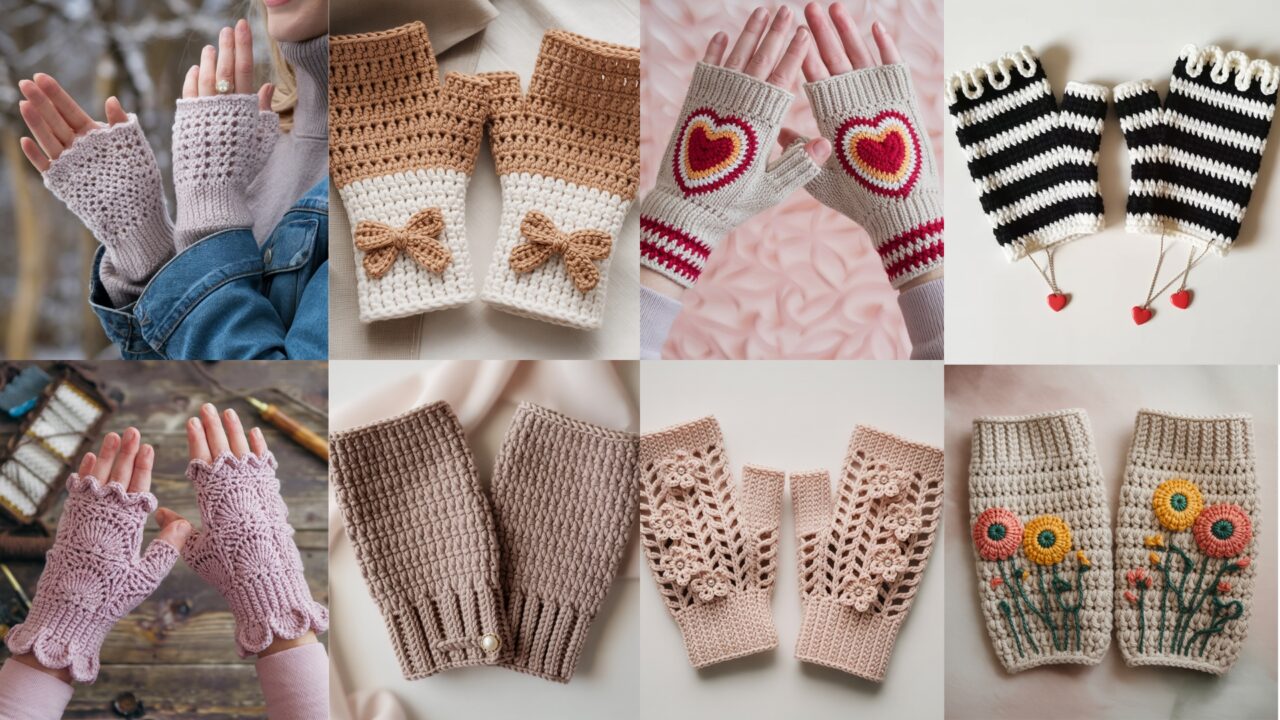
Fingerless mittens are the perfect accessory for chilly days: cozy enough to warm your hands, yet practical for phone use and fine tasks. This collection gives you eight stylish, wearable mitten patterns — from lacey batik yarn designs to Bridgerton-inspired coquette cuffs and playful Alice-in-Wonderland stripes. Each pattern includes: skill level, recommended materials, gauge guidance, finished size and how to adjust, a clear step-by-step construction method (in US terms), instructions for the thumb opening, finishing tips, and variation ideas so you can make each design your own.
Use the abbreviations below for the stitch instructions.
Abbreviations (US): ch = chain, sl st = slip stitch, sc = single crochet, hdc = half double crochet, dc = double crochet, tr = treble, inc = increase (2 sts in same st), dec = decrease (sc2tog), BLO/FLO = back/front loop only, RS/WS = right/ wrong side, MR = magic ring.
Before you start — general notes
- Yarn & hook: I give recommended yarn weights (DK/light, worsted/medium, or fingering) and hook sizes for each pattern. Swatch and adjust hook to match gauge if exact sizing matters.
- Sizing & fit: Fingerless mittens fit best when you measure wrist and hand circumference and aim for 1–2″ positive ease (for a comfortable, not-too-tight fit). I provide example stitch counts and explain how to increase/decrease rounds to fit other sizes.
- Construction approaches: Most of these mittens are worked in the round as a tube and then a thumb opening is created by binding off a set of stitches and then picking them up later for a short tube thumb. I’ll show that technique repeatedly — it’s simple and highly adaptable.
- Blocking: For lace patterns, block gently (steam/wet-block) to open the lace. For textured stitches, blocking evens the fabric and makes seams easier.
- Gauge rule: If you change yarn weight or stitches, measure your gauge swatch (stitches × rows per inch) and recalculate counts:
target_circumference / (stitches_per_inch) = number_of_stitches.
Pattern layout for each design:
- Short intro / style note
- Skill level & materials
- Gauge / finished size / sizing adjustments
- Step-by-step instructions (main tube, thumb opening, thumb finish)
- Finishing, variations, styling tips
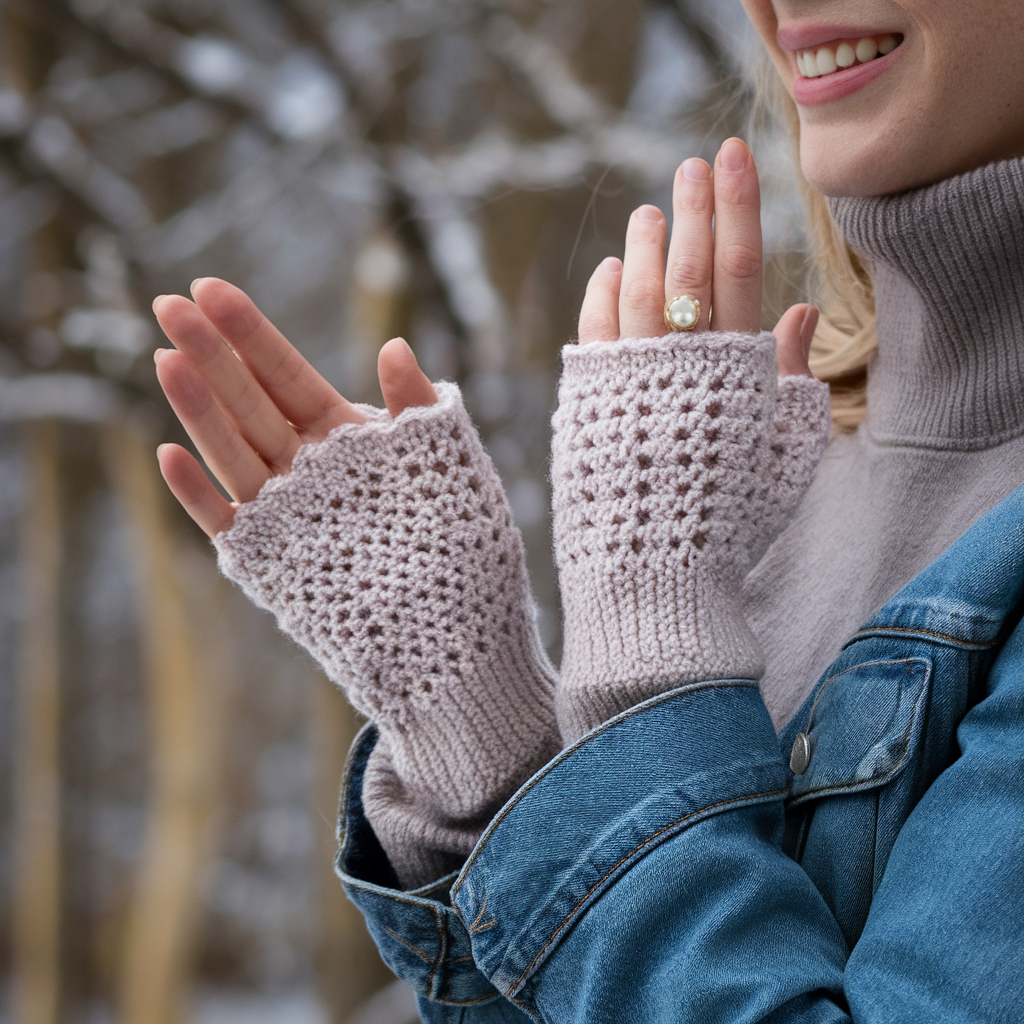
1. Crochet Batik Yarn Lace Fingerless Mittens Pattern
Style note: Lightweight, drapey lace that showcases variegated batik yarn. The soft color transitions create painterly effects — perfect for evening layering.
Skill level: Intermediate (lacy stitch pattern + reading repeats)
Materials
- Batik/hand-dyed fingering or light DK yarn, approx 200–225 yards per pair (fingering) or 150–175 (DK).
- Hook: 3.0–3.5 mm for fingering, 3.5–4.0 mm for DK depending on drape.
- Tapestry needle, stitch marker.
Gauge & sizing
- Example gauge (fingering + 3.25 mm): 24 sts × 32 rounds = 4 in in lace pattern (blocked).
- Finished circumference (unstretched): ~7.5–8.5 in (adult medium). Adjust number of pattern repeats to increase/decrease circumference by 0.5–1 in.
Stitch pattern (4-row lace repeat, example)
Row A: (ch 1, sc in next 2 sts, ch 3, skip next 2 sts, sc in next 2) across — creates little eyelets.
Row B: (ch 3, dc in ch-3 space, ch 1, dc in same ch-3 space) across to make small shells.
(You can use any delicate mesh/lace you prefer; pick a 4–8 st repeat that shows color changes well.)
Instructions
- Measure the wearer’s hand circumference at the knuckles (exclude thumb). Decide target finished circumference (hand circumference + 0.5–1 in ease). Example: 8 in finished → need 48 sts at 6 sts/inch gauge. Calculate stitches from your gauge swatch.
- Foundation: Ch a multiple that fits your lace repeat plus any edge sts. Join with sl st to form a loop without twisting. Place marker. Example: ch 48, join.
- Hem (optional): Work 6 rounds of ribbed hdc in BLO (hdc in BLO) for a gentle cuff that folds slightly inward. This gives structure.
- Body – lace rounds: Work the 4-row lace repeat in rounds until the mitten tube reaches the base of the thumb (measure on wearer or ~4–4.5 in from cuff for medium adult). Keep marker at round start.
- Thumb opening: On next round, determine thumb placement — measure across the palm where thumb begins (typically 2.5–3 in in from inner seam). Work to the thumb start point; bind off or skip 6–8 sts (this gap becomes the thumb opening). Secure with a removable marker or scrap yarn where you skip; continue joining body and work a few extra rounds so the gap is 6–8 stitches high. Alternatively work a short gusset: decrease for a few rounds before the gap for shaping.
- Finish hand: Continue lace repeats for 2–3 more rounds above the thumb opening (so thumb sits under a nice lace canopy). Then work 6 rounds of BLO hdc or scalloped shell edge in contrast (if desired) and finish with sl st; fasten off and weave ends.
Thumb
- Transfer the 6–8 bound-off stitches onto hook/needle (or pick them up with your crochet hook) and join yarn.
- Work in rounds sc or hdc for 6–8 rounds (or until thumb length measured from base to desired tip), tapering by 1–2 decreases in the last 2 rounds to close slightly. Fasten off; weave and hide tail.
Finishing
- Block lightly to open lace and settle the batik color transitions.
- If the yarn is very drapey, add a round of hdc at the wrist for structure.
- Embellish with a tiny metal charm looped on a jump ring and attached to the cuff.
Variations
- Make the lace sparser (larger eyelets) for a more open, airy mitt.
- Add a narrow thumb gusset before binding off for a roomier thumb.
- Work longer cuffs for a fingerless glove style that reaches mid-forearm.
2. Crochet Flower Embroidered Fingerless Mittens Pattern
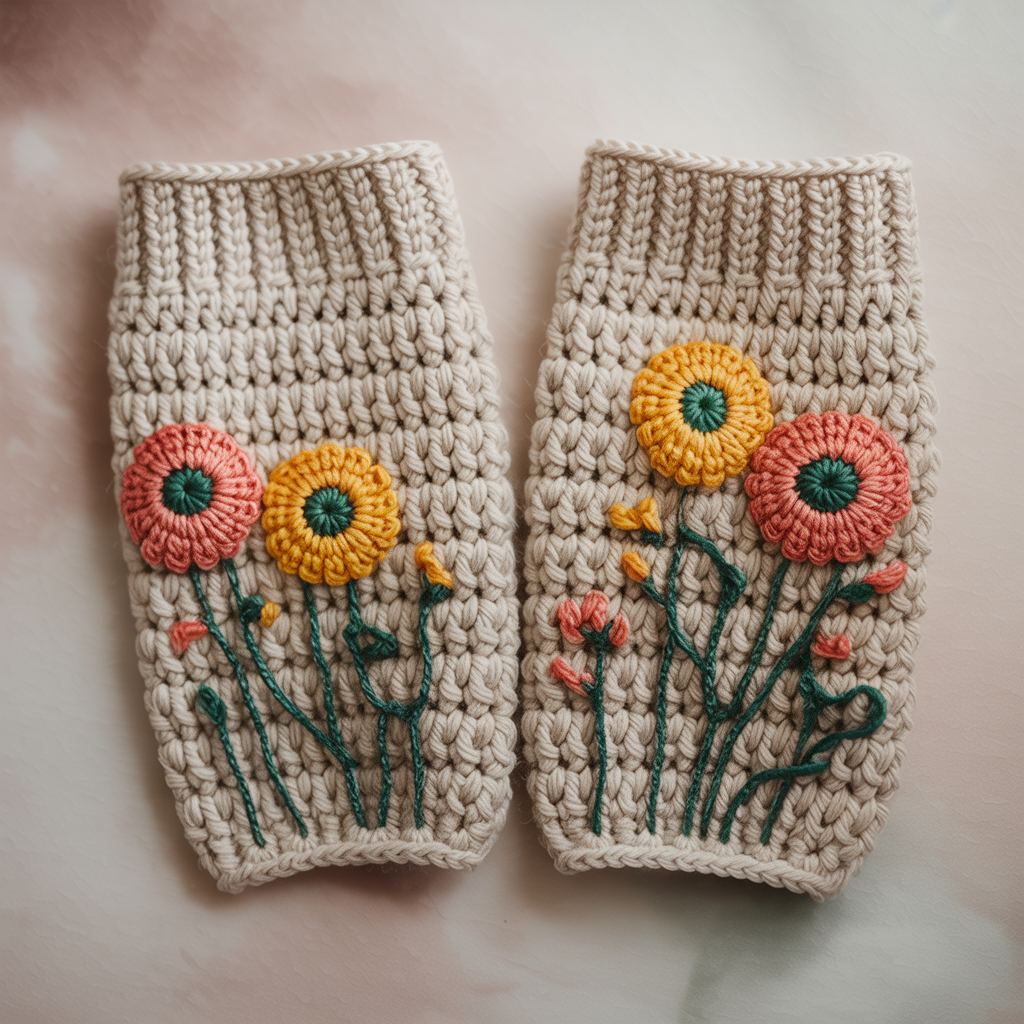
Style note: Textured base mittens embellished with surface-embroidered flowers — classic and customizable.
Skill level: Confident beginner (basic crochet + embroidery)
Materials
- Worsted weight cotton/blend yarn, approx 150–200 yards per pair.
- Hook: 4.0–4.5 mm.
- Yarn for embroidery (contrast colors), yarn needle, tapestry needle, stitch markers.
Gauge & sizing
- Example gauge: 16–18 sts × 22 rows = 4 in in hdc. Finished circumference ~8–9 in. Adjust chain count for fit.
Base stitch
- Use hdc or moss/linen stitch (alternating sc and dc) for a slightly textured background that shows embroidery well.
Instructions
- Foundation: Ch to your target circumference: e.g., if gauge is 4.5 sts per inch and target is 8 in, chain 36 and join.
- Cuff (optional): Work 8 rounds of BLO hdc for a neat cuff.
- Body: Switch to the moss/linen stitch for a sturdy, flat fabric: Row pattern in rounds: (Round: ch 1, sc in next st, ch 1, skip next st), but worked as continuous rounds substitute sc and ch sequence adapted for in-the-round. Alternatively work in hdc in the round for a simpler stockinette-like look. Continue until you reach thumb position (approx 4 in from cuff).
- Thumb opening: Work to the thumb start; bind off 6–8 sts (or place on scrap yarn) and continue body for desired top length (2–3 rounds above gap). Finish top with a tidy round of sc or a picot edge.
- Thumb: Pick up bound-off stitches with hook and work sc or hdc in rounds for the thumb tube; close with decreases if desired.
Flower embroidery
- After finishing and blocking the mitten, embroider flowers using stranded embroidery floss or thin yarn. Use lazy daisy for petals (anchored with small sc foundation), French knots for centers, and stem stitch for vines.
- Plan your motif: a cluster near the back of the hand or a couple of scattered florals look great. For durability, stitch through 2–3 passes inside the fabric to anchor threads.
- For long-term wear, anchor the back of your embroidery with an invisible small felt patch sewn inside to protect stitches.
Finishing
- Weave embroidery ends on the wrong side; tack down with small stitches.
- Block lightly to settle the base fabric.
Variations
- Work the base in a gradient yarn and embroider with slightly brighter threads for punch.
- Add sequined accents for special-occasion mittens (sew securely and avoid for kids).
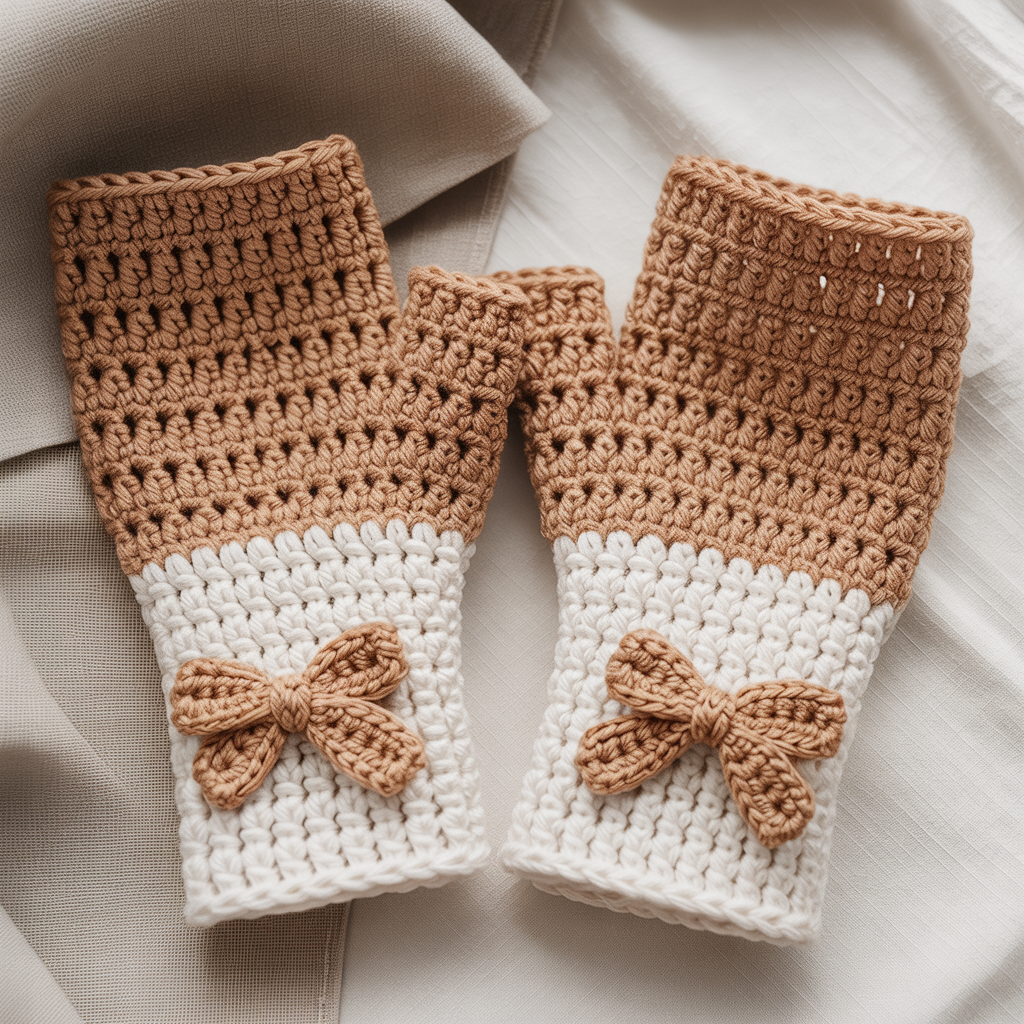
3. Crochet Coquette Bridgerton Fingerless Mittens Pattern
Style note: Romantic mid-Victorian/Regency vibe: dramatic cuffs, picot edges, delicate eyelets — think Bridgerton ball-ready accessories.
Skill level: Intermediate (lace + decorative edges)
Materials
- Fingering or light DK yarn in a soft wool blend or cotton-silk blend, ~200 yards per pair.
- Hook: 3.25–3.75 mm.
- Small pearl buttons (optional), tapestry needle, blocking pins.
Gauge & sizing
- Example gauge: 24 sts × 32 rounds = 4 in in lace. Finished cuff length ~4–5 in with tall picot cuff.
Characteristic features
- Tall cuff that flares slightly, sweet picot top, optional tiny pearl button or ribbon loop.
Instructions
- Begin with a long cuff: Ch to circumference (e.g., 40–48 ch) join. Work fpdc/bpdc rib (front post/back post double crochet) in the round for 3–4 inches to create vertical ribbing that looks slightly corseted. Or alternate rows of dc and ch-lace to create openwork.
- Flare shaping (optional): To achieve a slight bell/Bridgerton flair at the wrist, increase 2–4 sts evenly over 2 rounds (e.g., work dc in next 6, inc repeat) to add gentle flare.
- Lace body: After the cuff, switch to a delicate eyelet lace: Example 6-row repeat: R1: (dc, ch 1, skip 1, dc); R2: (sc across tops); R3: (shell in ch-1 spaces) etc. Work until mitten reaches base of thumb. The lace should be airy but stable enough to hold shape.
- Thumb opening: Bind off 6–8 sts at thumb start (mark), then continue body and finish with a row of small shells or picots to create a feminine edge.
- Top edge: Work a picot edge: sc, (ch 3, sl st at base of last sc) across for dainty points. Add a tiny pearl sewn into each picot peak for sparkle.
Thumb
- Pick up stitches for thumb and work in hdc or sc for a neat tube. Add a tiny cuff: 2 rounds of BLO hdc for a small turn-back cuff.
- Optionally add a little ribbon loop sewn inside the top so wearer can tie a bow or add a decorative pearl button on the outer side (purely decorative).
Finishing
- Block carefully on a hand-shaped form or a rolled towel to maintain flare and lace.
- Sew a tiny interior felt patch at the base of the thumb if you attach beads.
Styling
- Pair with a lace collar or a crocheted necklet to complete the Bridgerton aesthetic.
- Make in cream or pale pink for authentic Regency softness.
4. Crochet Victorian Fingerless Mittens Phoebe Pattern
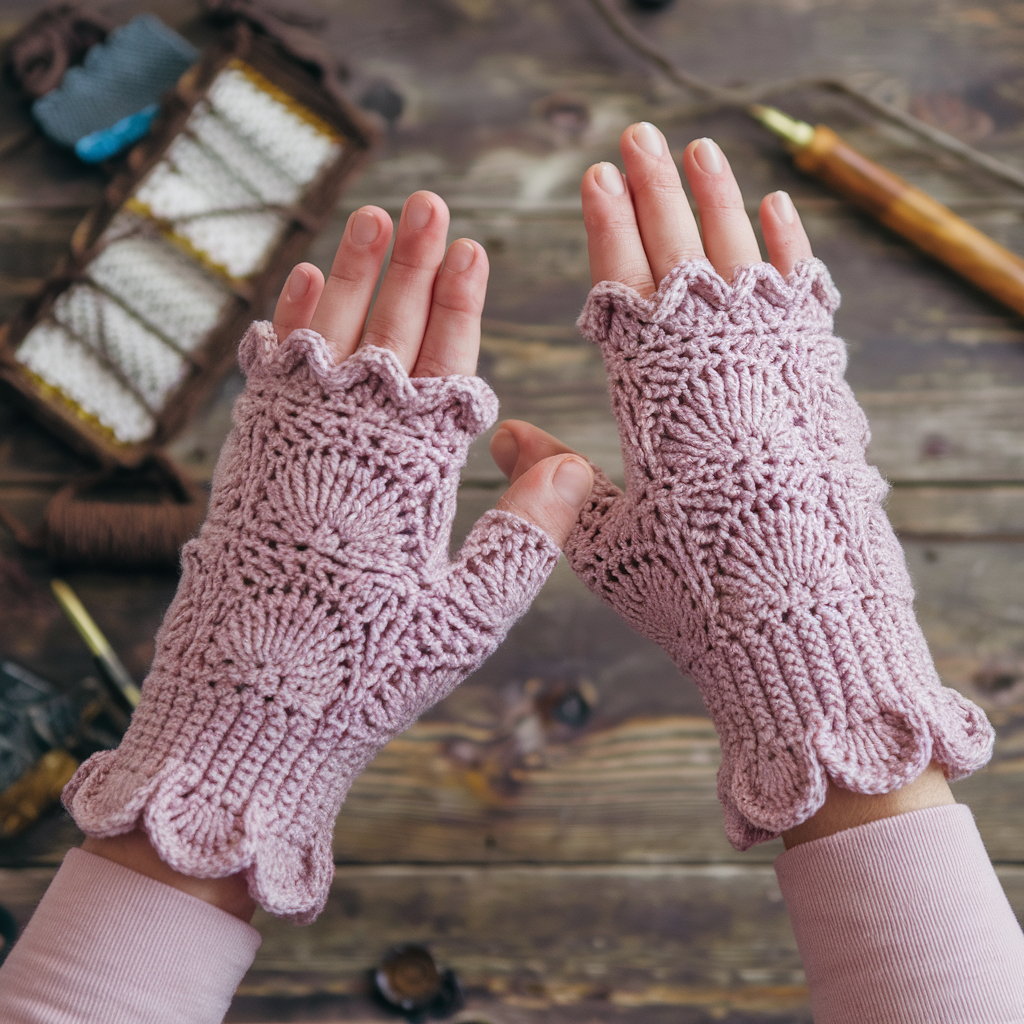
Style note: Victorian-inspired with textured motifs (fan shells, picot edges, stacked stitches) — “Phoebe” evokes elegant detailing and vintage charm.
Skill level: Intermediate → Advanced (multiple stitch textures)
Materials
- Light worsted or DK wool-blend yarn, 175–225 yards per pair.
- Hook: 3.5–4.25 mm depending on yarn.
- Small vintage buttons or brass charms for cuff.
Gauge & sizing
- Example gauge: 18–20 sts × 24–28 rows = 4 in in pattern (depends on complexity). Finished circumference ~8.5–9.5 in for medium adult.
Stitch motifs
- Alternate rounds of fan shells and textured bobble/puff rows for a Victorian surface.
Instructions
- Cuff: Work foundation round in sc to circumference; then 6 rounds of alternating FLO sc and BLO hdc to make a rib-like textured band. Add a decorative button tab by chaining a short strap and sewing it to the cuff with a small button (optional, decorative).
- Main body — texture rounds: Work pattern in repeats of 6–8 rounds:
- Round A (fan round): work shells: (sk 2, 5 dc in next, sk 2, sl st in next) to create ornate fans.
- Round B (anchor round): sc around to anchor fans.
- Round C (puff row): work 3-loop puff in every other st to create raised dots.
- Round D: sc around to stabilize.
Repeat these rounds until you reach thumb position.
- Thumb opening: Bind off 6–8 sts; continue body for 2–3 rounds above opening to create a decorative scallop crown for thumb emergence.
- Top finish: Work a scalloped shell round: (3 dc, ch 2, 3 dc) in every 6–8 sts across, or a picot round if you prefer smaller points.
Thumb
- Pick up bound-off sts and work a small tube in sc, adding a few puff stitches if you want the thumb to mirror the body texture. Finish with a small scallop to echo the top.
Finishing
- Sew on small vintage-style buttons as cuff accents or to secure a tiny decorative strap.
- Block to show off the fan shapes — these benefit from a wet block and careful pinning.
Variations
- Replace puff rows with star or popcorn stitches for extra dimensionality.
- Use muted jewel tones (burgundy, deep teal) for a true Victorian palette.
5. Crochet Vintage Inspired Fingerless Mittens Pattern
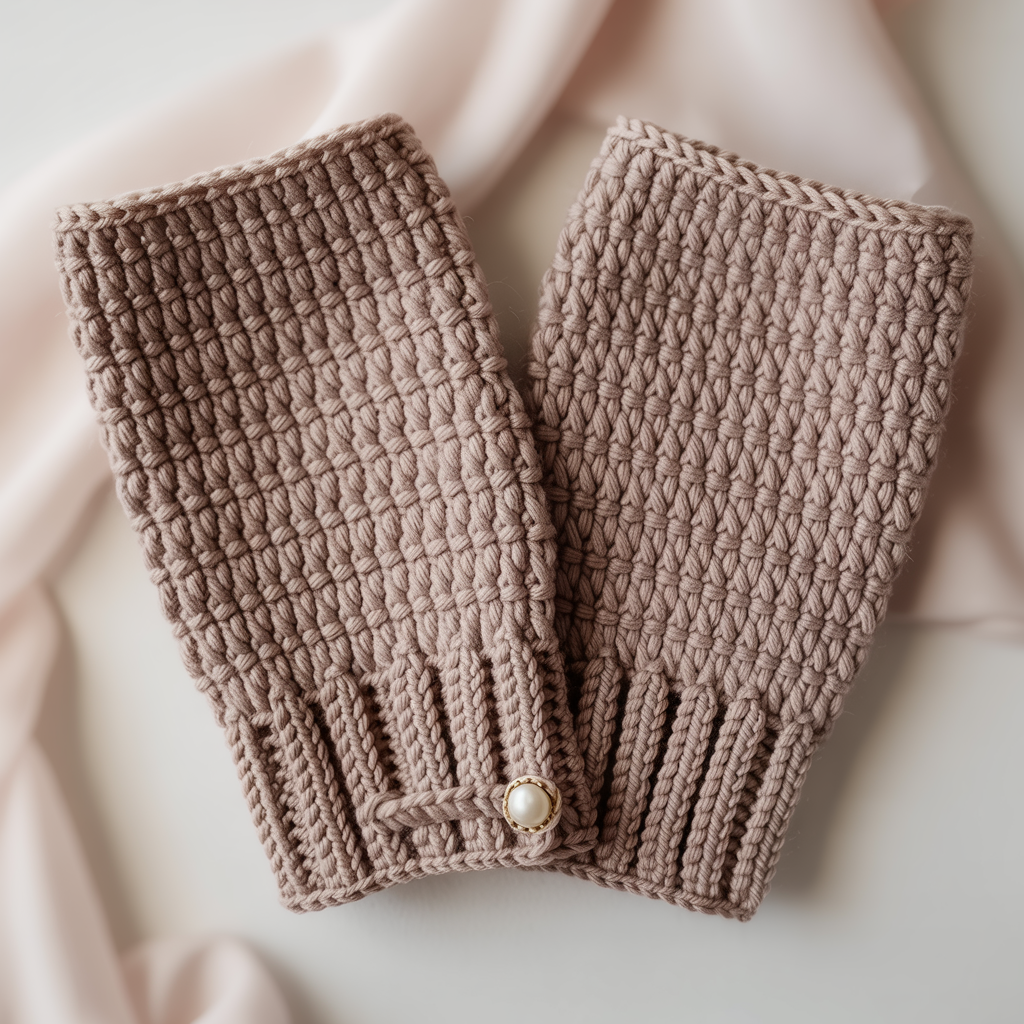
Style note: A throwback look using classic stitches — moss stitch, little lace borders, and an optional crochet button tab for old-school charm.
Skill level: Confident beginner
Materials
- Sport or DK yarn, 150–200 yards per pair.
- Hook: 3.5–4.0 mm.
- Small wooden or mother-of-pearl buttons for tab.
Gauge & sizing
- Example gauge: 20 sts × 28 rows = 4 in in moss stitch. Finished circumference ~8 in (medium).
Moss stitch fabric
- The moss/linen stitch (alternating sc and ch 1) produces a dense, flat, slightly textured fabric perfect for vintage look.
Instructions
- Foundation: Ch appropriate number for fit (e.g., ch 40 join).
- Cuff: Work 6–8 rounds of BLO sc for a neat cuff band.
- Body (moss stitch in rounds): Round 1: ch 1, sc in same st, ch 1, skip next st, sc in next — this is the orientation of moss in flat; translate into rounds by working sc in alternate spaces; one way is to work in back-loop-only alternation to create ladder spaces. Work moss stitch for 3–4 in to reach thumb start.
- Thumb opening: Reserve 6–8 sts (place on scrap yarn) and continue for two rounds above the gap. Finish with a small scalloped edge (optional).
- Top finish: Add a crochet tab and small button at cuff to close over a decorative chain loop (purely aesthetic). For the tab: attach yarn at cuff edge, ch 12, sc back across chain, fasten and sew tab to cuff; sew on a small button near cuff to catch the tab.
Thumb
- Pick up reserved stitches and work sc around until thumb length fits. Finish with a single round of sc in BLO for a neat top.
Finishing
- Wash and block gently to even the moss texture.
- Sew buttons and hide tails inside.
Variation
- Make a striped version using two antique colors; add a tiny embroidered initial on the back for personalization.
6. Crochet Heart-shaped Embroidery Contrasting Colors Retro Mittens Pattern
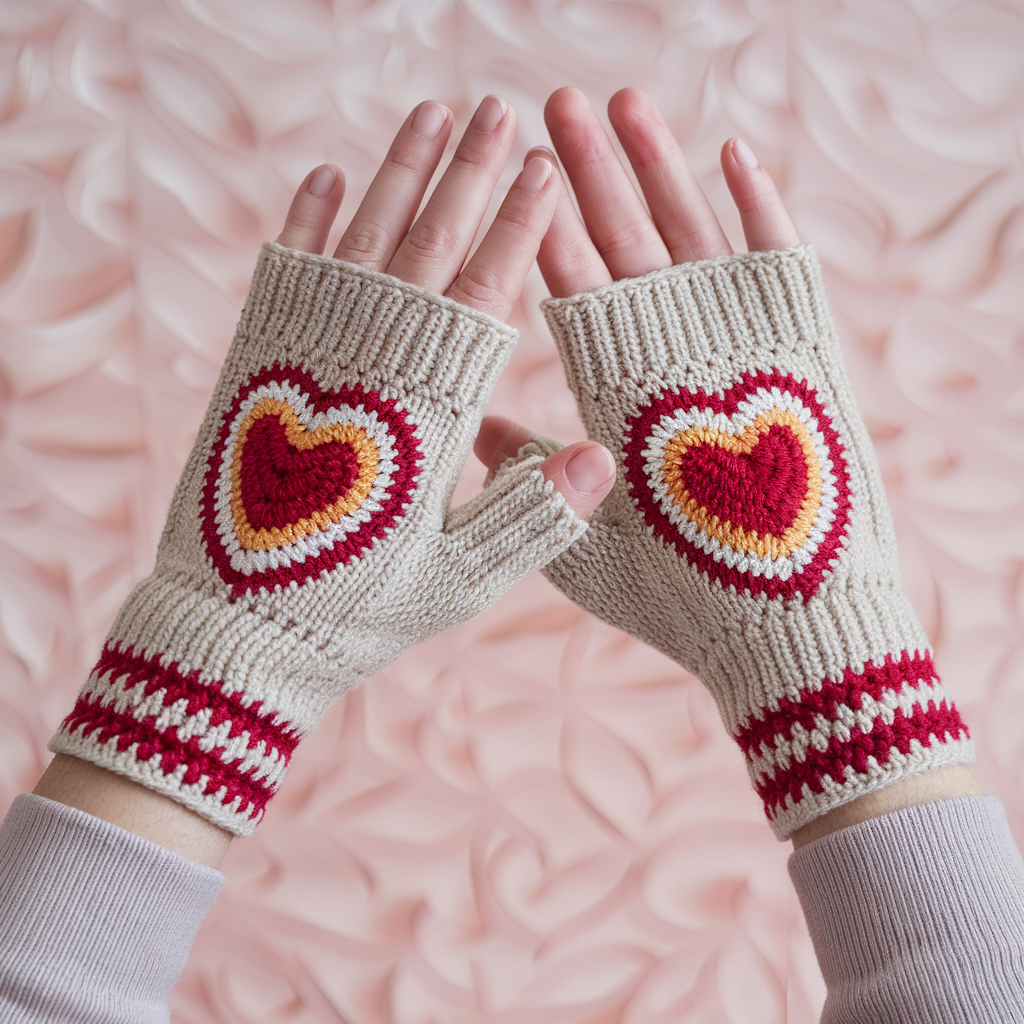
Style note: Retro 1960s/70s motif: bold contrasting color hearts embroidered on a neutral mitten background. Fun and graphic.
Skill level: Confident beginner (colorwork + embroidery)
Materials
- Worsted yarn in two contrasting colors (e.g., cream + deep red), 175–225 yards total.
- Hook: 4.0–4.5 mm.
- Tapestry needle, contrasting embroidery yarn.
Gauge & sizing
- Example gauge: 18 sts × 24 rounds = 4 in in hdc. Finished circumference ~8–9 in depending on tension.
Construction approach
- Work plain tube in main color; after assembly and blocking, embroider retro hearts using surface slip-stitch or duplicate stitch for bold, durable colorwork.
Instructions
- Base mitten: Chain two: pick number of sts to reach circumference (e.g., ch 40 Join). Work in hdc rounds until thumb position reached (approx 3.75–4 in from cuff).
- Thumb opening: Bind off 6–8 sts and continue body for 2–3 rounds above the gap. Finish with 2 rounds of sc in contrast color for a vintage rim.
- Thumb: Pick up reserved stitches and work sc rounds until thumb length achieved; finish with 1–2 rounds of contrasting color.
Heart embroidery
- Draw heart template on paper sized to your mitten (approx 1.25–1.75 in high) and place on top of mitten to mark placement. Using a water-erasable pen or tiny pins as guides, transfer stitch points or outline where the heart should sit.
- Use duplicate stitch (embroidering over existing stitches) with contrast yarn to fill the heart shape — this creates a solid, long-lasting motif. Anchor thread well and weave ends inside.
- For retro effect, add 1–2 concentric outline stitches in another accent color.
Finishing
- Block to set shape and correct alignment of hearts. Weave ends inside and trim.
Variation
- Repeat hearts along the back of the hand or make a single large heart centered on the knuckles.
- Use ombré embroidery (shading) for a modern twist on retro aesthetic.
7. Crochet Floral Lace Fingerless Mittens Pattern
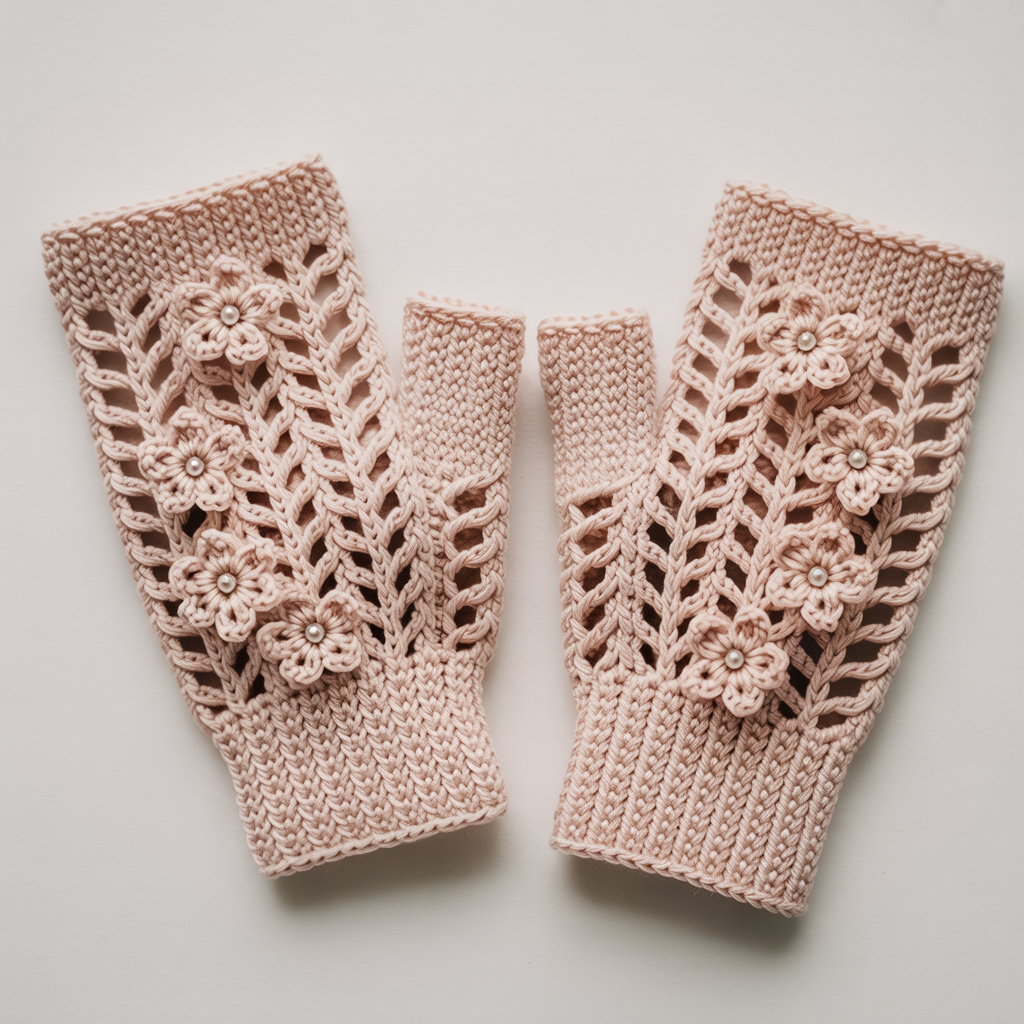
Style note: Delicate full-lace mittens decorated with tiny crocheted flowers appliquéd to the back-of-hand — romantic and feminine.
Skill level: Intermediate (full lace + small applique work)
Materials
- Fingering or light DK yarn, 200–225 yards per pair (fingering) or 150–175 (DK).
- Hook: 3.0–3.5 mm fingering, 3.5–4.0 mm DK.
- Tiny buttons or pearl bead centers (optional) and tapestry needle.
Gauge & sizing
- Gauge example: 24 sts × 32 rows = 4 in in lace. Finished circumference ~7.5–8.5 in.
Lace body
- Pick an elegant repeat such as a leaf-lace (6-8 stitch repeat) or star lace. The lace should have some open spaces where small flowers will sit.
Instructions
- Foundation: Chain to fit circumference; join. Work 6 rounds of small BLO hdc for cuff structure.
- Lace rounds: Work your chosen lace chart for the body until the mitten reaches thumb placement (approx 4–4.5 in). Keep a consistent marker for orientation so flowers line up sym symmetrically on both mitts if desired.
- Thumb opening: Bind off 6–8 sts; work 2–3 rounds above; finish with a scallop or picot edge for delicate appearance.
- Flowers (make 3–5 per mitten): Small 5-petal flowers: MR, ch 1, 5 sc into ring; R2: ch 3, sl st into next sc around to make loops; R3: into each loop work sc, hdc, dc, hdc, sc to form petals. Sew flowers onto the back-of-hand in a small cluster or scatter. Add a tiny bead or french knot center (secure heavily for toddlers).
Thumb
- Pick up reserved stitches and work a few rounds of the lace repeat or just sc/hdc for a snug tube. Finish with a small scalloped edge.
Finishing
- Block on a flat hand shape to open lace and flatten flowers.
- Sew a small felt circle behind each flower before sewing to protect palms and anchor stitches.
Variations
- Make a pair with mirrored flower placement for a coordinated look.
- Incorporate metallic thread into the lace for subtle shimmer.
8. Crochet Alice in Wonderland Fingerless Mittens Pattern
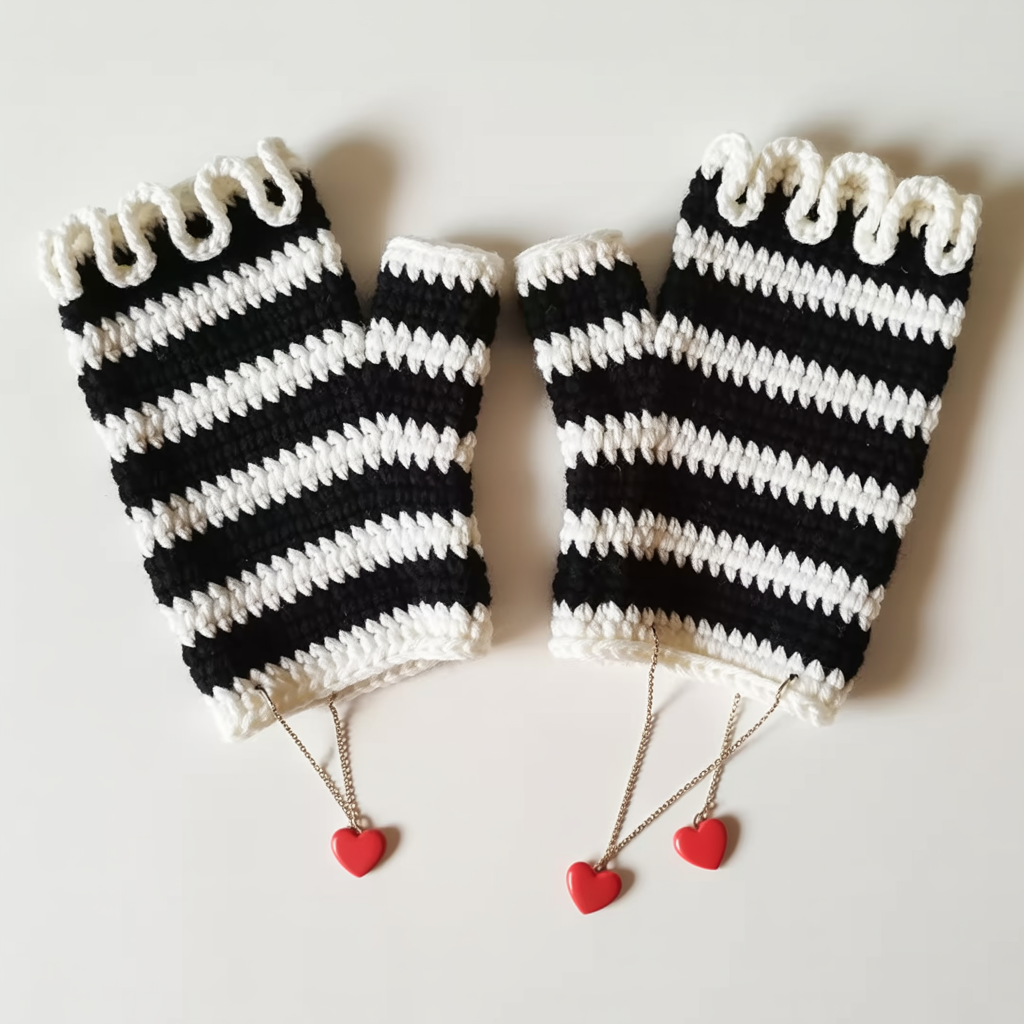
Style note: Playful, graphic black-and-white stripes with whimsical trim — a nod to Alice’s curious, costume-friendly charm. Bold, modern, and fun.
Skill level: Beginner → Confident beginner
Materials
- Worsted yarn in black and white (or high-contrast colors), 150–200 yards total.
- Hook: 4.0–4.5 mm.
- Tapestry needle, stitch marker.
Gauge & sizing
- Example gauge: 18 sts × 24 rows = 4 in in hdc. Finished circumference ~8–9 in for medium.
Striping scheme
- Alternate two rounds per color for crisp horizontal stripes (or one round per color for fine striping). Two-round stripes reduce jogging visibility when working in the round.
Instructions
- Foundation: Ch for circumference (e.g., 40 ch join). Start with 2 rounds of white, then 2 rounds black, alternate until you reach thumb position. Maintain consistent color change technique: carry up unused color and catch floats every 3–4 sts or cut and rejoin for cleaner color edges.
- Thumb opening: At thumb point bind off or place 6–8 sts on scrap yarn; continue body for 1–2 stripe repeats above the gap (ensures the stripes match well above the opening).
- Top finish: For a costume-ready look, work a ruffled trim in white: work dc, ch 2, dc into each st around for an instant ruffle. Alternatively make a scalloped edge (3 dc shell every 3 sts) in contrasting color.
- Thumb: Pick up reserved sts and work 6–8 rounds in stripes or single color; finish with a small rolled edge (work sc in BLO for 3 rounds to create a tidy rolled cuff).
Finishing
- Weave ends and block lightly (a moderate steam if using acrylic will set shape).
- Add a tiny felt playing-card charm or sew a small crocheted heart with contrasting color for an Alice motif.
Variations
- Make the stripes vertical by working panels and seaming (more advanced).
- Add checkered contrast at the cuff by alternating colors stitch-by-stitch for a bold chessboard cuff.
Final finishing tips & care for all mitten patterns
- Weave ends thoroughly: Because mittens are handled, weave tails at least 2–3” into the work and knot or backstitch for security.
- Blocking: Lace and textured stitches benefit from gentle wet-blocking; shape flat or on a hand-form for best fit. Avoid heavy stretching.
- Care: Follow yarn label. Most acrylic/wool blends can be machine-washed on gentle; wool may need hand wash. Reshape while damp and dry flat.
- Sizing adjustments: To scale a pattern up/down, change hook and/or yarn weight and recalculate stitch count from your gauge swatch; alternatively add or remove repeats evenly around for circumference or add/subtract rounds for length.
- Thumb fit: If your thumb feels too tight, add 1–2 sts to thumb opening or use a slightly larger hook for the thumb rounds. If too loose, reduce stitches by 1–2 for a snug fit.
Conclusion
You now have eight distinct, stylish fingerless mitten patterns to try this season — from painterly batik lace and embroidered floral mitts to Bridgerton-style coquette cuffs and playful Alice-in-Wonderland stripes. Each is designed to be adaptable: change yarn weight, color, or stitch repeats to customize fit and personality.
asia slot365 login Hiện nay, nền tảng cung cấp đa dạng hình thức giải trí khác nhau để phù hợp với mọi nhu cầu của anh em. Ngoài việc được tham gia vào các danh mục truyền thống như Casino, Thể Thao, Nổ Hũ thì bạn còn được khám phá nhiều loại hình đặc sắc mới như Đá Gà, Bắn Cá.
I don’t think the title of your article matches the content lol. Just kidding, mainly because I had some doubts after reading the article.
188v con luôn quan tâm và tri ân những người lâu năm bằng những chương trình khuyến mãi độc quyền. Nhà cái có hệ thống xếp hạng thành viên dựa trên số lần chơi nạp tiền.
Thank you for your sharing. I am worried that I lack creative ideas. It is your article that makes me full of hope. Thank you. But, I have a question, can you help me?
Thanks for sharing. I read many of your blog posts, cool, your blog is very good.
Thanks for sharing. I read many of your blog posts, cool, your blog is very good.
Your article helped me a lot, is there any more related content? Thanks! https://www.binance.com/sl/register?ref=GQ1JXNRE
Expliciete video’s lokaliseren door betrouwbare adult platforms online te verkennen. Ontdek gegarandeerde inhoudsbronnen voor een private ervaring.
Ι’m really enjοying the design and ⅼayout of your site.
It’s a very easy on the eʏеs which makes it mucһ more enjoyable for me to come
here and ᴠіsit more oftеn. Did you hire out a
developer to create your theme? Ꮐreat work!
Here iѕ my page fintechbase
Can you be more specific about the content of your article? After reading it, I still have some doubts. Hope you can help me. https://www.binance.info/fr-AF/register?ref=JHQQKNKN
This is very interesting, You are an overly professional blogger.
I have joined your feed and look ahead to in the hunt for extra of your fantastic post.
Additionally, I have shared your web site in my social networks