


Handmade bracelets are the perfect small gift—you can tailor the colors, stitches, and charms to suit any style, and the recipient will always treasure the time and care you put into each piece. Seed beads, with their tiny size and multitude of finishes, are especially versatile: they slide into intricate weaves, twist into spirals, and shimmer in simple strands. Whether you’re new to bead weaving or a seasoned stitcher, these eight seed bead bracelet patterns offer something for every skill level. From two-hole Superduos to classic daisy chains, let’s explore projects you can finish in an afternoon and give with pride.
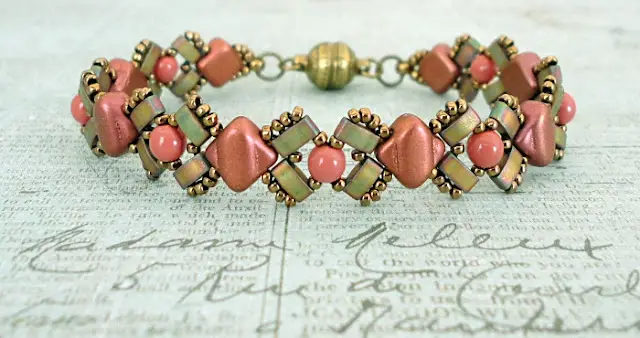
1. Superduo 2-hole Seed Bead Bracelet Pattern
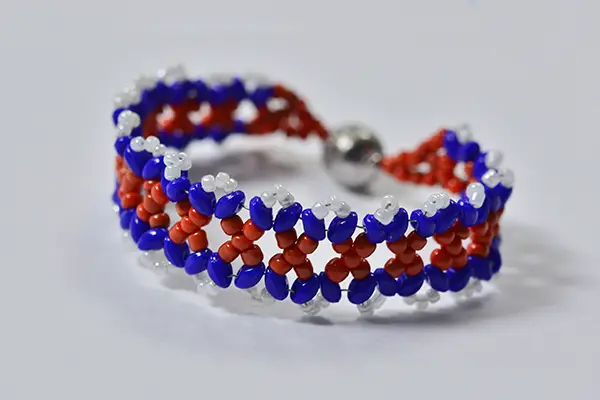
Skill Level: Intermediate
Materials:
- Superduo 2-hole seed beads (2 × 5 mm) – 50 pcs
- 11/0 round seed beads – 200 pcs
- FireLine or Nymo thread
- Size 10 beading needle
- Clasp and jump rings
Instructions Overview:
- Foundation Row: String (SD, 11/0) in repeating sequence until you have enough to wrap your wrist plus ½ inch. Pass back through the first Superduo to form a loop.
- Weaving Second Pass: With the needle, pick up 1 SD, 1 11/0, pass through next SD hole (the opposite side). Repeat across so each Superduo is bridged by a round bead.
- Adding Texture: On the third pass, weave through the outer holes of each SD, adding one 11/0 between pairs to create a zig-zag fringe.
- Finishing: Weave the thread back through the entire band to secure, then attach jump rings and clasp.
2. Spiral Rope Bead Bracelet Tutorial
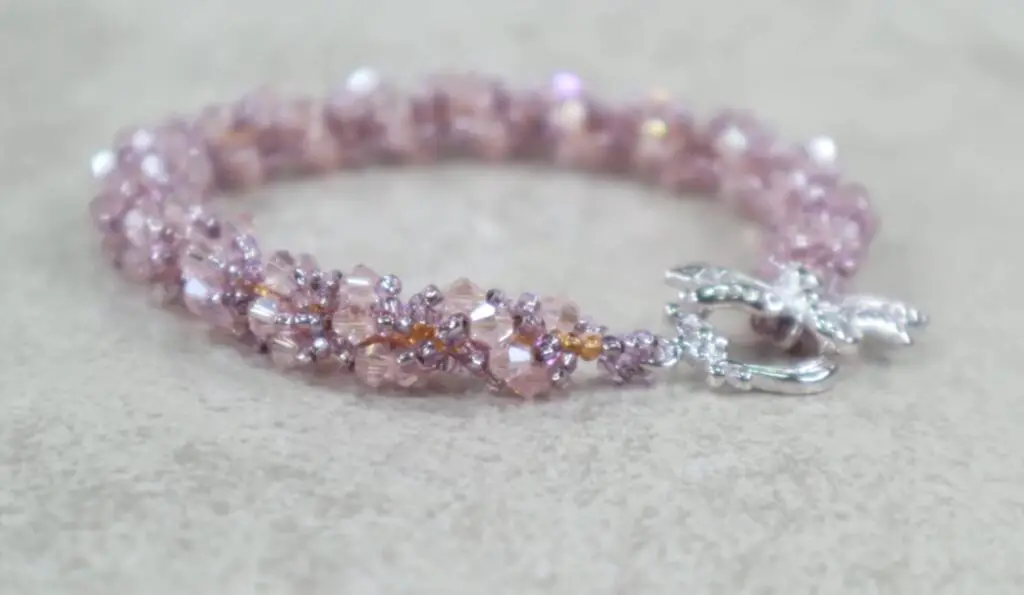
Skill Level: Beginner-Plus
Materials:
- 8/0 and 11/0 seed beads in contrasting colors
- FireLine thread
- Size 10 needle
- Clasp
Step-by-Step:
- Start the Core: String 6 11/0 beads and tie into a ring.
- Begin Spiral: Pick up 3 8/0 beads, skip 2 beads of the ring, pass through the next. Continue picking up 3 8/0, skipping 2 11/0 to build a spiral.
- Grow the Rope: As you add spirals, the beads will twist naturally. Keep tension even for a tight coil.
- Finish & Attach: Once long enough, weave the end into the rope core, then sew on your clasp.
3. Bead Weaving Watermelon Bracelet Pattern
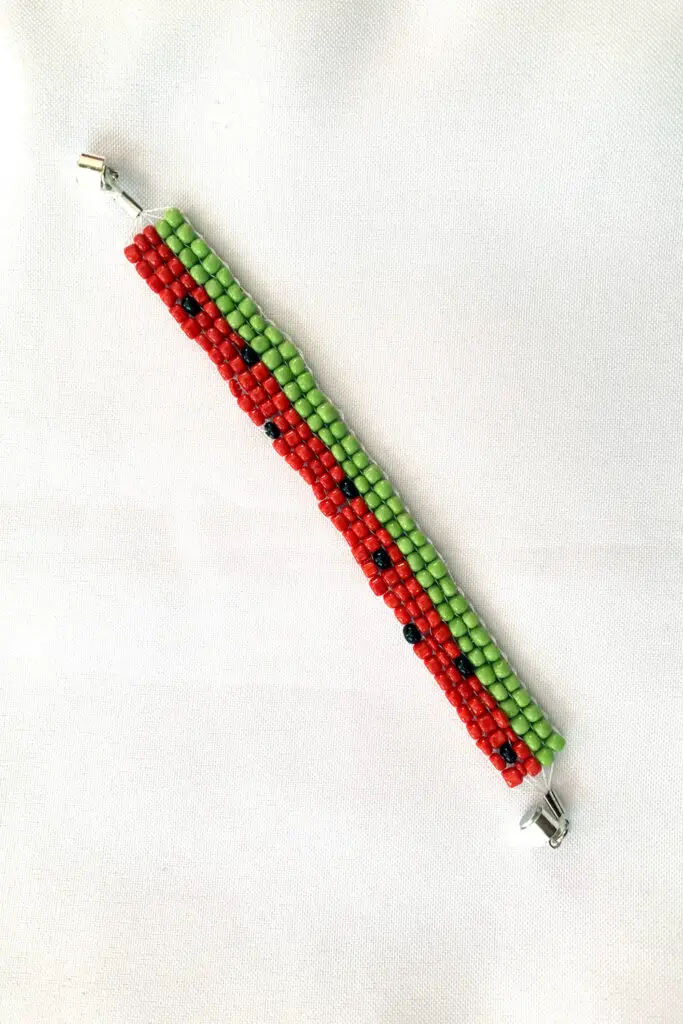
Skill Level: Intermediate
Materials:
- 11/0 seed beads in green, white, red, black
- Beading thread, needle
- Clasp
Pattern Breakdown:
- Brick Stitch Foundation: Brick-stitch a stripe of green (2 rows), white (1 row), red (3 rows). Each row’s bead count = wrist length + 2.
- Embroider “Seeds”: After red rows, pick up a black bead at random spots and stitch back down through one bead to anchor.
- Edge Rows: Finish top and bottom with a row of 11/0 green (for rind).
- Secure & Clasp: Weave back through all beads for strength, then attach clasp.
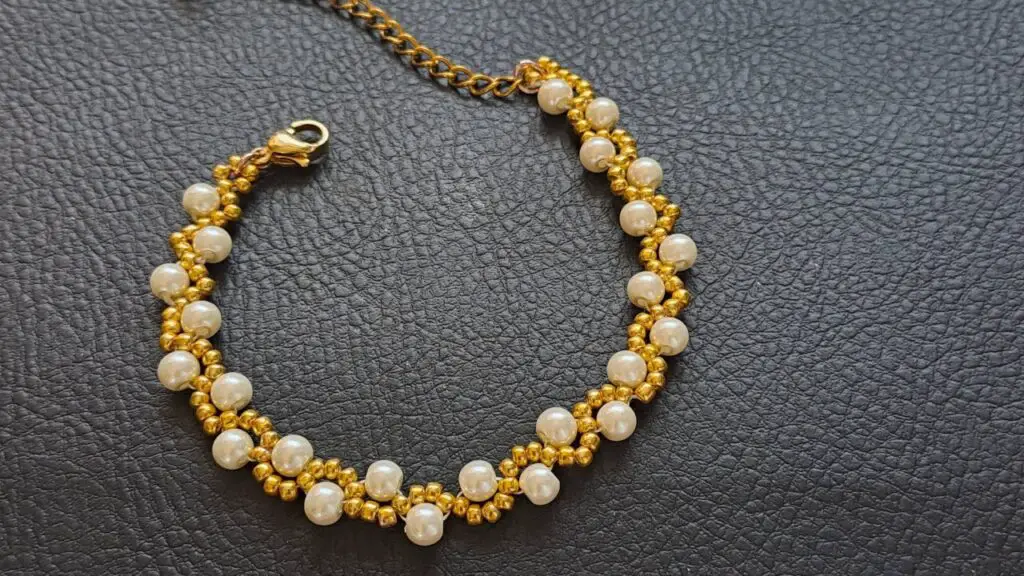
4. Seed Beads Pearl Bracelet Tutorial
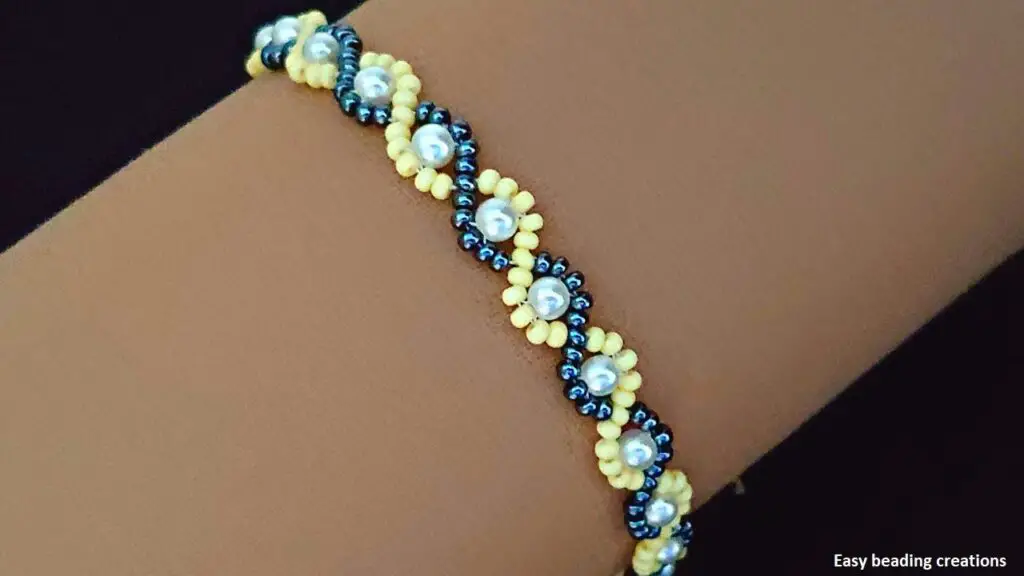
Skill Level: Beginner
Materials:
- 4 mm glass pearls – 20 pcs
- 11/0 seed beads – 200 pcs
- Beading thread, needle
- Clasp
Instructions:
- Alternate Stringing: On thread, string (1 pearl, 5 seed beads) repeatedly until desired length.
- Reinforce: Pass back through each bead group a second time to tighten.
- Finish Ends: Add crimp beads and clasp or tie secure knots and hide in beadwork.
5. Beaded Lucy Bracelet Pattern
Skill Level: Intermediate
Materials:
- Miyuki 4 mm fire-polished beads – 30 pcs
- 11/0 seed beads – 150 pcs
- Beading thread, needle
- Clasp
Step-by-Step:
- Brick Stitch Ladders: Start two parallel brick-stitched strips of 11/0 beads.
- Join with Fire-Polished Beads: Every 5 rows, cross the strips by stringing one fire-polished bead through the corresponding bead on each strip.
- Continue Until Wrist-Length: This creates a ladder-like motif.
- Finish & Attach: Weave ends into beadwork, then affix clasp.
6. Russian Spiral Seed Beads Bracelet Tutorial
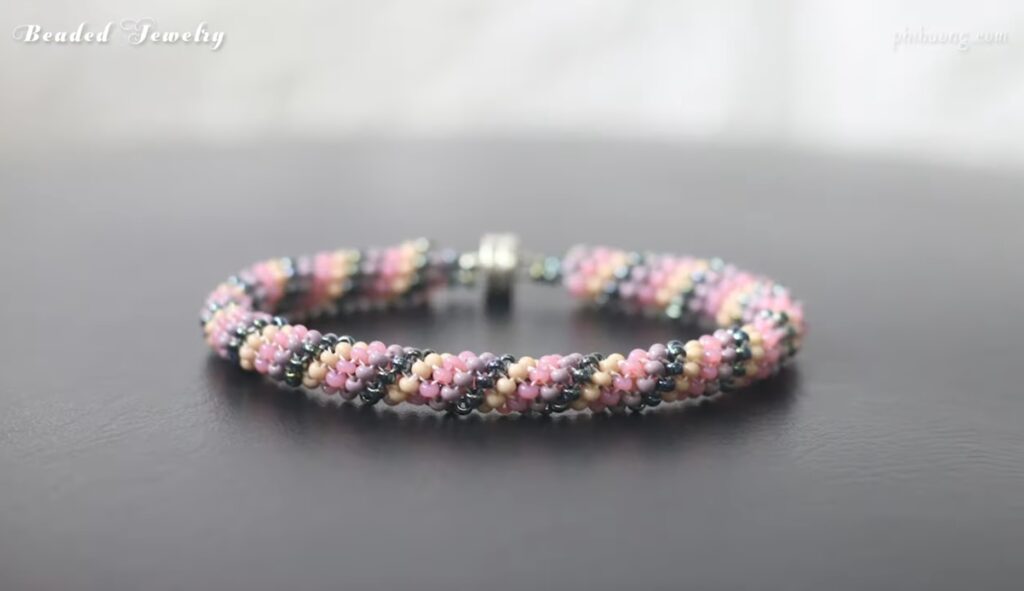
Skill Level: Advanced
Materials:
- 15/0 seed beads (core color)
- 11/0 seed beads (spiral color)
- Beading thread, size 13 needle
- Clasp
Instructions:
- Core Loop: String 7 15/0 beads, tie into a ring.
- Spiral Rounds: Pick up 2 11/0, pass through next core bead; continue around to form a spiral of two beads around each core bead.
- Build Height: Repeat spiral rows until band is about ¼ inch wide.
- Finish: Weave thread back through spirals, then sew on clasp.
7. DIY Beaded Daisy Chain Bracelet Pattern
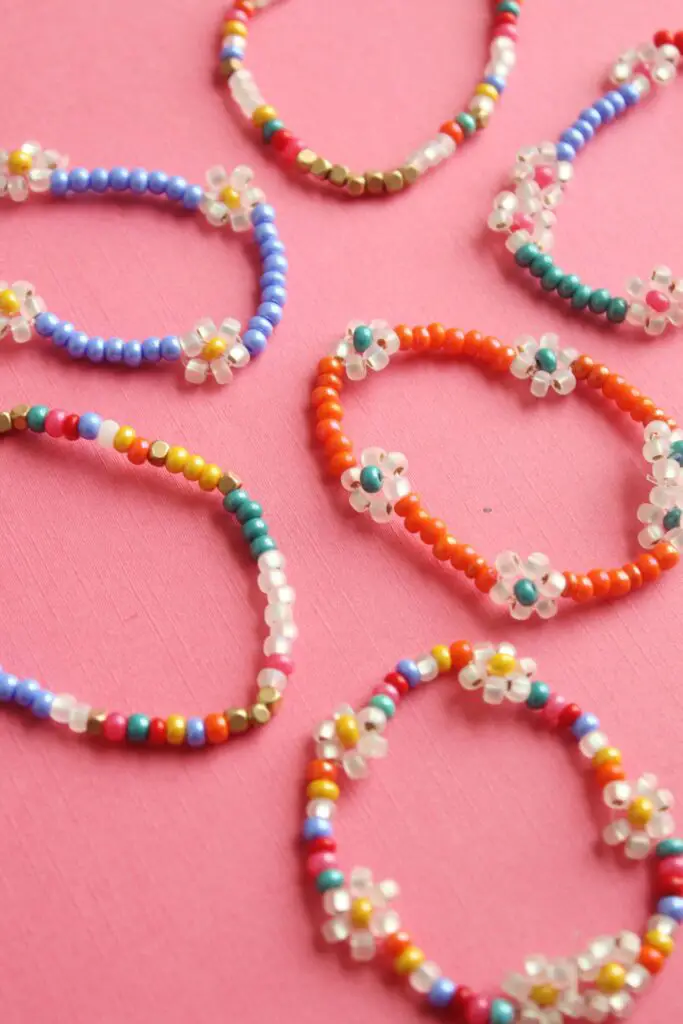
Skill Level: Beginner
Materials:
- 4 mm round beads (for centers) – 15 pcs
- 11/0 seed beads (for petals) – 200 pcs
- Thread, needle
- Clasp
Step-by-Step:
- Make One Daisy: String (1 center bead, 8 seed beads), pass back through the center bead to form petals.
- Linking Daisies: After finishing one, string 4 seed beads, then start the next daisy on the 5th bead. Continue to wrist-length.
- Edge Reinforcement: Pass back along the chain once more, weaving through the center beads.
- Finish & Clasp: Tie off, hide knot inside one daisy center, then attach clasp.
8. Beautiful Beaded Bracelet Tutorial
Skill Level: Beginner-Plus
Materials:
- Mixed 3 – 6 mm beads (glass, crystal, metal)
- 11/0 seed beads – 100 pcs
- Beading wire or thread
- Clasp
Instructions:
- Design Layout: Lay out a repeating pattern of one large bead, two seed beads, one small bead, three seed beads.
- String & Space: String beads in order; use seed beads to space and accent larger beads.
- Secure & Finish: Crimp or tie ends, affix clasp, trim excess.
Conclusion
These eight seed bead bracelet patterns span delicate spirals, bold ladders, and playful motifs—ideal for gifting or building your bead-weaving skills. Each tutorial includes clear, step-by-step guidance so you can tailor colors, bead sizes, and lengths to your recipient’s taste. Gather your tools, spread out your bead mat, and let these patterns inspire you to create heartfelt, handcrafted treasure that friends and family will adore. Happy beading!


Theo iGaming Asia (2024), 888slot thuộc Top 5 nhà cái phát triển nhanh nhất khu vực, với mức tăng trưởng người dùng lên tới 62%/năm.
Theo iGaming Asia (2024), 888slot thuộc Top 5 nhà cái phát triển nhanh nhất khu vực, với mức tăng trưởng người dùng lên tới 62%/năm.
Theo iGaming Asia (2024), 888slot thuộc Top 5 nhà cái phát triển nhanh nhất khu vực, với mức tăng trưởng người dùng lên tới 62%/năm.