A crochet tray is one of those deceptively useful projects that instantly makes a home feel organized and handmade. Trays corral jewelry, keys, glasses, remotes, and loose change — or become decorative bowls for gifts and markets. Because trays are compact and mostly structural, they’re excellent for learning post stitches, working in the round, and combining yarn/rope for sturdiness.
This post gives you 8 modern tray patterns — from a minimal oval mini tray to playful avocado and bear-shaped trays — each with a complete, step-by-step guide plus Skill Level, Finished Size, Materials, Assembly, Tips & Variations, and Care. All instructions use US crochet terms. Where I give example stitch/chain counts I assume worsted weight cotton (or cotton-ropes) and a 4.5–6.0 mm (G–J) hook — but I also explain how to scale and adapt to different yarns or sizes.
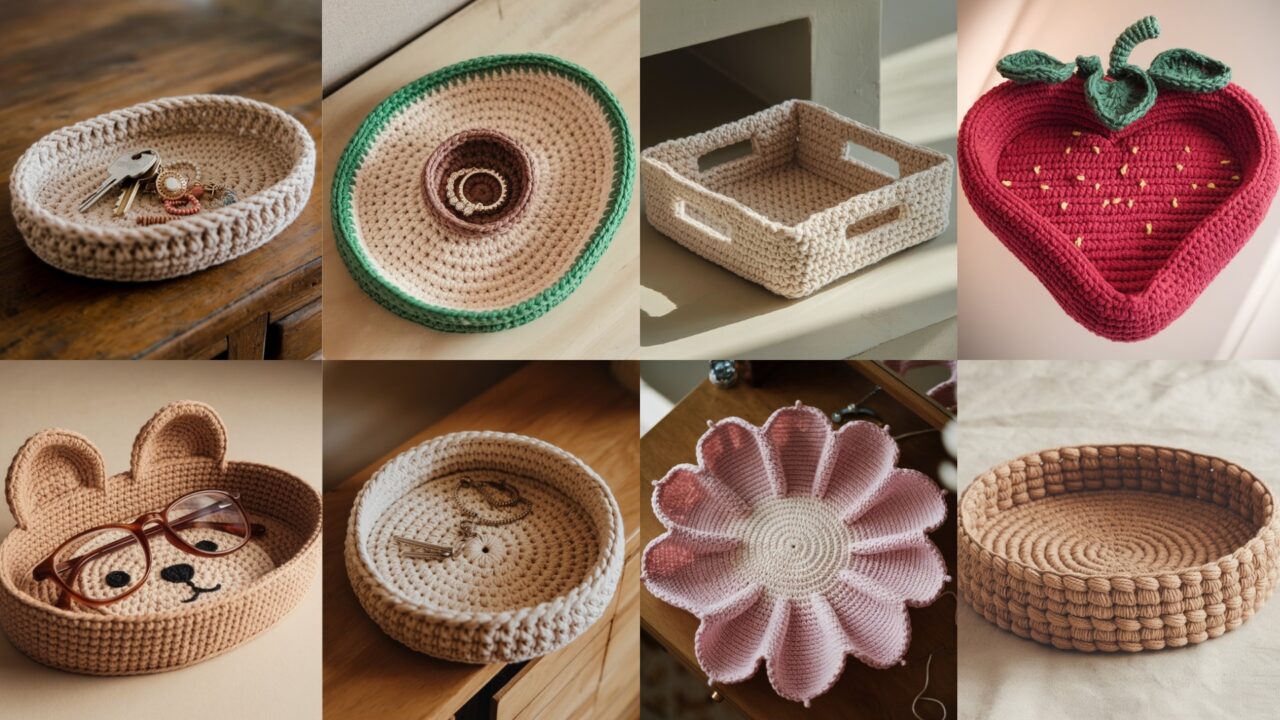
1. Crochet Oval Mini Tray Pattern

Skill level
Beginner → Easy
Finished size (example)
About 7 x 5 in (18 x 13 cm) and 1–1.25 in tall (depends on yarn & hook). Easily resized.
Materials (example)
- Worsted weight cotton or cotton-blend yarn, ~80–120 yd (or 1 skein scraps)
- 5.0 mm (H) hook (use 4.5–6 mm depending on yarn & desired stiffness)
- Tapestry needle, scissors, stitch marker
- Optional: non-slip shelf liner or thin felt circle for base
Gauge / notes
Gauge not critical. Example gauge with worsted & 5.0 mm: 14 sc × 8 rows = 4 in. If you switch to rope or jumbo cotton, drop hook size for a dense fabric.
Concept / construction overview
Work a flat oval bottom using increasing rounds, then build up the sides by working in back loops-only (BLO) or by skipping increases and working even rounds. Finish with one or two rounds of taller stitch or post stitch for a neat rim.
Step-by-step guide (example counts)
Oval base — flat (bottom):
- Make a foundation chain of 20 (this gives the center length across; adjust for needed length). This example chain 20 yields an oval about 5–6 in long in worsted cotton.
- R1: sc in 2nd ch from hook and across to end (19 sc). Now work 3 sc in last ch to work along the underside of the chain, sc across back along the opposite side of the chain, and work 2 sc in the final chain to close the oval corner. (You’ll have approx 40–44 sc — count will vary.) Either join with sl st or place marker and work continuous rounds.
- Tip: If you want a perfectly flat oval, keep increase counts symmetrical (e.g., if you did 3 sc at one end and 2 at the other, keep consistent on the returning side). Many patterns use 3 sc + 2 sc per corner for smooth shaping.
- R2: sc in each st around (work evenly, avoid twisting). Join or continue.
- R3–R6 (or until base reaches desired width): sc around. Stop when the base is the width you want for the tray bottom. Example: stop when base ≈ 5–6 in.
Build the sides:
5. R7 (start sides): To make sides rise, work 1 round BLO sc (work into back loop only of each stitch). This creates a gentle fold and side formation. Join.
6. R8–R12 (side height): sc in each st around (work even rounds, in BLO if you want a sharper fold). Repeat until sides are 1–1.25 in tall (or desired height). For a stiffer side, switch to hdc or even fpdc/bpdc alternating (front post/back post double crochet) for a ribbed look.
7. Rim: Work 1–2 rounds of sc in both loops for a tidy rim; or work crab stitch (reverse sc) for a twisted edge.
Finishing & optional lining:
8. Weave in ends. If you want a non-slip stable bottom, cut a felt or shelf-liner piece to the oval size and glue or stitch it to the underside. For a luxury finish, hand-stitch a thin cotton canvas on the inside base.
Assembly & tips
- If the base buckles, remove 1 increase round or work tighter tension. If it ruffles, add another increase round spacing increases more widely.
- For sturdier trays, use cotton rope/cord held single or doubled; use a larger hook (6.0–8.0 mm) and tighten tension. Trays made from rope are heavy-duty and look modern.
- To store rings: make two small loops of yarn sewn inside to hold a ring upright.
Variations
- Make a deeper tray by adding more side rounds.
- Add a contrasting border color for a modern inlay look.
- Work the sides in linen/moss stitch for texture.
Care
Machine wash gentle with cotton yarn; air dry flat. Rope trays may hand-wash and air dry to maintain shape.
2. Crochet Square Carry-All Tray Pattern

Skill level
Beginner → Easy
Finished size (example)
Approx 8 x 8 in (20 x 20 cm) with 1–1.5 in sides.
Materials
- Worsted weight cotton or cotton-ropes ~120–180 yd
- 5.0 mm (H) or 6.0 mm (J) hook depending on yarn
- Tapestry needle, stitch markers
- Optional: 4 snap buttons (to make it fold-flat when open)
Concept
Work a flat square or rectangle base using alternating rows (worked flat) or rounds (granny/square), then fold up edges and seam or add snaps to form a box. Another option: work square in continuous rounds and develop sides by vertical post stitches.
Step-by-step guide (flat-to-box method)
Base — flat square (worked flat):
- Chain 28 (example for 8 in; adjust by gauge). Row 1: sc in 2nd ch and across (27 sc). Turn.
- Rows 2–20: ch 1, sc across (or hdc for taller fabric). Repeat until base becomes square (approx 8 in). For perfect square, check both dimensions and add/subtract rows accordingly.
Form corners & sides:
3. Fold base into box shape by bringing sides up. Mark the fold lines and trim corners if you want beveled corners. Option A (seaming): whipstitch side edges to form a finished corner, leaving bottom seam flat (i.e., join seam lines to make corner right angles). Option B (snap corners): fold and attach a snap or button at each corner to allow flattening when needed.
Add side height (worked onto base)
4. Alternatively, rather than seaming, work upward rounds along the edges: With right side facing, join yarn at a corner and work sc evenly across the edge of the base turning and working sc up the short sides to desired height, join, and continue to work adjoining sides until box is formed. Use increases at the corners if necessary to keep corners neat (3 sc into corner stitch).
Rim & handles
5. Work 2 rounds of sc or hdc for a sturdy rim. For carrying, create two small strap holes on opposite sides: chain 6 and skip 6 stitches, continue sc — on the next round work sc across the chain to make a strap loop. Add a second matching strap on the opposite side.
Finishing & assembly
- If you seamed sides, bury ends and line inside with fabric or felt for a refined look.
- For market-ready trays, stitch a small leather or felt label on an inside corner.
Tips & variations
- Make modular nested trays in graduated sizes.
- Use bright colors inside neutral exteriors for modern contrast.
- For gift sets, make 3 sizes that stack.
Care
Machine wash gentle (cotton) and reshape; rope may need hand wash.
3. Crochet Jute Cord Tray Pattern

Skill level
Intermediate (working with cord/rope — slightly heavier handling)
Finished size (example)
Approx 10 in diameter (round) and 2 in tall.
Materials
- Natural jute cord or cotton rope (3–6 mm diameter) ~40–80 ft depending on size and thickness
- Large crochet hook sized to cord (8.0–12.0 mm) — check cord thickness
- Tapestry needle, hot glue (optional) for secure ends, scissors
Notes
Working with jute or cotton rope gives a minimalist, rustic look and makes very sturdy trays. You can crochet directly into the cord with a large hook, or make i-cord loops and stitch them together.
Concept: coiled rope (continuous single-crochet spiral)
Step-by-step guide
Foundation coil
- Make a slip knot in the jute cord and chain 2–3 stitches (this stitches the starting tail). Beginning in the 2nd ch from hook, work sc tightly, pushing cord down close to previous row as you work. Because rope is thick, you’ll be making large, chunky sc. Work in a spiral: after working across the chain, work along the underside of the chain and then continue in circles, working increases at the two “ends” (the points where the chain turns) to keep a flat circle.
Increase logic for flat rounds
2. For the first round (small center), place 6 sc in first round; next round inc into each sc (12); next round (sc 1, inc) etc. Because rope is bulky, fewer rounds are needed. Continue in spiral until coaster/tray base reaches desired diameter (example: 10 in). Use your hand to flatten and test as you go.
Build sides
3. When base is done, stop increasing and continue to work even sc around to build up walls. Work 6–12 rounds for a 1.5–2 in side height. Keep tension firm so sides stand.
Finish
4. When complete, work a final round of sl st or crab stitch for a finished edge. Tuck the tail of the cord through the interior rounds and secure with hot glue if using jute (jute may fray — sealing with glue or clear nail polish at tail helps). Alternatively, weave the cord back into adjacent loops neatly with a large tapestry needle.
Assembly & tips
- Jute is rough on hands — use gloves if needed. If using hot glue, avoid visible glue on outside.
- Because rope is heavy, the tray will have excellent structure and can hold heavier items.
Variations
- Use colored cotton rope instead of jute for modern looks.
- Combine two cords held together (e.g., white + natural) for a twisted striped effect.
Care
Spot clean jute; do not soak natural jute — it can weaken and discolor. Cotton rope can be hand-washed and air-dried.
4. Crochet Bear Glasses Holder Tray Pattern

Skill level
Easy → Intermediate (amusing shape + functional rim)
Finished size (example)
Approx 6.5 in wide × 6 in tall (with ears) and 1 in high (tray base 5 in).
Materials
- Worsted cotton in main color ~80 yd; accent colors for inner ears or nose ~10 yd
- 5.0 mm hook, tapestry needle, stitch marker
- Optional: small piece of felt for nose reinforcement
Concept
Make a rounded square or oval base, then shape the top into a bear silhouette with ears. This tray is sized to cradle glasses and daily pocket items.
Step-by-step guide
Base
- Work an oval or circle base like the Oval Mini Tray (chain 18–22, work in rounds until base ≈ 5 in wide).
Sides (low)
2. Work 1–3 rounds even to rise slightly.
Shaping the back up into bear head
3. On one long side of oval (this will be the back of the tray), work additional rounds only across the back half to build a taller vertical back (2–4 rounds more than rest). This gives a sloped back to support glasses. To do this: mark the back half stitches; for the next 4 rounds, work sc just across those stitches and slip-stitch across the sides to the front to continue even height on the base (so only the back builds up taller). Essentially you’re sculpting a low ramp.
Ears (make 2)
4. Crochet two small semicircles: MR, 6 sc in ring; R2: sc 1, inc around make a 9–12 st small semi-dome; fasten off leaving tail. Fold the base and sew to shape or make small triangle ear via short row decreases and sew on top corners of the built-up back. Sew ears securely.
Face detail (optional)
5. Add a small nose applique (dark contrast) and embroider tiny eyes or attach small stitched dots. For durability, sew a small felt piece under the nose for reinforcement if the tray handles heavy keys.
Final rim and base reinforcement
6. Work 1–2 rounds sc around entire tray catching base and inside to finish. Optionally add a sturdy row of hdc or crab stitch for a polished rim.
Assembly & tips
- The taller back supports glasses when placed on the base — angle it so the ear border prevents slipping.
- For prescription glasses, make the back slightly higher (add an extra 0.5–1 in) to cradle frames better.
Variations
- Make matching sets: bear + small bear ring tray.
- Add embroidery motifs: hearts, initials to personalize.
Care
Machine wash gentle (cotton yarn); reshape while damp.
5. Crochet Jasmine Star Stitch Valet Tray Pattern

Skill level
Intermediate — textured star stitch (Jasmine/Star stitches make thick, squishy fabric)
Finished size (example)
Approx 8 in diameter round valet tray, 1.25–1.5 in tall.
Materials
- Two strands of worsted cotton held together (or bulky yarn) ~150–220 yd (Jasmine stitch is lofty so yardage increases)
- 6.0–8.0 mm hook to get dense fabric, tapestry needle
Notes on Jasmine / Star stitch
Jasmine or star stitch produces a thick textured fabric ideal for trays: it’s dense, squishy, and attractive. The stitch is made from clusters of loops pulled through and joined with sl st.
Step-by-step guide
Make a dense round base (star stitch rounds):
- Start with a magic ring. For the Jasmine stitch, you’ll pull loops: yarn over, insert hook, pull up loop about ⅔ height, repeat 4 times (5 loops on hook), yarn over and pull through all five loops to form a star-like cluster, ch 1 to close. This is a simplified description; check your yarn for best loop height. Work 6 clusters into MR. Join. (6 clusters)
- R2: work 2 clusters into each cluster space (12 clusters). Keep clusters tight and close to each other.
- Continue increasing in rounds (12 → 18 → etc.) using the same logic as increasing rounds in a circle (add one additional cluster at regular intervals) until base reaches desired diameter (example 8 in).
Sides (build up)
4. Stop increasing and work even rounds of Jasmine / star clusters around to build sides. Because of the stitch’s texture, the sides will naturally stand. Work 4–8 rounds to desired height.
Rim
5. Finish with one round of sc or crab stitch in a single strand to define edge.
Assembly & tips
- Because star stitch is thick, three or four rounds suffice for a sturdy tray.
- Use two strands held together for an even bolder texture.
- The stitch can be slow; plan appropriately.
Variations
- Add a contrasting color border to highlight the textured star points.
- Make a rectangular valet by working star-stitch panels and sewing them.
Care
Hand wash or gentle machine wash in mesh bag; re-shape when damp.
6. Crochet Strawberry Trinket Tray Pattern

Skill level
Easy → Intermediate (shape + applique leaves)
Finished size (example)
About 6–7 in tall (including leafy crown) and 4–5 in base diameter.
Materials
- Worsted cotton: red ~100 yd, green ~20 yd, yellow for seeds ~ small amount
- 4.5–5.0 mm hook, tapestry needle, small beads (optional for seeds)
Concept
A rounded tray shaped like a strawberry with a leafy crown rim that hides the top seam and acts as decorative edge.
Step-by-step guide
Base (rounded strawberry body):
- Work an oval or circle base in red as previous patterns (chain 18–22; increase to make a circle 4–5 in wide).
- For a strawberry bulge, gradually increase more on the early rounds to create a plump shape, then work more body rounds before decreasing at the top so the top closes slightly (but do NOT close completely — you must leave room for items).
Sides & strawberry taper
3. As you approach the top, decrease slightly to make the strawberry taper. Example: when base is your target diameter, work 3–4 rounds even; then do one decrease round (sc 3, dec), then 1–2 rounds even to create slope.
Leaf crown
4. Change to green. Around the top edge, work ch 5, sl st into same st in spaced intervals to create loops for leaf bases. In each loop work: sc, hdc, dc, hdc, sc to make a pointy leaf. Repeat to make 6–8 leaves that form the crown. Make leaves slightly overlapping and sew them down a bit inside so they stand but also help hide seam.
Seeds / embellishment
5. Add seeds by sewing small yellow French knots or attach tiny beads across the red body in a random pattern (secure beads carefully if used around kids).
Rim
6. Work a round of sc in both loops to finish the leaf bases and tidy.
Assembly & tips
- The crown acts as a small lip that can hold jewelry while also being decorative.
- For a flat display coaster, flatten the body more by making base broad and sides short.
Variations
- Make a whole set: strawberry + lemon + pear trays for a fruit bowl set.
- Make a hanging pouch by adding a back loop strap to hang on a wall hook.
Care
Hand wash recommended (beads may tarnish). Reshape leaves while damp.
7. Crochet Avocado Tray Pattern

Skill level
Beginner → Easy
Finished size (example)
About 7–8 in long (avocado half) and 1–1.25 in tall.
Materials
- Worsted cotton: avocado green ~50 yd, flesh cream ~20 yd, brown for pit ~10 yd
- 4.5–5.0 mm hook, tapestry needle
Concept
Work an oval base, then shape a shallow avocado half with a circular pit that can be a small trinket bowl when removed.
Step-by-step guide
Base — avocado half shape
- Chain 20–24 forming the length of the avocado. Work an oval as in Pattern 1 but shape one end slightly more pointed (make 2 sc at one corner and 3–4 sc at the other to round the “shoulder”). Work rounds until base is approx 7–8 in long.
Sides
2. Work a couple of even rounds to create a small raised lip.
Pit (small removable bowl)
3. With brown yarn, make a small round pouch: MR, 6 sc in ring; R2 inc to 12; R3 sc 1 inc to 18; R4–R5 sc around for depth. Fasten off leaving tail. You can make pit a separate little bowl by making the pit slightly taller and sit it inside the avocado half; alternatively, sew pit to base slightly so it’s fixed.
Flesh inset
4. Use cream yarn to create an inner flesh oval: either surface crochet a ring of cream on the base or change color for a few inner rounds at base construction to form a light inner filler (gives the avocado “flesh” visual).
Finish
5. Work outer rim round in green to tidy. Optionally add a tiny stem at the narrow end: ch 5, sl st into base and fasten.
Assembly & tips
- The removable pit acts as a small jewelry dish and is great for rings and earrings.
- For a picnic-themed set, make matching lemon/tray coasters.
Variations
- Make a plush version by stuffing the pit and sewing it to be slightly raised.
- Make a half-avocado and matching whole avocado set for a novelty gift.
Care
Machine wash gentle cotton pieces; reshape when damp.
8. Crochet Flower Tray Pattern

Skill level
Easy → Intermediate (decorative petal rim)
Finished size (example)
Approx 8–9 in diameter with 1–1.5 in petal rim.
Materials
- Worsted cotton yarn in center & petal color ~150 yd total (two colors)
- 5.0 mm (H) hook, tapestry needle, blocking pins
Concept
Work flat round base, then create large petal scallops around the edge to create a flower-like tray that’s both decorative and functional.
Step-by-step guide
Round base
- MR, ch 1, 8 sc in ring. R2: inc each st (16). R3: sc 1, inc (24). R4: sc 2, inc (32). R5–R7: sc around until base ≈ 6–7 in.
Petal formation
2. Change color to petal shade. Ch 3, skip 2 sts, sl st in next, repeat to create loops for petal anchors around (you’ll make as many loops as space allows). Alternatively, for larger defined petals: work a petal cluster every 3–4 stitches: in a single stitch work sc, hdc, (3 dc), hdc, sc — this forms a tall petal. Skip 2–3 stitches and repeat for next petal. Continue around.
Rim
3. Work a round of sc around base and into petal bottoms to anchor petals firmly. For a neat finished look, work picots at petal tips (ch 3, sl st) or single crochet around petals’ backs.
Stiffening (optional)
4. If you want the petals to stand up more, lightly starch with commercial fabric starch or spray starch while blocking. Pin petal tips to shape and let dry. For heavily used trays, avoid starch as it may wash out; instead use a firmer yarn or double up strands.
Assembly & tips
- The flower tray makes a lovely jewelry holder on a vanity. Place pit/box inside for rings.
- For a centerpiece, make multiple flower trays of graduated sizes to nest.
Variations
- Make multilayered petals by adding a second smaller petal round offset between first petals to create a fuller blossom.
- Use variegated yarn for petals for a watercolor look.
Care
Hand wash recommended if petals are starched or stiffened; otherwise machine wash gentle and reshape.
Conclusion
Crochet trays are small but mighty — they organize, display, and make charming gifts. The eight patterns above give you a full toolbox:
- The Oval Mini Tray and Square Carry-All are excellent everyday catch-alls.
- The Jute Cord Tray brings rustic minimalism and heavy-duty structure.
- The Bear Glasses Holder and Strawberry / Avocado trays are whimsical and giftable.
- The Jasmine Star Stitch Valet Tray and Flower Tray are textural showpieces that double as decor.
Quick practical checklist before you start a batch
- Choose fiber for function: cotton/cotton-blend for absorbency and washability; jute/rope for rugged durability; linen blends for an elegant drape and matte finish.
- Swatch for shape: make a small swatch and test whether you need a smaller hook for denser fabric; too loose = floppy sides.
- Reinforce stress points: if trays will hold heavy items, line them with canvas or stitch on a felt base.
- Finishing: weave tails tightly, block where applicable, and add non-slip or felt bases for table protection.
- Label care instructions if you plan to sell: fiber content + washing guidance will increase buyer confidence.