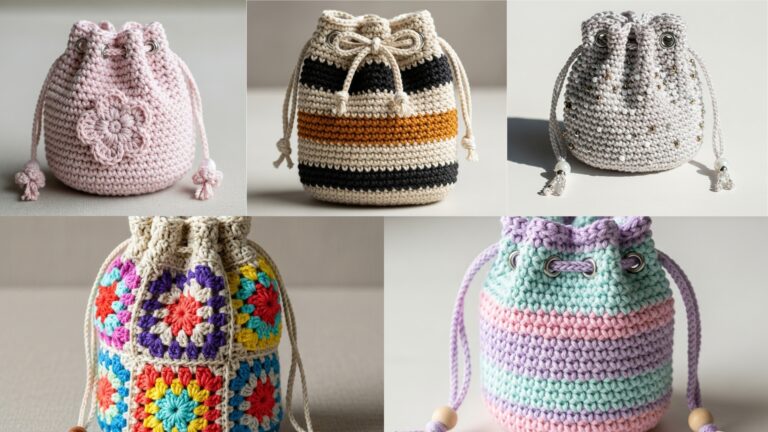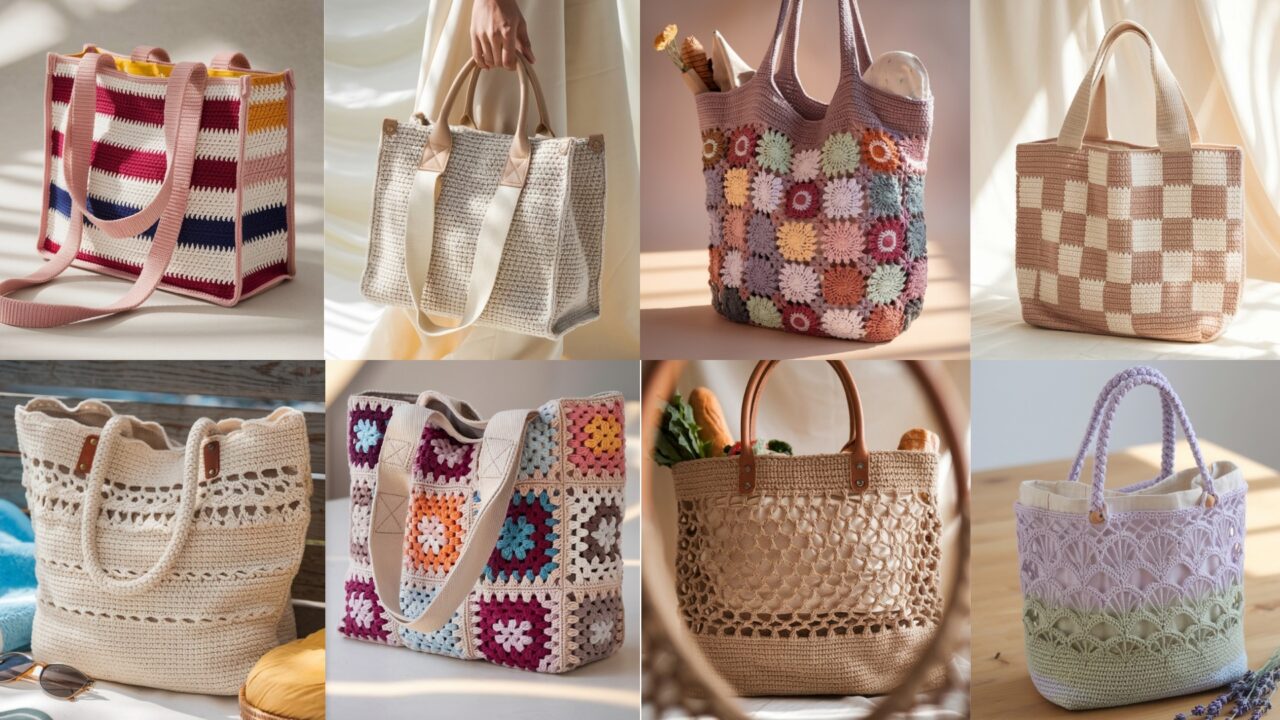
A tote is where form meets function: big enough for groceries, tidy enough for laptop day, and attractive enough to avoid being mistaken for someone’s gym bag. These eight designs cover everyday cotton market bags, airy summer styles, structured jute blends, and granny-motif market totes. Each pattern is written top-to-bottom so you — not the internet — decide how it ends up.
Before you start any pattern, do three things: swatch, measure, and decide whether you’ll line and reinforce the handles. The rest is repetition and tasteful color choices.
Universal notes you must read (or suffer consequences)
Abbreviations (US): ch, sc, hdc, dc, tr, sl st, st(s), BLO/FLO, inc (2 sc in same st), dec (sc2tog), MR = magic ring.
Suggested baseline yarn / hooks:
- For structured tote: worsted cotton (#4) or cotton-blend + 4.5–5.5 mm hook.
- For airy summer/open totes: cotton-linen blends or DK + 3.5–4.5 mm hook.
- For jute mesh: jute or paper-twine + 5.5–6.5 mm hook (use a lining if you don’t like scratch).
Swatch & sizing math (do this):
- Make a 4″ × 4″ swatch in the stitch used for the bag and block it the way you will care for the finished tote.
- Count stitches across 4″ — example I’ll use in many samples: 16 sc = 4″ → 4 stitches/inch. Write that down.
- Decide finished bag width. Example target for a medium tote: 14″ wide. Multiply: 14 × 4 = 56 stitches. (Four stitches per inch times fourteen inches equals fifty-six stitches.) Round to nearest pattern multiple if necessary. I’ll show multiples per pattern.
Finished sizes used in examples: medium tote ≈ 14″ wide × 12″ high × 4″ depth. Adjust depending on your needs.
Handles / strap notes (don’t wing it):
- For durability, reinforce strap ends with cotton webbing sewn into the seam or a small leather tab riveted.
- If you want a shoulder tote, aim for strap drop 9–11″ (strap total length around 28–32″). For crossbody, make detachable straps with swivel hooks.
- Lining and interfacing make a tote rigid and long-lived. If in doubt, line it.
Hardware & finishing: zippers, magnetic snaps, D-rings, and rivets all work — reinforce any hardware with webbing or dense stitching through several layers.
1. Crochet Elvina Tote Bag Pattern
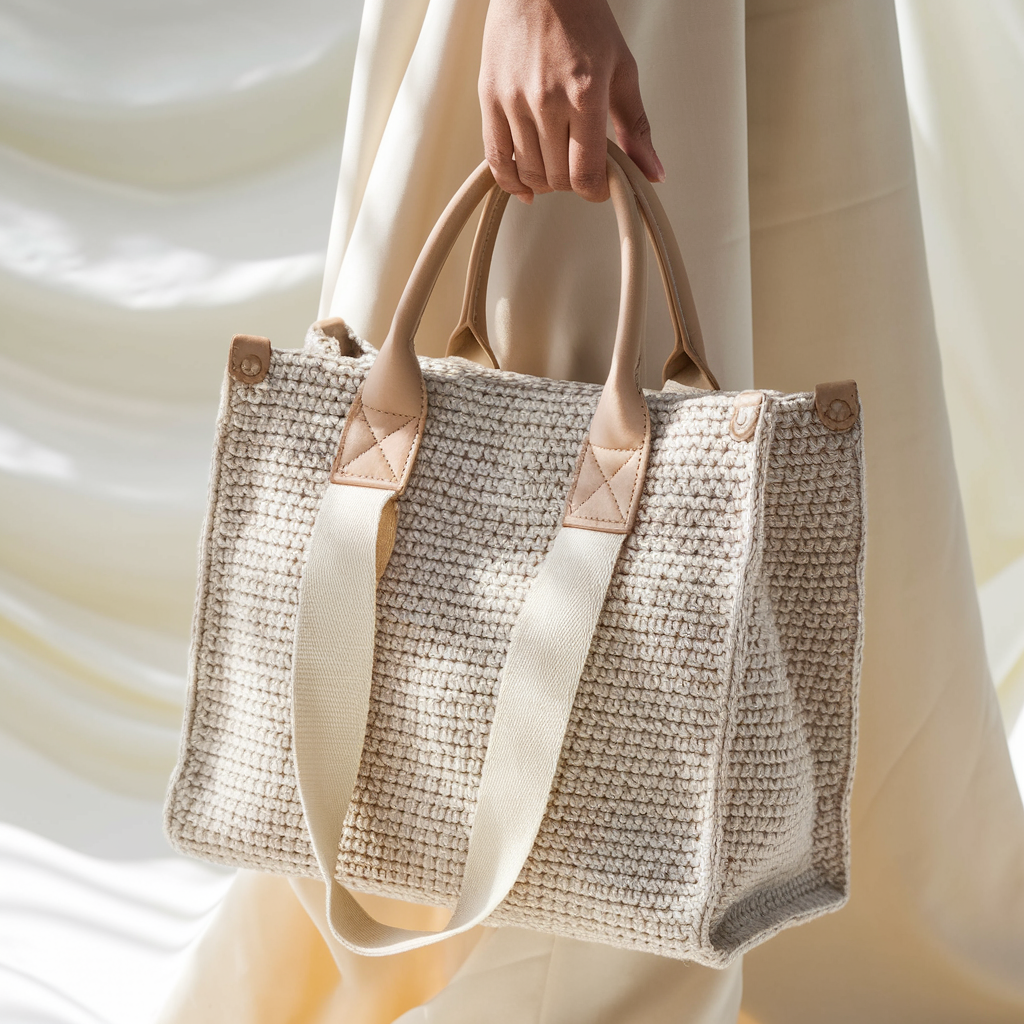
A sharp, modern structured everyday tote with wide panel and reinforced handles — looks like a boutique bag, performs like a utility tote.
Skill level: Confident Beginner → Intermediate
Finished size (sample): 14″ W × 12″ H × 4″ D; strap drop ≈ 10″ (shoulder length).
Materials: worsted cotton (approx 700–900 yds), 5.0 mm hook, 1″ cotton webbing 2 × 10″ pieces for handle reinforcement, sturdy zipper 14″ (optional), lining fabric ~ (20″ × 16″).
Gauge example: 4″ = 16 sc → 4 sts/in.
Stitch & repeat: Pattern uses single crochet in rows for a dense fabric. Foundation count example for 14″ wide: 14 × 4 = 56 stitches (multiple not restrictive).
Step-by-step — Body & base (worked flat)
- Chain foundation: ch 57, sc in 2nd ch from hook and across → 56 sc. Turn.
- Rows 2–Rows 28 (height): ch1, sc across 56 sc. Continue until panel height ≈ 12″ (measure; our sample reached 28 rows but check your row gauge).
- Gusset strip (base depth): for 4″ depth with gauge 4 sts/in: base circumference in stitches = width (14″) × 4 = 56 stitches; we’ll make a strip 4″ wide × 56 sts long. Ch 57, sc across, join to form loop, work in rounds until strip height = 4″. Block if desired.
- Assembly: fold main body into tube and whipstitch one side to the long edge of gusset; then seam the opposite side. Align carefully so corners are square. Reinforce seams with a second pass.
Handles (wide reinforced straps)
- Strap crochet: ch 6, sc across to make a strip ~1″ wide. Work in rows until strap length reached when folded equals approx 28″ total length (i.e., ~56 rows depending on row height) — you’ll make two identical straps.
- Reinforce: insert cotton webbing inside strap before stitching ends closed or stitch the strap down onto webbing with heavy thread.
- Attach: Position handles 3″ in from sides evenly. Using heavy thread and needle, sew the webbing-reinforced strap ends into top seam with an X-box pattern; make at least 8–10 passes.
Lining & closure
- Cut fabric lining 1/2″ smaller than bag interior. Sew pockets onto lining before attaching. Install zipper by stitching zipper tape to top edges of crochet and lining using ladder stitch for a neat finish, or sew magnetic snap.
Finishing
- Topstitch around top edge through lining and crochet for a crisp look. Weave ends.
Variations
- Add a small internal laptop sleeve with interfacing.
- Convert to a market tote by skipping zipper and using a single long strap.
2. Crochet Lavender Fields Tote Bag Pattern
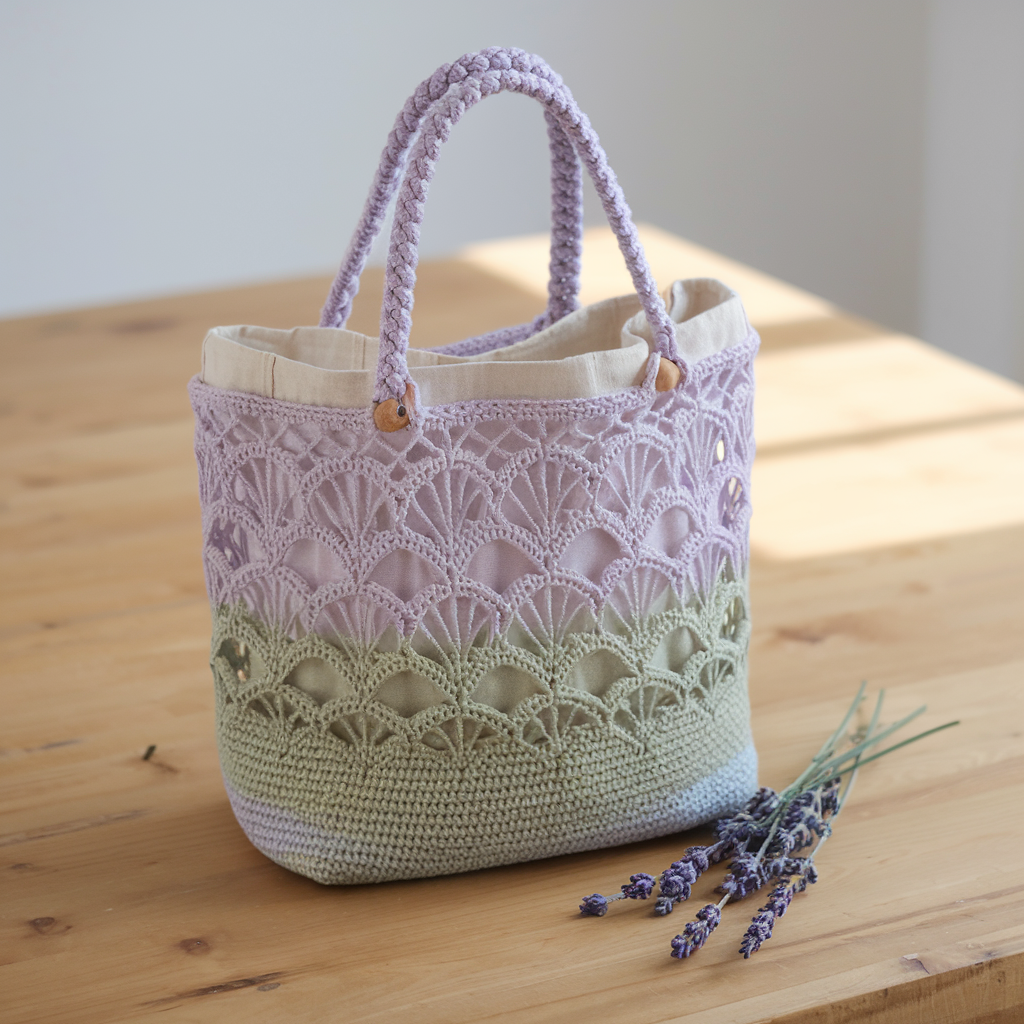
Airy lacy panels inspired by lavender rows — a light summer tote that still carries your market haul if lined.
Skill level: Confident Beginner
Finished size (sample): 14″ W × 12″ H × 3.5″ D (unlined); lined for groceries.
Materials: DK cotton-linen blend ~600–800 yds, 4.0 mm hook, lining fabric optional, wooden bead toggles for closure.
Gauge example: in lace pattern 4″ = 14 sts → 3.5 sts/in (recalc for your swatch).
Stitch & repeat: the lace panel uses a shell-and-chain repeat: multiple of 8 + 5 for foundation.
Step-by-step — Front panels (make 2)
- Foundation chain: decide width using your swatch. For the sample width 14″ with 3.5 sts/in: stitches = 14 × 3.5 = 49 → round to pattern multiple: (8×5 = 40; +5 = 45) or (8×6 = 48; +5 = 53). Choose 53 ch for 53 sts across (8×6 + 5). Ch 53.
- Row 1 (setup): sc in 2nd ch from hook across (52 sc). Turn.
- Row 2 (lace row): ch4, sk3, sc in next, ch3, sc in next repeat across. Turn.
- Row 3 (shell row): in each ch4 space work (2 dc, ch2, 2 dc); in chain-3 spaces work sc to anchor. Turn.
- Repeat Rows 2–3 until panel height ≈ 12″. Make second panel identical.
Gusset & assembly
- Make a gusset strip ch (depth × sts/in + 1) to create a 3.5″ base. Join and sew panels to gusset as earlier.
Handles (braided chain handles)
- Make three long cords (I-cord or ch/tight sc) each ~24–30″ long.
- Braid cords and flatten slightly with a few rows of sc across the braid, or sew them together. Attach with reinforced loops and topstitch around. Add small wooden bead toggles and elastic loop as closure.
Lining
- For a lacy tote, line with cotton. Cut lining to fit and sew it in; topstitch to secure. Lining prevents groceries from catching on holes.
Variations
- Work in gradient purple + green for a literal lavender field.
- Make a smaller clutch version by halving stitch counts.
3. Crochet Gingham Tote Bag Pattern
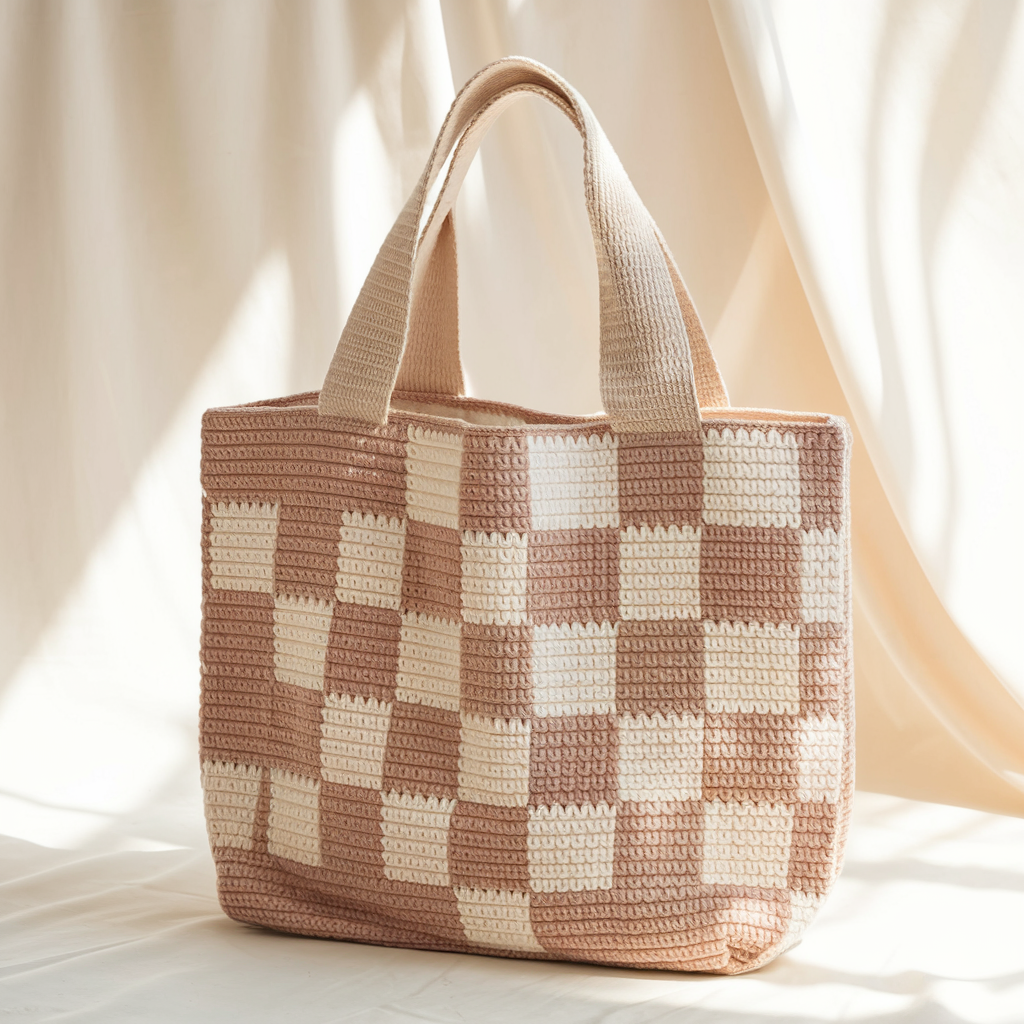
Clean, modern gingham blocks built from color-block granny or mosaic slip-stitch — great for grown-up, graphic totes.
Skill level: Intermediate (color planning & joining)
Finished size (sample): 15″ W × 13″ H × 4″ D (grid of 5 × 4 squares at ~3″ each)
Materials: worsted cotton in two (or three) colors, 4.5–5.0 mm hook, lining ~ (22″ × 18″).
Method choices: Make small solid squares (sc/hdc panels) and assemble, or use mosaic/slip-stitch to create block pattern in a single rectangle.
Option A — Color-block squares (recommended)
- Decide square size: 3″ squares => to cover 15″ width need 5 squares across; height 13″ => 4–5 squares tall (choose 4 for 12″). Total squares 5 × 4 = 20.
- Square pattern (solid sc square): ch (stitches = square width × sts/in +1) — if 3″ and gauge 4 sts/in => 3 × 4 = 12 stitches => ch13; sc rows to reach 3″ height; finish and block. Make 20 squares in alternating colors to form gingham grid (arrange like a checkerboard but with overlapping shades for gingham look).
- Joining: arrange in grid and whipstitch or join-as-you-go. For gingham effect, use a contrasting slip-stitch join to create crisp grid lines.
- Gusset & base: same as other patterns — add 4″ base strip and sew.
Handles & lining
- Use wide hdc straps worked directly onto the top edge or sew a webbing strap. Lining recommended for hidden seams.
Variations
- Use three colors: light, mid, dark to mimic woven gingham with intersection shades.
- Use tapestry crochet for a single-piece gingham if you hate seaming.
4. Crochet Cotton Granny Tote Bag Pattern
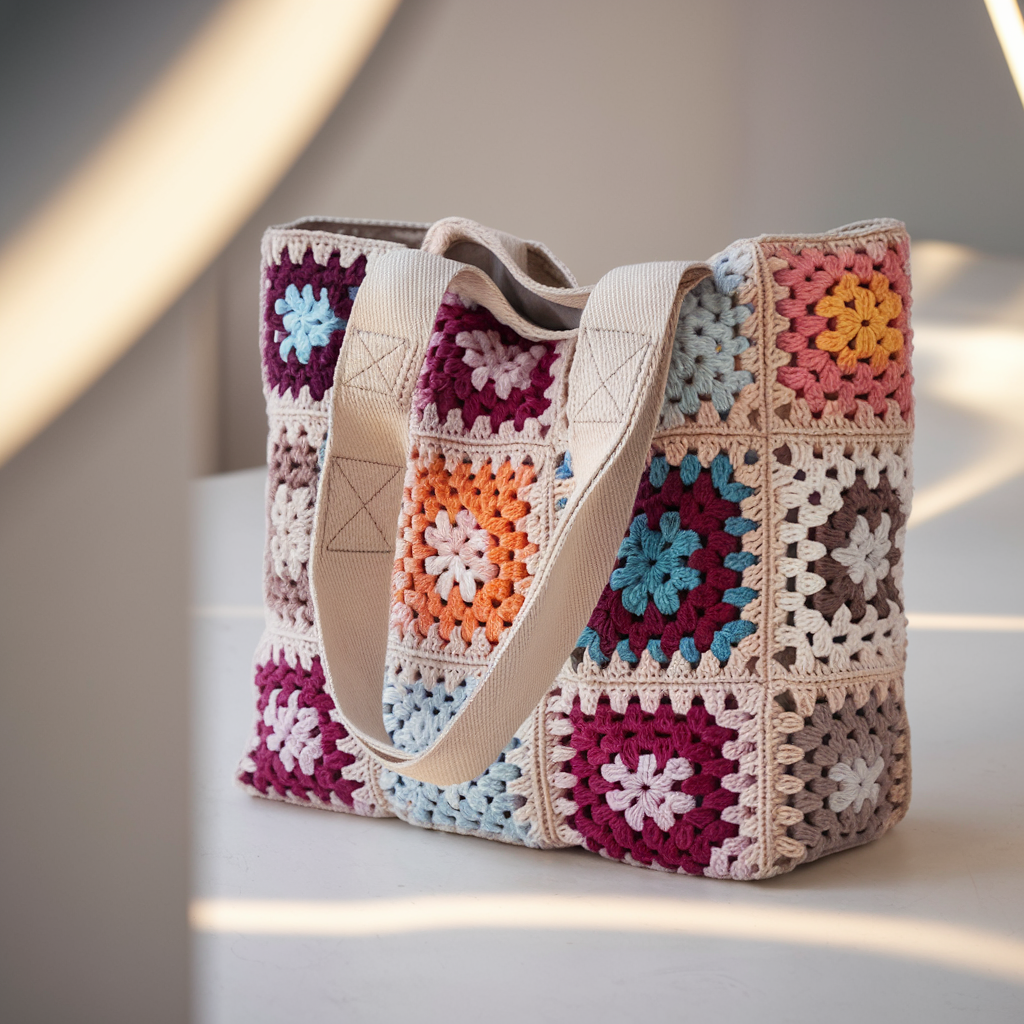
A granny-square market tote with modern palette and a thick, supportive strap — classic but useful.
Skill level: Confident Beginner
Finished size (sample): 14″ W × 14″ H × 4″ D (8 granny squares across top 2 × 3 layout, larger squares)
Materials: worsted cotton (solid + accent), 5.0 mm hook, lining optional, 1″ cotton webbing for handles.
One-square size: target 6–7″ blocked.
Granny square (make 6–8 squares)
- MR, ch3 (counts dc), work 2 dc, ch2, 3 dc in ring — repeat 4 corners — round 1.
- Rounds 2–4: switch colors as desired and work granny-cluster rounds (3 dc clusters with ch2 corners) until square measures ~6–7″ blocked.
- Block squares.
Assembly
- Arrange squares into 2 rows of 3 for front/back and two squares for base or create a single-row panel and add a separate base. Join squares with join-as-you-go or whipstitch.
- Work sc rounds around whole joined panel to tidy edges.
- Make gusset if you want depth beyond the square dimensions — typically with granny tote the seam between front/back defines depth.
Handles
- Sew cotton webbing handles across the width (attach to top edge with X-box stitching through both granny fabric and lining/webbing). Or crochet a wide strap and insert webbing as earlier.
Lining & finishing
- Lining is optional but recommended if you carry small items. Add interior pocket and zip if you like.
Variations
- Make mini granny squares for an all-over mosaic look; use neutral background and bright daisy centers.
5. Crochet Lacy Summer Tote Bag Pattern
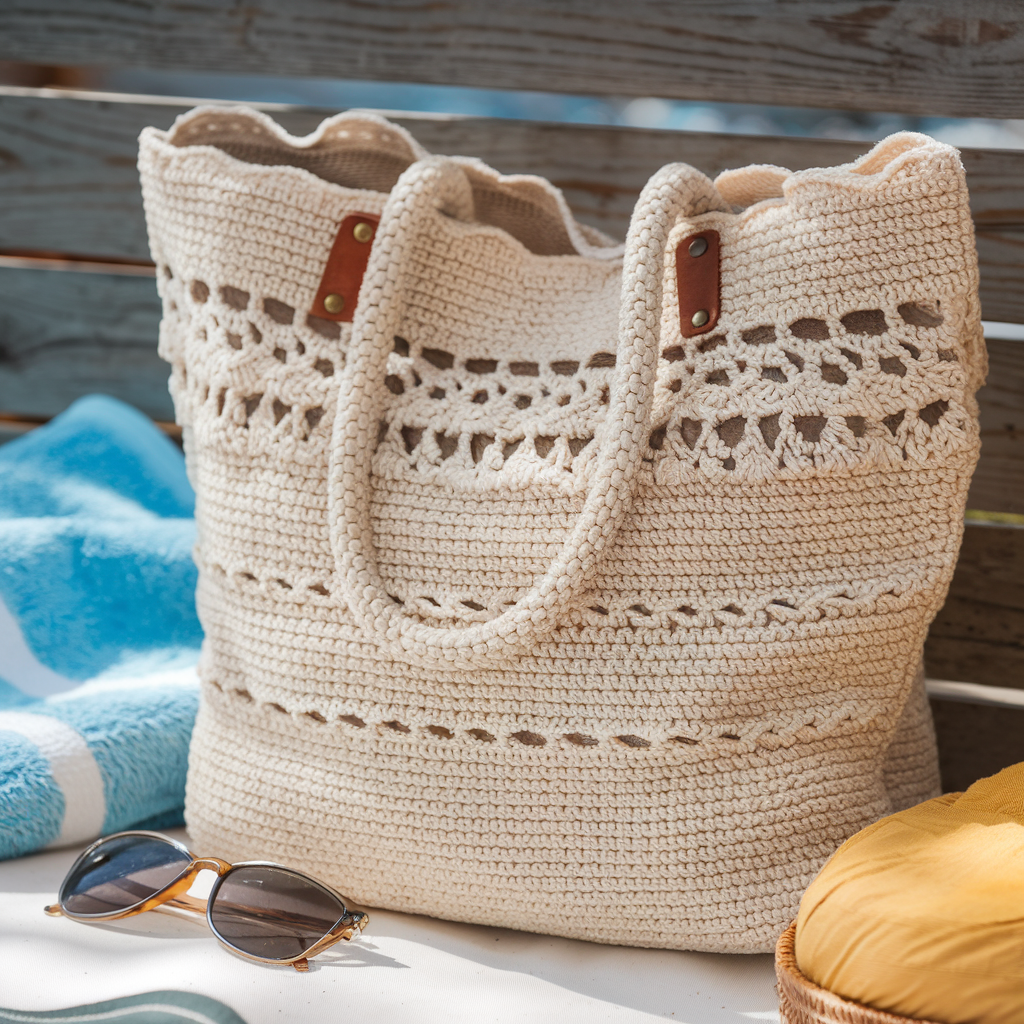
A breathable, slouchy beach tote with scalloped edging — lightweight, packs flat.
Skill level: Confident Beginner
Finished size (sample): 16″ W × 14″ H × 3″ D (slouchy)
Materials: cotton-linen blend worsted or DK, 4.0 mm hook, optional rope handles or crochet handles with webbing reinforcement.
Stitch & repeat: Moss, V-stitch, or open shell repeat — multiple of 6 often works. Example uses V-stitch repeat (V-stitch = dc, ch1, dc).
Step-by-step — Body (worked in rounds)
- Foundation circumference: for 16″ width and lace gauge 3.5 sts/in → 16 × 3.5 = 56 stitches. Round to multiple of 6 if needed. Make ch 56, join to work in rounds.
- Round 1: sc in each stitch around to make solid base round.
- Round 2 (V-stitch pattern): dc, ch1, dc in next st, sk 1 repeat around. Join.
- Round 3: sc in ch-1 spaces of previous round to anchor V’s as needed. Continue V-stitch rounds until desired height ~12–14″.
- Top scallop: work shell edging: (skip 2, 5 dc in next, skip 2, sl st) around for scallops.
Handles
- Make sturdy handles: crochet flat hdc strips and insert webbing, or use rope handles with small leather tabs sewn into top seam. For shoulder wear, make long straps (~28–32″).
Lining
- Use a removable fabric bag insert with drawstring so the outer lace remains washable and the lining can be laundered separately.
Variations
- Add an inner zip pocket or a detachable pouch.
- Change shell depth for chunkier or delicate scallops.
6. Crochet Motif Market Tote Bag Pattern
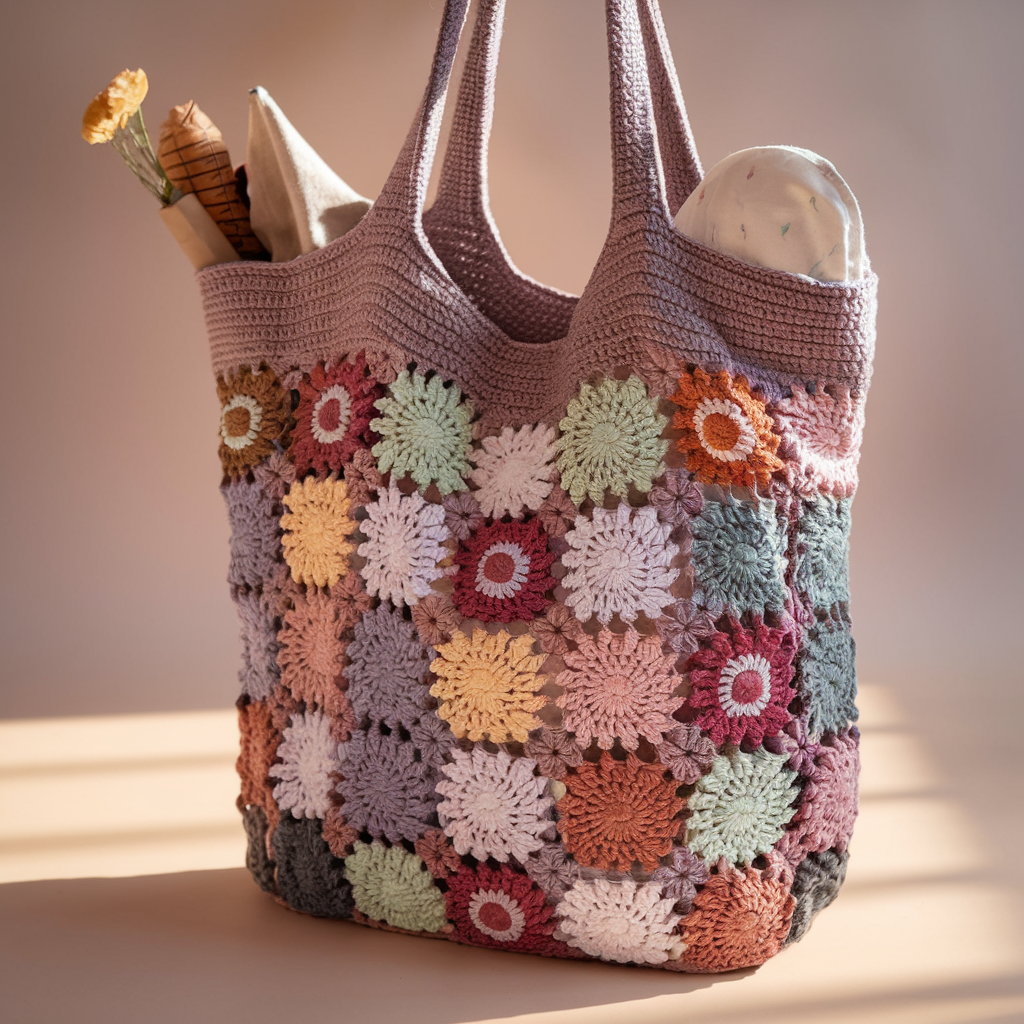
A market tote constructed from joined motifs (flowers, hexagons, octagons) for a boho-chic market bag.
Skill level: Intermediate (joining motifs)
Finished size (sample): 16″ W × 15″ H × 5″ D assembled from 12 hexagon motifs (~4.5″ each)
Materials: worsted cotton, 4.5–5.0 mm hook, lining optional, long strap.
Stitch & repeat: motif shapes vary — sample uses 6-round flower hexagon.
Hexagon motif (one)
- MR, ch3, 11 dc in MR → join (12 dc).
- Round 2: ch3, dc in same st, (2 dc, ch2, 2 dc) in corners to expand into hex form.
- Round 3–5: expand by adding shell clusters in each side and ch2 in corners until motif ~4.5″. Block flat.
Layout & joining
- Plan layout: front panel 3 × 3 motifs (9), back panel 3 × 3 (9), base floor assembled with 3–4 motifs or a rectangular base strip. Total motifs ~20–22 depending on size.
- Join-as-you-go on final round or whipstitch with matching yarn for a subtle seam. Be sure to align motifs so flower centers face same direction.
- Seam front/back to base with whipstitch; block as needed.
Handles & finishing
- Crochet a wide strap and reinforce with webbing, or use leather straps with rivets. Add lining and a zipper for utility.
Variations
- For a lighter market bag, use larger hexagons and fewer motifs.
- For sturdiness, carry two strands of worsted together for the base and first few rounds.
7. Crochet Jute Mesh Tote Bag Pattern
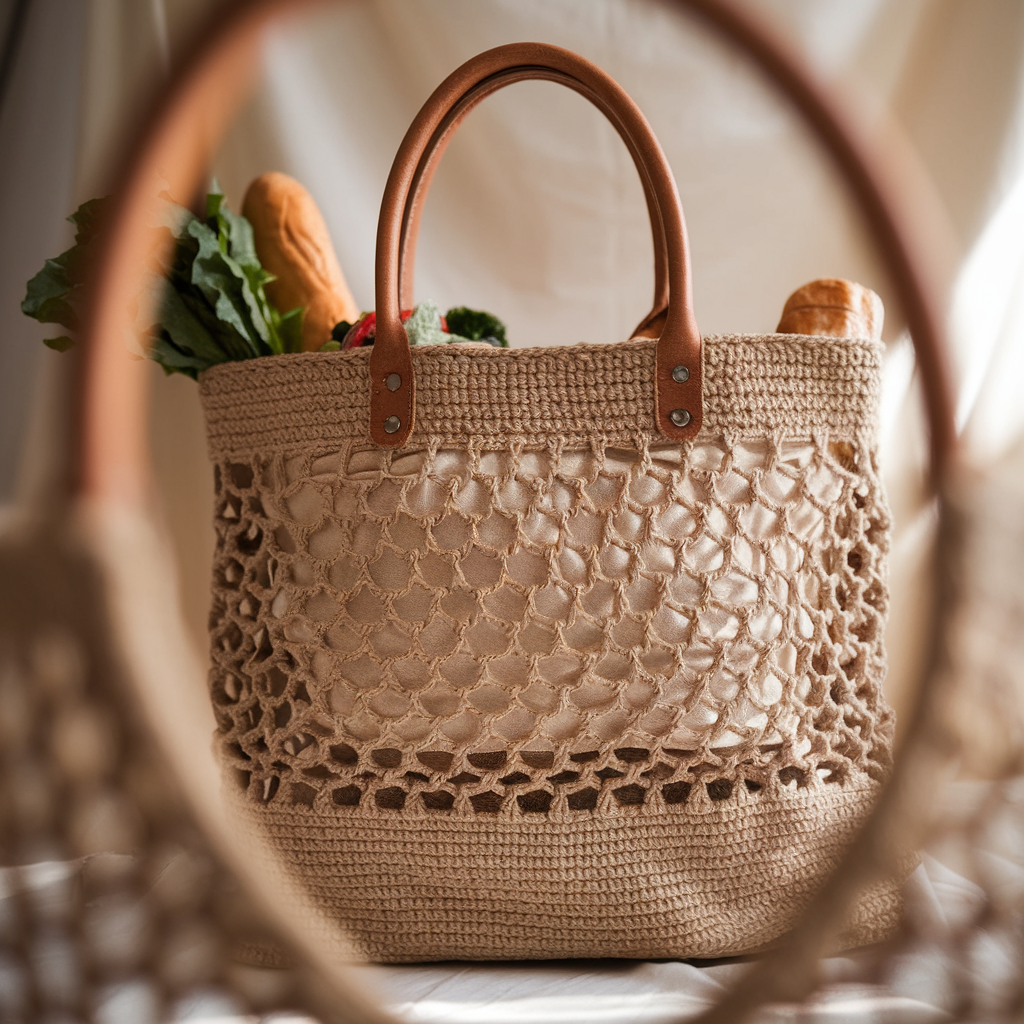
Rugged, natural, and excellent for heavy groceries if lined — the Jute Mesh is an eco-forward market solution.
Skill level: Confident Beginner → Intermediate (tough to handle jute)
Finished size (sample): 15″ W × 14″ H × 6″ D (deep market bag)
Materials: jute or paper-twine yarn, 6.0–7.0 mm hook, sturdy cotton lining, leather or riveted handles. Warning: jute is abrasive — use a fabric lining to protect contents and your hands.
Stitch & repeat: mesh worked with chain spaces and dc or hdc. Multiple of 3+2 often works.
Step-by-step — base & body
- Base: make a rectangle or oval base in sc with jute; for oval base work rounds and increase at ends until base reaches approx 6″ depth across width. Jute holds shape rigidly.
- Body (mesh rounds): join yarn and work dc, ch3, sk2 repeat around to form mesh; adjust ch count to keep mesh proportional. Continue rounds until desired height.
- Top band: work a wide hdc band 3–4 rows to create a robust attachment area for handles.
Handles
- Leather handles/rivets: cut leather straps and rivet to top band using rivets and washers; place rivets through both lining and crochet band for strength.
- Alternate: crochet wide handles and stitch securely to top band, then stitch leather patch on top for aesthetics.
Lining
- Sew a cotton lining with a flat base and small interior pockets and topstitch to top band; rivet or stitch handles through both layers so load is distributed.
Care
- Spot clean only. Jute does not love immersion. Keep a spare fabric liner you can wash.
8. Crochet Striped Tote Bag Pattern
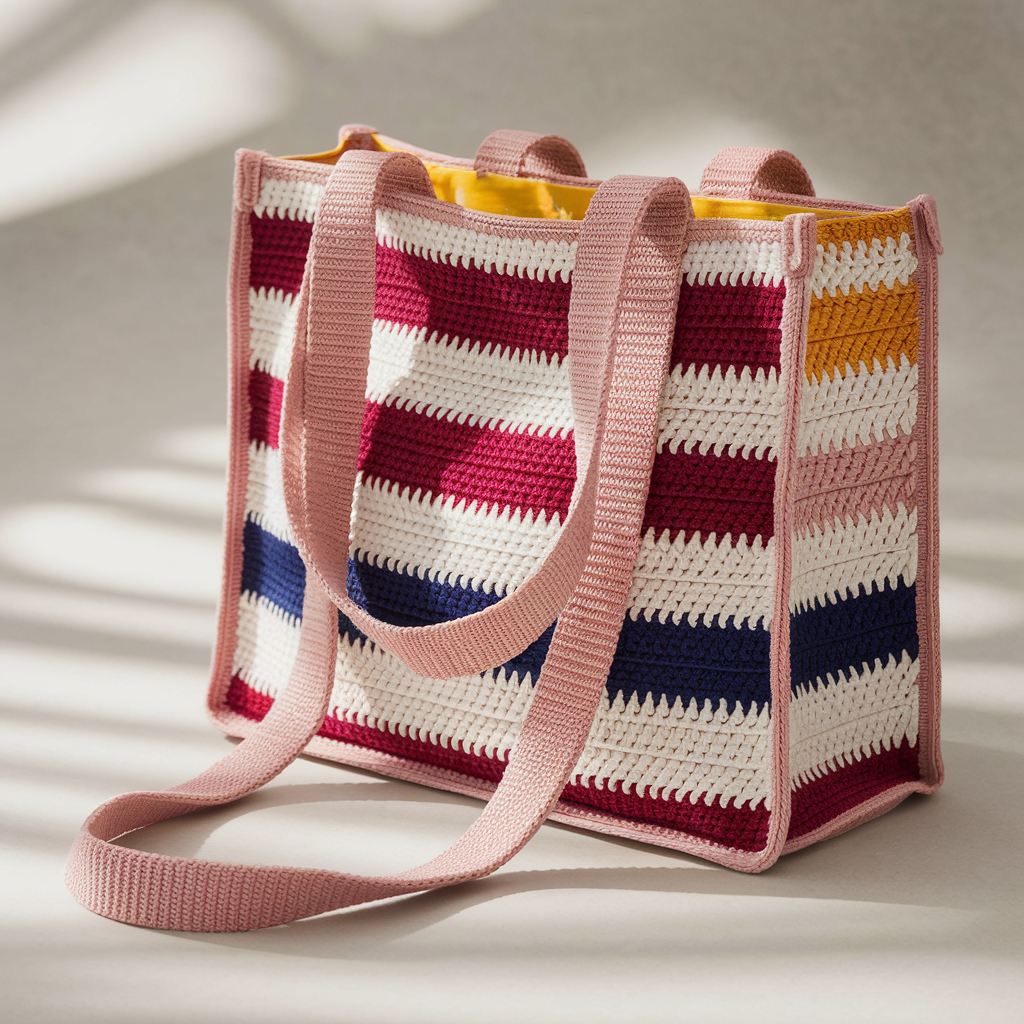
Classic, endlessly customizable stripes — good for daily use and quick to change color palettes.
Skill level: Confident Beginner
Finished size (sample): 14″ W × 13″ H × 4″ D
Materials: worsted cotton in 2–4 colors, 5.0 mm hook, lining optional.
Gauge: sc pattern baseline 4″ = 16 sc → 4 sts/in.
Step-by-step — Body (worked in rows)
- Foundation chain for 14″ width: 14 × 4 = 56 stitches → ch 57 for 56 sc.
- Rows: sc across in color A for 6 rows (example stripe height = 1.5″), fasten off and join color B for 6 rows. Continue alternate colors until panel height ~13″. Repeat for back panel.
- Gusset: make 4″ deep strip in one color and join panels. For a smoother look, carry colors along one side and change on inside.
- Handles: make long flat hdc straps in contrast color and sew onto top; reinforce with webbing inside. For a sporty vibe, make straps in a bright neon.
Lining & pocket
- Sew lining in a contrasting shade for a stylish pop when the bag opens; add phone pocket and zipper pocket.
Variations
- Use color transitions (ombre) by gradually introducing new colors every two rows.
- Use variegated yarn for subtle stripes without changing skeins.
Final finishing checklist (don’t skip these)
- Measure as you go. Try the bag on once the body is assembled but before final top edge finishing — easier to add rows than remove them.
- Reinforce handles. Always. Webbing + box/X-stitch = the difference between “cute tote” and “sad single-use.”
- Lining: If you plan to carry small items, line your bag. For heavy use, add a small internal base panel (fabric or faux leather) sewn into corners.
- Seam tidy: Weave ends into seams and hide knots inside lining pockets so nothing snags.
- Care: Cotton totes are usually machine washable on gentle; reshape and dry flat. Jute and leather-detailed totes: spot-clean, do not machine wash.
Conclusion
There: eight modern, usable tote recipes that actually fit real life — grocery runs, laptop commutes, beach days, and the occasional farmers market victory. Pick a structure first (do you want stiff or slouchy?), swatch for your yarn and stitch choice, do the math (stitches-per-inch × desired width), and then follow the step-by-step for body, base, handles, and lining. Reinforce the hardware and handles like you mean it, and your tote will be the one bag that keeps getting used.