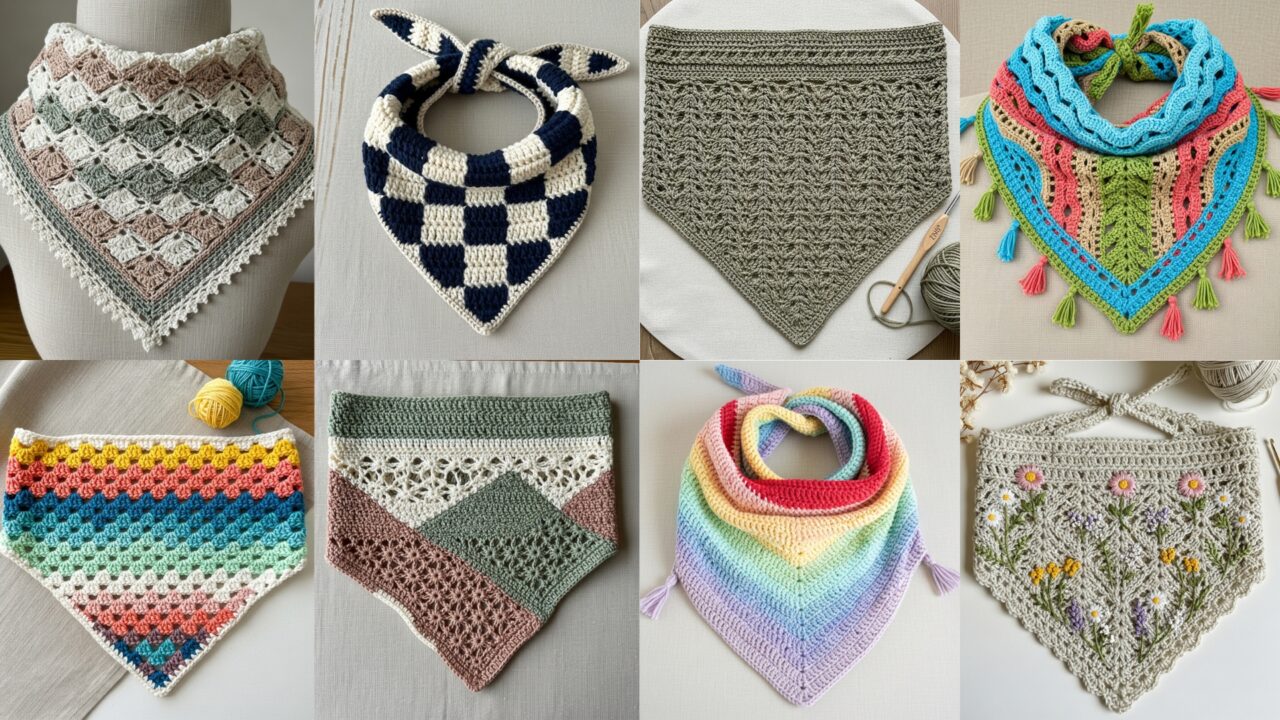
Bandanas are one of the most versatile small-wearable crochet projects: quick to stitch, endlessly customizable, and perfect for adding a handmade accent to outfits, pet collars, or home décor. This collection pairs airy lace with solid textures so you can choose lightweight, summery bandanas or warmer, structured versions. Each pattern below includes: skill level, suggested materials, sample gauge and finished-size guidance, a clear step-by-step construction (with counts and repeat guidance you can adapt), helpful variations, finishing and blocking tips, and styling ideas. All patterns use US crochet terms.
Before you begin, measure how you want to wear the bandana (neck, head, pet, or folded triangle) and decide whether you want a tie, button, snap or elastic closure. Most of these bandanas are triangular and wearable two ways — tied at the back or folded and pinned.
Quick general notes (read first)
- Abbreviations: ch = chain, sc = single crochet, hdc = half double crochet, dc = double crochet, tr = treble, sl st = slip stitch, sk = skip, sp = space, rep = repeat, RS = right side, WS = wrong side, BLO/FLO = back/front loop only, MR = magic ring.
- Yarn selection: lightweight cotton (DK) or sport-weight for breathable lace; worsted/light worsted yarn for more structured or winter bandanas. Use cotton blends for drape and easy care.
- Hooks: I list recommended hooks for each sample; adjust to match your tension. Use a smaller hook for crisper lace or a larger one for drapier fabric.
- Finished sizing: I give sample dimensions (adult bandana tied style). Adjust by changing the number of repeats or foundation chain length. For pets, scale down by reducing repeats or switching to finer yarn.
- Blocking: Most lace bandanas look best after light blocking to open lacy motifs and square edges. Use wet or steam blocking based on fiber content.
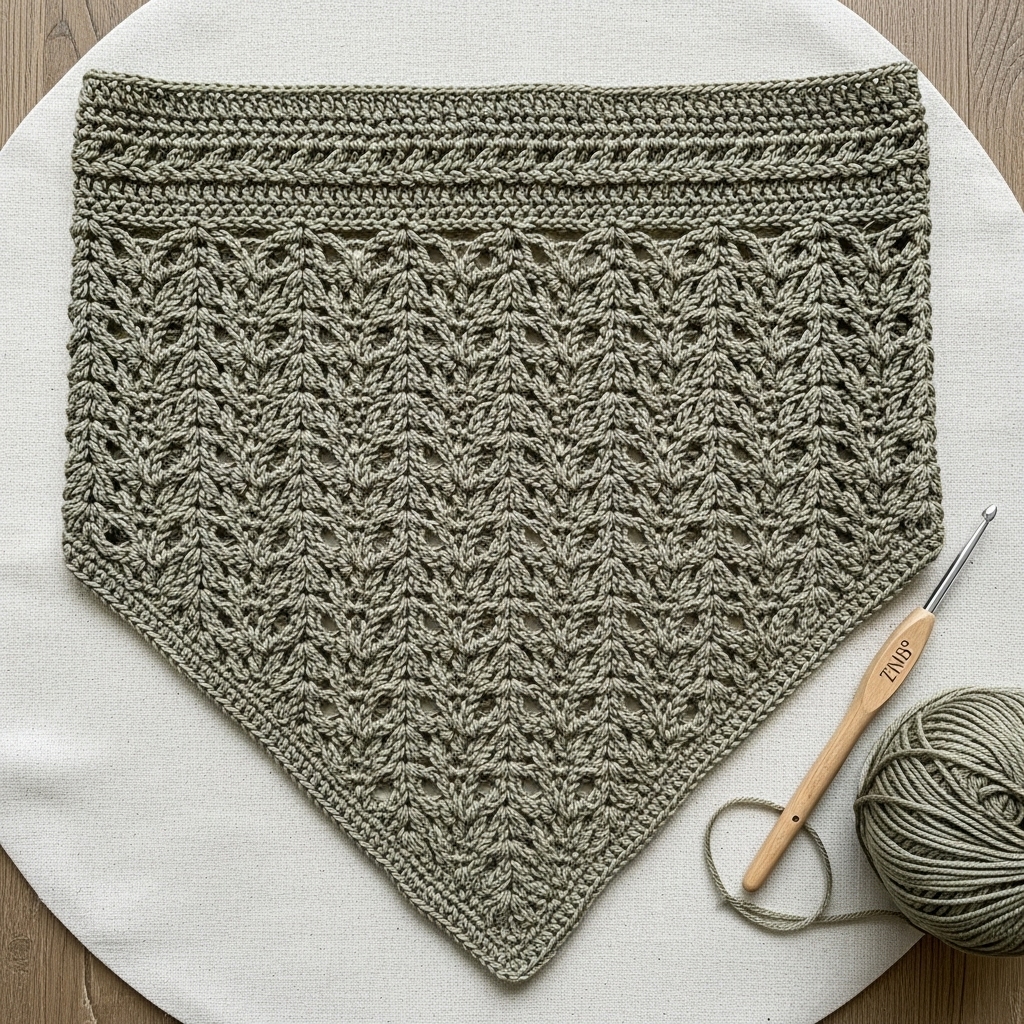
1. Crochet Diamond Lace Bandana Pattern
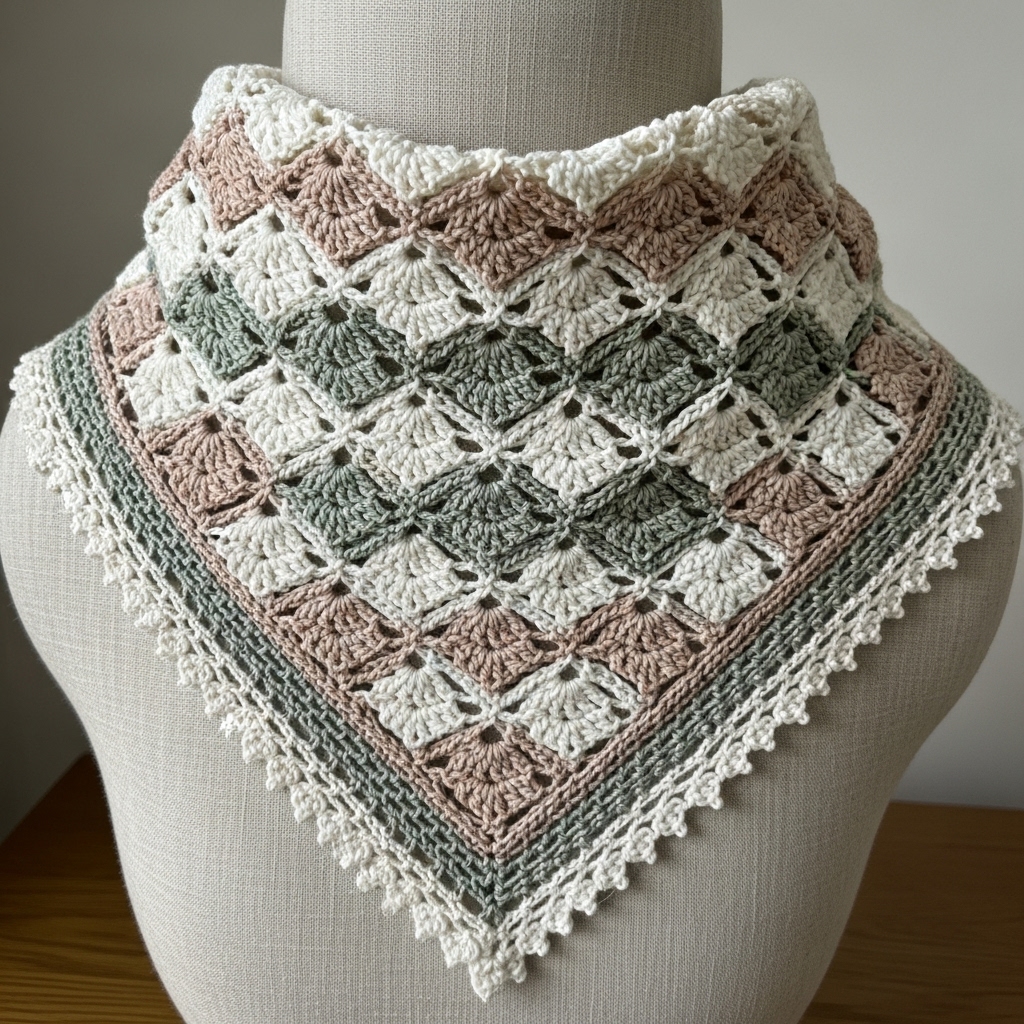
Style & mood: Elegant, geometric lace made from diamond motifs — lightweight and slightly see-through, ideal for spring/summer wear or as a decorative headband.
Skill level: Confident beginner → intermediate (reading lace repeats and keeping counts)
Materials
- Sport or DK cotton yarn, approx. 150–250 yds depending on size.
- Hook: 4.0 mm (adjust to match gauge).
- Tapestry needle, blocking mats, pins.
Sample finished size (adult)
- Triangle base (widest edge) ≈ 42–44 in when worn folded as a scarf; height (center front to tie) ≈ 20–22 in when unfolded as triangle. To wear as a headband, use smaller size or fold multiple times.
Gauge (sample)
- Lace pattern gauge is flexible; for planning, 18 stitches × 10 rows ≈ 4 in in the lace pattern using DK on 4.0 mm.
Construction concept
- Worked from the top center of the triangle downward in rows, increasing at each end to form a triangle. Diamond motifs are created by alternating shell/chain mesh sequences. You can also work the bandana sideways from point to base.
Step-by-step (center-top out method)
- Foundation (center top): Ch 7, join with sl st to form a small ring — this is the triangle point (or start with MR: ch 3, dc 2 into ring). Alternatively chain 4 and work first motif if you prefer a clean pointed tip.
- Row 1 (establish diamond centers): Ch 3 (counts as dc), 2 dc in ring, ch 2, 3 dc in ring (one little v) — this creates the top diamond center. Turn.
- Row 2 (increase row): Ch 3, dc in same st, ch 3, sk chain, (3 dc in next chain space) repeat to work a row of small 3-dc clusters separated by chain spaces. Increase at each row’s ends by starting and ending with (3 dc) clusters so the triangle widens evenly.
- Row 3–8 (build diamonds): Continue working rows of shell clusters and chain spaces; every set of rows (typically 4 rows) forms one diamond motif. The diamond is created by stacking shells with central chain spaces and then surrounding them with mesh rows.
- A representative 4-row repeat:
- Row A (mesh): sc across or ch3, sk sp pattern depending on motif.
- Row B (shell): In ch-space make (3 dc, ch2, 3 dc).
- Row C (mesh): sc in top of shell center and ch3 spaces forming net.
- Row D (shell placement): anchor shells into mesh centers to form diamond shape.
- A representative 4-row repeat:
- Repeat the 4-row diamond repeat until bandana reaches the desired depth (approx. 20–22 in from top center to bottom for adult size). Keep counting shells so diamonds remain symmetric.
- Edge finish: Work 1–2 rounds of sc around the entire triangle to tidy edges. For a lacy scallop, work shell picot around: (sc, ch3, sl st in first ch) or (sc, ch3, sc) at shell points.
- Blocking: Wet block and pin border to open diamonds and achieve crisp lines. Lay flat to dry.
Variations
- Make diamonds larger by using taller shells (tr instead of dc).
- Work the diamond motif in color-block stripes — change color every 4–8 rows for modern effect.
Finishing & styling
- Fold into a narrow band to wear as a headband or kerchief; tie at back. Pair with linen dresses or beachwear for a bohemian look. For colder weather, work in light worsted for more warmth.
2. Crochet Wildflower Bandana Pattern

Style & mood: Feminine, floral-focused bandana with small worked flowers integrated across a lightly textured ground — romantic and cottagecore-friendly.
Skill level: Confident beginner (must join small motifs and work textured stitches)
Materials
- DK cotton or cotton-blend in one main color for ground and a few small scraps for flowers (contrasting colors).
- Hook: 4.0 mm.
- Tapestry needle, small sewing needle for applique, blocking tools.
Sample finished size (adult)
- Base width ≈ 40–42 in; height ≈ 18–20 in. Add extra rows if you want deeper fold.
Construction concept
- Work a solid or lightly textured triangle and either (A) sew small flower appliqués on, or (B) crochet tiny flowers and join them into the fabric as you go (join-as-you-go).
Step-by-step (solid triangle with appliqué)
- Triangle foundation (solid texture): Ch 3, dc 2 in 3rd ch from hook or MR with 3 dc to start.
- Row 1: ch 3 (counts as dc), dc 2 in ring = 3 dc total; turn.
- Row 2: ch 3, dc in first st, dc across to last st, dc 2 in last st — this increases triangle width by 2 dc each row. Continue until triangle base equals desired width (approx. 40–42 in).
- For a slightly open texture, substitute some rows with V-stitch rows: (dc, ch1, dc) in same st to create vertical lines for flower placement.
- Make small flowers (appliqués)
- Tiny flower pattern: MR, ch1, 6 sc in MR, sl st to join (6 sc center). R2: ch 3, sl st in next st repeat 6 times to create loops; in each loop work (sc, hdc, dc, hdc, sc) to form a petal. Fasten off leaving tail to sew.
- Make 12–20 small flowers depending on look. Use complementary colors (soft pinks, cream, lavender).
- Position and sew
- Lay the triangle flat and experiment with flower placement. Sew flowers over the fabric just catching a few loops so they are secure but maintain a slight lift. You can add tiny embroidered French knots as flower centers.
- Edge (optional leafy border)
- Crochet a narrow border of green leaves: (ch6, sc in 2nd ch, hdc in next, dc in next, hdc in next, sc in last) and attach along the lower edge, spacing leaves between flower clusters.
- Blocking
- Lightly block to flatten triangle and ensure flowers sit well.
Variations
- Work flowers directly into bandana by replacing certain V-stitch clusters with the flower center and petal rows as you work, for an integrated look.
- For pet bandanas, make flatter appliqués and keep centers embroidered instead of 3D.
Finishing & styling
- Tie loosely at the nape of the neck for a soft, romantic accessory. For a headscarf, fold to desired width and secure with a knot under the hair.
3. Crochet Tunisian Leaf Lace Bandana Pattern
Style & mood: A hybrid: Tunisian crochet used to create an elegant leaf-lace that has structure and fine drape — excellent for those who love Tunisian textures.
Skill level: Intermediate (must know Tunisian simple stitch plus Tunisian lace/leaf patterns)
Materials
- Sport-weight cotton or light DK.
- Tunisian hook (long or cable hook) 4.5–5.5 mm.
- Tapestry needle, blocking mats.
Sample finished size (adult)
- Base ~40 in; height 18–20 in (depending on gauge and leaf repeat count).
Construction concept
- Worked in Tunisian stitch back-and-forth rows from top-center or along the short edge as panels, using a leaf-pattern chart (Tunisian leaf stitch is usually a combination of TKS/TPS and chain spaces woven into return pass).
Step-by-step (top-down triangle, Tunisian basics included in steps)
- Set up foundation
- Ch 5 (or multiple for matching repeat) as base, pick up loops across using forward pass: insert hook into 2nd ch from hook and pull up a loop across until you have required number of loops for your triangle base (we’ll increase rows for triangle).
- Row 1 forward & return passes
- Forward pass: pick up loops across chain (foundation row loops).
- Return pass: yo, pull through 2 loops across (standard Tunisian return) to close row.
- Leaf lace repeat
- A classic Tunisian leaf motif is often a 6–10-row repeat where you work a series of TKS/TPS columns and create open chain ladders on alternate rows to form leaf shapes. Example simplified motif:
- Row A (setup): TSS across with occasional ch-1 loops worked on forward pass for mesh.
- Row B (leaf starting): In ch-1 space work a cluster or TKS cluster to start leaf tip.
- Row C–E: increase in center by picking up 1 extra loop at each forward pass to widen leaf then decrease to taper.
- Because Tunisian stitch counts are managed on the hook, many crocheters prefer working leaf motifs as small rectangular panels and joining them at angles to create a triangle. If you are new to Tunisian lace, consider making narrow strips (leaves) and assembling them.
- A classic Tunisian leaf motif is often a 6–10-row repeat where you work a series of TKS/TPS columns and create open chain ladders on alternate rows to form leaf shapes. Example simplified motif:
- Increase triangle
- At the beginning and end of select rows, add 1 loop (increase) to widen the triangle symmetrically. Continue building rows until desired height.
- Finish
- Work a round of sc around edges for a neat finish (pick up stitches along the edge and work sc).
- Blocking
- Block carefully to open leaf lace and show the motif clearly; use pins to shape triangular edges.
Variations
- Work Tunisian knit stitch panels for a denser bandana that still has leaf surface texture.
- Use gradient or tonal yarn to emphasize leaf veins.
Finishing & styling
- Tunisian fabrics can be heavier — this bandana is great for transitional seasons. Pair with denim jackets or layered knits.
4. Crochet Granny Triangle Bandana Pattern
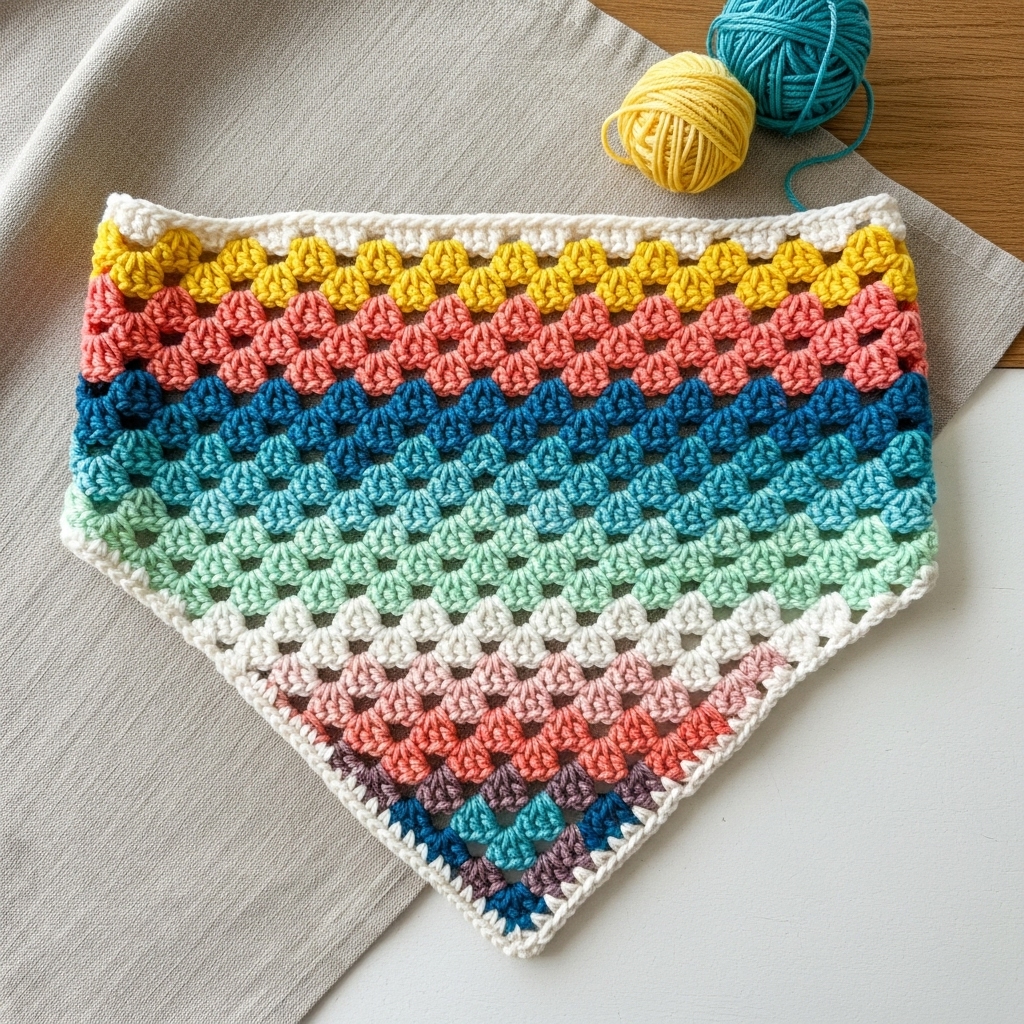
Style & mood: Retro and cheerful — classic granny-triangle motifs joined into a triangular bandana. Great use of scraps and colorwork.
Skill level: Confident beginner (granny clusters and join-as-you-go technique)
Materials
- DK or fingering yarn in multiple colors (scraps are ideal).
- Hook: 3.5–4.5 mm.
- Tapestry needle, blocking tools.
Sample finished size (adult)
- Base ~42 in; height ~20 in (makes an oversized granny kerchief when joined).
Construction concept
- Make a set of triangular granny motifs (mini granny triangles) and join them row by row into a larger triangle, or make one large granny triangle using the classic granny increase blocks.
Step-by-step (large granny triangle method)
- Start granny center
- MR or chain 4 and join; Round 1: (ch 3 (counts as dc), 2 dc, ch 2, 3 dc) into ring to make first corner — this is one corner of triangle. For a triangle, you make three corners per round.
- Round 2 (grow triangle)
- In each corner ch-2 space, work (3 dc, ch 2, 3 dc); along each side between corners work 3 dc cluster spaced by ch 1 as the side increases. This creates the classic triangular granny motif.
- Repeat rounds until triangle width reaches desired base (example 42 in). Use multiple colors: change color at the end of a round to create stripes or color blocks.
- Edge finish
- Work one or two rounds of sc to stabilize edge. Add a decorative scallop or shell round if you like.
- Alternately: join small granny triangles
- Make several small granny triangles (each about 6–8 rows) and join them using join-as-you-go to form a larger triangle mosaic for a patchwork effect.
Variations
- Make a scrappy granny bandana using multi-color rounds; this is a fast stash-busting project.
- Add a narrow crocheted tie: ch 80 and sc back to make a tie, then attach to outer corners.
Finishing & styling
- Block to open granny clusters and make sides straight. Fold and wear as a neckerchief or tie around a ponytail for a retro look.
5. Crochet The Hawthorne Bandana Pattern
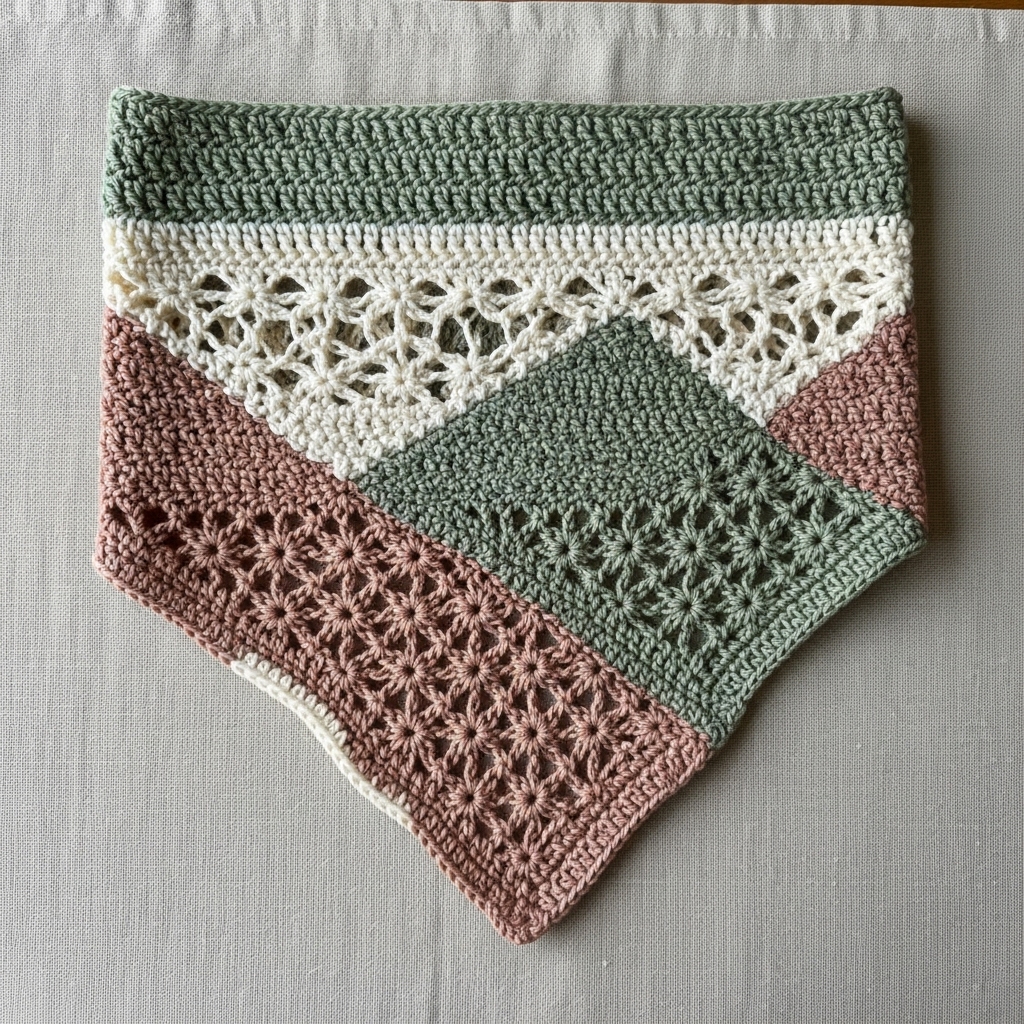
Style & mood: A modern, slightly asymmetrical bandana inspired by delicate lace with accent rows; name used here to denote a specific constructed balance of openwork and solid bands.
Skill level: Intermediate
Materials
- Sport-weight cotton or bamboo blend for sheen and drape.
- Hook: 3.5–4.5 mm.
- Tapestry needle, pins for blocking.
Sample finished size (adult)
- Base ~40 in; height ~18 in; asymmetry adds visual interest when worn off-center.
Construction concept
- Start with a centered top and work uneven repeats of lace and solid band rows to create a tapered and slightly off-balance look. The Hawthorne pattern alternates a 6-row lace repeat with 2–4 rows of solid stitched texture.
Step-by-step
- Top center: Chain 6, join to a ring. Work 3 dc in ring to start triangle top.
- Build rows: Increase two dc per row at each end (as with a triangle) but alternate the row patterns:
- Lace repeat (6 rows): A light mesh of ch3, sk, dc with star/stitch-based motifs every other repeat to build floral-like holes.
- Solid bands (2–4 rows): Hdc or dc rows worked across to give weight and contrast.
- Asymmetry: On one side of the triangle, every 8th lace repeat shift a motif one stitch into the side to create the Hawthorne offset. This subtle shift makes the bandana look hand-crafted and modern.
- Edge finish: Work a neat border round of sc or a decorative shell to balance the airy center and create a polished edge.
- Blocking: Spray-block or wet-block for lace definition; pin the off-center points accordingly so the final piece lies as designed.
Variations
- Work the same structure in a two-color palette — light color for lace rows and deep color for solid bands to emphasize asymmetry.
- Scale down for a child’s bandana or pet scarf by reducing the number of repeats.
Finishing & styling
- Wear offset on the shoulder or tied loosely at the neck for a modern look. The Hawthorne bandana pairs well with linen shirts and modern minimalist wardrobes.
6. Crochet Caribbean Boho Bandana Pattern
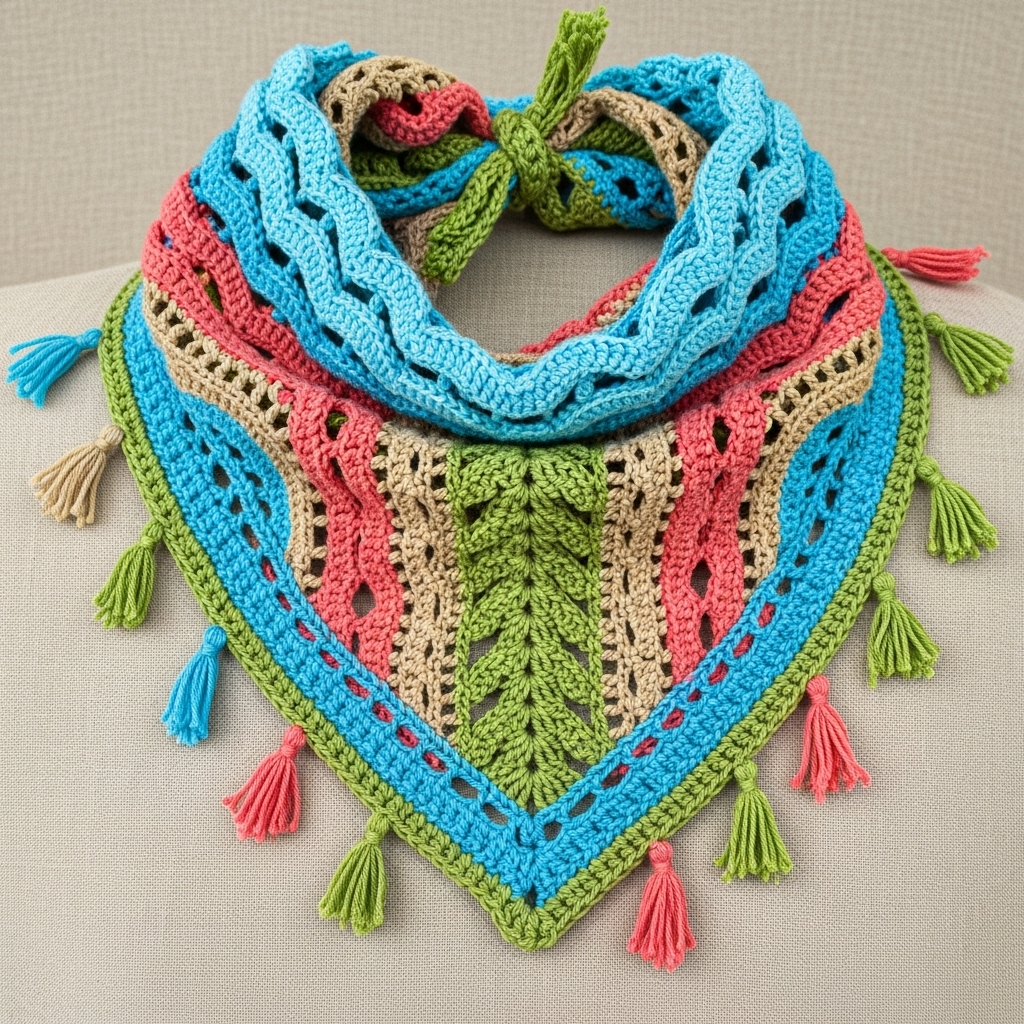
Style & mood: Colorful, tropical-inspired boho bandana with openwork and textured stitches that mimic waves and palm fronds.
Skill level: Confident beginner → intermediate
Materials
- DK cotton or cotton blend in 3–5 tropical colors (turquoise, coral, sand, palm green).
- Hook: 4.0 mm.
- Tapestry needle, blocking tools.
Sample finished size (adult)
- Base ~42 in; height ~18–20 in.
Construction concept
- Work repeating wave and shell rows with color changes to create a horizontal striping of texture evoking Caribbean beaches. The bandana is triangular or rectangular (for neck wraps) depending on how you work panels and join them.
Step-by-step (triangle with horizontal bands)
- Start at center top: Chain 4, join to ring, or MR with 3 dc cluster.
- Band repeats:
- Wave row: dc in next 2 sts, skip 1, dc in next 2, shells in next to create wave-like arcs.
- Palm row (textured): Use front-post/back-post dc alternating across row to create vertical rib reminiscent of palm fronds.
- Net row: chain-space mesh rows between waves for airiness.
- Color changes: Change color every 4–6 rows to create tropical stripes; carry yarn up the side or fasten off and weave ends between color blocks.
- Increase for triangle: Continue increasing at each row’s ends (2 stitches per row) to expand triangle. Continue bands repeat until desired height.
- Edge & tassels: Add a simple shell or picot border; for boho effect add tassels or pom-poms at triangle points or along the base using contrasting colors.
Variations
- Work the bandana as a neck wrap by making a long, narrow triangle for easy drape.
- Add a fringe with shell-tassel clusters for festival-ready look.
Finishing & styling
- Block to open shells; tie loosely for a relaxed, beachy vibe. Great with white linens and denim shorts.
7. Crochet Checkered Bandana Pattern
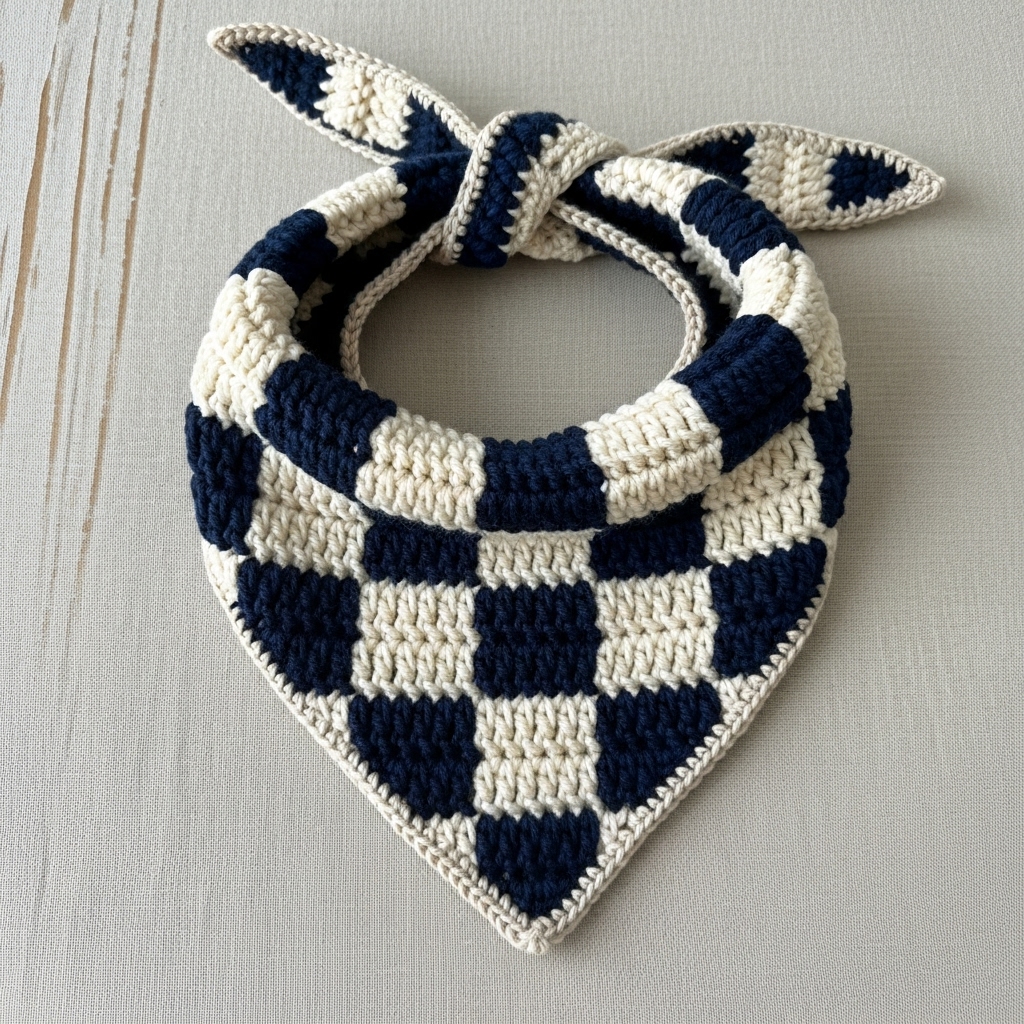
Style & mood: Graphic and modern — bold checks reminiscent of gingham but made in crochet. Works for neutral wardrobes or playful colorful statements.
Skill level: Confident beginner (color changes and carrying yarn)
Materials
- DK or worsted cotton in two contrasting colors (e.g., cream + navy).
- Hook: 4.0–5.0 mm.
- Tapestry needle for weaving ends.
Sample finished size (adult)
- Base 40–44 in; height 18–20 in.
Construction concept
- Work a triangle with alternating blocks of color forming a checkerboard grid. Use tapestry/stranded technique (carry floats) or join small color blocks as you go. Another easier method is to make stripes and overlay surface slip stitches to create checks.
Step-by-step (block method)
- Plan grid size: Decide how many checks across the base — e.g., 10 checks across the base of the triangle. Compute number of stitches per block using gauge (e.g., 4–6 stitches per check).
- Start triangle: Ch 3, 3 dc in ring. Increase row ends each row as normal to form triangle. Work color blocks:
- For each row, work a sequence: color A block across N sts, switch to color B for next block and continue. Use intarsia-like switching and twist colors at change points to avoid holes.
- Carry floats (if using tapestry): Keep floats short (no more than 5–6 sts) and trap them on the wrong side. For long floats, cut and weave ends.
- Continue rows forming checkers: Each subsequent row offsets blocks so checks align like a chessboard.
- Edging: sc round in a neutral color to frame the checks.
Alternative simpler method (surface check)
- Create base in solid color. Work contrasting color surface slip-stitch squares arranged as checks across the triangle after finishing. This avoids complex colorwork while achieving check look.
Variations
- Use more than two colors to create rainbow checkers.
- Scale down check size for a delicate gingham effect.
Finishing & styling
- Crisp blocking ensures checks look geometric. Wear folded as a bandana or tied at the neck for preppy styling.
8. Crochet Rainbow Bandana Pattern
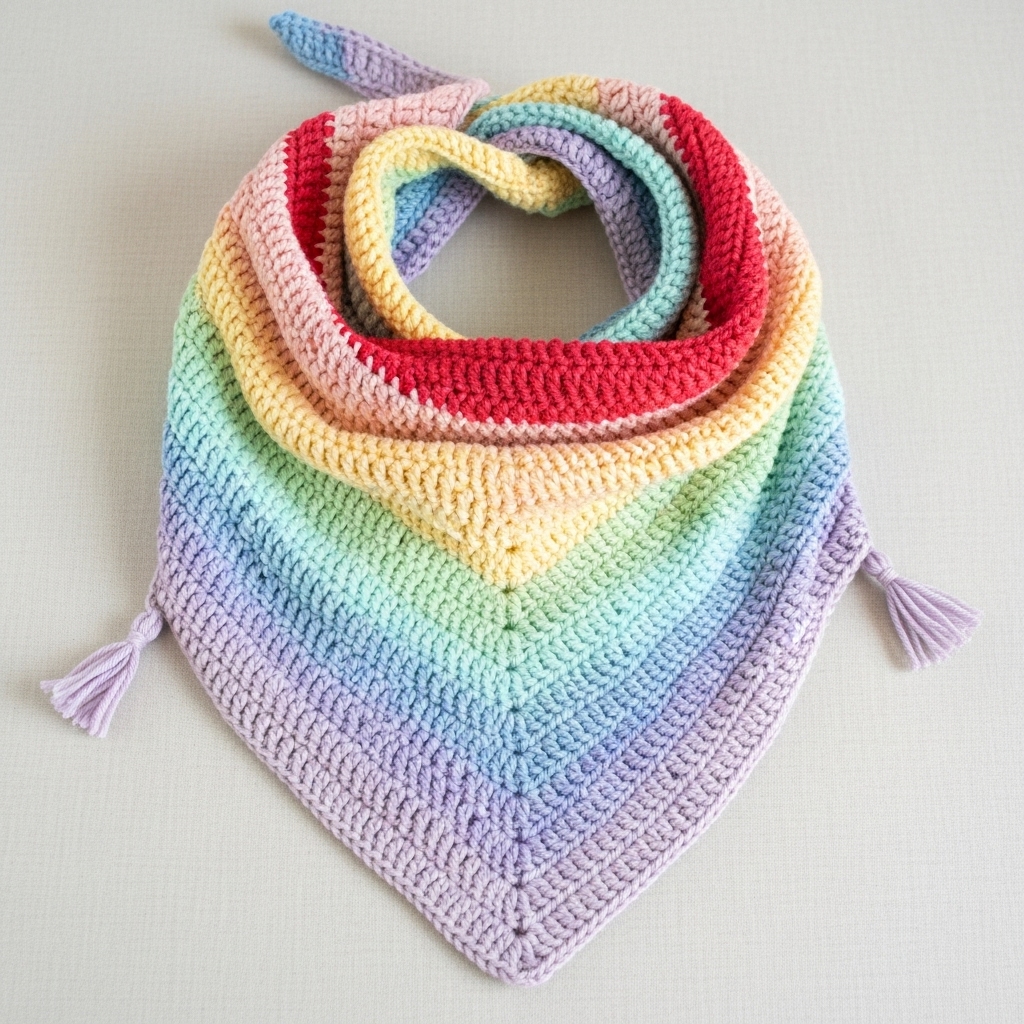
Style & mood: Bright, optimistic bandana with rainbow gradient or stripes — cheerful and modern. Great for gifting, festivals, or adding playful color to outfits.
Skill level: Confident beginner
Materials
- DK yarn in gradient set or multiple colors to create rainbow (or a variegated gradient cake).
- Hook: 4.0 mm.
- Tapestry needle, blocking tools.
Sample finished size (adult)
- Base ~42 in; height ~18–20 in.
Construction concept
- Work horizontally striped triangular bandana using color changes every few rows in rainbow order, or use self-striping gradient yarn for smooth transitions.
Step-by-step (striped triangle)
- Top center start: Chain 4 and join or MR with 3 dc to begin.
- Row pattern and color changes
- Basic row: ch 3 (counts as dc), work dc to end; at row ends increase by working 2 dc in last stitch to widen triangle (increase 2 dc per row across both sides).
- Change color every 4–6 rows for each rainbow stripe: red, orange, yellow, green, blue, indigo, violet. Carry color up the side or weave in ends neatly.
- Optional stitch texture
- For extra interest, alternate plain dc stripe rows with one textured stripe (shells, v-stitch, or herringbone) to make the rainbow bandana more tactile.
- Edge finish
- Work a round of sc in a neutral or contrast color to frame the rainbow. Add a picot round or small tassel fringe if desired.
- Blocking
- Light block to even rows and set shape.
Variations
- Use gradient yarn to avoid many ends.
- For a subtler rainbow, use tonal shifts in a single yarn family.
Finishing & styling
- Fold and wear as a cheerful scarf or kerchief. Great for Pride events, summer festivals, or kids’ accessories.
Final finishing, blocking & care tips (applies to all bandanas)
- Blocking: Lace patterns especially benefit from wet or steam blocking — pin motifs and edges to open lace and achieve crisp lines. For cotton, wet block and dry flat; for blends, test steam blocking on a small swatch.
- Edges: A round of single crochet around the perimeter stabilizes and frames the bandana. For a decorative finish try crab stitch (reverse sc), scallop, or picot edging.
- Closures: For adult bandanas, ties are easiest (make ties by chaining 80–120 and working a few rows of sc). For pet bandanas or quick fastening, add snaps, small buttons, or an elastic loop. Reinforce any hardware with extra stitches or a small fabric patch.
- Yarn care: Use machine-washable yarns for everyday wear; otherwise hand wash and reshape. Avoid tumble-drying delicate lace bandanas to preserve shape.
Conclusion
These eight lace & solid bandana patterns offer a wide palette of styles — from geometric Diamond Lace and graphic Checkered Bandanas to boho and tropical looks like Caribbean Boho and Rainbow stripes. Use these patterns to make a versatile range of wearable accessories: lightweight headscarves, tied neck kerchiefs, pet bandanas, or festival-ready slings. Each design is adaptable: change yarn weight, hook size, and repeat counts to fit the wearer and the look you want.