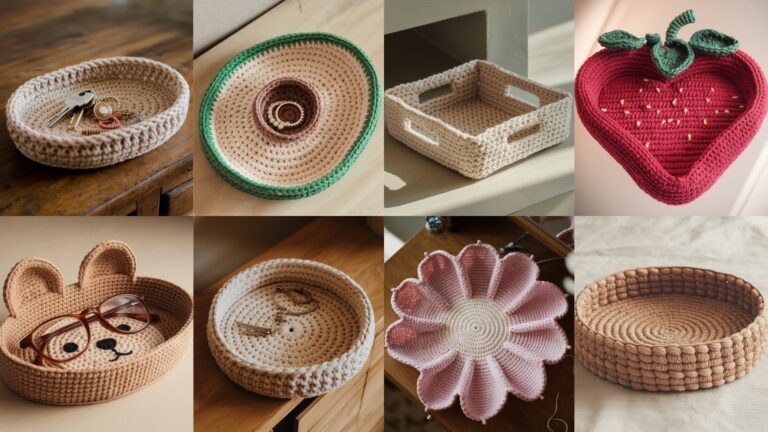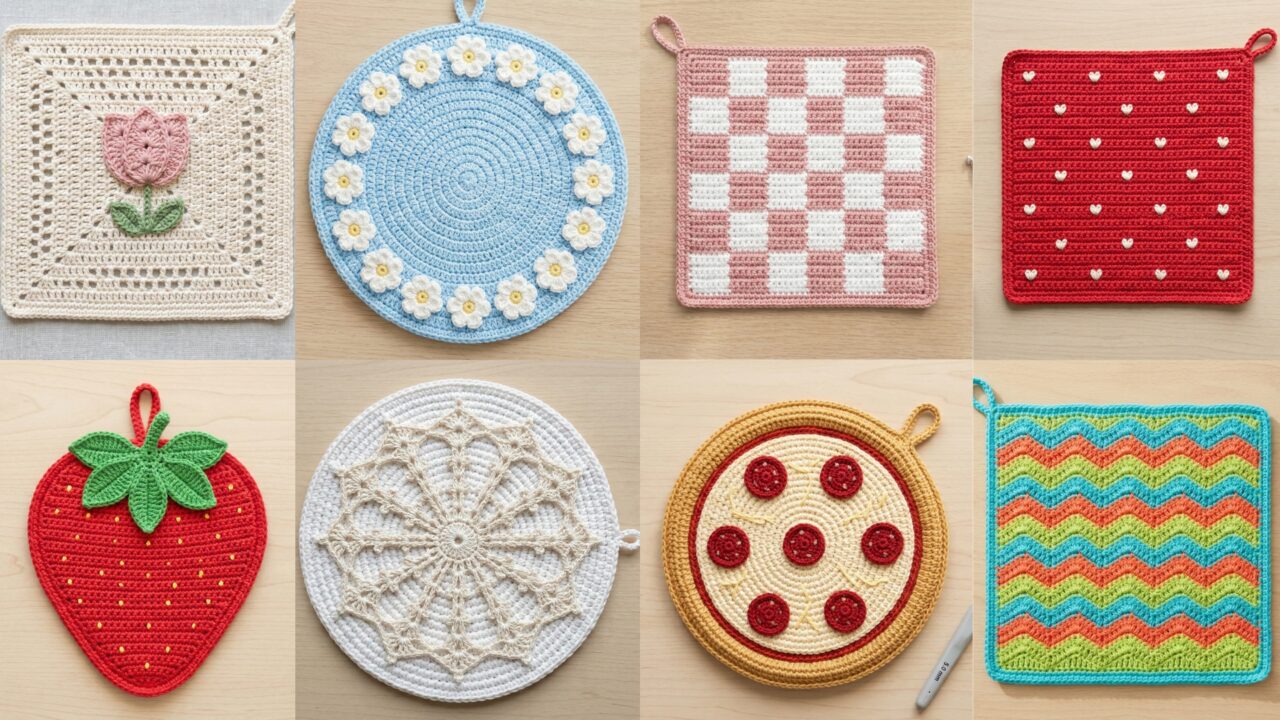
Pot holders are the perfect mix of fast, useful, and adorable — a small weekend project that keeps your hands and countertops safe and brightens the kitchen. Below you’ll find a warm introduction covering safety-first materials and construction, followed by eight complete pot-holder patterns: Tulip, Pink Checkered, Pepperoni Pizza, Snowflake, Strawberry Inspired, Spring Circle, Wavy Ripple Square, and Tiny Hearts. Each pattern includes materials, finished size, stitch abbreviations, a step-by-step how-to, finishing and safety notes, plus variations so you can customize them.
Safety first: crocheted pot holders alone are not inherently heatproof. Always use heat-safe materials (100% cotton or cotton blends rated for high heat), and add a thin thermal batting (Insul-Bright) or a fabric lining (quilted cotton) between layers for real heat protection. Never rely on acrylic or novelty yarns alone to handle hot pans — they can melt and cause burns.
Quick primer — yarn, hook, construction & safety essentials
Best yarn
- 100% cotton (sport/DK or worsted) — highly recommended. Absorbs heat, washable, blocks well.
- Cotton blends: OK if the cotton content is high and label says safe up to reasonable temps.
- Avoid 100% acrylic, nylon, polyester, mohair, eyelash or other novelty yarns for the pot-holder body that will face direct heat — they can melt, become glassy, or catch fire.
Extra heat protection
- Insul-Bright (thin reflective batting) — made for oven mitts/potholders; sew into lining.
- Quilt batting + cotton fabric — layer cotton fabric + thin batting and quilt the layers together before finishing.
- Double-thick crochet — you can crochet two thick squares and seam them with batting/wadding between them, but quilting with Insul-Bright is safest.
Hook & tools
- Hook size to match yarn — usually 4.0–5.5 mm for DK/worsted cotton.
- Tapestry needle, sewing needle, thread, fabric for lining, thin heat-resistant batting, pins, scissors, stitch markers.
Useful stitches & abbreviations (US)
- ch = chain
- sc = single crochet
- hdc = half double crochet
- dc = double crochet
- tr = treble (UK: tr = US dc) — I’ll use US terms throughout
- sl st = slip stitch
- BLO / FLO = back/front loop only
- inc = 2 sc in same st (increase)
- dec = sc2tog (decrease)
Size guide
- Typical square pot holder: about 8″–9″ (20–23 cm) per side. Round ones: 8″–9″ diameter. If you want larger oven mitt–style pieces, scale up.
Construction approaches
- Work a single thick panel and line with Insul-Bright + cotton.
- Work two identical crochet panels, sandwich Insul-Bright between them, and whipstitch/sew around edges.
- Crochet in dense stitch patterns (sc, hdc, waffle, or tightly worked post stitches) to reduce gaps.
1. Crochet Tulip Pot Holder Pattern
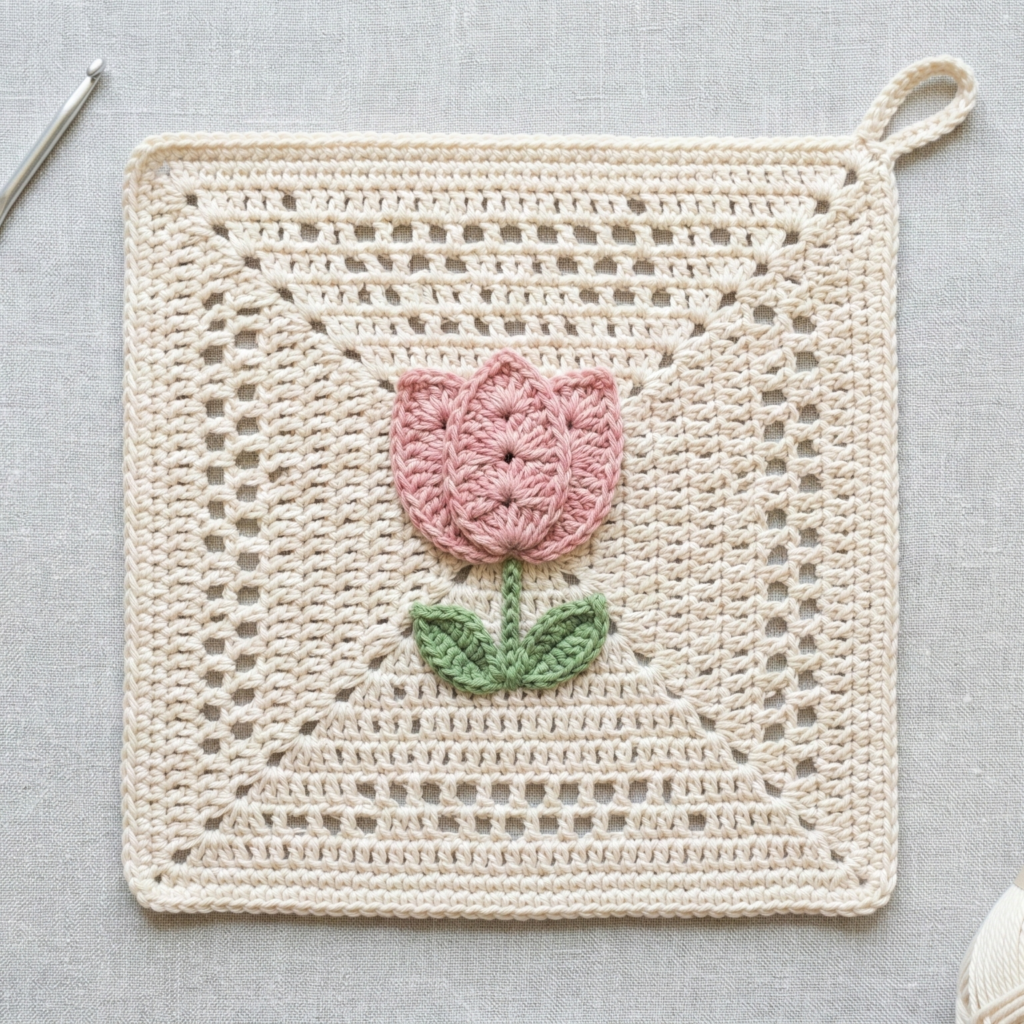
Sweet tulip applique centered on a dense, heat-friendly square.
Finished size: ~9″ square (after blocking)
Skill level: confident beginner
Materials
- 2 skeins worsted 100% cotton (main color for square) ~200 yd total
- Small amount of yarn for tulip colors (pink/red/green)
- 5.5 mm (I) hook (or size to get tight fabric)
- Insul-Bright square or thin cotton batting + cotton lining fabric
- Tapestry needle, pins, optional button for decoration
Construction overview
Work a dense square in sc (or waffle variant), make a tulip appliqué, sew tulip to square, add insulated lining, and finish edge with single crochet. Add a hanging loop.
Step-by-step
A — Dense 9″ Square (worked flat in rows)
- Make a 4″ swatch in sc with your hook and cotton to find stitches per inch. Example: you get 4 sc = 1″. For 9″ width you need 36 stitches. Chain 37 (36 + 1 extra turning ch).
- Row 1: sc in 2nd ch from hook and across. (36 sc) Turn.
- Rows 2–36: ch1, sc across. (repeat until square measures ~9″) Keep tension firm — use a hook slightly smaller if fabric is loose.
- Fasten off and weave ends. Block square to shape if needed.
B — Tulip appliqué (make 1)
- MR, ch1, 6 sc in MR; pull tight. (6)
- ch3, 5 dc in next st, ch3, sl st — repeat to make 3 petals (or work five small petals by making loops around the ring). A compact tulip: make three larger petals and a little stem/leaves: after petals, join green and ch8, sc back to form a stem and make two small leaves (ch5, sc back).
- Fasten off leaving long tail for sewing.
C — Attach appliqué
- Pin tulip centered on square. Use the long tail and tapestry needle to sew securely using small stitches through the appliqué and the square; hide knot on wrong side.
D — Assemble insulation/backing
- Cut Insul-Bright to the same 9″ square. Cut cotton lining to same size.
- Place Insul-Bright between the crochet square and lining (crochet side out), pin. Using strong thread, whipstitch or machine-stitch the lining to the crochet around three sides, then turn right side out through fourth side and hand-stitch closed. Alternatively, crochet a border around the square to catch lining and batting inside (see step E).
E — Edging & hanging loop
- With main color, join at a corner and sc evenly around all edges (through crochet stitches and over the lining if you prefer), placing 3 sc in each corner for neatness.
- On final round, make a small loop: chain 10, sl st to the same spot, fasten off. This makes the hanging loop. Weave in ends.
Variations & tips
- For sturdier heat protection, make an extra outer crochet square and sandwich Insul-Bright between two crochet layers; whipstitch together.
- Use surface crochet or embroidery to make tulip details.
2. Crochet Pink Checkered Pot Holder Pattern
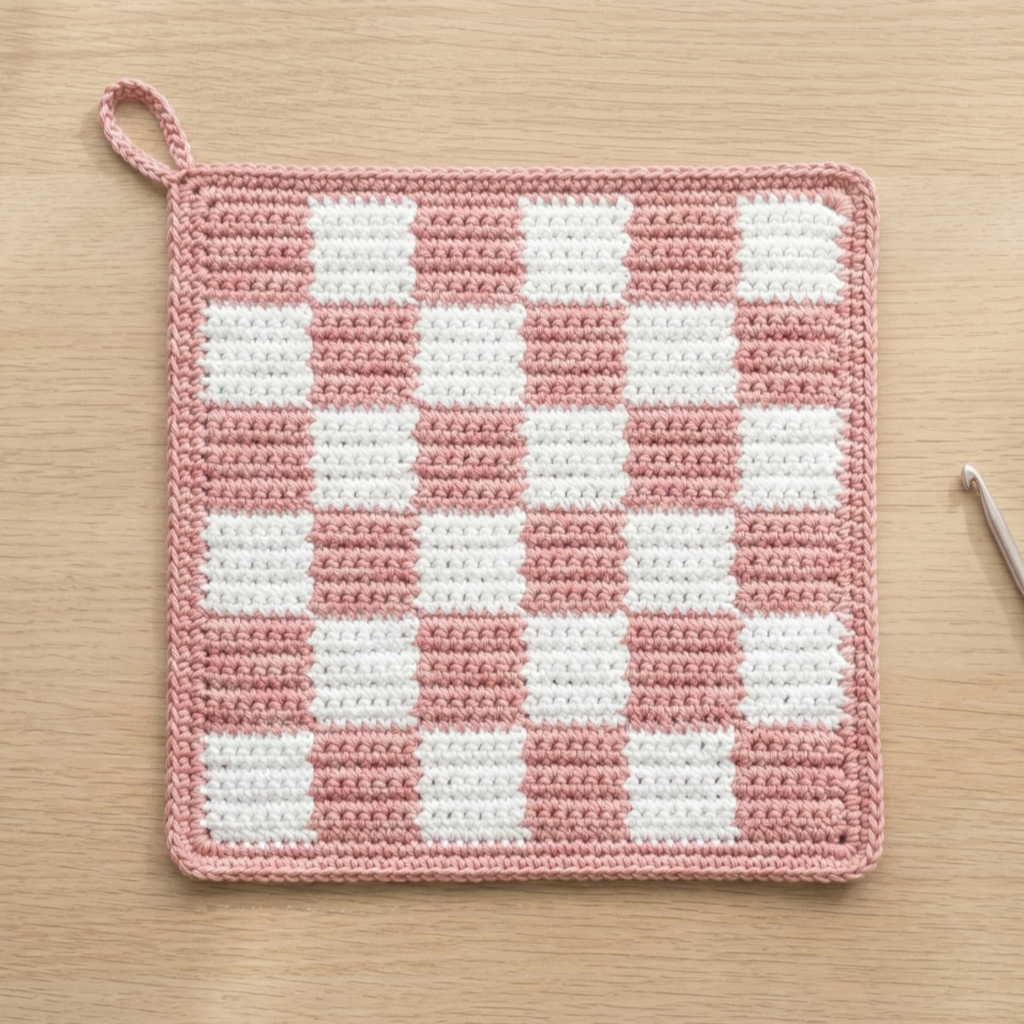
A modern checkered design worked in two colors using tight sc fabric.
Finished size: ~8.5–9″ square
Skill level: confident beginner (color changes)
Materials
- Two high-quality cotton colors (A = pink, B = white or cream), worsted cotton, ~200 yd total
- 5.0–5.5 mm hook
- Insul-Bright or batting + lining fabric
Construction overview
Work in the round or rows in sc with small color blocks to form a checkerboard. We’ll do it in rows with block width of 4 sc × 4 rows per square. Add lining as before.
Step-by-step
A — Swatch & calculations
- Make a 1″ sc swatch to find stitches per inch. Example: 5 sc = 1″. For 9″ width you need 45 sc. If each checker square is 4 sc wide, 45 ÷ 4 = 11.25 → choose 44 sc (11 squares) or 48 sc (12 squares). Choose 44 for 11 blocks across.
B — Foundation
- Chain 45 (44 + 1). Row 1: sc across.
C — Checker pattern (block size 4 × 4)
- Decide starting color for block. Row 1–4: work sc across switching colors every 4 sts to form horizontal blocks (carry unused yarn loosely along the row or carry in back using bobbins for tidy back).
- Row 5–8: shift color pattern across to create checker offset? Actually, to make checkerboard, keep vertical blocks aligned and change rows every 4 rows: e.g., Rows 1–4 = pattern A,B,A,B…; Rows 5–8 = same pattern to stack blocks vertically. Continue until the piece is square (measure height to match width). Work until about 8.5–9″ tall.
D — Finish & lining
- Follow the insulation / backing process described in Pattern 1. Because the fabric is dense sc, the surface is smooth and perfect for a clean look.
E — Edging & loop
- Sc around edge in color A, making 3 sc in corners. Add hanging loop as before.
Variations & tips
- Try mini-check (3 x 3) or larger blocks for different scales.
- Use gradient yarn for one color for a modern twist.
3. Crochet Pepperoni Pizza Pot Holder Pattern
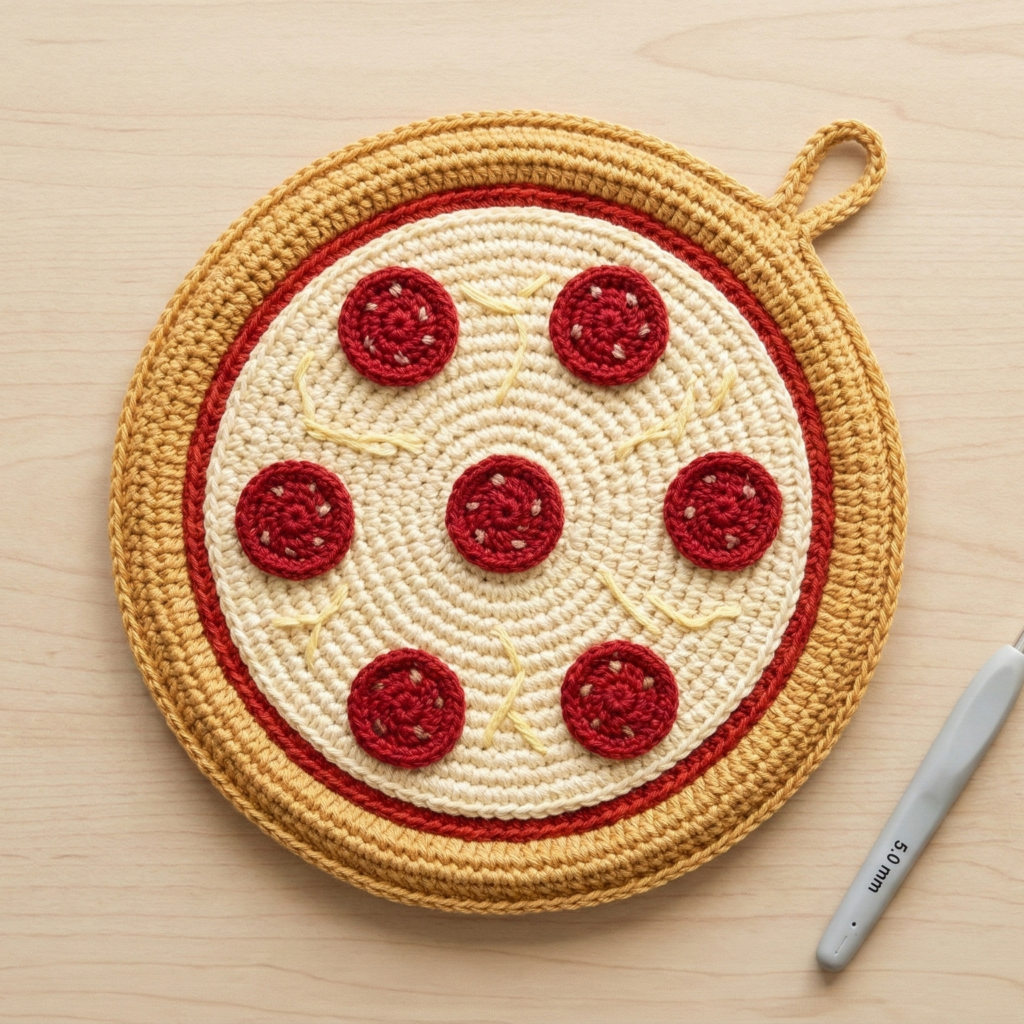
Fun novelty pot holder — round pizza base with crochet “pepperoni” appliqués. Great as a gift!
Finished size: ~8–9″ diameter
Skill level: intermediate (colorwork + appliqué)
Materials
- Worsted cotton: beige/cream for crust, light tan for base, red for sauce/pepperoni, dark brown for crust edge (optional), 5.0 mm hook
- Insul-Bright round or square cut to circle, cotton lining
Construction overview
Make a flat round pizza base with layered colors (crust + sauce), add pepperoni circles and optional cheesy texture (surface stitches), add Insul-Bright and a lining, finish edge to look like crust.
Step-by-step
A — Round pizza base
- MR, ch1, 8 sc in MR. (8)
- R2: inc in each st → 16
- R3: sc1, inc around → 24
- R4: sc2, inc → 32
- R5: sc3, inc → 40
- Continue increasing by adding one more sc between increases each round until you reach about 8″ diameter; for worsted on 5.0 mm this might be around 6–7 rounds. Check by holding a plate: stop when diameter ~8–9″.
B — Color change for sauce
- Change to red or tomato color for a couple of inner rounds (2–3 rounds) to represent sauce; work sc or hdc across. Then switch to tan or light yellow for the crust section near the outermost rounds if you want a crust ring.
C — Crust edge
- For a textured crust edge, work a round in darker brown: sc in BLO around to create a ridge, then make a puff stitch round or crab stitch to emulate crunchy edge.
D — Pepperoni appliqués (make 6–8)
- Small pepperoni: MR, ch1, 6 sc in MR. R2: inc around (12). Fasten off leaving tail. Sew pepperonis randomly onto the pizza base using long tail and needle.
E — Cheesy texture (optional)
- Use yellow yarn and surface slip stitch or small embroidered stitches across base to suggest melted cheese.
F — Insulation & backing
- Cut Insul-Bright into circle same size; sandwich and stitch lining as Pattern 1. Because it’s round, you can either whipstitch around the rounds or crochet a circular edging to join both layers.
G — Final edge
- With crust color, sc around outermost edge catching lining and baking insulation inside; add small surface French knots as crust bumps if you like.
Variations & tips
- Make “pizza slice” potholders by dividing circle into triangular segments and adding topping placement.
- Add a small fabric loop for hanging.
4. Crochet Snowflake Pot Holder Pattern
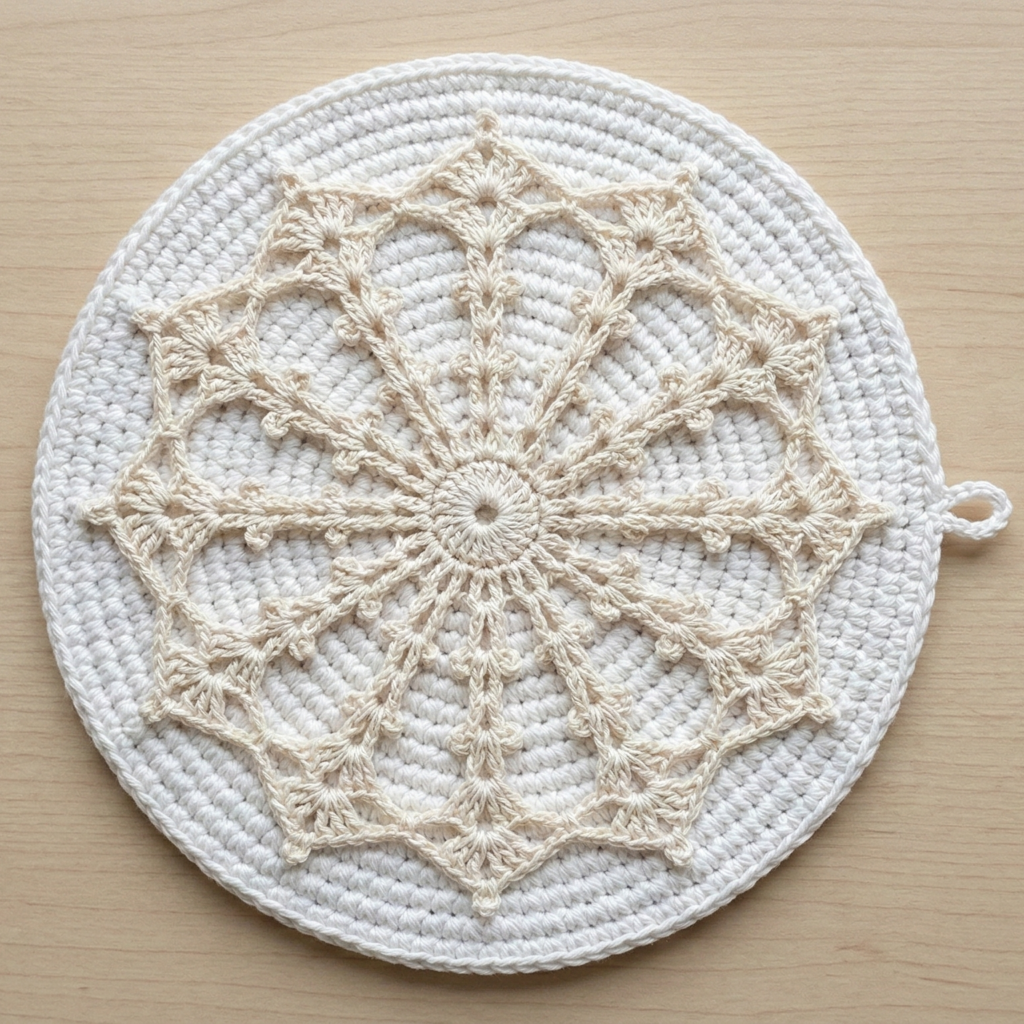
A lacy, decorative snowflake motif worked into a sturdy base — pretty for winter table décor. Use thicker cotton and a lining for heat safety.
Finished size: ~8″ diameter
Skill level: intermediate → advanced (lacy stitch & shaping)
Materials
- Sport or DK cotton (white/cream), 4.0–4.5 mm hook, Insul-Bright or batting + lining, spray starch optional
Construction overview
Work a solid round base for heat resistance, then crochet a lacy snowflake motif on top (or work the snowflake integrated into the final rounds). Back with Insul-Bright.
Step-by-step
A — Solid base
- Work a dense circle in sc up to ~6.5–7″ diameter (follow increase method). This serves as the thermal core.
B — Snowflake overlay (worked separately and sewn on)
- Make a central small motif (MR, 8 sc).
- Work 6 spokes: ch long chain from center (e.g., ch 10), then slip stitch back into the center to form spoke. On each spoke, work tiny picot loops or shells: sl st, ch3, sl st at regular intervals and secure. Make 6 identical spokes and connect them at outer ring by sl st to a round of loops worked onto a small ring. This creates the snowflake look.
C — Attach overlay
- Pin overlay to base and sew carefully through center and at each spoke junction. Avoid too many holes — use small stitches that don’t create big gaps.
D — Insulate & backing
- Sandwich with Insul-Bright and lining as usual. Optionally spray with mild starch while pinned to open lace, but ensure starch is fabric-safe and dry thoroughly.
Variations & tips
- Make a set in silver/metallic cotton blends for holiday glam, but keep metallic yarns away from direct heat — line them well.
- For a sturdier look, make snowflake motifs from thicker cotton and work them as appliqués.
5. Crochet Strawberry Inspired Pot Holder Pattern
A sweet berry motif with a textured seed pattern — bright and summery.
Finished size: ~8–9″ diameter (round) or square
Skill level: confident beginner → intermediate
Materials
- Red, green, and light yellow cotton yarn, 5.0 mm hook, Insul-Bright and lining
Construction overview
Make a red round base, add yellow French knots or small embroidered seed stitches, sew on a green calyx, finish with lined backing.
Step-by-step
A — Base (round)
- Work flat round as in Pizza pattern to reach ~8″ diameter using red cotton.
B — Seeds
- Use light yellow or cream yarn and a yarn needle to embroider tiny seed stitches: stitch small vertical satin stitches or French knots randomly across the red surface to suggest seeds.
C — Calyx (green top)
- Make 4–6 small leaf petals: ch6, sc5 back across to make a curved petal; or make small pointed leaves as apricot-shaped triangles; sew them in a ring at one edge of the round to look like a strawberry top.
D — Insulation & finishing
- Add Insul-Bright and lining as usual. Sc around the edge to catch the layers.
Variations & tips
- Make a set of fruit pot holders — strawberry + lemon + orange — for a kitchen theme.
- Add a felt backing if the embroidered knots are scratchy.
6. Crochet Spring Circle Pot Holder Pattern
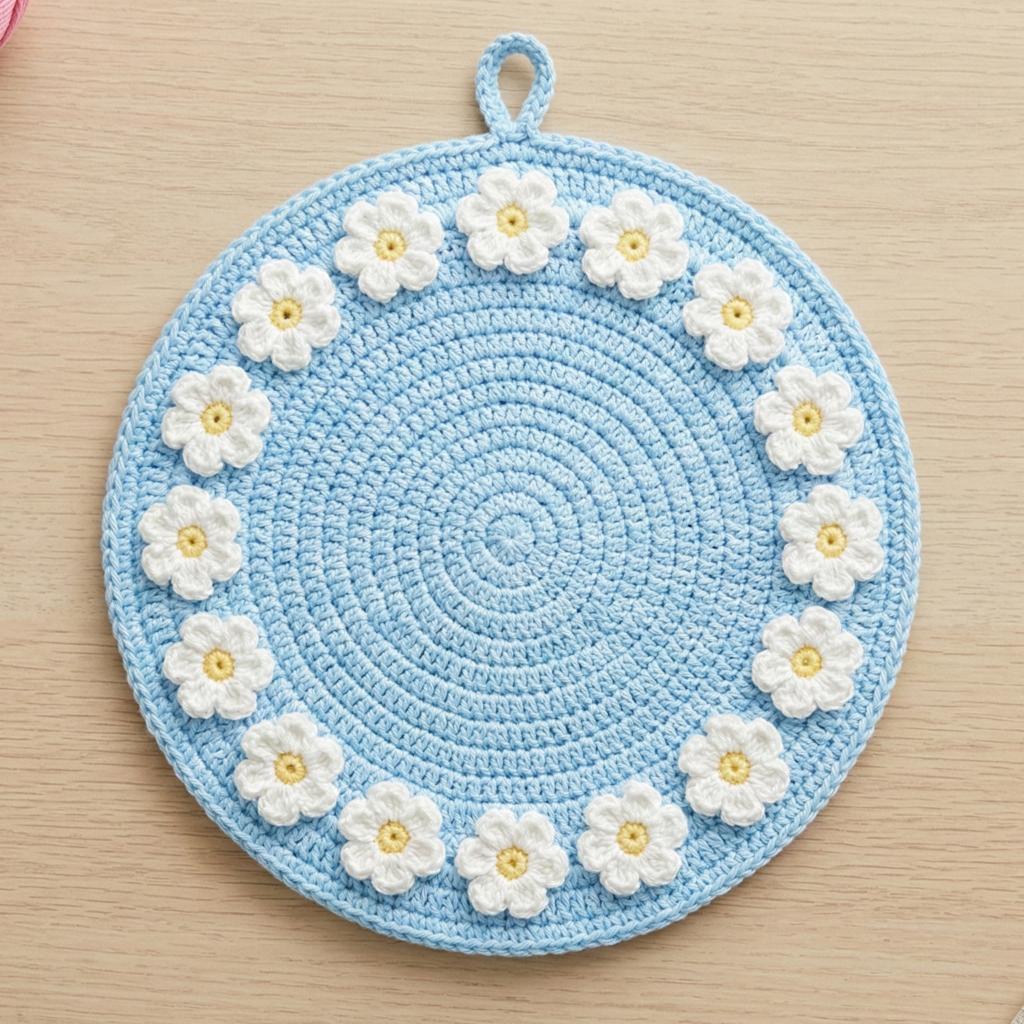
A bright round with a ring of small flowers around the edge — cheerful, easy to customize.
Finished size: ~8–9″ diameter
Skill level: confident beginner
Materials
- DK cotton in main color + small contrast for little flowers, 4.5–5.0 mm hook, Insul-Bright + lining
Construction overview
Work the main round base, then crochet/attach small flower motifs evenly spaced around edge, join, and add lining.
Step-by-step
A — Main round base
- Work flat round to desired diameter (see earlier rounds method).
B — Little flower motifs (make 8–12)
- MR, ch1, 6 sc in ring. R2: ch3, sl st in next st around to make loops. R3: in each loop work (sc, hdc, 3 dc, hdc, sc) to form tiny petals. Fasten off leaving tails.
C — Attach flowers
- Pin flowers evenly around outer round (use ruler to space or count stitches: if you have 48 outer stitches and want 8 flowers, place one every 6 stitches). Sew flowers to the base with small stitches. Add a button or bead center if desired.
D — Insulate & finish
- Add Insul-Bright/layer and sc edge.
Variations
- Use multi-colored flowers; make a matching trivet set.
7. Wavy Ripple Square Pot Holder Pattern
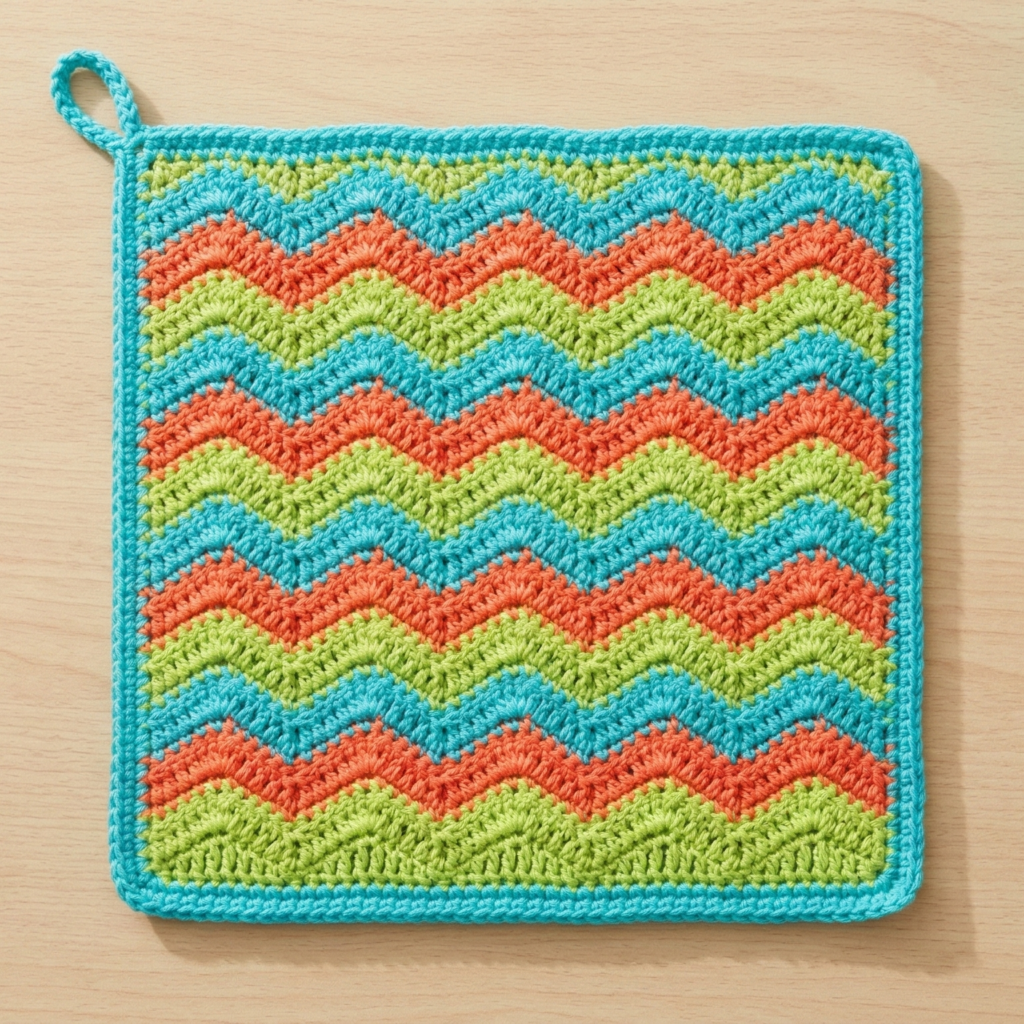
Textural ripple waves in bright colors — dense and pretty when worked in hdc or sc ripple.
Finished size: ~9″ square
Skill level: confident beginner (ripple pattern)
Materials
- 2–3 colors DK/worsted cotton, 5.0 mm hook, Insul-Bright + lining
Construction overview
Work a ripple (chevron) pattern with hdc or dc that makes a firm fabric; work to square size, line, and finish.
Step-by-step
A — Swatch & chain
- Ripple repeats usually require a multiple of 14 + offset depending on pattern; pick a standard ripple repeat or adapt. For an 9″ width and gauge of 4 hdc = 1″, chain accordingly.
B — Ripple pattern sample (hdc version)
- Chain foundation (e.g., 58 ch). Row1: hdc across. Row2: (hdc2tog over next 2, hdc in next 7, increase over next st (2 hdc in same st), hdc in next 7) repeat across to form peaks and valleys. Work rows until square size reached (approx 36 rows for 9″ if gauge 4 rows = 1″). Keep tension firm.
C — Edging & lining
- Sc around the edge. Add Insul-Bright and backing as described.
Variations & tips
- Make rainbow ripples or tonal blues for coastal look.
- For extra stiffness, work in double-thickness: seam two ripple panels together with insulation between.
8. Crochet Tiny Hearts Pot Holder Pattern
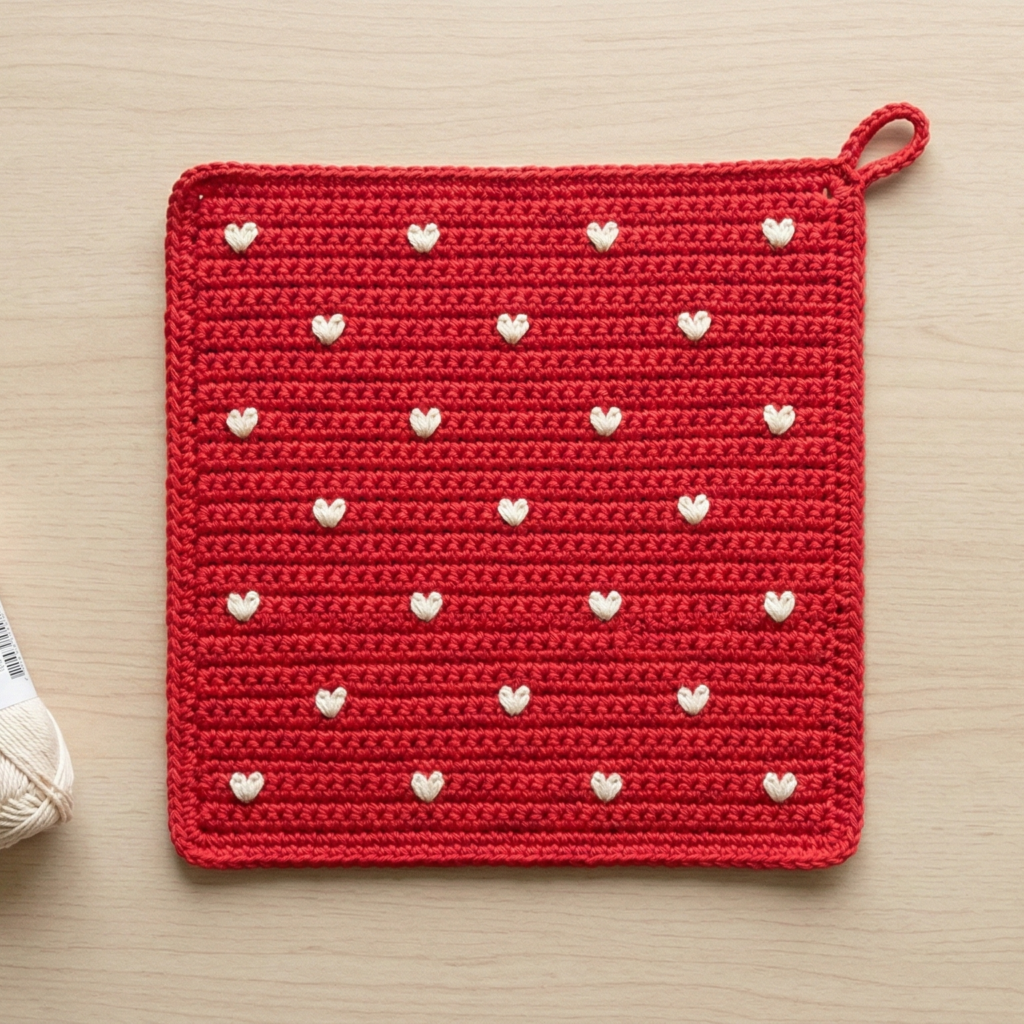
Quilted-look small hearts repeated over the surface for an all-over cute design.
Finished size: ~8–9″ square
Skill level: intermediate (small motif repetition)
Materials
- DK cotton in background color + heart color, 5.0 mm hook, Insul-Bright + lining
Construction overview
Work a background fabric of sc or moss stitch, then add many tiny hearts either as appliqués sewn on, or worked as little clusters integrated into the final rounds (surface crochet cluster hearts). I’ll describe appliqués because they’re easier.
Step-by-step
A — Background square
- Chain to desired width (e.g., with 4 sc/in and 9″ target → 36 sc). Work sc rows until square is 9″.
B — Tiny heart appliqués (make 12–20)
- Ch5; R1: sc in 2nd ch and next 3 (4 sc). Turn. R2: ch1, sc across (4 sc). Turn. R3: sc2tog twice to make a diamond tip and shape into a heart by folding and sewing rounded top. Or follow a tiny heart motif: MR, ch1, 6 sc; ch3, 3 dc in same st, ch3, sl st in next for two lobes. Make as many hearts as you like.
C — Arrange & sew
- Lay out hearts in rows spaced evenly. Sew securely through hearts and background with small stitches.
D — Insulation & edge
- Add Insul-Bright and lining. Sc around edge and add a hanging loop.
Variations & tips
- Alternate heart and blank block rows for a pixel-art effect.
- Use contrasting colors for a bold look or tone-on-tone for subtle texture.
Final finishing & care — general notes for all patterns
- Always line with Insul-Bright or quilted cotton batting + cotton fabric for real heat protection. Make sure the insulation is not visible and is fully enclosed.
- Sew securely: when attaching appliqués or surface stitches, use sturdy sewing thread and make multiple passes so they don’t pull off during washing.
- Edge finishing: a round of sc around the final piece both tidies and bonds the crochet to the lining. Work a small hanger loop at a corner.
- Washing: cotton pot holders are machine-washable (gentle), but if you used glued cork or metal buttons, remove them before laundering. Dry flat or tumble low per yarn instructions.
- Testing: before using with very hot cookware, test the pot holder with oven mitt gloves to ensure heat transfer is acceptable for your chosen materials.
conclusion
There you have it — eight cute and functional pot holder patterns you can make for your kitchen or gift to friends: tulip-and-flower motifs, modern checkered squares, novelty pizza and strawberry designs, thoughtful winter snowflakes, fresh spring rings, wavy ripples, and a sweet tiny-hearts all-over pattern. Each pattern was written for cotton yarn and encourages lining with heat-resistant batting (Insul-Bright) or quilted cotton for real protection — safety that matters.