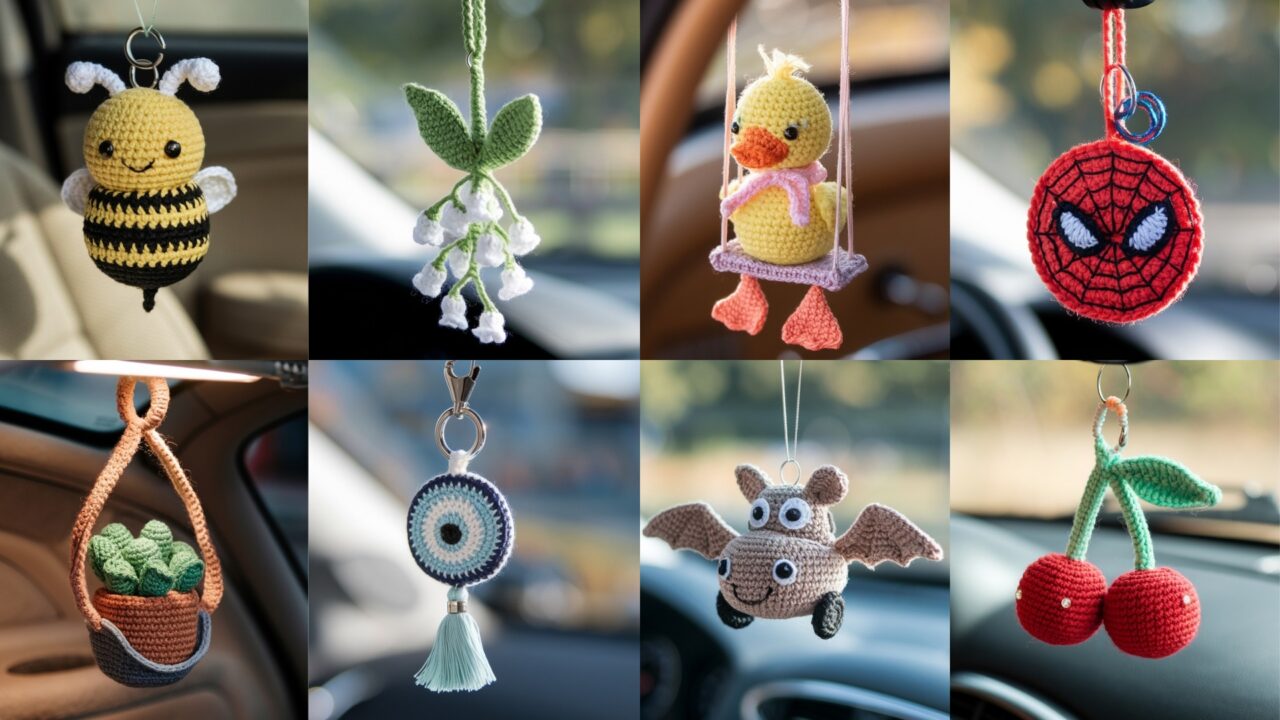
Car hangings are tiny wins: they personalize your ride, make the rearview feel less bleak, and they’re small enough to finish in an evening. But they live in a rough environment (sun, friction, dunking in pockets), so use sturdy yarn, tight tension, and secure attachment points. Each pattern below is designed to be durable and light so it hangs nicely without obstructing your view.
Important safety & materials notes (read this; it matters)
- Visibility first: Never hang anything that blocks your view or can swing into sightlines. Keep hangings small and sit them so they hang below the mirror line and slightly to one side. Don’t attach heavy metal bits that could become projectiles.
- Yarn choice: Use cotton or cotton-blend for structure and UV resistance. Acrylic dissolves in sun over months; cotton holds shape. For fuzzy characters (bee, duck), choose a cotton/acrylic blend but keep trim minimal.
- Hook & tension: Use a slightly smaller hook than yarn label to create firm stitches that handle handling.
- Stuffing: Low-loft polyfill, a few scraps of yarn, or felt stuffing — not heavy.
- Hardware: 25–40 mm split ring or small lobster clasp for easy hanging; thin cord (braided cotton) for loops. For swing mechanisms (duck), add a short jump-ring chain and small brass swivel if you want real movement.
- Attachment method: Sew a reinforced yarn loop into the top of the piece (through body, not just surface), or use a small metal eyelet (installed on a reinforced felt backing) if you expect heavy use.
- Tools: tapestry needle, stitch marker, small pliers (for jump rings), optional small hot-glue for hiding knots (use sparingly).
- Sizing: Target finished hanging weight under ~40 g; diameter/height about 3–5″ (7.5–12.5 cm) for safety. I give finished sizes.
1) Crochet Lily of the Valley Car Hanging Pattern
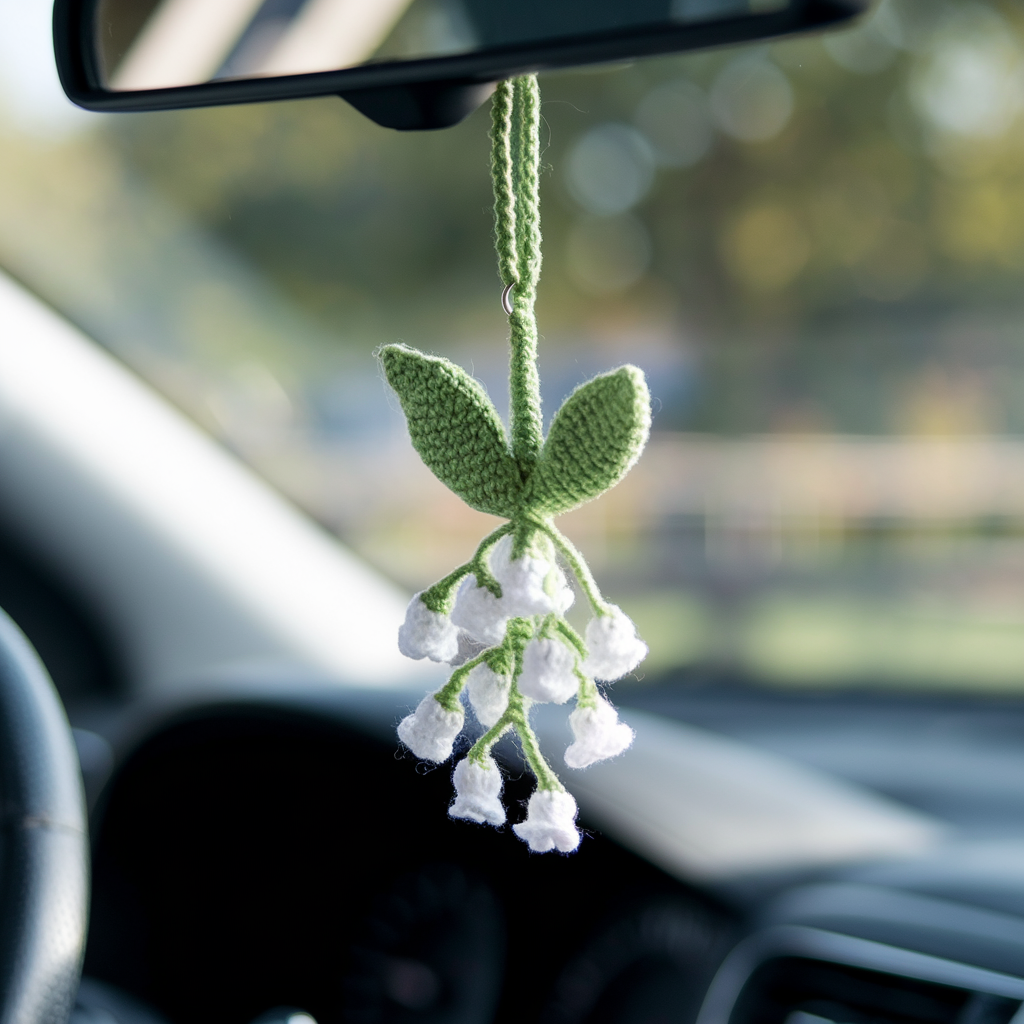
Delicate, charming, and surprisingly robust if you use cotton. Looks elegant, smells like spring (well, until your air freshener does the heavy lifting).
Skill level: Confident Beginner
Materials:
- Fingering/sport cotton (white & green): ~20–30 yds white, 10–15 yds green.
- 2.75–3.5 mm hook (use smaller for denser bells).
- Small amount polyfill or scrap yarn.
- 30 mm split ring + 12–18″ of thin braided cotton cord for hanging loop.
Finished size: stem length ~4.5–5.5″ (11–14 cm) including loop; each bell ~1″ (2.5 cm) diameter; cluster width ~2–2.5″ (5–6.5 cm).
Construction overview
Make small bell-shaped flowers (worked in rounds), a short curved stem in green, join 3–5 bells to the stem, add a top leaf or two, reinforce and make hanging loop.
Stitch abbreviations
MR = magic ring; sc = single crochet; hdc = half double crochet; dc = double crochet; sl st = slip stitch; inc = 2 sc in same st; FLO/BLO where noted.
Step-by-step
Bell (make 4–5) — white, worked in continuous rounds (no join alternative)
- MR, R1: 6 sc into MR. (6)
- R2: inc around (12).
- R3: sc, inc around (18).
- R4: 2 sc, inc around (24).
- R5: switch to dc rounds to flare: ch2 (counts as hdc), 2 dc in next st, ch1, skip 1 st repeat around for decorative scallop — or for a tidy bell: ch2, (2 dc, ch 1, 2 dc) in every 3rd st to make a fluted rim. Fasten off leaving a 6″ tail for sewing. Slightly stuff with single small puff in the top if you want a slight dome; normally bells are light and hollow.
Stem — green
- Ch 20 (or length to desired curve), join into a loop for stiffness OR work i-cord: ch 4, sc back for several rows to make a thin tube (works as stem). For a curved effect, before finishing, damp-block the stem around a pencil and dry.
Leaves (make 2)
- Ch 6, sc in 2nd ch from hook, hdc, 2 dc in next st, hdc, sc, sl st to finish — shape into a small leaf. Fasten off.
Assembly
- Arrange bells along one side of stem spaced 6–8 sts apart; sew each bell’s top (the center) to stem, using the sewing tail. Reinforce by passing needle through stem and bell base 4–6 times.
- Sew leaves to stem near top to cover sewing knots.
- Make a sturdy hanging loop: fold 12–18″ of thin braided cotton in half to make a loop, stitch both loose ends securely through the top of the stem with multiple passes, knot, and hide ends inside stem. Attach split ring on loop.
Finishing & care
- Weave all tails. Optionally add a small dab of clear glue into the final knot for parking-lot longevity. Hand wash cold if needed; reshape while damp. Avoid long sun exposure.
Variations / styling
- Make a single big bell and three tiny bells for a balanced cluster. Use cream or pale blue for vintage vibes.
2) Crochet Halloween Bat Car Hanging Pattern
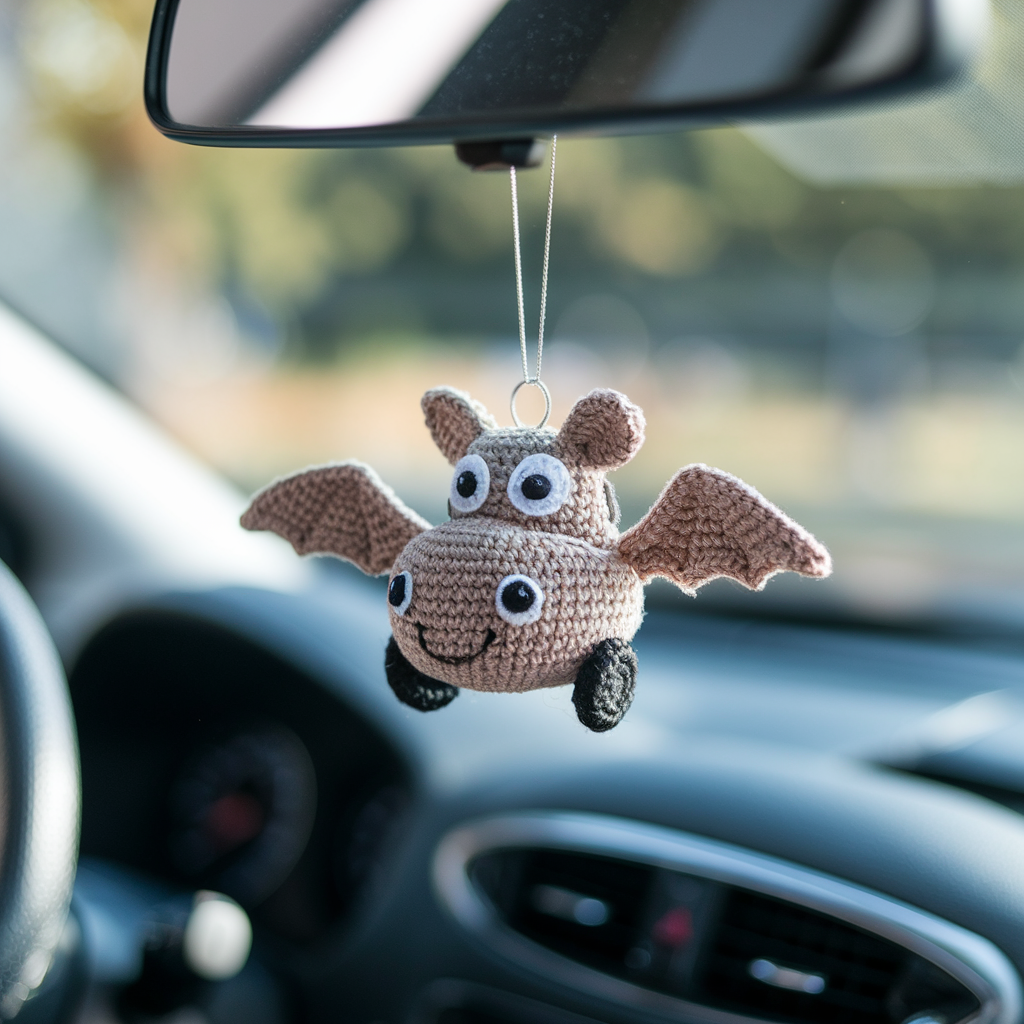
Playful little bat that flips perfectly in the rearview (in a non-scary way). Use darker yarn and a friendly face.
Skill level: Advanced Beginner
Materials:
- Worsted cotton in black and a tiny white for eyes; 30–40 yds black, 5 yds white.
- 3.5 mm hook.
- Polyfill, 25 mm split ring or metal clasp, thin cord for loop.
Finished size: wingspan ~3.5–4″ (9–10 cm); body height ~1.5″ (4 cm).
Construction overview
Make a small round body, two ribbon-style wings worked flat and sewn to the body, petite ears, eyes embroidered. Option for weighted bottom (tiny washer sewn into the bottom inside fabric to stabilize swing) — use caution: if you add weight, enclose it in fabric and ensure it’s secure.
Stitches used
sc, hdc, dc, sl st, MR, dec.
Step-by-step
Body (amigurumi ball, small)
- MR, R1: 6 sc (6). R2: inc → 12. R3: sc, inc → 18. R4–R5: sc around (2 rounds). R6: sc, dec → 12. Stuff lightly. R7: dec around to close. Fasten off leaving long tail.
Wings (make 2) — worked flat in rows for a scalloped bat wing
- Ch 16. Row1: sc in 2nd ch from hook and across — 15 sc. Row2: ch2, turn, hdc across. Row3–Row4: work a scallop edge by placing (dc, ch2, dc) in every 5th stitch to create 3 scallops across top, or shape the wing with increases and decreases to form bat-curved edge. Aim for airy but structured wing. Fasten off leaving long tail for sewing.
Ears
- MR, 4 sc, fasten off. Flatten and sew to top of body.
Assembly
- Position wings on body sides; sew securely with many passes. The wing seam should be strong because the wings move when car jukeboxes play.
- Add a tiny embroidery for eyes (two white stitches + black French knot pupil) or use mini safety eyes (danger for small kids, so sew tightly or avoid).
- Create hanging loop through top of body with doubled cord; thread split ring onto loop.
Optional swing
- For a little boogie, attach a tiny jump ring at bottom of bat body and dangle a short beaded chain (3–4 beads) so the bat sways and has personality when the car accelerates.
Finishing & care
- Hide knots and weave tails into body. Hand wash only for black yarn to limit bleeding; air dry.
Style notes
- Use variegated purple-black for a gothic-but-playful bat. Add a felt lining for extra sun protection.
3) Crochet Swinging Duck Car Hanging Pattern
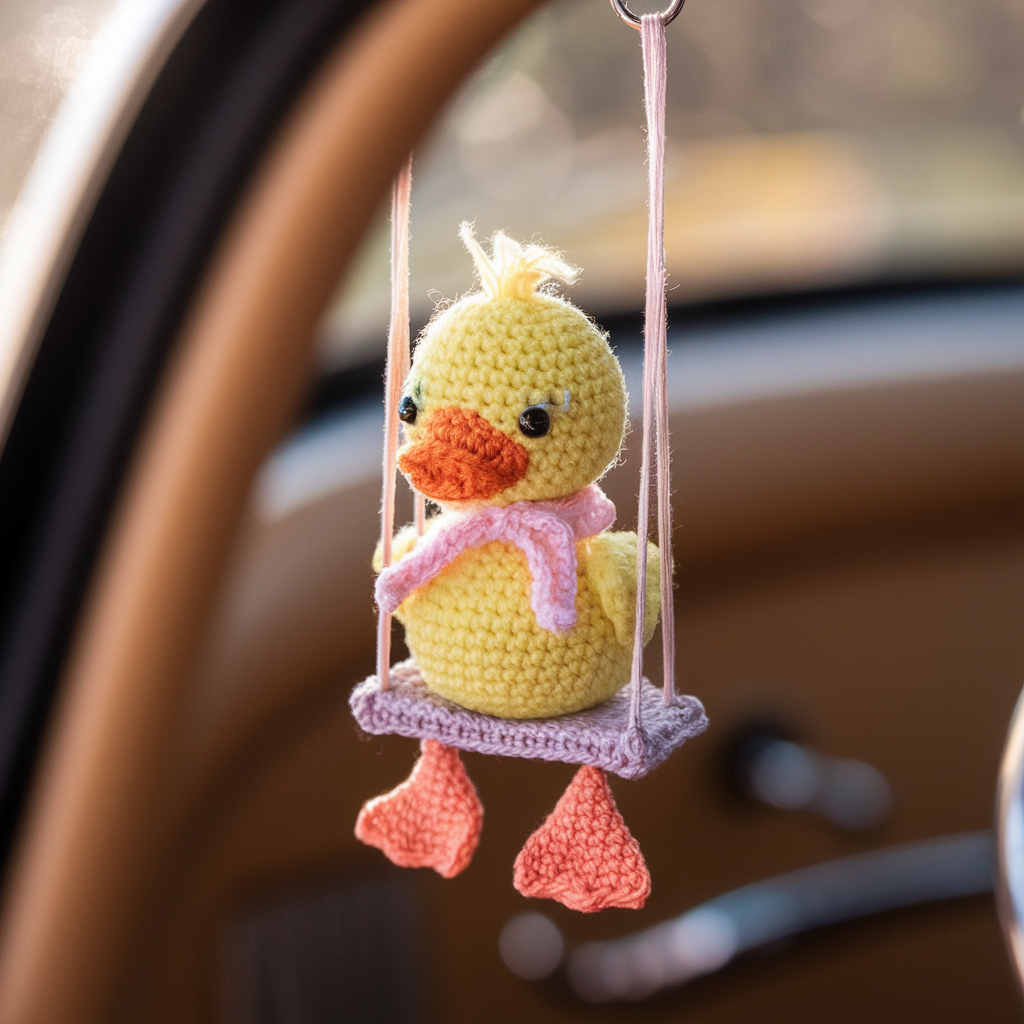
A tiny duck with a real swinging body — uses a short swivel chain so the duck bobs with movement. Slightly more mechanical but satisfying.
Skill level: Intermediate (simple joint + swivel)
Materials:
- Worsted cotton yellow, orange (beak), white for eyes, small amount polyfill.
- 3.5 mm hook.
- 20–25 mm split ring for top + 1 small swivel or tiny brass jump chain with swivel connector (available in jewelry supply) for the swing.
- Small washer or inside reinforcement disc (felt).
Finished size: duck height ~3.5″ (with swivel) and width ~2–2.5″.
Construction overview
Make 2 body parts: head/upper torso (top piece) and bottom/feet piece (bottom) that hang below on a small swivel so the bottom swings. Join them with a short chain/jump ring to allow movement.
Step-by-step
Head & upper torso (top piece)
- MR, R1: 6 sc. R2: inc → 12. R3: sc, inc → 18. R4: sc around 18. Before closing totally, embed a small felt disc inside to distribute stitch forces (this prevents the hanging loop from tearing through). Close and leave a tail for attaching swivel at the bottom of head (where neck would be). Sew a small orange beak (flat triangle) onto front and embroider eyes.
Lower body (bottom piece)
- Ch 8, join to a loop, or make a flat oval base then build height: MR, R1: 6 sc. R2: inc → 12. R3–R4: sc around 12 (for squat bottom). Flatten and make two tiny webbed feet: ch5, sc back across, join to base and reinforce. Fasten off leaving tail for sewing.
Swivel & hanging mechanism
- Attach a short length of chain (1–1.5″) or a small brass swivel to bottom of head piece via small stitched organic loop (sew through felt disc and head for reinforcement). On the other side of swivel attach the top of lower body using a small jump ring so it dangles freely. This allows the bottom to swing while head remains near mirror.
- For the overall hanging, attach the split ring to the top of the head via a stitched loop.
Assembly
- Sew lower body to swivel with secure passes — the joint is where stress concentrates so stitch through the felt washer and yarn multiple times.
- Add a tiny scarf or ribbon as decoration — ensure it’s short so it doesn’t tangle.
Finishing & care
- Ensure swivel is rust-resistant (brass or stainless). Hand wash only and dry fully to prevent the metal from rust. Check swivel periodically and replace if it loosens.
Variation
- Make rubber-ducky colors or add embroidery features (eyeswinkles, polka dot scarf).
4) Crochet Car Hanging Plant Pattern
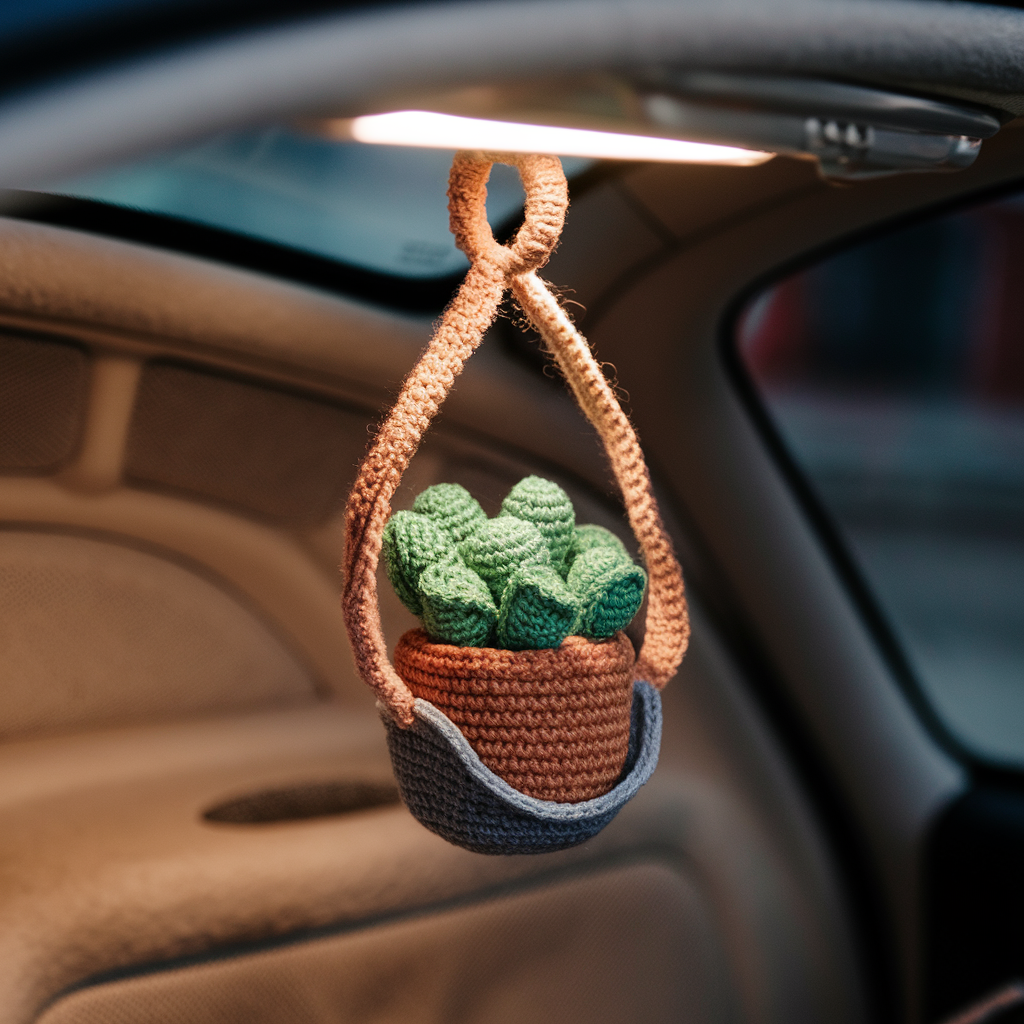
Charming faux plant in a tiny crocheted pot — zero watering required and zero guilt.
Skill level: Confident Beginner
Materials:
- Worsted cotton: pot color (brown/terracotta) 20–30 yds, plant color (varied greens) 15–25 yds.
- 3.5–4.0 mm hook.
- Small amount polyfill or felt disc for base.
- Thin cord and 25–30 mm split ring for hanging.
Finished size: pot diameter ~1.75–2.5″ (4.5–6.5 cm); plant height ~3–4″.
Construction overview
Crochet a small cylindrical pot (tube), fill with a felt base or polyfill, crochet succulents/leaves and sew into pot, then add hanging loop.
Step-by-step
Pot (worked from bottom up)
- MR, R1: 6 sc. R2: inc → 12. R3: sc, inc → 18. R4: 2 sc, inc → 24. R5: 3 sc, inc → 30 (stop when base diameter ≈ desired size).
- Work even sc rounds in the round until pot height ≈ 1.25–1.5″. Finish with 1–2 rounds sc in BLO for folded lip (makes a neat rim). Fasten off and weave tail inside.
Felt base
- Cut a small round felt disc to fit bottom and glue inside with fabric glue (or sew); this gives stability and prevents stuffing from migrating.
Leaves / succulent elements (make multiple)
- Simple paddle leaf: ch 6, sc back across, hdc in next, 2 dc at widest, hdc, sc, sl st. Fasten off and shape with a few wet-blocking spritzes.
- Rose succulent (rosette): make chain of 20, sl st into ring of the chain repeatedly to roll into a rose, sew base to pot interior. Or make layered petals by crocheting small rounds of sc/dc in graduated sizes and sewing together in a spiral.
Assembly
- Arrange leaves and rosette inside pot; sew secure with multiple passes to pot rim and felt base. You can hot-glue lightly for instant hold, but hand-stitch for durability.
- Add a hanging loop behind the pot by sewing a doubled cord through the back of pot and tying strong knots inside (back stitching into felt prevents ripping). Attach split ring to loop.
Finishing & care
- Dust occasionally; if it gets dirty, spot clean with a damp cloth. Avoid long sun exposure to reduce fading.
Variations
- Make a mini trailing plant (like string-of-pearls) by crocheting a small cord with tiny bead pearls attached and let it drape.
5) Crochet Evil Eye Car Hanging Pattern
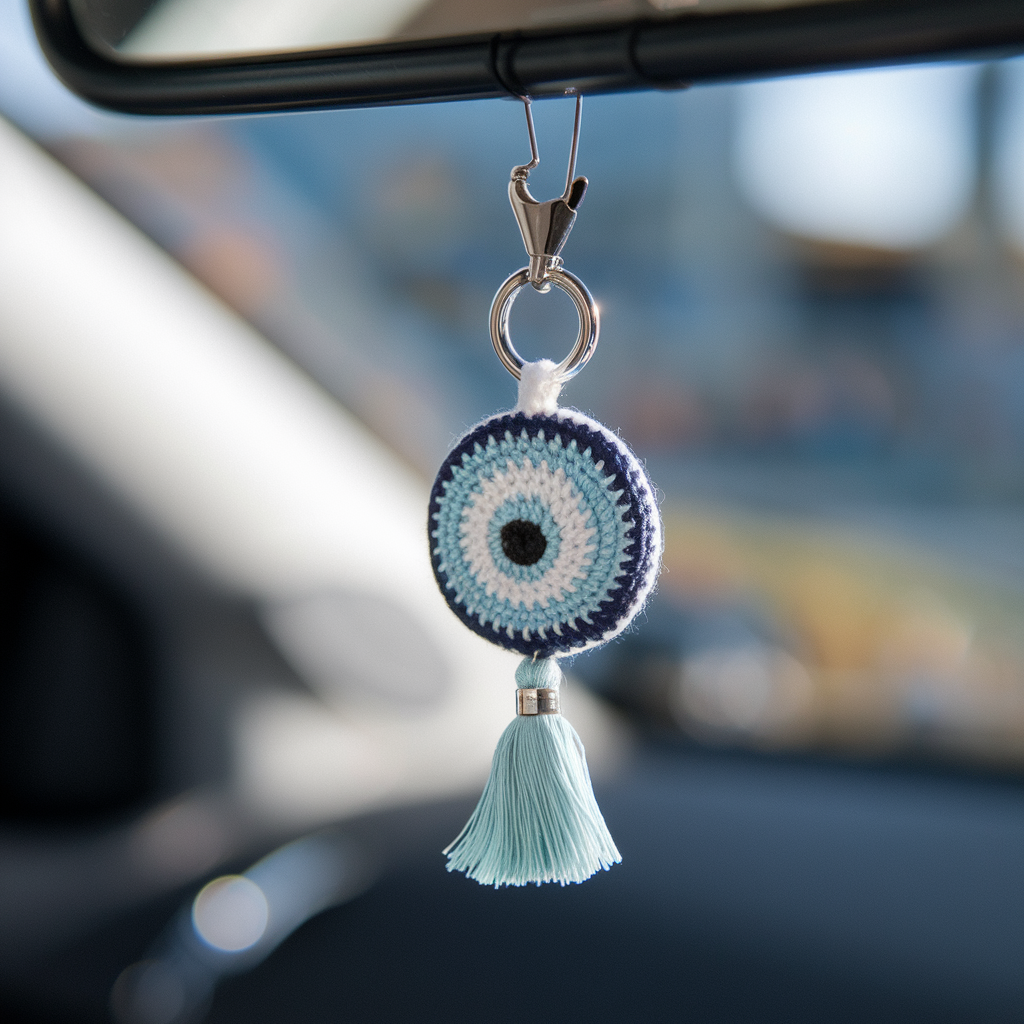
Tiny protective (and stylish) charm—use bead or embroidery for the pupil. Avoid religious claims; think of it as a colorful talisman that looks great.
Skill level: Confident Beginner
Materials:
- Fingering cotton in white, light blue, navy, black — small amounts (20–40 yds total).
- 2.5–3.5 mm hook for compact rounds.
- Small glass bead or French-knot embroidered pupil.
- Split ring or small tassel for finishing.
Finished size: diameter ~1.5–2″ (4–5 cm).
Construction overview
Make a flat concentric circle (rounds) in color bands representing white → light blue → navy → black center; optionally stiffen with a backing and add a tassel.
Step-by-step
Concentric circle (worked in rounds)
- MR, R1: 6 sc (white center). R2: inc around → 12. R3: sc, inc → 18 (complete white band). Change to light blue: R4: 2 sc, inc → 24 (light blue band). R5: switch to navy and work 1–2 rounds even to create thicker band. R6: work 1 round in black purchased beads or leave a 6-st circle for pupil. Sew a tiny black bead or embroider center. Fasten off leaving tail.
Backing & finishing
- For stability and longevity, cut a circular felt backing slightly smaller than the eye and blanket-stitch it around back with coordinating thread. This hides knots and provides reinforcement for the hanging loop.
- Make a small tassel in matching color and attach at bottom, or attach a small charm (metal). For hanging, sew a reinforced loop at top and add split ring.
Care
- Spot clean; if too sunny, the blue may fade slowly over months — keep it shaded or use colorfast cotton.
Variations
- Make a pair with alternating colorways (turquoise/gold) to match your interior.
6) Crochet Bee Car Hanging Pattern
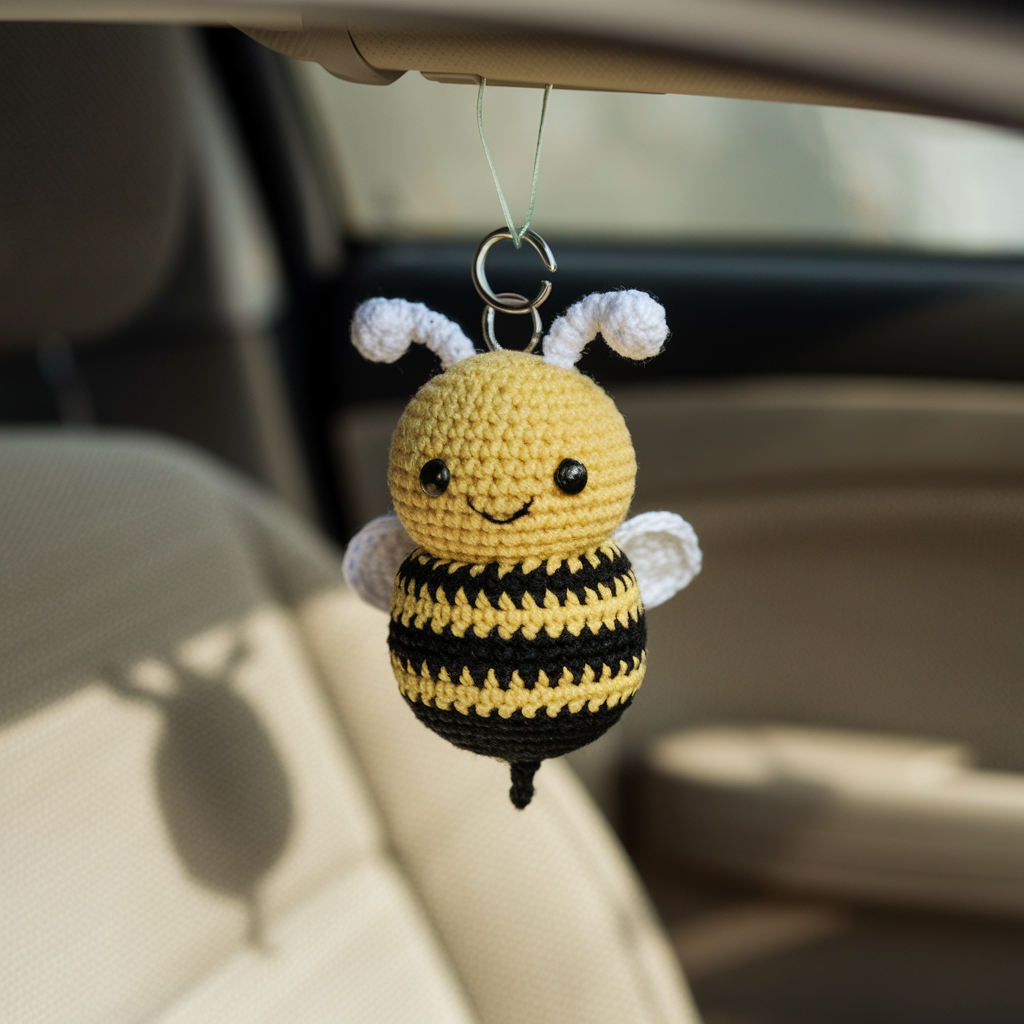
Cute, buzzy, and bold — black & yellow stripes with tiny wings. A classic, but don’t let it sting the rearview.
Skill level: Advanced Beginner
Materials:
- Worsted cotton in black, yellow, and a small amount of white for wings.
- 3.5 mm hook.
- Small amount polyfill.
- Split ring + optional small bell (safety-limited — only if not irritating).
Finished size: wing-to-wing ~3–3.5″ (8–9 cm); body length ~2.5″.
Construction overview
Amigurumi-style body with horizontal stripes, two small wings sewn on top, embroidered eyes and smile, reinforced hanging loop.
Step-by-step
Body (striped)
- In yellow MR, R1: 6 sc. R2: inc → 12. R3: sc, inc → 18. R4–R5: sc (2 rounds) in yellow. Change color to black R6–R7: sc (2 rounds) in black. Alternate color every 2 rounds until body length ~2.5″. End with a yellow round. Decrease last 2 rounds to close lightly. Stuff before finishing.
Wings (make 2)
- Ch 7, Row1: sc in 2nd ch from hook across (6). Row2: inc in 1st st, sc 4, inc in last st (8). Row3: sc across 8. Make a small picot or sl st edge; fasten off. Sew wings onto body top.
Eyes & face
- Embroider two small eyes with black thread or use very small safety eyes (again, if this will live where kids grab, embroider). Add a tiny smile.
Hanging loop
- Make a strong loop at top by crocheting a small I-cord or narrow chain strap folded and sewn through the body top. Attach split ring.
Decoration
- Add tiny stinger (little black cone) at bottom by crocheting 4 sc decreasing into a small cone and sewing.
Finishing & care
- Bees live in sun — cotton will hold but check for color fading. Hand wash and dry flat.
Variations
- Make a mini swarm of 3 bees at different lengths for a sweet cluster.
7) Crochet Cherry Car Hanging Pattern
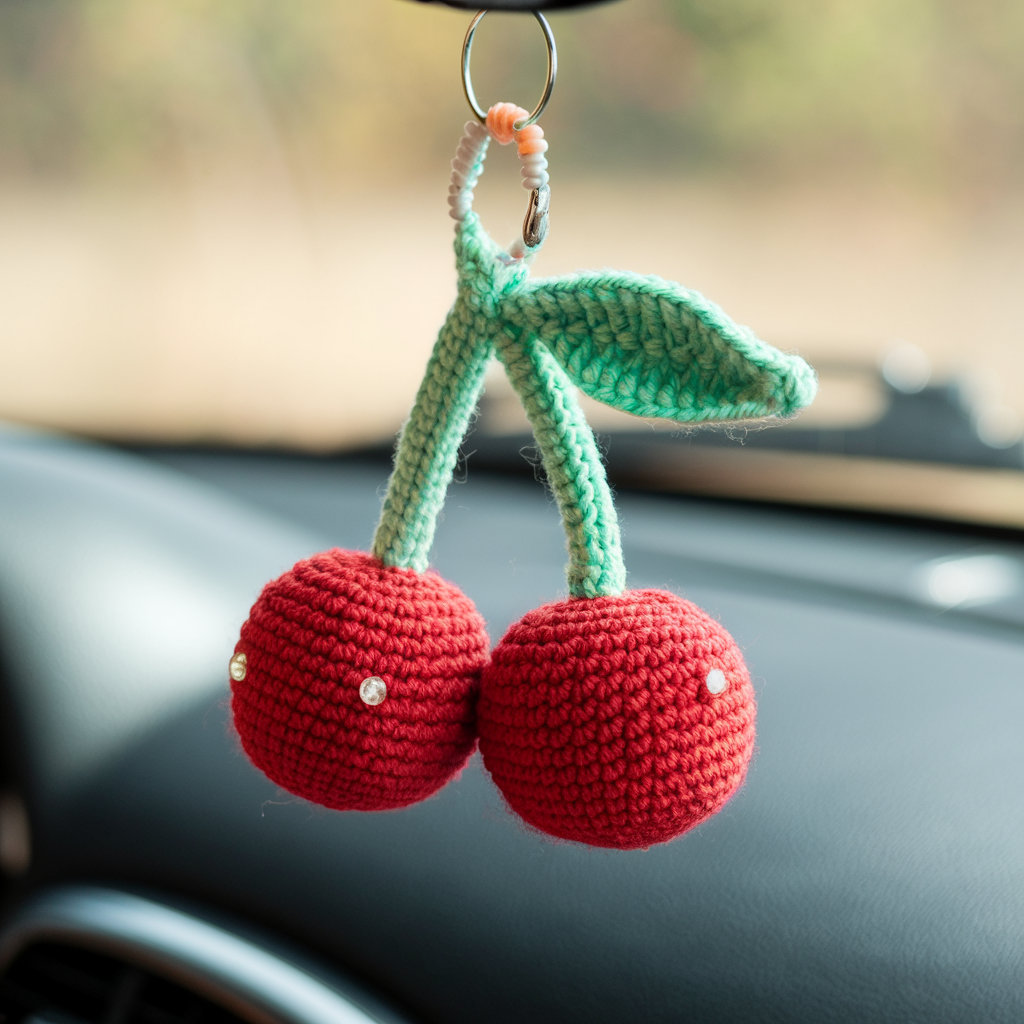
A pair of cherries with a stem — classic, bright, and hangs cheerfully.
Skill level: Intermediate (two small spheres + secure stem)
Materials:
- DK/worsted red (cherries), green for stem, optional brown for accent.
- 2.75–3.5 mm hook.
- Two small beads for glossy highlight (optional), polyfill, split ring.
Finished size: each cherry ~1.25–1.5″ diameter; total drop ~3.5–4″.
Construction overview
Two small amigurumi balls, joined at the top with a crocheted stem loop. Add a leaf or two if desired.
Step-by-step
Cherry (make 2)
- MR, R1: 6 sc. R2: inc → 12. R3: sc, inc → 18. R4: 2 sc, inc → 24. R5–R6: sc around (2 rounds). R7: 2 sc, dec → 18. R8: sc, dec → 12. Stuff firmly. R9: dec around to close. Leave long tail.
Stem & join
- With green, ch 12, sl st back along chain to make a thicker stem (or crochet a short tube). Fold loop and sew through top of both cherries, pulling them close so they sit adjacent but not smashed. Knot securely and weave ends.
- Add a small leaf: ch5, sl st in 2nd ch from hook, sc, hdc, slip st to base. Attach at stem base.
Hanging loop
- Add split ring onto stem loop before finishing or make a double loop and attach ring to top. Reinforce with multiple passes.
Finishing & care
- Sew beads on as glossy highlights or use a whipping of gloss varnish on tiny dots (test on scrap first). Hand wash only.
Variations
- Make cherries in variegated red or piebald for personality; add a tiny crocheted bow.
8) Crochet Spiderman Car Hanging Pattern
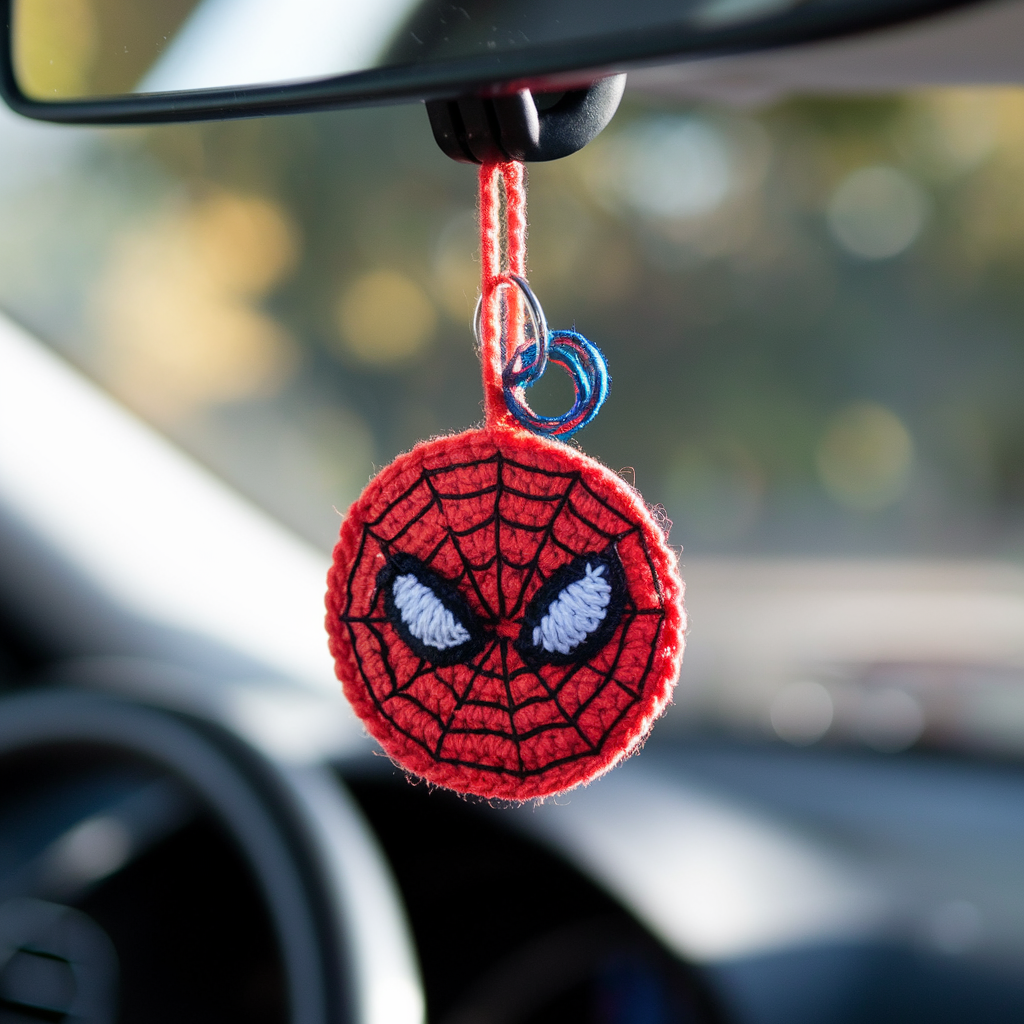
Tiny hero for your mirror. Stylized head with embroidered web lines and felt-backed to keep it flat and durable.
Skill level: Intermediate (shaping + embroidery)
Materials:
- Red and black cotton, small amount of white for eyes, 2.5–3.0 mm hook.
- Small felt backing disk, split ring, embroidery needle.
Finished size: head diameter ~2–2.5″ (5–6 cm); total drop ~2.5″.
Construction overview
Make a flat round disk in red, embroider or appliqué black spider-web lines and white eyes, secure a felt backing for durability and attach the loop.
Step-by-step
Head/disk (worked in rounds)
- MR, R1: 6 sc. R2: inc → 12. R3: sc, inc → 18. R4: 2 sc, inc → 24. R5: 3 sc, inc → 30. If you want a flatter disk, stop at 24 or 30 depending on desired diameter. Fasten off leaving a tail.
Eyes (make 2 white patches)
- Ch3, sc in 2nd ch, sl st — tiny tear-drop shape; or make small ovals: MR, 6 sc, flatten into oval and sew onto red disk.
Web embroidery
- With black thread (fine embroidery / thin beading thread or stranded cotton separated to 2 strands), mark center of disk and draw 6 radiating lines from center to edge (like a wheel). Add curved webbing strips between radiating lines by stitching a series of short arcs. Keep stitches small.
- Sew white eyes onto appropriate positions and outline in black fine stitch to create Spidey-style eye-shapes.
Backing & loop
- Cut a felt circle slightly smaller than disk and glue/sew to back to hide embroidery knots and reinforce.
- Sew or embed a strong loop at top and attach split ring.
Finishing & care
- Because of embroidery and felt, spot clean only. Avoid heavy exposure to sunlight.
Variations
- Make a Mad-Lib style set of Marvel colors (green for Hulk, yellow for Wolverine) to match mood.
Final finishing checklist — because tiny things fail on account of laziness
- Reinforce every knot that bears load — weave it 20–30 beads/rows worth or through fabric multiple passes.
- Hide knots inside body whenever possible (not on exterior) for neatness and strength.
- Use felt backings for flat items with embroidery; it hides knots and protects stitches from friction.
- Check metal: use brass or stainless hardware for rust resistance. If you must use cheap metal, avoid on humid climates or replace periodically.
- Weight: keep it light — under ~40 g. If you add washers for stabilization, encase them fully in felt and stitch them into the stuffing so they cannot come loose.
- Secure loop placement: sew through body core, not just surface; surface loops tear sooner.
conclusion
There you go: eight ready-to-make crochet car hangings that actually hold up. Each pattern is tuned for durability, lightness, and a low chance of being the thing that blocks your rearview mirror during rush hour. Pick the handful that match your vibe — lily-of-the-valley if you’re serene, Spidey if you’re dramatic, duck if you like your charms with a built-in personality — and make sure you sew the loop through the core. If you want, I can turn any of these into printable one-page patterns with row-by-row counts and a materials table for S–M sizes. Tell me which three and I’ll spit them out neat and tidy; otherwise, go make something tiny and ridiculous and then hang it like you mean it.