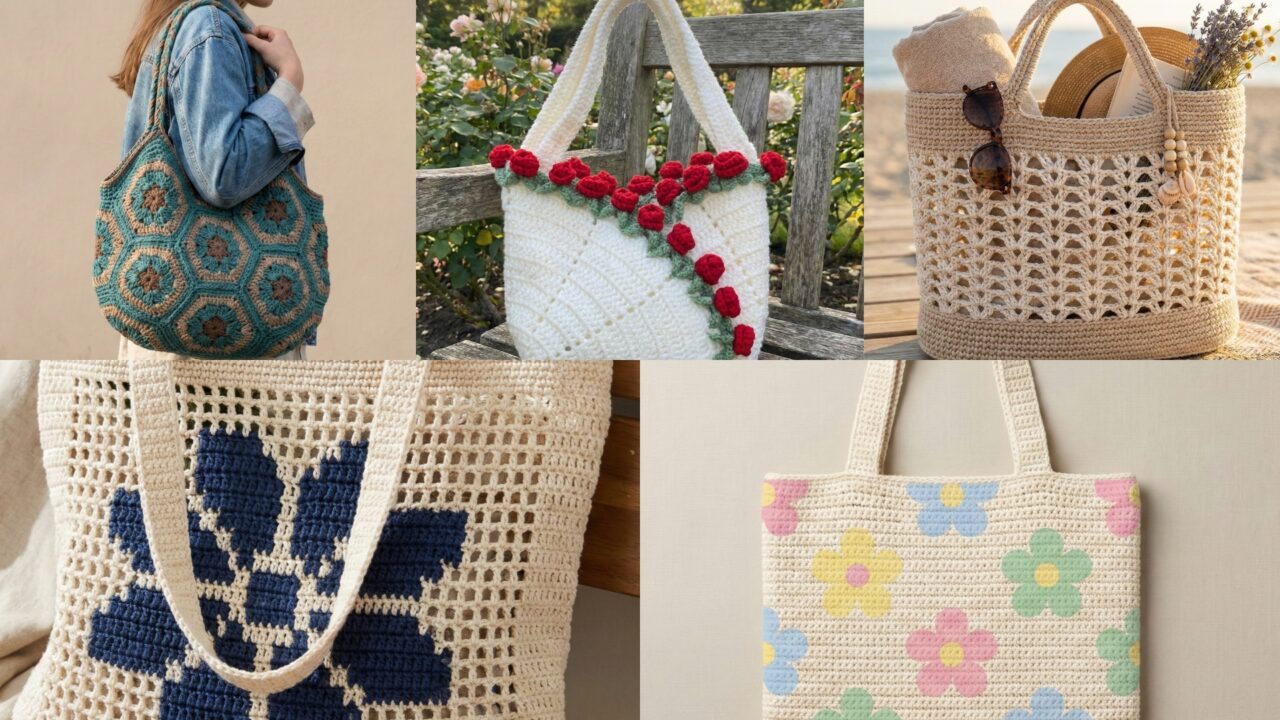
Tote bags are the perfect handmade accessory — useful, customizable, and a great way to show off stitch texture, colourwork or motif-assemblies. Below is a full blog-ready post: a practical introduction (materials, gauge, lining & handles, finishing and care), followed by eight detailed tote patterns with materials lists, skill level, finished-size examples, stitch notes and step-by-step instructions you (or your readers) can follow start-to-finish. Each pattern includes construction choices, sewing/lining advice, and styling ideas so the finished tote looks polished and lasts a long time.
Quick Introduction — yarn, hooks, hardware, sizing, lining & finishing basics
Why crochet totes?
Totes are fast, useful, and let you experiment with texture, colour, and structure. Choose yarn and construction to match how you plan to use the bag: market-shopping, beach, everyday carry, or a special statement piece.
Yarn choices (quick guide)
- Cotton / cotton blends — best for sturdy totes that keep shape and are washable. Great for market and everyday totes.
- T-shirt yarn / rope / bulky cotton — excellent for structured, sculptural totes and for quick builds.
- DK / worsted weight acrylic-cotton — lightweight yet sturdy; good for lined fashion totes.
- Lus-like blends (linen / bamboo) — drapier, elegant for summery printed totes but less structured.
For bags that will carry weight, pick a yarn with low elasticity and good stitch definition (cotton, cotton-blend, rope).
Hooks & tension
- Choose a hook size that produces a dense fabric (usually 0.5–1.0 mm smaller than label suggests) to reduce stretch and gaps. Examples: 4.0 mm for worsted, 6.0–8.0 mm for t-shirt/rope.
- Make a small 4” (10 cm) swatch and measure stitches per inch for long-edge calculations.
Handles & hardware
- Crocheted handles: sturdy, padded straps crocheted and sewn to bag; recommend double-stranded yarn or rope core for strength.
- Leather straps: attach with rivets or sew through a felt/lining reinforcement.
- Round wooden handles: crochet a band that slips over the handle and sew closed.
- Zippers / magnetic snaps: for closure options add small hardware — reinforce with lining and top-stitching.
Lining & stability
- For load-bearing bags (groceries, books), add a fabric lining and a stiff base (cardboard covered with fabric, thin cork, or plastic canvas).
- Lining steps: measure finished bag interior, cut fabric 1/2” smaller than interior on all sides, sew a box bottom if desired, slip inside bag, hand- or machine-sew to top edge, and topstitch or slip-stitch to secure.
Measurements & a quick math example
Decide the finished bag size: e.g., medium tote 15” wide × 12” tall × 4” deep. Swatch gauge (e.g., 4 sc = 1 in). For a 15 in width: 4 × 15 = 60 foundation stitches (or nearest multiple required by your stitch pattern). Always round to match stitch multiples.
Care & durability
- Wash cotton totes on gentle cycle or hand wash, reshape while damp. Avoid overloading heavy bags if you used drapey yarn.
- For heavy use, reinforce handles with extra stitches and a fabric strip under the join.
1. Crochet Summer Boho Tote Bag Pattern
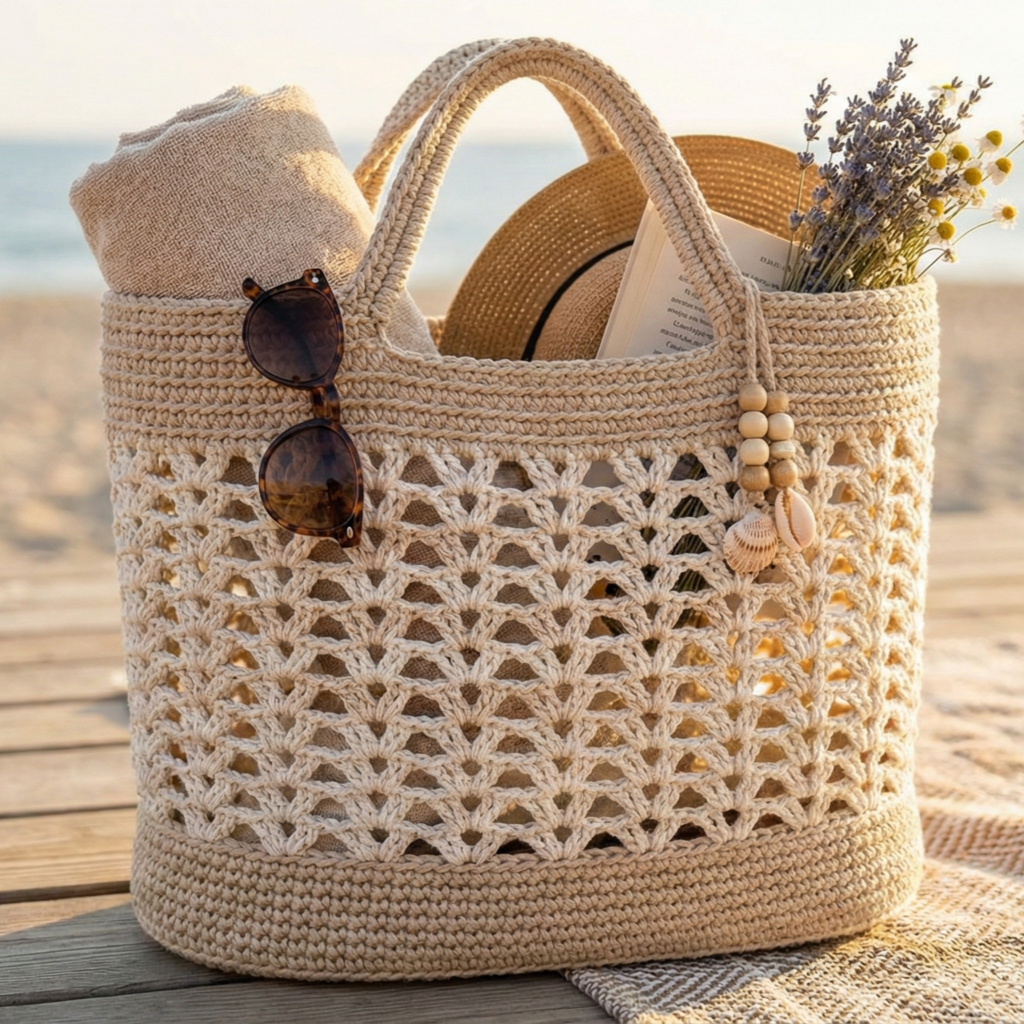
Laid-back, airy but roomy beach tote with openwork body and sturdy base — a summer essential.
Skill level: confident beginner → intermediate
Finished size (example): 17” W × 14” H × 4” D (without handles)
Yarn & tools
- DK cotton or cotton-rope for base (approx. 700–900 yd total), or t-shirt yarn for faster build
- Hook: 5.0–6.5 mm (adjust; smaller for denser stitches)
- Tapestry needle, measuring tape, optional lining fabric & bias tape for handle reinforcement
Stitches & notes
- dc, ch, sc, shell (5 dc), V-stitch (dc, ch1, dc). Work bottom in a dense stitch (hdc or sc) then switch to openwork for body.
Construction overview
- Sturdy round/oval base worked in sc/hdc.
- Even increase rounds to form base width.
- Body worked in attractive openwork (V-stitch shells or lacy rows) up to bag height.
- Strong top band in sc/BLO for stability and handles attached.
Step-by-step
A — Base (oval)
- Foundation: MR + increases to desired base width. Example for oval: ch 36, join to form loop. Round 1: 72 sc around (work 2 sc in each ch to expand). Or start with MR and increase evenly until you reach measurements equal to base width.
- Rounds 2–6: sc in each st around to build base thickness — measure until base equals 17” long dimension when flattened.
B — Sides (start body)
3. One round of sc across base edge to prepare. Begin body: switch to V-stitch openwork: dc in next st, ch 1, dc in same st (V), skip 1 st repeat around; on each round increase in corners if needed to keep shape. Work 12–14 rounds of openwork for airy look. Measure as you go.
C — Top band & handles
4. To make top sturdy, work 3–6 rounds of sc or hdc in BLO to build a band that won’t stretch.
5. Handles (crocheted strap): pick up stitches and sc in rows to desired strap width and length (example strap: chain 80 for approx 20” total strap length with sc rows to make 1.25” wide strap). Fold strap and sew ends into band (through stitches and into lining). For rope handles, create 2 tubes and insert a rope core.
D — Lining & base support
6. For stability: cut a fabric base insert (waterproof nylon or canvas) and a printed lining. Hand sew lining into bag, tack at top and handle joins. Topstitch if desired.
E — Finishing & styling
- Add fringe or tassels along top edge for boho charm.
- Use natural or pastel palette for summer vibe.
Variation
- Use t-shirt yarn for a very sturdy market tote; shorten openwork rounds for a denser bag.
2. Crochet Filet Tote Bag Pattern
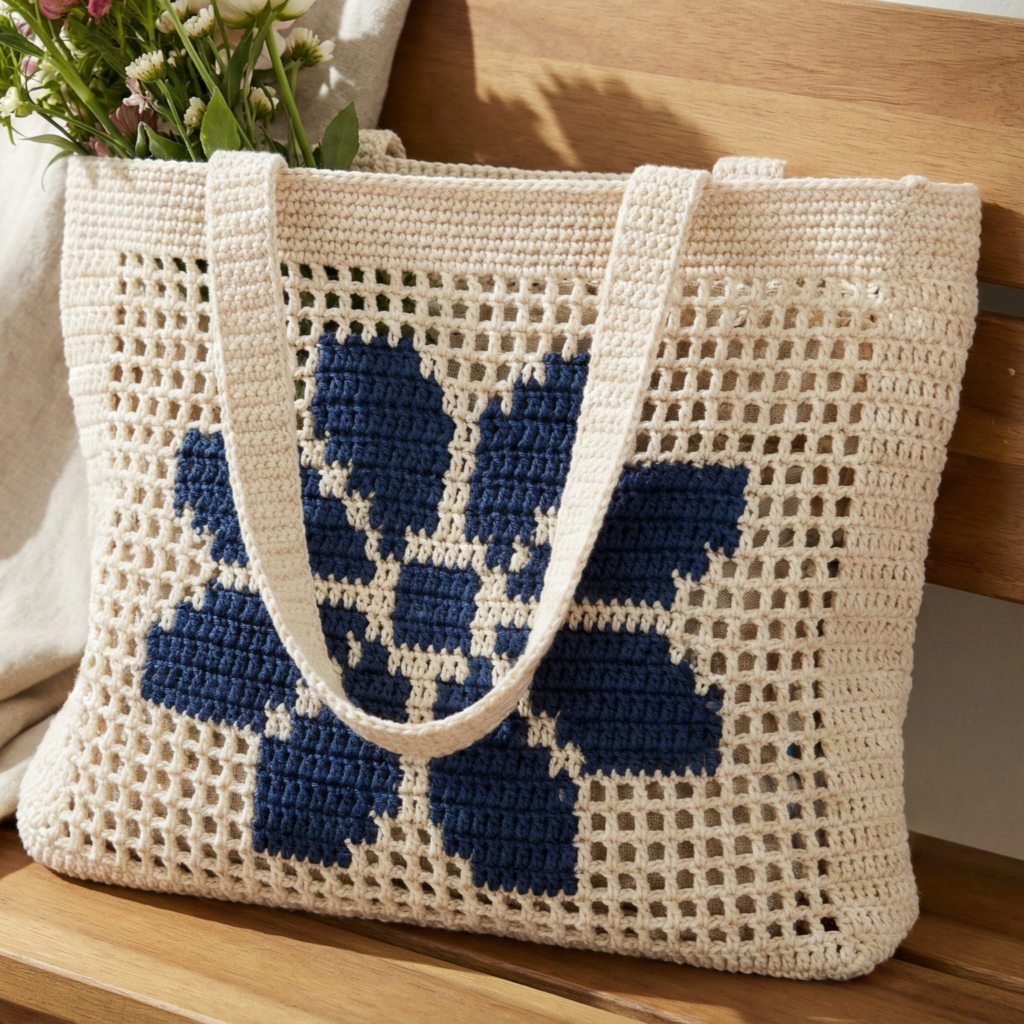
A mesh-style, graphic tote which uses filet crochet to create a bold pattern or typography — lightweight and perfect for market trips.
Skill level: intermediate (chart reading for filet)
Finished size: 16” W × 14” H × 4” D
Yarn & tools
- Sport/DK cotton (approx. 600–800 yd)
- Hook: 4.0–4.5 mm
- Tapestry needle, optional strap hardware
Stitches & notes
- Filet uses a grid of dc + ch1 = open mesh cell and dc dc (or 2 dc) = filled cell. Charts map filled vs open cells.
Construction overview
Work front and back panels flat using filet chart then seam sides and bottom. Add sturdy top band and straps. Lining recommended.
Step-by-step
A — Make a chart
- Create or choose a filet chart (a motif, word, or floral). Compute number of cells across for the desired width: each cell ~ 6–8 mm depending on gauge. Example: 60 cells across at 4 cells/in → 15 in.
B — Work panels
2. Foundation: chain (cells × 2 + turning ch). Example: 60 cells × 2 + 1 = 121 ch (turning ch counts). Row 1: dc in 4th ch from hook & across with ch1 spaces to form mesh. Use chart for filled/open cells: filled cell = 2 dc in cell area, open cell = dc, ch1.
- Continue following chart rows until panel height equals 14 in.
C — Back panel
4. Make second identical panel (or mirrored if your design is asymmetric).
D — Join & finish
5. Seam sides and bottom using sc through back loops for neat join or mattress stitch with yarn for flat seam.
6. Add 4–6 rounds of sc around top edge for stiffening. Add straps: pick up stitches and sc in the round for strap base then work rows to desired width & length.
E — Lining & reinforcement
7. Filet has holes — add lining for groceries or small items. Sew lining in and top-stitch for durability.
Styling
- Use contrasting color for motif (filled cells) against a neutral background for a graphic look.
- Replace a motif with a name or short word for personalized totes.
3. Crochet Large Knitted Tote Bag Pattern
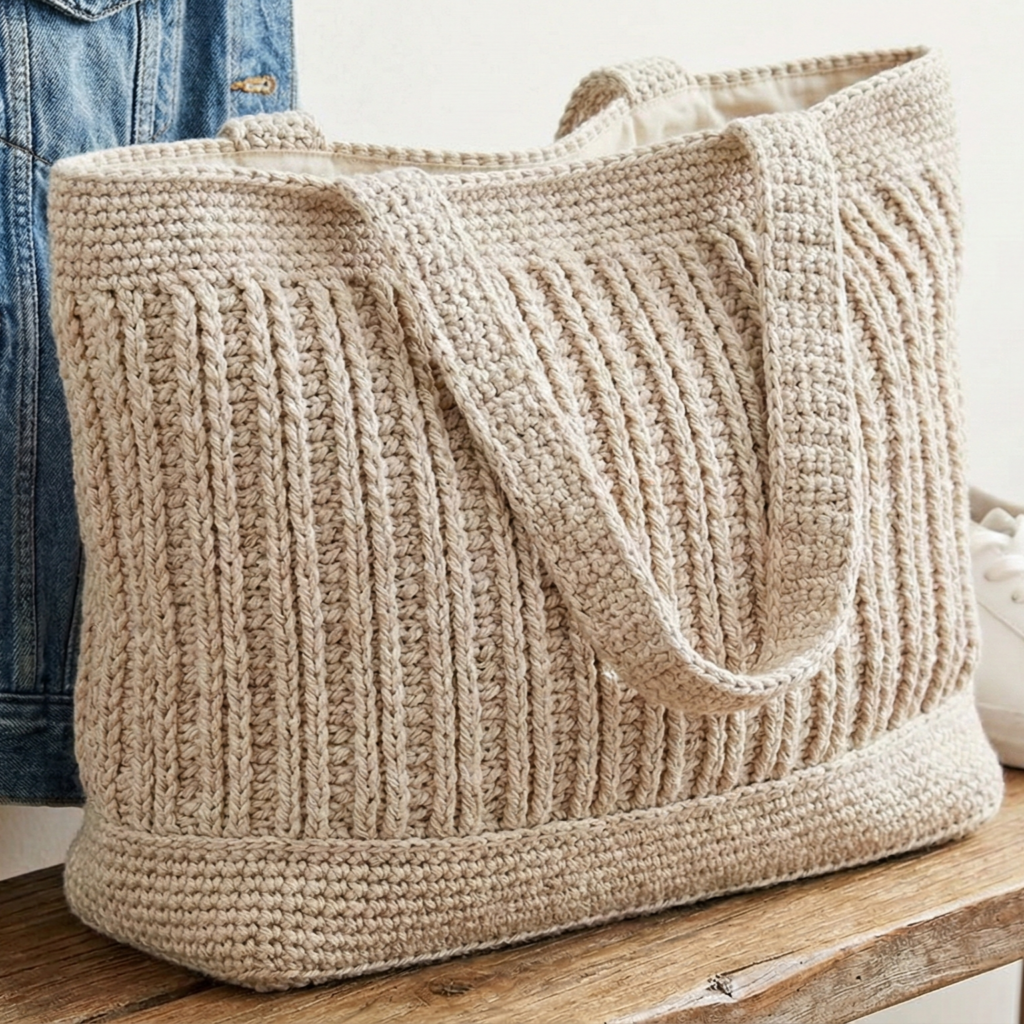
This pattern intentionally mimics the dense look of hand-knit fabric while staying fully crocheted — great if you love the knit aesthetic but prefer crochet techniques. It’s a roomy, slouchy everyday tote.
Skill level: intermediate (post stitches for knit look)
Finished size: 18” W × 15” H × 5” D
Yarn & tools
- Bulky cotton or super-bulky roving-style yarn (approx. 900–1,200 yd)
- Hook: 8.0–10.0 mm (or size that gives dense fabric)
- Tapestry needle, optional fabric lining & zipper
Stitch notes
- Use front post double crochet (fpdc) and regular dc to create faux-knit ribbing; use Tunisian simple stitch for dense knit-like fabric (if you prefer a true knit texture) — but I’ll show a crochet-only fpdc rib method.
Construction overview
- Bottom rectangle — make base panel;
- Tall sides worked in alternating fpdc rows for knit rib look;
- Top band & wide straps crocheted separately then sewn.
Step-by-step
A — Base rectangle
- Chain foundation to desired base length (e.g., 18 in × stitches per inch = st count). Work 6–8 rows of sc or hdc for a dense base and to prevent sag.
B — Sides with knit look
2. Turn and work rows of dc across for first row. Next row: ch2, fpdc around 1st st, dc across alternating to create ribbing. Repeat fpdc row and dc row alternating so the fabric reads like vertical knit ribs. Work until side height ~14–15 in.
C — Boxed corners
3. Fold base and seam sides or work vertical increases to make boxed corners: seam edges with mattress stitch and ensure base corners are reinforced with extra stitches.
D — Top band & straps
4. Add 4–6 rounds of sc in a smaller hook for a firm top band. Make straps by crocheting two wide straps in sc or by making long flat cords: ch desired length × sc rows until strap wide & thick (~2 in wide). Sew strap ends securely to top band and reinforce with sewn rectangle and X pattern (like sewn leather bag straps).
E — Lining & closure
5. Line the bag with fabric for stability. Add zipper to top opening by sewing lining with zipper into seam for a clean finish.
Styling
- The knit-like texture makes this tote look hand-knit while being 100% crochet — pair with jeans and sneakers for casual chic.
4. Crochet Romantic 3D Rose Floral Tote Bag Pattern

A romantic statement tote covered in 3D roses — couture and showy. Make a floral front panel or an entire bag of roses for dramatic effect.
Skill level: advanced (lots of small motifs + assembly)
Finished size: 14” W × 12” H × 4” D (rose front panel); full-rose bag will be larger and heavier
Yarn & tools
- DK cotton or cotton-blend in multiple shades for roses + green for leaves (approx. 800–1,200 yd depending on coverage)
- Hook: 3.0–4.0 mm
- Felt backing, fabric lining, stitch markers, tapestry needle, hot glue (optional)
Components
- Many small rosette units (rolled or layered petals), leaves, sturdy base fabric to attach to, top band & straps.
Construction overview
Work rosette units (spiral or layered petal), sew densely onto a pre-made bag panel (crochet or fabric), add leaves and top band, line and finish.
Step-by-step
A — Make rosette units (example rolled strip)
- Chain 40. Row 1: dc across (approx 37 dc). Row 2: sc across to tidy, fasten off.
- Roll strip from one end and sew along the base as you roll to create a rose shape. Use the tail to stitch through the base of the coil securing petals in place. Make 40–60 rosettes depending on coverage.
B — Prepare bag panel
3. Crochet a sturdy rectangular panel in sc or basketweave stitch that matches final bag size (14” × 12”). This will be the base to which rosettes are sewn. Work two panels (front/back) plus base and sides (or just front rosette panel with plain back for contrast).
C — Sew rosettes to panel
4. Lay rosettes on panel in a pleasing layout (tight packing for full bloom coverage). Pin or tack with small stitches if needed. Sew each rosette through its base into the panel catching yarn and panel stitches—aim for a secure attachment. Add leaves in between to give a natural look.
D — Assemble bag
5. Join front and back panels, add base and sides, and sc around top edge. Add top band and straps (wide sturdy straps, sewn with several passes).
E — Lining & reinforcement
6. Sew a full lining: cut lining fabric to interior (allowing seam allowance), seam sides and bottom, slip into bag, then hand-stitch top edge to top band for a clean finish. For heavy bags, add a cardboard/plastic base insert inside lining bottom.
F — Finishing
- Consider coating the underside of the panel with a light fusible interfacing before sewing rosettes to prevent stretching. For extra security, sew a felt backing over the inside where rosettes attach.
Styling
- Use monochrome roses (all blush or cream) for a sophisticated bridal tote. For a dramatic fashion piece, mix hot pinks and reds.
5. Crochet Cabled Tote Bag Pattern
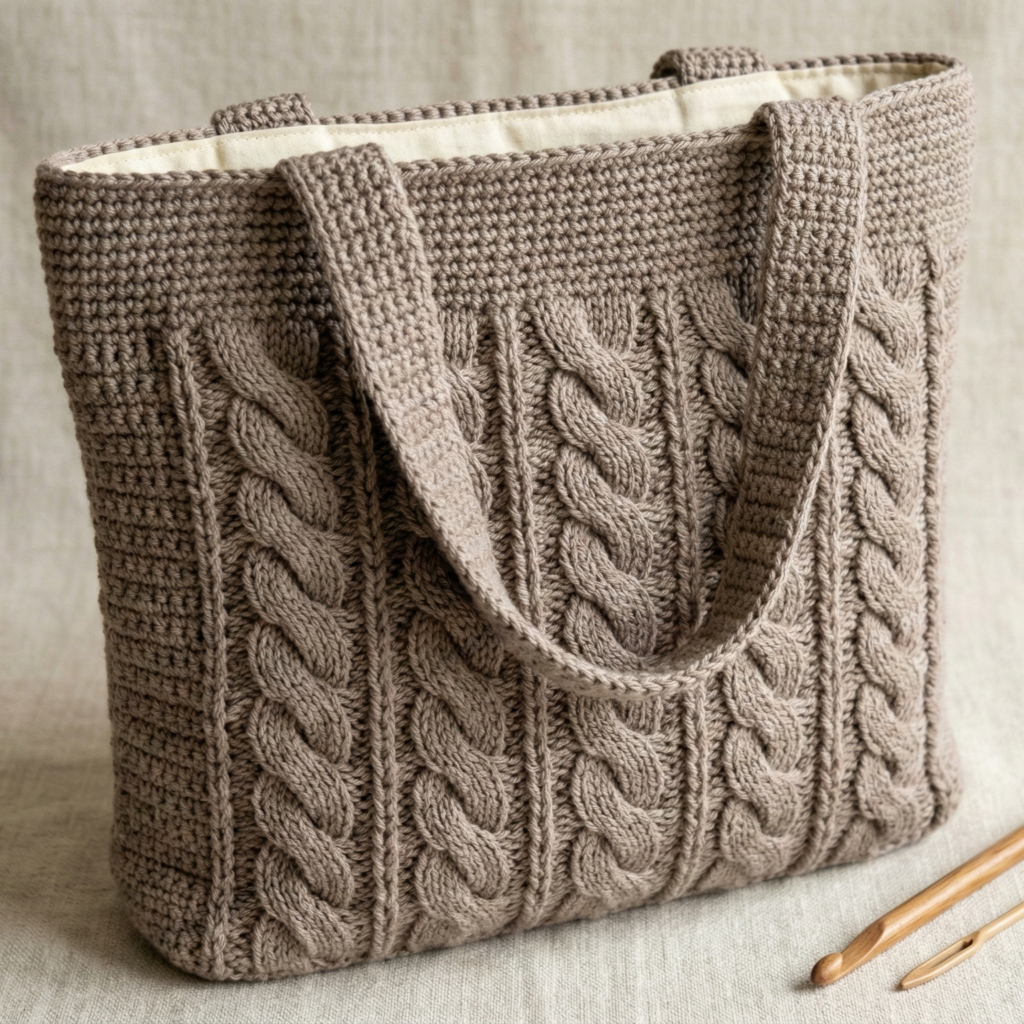
A luxe tote with crochet cable panels — tactile, structured and classic.
Skill level: intermediate → advanced (post stitches & cable cross technique)
Finished size: 15” W × 13” H × 4” D
Yarn & tools
- Worsted or aran weight cotton/acrylic blend (approx. 800–1,000 yd)
- Hook: 5.0–6.0 mm (use smaller than label for dense cables)
- Cable needle or spare dpn (use hook technique to cross cables), tapestry needle
Stitches & notes
- Use front-post dc (fpdc) and back-post dc (bpdc) to form raised ribs; cross groups of fpdc to create cable twists every N rows.
Construction overview
- Work front panel in cable pattern (multiple vertical cable columns).
- Work back panel in same pattern.
- Seam sides, add top band and handles. Optionally add base panel and lining.
Step-by-step
A — Cable panel chart
- Make a foundation chain equal to width in multiples of cable repeat + edge. Example cable repeat = 12 sts; for 15” width at 4 sts/in you need 60 sts → 5 repeats of 12 (adjust).
B — Base rows
2. Row 1: sc across to stabilize; Row 2: set up row: dc row.
C — Cable pattern (example of 6-st cable)
3. Row pattern: work columns of fpdc and bpdc:
- R1: (3 fpdc, 6 dc, 3 bpdc) across (adjust repeats).
- After working 6–8 pattern rows, create a cable cross by holding the first 3 fpdc stitches on a cable needle behind the work, work the next 3 fpdc, then work the 3 held stitches — this twists the columns and creates cable texture. Use a hook or spare needle to hold stitches.
D — Continue until panel height reached
4. Repeat the cable chart until panel height equals bag height (13”). Make second panel identical.
E — Assembly
5. Seam panels (mattress stitch or sc seam), add base panel worked in sc for structure. Add top band 4–6 rows of sc to firm up. For handles, either crochet two wide straps or attach leather straps with reinforced sewing.
F — Lining & reinforcement
6. Lining recommended for heavy use. Insert a base board for shape and to prevent sagging.
Styling
- Neutral shades for a timeless look; contrast lining for a surprising pop inside.
6. Crochet Swirly Stripes Tote Bag Pattern
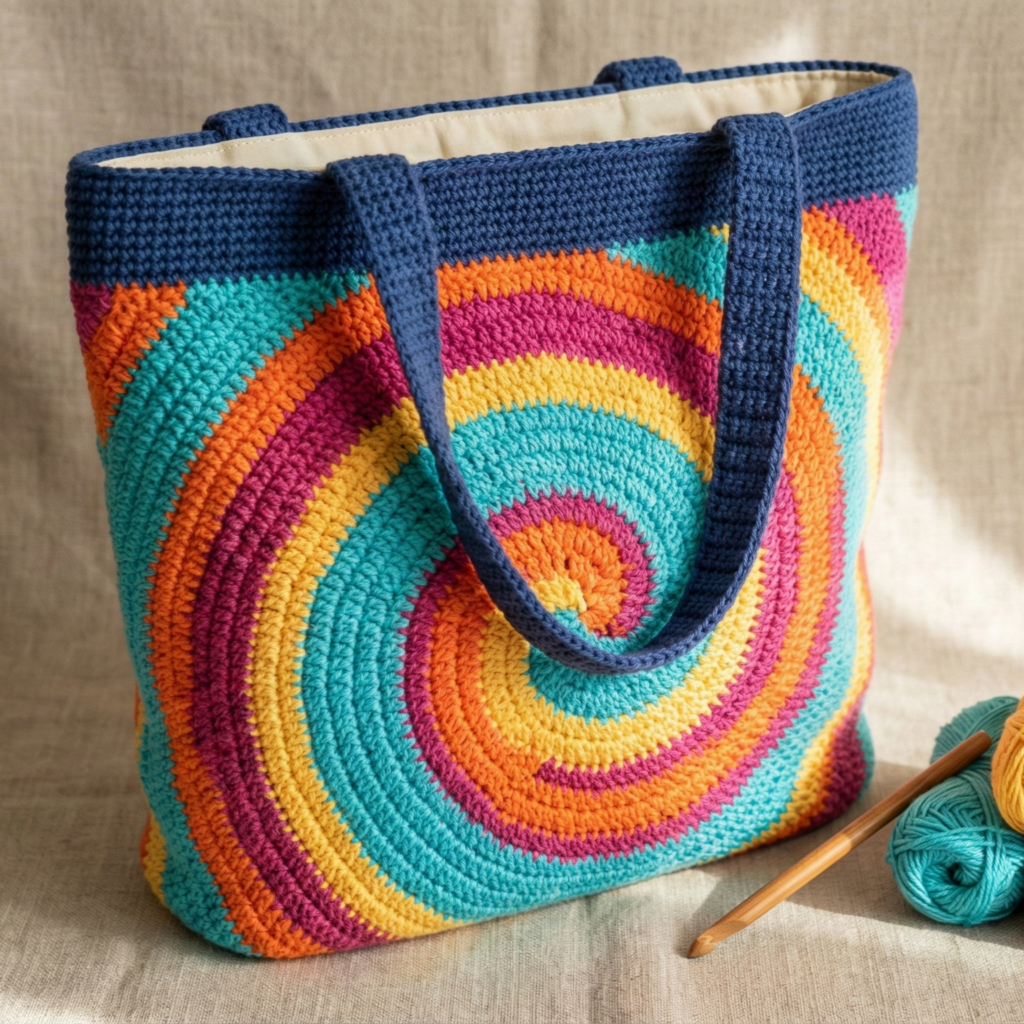
A playful tote with spiral swirl or horizontal stripes — modern and eye-catching.
Skill level: confident beginner
Finished size: 16” W × 14” H × 4” D
Yarn & tools
- DK or worsted cotton in 3–5 coordinating colours (approx. 800 yd total)
- Hook: 4.0–5.0 mm
- Tapestry needle, optional lining
Construction overview
Two main approaches:
- Spiral body: work continuous round in gradual colour changes or join colours to create a swirl effect; or
- Striped panels: alternate coloured stripes across panels and assemble.
Step-by-step (striped panels approach)
A — Base & body
- Make base rectangle (oval or box) using sc/hdc in a neutral colour. Size base to 16” width.
- Body: pick up stitches and work rounds in dc, changing colour every 6–8 rounds to make wide stripes. Carry yarn up the side or cut & join each stripe—carry only if colour contrast and tidy floats are acceptable.
B — Spiral variation
3. For spiral: after base, work in continuous round with colour transitions at an angle: change colour mid-round every N stitches to create a spiral illusion, or switch to self-striping yarn for easier swirl.
C — Top band & handles
4. Add sc rounds at top for a firm finish. Crochet or attach handles in contrasting colour and reinforce.
D — Lining & closure
5. Lining optional. Top-zipper closure gives a neat finish for everyday use.
Styling
- Bold contrasting stripes or tonal gradient for subtle chic. This is a great scrap-busting project.
7. Crochet Hexagon Market Tote Bag Pattern
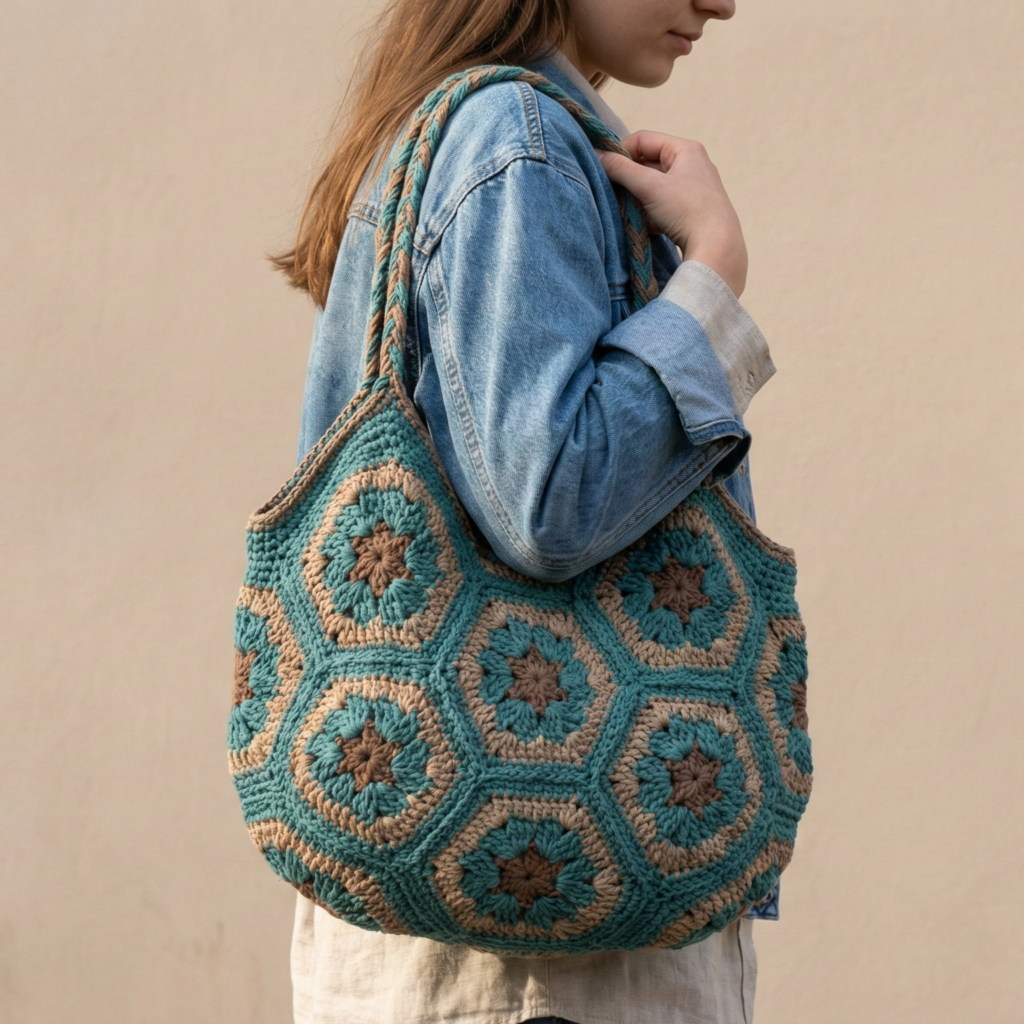
A modern market tote assembled from hexagon motifs — geometric and great for colourwork.
Skill level: intermediate (motif join-as-you-go)
Finished size: 18” W × 15” H when arranged in 4 × 4 grid (adjust by hexagon size)
Yarn & tools
- DK/worsted cotton in multiple colours (approx. 900–1,200 yd)
- Hook: 4.0 mm
- Tapestry needle, blocking supplies, lining fabric optional
Stitches & notes
- Make hexagons with 3–4 rounds and join-as-you-go for seamless look. Block each motif for uniformity.
Construction overview
- Make multiple hexagons; layout into rectangle or triangle for desired tote shape.
- Join hexagons with join-as-you-go or mattress stitch.
- Add base and top band; line if desired.
Step-by-step
A — Hexagon motif
- MR, ch1, 6 sc into ring — R1. R2: ch3, 3 dc cluster, ch3, sl st in next around to form 6 sides. R3: in each ch3 space work (sc, hdc, 3 dc, hdc, sc) to enlarge hexagon. Block to uniform size.
B — Layout
2. Arrange hexes into a grid to form front/back panels and optional base panels. For a 4 × 4 grid use 16 hexes per panel; adjust hex size for your bag dimension.
C — Join
3. Join hexes as you go (when working final round of next hex, slip-stitch into adjacent hex’s corresponding stitch to join seamlessly). Or use mattress stitch with matching yarn to join edges.
D — Body assembly
4. Once front, back, and side strips are assembled, seam panels into bag. Add a top band worked in sc to reinforce.
E — Handles & lining
5. Crochet wide straps and sew through multiple hex seams for extra strength. Line bag if you plan to carry small items.
Styling
- Use bright summer colours or monochrome hexes with a contrasting band.
8. Crochet Flower Print Summer Tote Bag Pattern

A flat-panel tote featuring crocheted applique flowers on a solid background — easy to customise with colour and floral placement.
Skill level: confident beginner → intermediate
Finished size: 16” W × 14” H × 4” D
Yarn & tools
- DK cotton for panel and flowers (approx. 700–900 yd), hook 3.5–4.5 mm
- Felt for backing, fabric lining optional, tapestry needle
Construction overview
- Crochet two solid panels in sc; 2. make flower appliqués and leaves; 3. sew appliqués onto front panel; 4. assemble bag and add handles.
Step-by-step
A — Background panels
- Chain foundation for 16” width (stitches based on gauge). Work sc rows until panel height 14”. Make two identical panels (front/back) and a base if desired.
B — Appliqué flowers
2. Flower (simple layered motif): MR; round 1: 6 sc. Round 2: ch3, sl st in each sc for loops. Round 3: in each loop make (sc, hdc, 3 dc, hdc, sc) for petal. Make 6–10 flowers in various sizes and colours; add small leaf motifs (chain 7, sc back shaping) and buds.
C — Placement & attachment
3. Arrange flowers on front panel in a pleasing composition (diagonal cluster, corner spray, or full field). Pin in place and sew with small stitches catching both flower base and panel. Secure centers with small beads or French knots.
D — Bag assembly
4. Seam panels and add base. Add sc rounds at top and strap attachment points. Crochet straps or attach leather straps.
E — Lining & finishing
5. Add lining and reinforce strap attachment inside with small squares of fabric or felt.
Styling
- Make a matching coin pouch with a single flower appliqué.
Final finishing tips, care & styling
- Reinforce strap joins: make multiple passes when sewing handles; use a little fabric reinforcement inside the bag between strap and lining.
- Top edge finishing: 3–6 rounds of sc or single crochet in a smaller hook give a clean, stable opening.
- Base support: for groceries or heavy books, add a rigid insert (thin plastic, cork, or sturdy cardboard covered in fabric) into the lining bottom.
- Block motifs: always block granny motifs, hexagons and lace panels before assembly for uniformity.
- Wash & care: cotton totes can be machine washed gentle and air dried; avoid overloading with very heavy items. For lined totes, remove any inserts and wash according to fibre content.
conclusion
These eight tote patterns cover a wide range of aesthetics and construction techniques — from airy Summer Boho and graphic Filet to knit-look texture, couture 3D Rose, tactile Cabled, playful Swirly Stripes, geometric Hexagon Market, and feminine Flower Print. Pick the design that matches your wardrobe, stash and skill level:
- Need a quick market bag? Try the Boho or Large Knitted (crochet-knit) pattern.
- Want a statement piece? The 3D Rose or Cabled totes are show stoppers.
- Love colourwork and motifs? Make the Hexagon or Flower Print tote.