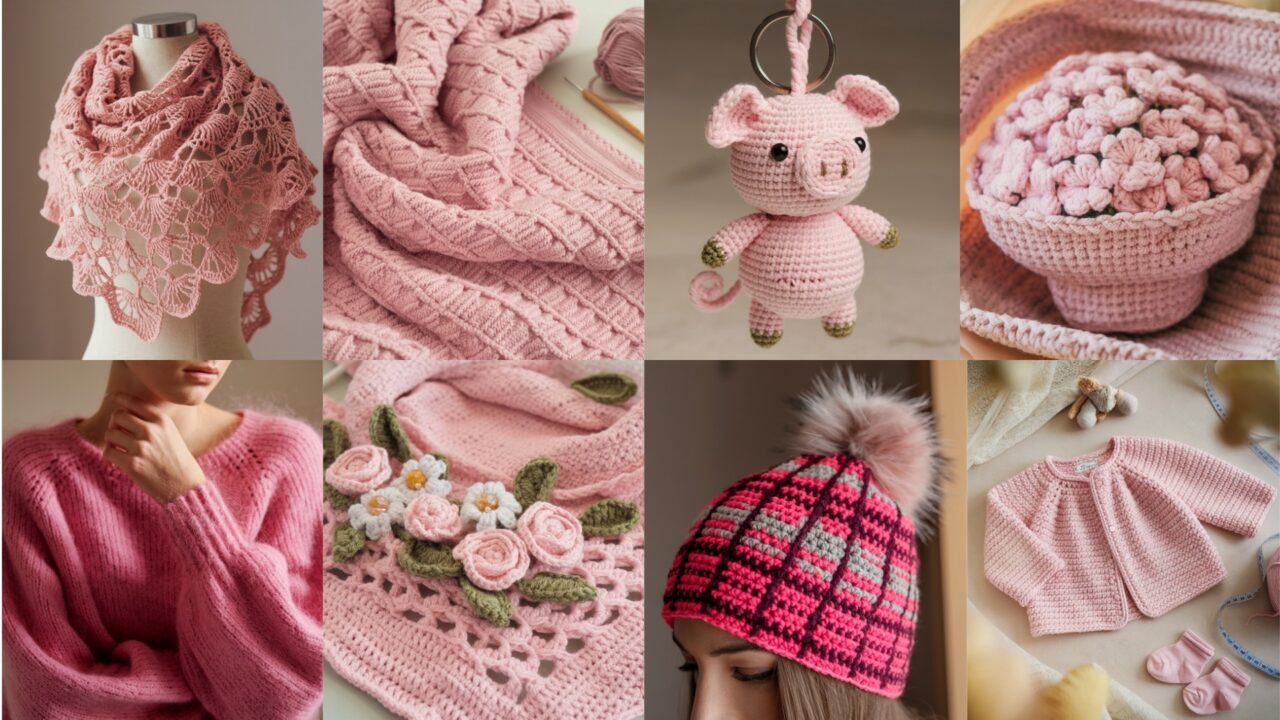
If you love pink, cozy texture, and small bursts of handmade joy, this collection is for you. These eight projects—ranging from blankets and garments to tiny amigurumi and floral decor—are designed to be cheerful, wearable, and approachable. Each pattern includes a materials list, skill level, estimated time, a very detailed step-by-step guide, finishing tips, and quick variations so you can personalize every pink project to your style.
Before we begin: choose yarns in shades of pink that make you smile—blush, bubblegum, rose, dusty rose, or even a pink variegated yarn. Mix in a neutral (cream, gray, soft brown) if you’d like contrast. Let’s make something rosy!
Quick notes & abbreviations (read first)
- Abbreviations: ch = chain, sl st = slip stitch, sc = single crochet, hdc = half double crochet, dc = double crochet, tr = treble crochet, inc = increase (2 sts in same stitch), dec = decrease (sc2tog unless specified), BLO/FLO = back/front loop only, MR = magic ring, st(s) = stitch(es).
- Hook sizes and yarn weights are suggestions. Gauge is not strict for many of these projects (they’re forgiving), but for garments check gauge in the pattern.
- Finish by weaving in ends with a tapestry needle and lightly blocking items where noted.
- Safety: for baby items and toys, avoid small detachable parts (use embroidered eyes rather than safety eyes for under-3-year-olds).
1. Crochet Petal Stitch Blanket Pattern

Finished size: ~36″ × 48″ (lap blanket) — easily scaled
Time: 10–20 hours (spread across days)
Skill level: Beginner → Intermediate (petal stitch is repetitive; great for relaxing)
Yarn & hook: Worsted weight (Aran/Weight 4), approx. 900–1,200 yards; hook 5.5–6.5 mm.
Why this blanket?
The petal (also called the shell or puff-petal) stitch creates a soft, bumpy texture that looks floral—perfect in soft pinks. It’s cozy, quick to grow, and forgiving on gauge.
Materials: yarn, hook, tapestry needle, scissors, measuring tape.
Stitch used: Petal cluster = typically (dc, tr, dc) worked into same stitch or loop to create a petal; below I’ll use a simple and consistent petal cluster that’s easy to count.
Pattern — step-by-step
Notes: Foundation chain must be a multiple of 6 + 3 (for turning). Adjust width by adding 6 chains per repeat.
- Foundation chain. Chain 123 (multiple of 6 = 120) + 3 = 123 for a 36″ width (adjust as needed). Ch 123 loosely.
- Row 1 (base row). Dc in 4th ch from hook (counts as dc + ch-1 space made), skip 2 ch, (dc, ch 1, dc) in next ch (this is small shell), skip 2 ch, dc in next ch — repeat across. Turn. (This creates small shell anchors.)
- Row 2 (petal row). Ch 3 (counts as dc), in the ch-1 space of next shell work (dc, tr, dc) — this is a petal cluster; dc in top of next dc from previous row — repeat across. Turn. The trim of dc between petals spaces the petals evenly.
- Row 3. Repeat Row 2. Continue repeating Row 2 for the blanket body until you reach desired length (~48″). For a 48″ length you’ll likely do ~80–100 rows depending on yarn and gauge—measure as you go.
- Edging. Once desired length is reached, work 2 rounds of sc around the blanket to tidy edges. On the corners, work (sc, ch 1, sc) to keep corners square. Fasten off and weave in ends.
- Optional border variations. Add a picot edge or scalloped border: sc round followed by skip 2 sts, 5 dc in next st, skip 2, sl st for a decorative scallop.
Finishing & tips
- Block lightly to even the petal shape if using natural fiber.
- Make color bands: change color every 10–20 rows for wide stripes. Carry yarn up the side or fasten off and join for clean color changes.
- To make larger (throw/bed), increase foundation chain logically by +6 repeats.
2. Crochet Flourish Shawl Pattern
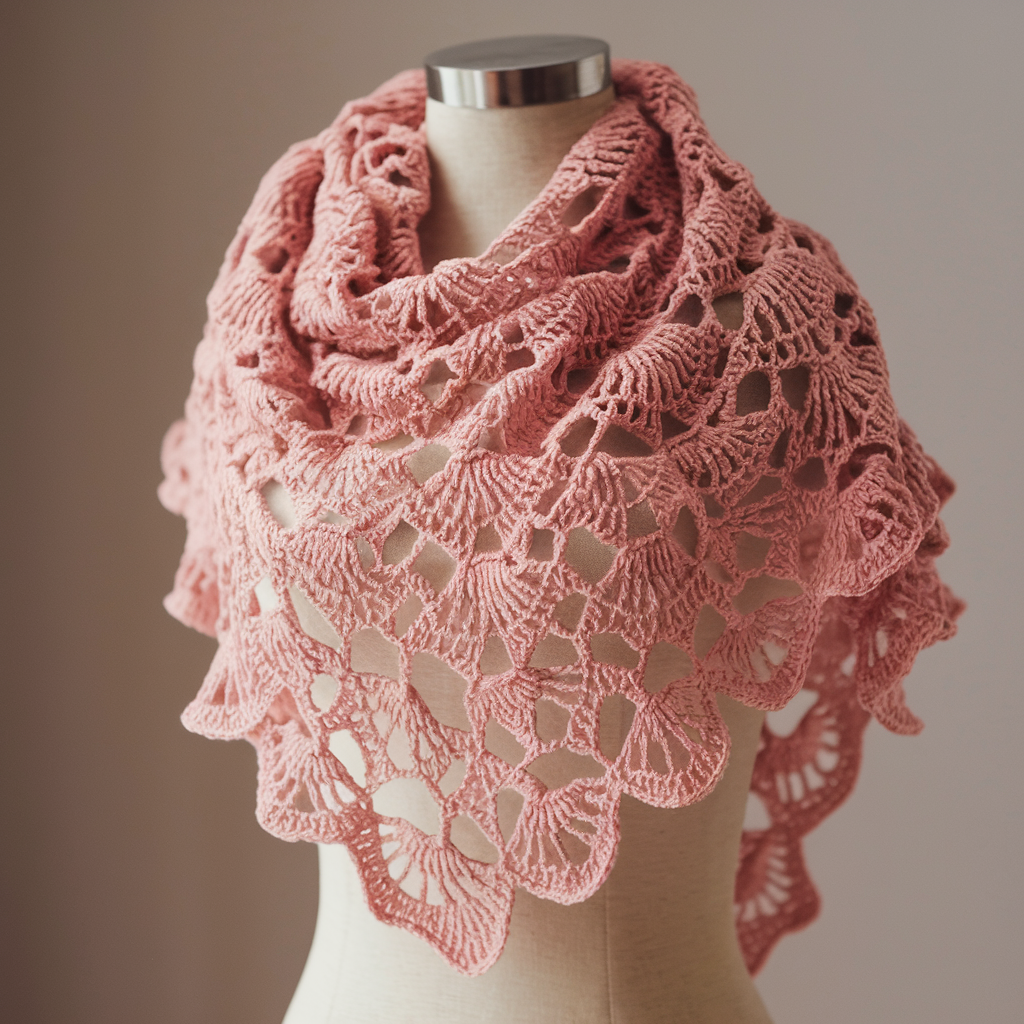
Finished size: Approx. 60″ wingspan × 24″ depth (triangular shawl)
Time: 6–12 hours
Skill level: Intermediate (lace repeats and shaping)
Yarn & hook: DK or light worsted (weight 3/4), 600–900 yards; hook 4.0–5.5 mm.
Why this shawl?
A flourish shawl uses openwork petal clusters and lace chains for an airy, feminine wrap. Pink mohair-blends or a blush fingering yarn with a halo make this especially soft and ethereal.
Materials: yarn, hook, tapestry needle, blocking pins, blocking mat.
Stitches & techniques: shell/petal repeats, ch-spaces, and simple increases for triangular shaping.
Pattern — step-by-step (top-down triangle, center stitch method)
- Start at center top. Ch 4, sl st to form a loop. R1: ch 3 (counts as dc), 2 dc into loop, ch 1, 3 dc into loop. Turn. You now have the small triangular start (3-3 split around center).
- Row 2 (first increase row). Ch 3, turn, dc into same st, ch 1, dc in next dc across to the center ch-space; in center ch-space work (dc, ch 1, dc) to create the center increase; continue dc across to edge, ending with dc, ch 1, dc in last stitch. This increases width symmetrically.
- Row 3 (lace flourish). Ch 3, skip one stitch, (dc, tr, dc) in next ch-1 loop (petal cluster), ch 2, dc in next dc — this alternates petals with spacing chains for lace. Work symmetrical to the center; in center ch-space work (dc, ch 2, dc) as center marker. Turn.
- Continue. Repeat Row 3, adding rows until the wingspan reaches ~60″ or desired size. Each row will increase 4–6 stitches depending on the base setup—watch the edges to keep symmetry.
- Edging. Bind off with a decorative scallop: ch 1, sl st to next stitch, ch 3, sl st in same stitch to make mini-loops; or do reverse single crochet for a corded edge.
- Blocking. Crucial for lace: pin to full wingspan and mist or wet-block to open lace and set shape. Let dry fully.
Styling & variations
- Use a contrasting trim in cream or gold.
- Make a smaller triangle for a neck kerchief.
- For extra softness, hold a mohair strand with the main yarn (work slowly).
3. Crochet Plaid Slouchy Beanie Pattern
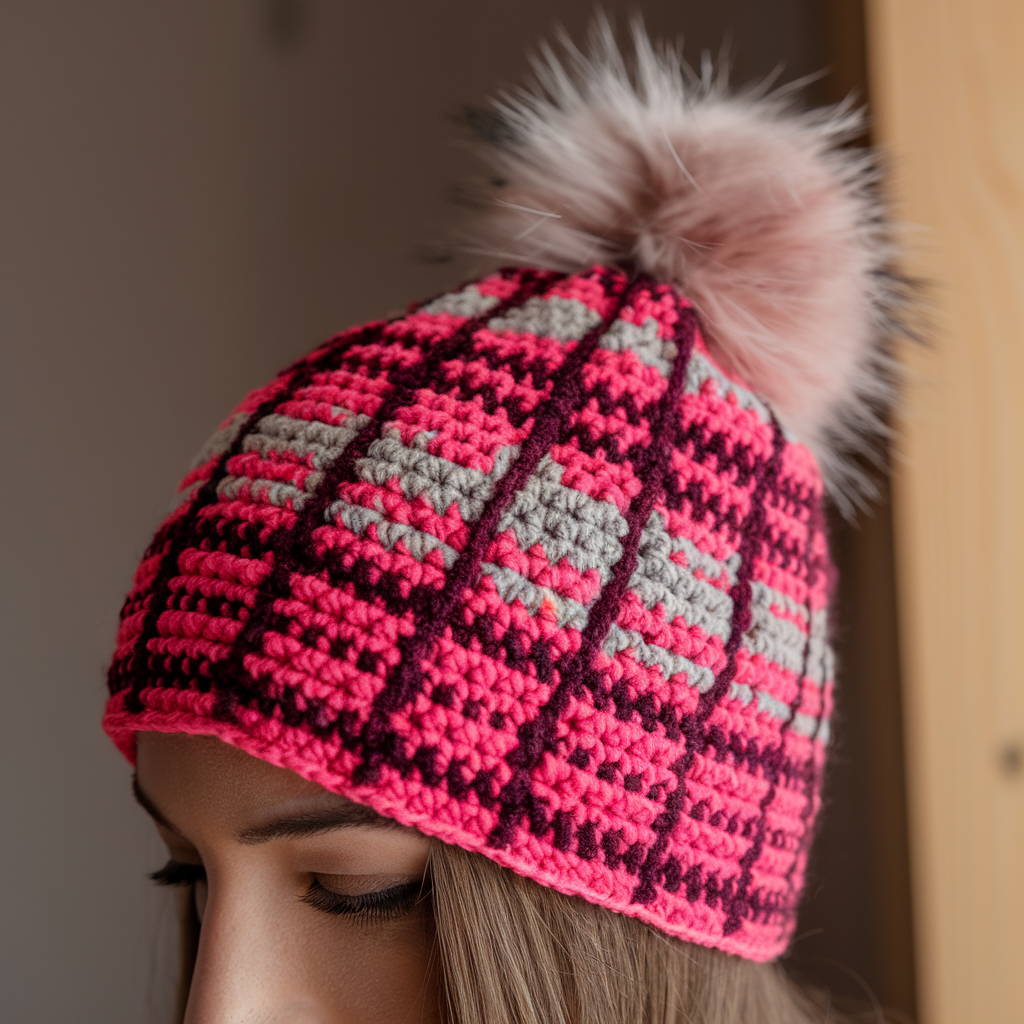
Finished size: Adult 20–22″ circumference, slouchy style
Time: 2–3 hours
Skill level: Beginner → Intermediate (colorwork/stripes)
Yarn & hook: Worsted weight (3 colors: blush, deep rose, neutral), 150–200 yards; hook 5.5–6.5 mm.
Why this beanie?
Plaid effect created with simple stripes and surface slip-stitch colorwork looks designer but is easy. Pink tones create a cozy feminine accessory.
Materials: yarn in three contrasting pinks/neutral, tapestry needle, stitch marker.
Techniques: worked in the round from crown down, basic color changes, and optional surface slip stitch to create plaid lines.
Pattern — step-by-step (top-down)
- Magic ring & crown. MR, ch 2 (counts as dc), make 10 dc into ring, pull tight, join with sl st (11 dc including ch2) OR adjust to 12. Place marker at start.
- Increase rounds for crown (simple increase formula). Round 2: ch 2, dc in each st, with increases evenly spaced: (dc, inc) repeat to increase to ~24 sts. Round 3: ch 2, dc in next 2, inc repeat to ~36 sts. Continue increasing similarly until crown diameter is ~7–8″ flat (depends on desired slouch).
- Work even. Once crown diameter reached, stop increasing. Work dc in each st around in main color for ~6–7 rounds depending on depth. Change colors every 2–3 rounds to create horizontal stripes.
- Plaid detail (surface slip stitch). After finishing body, use contrast color yarn and surface slip stitch to draw vertical lines every few stitches: insert hook from front to back in base of stitch and sl st across the fabric’s outside, creating thin lines that read as plaid. Add another set of lines crossing at right angles if desired.
- Brim. Work 2–3 rounds of hdc or ribbed ribbing: ch 1, hdc in BLO across for a folded cuff or work sc through both layers for a turned brim. Fasten off and weave in ends.
Tips & variations
- For a chunkier look, make with bulky yarn and larger hook—reduce rounds for shallow slouch.
- Add a faux fur pom-pom in coordinating pink for extra cuteness.
4. Crochet Fluffy Mohair Sweater Pattern
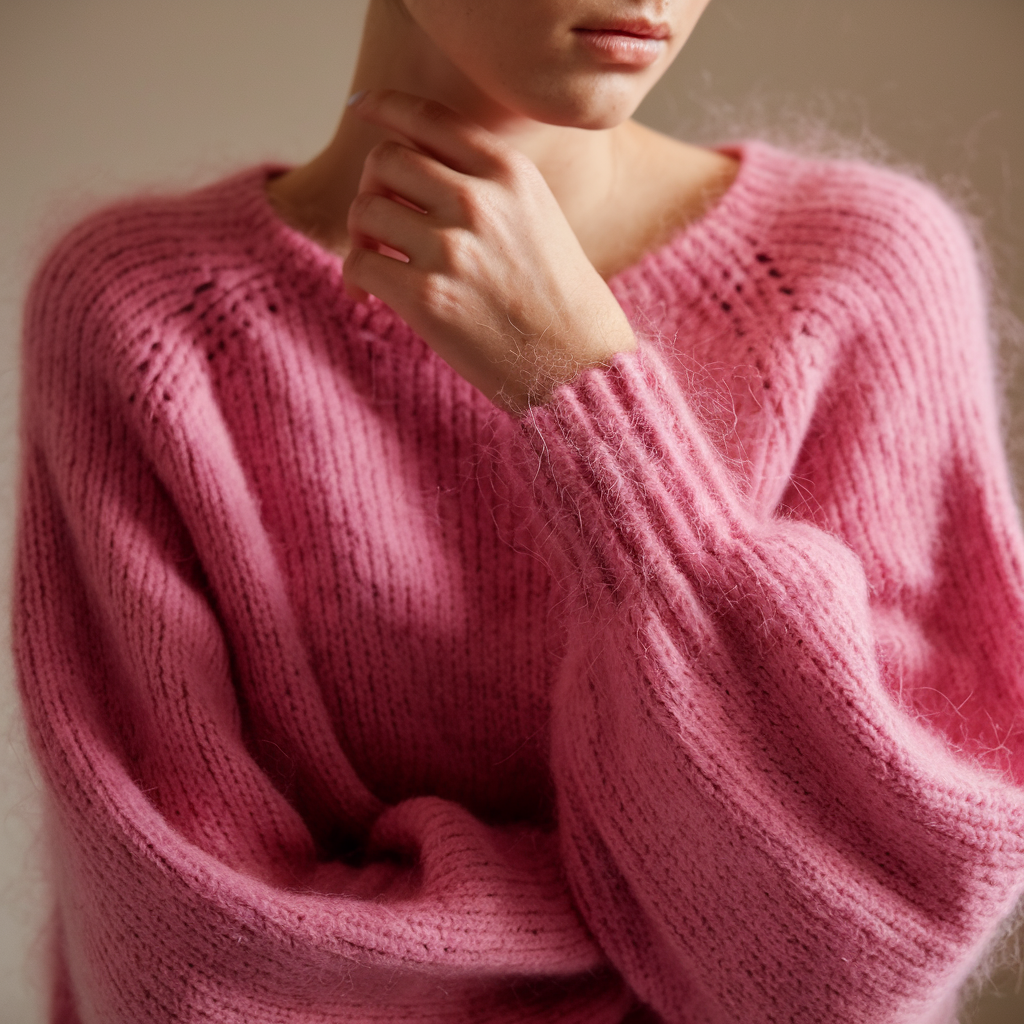
Finished size: Relaxed medium (bust 38–42″) — instructions include simple adjustments
Time: 10–20 hours
Skill level: Intermediate (working halo yarn and shaping)
Yarn & hook: Mohair blend paired with a stranded DK or worsted to give body: e.g., one strand mohair + one strand DK held together, 900–1,200 yards; hook 6.0–7.0 mm.
Why this sweater?
A soft fluffy mohair sweater in pale pink is dreamy and elevated. The mohair halo traps warmth and light; pairing it with a solid strand adds stitch definition. Keep a loose gauge for drape.
Materials: mohair yarn, solid DK, hook, stitch markers, tapestry needle, measuring tape, optional sweater pattern template.
Techniques: working with two strands (one halo), basic raglan or drop shoulder shaping, simple stockinette in crochet (dc rows) for soft drape.
Pattern — step-by-step (drop shoulder, worked flat and seamed)
Sizing: Bust measurement + 6″ for ease. Example: target finished bust 40″ → back piece width 20″ (flat).
- Swatch & gauge. Make a 4″ swatch holding mohair + DK with chosen hook and note dc per inch. For this example assume 3 dc/inch.
- Back panel. Chain to match half bust + seam allowances: for 20″ width at 3 dc/inch → ch 60 + 2 for turning. Row 1: dc in 4th ch from hook and across. Turn. Row 2–20: ch 2, dc across in each st until back length reaches underarm (e.g., 16–18″). Keep edges neat with sc borders if you prefer.
- Front panel. Work same as back until neck shaping: when piece reaches desired neckline start (e.g., 2″ before full length), divide for neckline by working center stitches separately: leave center 8–12 sts unworked, finish each shoulder separately, decreasing 1 st every other row 2–3 times for gentle scoop.
- Sleeves. For drop shoulder: make two rectangles about 14″ wide × desired sleeve length (e.g., 16–18″). Seam bottom edges to body underarms. For fitted sleeve: work in the round in dc, decreasing slightly toward cuff.
- Assembly (seaming). Block each piece lightly. Use mattress stitch with matching yarn for neat seaming. Attach sleeves underarm, weave ends.
- Neck & hem finishing. Work one round of sc around neckline and 2 rounds of hdc along hem and cuffs for stability. For a modern look, leave edges raw (trim tails, block).
Tips for mohair handling
- Work slowly: mohair fibers hide stitches; place markers carefully.
- Use a lifeline (scrap yarn) if doing complex shaping.
- If mohair splits, hold the solid strand to anchor placement.
Variations
- Make a cropped sweater by reducing length and adding elastic ribbing.
- Use two-tone: body in pale pink, cuffs and neck in dusty rose.
5. Crochet Pig Amigurumi Keychain Pattern
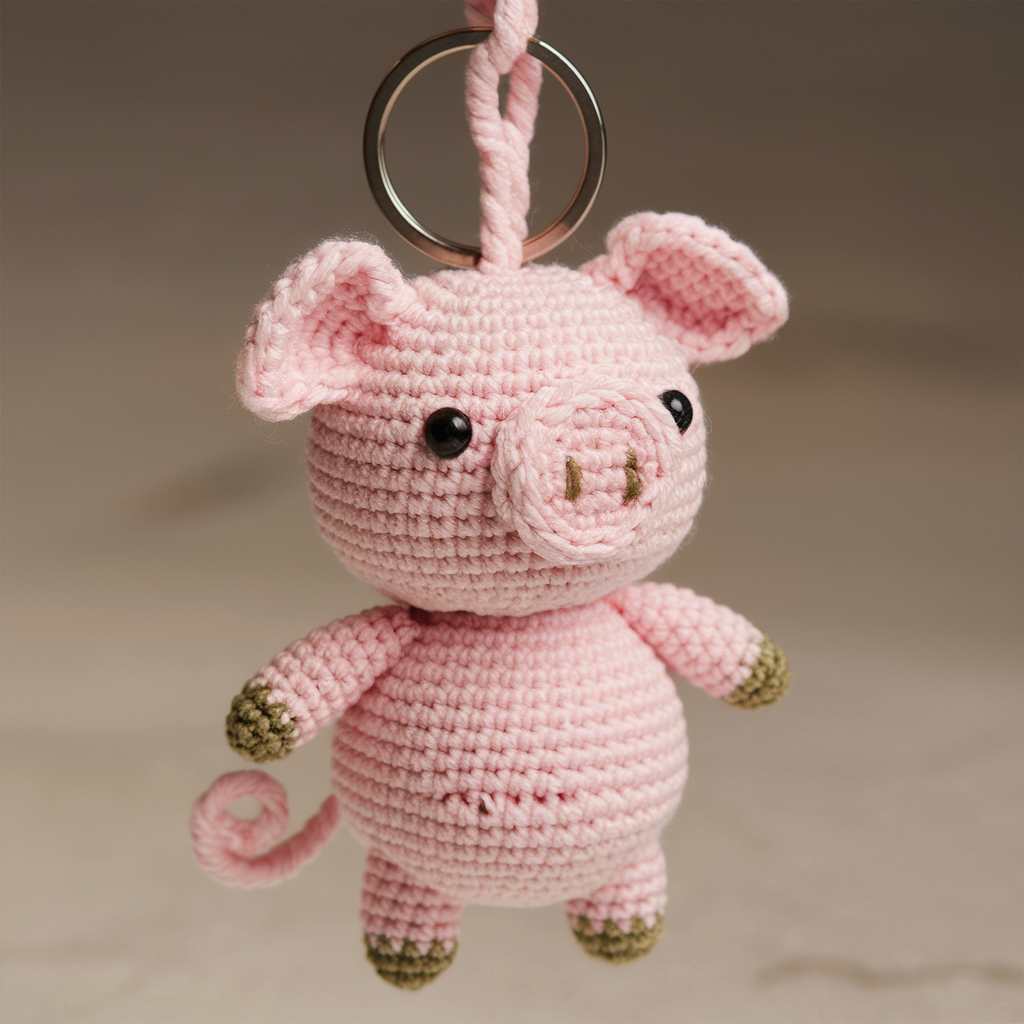
Finished size: ~2.5–3″ tall (compact keychain)
Time: 1–2 hours
Skill level: Beginner to intermediate (amigurumi basics)
Yarn & hook: Sport/ DK weight yarn in pink and small amount of white/light pink for snout; hook 2.5–3.5 mm.
Why this keychain?
Tiny, adorable, and portable—pink pig amigurumi is a perfect quick gift. Use embroidered eyes for child safety or safety eyes for older recipients.
Materials: yarn, small amount of fill, embroidery thread for nostrils, keyring, tapestry needle, stitch marker.
Stitches & techniques: MR, sc in continuous rounds, inc/dec, sewing on limbs.
Pattern — step-by-step (simple round amigurumi)
Head & body (worked as one or separate sewn pieces). I’ll give head/body as one short oval for compactness.
- Head start (MR). MR, 6 sc into ring. (6)
- Increase rounds. R2: inc in each st around (12). R3: sc, inc around (18). R4: sc in next 2, inc around (24). R5–R7: sc around (24) to build height. Insert safety eyes between R6–R7 ~6 sts apart (if using).
- Body decrease. R8: sc in next 2, dec around (18). R9: sc, dec around (12). Stuff firmly. R10: dec around to close — finish, leave tail to sew and weave in.
Snout (make 1). MR, 6 sc, pull tight. R2: inc in each st (12). R3: sc around. Embroider two nostril dots with darker pink. Sew snout centered on face.
Ears (make 2). Ch 4, sc in 2nd ch and across (3 sc). Ch 1, turn, sc across 2 rows. Fold base and sew to head for triangular ears. Or use a small half-circle shaped by MR and 5–8 sc.
Arms & legs (make 4). Small tubes: MR, 6 sc into ring, sc around for 3–4 rounds, stuff slightly, flatten and sew to body.
Tail. Chain 12, sc back along chain for a curly tail; or wind a small chain into a spiral and sew.
Keyring assembly. Sew a small loop of yarn to top of head, pass keyring through loop, reinforcing by stitching several times.
Finishing touches. Add blush with a tiny dab of non-toxic blush powder for photos, stitch a smile if desired.
Safety note: For baby items, embroider eyes/nose rather than using safety eyes.
6. Crochet Baby Cardigan Pattern
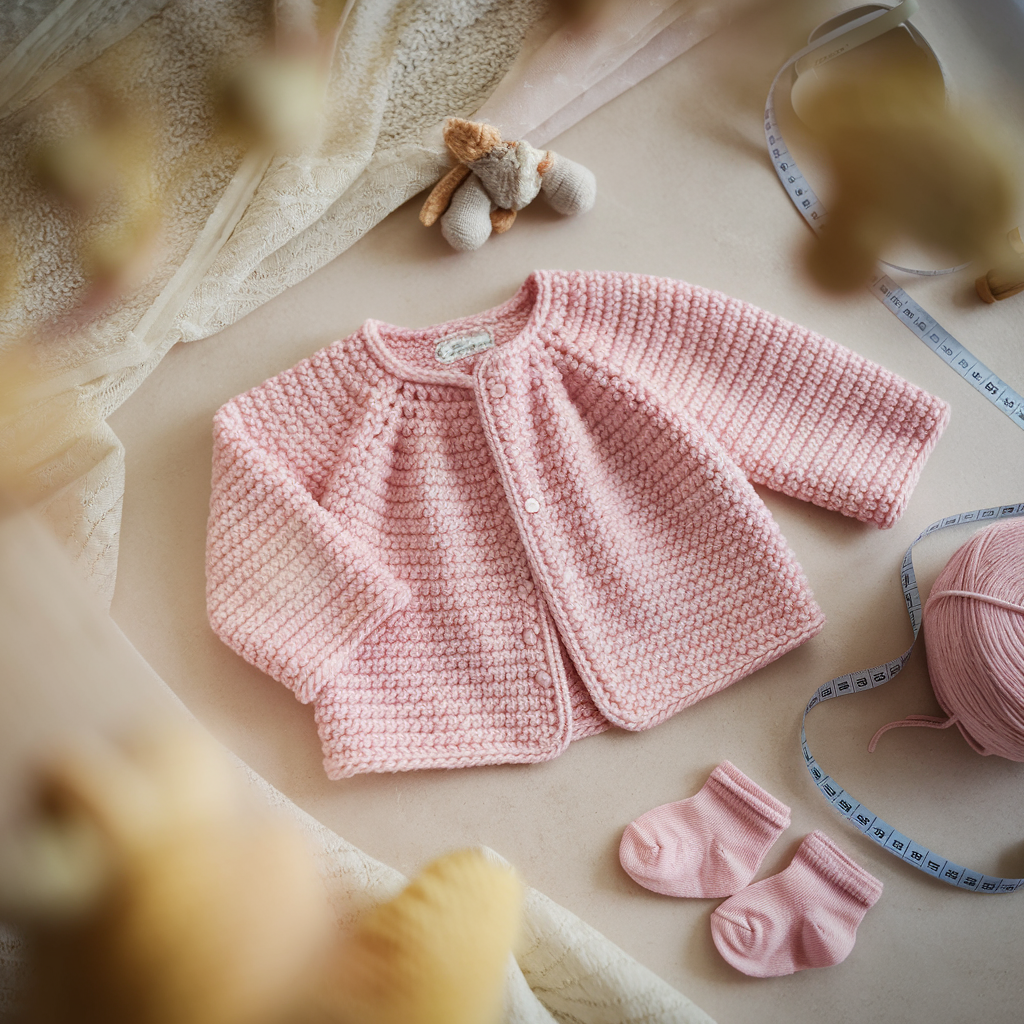
Finished sizes: newborn to 12 months — provide measurement for 3–6 months example (chest 17–18″)
Time: 6–12 hours depending on size
Skill level: Beginner → Intermediate (basic shaping & sleeves)
Yarn & hook: Soft worsted or baby DK (superwash recommended), 300–600 yards; hook 4.0–5.0 mm.
Why this cardigan?
A pink baby cardigan is a timeless, practical gift. Use gentle yarn and minimal closures for safety and comfort.
Materials: yarn, buttons (large flat, sew-on), tapestry needle, stitch markers, measuring tape.
Techniques: top-down raglan or simple seamed construction, button bands.
Pattern — step-by-step (basic seamed cardigan)
Make two front panels and a back panel + sleeves. This is straightforward and good for beginners.
- Back panel. Chain foundation for back width: e.g., for a 9″ back (half chest) at 3 dc/inch → ch 27 + 2. Row 1: dc in 4th ch from hook and across. Work dc rows until back length to underarm ~9″. Bind off.
- Front panels (make 2). Chain half of back width plus seam allowances (e.g., ch 14). Work dc rows until same height as back. For neckline shaping, taper the inner edge by decreasing 1 st every 4–6 rows once you reach the desired depth.
- Sleeves (make 2). Chain for cuff circumference ~16 sts (for small baby; adjust), join in round or work flat and seam: dc in round up to desired length ~6–7″. Increase 1 st every 4–6 rows to make a slight puff if desired.
- Assembly. Pin pieces together at shoulders and sides: sew shoulders first, then set in sleeves by matching underarm seam, sew sleeves into armhole, and seam sides & sleeve seams. Use mattress stitch for neat joins.
- Button band. Pick up stitches along front edges with hook and do 2–3 rounds of sc for a firm button band. Mark button positions and sew buttons on opposite band. For a baby, consider a single large toggle or ribbon tie at neck rather than multiple small buttons.
- Edging & finishing. Work one round sc around neckline to tidy. Weave in ends. Light block to shape.
Fit & safety tips
- Use soft, machine-washable yarn for easy care.
- Avoid long decorative ties that could be a choking hazard — use short closures and supervised wear for infants.
7. Crochet Plush Flower Bouquet Pattern
Finished set: bouquet of 5–9 plush crochet flowers on stems; bouquet ~10–14″ tall
Time: 2–6 hours for a bouquet depending on number of stems
Skill level: Beginner → Intermediate
Yarn & hook: Worsted in pink shades + green for stems; hook 4.0–5.0 mm.
Why this bouquet?
Crocheted flowers last forever and make a lovely pink accent—great as a gift, centerpiece, or room decor. Mix petal shapes and sizes for interest.
Materials: yarn, pipe cleaners or floral wire for stems, floral tape (optional), stuffing, small vase or jar.
Stitches & techniques: basic petals from chains and dc clusters, cone base, simple assembly with wire.
Pattern — step-by-step for one plush flower (make many)
- Petal strip. Ch 20 (length depends on petal size). Row 1: dc in 4th ch from hook and across to end. Row 2: ch 3, turn, skip 1 st, (dc, tr, dc) in next st repeat across to create tall petals. Fasten off leaving a long tail for stitching.
- Form the petal spiral. Lay the strip with right side up and roll from one end into a spiral rose shape. Use the long tail to sew through the base of the spiral and secure petals to form the flower head. Add stuffing in center if you want a puffed bloom.
- Create a base & backing. Make a small circle: MR, 6 sc, join. Sew the spiral flower onto this circle and secure stitches to the backing to hold shape.
- Stem. Insert floral wire or a wrapped pipe cleaner through center back, secure with thread and then wrap yarn tightly around the wire for a finished stem. Cover wire with green yarn and use floral tape for a smooth finish if desired.
- Leaves (optional). Make small leaves: ch 6, sc/hdc/dc along chain to create leaf shape, fasten off, sew to stem.
- Arrange. Make 5–9 flowers of varying sizes and shades of pink. Arrange in vase, secure stems with floral foam or pebbles.
Variations & presentation
- Make a bouquet of identical flowers for a cohesive look or mix different flower types (roses, daisies, peonies).
- Add small crocheted buds or ribbon for a gift-ready bouquet.
8. Crochet Spring Blossom Scarf Pattern
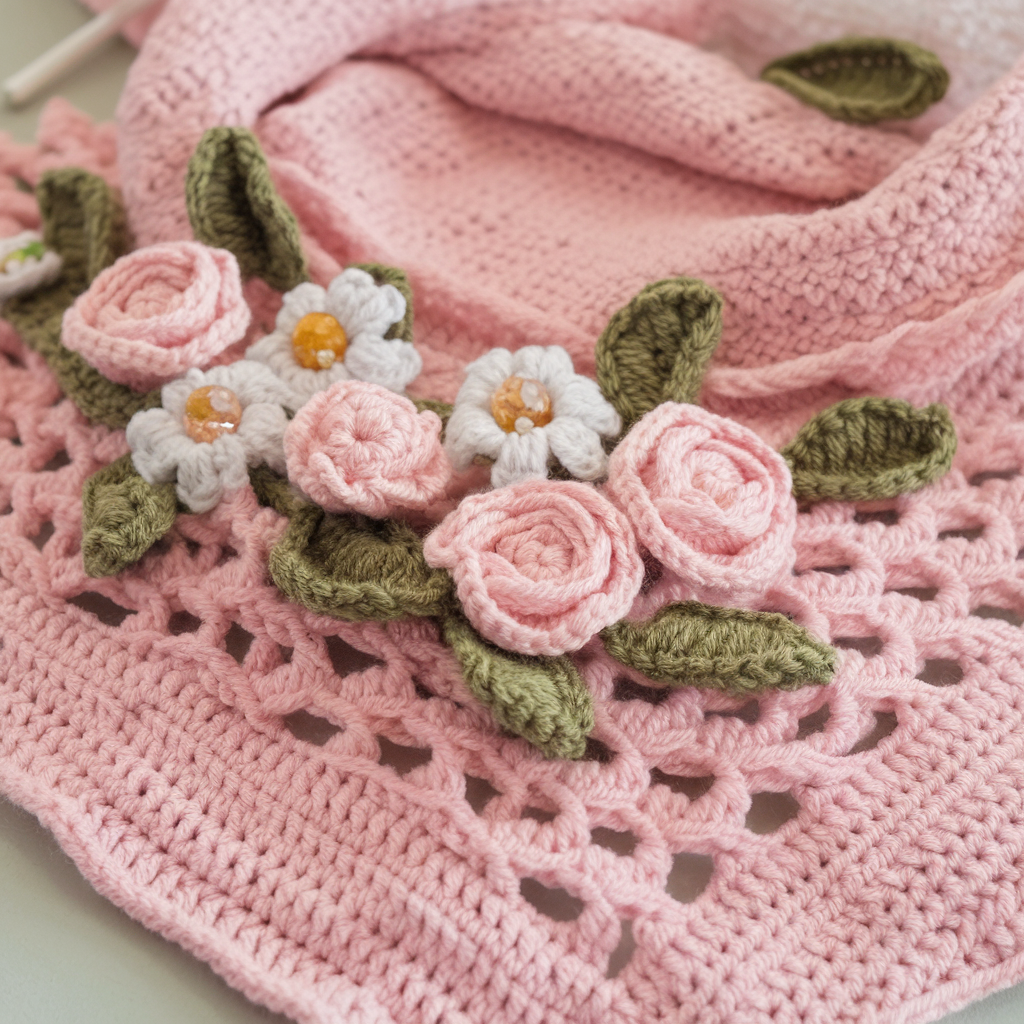
Finished size: 60″ long × 6–8″ wide (can be shortened)
Time: 4–8 hours
Skill level: Beginner → Intermediate (flower appliqués and lace)
Yarn & hook: Sport or DK light worsted in pinks and green for accents; hook 4.0–5.0 mm.
Why this scarf?
Lightweight, floral accents make a spring scarf sweet and wearable. The blossoms can be appliquéd or worked integrated into the body for a 3D effect.
Materials: yarn, hook, tapestry needle, blocking pins.
Techniques: crocheted flowers (small daisies/roses), mesh or filet background, assembly.
Pattern — step-by-step (mesh scarf + appliqué blossoms)
- Mesh foundation. Chain 121 for ~60″ length. Row 1: dc in 4th ch from hook, ch 1, skip 1 ch, dc in next ch repeat across → creates a light mesh (dc separated by ch1 spaces). Turn. Row 2+: ch 3, dc in each dc across, continuing mesh for desired width (6–8 inches).
- Make tiny blossom appliqués (make 10–15). Daisies: MR, ch 1, 6 sc into MR — pull tight. Petals: in each sc make (ch 3, 3 dc, ch 3, sl st in sc) repeat across for 6 petals. Fasten off leaving tail to sew.
- Attach blossoms. Pin blossoms along the scarf in a gentle scattered pattern, then sew them down by working a few stitches through the base and the mesh so they sit on top.
- Greenery (optional). Add small chain leaves and sew them behind blossoms for depth: ch 6, sc, hdc, dc, hdc, sc — sew to the scarf.
- Edging. Work one round of sc around edges to tidy and give a defined border. Fasten off and block lightly.
Styling & variations
- Add tiny beads in the centers of blossoms for sparkle.
- Make a reversible scarf by crocheting flowers separately and slip-stitching them into the mesh so both sides look tidy.
Troubleshooting & helpful tips (general)
- Hiding ends: For fluffy yarns (mohair), thread tail onto tapestry needle and bury through a few stitches, then trim close—fuzz hides tails. For smooth yarn, weave in tails back and forth for 2–3 cm.
- Adjusting size: For blankets/garments, adjust foundation chains in pattern multiples and keep stitch patterns consistent.
- Blocking: Use steam or wet blocking for lace and blankets. For mohair and delicate fibers, be gentle—pin and air-dry.
- Photography & presentation: Use soft natural light and neutral backgrounds for pink projects. A little greenery or a wooden prop enhances pink without overwhelming.
Conclusion
These eight pink projects offer a mix of cozy, wearable, and decorative ideas to brighten your day—and your home. From the tactile comfort of a petal-stitch blanket to the tiny grin-inducing pig keychain and the dreamy mohair sweater, there’s something here for every maker: quick amigurumi for instant gratification, modular hexes or flowers for addictive small-batch crafting, and full garments for a bigger weekend project.
Pick one that fits your time and energy: a scarf or keychain for today, a beanie or bouquet for a weekend, or a blanket or sweater if you want a longer, meditative project. Personalize every pattern with your favorite pink shades or mix in neutrals for subtlety.