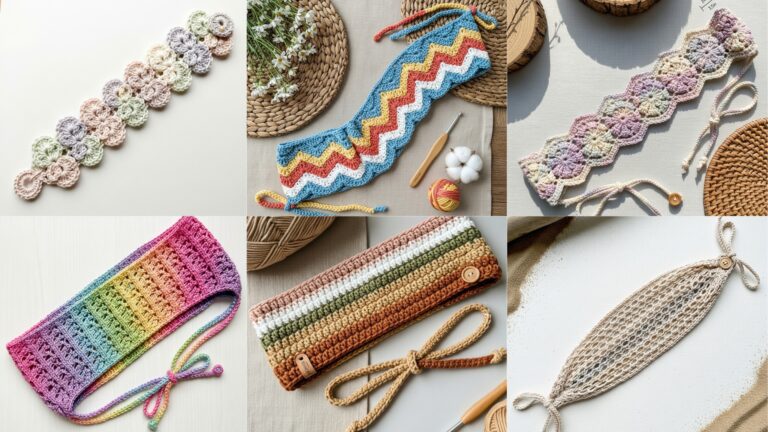
Headbands are one of the most satisfying small projects in crochet: quick to make, highly wearable, and endlessly customizable. They take a few evenings (or one focused afternoon), use little yarn, and let you experiment with texture, color, beads, and shaping. In this post you’ll find seven headband patterns — from sporty ribbed bands to romantic lacy crowns — each written so you can reproduce it straight away:
For every pattern I include: Skill level → Finished size & fit tips → Materials → Step-by-step instructions → Finishing & assembly → Tips & variations → Care. Measurements assume an adult head circumference of roughly 21–22 in (53–56 cm); I give notes for resizing. Abbreviations used are US: ch, sl st, sc, hdc, dc, tr, BLO (back loop only), FLO (front loop only), RS/WS.
Let’s make something cozy (or blingy) to top off your outfit!
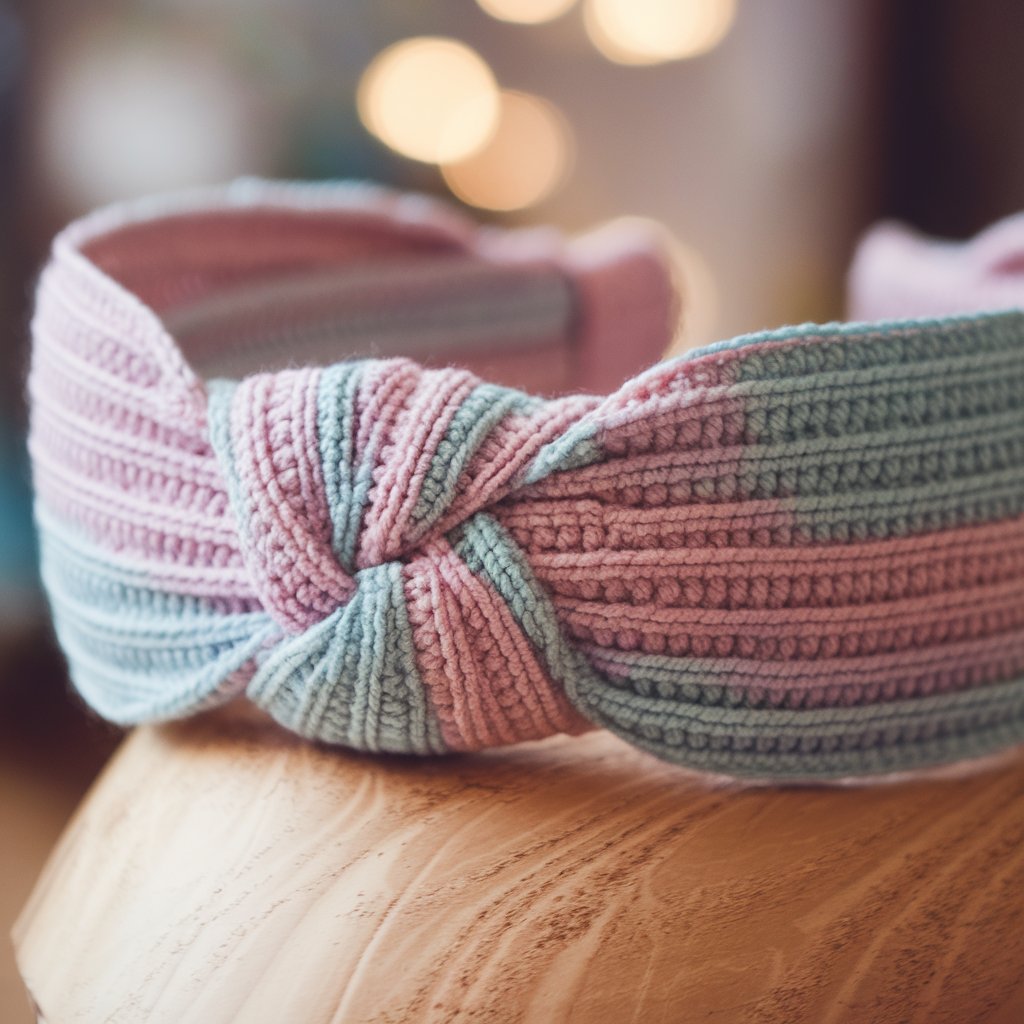
1. Simple Twist Headband Crochet Pattern
Skill level: Beginner — basic stitches and a simple knit-style twist.
Finished size: Adult: circumference ~21–22 in (unstretched); width 3–4 in (7.5–10 cm). Make slightly smaller (–½ in) for snug fit because fabric will stretch.
Materials
- Worsted weight yarn (#4), 80–120 yd (small amount)
- 5.0 mm (H) hook
- Tapestry needle, scissors, optional elastic or small snap for inside security
Step-by-step instructions (flat panel + twist)
- Foundation chain: Ch 11 for a 3–4 in width (or ch 13 for wider). This determines band width.
- Row 1: Hdc in 3rd ch from hook and across (counts as neat height). Turn.
- Row 2–20 (or length): Ch 2, hdc in each stitch across. Repeat until the rectangle length = desired circumference plus 1 in for seam allowance. For adult 21 in circumference and using this gauge, you’ll likely need ~56–60 rows of hdc (measure as you go).
- Finish panel: Fasten off, weave ends.
Create the twist and join
- Lay panel RS up. Fold short ends together as if closing a tube but before sewing, twist one end 180° (this makes the front twist). Match edges and whipstitch the long raw edges together with mattress stitch so seam is hidden. For a cleaner inside, fold seam allowance inward and stitch through both thicknesses.
- Optional: add a small piece of elastic (½–1 in) inside seam for comfort and to keep twist centered.
Tips & variations
- Work in BLO hdc for a more knit-looking texture that drapes nicely.
- Use chunky yarn + larger hook for a bold, quick make — you’ll need fewer rows.
- For a reversible look, seam with whipstitch on the inside and add a decorative button over the seam outside.
Care
- Machine wash gentle for acrylic/cotton; lay flat to dry. For wool, hand wash and dry flat.
2. Crochet Braided Headband Pattern
Skill level: Easy–Intermediate — chaining and joining three panels into a braid.
Finished size: Adult circumference 21–22 in; finished braid width about 2.5–3.5 in depending on panel width.
Materials
- DK or worsted yarn depending on desired braid heft — 120–160 yd total
- 4.0–5.0 mm hook
- Tapestry needle
Step-by-step instructions (3-panel braid)
- Make three strips (A, B, C): Ch 8–10 (for 2.5–3 in width). Row 1: sc in 2nd ch and across. Row 2–34: ch 1, sc in BLO across (gives slightly ridged strips). Repeat until each strip length is ~7–7.5 in (so three strips when braided will wrap an adult head; you’ll seam ends to meet circumference). Make three identical strips.
- Block/flatten strips lightly for even braid.
- Join ends: Lay strip A, B, C side by side; sew one short end of each together (stacked) so they’re secured — you’ll braid from the other end. Attach a removable clip or pin to hold starting join.
- Braid: Braid strips as if hair (A over middle, C over middle, repeat) until the braid length is long enough to wrap head. Sew braid end to starting join securely, folding over ends for a neat finish.
- Close into headband: Overlap braid ends, seam with mattress stitch to make a smooth join. Optionally add a lining strip of soft fabric along inside to smooth braid.
Tips & variations
- Use three colors for a tri-tone braid, or two colors (A and C same color) for mirrored look.
- Make strips wider for a voluminous braid or slimmer for delicate look.
- For a no-sew finish, use a few sturdy small snaps to join ends inside.
Care
- Machine wash gentle for cotton/acrylic; reshape braid by re-braiding after washing.
3. Crochet Flower Headband Pattern
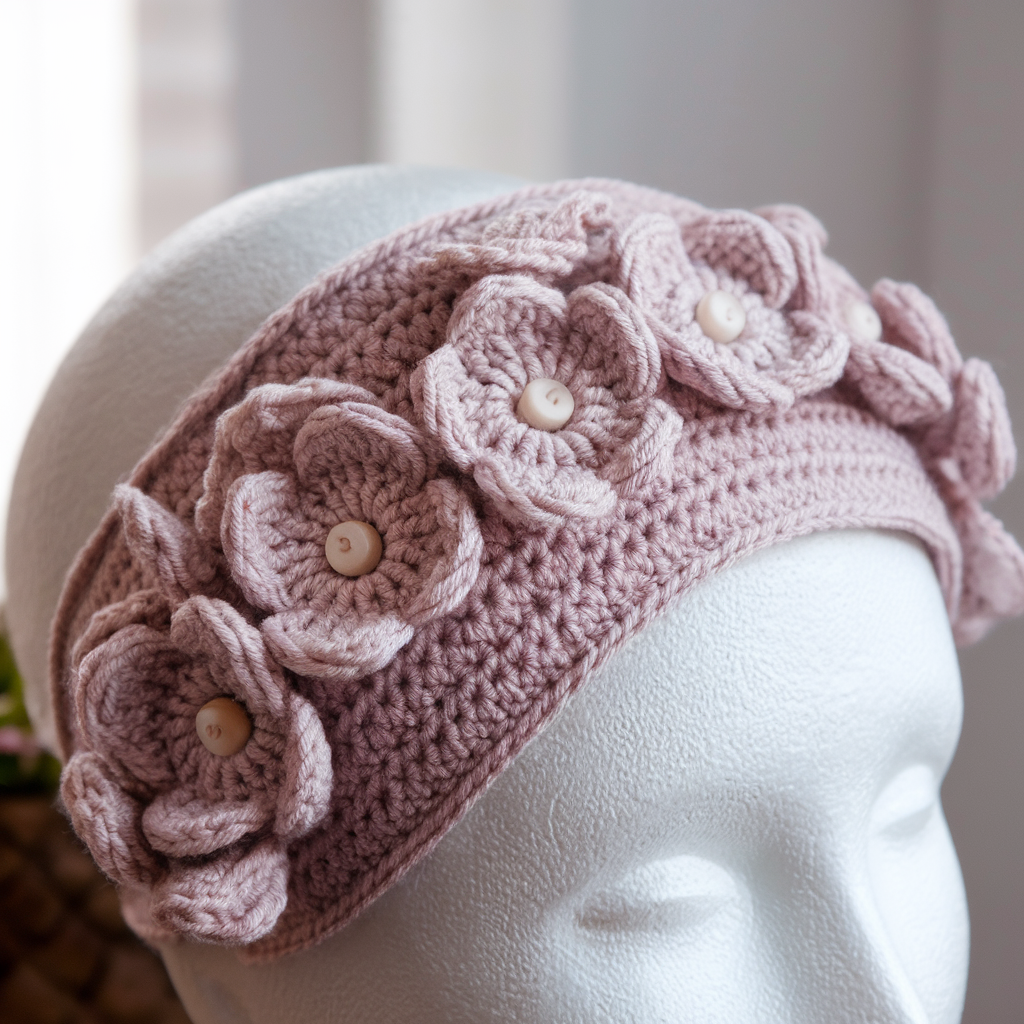
Skill level: Easy → Intermediate — small motifs (flowers) and band assembly.
Finished size: Band circumference adult 21–22 in; flower diameters ~2–3 in; make number of flowers to taste (3–6 typical).
Materials
- Fingering to DK yarn for flowers and band — 150–200 yd total
- 3.5–4.5 mm hook for flower detail and 4.5–5.5 mm for band if you want contrast
- Small buttons or beads for flower centers (optional)
- Tapestry needle, felt or soft lining for inside (optional)
Step-by-step instructions (band + 5-petal flowers)
Band:
- Ch 64 (or measure to fit head circumference; ch count varies with yarn). Join in the round, careful not to twist. Round 1: ch 1, sc in each ch around; join. Round 2–6: ch 1, sc in BLO around for a slightly ribbed, snug band. Fasten off and weave ends.
Flower motif (make 4–6):
- Magic ring, ch 1, (sc, ch 3, 5 dc, ch 3, sc) in ring — repeat to make 5 petals total. Pull ring closed and join. (You can scale petals by doing (sc, ch 4, 7 dc, ch 4, sc) for larger petals).
- Fasten off leaving tail for sewing. Add a button or bead at center and sew through center to secure.
Attach flowers:
- Arrange flowers across the front of the band overlapping slightly. Hand sew each flower through center to the band using matching yarn. For extra security, tack petals down with a couple small stitches so they don’t flap.
Tips & variations
- Make offset flower placements (one large flower at side center) for an elegant look.
- Crochet leaves (ch 10, sc hdc dc hdc sc) and tack between flowers.
- For bridal version use ivory thread, tiny pearls at centers, and a satin ribbon lining.
Care
- Hand wash if flowers have glued beads. Otherwise gentle cycle and lay flat.
4. Crochet Boho Headband Pattern
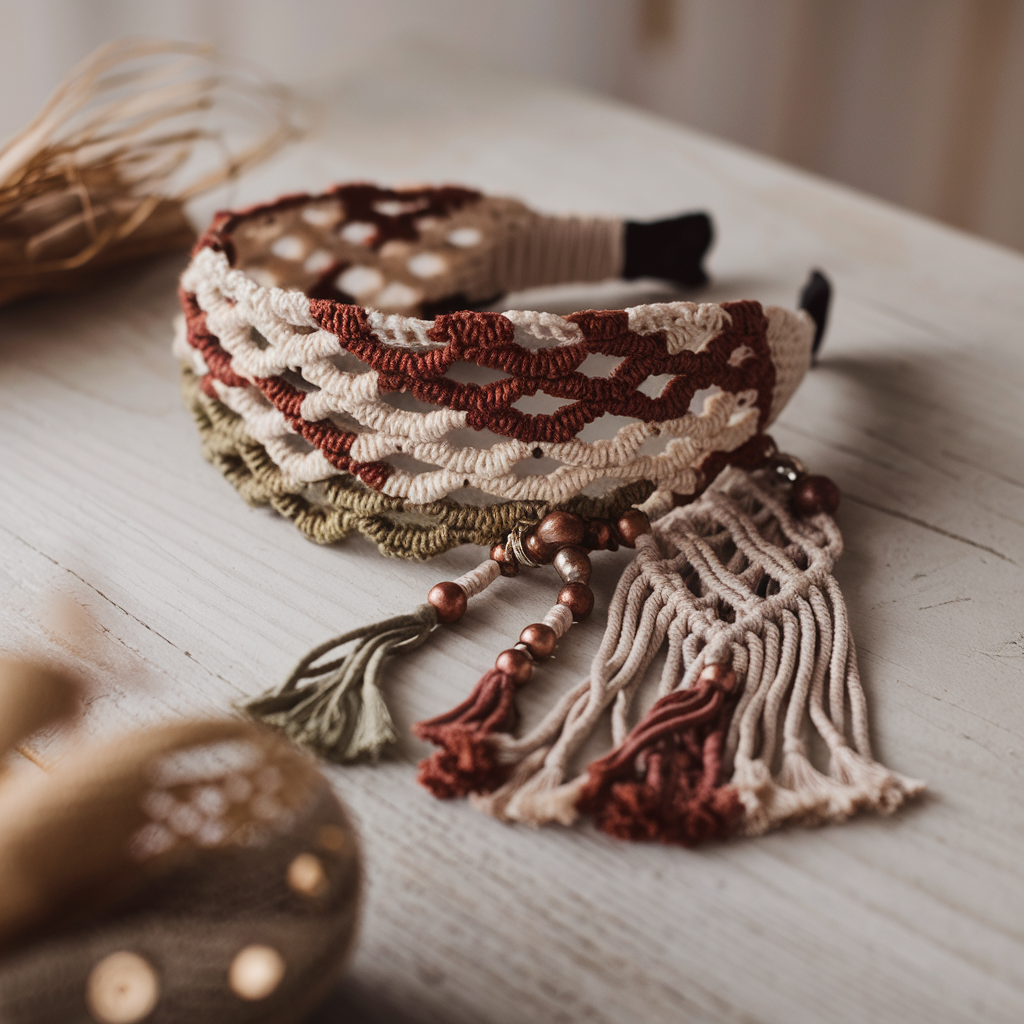
Skill level: Intermediate — texture + fringe and possibly beads.
Finished size: Width 2.5–4 in; circumference adult standard (21–22 in).
Materials
- Bulky or worsted yarn for body; contrast thread for macramé detail — ~150–220 yd
- 6.0 mm (J) hook (or as needed for yarn)
- Small wooden or metallic beads (optional), tapestry needle, scissors
Step-by-step instructions (openwork + fringe)
- Foundation chain: Ch 48 (adjust to head circumference). Join, ch 3 (counts as dc).
- Round 1 (openwork): dc, ch 2, skip 2, dc in next — repeat around to produce airy lattice. Join.
- Round 2 (anchor): Ch 1, sc in each dc and sc in ch-2 spaces to make the band more stable. Join.
- Rounds 3–5: Repeat Round 1 and Round 2 alternately for a slightly wider band.
- Fringe (optional): Cut 3–4 in strands of yarn. Using a crochet hook or latch-hook motion, attach fringe at bottom edge every 1–2 in. Add wooden beads to some fringes before knotting for boho beads.
- Finish: If the lattice is too loose, add a round of sc in BLO to tighten. Sew ends together neatly with invisible seam or add a leather strip to the inside for comfort.
Tips & variations
- Add a macramé wrap: tie thin cord in square knots around one section of the band for a festival look.
- For a braided boho look, attach leather thong ends and small charms.
- Make a detachable fringe using a few small snaps so the headband can switch styles.
Care
- Remove beads if fragile; hand wash recommended for heavy embellishments.
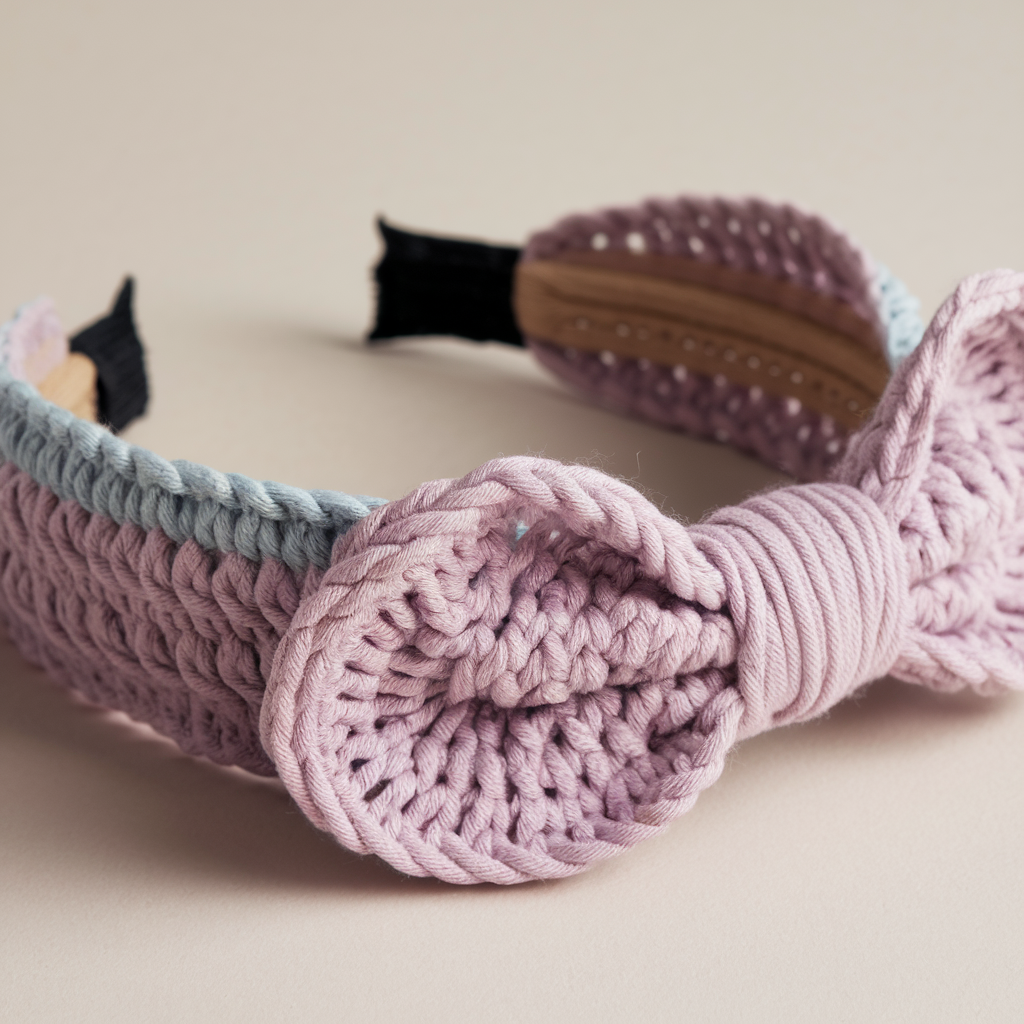
5. Crochet Knotted Headband Pattern
Skill level: Beginner–Easy — creates a faux knot in front using fold/seam technique.
Finished size: Width 3–4 in; circumference adult standard.
Materials
- Worsted yarn ~100–140 yd
- 5.0 mm hook, tapestry needle
Step-by-step instructions (tube method for centered knot)
- Foundation chain: Ch 12. Row 1: sc in 2nd ch and across (11 sc). Row 2–28: ch 1, sc in BLO across to create a slightly ribbed texture. Continue until rectangle length ≈ 7–8 in (this equals one half of the band — you’ll fold the tube to create knot).
- Form tube: Fold short ends and seam to create a tube (invisible seam on inside). Turn tube RS out.
- Create knot: Flatten tube and fold so center of tube forms a looped “knot” — twist the tube 180° and fold to create a knot shape. Tuck ends under and seam together securely on the inside so knot holds. Adjust shape until knot looks even.
- Finish inside: For comfort, add a soft felt strip inside at the seam spot.
Tips & variations
- Use BLO sc for knit-like ridges; use hdc for chunkier look.
- For an open-top knot, cut tube longer and tie a loose fabric knot before tucking ends under.
- Add a decorative brooch or pin through knot for vintage flair.
Care
- Machine wash gentle for cotton/acrylic; reshape knot while damp.
6. Crochet Bow Headband Pattern
Skill level: Easy — small bow attached to a band.
Finished size: Band circumference adult standard; bow ~3–4 in wide.
Materials
- Worsted or DK yarn — 100–150 yd total
- 4.0–5.0 mm hook, tapestry needle
Step-by-step instructions
Band (simple):
- Ch to fit head (example ch 54), join, sc in each ch around for 6–8 rounds until band height ~1–1.5 in. Fasten off.
Bow motif:
- Ch 18. Row 1: sc in 2nd ch and across (17 sc). Row 2–6: ch 1, sc across. Fasten off leaving long tail.
- Fold the rectangle accordion-style or roll and wrap the long tail tightly around center several times to cinch, forming bow. Secure with a few stitches and weave in end. For tidy look, sew a small rectangular band (ch 6, sc across 3 rows) and wrap around bow center to hide wraps.
- Sew bow securely to band at desired position.
Tips & variations
- Make the bow in a contrasting color or in textured stitch (bobble or moss) for interest.
- For toddler sizes, make bow larger relative to band.
Care
- Hand wash delicate bows or low-temp machine wash; reshape while damp.
7. Crochet Lacy Flower Crown Headband Pattern
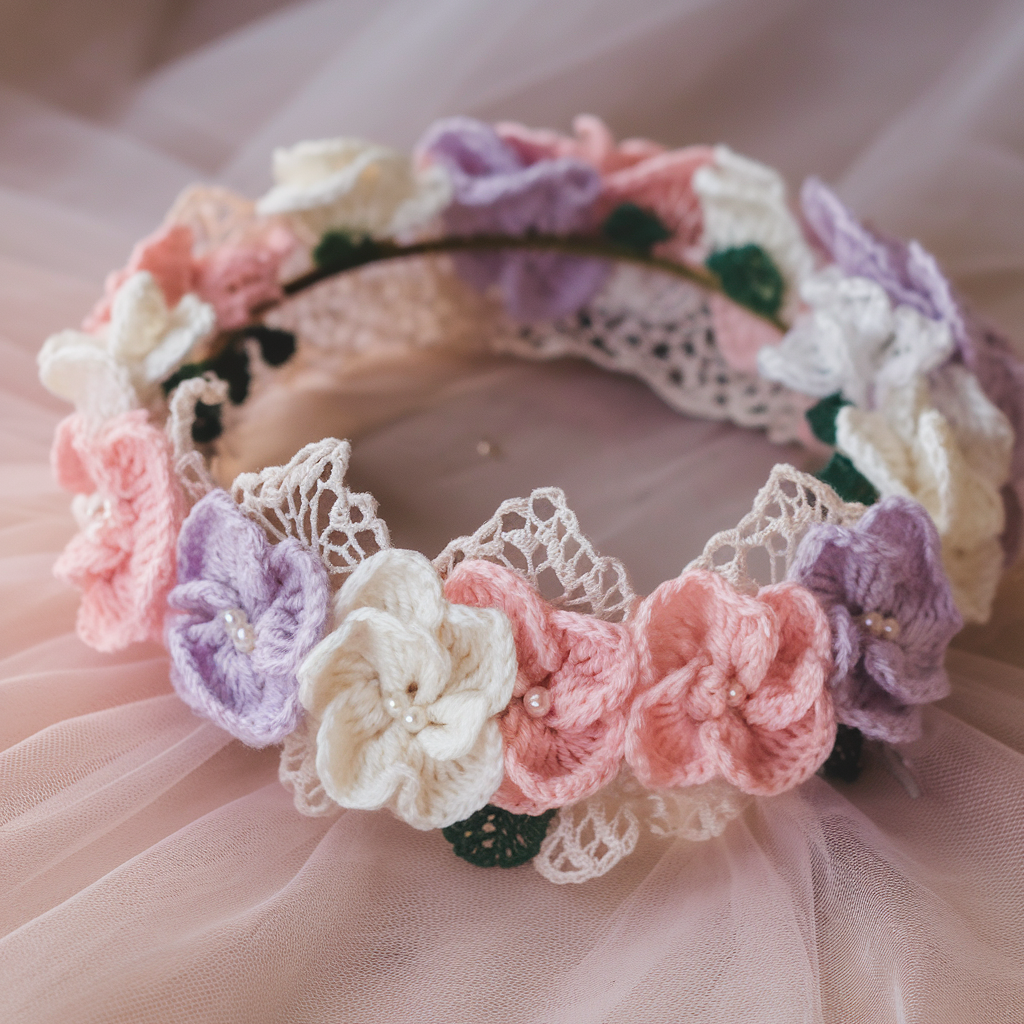
Skill level: Intermediate — multiple small motifs, joins, and blocking needed.
Finished size: Circumference adjustable for adults 21–23 in; crown height varies with floral motif size (1.5–3 in).
Materials
- Fingering or sport weight yarn (cotton or bamboo for drape), ~200–300 yd
- 3.0–3.5 mm hook for delicate stitches
- Small beads or seed pearls, tapestry needle, blocking pins
Step-by-step instructions (crown of joined flowers)
- Make flower motifs: Use small 5-petal flower (as earlier) or layered flower (small center rounds + petal round). Make 12–15 flowers depending on size. Example flower (small): Magic ring, ch 1, sc, ch 3, (3 dc, ch 3, sc) repeat 5 times; join. Fasten off.
- Make leaf motifs (optional): Ch 6, sc hdc dc hdc sc across chain to make tiny leaves. Make 12–15 leaves.
- Block motifs: Pin each flower and leaf to same size on blocking mat and spray lightly; let dry. Blocking makes joining easy and even.
- Join flowers into band: Arrange flowers so they overlap slightly. Join using slip stitch through back loops of neighboring motifs (or sew with matching yarn). Aim for a continuous floral strip equal to head circumference minus ½–1 in for slight stretch. Tuck leaves between flowers as you join.
- Make base band or chain loop: Add a narrow sc band behind flowers by picking up loops along back edges and working sc rows until 1 in wide; this stabilizes crown and gives comfortable contact with skin. Alternatively, add soft elastic stitched into the back for flex.
Tips & variations
- Add tiny seed pearls or beads sewn into flower centers for wedding/bridal look.
- Use gradient yarn for ombré crown.
- For festival style, attach longer dangling chains or ribbons at back.
Care
- Hand wash and reshape; delicate beads should be removed if possible before washing.
Conclusion
These seven headband patterns run the style spectrum: minimal and modern (twist, knotted), romantic and floral (flower crown, lacy flower band), playful (bow), textured (braid, rib), and boho (fringe, beads). A few practical final tips before you publish or stitch:
- Measure as you go. Yarn and tension change outcomes — try band on a ruler or model head before seaming.
- Stabilize when needed. If a stitch pattern is too open, add a BLO round or a sc anchor round to stop sagging.
- Comfort matters. If your band has beads, snaps, or seams that touch skin, line it with soft fabric or felt.
- Mix materials. Combine yarn with leather cords, chain, beads, or ribbon for mixed-media headpieces.
- Photograph for the blog: show front view (styling), side view (profile), close-up of stitch, and labeled supply shot. Readers love scale and texture shots.