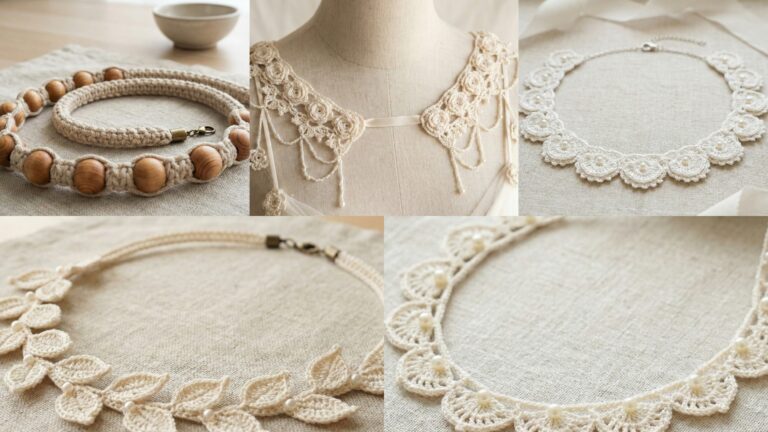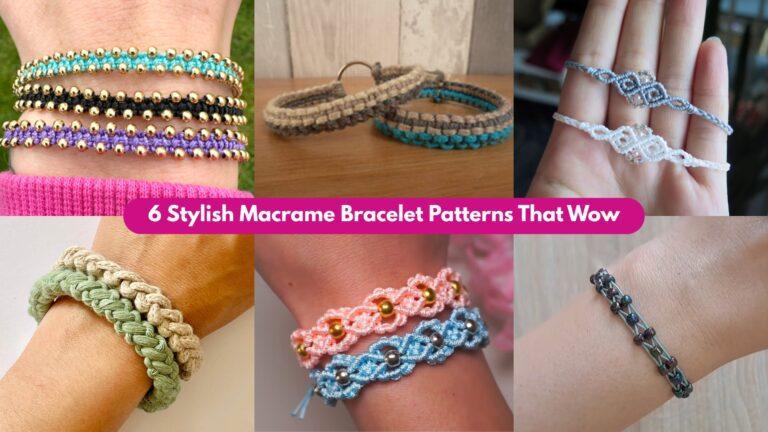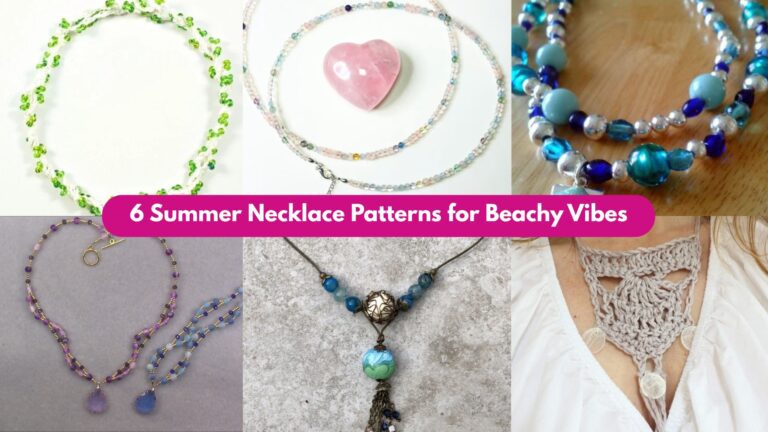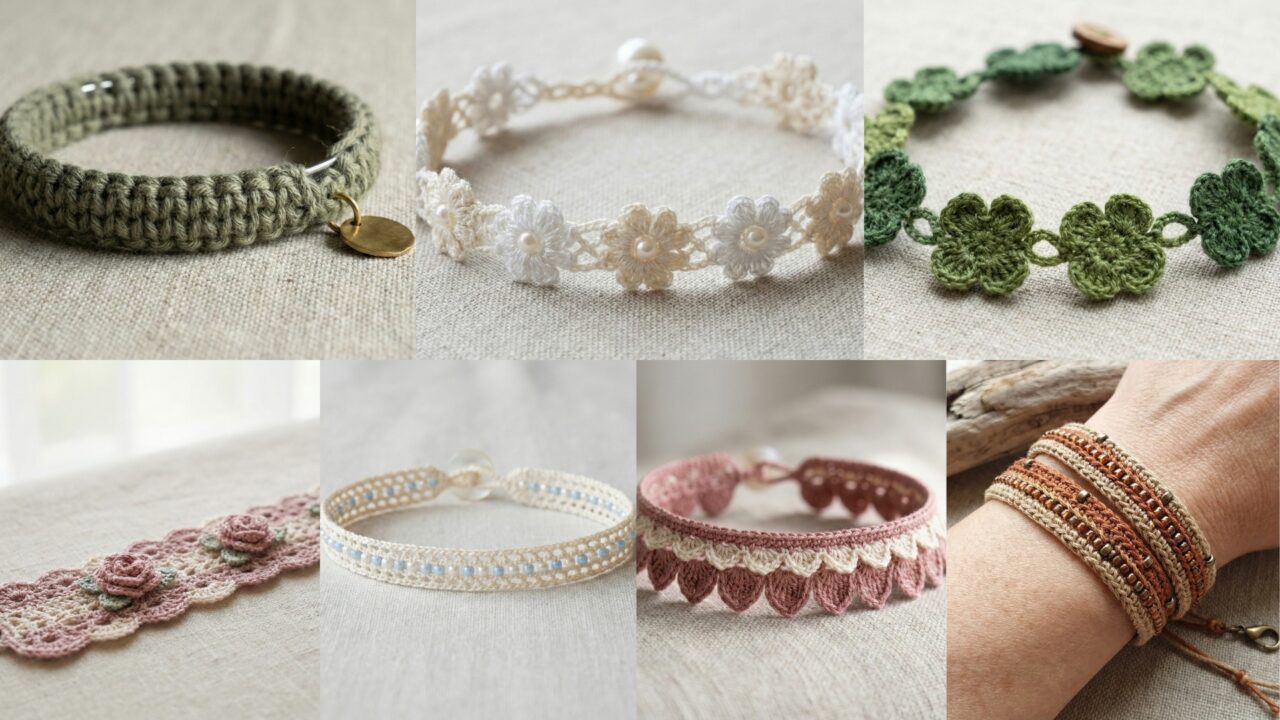
Bracelets are one of the quickest accessories to make and the easiest to personalise — from dainty pearl trims to bold cuffs. Below you’ll find one practical introduction that applies to all seven patterns (materials, sizing, hardware, closures, and finishing notes), followed by seven full bracelet patterns. Each pattern includes: skill level, materials and yardage, finished size and gauge guidance, a step-by-step construction method, suggested variations, finishing and care tips, and short styling notes so you can use the text directly in a blog post.
Read the introduction first (it saves time) and then jump to the bracelet you want to make.
materials, sizing, closures, and general tips
Yarn & thread
- Fingering / crochet thread / size 10 — best for delicate, lacy bracelets and fine beadwork.
- Sport / DK — good for slightly chunkier bracelets with texture.
- Cotton mercerized — crisp, holds beads and knots well; great for jewelry.
- Silk, bamboo or rayon blends — drapey and lustrous for evening pieces.
- Bead-compatible yarns: use smooth, non-fuzzy yarn so beads slide on easily and stitches look neat.
Hooks & tools
- Hooks: 1.25–2.75 mm for thread/fine yarn; 2.5–4.0 mm for DK.
- Beading needle (thin, flexible) if you add seed beads on the yarn before crocheting.
- Tapestry needle, small pliers, jump rings, crimps (optional), thread or fine jewelry cord for closures, fabric or jewelry glue for reinforcement if needed.
Findings & closures
- Button + loop — simple, elegant; choose low-profile buttons for wrist comfort.
- Lobster clasp + jump ring — durable and adjustable.
- Magnetic clasp — easy to use, choose strong neodymium type and be mindful around electronics.
- Toggle clasp — decorative, secure for cuffs.
- Sliding knot or adjustable macramé — good for cord-style wraps.
Bracelet sizing
- Measure wearer’s wrist at the point you want the bracelet to sit. Common finished circumference guidelines:
- Petite: 6.0 in (15.2 cm)
- Average women’s wrist: 6.5–7.0 in (16.5–17.8 cm)
- Mens / larger wrist: 7.5–8.5 in (19–21.5 cm)
- For a comfortable fit add 0.25–0.5 in ease for snug; 0.5–1.0 in ease for looser fit or bangle-like feel. Bead weight and clasp type affect fit, so adjust accordingly.
Gauge & planning
- Make a small swatch in the stitch pattern you intend to use (even for beadwork). Measure stitches per inch (spi) and rows per inch (rpi), then compute required foundation chain or stitch count to match desired circumference.
- If the design uses motifs (flowers, shells), decide how many repeats will encircle the wrist and adjust motif counts to center key motifs at the top.
Attaching beads
- Pre-stringing beads: slide beads onto yarn before you start crocheting and slide them into place as you work. This is easiest with smooth threads and seed beads.
- Sew-on beads: crochet the base first, then sew beads into place with a beading needle and matching thread.
Finishing & reinforcement
- Reinforce closures by stitching through multiple fabric layers or using a small felt backing under a metal clasp. Use strong sewing thread for attachments and a drop of clear jewelry glue inside knots for security if appropriate.
- For bracelets that will be worn frequently add a small interior row of whipstitch or lining for comfort and longevity.
1. Crochet Hoop Bracelet Pattern
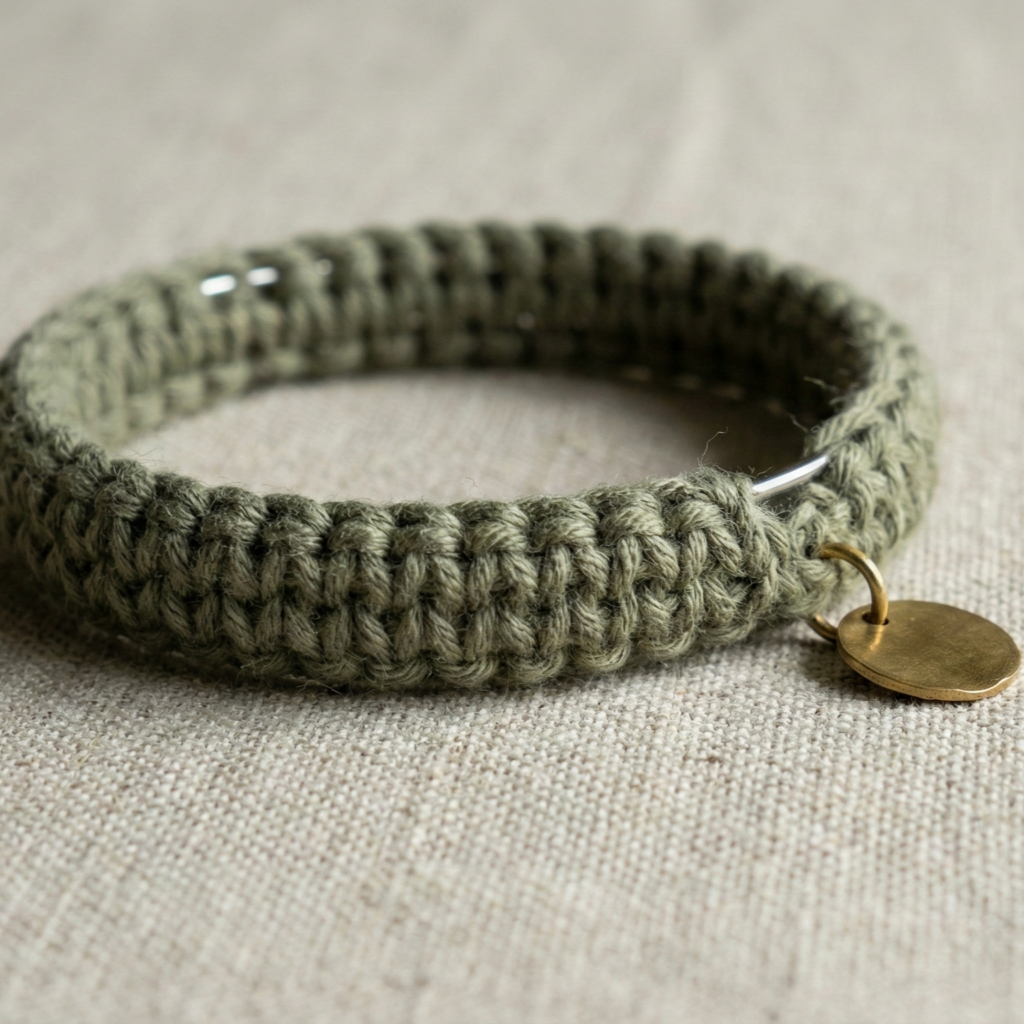
Style: Minimal, sculptural hoop made by crocheting around a metal bangle or rigid base. Clean, modern, and great as a base for charms.
Skill level: Confident beginner
Materials
- Fine DK or sport-weight cotton or silk blend — ~20–35 yd (one color).
- 3.0–3.5 mm hook (or size to get neat stitches around hoop).
- Metal bangle or hardware hoop (inner diameter matching wrist size), pliers.
- Tapestry needle, optional charms and jump rings.
Finished size & gauge
- Sized to fit the chosen bangle. Plan for a closely worked sc fabric so the crochet covers the hoop smoothly; 7–9 sc per inch is typical with fine yarn.
Step-by-step
- Prep the hoop: choose a metal bangle with no sharp edges and an inner diameter comfortable for the wearer. If the bangle is a split ring, ensure closure is secure.
- Make a foundation row around the hoop:
- Tie the yarn to the hoop with a slip knot and pull snug; leave a 6–8 inch tail for weaving.
- Work sc stitches evenly spaced around the hoop. To keep tension even, aim for about 7–9 sc per inch (adjust by eye). Use a stitch marker every 10 stitches as a reference.
- Work subsequent rounds:
- Continue working rounds of sc in continuous rounds (spiral) or joined rounds, keeping stitches close together so the crochet fabric sits flat on the hoop. Usually 4–8 rows of sc will produce a neat band; the number depends on hoop width and desired look.
- Add accents (optional):
- Once the base is covered, add a round of shell stitches for a fluted edge: work (2 dc, ch2, 2 dc) into every 6th stitch around, spacing to create scallops.
- Alternatively, attach small jump-ring charms evenly placed by sewing through the stitch base and fixing the ring with a few secure stitches.
- Finish:
- Fasten off, weave in ends tightly into the inner side of the hoop. If using a split bangle, hide the ends inside the split and secure with a small dot of glue if necessary.
Variations
- Use two different yarn colors, changing color across a single round for a striped hoop.
- Crochet a lace overlay (picot or openwork) and line the inside with soft felt for comfort.
Finishing & care
- Spot-clean; hand wash shaped items. Avoid bending the hoop repeatedly to prevent strain on stitches.
Styling tip
- Wear as a single sculptural piece or stack 2–3 hoops in complementary colors for a modern layered look.
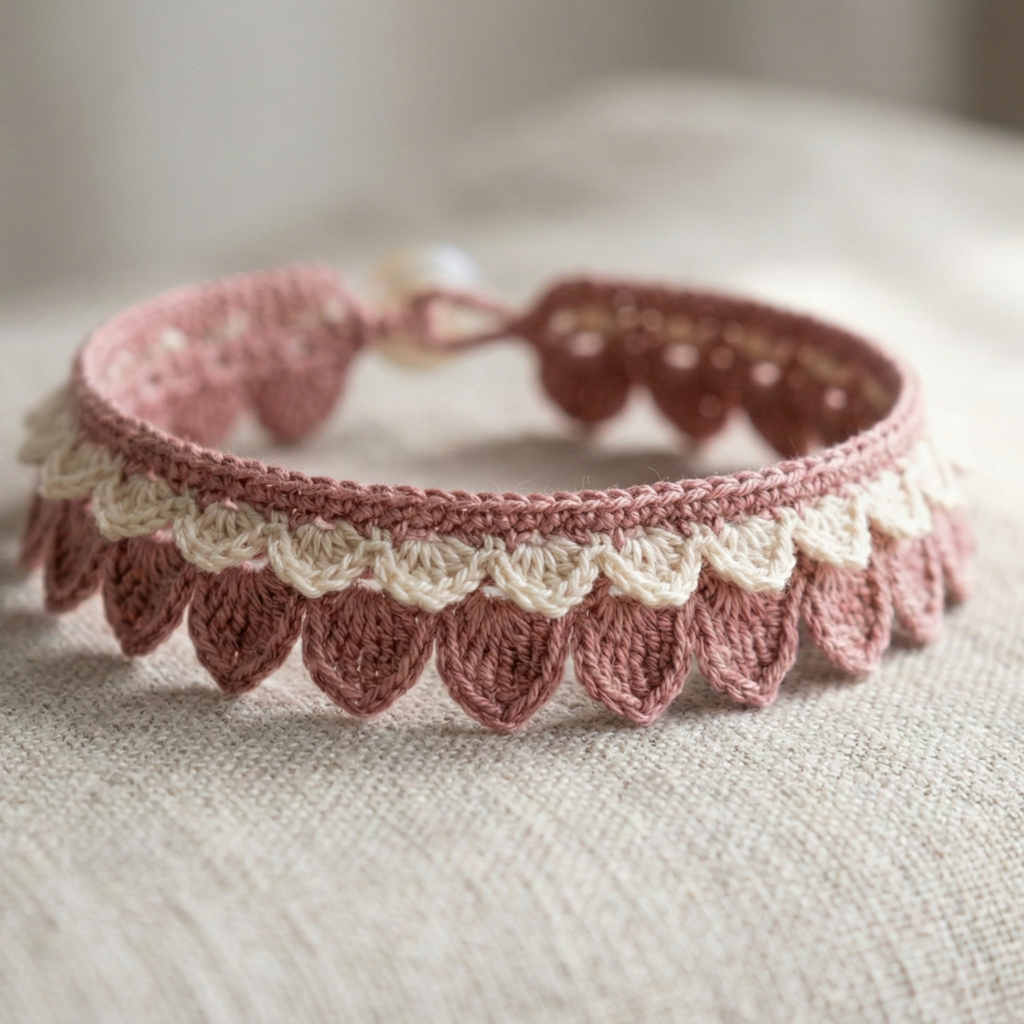
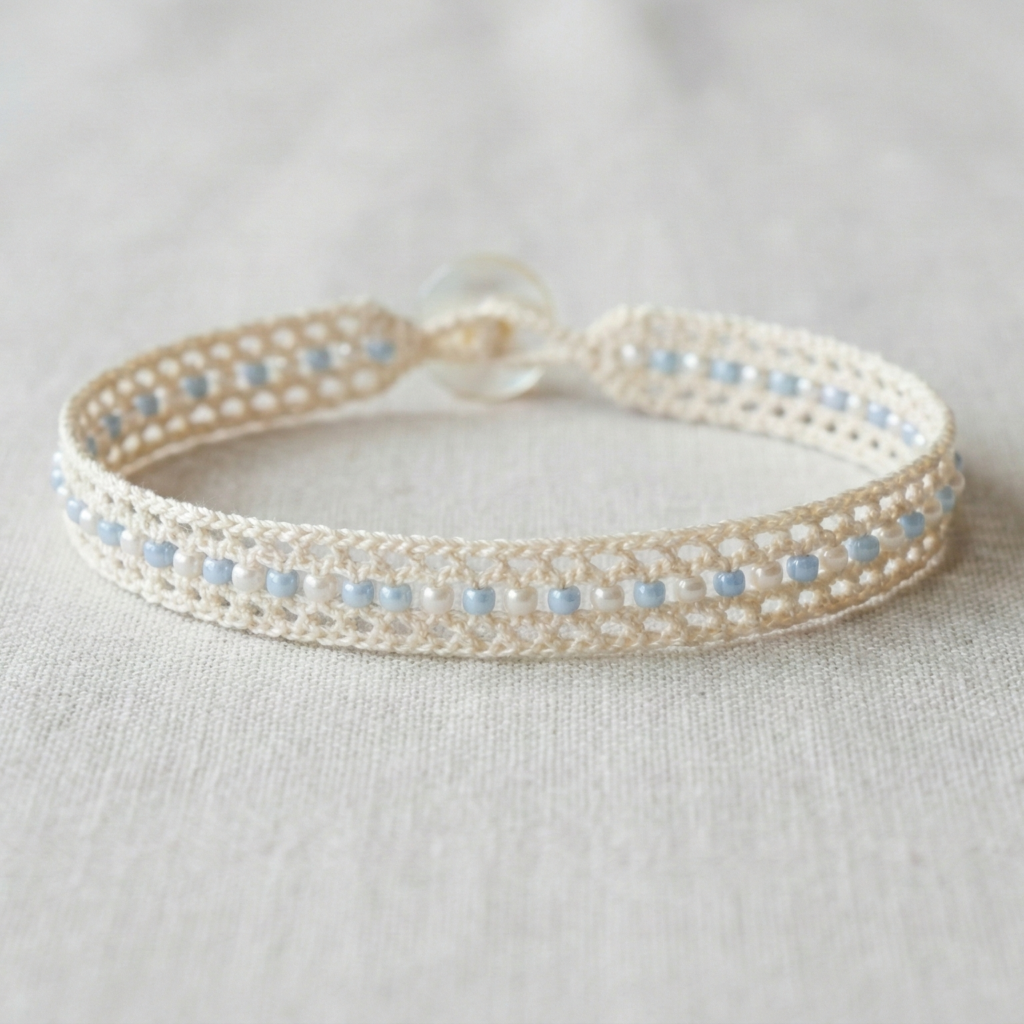
2. Crochet Dainty Flower Trim with Pearls Bracelet Pattern
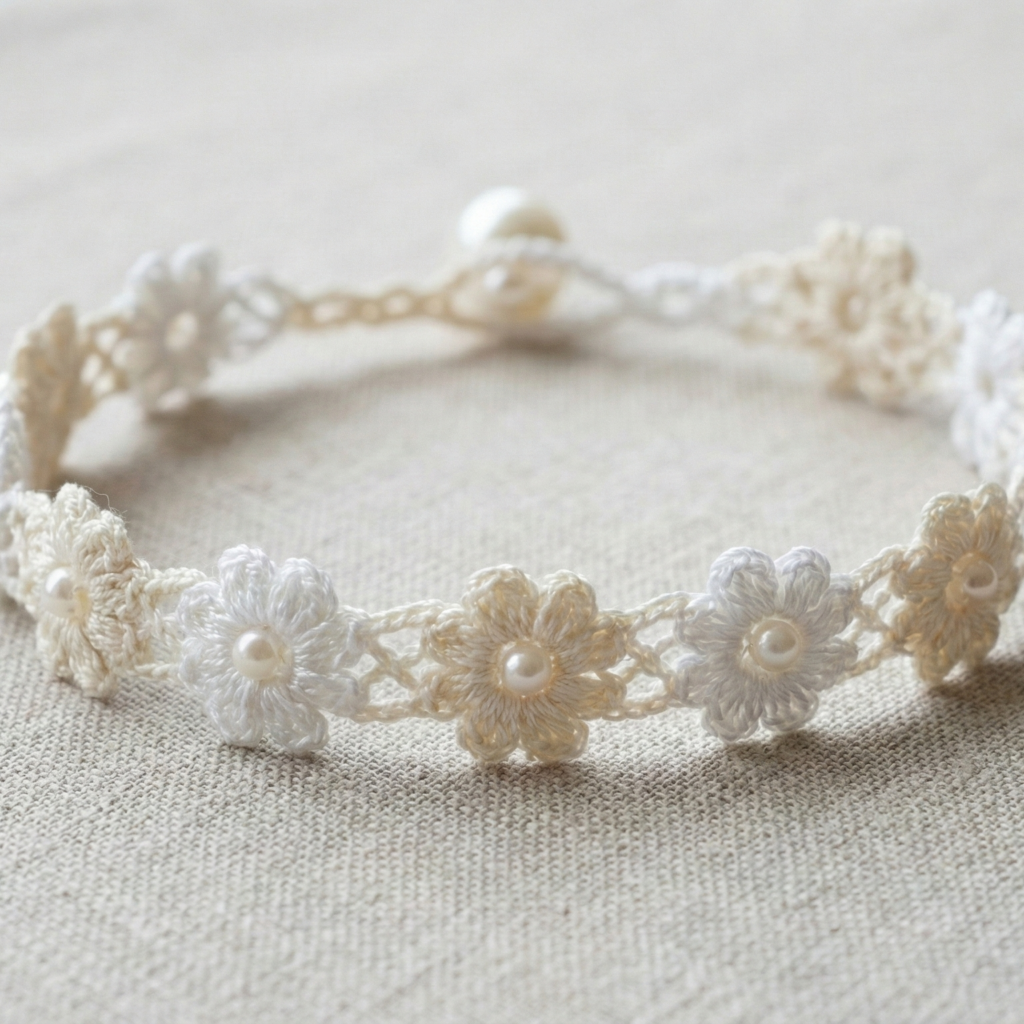
Style: Romantic, lace-like row of tiny flowers accented with seed pearls; closes with a pearl button.
Skill level: Intermediate (beads + small motifs)
Materials
- Size 10 crochet thread or fingering-weight cotton — ~10–15 g main color.
- Tiny freshwater or glass seed pearls (2–3 mm) — approx 12–16.
- 1.25–1.75 mm hook (thread size).
- Small pearl or decorative button for closure, tapestry needle.
Finished size & gauge
- Finished length equals wrist circumference + desired ease. Flower motif width about 0.5–0.75 in; plan motifs to form a row around the wrist (usually 8–12 motifs).
Step-by-step
- Pre-string pearls: Thread pearls onto a length of your crochet thread before you begin. Keep them out of the way near the skein end.
- Foundation chain: Chain a number of stitches that will produce the desired length — a multiple matching the flower repeat (for this pattern, a multiple of 4 + 1 works well). Example for 7″ wrist with thread gauge ~8 ch/in → 7 × 8 = 56 ch, rounded to fit repeat.
- Row 1 (base): sc in 2nd ch and across to create a firm base row. Join if working in the round or continue flat for a seam.
- Flower trim (repeat across):
- ch3, skip 1 ch, sl st into next ch to form a little loop; into that loop work (sc, hdc, 3 dc, hdc, sc) to form a small flower petal cluster; sl st into base to secure. Slide a pearl up to the hook and work a sl st or sc to lock the pearl into the petal center (or sew the pearl on after crocheting, whichever you prefer). Repeat across.
- If working in the round, continue motifs until you reach the final repeat.
- Finishing row: Add a final single crochet round to tidy top edges. Create a small loop at one end large enough to fit the pearl button: ch5, sl st to base where you want the loop; secure.
- Attach button: Sew pearl or decorative button to the opposite end and reinforce with several passes of thread.
Variations
- Replace pearls with tiny glass beads strung on thread and locked in place with sc — gives sparkle.
- Make a double-row by joining two trimmed strips edge-to-edge to create a wider cuff.
Finishing & care
- Hand wash cold and lay flat. Avoid machine agitation to prevent bead loosening.
Styling tip
- Perfect with a delicate daytime dress or stacked with thin gold bangles for a bridal-ready look.
3. Crochet Flirty Petal Bracelet Pattern
Style: A narrow cuff made of layered petal motifs that flare slightly above the wrist — playful and tactile.
Skill level: Intermediate (motif shaping and join)
Materials
- Fingering or sport weight cotton — ~25–40 yd.
- 2.5–3.25 mm hook.
- Small toggle or button closure.
- Tapestry needle.
Finished size & gauge
- Petal motif width ~0.75–1.0 in. You’ll need 6–10 petals to encircle a typical wrist depending on petal size.
Step-by-step
- Petal motif (make N petals):
- MR, ch1. Round 1: 6 sc in MR — join (6).
- Round 2: ch2, 4 dc in next st, ch2, sl st in same st — creates one petal. Repeat around to make 6 small petals in a compact circle. For a larger petal, work more dc in each petal or add an extra round of petals built on wider arcs. Make 8–10 separate petal units (single petals that will be joined edge to edge).
- Join petals into a cuff:
- Lay petals in a row with right sides up, overlapping slightly so petals form a scalloped edge. Join them by whipstitching through the back loops of adjacent petals or using join-as-you-go: slip stitch into edge of petal to connect, then continue to the next petal.
- Make a second row (optional):
- For dimension, make a second row of smaller petals and sew them staggered on top of the base row, nesting between the lower petals to create a layered ruffle.
- Edge & closure:
- On the underside (the side that will sit against the skin), sew a narrow band of sc to make the cuff comfortable and stable. Add a button or toggle at one end and an elastic loop or chain loop at the other end for closure. Optionally make two button positions for adjustable fit.
Variations
- Use gradient yarn for ombré petals.
- Add a tiny bead at the base of each petal for subtle sparkle.
Finishing & care
- Weave in ends and block lightly to open petals. Hand wash recommended.
Styling tip
- This piece pairs well with short sleeves and rolled cuffs — the petals peek out and make a flirty accent.
4. Crochet Vintage Rose Bracelet Cuff Pattern
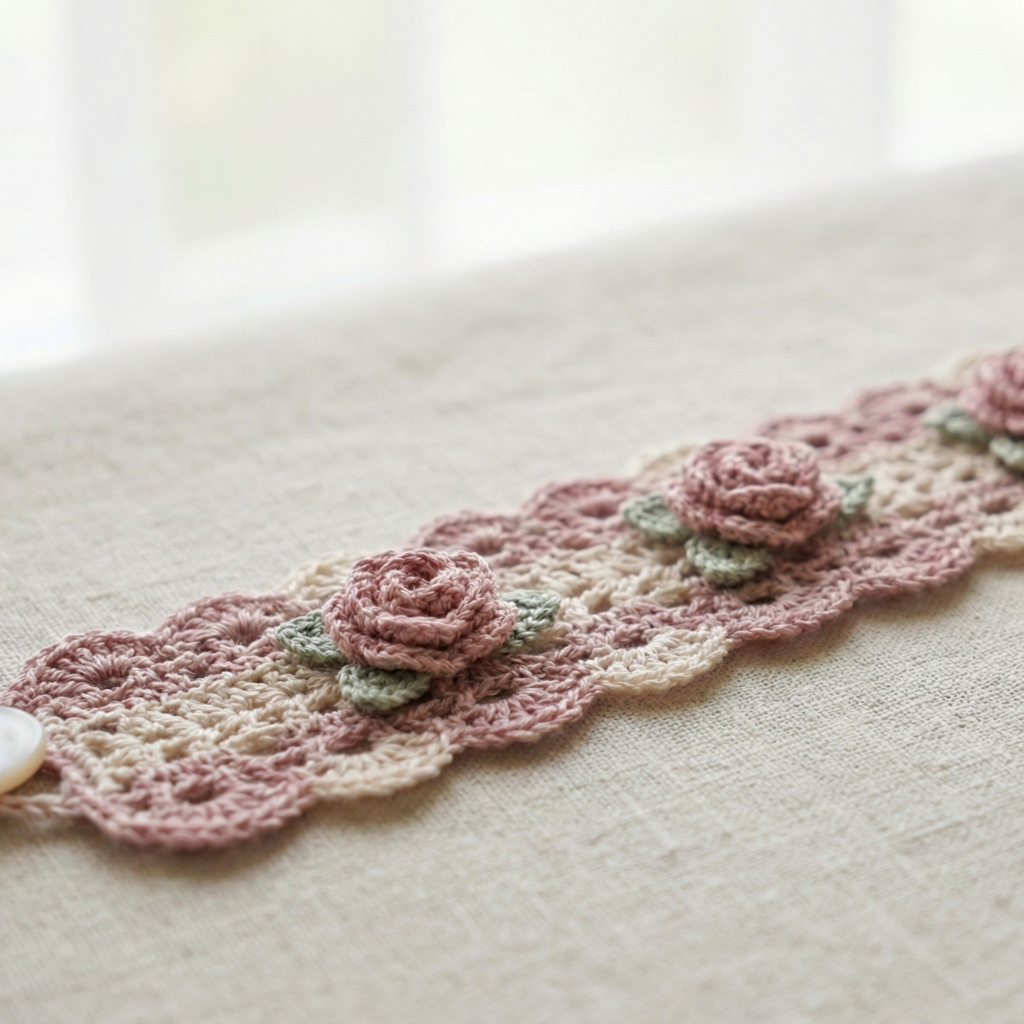
Style: Bold cuff with raised rose appliqué(s) and textured background, finished with a decorative toggle — vintage inspired.
Skill level: Intermediate → advanced (3D flower shaping + sturdy cuff construction)
Materials
- Sport / DK cotton or lightweight wool — ~30–50 yd (main) + small amount for rose contrast.
- 3.0–3.75 mm hook.
- Decorative toggle clasp (1 set), small piece of felt for backing, tapestry needle.
Finished size & gauge
- Cuff width 1.5–2.5 in typical; circumference as wrist measurement plus ease. Backed cuff is more robust for toggle attachment.
Step-by-step
- Cuff base:
- Chain foundation to desired circumference (use your swatch to compute stitches). Join into a ring and work in rounds of a textured stitch (e.g., waffle stitch or moss stitch) until the cuff reaches desired width (1.5–2.5 in). For a firm base use sc or hdc rounds in the beginning and end.
- Rose applique (make 1–3):
- Option A — Spiral rose: Ch 50 (or adjust for size). Row: sc in 2nd ch from hook and across. Fasten off. Roll the strip up from one end to form a spiral and sew the base as you roll to form the rose; secure with stitches at the base.
- Option B — Petal rounds: MR; Round 1: 6 sc in MR; Round 2: ch3, 3 dc in next st, ch3, sl st in next st to form petal loops; continue and build concentric petal rounds.
- Attach roses to cuff:
- Pin roses to cuff in the desired arrangement (center or offset). Sew them firmly through the rose base into the cuff fabric, catching multiple rounds of cuff fabric to distribute stress.
- Back lining & toggle attachment:
- Cut a felt strip to match the cuff interior. Sew felt to the inner side (hand-sewn) to hide stitches and protect skin. Sew toggle halves through the felt and through several rows of cuff stitches on opposite sides to create a secure closure — use numerous passes and backstitch to anchor well.
- Finishing:
- Weave ends, trim excess felt inside. Consider gluing the felt edges with fabric glue and then hand-stitching to secure.
Variations
- Add leaves crocheted in green and sew them into the rose base.
- Make multiple small roses for a wreath effect or a single dramatic bloom for focal style.
Finishing & care
- Remove the cuff before machine washing, or hand wash gently and reshape. Felt backing can be hand-stitched out for washing and reattached if you want a washable cuff.
Styling tip
- This cuff works beautifully with vintage lace blouses or as a statement piece with a plain dress.
5. Crochet Clover Bracelet Pattern
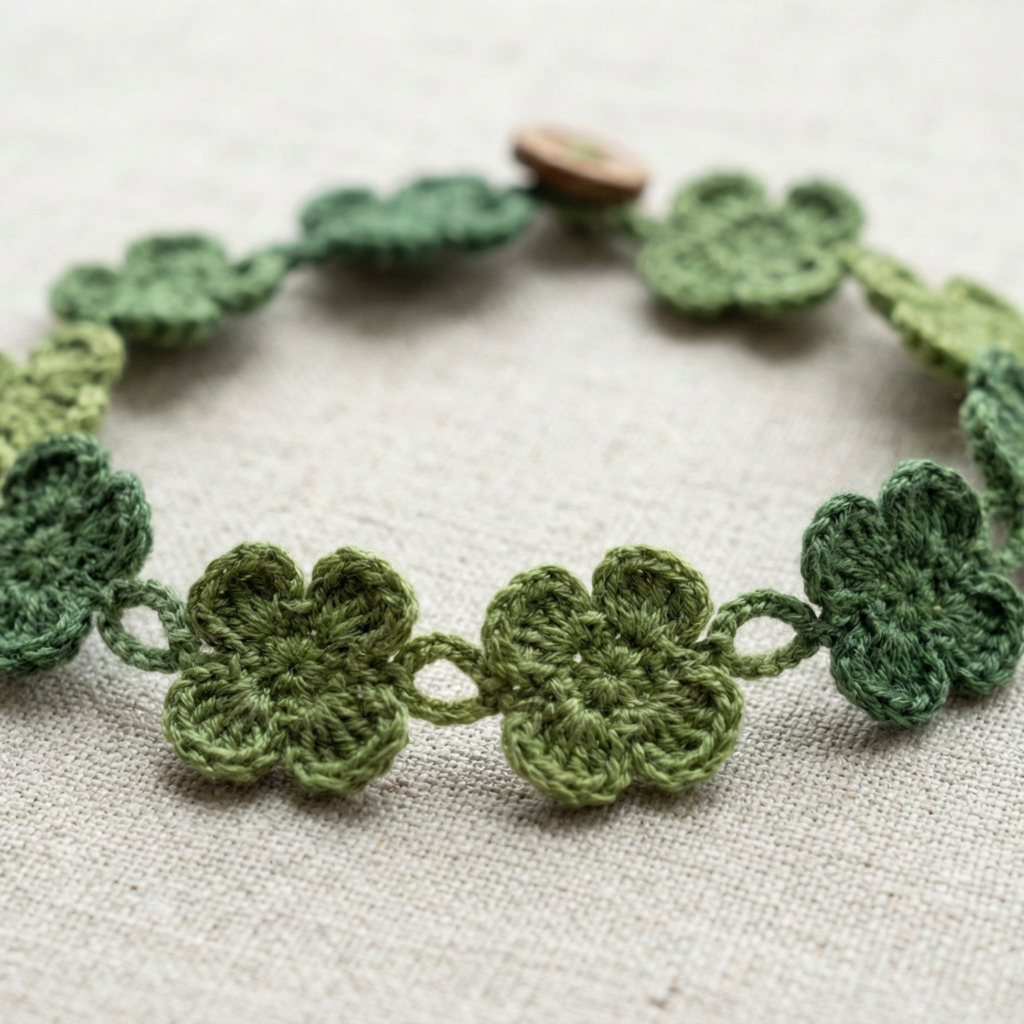
Style: Sweet, motif-based bracelet of small clover motifs joined into a delicate chain; perfect for gifting and symbolic wear.
Skill level: Confident beginner
Materials
- Fingering or sport cotton in green (main) and optional accent — ~20–30 yd.
- 1.75–2.5 mm hook.
- Small clasp or button, tapestry needle.
Finished size & gauge
- Four-leaf clover motif ~0.6–0.9 in across; number of motifs depends on wrist circumference (expect 8–12 motifs for a 7″ wrist).
Step-by-step
- Single clover petal (make 4 per clover):
- MR; ch1; 6 sc in MR; R2: ch3, 4 dc in next st, ch3, sl st in next st to create a petal. Repeat until you have 4 petals in a small circle. Fasten off and make 8–12 clovers.
- Join clovers into a chain:
- After blocking, lay clovers flat and join them by slip-stitching the last round of one clover into the starting round of the next or use a small tying stitch to connect through the petal bases to form a smooth chain. Leave a short gap at one point to attach clasp and jump ring.
- Add tiny connector/links (optional):
- Between motifs you can add a small chain of ch3 to allow gentle movement.
- Closure:
- Sew a small button and loop or attach a tiny lobster clasp and jump ring.
Variations
- Alternate dark and light green for visual interest.
- Add a single metallic bead between clovers for sparkle.
Finishing & care
- Block motifs to shape before joining. Machine-washable yarns okay on gentle; otherwise hand wash and air dry.
Styling tip
- Charming for daytime wear, and pairs well with a garden-themed outfit or spring wardrobe.
6. Crochet Sands of Time Bracelet Pattern
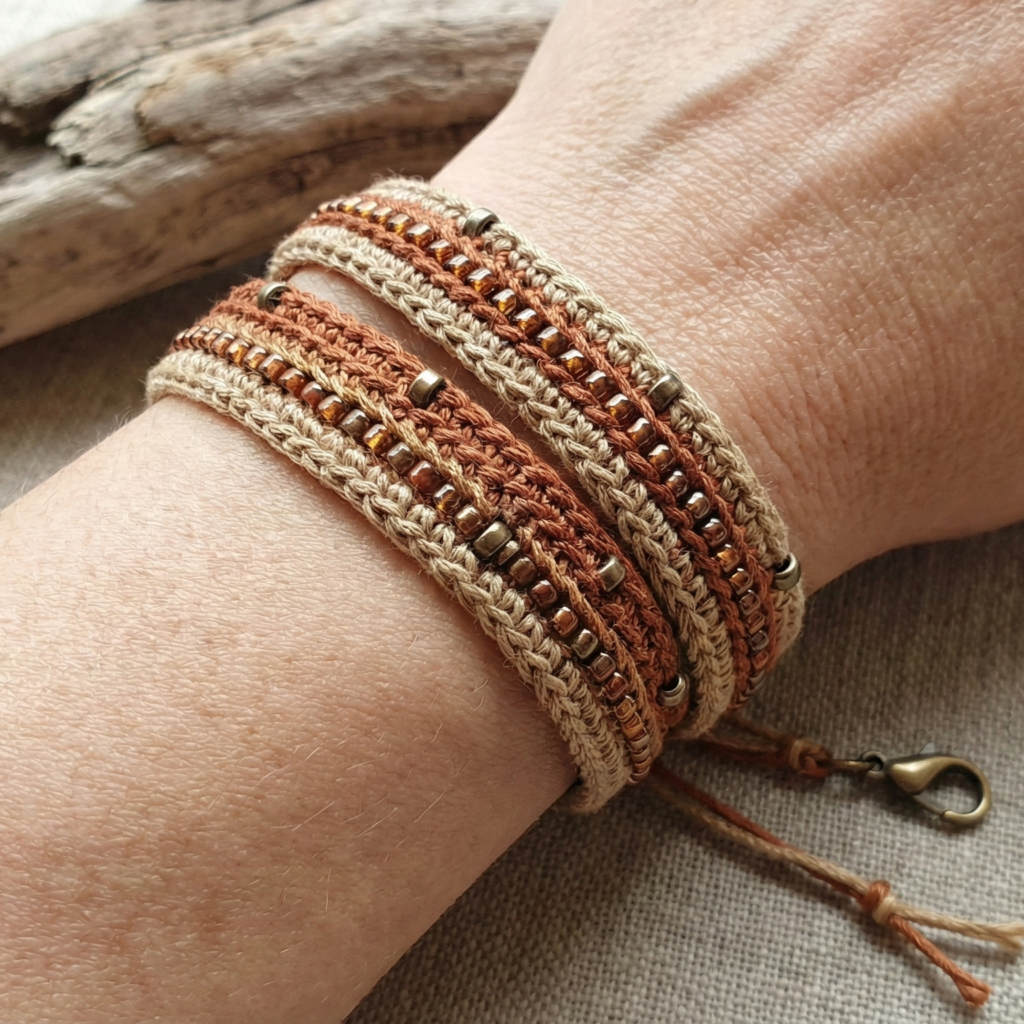
Style: A narrow wrap bracelet inspired by geological layers — long, beaded wrap with a sliding knot closure (or clasp). Rustic, boho, and great with mixed materials.
Skill level: Intermediate (beadwork and long wrap construction)
Materials
- Fine cord or mercerized cotton + small accent yarn — ~40–60 yd total.
- Seed beads (size 11/0), metallic spacers optionally.
- 1.5–2.5 mm hook or use a beading needle technique.
- Small lobster clasp or sliding knot materials.
Finished size & gauge
- Designed as a double or triple wrap depending on wrist size. For a double wrap on a 7″ wrist you need approx 14–15″ of finished length for the wrap plus extra for the knot (use 30–36″ working length before blocking).
Step-by-step
- Pre-string beads if preferred: If crocheting with beads, string seed beads onto yarn/cord before you start. For bead placement, plan a repeating motif like 3 beads, 2 sc, 4 beads, 2 sc.
- Foundation chain / wrap length: Chain the length needed for the wrapped bracelet taking into account how many times you’ll wrap (e.g., for double wrap, chain 15″ × 2 = 30″; convert inches to stitches with your swatch).
- Beaded row technique:
- Work in single crochet or hdc; when you reach a stitch where a bead is needed, slide a bead into place and work sc to secure it (or use sc with bead: slide bead into loop before pulling final loop to trap bead at the stitch top). Continue following the bead chart or spaced pattern across the length.
- Finish ends: Create a small loop at one end (ch6, sl st back) and add a small button or bead knot at the other end for closure, or attach lobster clasp and jump ring. For sliding knot closure use wrist-length cord ends and tie a double sliding knot for adjustability.
- Optional wrap layers: You can add rows of plain sc between bead rows to create a multi-texture “sands” effect — alternate bead rows and textured rows (moss stitch) to mimic strata.
Variations
- Mix seed beads and small pearls for a refined take.
- Use leather cord for an edgier look and crochet a thin lacy strip to overlay.
Finishing & care
- For cord pieces, avoid machine washing; wipe clean. For cotton versions, gentle hand wash recommended.
Styling tip
- Wrap bracelets look best layered with thin metallic bangles or a leather watch.
7. Crochet Seed Bead Bracelet Pattern
Style: Elegant, delicate bracelet where seed beads are integrated into a lace band; fastens with a tiny toggle or button.
Skill level: Intermediate (beadwork + lace)
Materials
- Size 10 crochet thread or fingering cotton, seed beads 11/0 — ~10–20 g thread, 30–80 g beads depending on design.
- 1.25–1.75 mm hook, beading needle.
- Tiny toggle or pearl button.
Finished size & gauge
- Lace band width typically 0.25–0.5 in. Plan bead counts per inch from a small beaded swatch. For 7″ wrist aim for length of 7.25–7.5″ incl. clasp.
Step-by-step
- Pre-string beads: Thread beads onto yarn using a beading needle. For an elegant single-row beaded chain, add a bead at every second stitch or follow a repeating pattern.
- Foundation: Chain foundation to the required length (accounting for bead spacing). Example: for main band chain 56 if your bead spacing and gauge produce ~7″ in length.
- Lacy band with beads:
- Row 1: sc across as base.
- Row 2: ch3, slide bead into place, sl st to next base st — this creates bead-in-chain pattern with beads sitting in the arches. Alternatively incorporate bead directly into a picot or picot-flower center by sliding bead up then working (ch3, sl st into base).
- Repeat rows: Work 3–4 rows to create a band of desired width with beads embroidered into the top row for sparkle. If you prefer beads all along the band, incorporate beads row after row in a grid.
- Closure: Add a tiny toggle clasp sewn securely through multiple passes or add a pearl button with a small loop.
Variations
- Work beads in a gradient color progression for an ombré effect.
- Add a narrow lace edging around the beaded strip to finish edges and provide structure.
Finishing & care
- Hand wash and lay flat. Because beads can chip or abrade, avoid heavy friction.
Styling tip
- Beaded bracelets shine best with open sleeves and muted tones; they’re ideal for evening wear.
Conclusion
You now have seven full bracelet designs that run the gamut from minimalist hoops to beaded lace and sculptural florals. A few practical tips to make your post even more useful for readers:
- Provide exact stitch counts and one printable size: For each bracelet include a small table with finished circumference (S/M/L), suggested yardage, and recommended hook — especially helpful for readers who want multiple sizes.
- Show construction photos & close-ups: For each pattern include a clear photo of the bracelet flat, a close-up of the stitch detail, and a styled photo on an arm for scale. A short 3–5 image step sequence (foundation, motif, assembly, finished clasp) improves usability.
- Offer care & materials list: Always add a clear “materials” box and a one-line care recommendation under each pattern (e.g., “hand wash cold, reshape and lay flat to dry”).
- Suggest sellable add-ons: e.g., matching earrings, a gift box, or a set of 3 stackable bracelets — useful if readers make items for craft markets.
- Photography tips: use natural diffused light, neutral backgrounds, and a macro lens or phone macro mode for bead/lace photos. Include a lifestyle shot with complementary props (coffee cup, book, or a linen top).
- SEO & pinnable images: create a vertical 9:16 pin image with bold title text on the top, one large product photo, and a color palette swatch strip. Use keywords in alt text: “handmade crochet bracelet pattern”, “beaded crochet bracelet DIY”, etc.