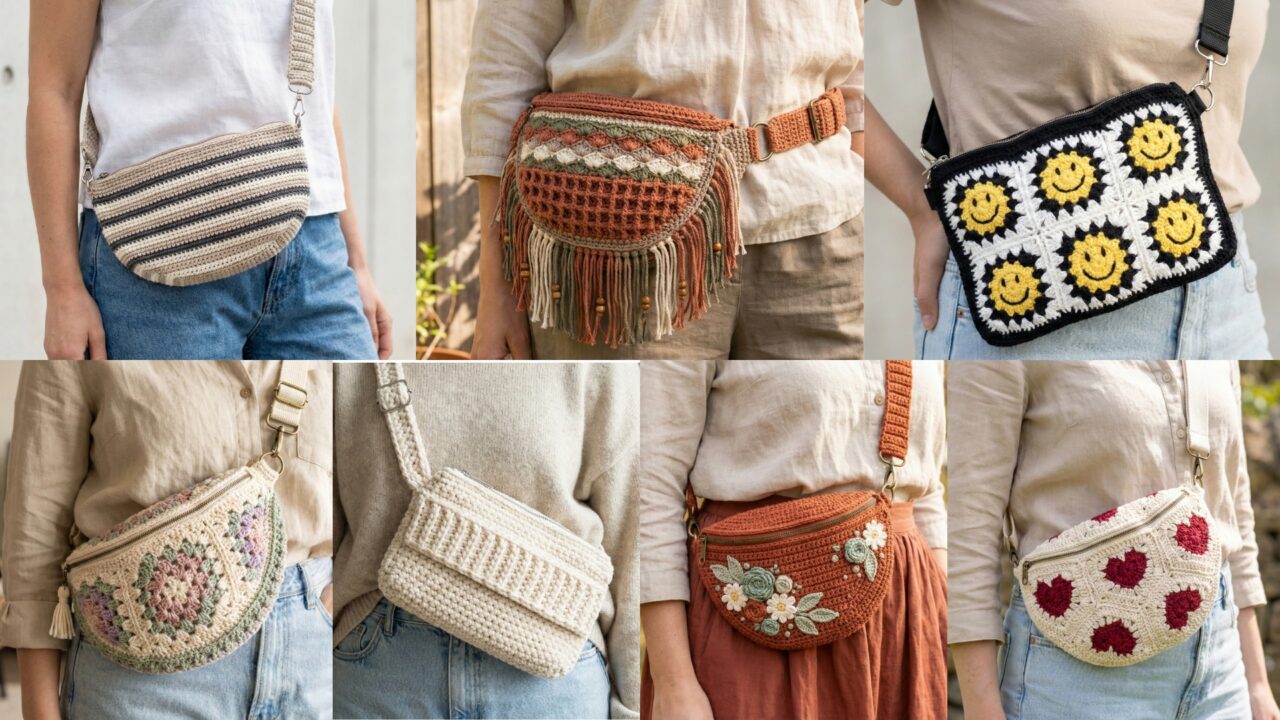
Waist bags / crossbody bum bags are back — they’re convenient, hands-free, and a perfect small project to show off texture, colorwork, or granny motifs. Below you’ll find a friendly introduction (materials, sizing, straps, closures, lining & care) and seven full bag patterns with clear materials lists, stitch notes, step-by-step construction, finishing tips, and styling ideas. Each pattern is written so you can follow it from start to finish and customize easily.
Quick Intro — materials, tools, sizing, straps, closures, lining & a gauge example
Yarn & fiber choices
- Cotton / cotton-blend (DK – worsted): the best all-around choice — sturdy, holds shape, washable.
- T-shirt yarn / rope / bulky: great for very structured, fast bags (chunky look).
- Acrylic blends: softer, colorful, and washable — OK for fashion bags but less rigid.
Pick fiber for the look and expected use: market/utility bags → cotton or rope; fashion/festival bags → DK acrylic or cotton blends.
Hooks & tools
- Hook sizes typically range 3.5–6.5 mm depending on yarn. Use a slightly smaller hook than the yarn label suggests to reduce stretch in load-bearing areas.
- Notions: tapestry needle, stitch markers, measuring tape, fabric for lining (cotton/quilting cotton), sewing thread, small zipper or magnetic snap, rivets/D-rings for adjustable straps (optional), sewing machine (helpful).
Hardware & closures
- Zippers (6–9 in) for secure pockets.
- Magnetic snaps or sew-on snaps for easy closure.
- Adjustable webbing or leather straps attached with D-rings for crossbody function.
- Buckles for waist straps (plastic side-release for casual looks, metal for refined looks).
Straps & conversion options
- Waist belt: shorter strap, usually 26–46 in (adjustable).
- Crossbody strap: longer strap, usually 40–52 in (adjustable).
- Many of the patterns below include instructions to make the bag convertible (add D-rings and a longer strap to convert waist bag → crossbody).
Lining & structure
- Lining adds structure and hides seams. For heavy use, add a thin interfacing or plastic canvas to base. Sew a lined pocket for phone/key organization.
- To compute lining size, measure finished interior width × height × depth then subtract seam allowances (e.g., 0.5 in per side).
Gauge & sizing example (digit-by-digit)
If your stitch gauge is 4 sc = 1 inch and you want a bag body 12 inches wide, compute stitches:
- 4 × 12 = ?
- 4 × 10 = 40
- 4 × 2 = 8
- 40 + 8 = 48 stitches across.
Round to the nearest multiple required by your stitch pattern if needed.
Safety & care
- For children’s bags avoid tiny glued-on beads — sew everything securely.
- Machine-washable: choose washable yarn and remove any rigid hardware if required. Line-dry to keep shape.
1. Crochet Granny Square Waist Crossbody Bum Bag Pattern

Classic granny, reimagined as a compact, stylish waist/crossbody bag. Make a central granny panel, line it, and add a sturdy strap.
Skill level: confident beginner
Finished size (example): 8.5 in W × 6.5 in H × 2 in D (small everyday bum bag)
Materials
- DK cotton in 2–4 colors — ~250–350 yd total
- Hook: 4.0 mm
- 1 zipper (8 in) or magnetic snap, tapestry needle, fabric for lining, 1 D-ring + buckle for adjustable strap (optional)
Stitches used
- ch, sc, hdc, dc, tr, sl st (standard granny cluster = 3 dc cluster)
Construction overview
Make several granny squares or one large granny, join into a front panel, work a matching back panel (solid or granny), crochet side gusset and bottom, add lining and strap.
Step-by-step
A — Make motifs
- Classic granny square (make 4 small squares ~4.5 in each) or one large granny square to match finished width. Example small granny: MR, ch3, 2 dc, ch2, (3 dc, ch2) ×3 → Round 2 add 3-dc clusters in corners and 1 dc in side spaces until desired size.
B — Join panels
2. Layout squares into a rectangle (2 × 2 for small bag) and join-as-you-go or sew edges with mattress stitch. Make a matching back panel (same layout or plain dc panel).
C — Gusset & base
3. Pick up stitches along edges of joined panels and work sc or hdc around to form side gusset and base. For 2 in depth, work enough rounds to create that depth (measure as you go).
D — Top edge & closure
4. Add zipper: attach zipper to top with whipstitch or topstitch through lining. If using magnetic snap, sew snap to lining and top band.
E — Strap
5. For waist: attach strap ends to bag sides with D-rings sewn into sturdy top band (reinforce with extra passes). For crossbody: create longer adjustable strap with a buckle or use purchased webbing threaded through D-rings.
F — Lining
6. Cut fabric lining to interior dimensions minus seam allowance. Sew pocket(s) and insert lining into bag; hand stitch top edge of lining to top of bag for neat finish.
Finishing & styling
- Add tassel or pom-pom on zipper pull. Make colorways: pastel cottagecore or bold festival granny.
2. Crochet Chunky Cute Waist Crossbody Bum Bag Pattern

Quick, sculptural and built with bulky yarn for a trendy chunky look — works up fast.
Skill level: confident beginner
Finished size: 9–10 in W × 6 in H × 3 in D
Materials
- Bulky cotton or t-shirt yarn — ~400–600 yd
- Hook: 8.0 mm (or size that gives a firm fabric)
- Magnetic snap or zipper, lining fabric (optional), 1 buckle for waist strap
Stitches
- sc, hdc, dc, fpdc/bpdc for texture
Construction overview
Crochet a firm rectangular tube (or a box bottom + sides) in bulky yarn. Add top band, lined interior, and a chunky strap (crochet rope or fabric webbing).
Step-by-step
A — Base & body
- Chain foundation for width (compute by bulky gauge). Work in sc in rows until base height ~3 in. Fold and seam sides to create bottom, or work a box base by turning and increasing short sides.
- Alternatively work flat rectangle and seam bottom and sides seam to make bag shape.
B — Texture band (optional)
3. Add a wide texture band across front with fpdc ribs or a puff stitch row for cuteness.
C — Top & closure
4. Work 6 rounds of sc in BLO to make a neat top band; add magnetic snap or install zipper.
D — Straps
5. Make a thick braided strap from leftover yarn or crochet a wide strap in sc (double strand for strength). Attach ends securely through reinforced stitches and topstitch lining if using.
E — Lining
6. For bulky bags the lining adds a finished interior; cut and sew cotton lining and stitch in place.
Finishing & styling
- Chunky pastel or neutral tones are fashionable. Skip lining if you like raw interior for a quick market bag but reinforce strap attachment.
3. Crochet Smiley Faces Waist Crossbody Bum Bag Pattern
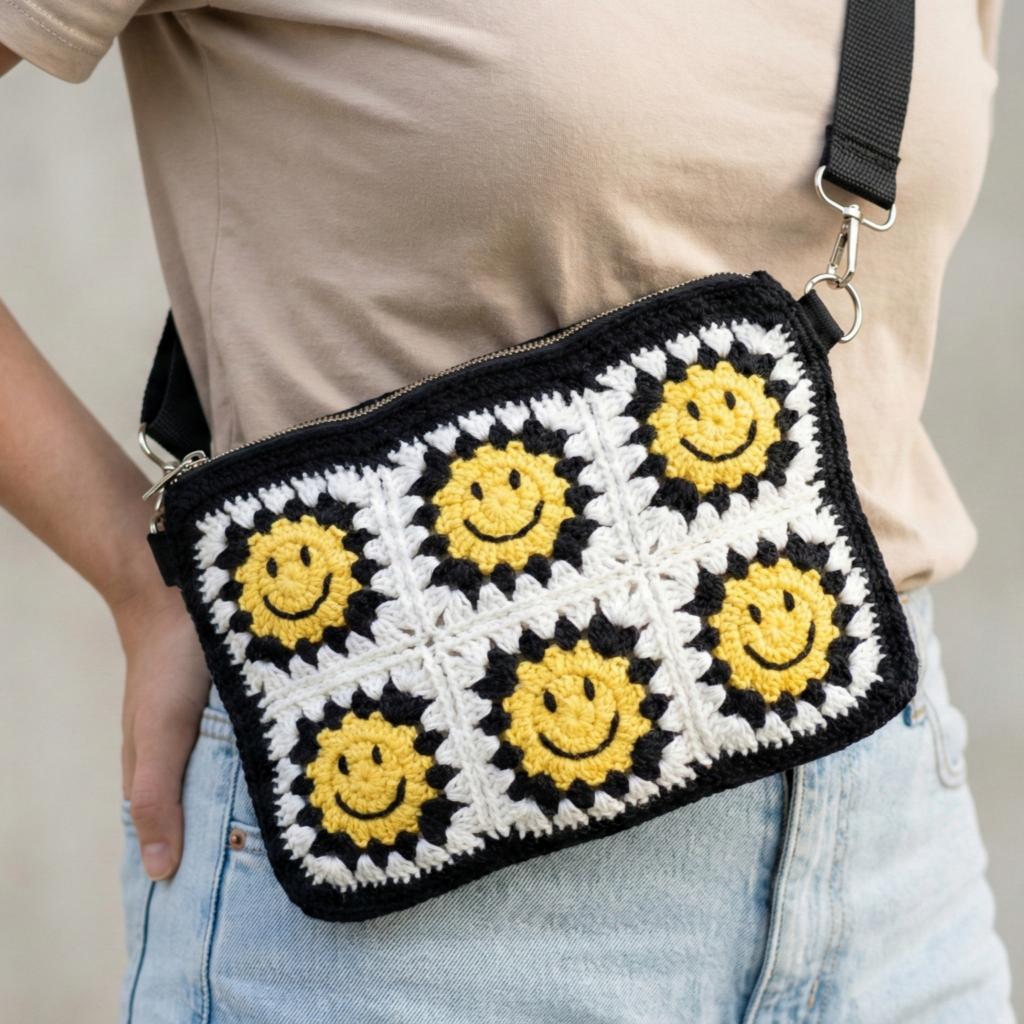
Playful, bold — smiley faces on a compact crossbody are great for festivals and streetwear.
Skill level: intermediate (intarsia or appliqué)
Finished size: 9 in W × 6 in H × 2 in D
Materials
- DK cotton in main color + contrasting yellow & black for smileys — ~300–400 yd
- Hook: 4.0 mm
- Zipper, lining fabric, D-rings for strap
Stitches
- sc for body, tapestry crochet (or appliqué smileys)
Construction overview
Work the bag body in sc; either tapestry crochet smiley faces into the front panel as you go or crochet small circular appliqués (yellow disks + embroidered smile) and sew them on.
Step-by-step
A — Body
- Chain foundation for width (e.g., 48 ch = 9 in if gauge 5 sc = 1 in). Work sc in rows until panel height ~6 in. Make back panel same size.
B — Add smileys (appliqué method — easier)
2. Make small smiley applique: MR, 10 sc in ring (yellow), R2 sc around for disk. Embroider eyes with black yarn (small satin stitches or French knots) and a smiling mouth. Make 3–5 smileys and arrange across front panel.
C — Join & gusset
3. Join front/back along sides and bottom using sc seam or mattress stitch. For depth, pick up stitches and work sc around base to create 2 in depth.
D — Top finish
4. Add zipper or flap with snap. If using a flap, sew on snap and add a small decorative stitch.
E — Strap
5. Add strap with D-rings for adjustability. Use webbing for durability or make a crochet strap double-strand for strength.
Finishing & styling
- For a secure festival bag, line and add a small internal zip pocket for cash/cards. Use bright color palette.
4. Crochet Heart Granny Square Crossbody Waist Bum Bag Pattern
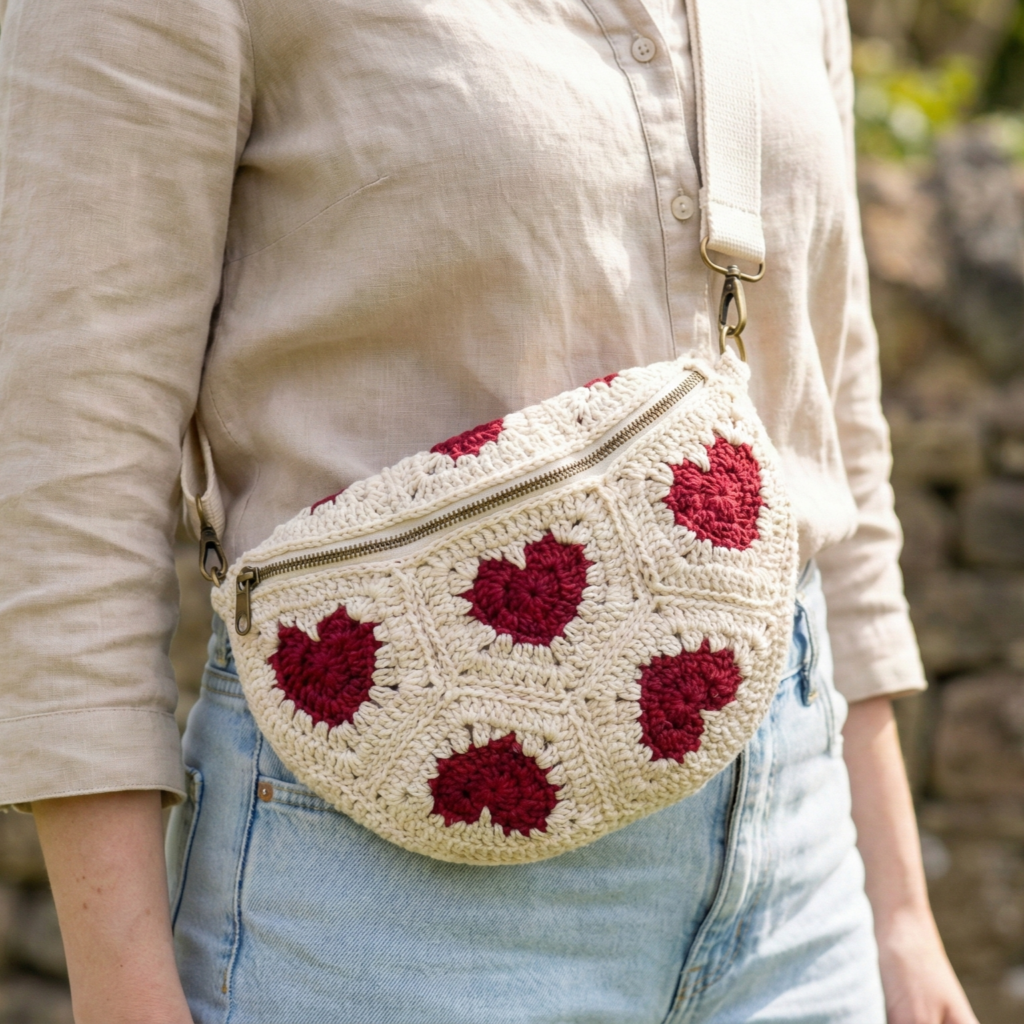
A heart-themed granny square bag — romantic, perfect for gifts. Uses heart granny motifs joined into a panel.
Skill level: intermediate
Finished size: 8–9 in W × 6–7 in H × 2 in D (varies with number of motifs)
Materials
- DK cotton in background and heart colors — ~300–400 yd
- Hook: 3.5–4.0 mm
- Magnetic snap or zipper, lining fabric, strap hardware
Stitches
- granny cluster (3 dc), heart motif in round
Construction overview
Make heart granny motifs (each ~3 in), join-as-you-go into a rectangle for front and back, add gusset and strap, line.
Step-by-step
A — Heart granny motif (make multiples)
- MR, ch3, 2 dc, ch2, 3 dc (round 1). R2: change color for heart fill: in corner spaces form shell petals that shape into a heart. Use a small heart chart or make a center heart disk and frame with granny rounds.
B — Join
2. Arrange motifs into rows (for example 3 × 2 layout for small bag). Join motifs with join-as-you-go or whipstitch to make front panel and matching back panel.
C — Gusset & base
3. Pick up stitches from panel edges and work sc around for gusset and base depth (2 in). Alternatively crochet a separate long strip equal to panel perimeter and seam it on.
D — Top & strap
4. Add a sc top band and sew in magnetic snap or install zipper. For strap, add D-rings and strap ends; make a matching granny strap for boho-chic look.
E — Lining
5. Line bag and add internal card pocket.
Finishing & styling
- Add small tassel hearts or a heart keyring. Make matching coin pouch.
5. Crochet Boho Belt Waist Crossbody Bag Bum Pattern

Boho fringe, beads, and earthy textures — designed to sit comfortably on the hip and convert to a crossbody.
Skill level: intermediate
Finished size: 9–10 in W × 6–7 in H × 2.5 in D
Materials
- DK or worsted cotton in earthy tones, optional beads or tassels — ~400 yd
- Hook: 4.0–5.0 mm
- 1 sturdy buckle (belt buckle) or alloy slider, D-rings for crossbody conversion, lining fabric
Stitches
- sc, hdc, dc, shell, macrame-style cord for belt
Construction overview
Work a textured front panel (shells or Waffle stitch), make a solid back, add long belt strap with buckle, and optional fringed trim.
Step-by-step
A — Front panel with texture
- Chain width for front (e.g., 48 ch). Work textured rows: Waffle stitch (fpdc and back loop rib) or shell rows for boho texture. Make front panel to height ~6 in.
B — Back panel & gusset
2. Make back panel in sc or hdc. Join sides and bottom with sc to make body and add gusset for depth.
C — Belt & hardware
3. For belt: crochet a long dense strap (double-stranded sc or use macrame cord) to required waist length + buckle overlap. Attach strap ends with metal buckle and reinforce with sewn patch inside bag. For crossbody: add D-rings to sides to clip a longer strap.
D — Fringe & beads
4. Add fringe across bottom of front panel: cut lengths of yarn, fold and knot through bottom edge. Thread small wooden or glass beads onto fringe ends if desired.
E — Lining & internal pocket
5. Line bag and include small zip pocket for valuables.
Finishing & styling
- Earthy neutrals and warm beads make a true boho piece. Make matching headband or bracelet.
6. Crochet Boho Rust Floral Waist Crossbody Bum Bag Pattern
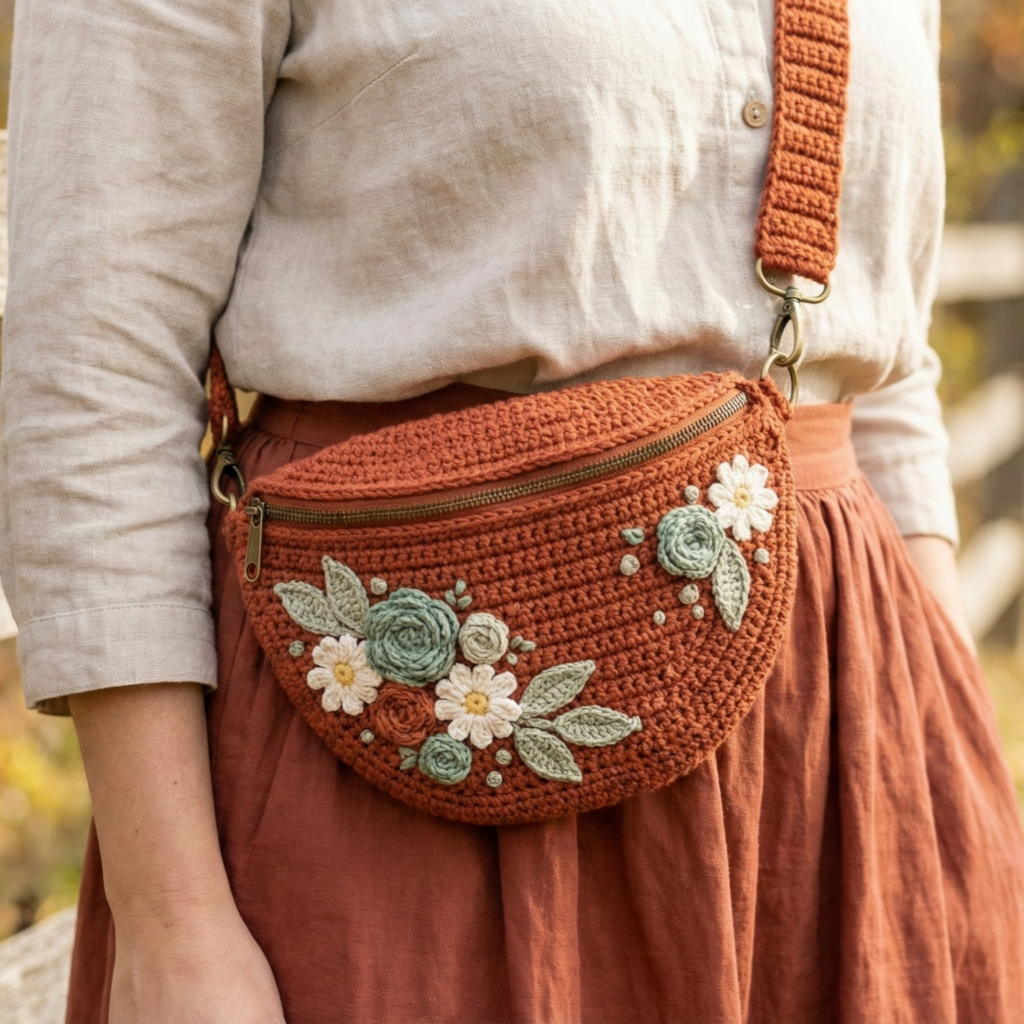
A floral tapestry-style bag using crochet appliqués or tapestry technique in a rust colour palette — pretty and wearable.
Skill level: intermediate → advanced (appliqué & colorwork)
Finished size: 9 in W × 6.5 in H × 2 in D
Materials
- DK cotton in rust, sage, cream, and accent colours — ~350–450 yd
- Hook: 3.5–4.0 mm
- Zipper, lining, strap hardware
Stitches
- sc, dc, small flower appliqués (petal shell)
Construction overview
Crochet a solid panel for front, sew floral applique garden onto panel, assemble bag, and line.
Step-by-step
A — Body panel
- Work a dense sc panel to desired size (e.g., 48 ch foundation worked in sc rows to 6.5 in height).
B — Floral appliqués
2. Make small rosettes, daisies, and leaves: rosette = rolled petal strip or layered rounds; daisy = MR, ch loops for petals; leaves = elongated sc shapes. Make 8–12 small appliqués in varying sizes.
C — Arrange & sew
3. Lay appliqués on front panel in an asymmetrical cluster. Sew securely using matching thread; anchor centers with small French knots or sewn beads (avoid beads for kids).
D — Assemble & gusset
4. Join front and back panels with sc rounds and add gusset. Add zipper at top.
E — Strap & finishing
5. Add adjustable strap with D-rings and add antique brass hardware for boho look. Line bag.
Styling
- Rust + sage is a gorgeous autumn palette. Make a matching scrunchie or headband.
7. Crochet Striped Crossbody Waist Bum Bag Pattern
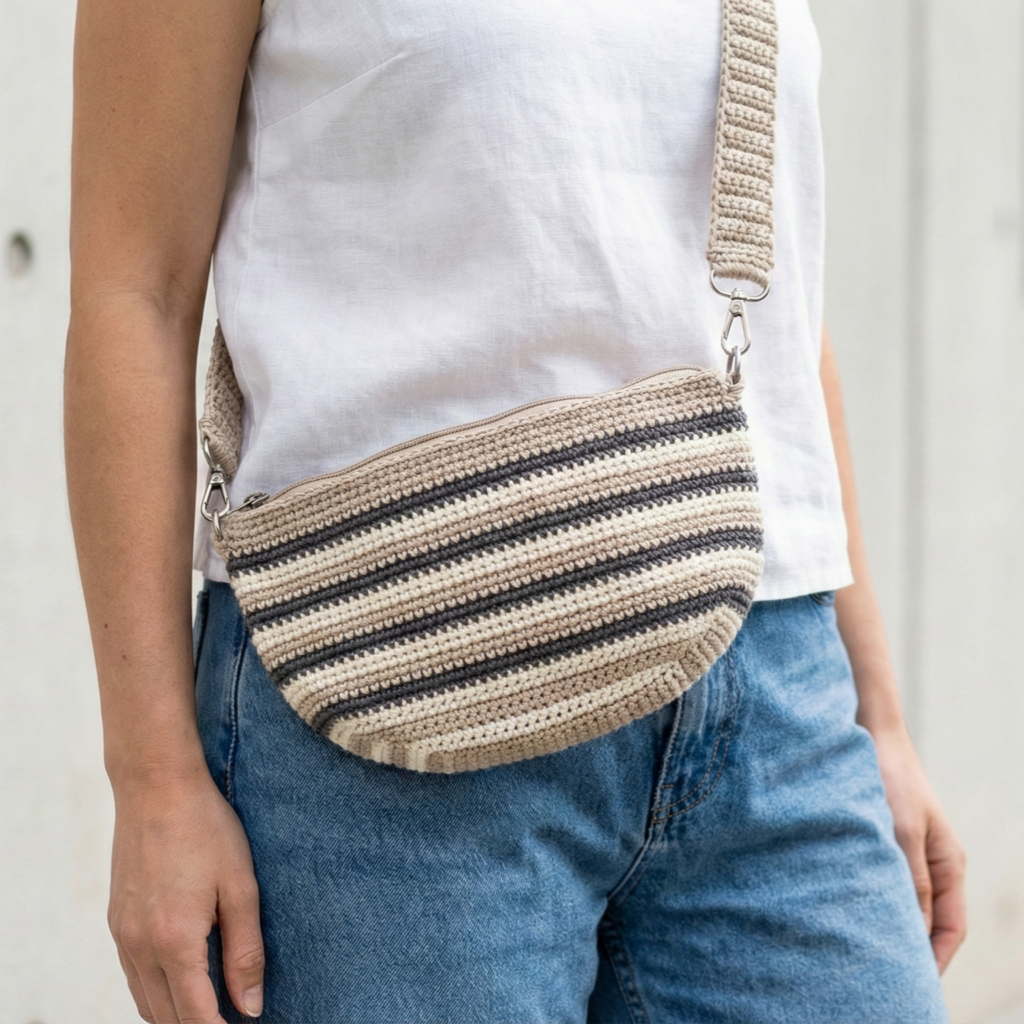
Clean, modern stripes — easy to customize length/width and convertible for waist or crossbody wear.
Skill level: confident beginner
Finished size: 9 in W × 5.5 in H × 2 in D
Materials
- DK or worsted cotton in 3 contrasting colors — ~300 yd
- Hook: 4.0 mm
- Magnetic snap or zipper, strap hardware
Stitches
- sc or hdc for tidy stripes; color changes every few rows
Construction overview
Work front and back panels in horizontal stripes, seam sides, add gusset, top band & strap.
Step-by-step
A — Panels
- Chain foundation for width and work sc rows, changing colour every 4 rows to create wide stripes. Make back panel to match.
B — Gusset
2. Join panels with sc around perimeter to form bag shell, leaving opening for zipper or adding a flap.
C — Top band & closure
3. For a neat top, work 6 rounds of sc in a single contrast color. Insert zipper or add snap.
D — Strap
4. Make an adjustable strap by crocheting a long strap in sc (double strand for strength) or attach webbing. Add D-rings to sides so strap can clip on/off for waist or crossbody.
E — Lining & finishing
5. Line and add an inner pocket for cards. Secure strap hardware with extra stitches and a small inside fabric patch for reinforcement.
Styling
- Minimalist stripes look great in neutral palettes or bold contrasts (black/white/red).
conclusion
That’s seven fully designed waist • crossbody • bum bag ideas — from classic Granny Square and chunky quick builds to playful Smiley motifs, romantic Heart Granny, boho belts and florals, and clean Stripes. Each pattern includes options to convert between waist and crossbody by adding D-rings and adjustable straps, and every bag benefits from a neat lining and reinforced strap joins.