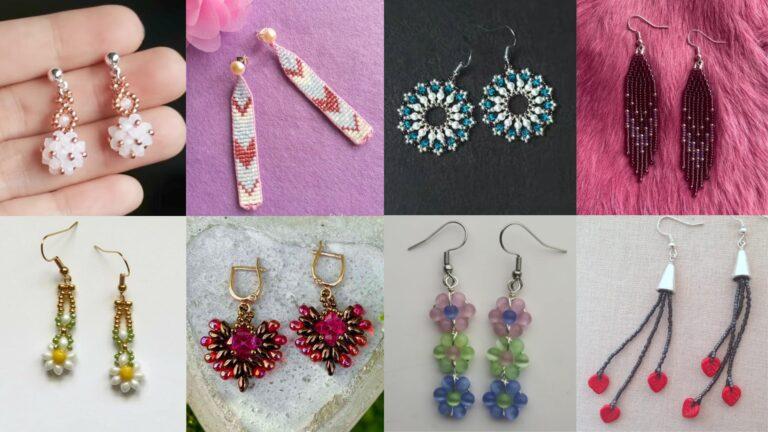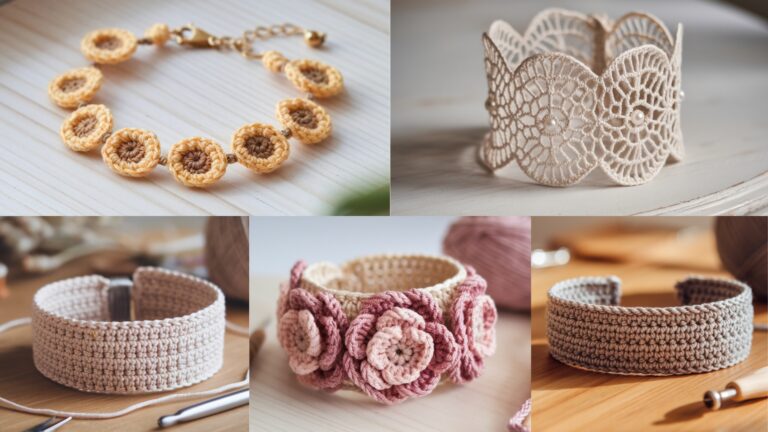
You want earrings people will actually wear — not a pair of yarn cobwebs that droop and get lost under the couch. Good. Below are seven finished, ready-to-make crochet earring patterns you can use for gifts, markets, or just to assert dominance at craft night. Each pattern includes: skill level, materials and hardware, finished size, abbreviations, a step-by-step stitch pattern (with counts), assembly/attachment instructions, finishing & care, and a few variations so the results don’t all look like the same Instagram mood board.
Make a practice pair in scrap yarn first. Earrings are tiny — mistakes are fast to fix. Also use metal earring hardware (hooks, studs, jump rings) rated for sensitive ears if these are gifts.
Quick common notes (read this once — it matters)
Abbreviations (US): ch = chain, sc = single crochet, hdc = half double crochet, dc = double crochet, tr = treble, sl st = slip stitch, st(s) = stitch(es), MR = magic ring, inc = 2 sc in same st, dec = sc2tog, BLO/FLO = back/front loop only, rep = repeat.
Recommended yarn & hooks:
- Use cotton or mercerized cotton (fingering to sport weight) for structure and lightness. Avoid fuzzy/wool yarns — they look meh and can irritate ears.
- Hook: 1.75–2.75 mm (size depends on yarn). I specify in each pattern.
- For very small, delicate earrings use size 10 crochet thread and 1.5–1.75 mm hook.
Hardware: hypoallergenic earring hooks, studs or posts, jump rings, small pliers, tiny lightweight earring backs, head pins (for dangles), and clear jewelry glue (optional). If adding beads use lightweight glass or acrylic — metal beads add weight.
Finishing essentials: stiffening option (gel fabric stiffener or diluted white glue), needle, small sharp scissors, and a small block or foam to shape pieces while they dry.
Safety/comfort: keep overall earring weight under ~6–8 g per ear for comfort. Test weight on a necklace before committing. If the recipient has sensitive ears, use surgical steel, titanium, or gold-plated hooks.
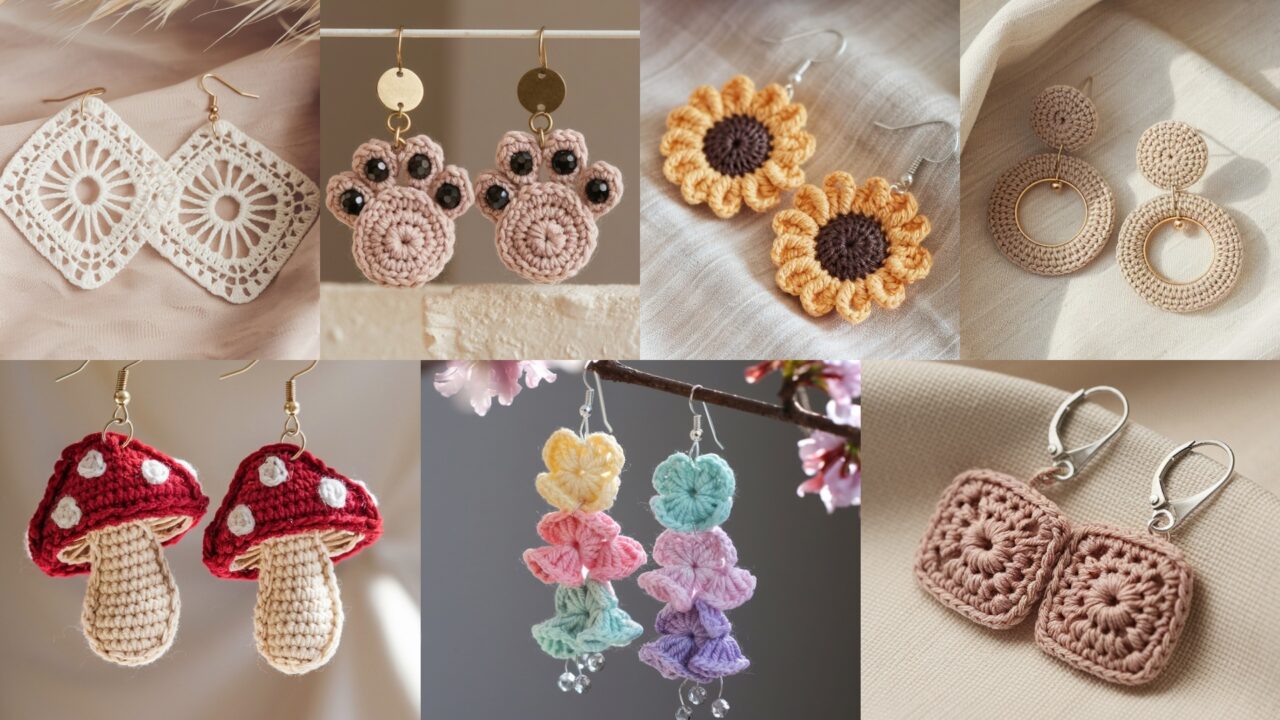
1. Crochet Small Granny Square Earrings Pattern
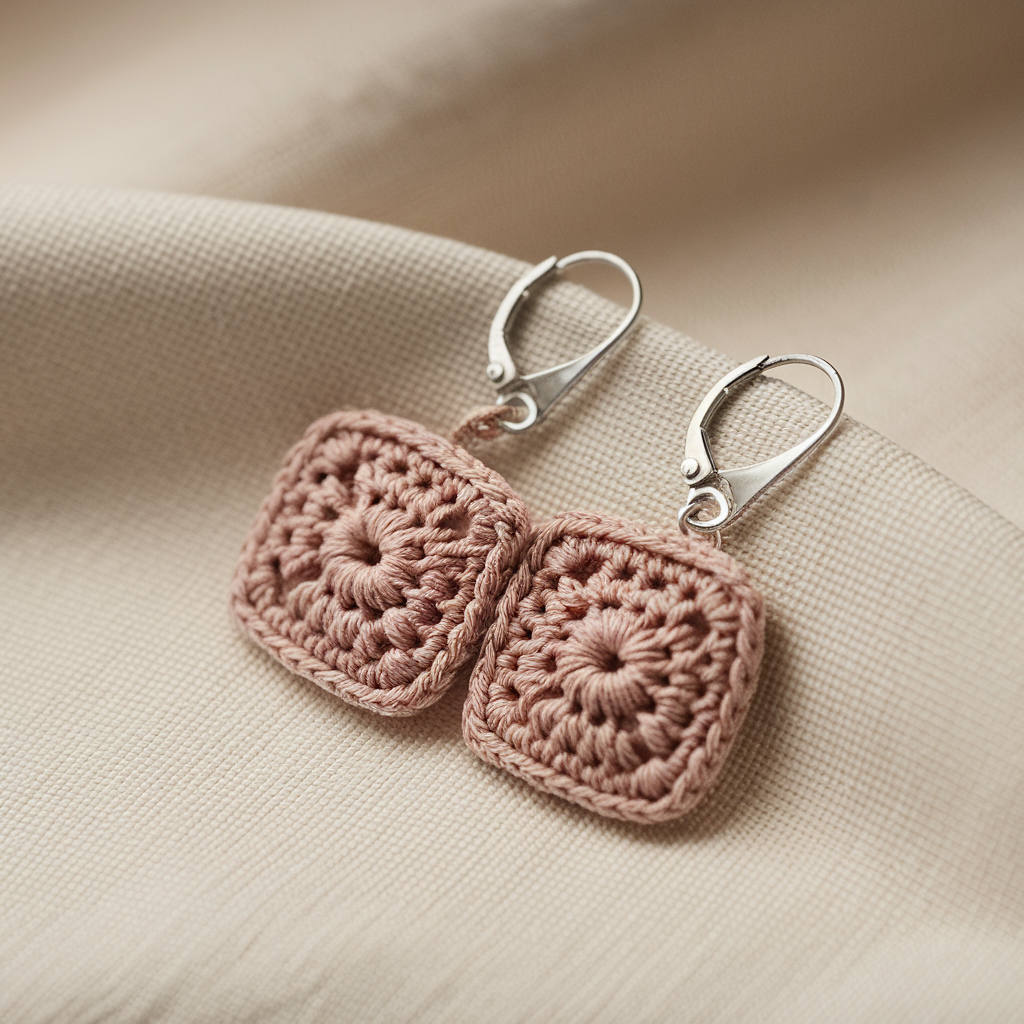
Classic, geometric, and surprisingly wearable. Tiny granny squares turned into earrings are instant hits.
Skill level: Confident Beginner
Materials: crochet thread size 10 or fingering cotton (#2–#3), 1.75–2.25 mm hook, 2 small jump rings, 2 earring hooks, tapestry needle. Optional tiny bead for center.
Finished size: approx 1″ (2.5 cm) square (adjust by hook and thread).
Gauge used here: 4 rounds = ~1″ in thread; replace with your gauge.
Pattern — one granny square (make 2 identical)
- MR, ch3 (counts as dc). R1: 2 dc in MR, ch2, 3 dc in MR, ch2 rep x2 more, join with sl st to top of beginning ch3. (4 clusters, ch2 corners)
- R2: sl st into next ch2 sp, ch3 (counts as dc), 2 dc in same ch2 sp, ch1, 3 dc in same ch2 sp (first corner made). In next ch2 sp do (3 dc, ch1, 3 dc) repeat around to make 4 corners. Join.
- R3 (optional small): sl st to first ch1 space, ch1, sc into same sp, ch1, sc in next ch1 sp, ch1 around to create a lace border if desired. Fasten off and weave in ends.
Assembly
4. Block gently on foam to square shape. Attach a small jump ring through one corner (use pliers) and connect to earring hook. If corner is too thin, reinforce by sewing a small loop of thread and attaching the ring through that. Add tiny bead in center before finalizing if you like.
Finishing & care
- To stiffen slightly for cleaner edges, brush a thin coat of diluted white glue (50/50 with water) or fabric stiffener, shape on foam, and let dry. Brush off sheen with light sanding if glue shows.
- Hand-wash only.
Variations
- Make mini tassels hanging from the bottom corner.
- Use variegated thread for a vintage vibe.
2. Crochet Minimal Sunflower Earrings Pattern
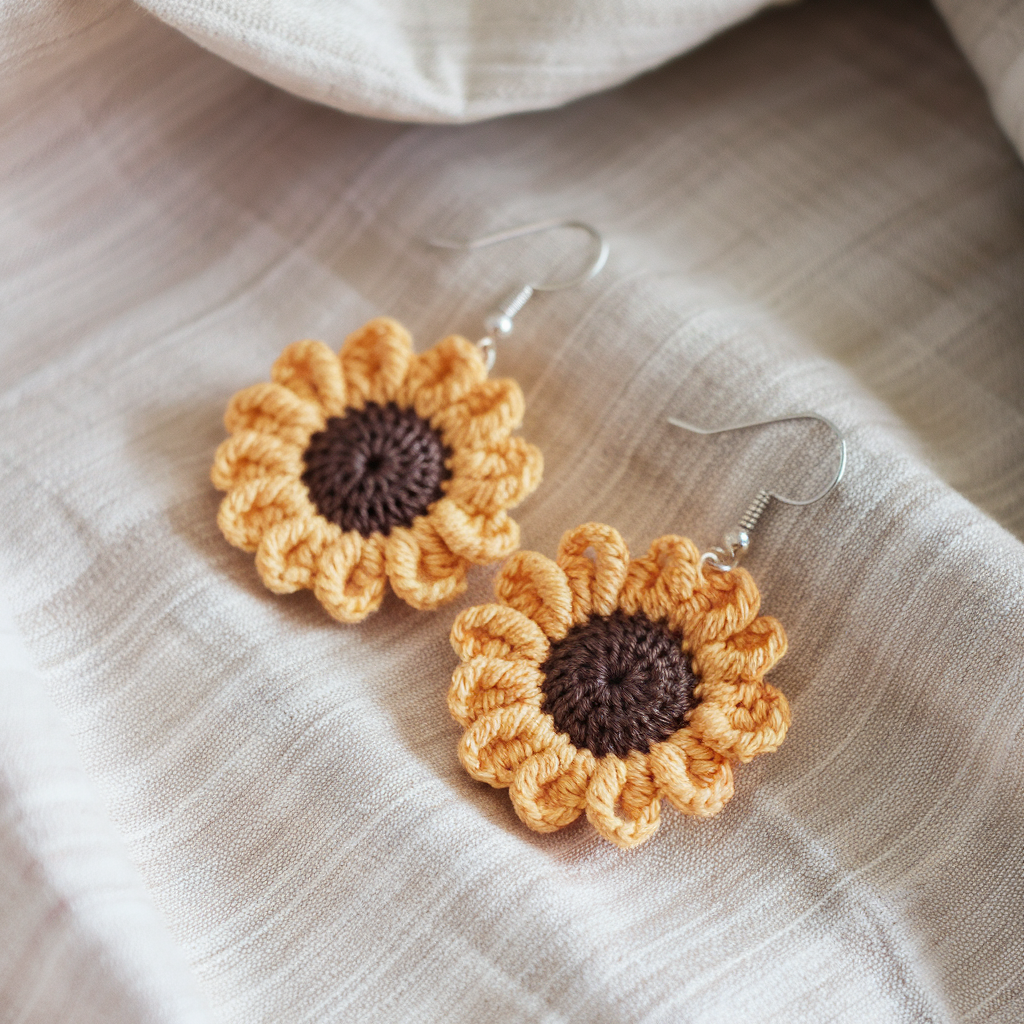
Flat, lightweight, and pretty. A crocheted sunflower with open center that’s perfect for summer gifts.
Skill level: Confident Beginner
Materials: fingering cotton or DK for bolder petals, 2.25–3.25 mm hook; contrast color for center; 2 small earring hooks; optional tiny bead for center.
Finished size: approx 1.25–1.5″ (3–4 cm) diameter.
Pattern — sunflower (one; make 2)
Center (small disc)
- MR, ch1, 8 sc into MR. Join. (8)
- R2: inc in each st → 16 sc. Join. Fasten off contrast.
Petal round (join petal color)
3. Join petal color into any st. Ch4, sl st into next st repeat around — yields 16 ch4 loops. (Adjust loop length for petal size.)
4. In each loop work: (sc, hdc, 3 dc, hdc, sc). Fasten off and weave ends.
Assembly
5. Block gently and connect a jump ring through one petal base (or an anchored top loop). Attach to hook. For extra sturdiness, dab a tiny drop of jewelry glue where the hook meets yarn.
Finishing & care
- Stiffen petals lightly if you want them rigid. Otherwise leave soft.
- Hand wash.
Variations
- Make a smaller center and longer petals for a daisy look.
- Add a tiny seed bead cluster in the center with French knots or small sewn beads.
3. Crochet Lace Square Boho Style Earrings Pattern
Airy, slightly boho, and elegant — lace squares that dangle without weighing the ear.
Skill level: Intermediate (lacy stitches & blocking)
Materials: crochet thread size 10, 1.5–1.75 mm hook, 2 earring hooks, 2 jump rings, blocking foam and pins.
Finished size: approx 1.25″–1.75″ (3–4.5 cm) square.
Pattern — lace square (one; make 2)
- MR, ch4 (counts as tr + ch1), tr, ch1 ×7 into MR, join — eight tr separated by ch1 (creates tall spokes). Pull ring tight.
- R2: sl st into next ch1 sp, ch3 (counts as dc), dc in same space, ch2, (2 dc, ch2, 2 dc) in next ch1 sp repeat around for open squares/nets. This creates a lacy grid; work 3 rounds of mesh increasing slightly to square out.
- Final round: Work a small picot or scallop edging: sc in st, ch3, sl st into top of sc to produce delicate points. Fasten off.
Blocking
4. Pin to foam to square shape, stretching gently and pinning each corner to sharpen the lace. Let dry fully.
Assembly
5. Attach jump ring through one corner and attach hook. Use a thin coated wire or wrapped jump ring for secure connection if the corner is delicate.
Finishing & care
- Avoid heavy wetting after blocking — shape is delicate. Spot-clean or hand wash and reblock lightly.
- Use thread conditioner if you plan to embroider or bead later.
Variations
- Add a single small bead at each corner for sparkle.
- Make two sizes and stack (small lace square layered over a slightly larger solid disk).
4. Crochet Octavia Earrings Pattern
A more modern, architectural pair: a layered circle-and-ring design with negative space for chic minimalism.
Skill level: Intermediate
Materials: mercerized cotton or light DK, 2.0–3.0 mm hook, 2 metal ring connectors or round jump rings (12–20 mm), 2 earring hooks, thin head pins (if adding bead drops).
Finished size: approx 1.5–2.0″ (4–5 cm) overall drop including metal ring.
Pattern — small solid circle + open ring accent
Solid circle (top, small)
- MR, ch1, 6 sc into MR. Join — (6)
- R2: inc each st → 12 sc. Fasten off.
Open ring “hoop” (bottom accent)
You’ll crochet a delicate ring that sits inside or outside a metal ring. Option A: stitch to a metal ring. Option B: make a fabric ring.
To stitch onto metal ring (recommended)
- Take a 12–20 mm metal ring (brass or gold-plated). Sl st into the ring to secure yarn and work a round of sc working into the ring itself: sc continuously around the metal ring until it’s covered (counts vary with ring circumference). Make sure stitches are tight and cover the ring fully. Join and hidden tail.
Assembly
2. Attach the small solid circle to the top of the metal-wrapped ring using 6–8 whipstitches (hide ends inside). Attach jump ring at top of small circle and connect earring hook.
Optional bead drop
3. Add a tiny bead on a head pin hanging inside the ring: thread bead, make a small loop, and attach to the inner top of ring.
Finishing & care
- Polish metal ring to remove fingerprints, then stitch yarn. Secure knots with a small drop of jewelry glue hidden under stitches if you expect heavy use.
Variations
- Use two concentric rings in different sizes.
- Make the top circle in contrasting color for modern geometry.
5. Crochet Mushroom Applique Earrings Pattern
Cute little mushroom appliqués for soft, whimsical earrings. Very light and adorable.
Skill level: Confident Beginner
Materials: fingering cotton, 1.75–2.25 mm hook in two colors (cap + stem), 2 earring hooks, jump rings. Optional varnish/coat for extra durability.
Finished size: approx 1–1.25″ (2.5–3 cm) tall.
Pattern — mushroom (one; make 2)
Stem (tiny tube):
- MR, ch1, 6 sc in MR. Join. R2–R4: sc around 6 sc for stem height. Fasten off leaving tail for sewing to cap.
Cap (worked flat dome):
- MR, ch1, 6 sc in MR. (6)
- R2: inc in each st → 12 sc.
- R3: sc1, inc → 18 sc.
- R4: sc2, inc → 24 sc. Fasten off leaving tail.
Assembly
5. Stuff cap lightly with one or two fibers (not too much) and sew stem to center underside of cap. If you want ultra-light earrings, skip stuffing — flat mushrooms look cute too.
Embellish
6. Embroider tiny white spots on cap using small straight stitches (cream yarn) or sew tiny French-knot beads. Use very small beads and secure with many stitches.
Attach & finish
7. Sew a small jump ring into top of cap seam (or make a small loop of stitched yarn), attach to earring hook. For weatherproofing, use a very thin coat of jewelry sealer (optional).
Care
- Hand wash only. Avoid heavy moisture if you used glued beads.
Variations
- Make a polka-dot mushroom with a contrasting lower band.
- Use felt backing for more firmness and easier jump-ring attachment.
6. Crochet Spring Earrings Pattern
A bright, breathable motif perfect for spring: open petal clusters and a dangling bead. Light, cheerful, and quick to finish.
Skill level: Confident Beginner
Materials: sport-weight cotton, 2.0–2.5 mm hook, 2 small glass drop beads, head pins, 2 earring hooks.
Finished size: approx 1.5–2.0″ (4–5 cm) drop including bead.
Pattern — petal cluster (one; make 2)
- MR, ch1, 8 sc into MR. Join. (8)
- R2: ch4, sl st into next st around to create 8 loops.
- R3: In each loop work (sc, hdc, 3 dc, hdc, sc) to create 8 small petals. Join and fasten off.
Dangled bead
4. Thread small glass bead onto head pin, make a 2–3 mm loop at top of pin with round-nose pliers, trim tail. Attach this bead loop to the base of petal cluster using a small jump ring or hook it to the center underside.
Assembly
5. Attach a jump ring through the top petal and connect to earring hook. Make sure the bead drop hangs freely.
Finishing & care
- Hand wash, reshape petals, and air dry. If beads are heavy, replace with lighter acrylic or skip the bead.
Variations
- Make the petals more open by increasing ch loop length to ch6.
- Try ombré thread for a soft color fade.
7. Crochet Paw Earrings Pattern
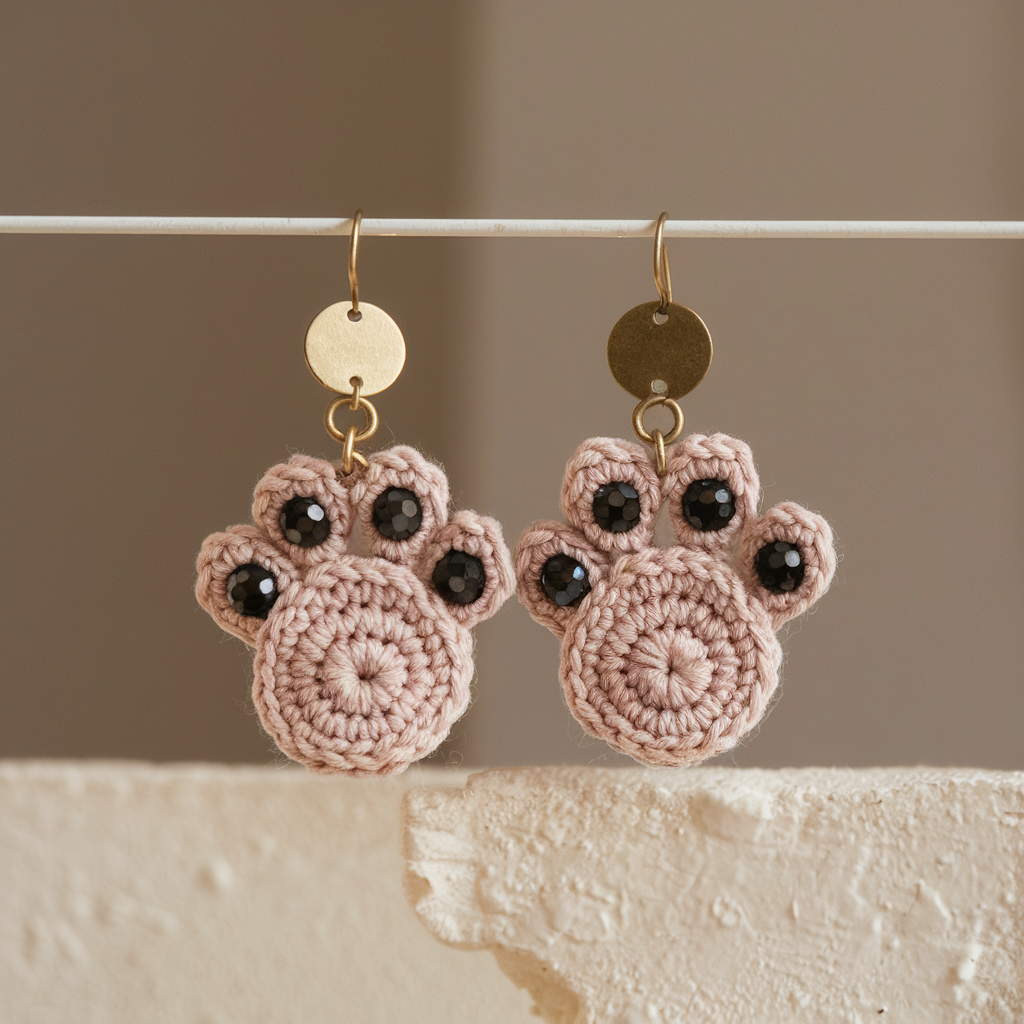
Tiny paw prints — a perfect small gift for pet lovers. Can be solid or appliqué onto metal discs.
Skill level: Confident Beginner
Materials: size 10 thread or fingering cotton, 1.5–2.25 mm hook, 2 earring hooks, optional tiny black seed beads for paw pads.
Finished size: approx 0.75–1.0″ (2–2.5 cm) — small and understated.
Pattern — paw (appliqué; make 2)
Base oval
- Ch 6, sc in 2nd ch from hook and across (5 sc). Turn.
- R2: ch1, sc across 5 sc, ch3, turn and sc into ch3 to create a short oval base. (Work 1 round around oval if you want a thicker pad.)
Little toes (make 4 tiny circles)
3. For each toe: MR, ch1, 6 sc into MR, sl st, fasten off leaving tail for sewing. Make 4 tiny rounds and sew arranged at top of oval.
Assembly
4. Place four toes on top of oval and sew them on with tiny stitches. For subtle shine or contrast, sew a tiny black seed bead into each toe center before securing it. Attach a small jump ring to top of oval and connect to ear hook.
Finishing & care
- Lightly stiffen and block flat so paws look crisp. Hand wash only.
Variations
- Sew paw appliqué onto small metal charm discs (brass or silver) for mixed media; attach disc to hook rather than stitch ring.
Final finishing & packaging notes (because this matters if you sell/gift)
- Weigh them: keep earrings under ~6–8 g each. If makers are careless, the prettiest earring becomes a painful accessory.
- Secure hardware: use two half-hitch wraps and a tiny dot of jewelry glue where the jump ring meets yarn for market-ready durability.
- Stiffening & shape: use diluted white glue (50/50 with water) or commercial fabric stiffener to shape lace pieces. Shape on foam until dry. Avoid over-stiffening — they should still move.
- Allergy safety: label with “ear-hook metal: [surgical steel / brass / gold-plated]” and offer surgical steel or titanium options for sensitive ears.
- Presentation: mount on small cardstock with your logo and care instructions: “spot-clean or hand wash; reshape when damp; avoid sleeping in.”
conclusion
There — seven polished crochet earring patterns that actually get worn: granny squares for retro charm, tiny mushrooms and paws for the whimsical, lace and sunflower designs for summer, and Octavia for the geometric minimalists. Make a test pair in scrap yarn, check weight, finish edges, and use hypoallergenic hardware when gifting. No one needs a pair of earrings that pulls on their lobes. You do need a stack of finished pairs for holiday gift-giving or your next craft fair.