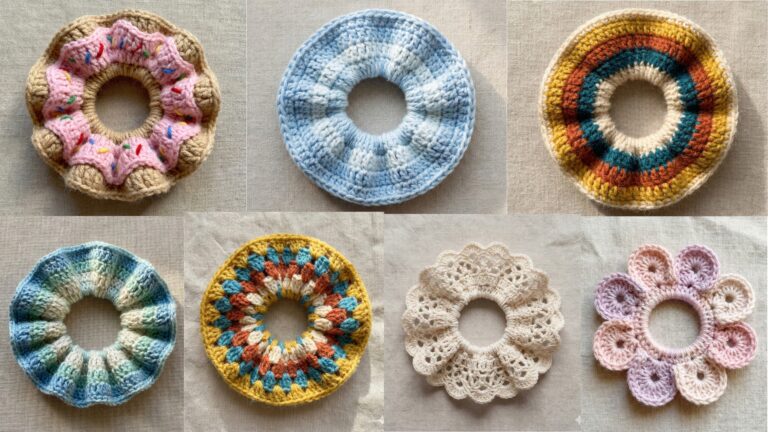
Crochet bralettes are one of the most satisfying wearable projects: small, quick, and endlessly adjustable. They’re perfect for summer layering, beach cover-ups, or soft casual tops. Below you’ll find a full, ready-to-post blog entry that includes a practical introduction (yarn, fit, measurements, gauge math and safety), seven complete bralette patterns with step-by-step construction (band → cups → straps → finishing), and a strong conclusion. Each pattern includes materials, skill level, fitting notes and variations so readers can adapt the design to their size and style.
Before you crochet — yarn, tools, measurements, and basics
Best yarn & hook choices
- Cotton or cotton blends (sport / DK / light worsted) — breathable, comfortable next to skin, and easy to wash.
- Bamboo/cotton blends — very soft with good drape.
- Avoid very scratchy novelty yarns for garments worn against skin.
- Hook sizes: common choices are 3.0–4.5 mm depending on yarn; use a slightly smaller hook for a firmer, less open fabric (better support).
Notions
- Tapestry needle, stitch markers, measuring tape, scissors
- ⅜”–½” elastic for underband (optional)
- Narrow lingerie elastic (optional) for strap reinforcement
- Small rings/sliders for adjustable straps (optional)
- Cotton lining fabric (optional) for modesty/support
Measurements you’ll need (non-invasive)
- Underbust (band) — measure snugly around ribcage just below bust.
- Bust (fullest point) — measure around fullest part of bust while relaxed or wearing a light bra (this helps with cup width).
- Front length — from underbust up to where you want the top of the bralette to sit (top of breast/upper chest).
- Strap distance — across the shoulder/back where straps will attach (optional).
Ease & fit guidance
- Band: most support comes from the band. For elastic bandated designs, aim for 0 to −1” ease (band finished equal or slightly smaller than underbust). For non-elastic crocheted bands, allow +1–2” ease for comfort.
- Cup coverage: triangle cups are minimal to moderate; bustier or fuller cups give more coverage. If in doubt, choose more coverage (larger cups, wider straps).
Gauge math — a quick method (digit-by-digit)
Always make a 4″/10 cm swatch in the stitch you plan to use and block it as you will the final garment. Measure stitches per inch (spi).
Example: spi = 5 and desired underbust finished circumference = 32″.
- Multiply: 5 × 32 = 160 stitches.
- If your stitch pattern requires a multiple (e.g., multiple of 4), round to the nearest multiple: 160 ÷ 4 = 40 → exact.
Use this number for foundation chains or to plan band stitch counts. For two-panel builds, divide by two.
Abbreviations (US)
- ch = chain
- sl st = slip stitch
- sc = single crochet
- hdc = half double crochet
- dc = double crochet
- tr = treble crochet
- inc = increase (2 sc in same stitch)
- dec = decrease (sc2tog)
- BLO / FLO = back/front loop only
- MR = magic ring
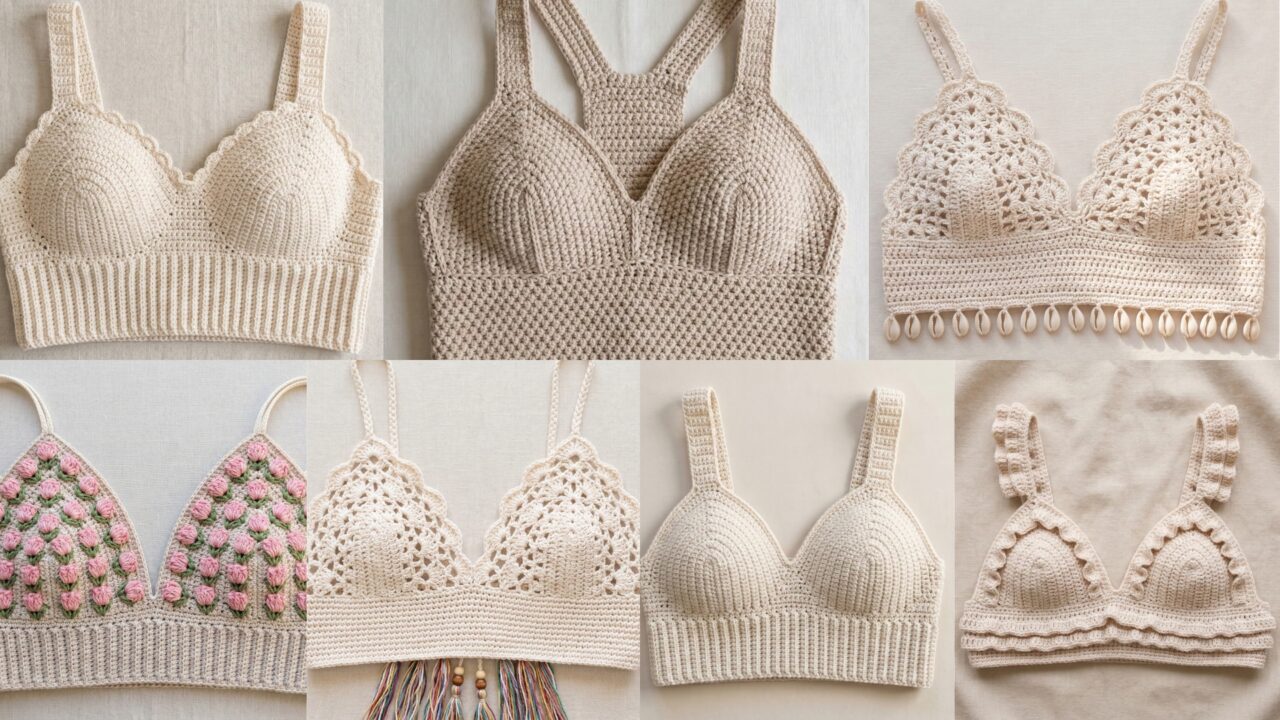
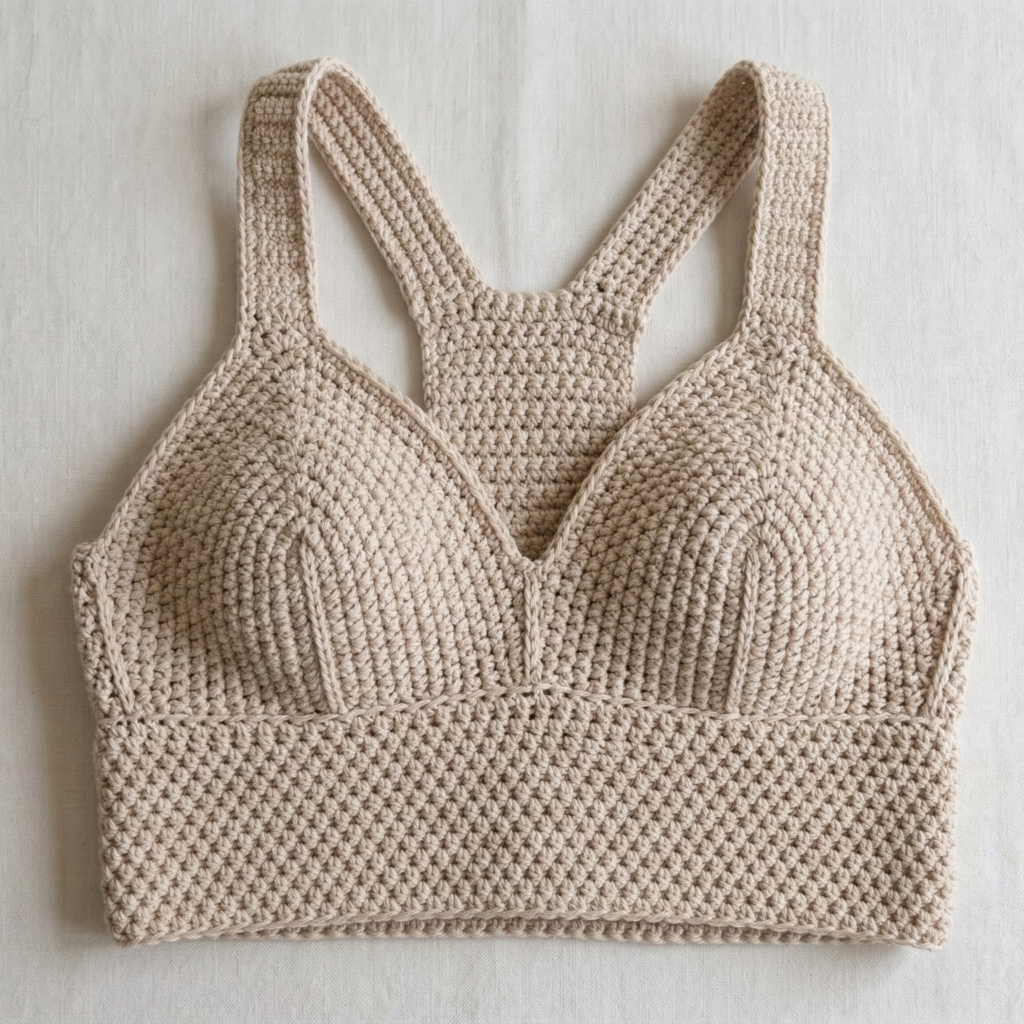
1. Crochet Bustier Bralette Pattern
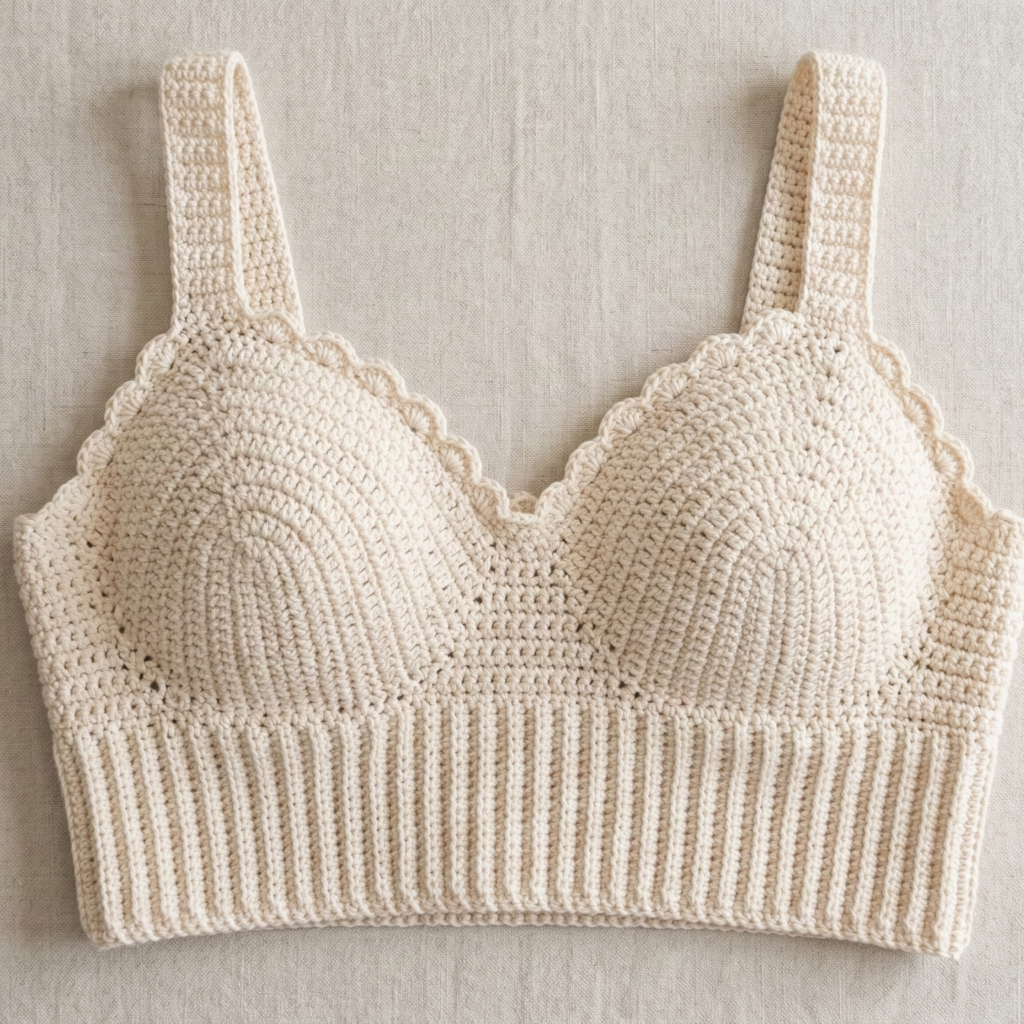
Skill level: intermediate
Style notes: firm underband, shaped cups, optional lining or elastic for extra support. Great for wearing as a top or layered.
Materials (sample adult S/M)
- DK cotton — 400–600 yd depending on size
- Hook 3.25–3.75 mm
- ½” elastic (optional) — length = underbust measurement minus ½”
- Tapestry needle, stitch markers
Gauge (example)
- 5 sc = 1″ in chosen yarn/stitch (make your own swatch)
Construction overview
- Make a firm ribbed underband worked in the round (foundation = underbust stitches).
- Work two shaped cups and seam them to the top edge of the band.
- Add back closure, straps and optional lining.
Step-by-step
A — Underband
- Compute underbust stitches: underbust (in) × spi. Example 32″ × 5 = 160 sts. Chain foundation of that stitch count (or use foundation sc). Join carefully to avoid twist.
- Work 8–10 rounds of BLO hdc (or hdc) for a rib that will fold; height ≈ 2.5–3″. Fold the band inward and sc through both layers around to form a double-thick band. Leave a ~2″ gap to insert elastic if using. Insert elastic, sew ends, close gap.
B — Cups (make 2)
3. Cups worked flat: MR, R1: 6 sc in MR. R2: inc each st (12). R3: sc1, inc around (18). Continue increasing rounds until base width equals half the cup base measurement (use measurements — base = bust/2 minus band allowance). Once base width reached, work even rounds (no increases) until cup height matches front length measurement. For more shaping, switch to hdc for upper rounds, or use short rows: work partial rows to build center fullness.
- If you prefer a smoother profile, shape with vertical seams: work cup as two halves, seam down center with mattress stitch.
C — Attach cups to band
5. Pin cups to the top edge of band at desired spacing (usually cups centered at front). Sew cups to band by whipstitching through cup lower edge and top of band. Reinforce with multiple passes.
D — Back & straps
6. Close the band at back: overlap edges and sc to join, leaving allowance for a small hook/eye, tie, or make a strap closure.
7. Straps: crochet flat straps (chain to length + rows of sc/hdc to width 1″–1.5″) and sew ends to tops of cups and back band. For adjustable straps add small rings/sliders.
E — Lining (optional)
8. Cut cotton lining to cup shapes and hand-sew inside cups for modesty. Sew lining into the band seam to hide edges.
Variations & tips
- For fuller busts add a vertical dart (seam in cup center) or a small side dart to improve fit.
- Add a decorative scallop along cup tops with shell stitch.
2. Crochet Tulip Stitch Bralette Pattern
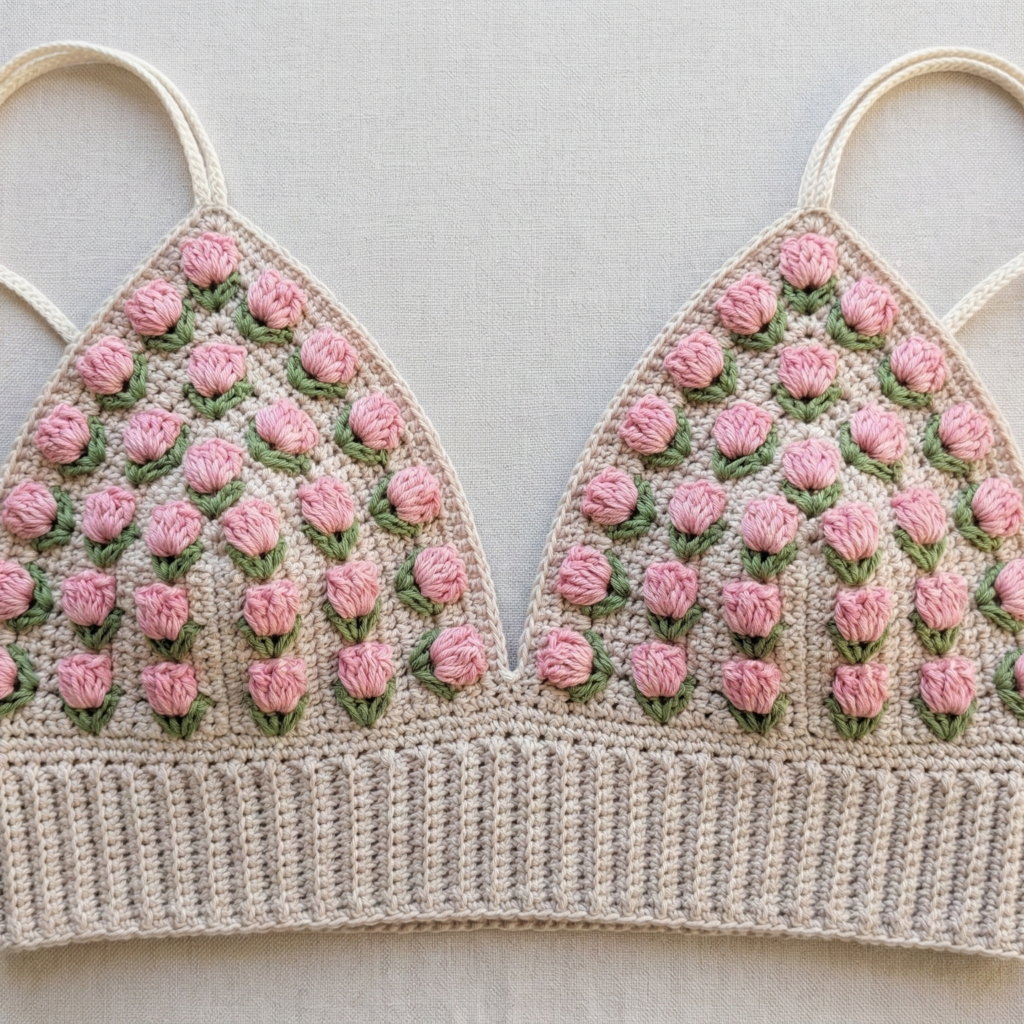
Skill level: confident beginner → intermediate
Style notes: pretty textured surface using tulip/petal clusters; triangle cups joined to a supportive underband.
Materials
- DK cotton — 300–450 yd
- Hook 3.25–3.5 mm
- Narrow elastic optional
Construction overview
Triangular cups made in a tulip cluster repeat, joined to a mid-height band, with thin straps. Lining recommended for extra modesty.
Step-by-step
A — Band
- Decide underbust stitch count as before and chain foundation; join. Work 6–8 rounds of hdc (BLO for rib) to make 2–3″ band. Optionally add casing and elastic.
B — Cups (make 2)
2. Make a small triangle foundation: ch 7 (multiple for tulip repeat), R1: sc across. R2: Work tulip stitch pattern across row (pattern could be: [ch2, 3 dc in next space, ch2] form petals — follow an exact tulip stitch chart). Increase one repeat at either edge each row to grow triangle until base equals half cup width.
- Mirror for second cup.
C — Join & straps
4. Sew cup bases to band; make narrow straps or tie-back style chains. Attach lining if desired.
Fit notes
- Tulip stitch can be open; choose smaller hook or add lining for coverage.
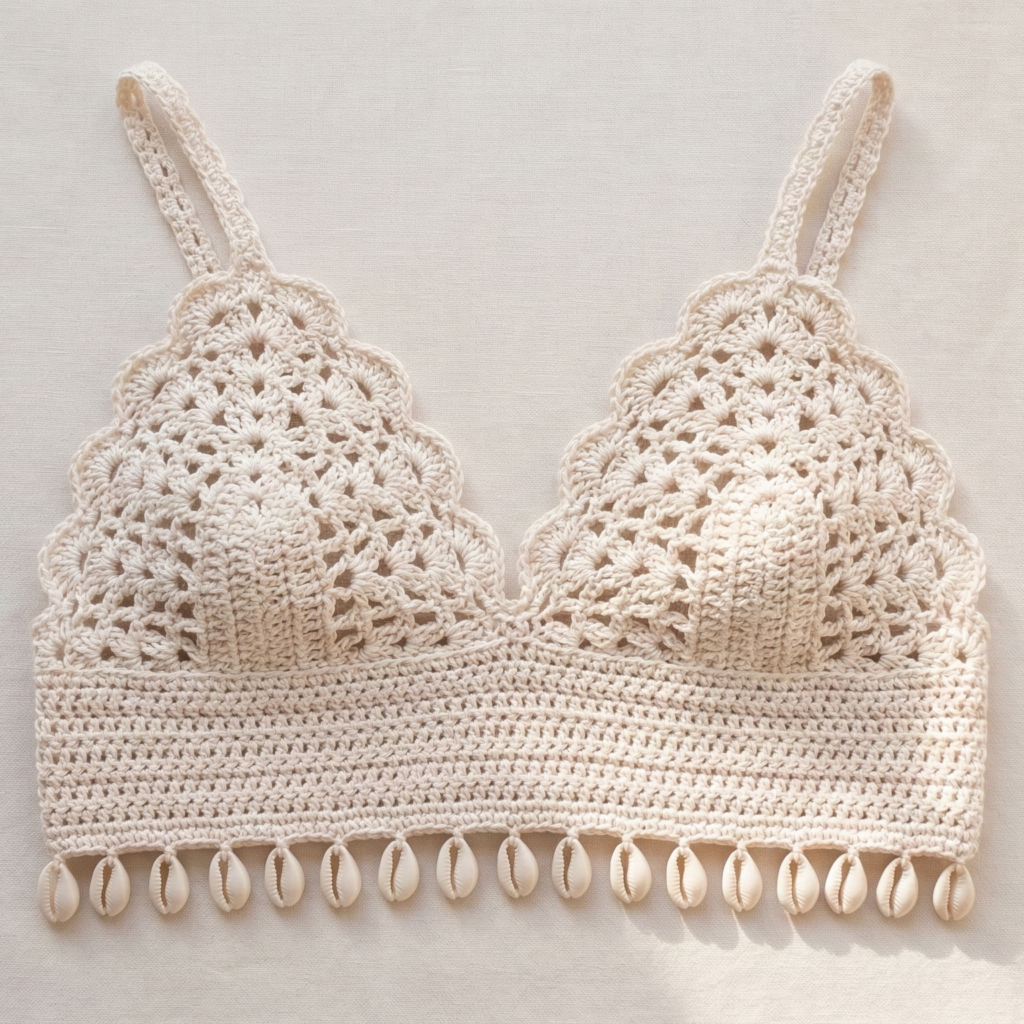
3. Crochet Boho Lace Bralette Pattern
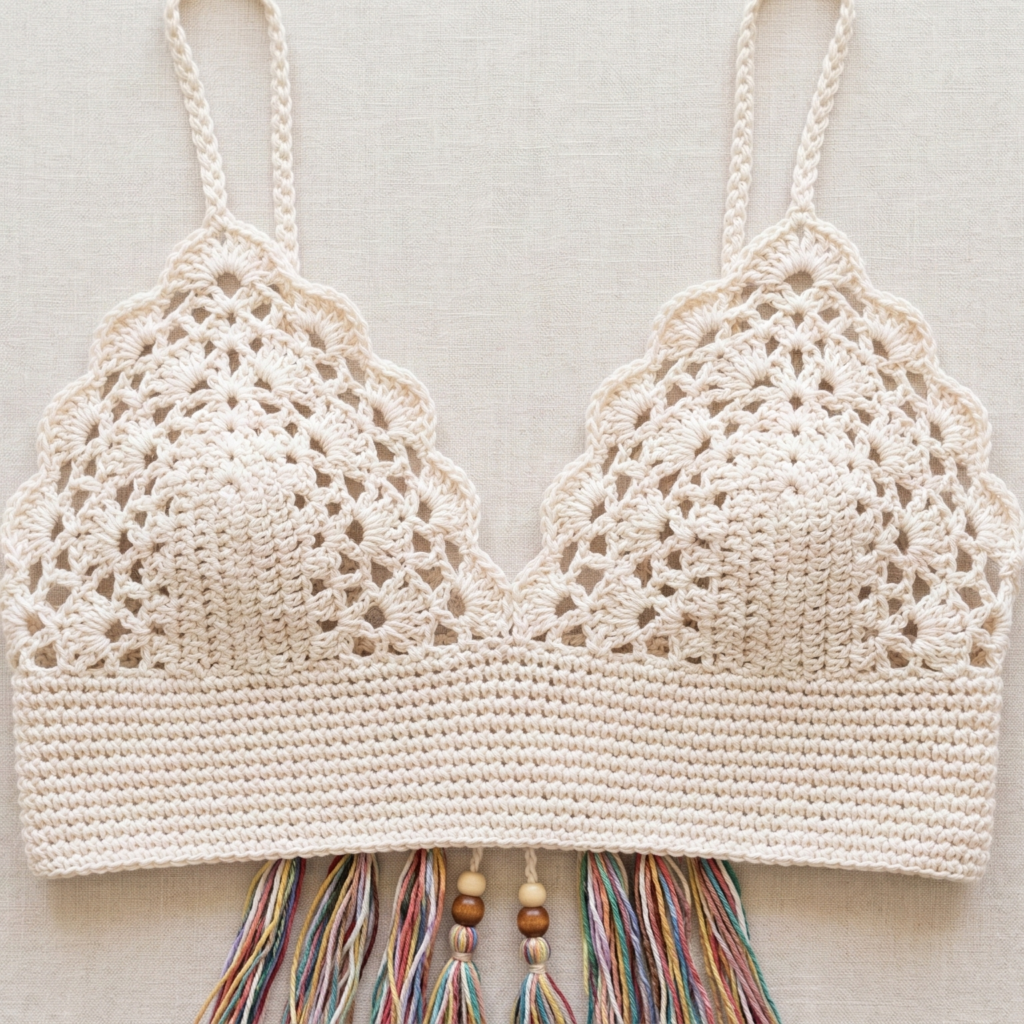
Skill level: intermediate
Style notes: airy, large shell & v-stitch lace; best layered or lined.
Materials
- Sport/DK cotton — 300–500 yd
- Hook 3.5–4.0 mm
- Lining fabric if you want coverage
Construction overview
Band → split to two lace cup panels (worked flat or in round) → scalloped top edge and thin braided straps.
Step-by-step
A — Band
- Work band in firm stitch: foundation chain to underbust count; 6 rounds of sc or hdc to form 2–3″ band. Add elastic if desired.
B — Lace cups
2. Mark cup positions on band, join yarn at mark and work shells and v-stitch mesh outwards/upwards: e.g., shell (5 dc) in one stitch, skip 2, sc in next, skip 2 to create scalloped lace. Shape cups by removing or adding repeats at side edges.
- Repeat for second cup.
C — Finishes
4. Work one or two rounds of small shell scallops along top edge for decorative finish. Add strap ties (braided yarn) or thin crocheted straps. Sew lining if wearing as stand-alone top.
Tips
- Use a smaller hook for the band than for the lace to ensure stability.
- For festival bralette, colorful yarn and long dangling tassels enhance boho vibe.
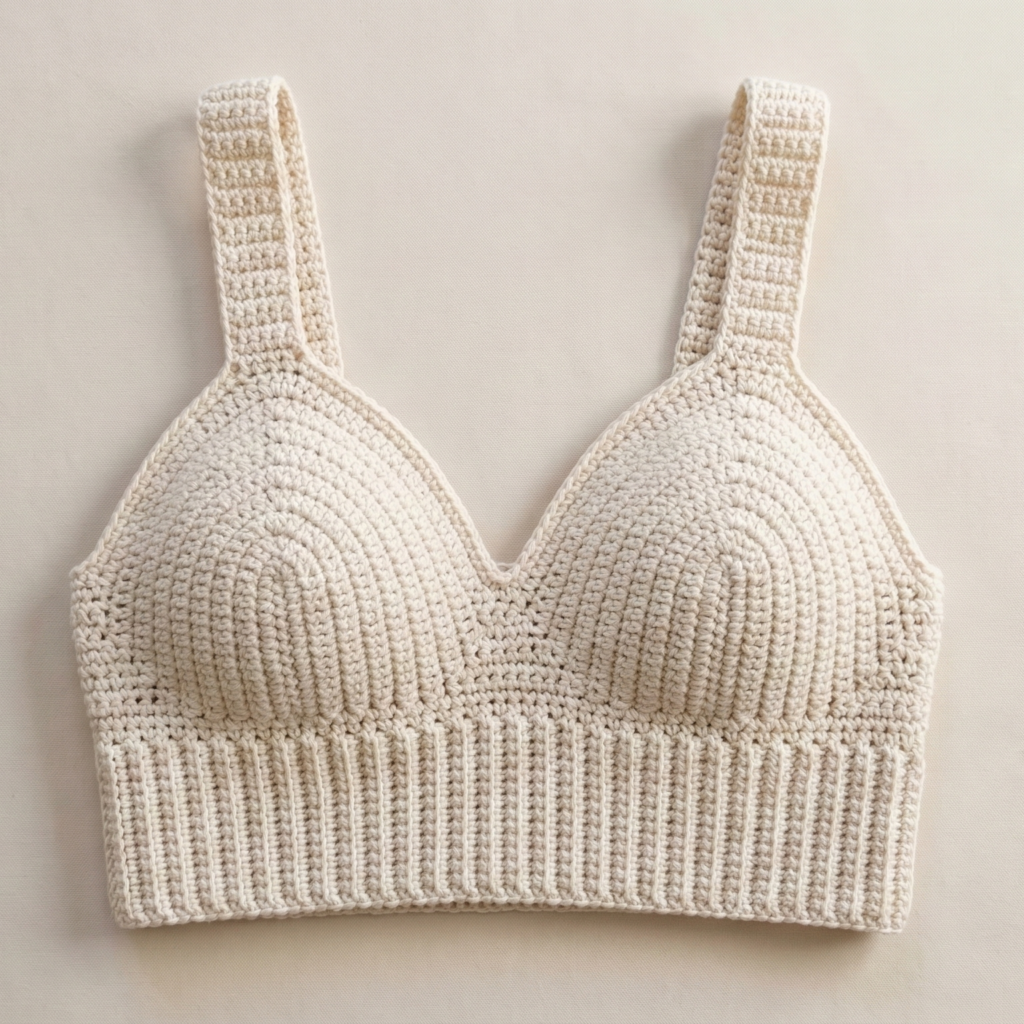
4. Crochet Seedling Bralette Pattern
Skill level: confident beginner
Style notes: dense, knit-like texture; good opacity and everyday wear.
Materials
- DK cotton — 300–500 yd
- Hook 3.25–3.5 mm
Construction overview
Wide seed-stitch underband; cups worked into band or picked up along edge; wide straps or racerback option.
Step-by-step
A — Seed band
- Chain to underbust stitch total and join. Work seed stitch in rounds: Round 1: sc, ch1, skip next st; Round 2: alternate sc into ch1 spaces to create the dense pattern. Work 8–12 rounds to get a 3″–4″ band.
B — Cups
2. Pick up stitches along the top of the band for cup base: pick up half-bust stitch count for each cup. Work short rows in seed stitch to produce vertical shape (wrap & turn) or make separate small cup panels and seam them on.
C — Straps
3. Make comfortable wider straps in seed or BLO ribbing and attach.
Notes
- This pattern is less open and more modest; good for everyday use without lining.
- For extra support, make band higher or add elastic inside casing.
5. Crochet Lacy Shell Bralette Pattern
Skill level: intermediate
Style notes: scalloped shells across cup tops; delicate and feminine.
Materials
- DK cotton — 300–450 yd
- Hook 3.5–4.0 mm
Construction overview
Triangles with shell stitch motifs that produce pretty scalloped edges; band can be narrow or wide depending on support preference.
Step-by-step
A — Underband
- Standard band worked in hdc or sc; 2–3″ height for a delicate look, more for support.
B — Shell cups
2. Work triangular cup using shell stitch repeats: foundation small chain; Row 1 sc; Row 2 shells: [5 dc] in one stitch, skip 2, sc in next; expand each row by adding shells at edges until desired base width. For even scalloping, finish with a shell round along top: sc, shell, sc.
C — Attach & straps
3. Seam cups to band; add thin lacy straps matching shell motif.
Tips
- Shell stitches have more give; consider lining for coverage.
- Add a narrow back strap with small hook/eye for adjustability.
6. Crochet Ruffle Bralette Pattern
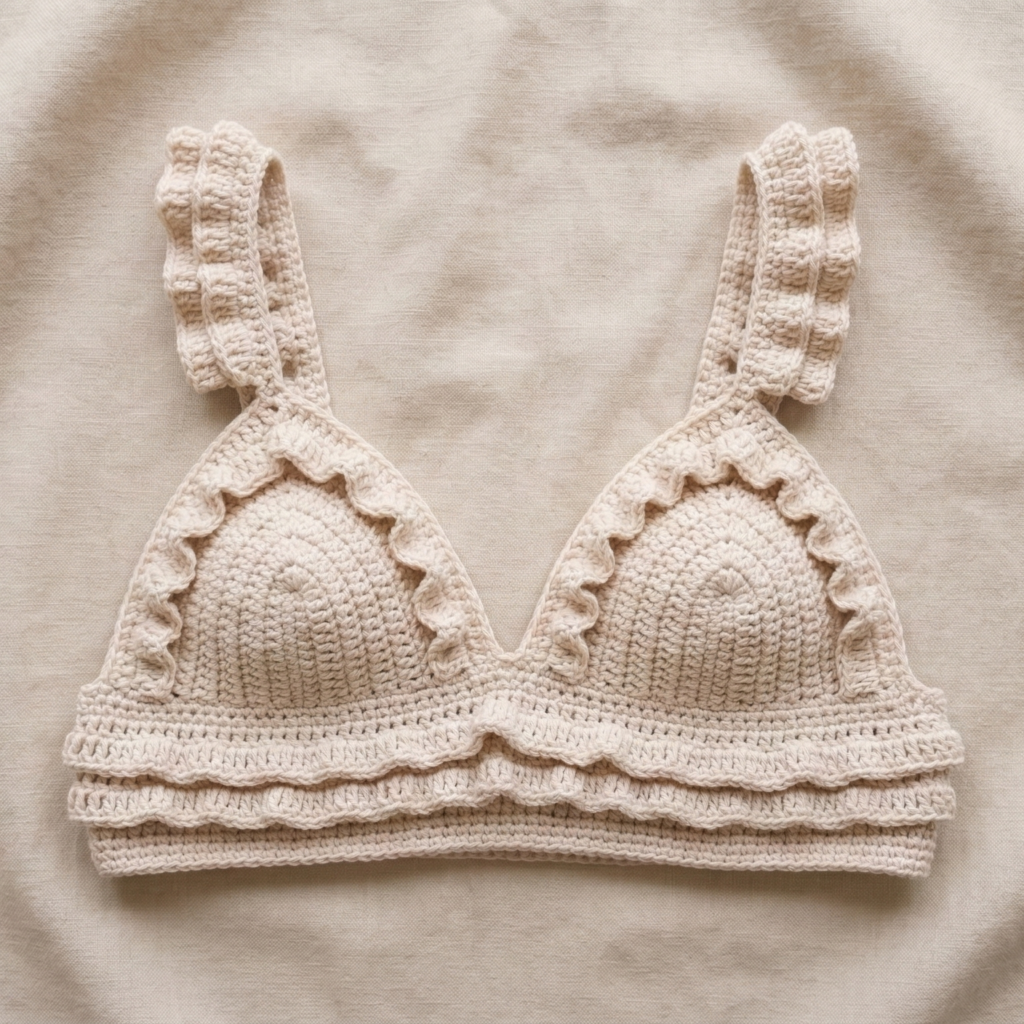
Skill level: confident beginner
Style notes: decorative ruffles along cup tops or underband; great over a tee or a swimsuit.
Materials
- DK cotton — 300–450 yd
- Hook 3.5 mm
Construction overview
Make a stable band + cups, then work ruffle rows on top edge or as tiered trim.
Step-by-step
A — Base
- Band and cups as in Tulip or Seedling pattern depending on desired support.
B — Ruffle
2. With a slightly larger hook, pick up along the top edge and work ruffle rounds: e.g., [3 dc in one st] across for a small ruffle, or [5 dc in one st] for a fuller ruffle. For layered ruffles repeat ruffle rows with a slight offset.
C — Straps & finish
3. Make straps thin or tie style so ruffle remains the focal point.
Notes
- Keep ruffle decorative but keep band supportive. Ruffle is aesthetic; it does not provide support.
7. Crochet Comfy Bralette Pattern
Skill level: confident beginner
Style notes: simple, practical, fully lined bralette for modest coverage and comfort.
Materials
- DK cotton — 350–600 yd
- Hook 3.25–3.75 mm
- Soft jersey cotton (for lining)
- Narrow elastic for band (optional)
Construction overview
Wide supportive band, shaped cups worked or picked up and lined with soft jersey; straps wide for comfort.
Step-by-step
A — Wide band
- Chain underbust stitch count and work 10–12 rounds BLO hdc to create a 3–4″ ribbed band. Fold and sc through both layers to form casing; insert ½” elastic if desired.
B — Cups
2. Pick up stitches along band for cup base and work small shaped panels in hdc/sc for density. Aim for full coverage cups; shape with increases and short rows if needed.
C — Lining
3. Cut lining pieces from jersey to match cup shapes and sew into place from inside; tack the lining to the band seam.
D — Straps & finish
4. Wide strap bands (1–1.5″) in hdc for comfort; securely sew to band and cups.
Notes
- This is the most practical pattern for regular wear and is safe for more public settings due to full lining and modest coverage.
- If you want more shaping, add a center gore (small triangle between cups).
Sizing, grading & quick fit tips
- Scaling — use your swatch and the gauge math method (spi × desired circumference) to calculate band stitches. For cup width, measure bust and allocate half for each cup minus center gore allowance.
- Try on as you go — check band snugness around underbust before final seaming. It’s much easier to adjust early rounds than to rip and re-do later.
- Adjust vertically — add or remove even rounds to change front length.
- Gusset/center gore — a small triangular piece between cups gives better separation and shaping on fuller busts.
Finishing & care
- Weave ends securely and back-stitch strap joins multiple times.
- Blocking: cotton dries to shape — wet-block flat or use gentle steam to set scallops.
- Care: hand wash or machine gentle in laundry bag; air dry flat. Remove elastic if fragile or follow elastic care instructions (air dry).
- Safety for teens/kids: ensure enough coverage, use lining, and avoid marketing intimate garments to minors.
conclusion
These seven patterns cover a spectrum of summer bralette styles — structured bustier for more shape, textured tulip and seedling for pretty everyday pieces, airy boho and lacy shell for festival or layered looks, playful ruffle for decorative fun, and a practical comfy lined bralette for everyday wear. Each design is intentionally adaptable: encourage readers to measure, swatch, and try on as they go, and to add linings or elastic when they want extra coverage or support.