

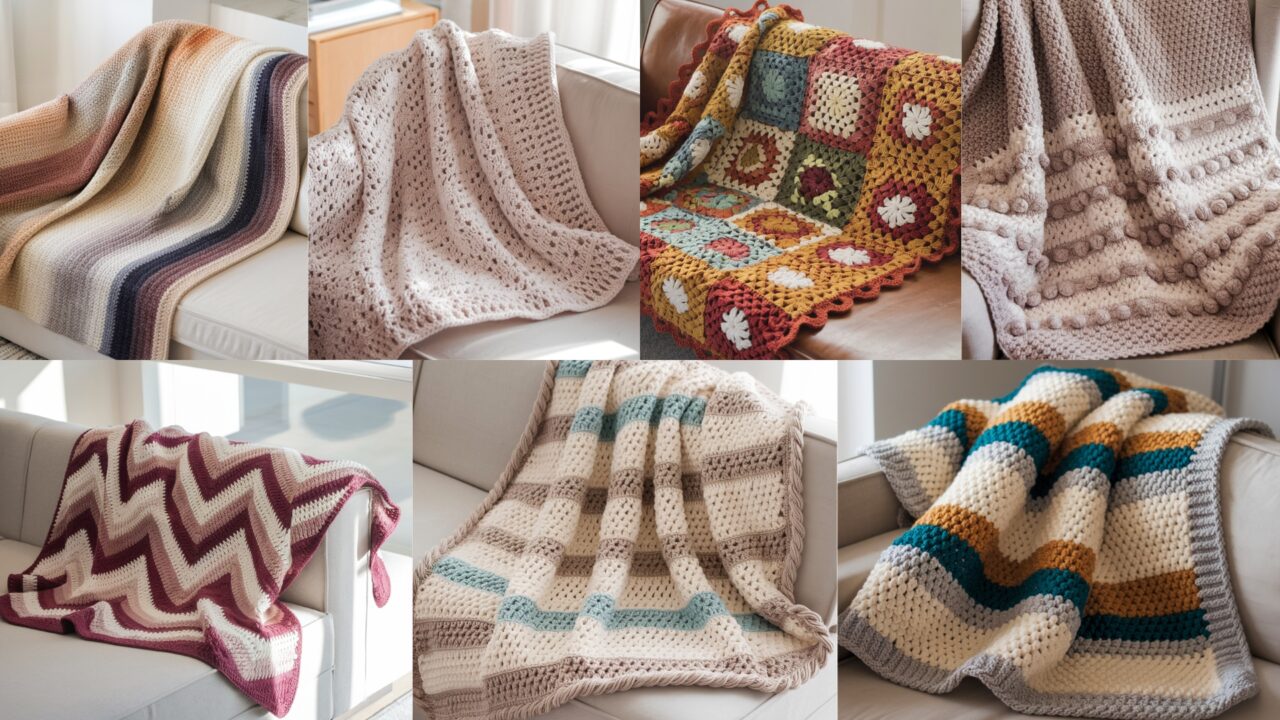
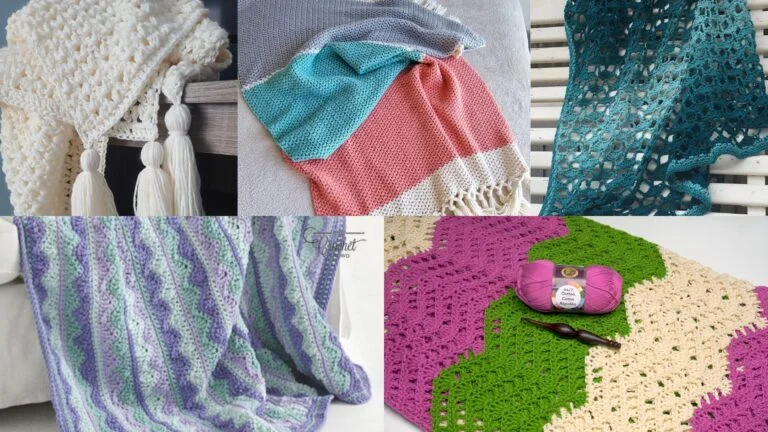
A handmade blanket is the ultimate cozy project: big enough to be satisfying, small enough to finish in a reasonable time, and endlessly customizable. These seven patterns cover modern geometry, lofty chunky stripes, vintage retro charm, global-inspired texture, calming colorwork, horizon gradients, and a classic V-stitch — each presented with clear materials lists, skill notes, step-by-step instructions, sizing guidance, finishing tips, troubleshooting help, and design variations so you can make a blanket that reflects your style.
Before you start, read the general notes and swatch advice — they’ll help you adapt any pattern to your yarn, hook and desired finished size.
General notes (read first)
- US crochet terms are used throughout (ch, sc, hdc, dc, tr, sl st).
- Swatch & gauge: Always make a 4 in × 4 in (10 × 10 cm) blocked swatch in the main stitch. Use that to calculate how many foundation chains (or motif repeats) you need for your target width. If your gauge doesn’t match, change hook size rather than changing stitch counts.
- Finished sizes (common targets):
- Baby: ~30 × 36 in (76 × 91 cm)
- Lap/Throw: ~48 × 60 in (122 × 152 cm)
- Twin/Small Bed: ~66 × 90 in (168 × 229 cm) — scale up motifs/rows proportionally.
- Yarn choice: Cotton and cotton blends drape less and wash easily; acrylics and superwash wools are forgiving and warm; chunky/bulky yarns make fast, lofty blankets. I list yarn suggestions per pattern and give yardage ranges — these are estimates; always buy a little extra when using hand-dyed or variegated yarn.
- Tools & notions: tapestry needle, blocking pins or mats, measuring tape, stitch markers (helpful), and if you plan a lining or backing: sewing needle & fabric.
- Finishing: Weave in ends neatly and block/steam to even edges. Consider a sewn or crocheted border to frame your blanket.
- Safety: For baby blankets choose washable, soft yarns and avoid stiff embellishments. Use secure finishing if gifting to children.
1. Crochet Modern Chevron Afghan Blanket Pattern
Overview & style: A crisp ripple chevron with clean peaks and valleys. Contemporary, graphic, and perfect for bold colorwork or tonal gradients.
Skill level: Confident beginner — steady stitch tension and turning chains required.
Materials (throw sample ~48 × 60 in):
- Worsted weight yarn (Category 4); sample uses 4 colors, about 1800–2400 yds total depending on size.
- Hook: 5.0 mm (H) — adjust for gauge and yarn.
- Tapestry needle, blocking surface.
Gauge & swatch: Make a 4 in swatch in the stitch pattern (see Pattern Row below). Measure stitches per inch across; this helps calculate width.
Construction concept: Work a straight rectangular panel in rows using an even chevron repeat — increases form the peaks and decreases form the valleys. Color changes can be stripes of any width.
Foundation & stitch repeat (how it works):
- Chain a foundation long enough to reach the desired width + turning chain. Instead of giving a strict multiple, use the general chevron repeat: work decreases at valley (commonly sc3tog or dc3tog), work flat section stitches, then increases at peak (2 or 3 stitches in one st) to shape the ripple. If you want a precise repeat later, you can swatch to find how many chains per repeat your version uses.
Example step-by-step (classic dc chevron, comfortable for a large throw):
- Foundation chain: Ch to desired width (for a sample throw, chain enough to get ~48 in at your gauge). Add 3–4 turning chains if working dc.
- Row 1 (Right Side): Dc in 4th ch from hook (counts as dc), dc in next 10 ch, (2 dc in next ch) — peak increase, dc in next 10 ch, dc3tog (worked across next 3 ch) — valley decrease; repeat pattern across until last 4 ch, dc in last 3 ch, turning chain as appropriate. Adjust counts per your swatch (10 here is an example spacer count; make it wider or narrower to shape the chevron point width).
- Row 2–end: Turn, ch 3, dc across following stitch pattern (work dc into tops and into increases/decreases to maintain the chevron); repeat Row 1 until blanket reaches desired length (~60 in for throw). Keep tension consistent to keep peaks even.
- Color changes: Add stripes by switching color at the beginning of a right-side row. Carry color up the side or fasten off and join fresh for cleaner joins. Block to even the ripple edges.
- Border: Work 2 rounds sc around entire blanket, then open-shell round or crab stitch for a modern finish.
Design tips & variations:
- Use high-contrast colors for a bold graphic chevron or tonal gradients for a modern ombré.
- To make sharper peaks, use dc3tog decreases and 3-dc increases. For gentler waves reduce stitches between increases/decreases.
- Add a neutral border in a chunky yarn to modernize and anchor the blanket.
Troubleshooting:
- If points drift: your increases/decreases aren’t placed consistently — mark the base of each peak when you begin to ensure placement.
- If edges ripple: add a firm border (1–2 rounds of sc) and block.
Finishing & care: Block to open chevrons; machine-wash recommendations depend on yarn — follow label.
2. Crochet Chunky Stripe Blanket Pattern
Overview & style: Fast, cozy, and made with chunky yarn for instant gratification. Wide stripes make a modern statement and the weight makes the blanket extra warm and drapey.
Skill level: Beginner — mostly working in rows.
Materials (throw sample ~50 × 60 in):
- Bulky/Chunky weight yarn (Category 5 or 6); odds: 10–18 skeins depending on yardage (estimate 1200–2000 yds).
- Hook: 8.0–10.0 mm (L–N), choose hook per yarn label for desired drape.
- Tapestry needle.
Gauge & swatch: 8–10 stitches per 4 in in sc or hdc with bulky yarn is common; make a swatch to confirm.
Construction concept: Simple panel worked bottom-up in sc or hdc for dense fabric; change colors every X rows for broad stripes.
Step-by-step:
- Foundation chain: Ch to desired width; for a 50 in throw with your bulky gauge chain enough to reach that width. (If your chosen stitch is sc with bulky yarn and your gauge is 3 sts/in, you would chain roughly 150 sts — use your swatch to calculate.)
- Row 1: Sc in 2nd ch from hook and across; turn.
- Rows 2–n: Sc across (or hdc for a looser drape) until you have 6–10 rows in one color (this makes a single wide stripe). Fasten off or carry color up the side. Join next color and repeat stripe rounds.
- Repeat color banding: Alternate colors in the sequence you like; for a modern look keep bands equal (e.g., 8 rows each) or alternate one wide stripe and multiple thin stripes for rhythm.
- Border: Work 2–3 rounds of BLO sc then 1 round sc across for a neat edge. Optionally add a fringe with leftover yarn.
Design tips & variations:
- Use bulky boucle or chenille for a sumptuous texture (note: boucle hides stitches).
- Make geometric stripe sets (e.g., three repeating colors for a Scandinavian vibe).
- Add a contrasting edge in a chunky rib worked in FPdc/BPdc for cozy structure.
Troubleshooting:
- Gaps at color joins: weave tails neatly or use a neat join method (standing sc or join with sl st).
- If fabric buckles: check gauge; switch to hdc for more drape.
Finishing & care: Many chunky yarns require hand wash or gentle machine wash; check label.
3. Crochet Vintage Retro Blanket Pattern
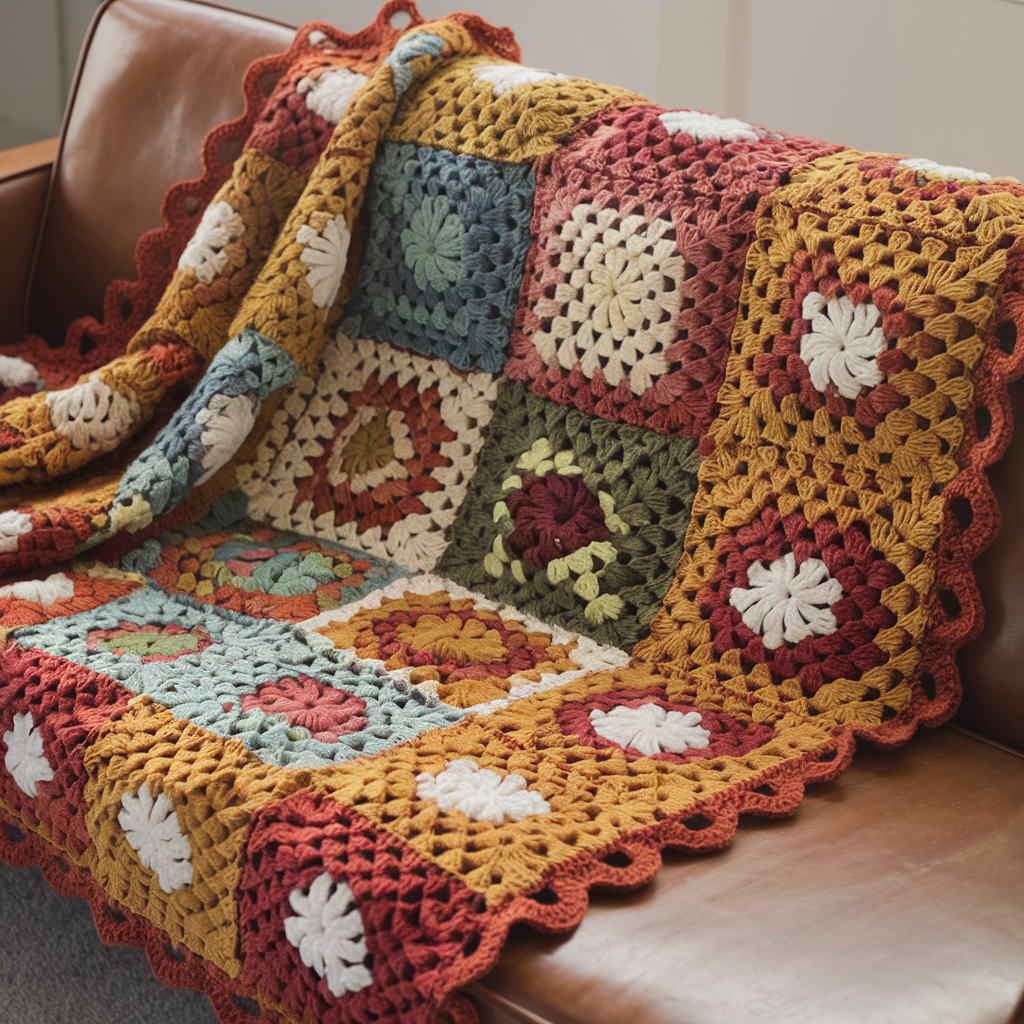
Overview & style: Nostalgic rows, granny-esque motifs and retro color palettes (mustard, avocado, burnt orange, cream). Works beautifully with modular squares or stripe-and-cluster construction.
Skill level: Confident beginner — modular assembly and simple crochet motifs.
Materials (throw sample ~48 × 60 in):
- Worsted weight yarn in 4–6 retro colors; 1500–2200 yds total depending on complexity.
- Hook: 4.0–5.0 mm.
- Tapestry needle.
Construction concepts: Choose either (A) joined granny squares, or (B) long-row vintage cluster stripes (fan shells and popcorns). I provide both outline options.
Option A — Granny square blanket (modular):
- Make a classic granny square or vintage ripple square in your color palette (each square ~4–6 in blocked).
- Make enough squares to form the blanket grid (e.g., 12 × 15 squares for a large throw depending on square size).
- Join-as-you-go or seam squares with mattress stitch; add a large shell border to unify patchwork.
Option B — Rowed retro blanket (shells & popcorns):
- Work a foundation chain to desired width.
- Row pattern ideas: alternate rows of shell stitch (5 dc in one st, skip 2) with rows of popcorn or puff clusters for texture. Use repeating color sets every 6–8 rows to create retro banding.
- Edge: scalloped shell border (3–5 dc per shell) for vintage flair.
Design tips & variations:
- Use a palette of 4 to 6 colors and repeat them in a predictable cycle for a cohesive vintage repeat.
- Distress the look with a faded dye bath (test a scrap first) or use heathered yarns.
Troubleshooting:
- Squares misaligning: block each square to a uniform size before joining.
- Heavy drape: add a thin lining or quilt batting for a bedthrow.
Finishing & care: Block square blankets and wash per yarn label.
4. Crochet Textured World Blanket Pattern
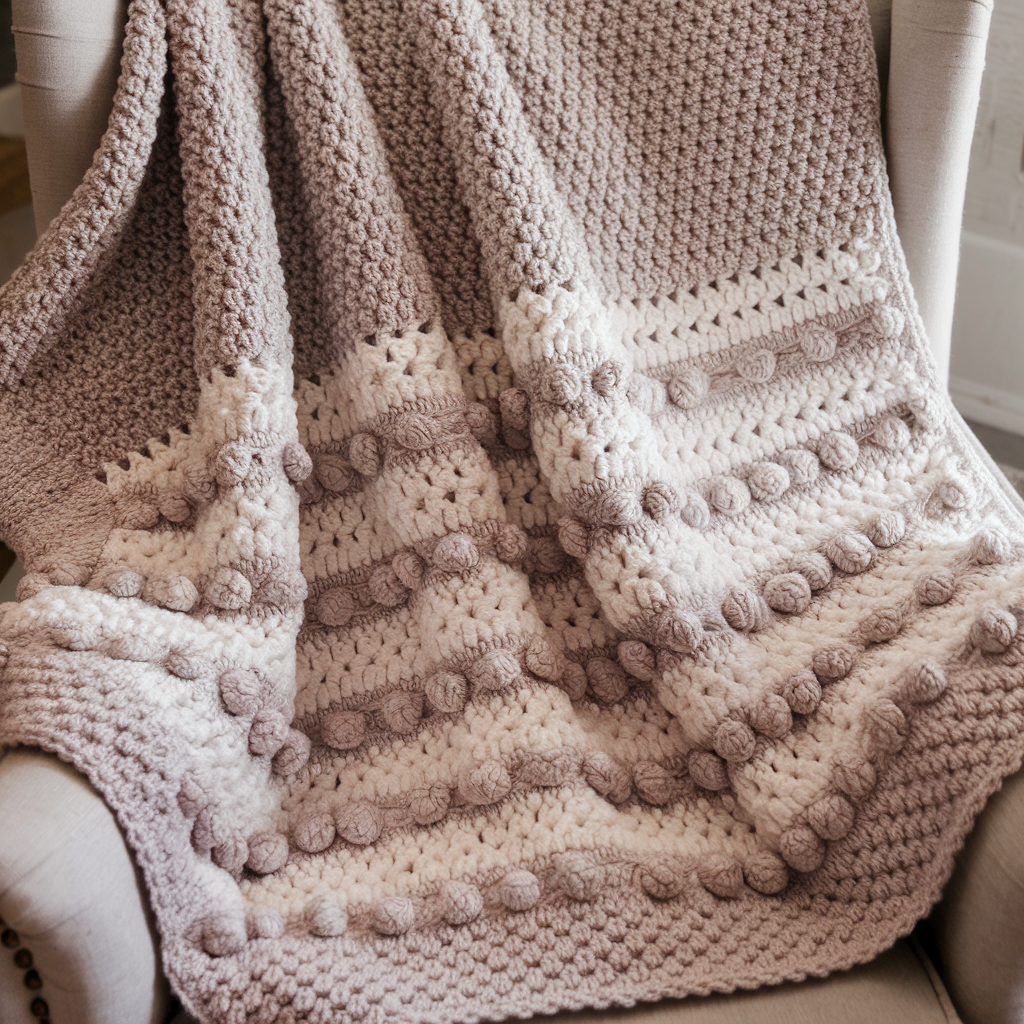
Overview & style: A globally inspired textured blanket combining bobbles, popcorns, post stitches and basket-weave panels — this one’s for tactile interest and slow, meditative stitching.
Skill level: Intermediate — multiple stitch types and some chart-reading.
Materials (throw sample ~50 × 60 in):
- Worsted or aran yarn with good stitch definition — 1800–2400 yds.
- Hook: 4.5–5.5 mm.
- Stitch markers and tapestry needle.
Gauge & swatch: Make a 4 in swatch in the main textured pattern to determine repeats and calculate stitch counts.
Construction concept: Work a large panel in alternating textured bands: e.g., basketweave, bobble clusters, raised diamonds (using FPdc/BPdc), moss stitch panels, and v-stitch lace to balance heaviness.
Example band-by-band approach (step-by-step):
- Foundation chain to width. Work a base band in sc for a sturdy start (4 rounds).
- Band A — Basketweave: Use FPdc/BPdc alternation to create horizontal boxes (pattern repeat: FPdc 4, BPdc 4 across; alternate on next rows). Work for 6–8 rows.
- Band B — Bobble clusters: Work a row of bobble clusters spaced evenly: (ch1, bobble in next st, ch1, sc) across; follow with anchor rows of sc.
- Band C — Raised diamond: Use post stitches to form diamond outlines: work rounds of FPdc/BPdc and cross-post rows to create angled lines.
- Repeat bands in an order that balances density (heavier bobble bands offset by open v-stitch bands).
- Finish with a wide border (2–4 rounds sc) and a decorative shell or raised rope round to frame texture.
Design tips & variations:
- Single-color yarn shows texture best; choose a slightly heathered yarn for subtle depth.
- For a global folk vibe, work short color pops—one contrasting band every 10–12 rows.
Troubleshooting:
- If texture looks uneven: block gently and restitch any rows that pull.
- If the blanket becomes heavy: remove a bobble band or replace with a lighter mesh band.
Finishing & care: Use gentle wash; bobbles/popcorns may need reshaping by hand after washing.
5. Crochet Sanibel and Chill Blanket Pattern
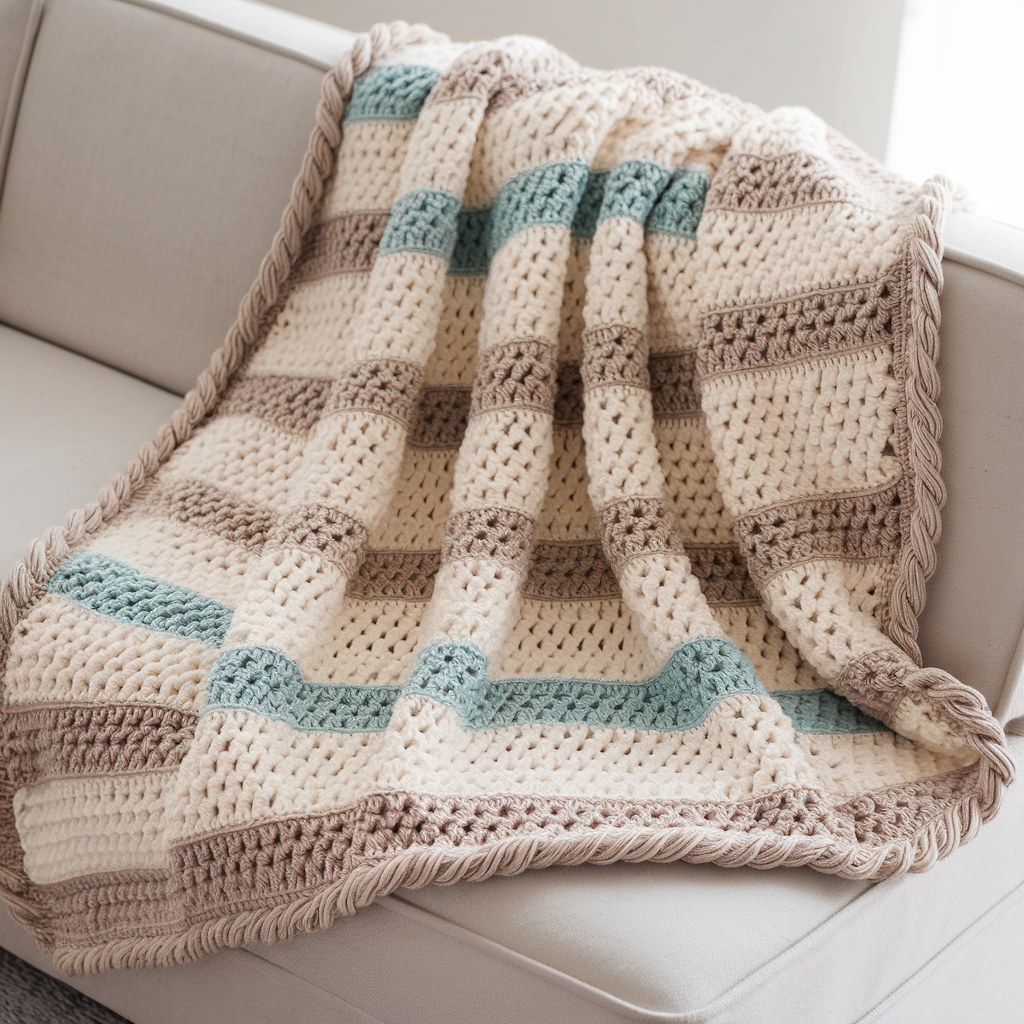
Overview & style: Inspired by coastal palettes and relaxed geometry — the Sanibel and Chill pattern uses soft striping, subtle texture, and calm color transitions. Great for neutral, beachy decor.
Skill level: Confident beginner — repetitive stripes and simple textured rounds.
Materials (throw sample ~48 × 60 in):
- DK or light worsted yarn in 3–5 soft coastal shades (cream, sand, sea glass, driftwood); ~1500–2200 yds.
- Hook: 4.0–4.5 mm.
Gauge & swatch: Swatch in the main stitch (I recommend a 4-row textured repeat shown below).
Construction concept: A striped blanket with textured rows (e.g., hdc + chain eyelets or a linen stitch band) and occasional wider accent stripes.
Step-by-step sample:
- Foundation chain to desired width.
- Stripe plan: work 6 rounds sand color, 4 rounds linen stitch in sea glass, 6 rounds muted stripe, repeat. Linen stitch (moss stitch) is made by alternating sc and ch1 spaces over rows (in the round adapt to alternating sc and sc into ch spaces).
- Add a textured accent every 8–12 rows: e.g., a row of reverse crab stitch or a row of raised tr clusters.
- End with two rounds of sc and a decorative rope-style border (FPdc/BPdc rounds) for a cozy edge.
Design tips & variations:
- Keep palette limited for a sophisticated coastal look.
- Use a single bright accent stripe (coral or teal) for a contemporary pop.
Troubleshooting:
- If stripes look crooked: carry yarn on the wrong side and make neat color changes at the start of the row; block to even.
Finishing & care: Machine wash on gentle for acrylic/cotton blends; line dry.
6. Crochet Horizon Blanket Pattern
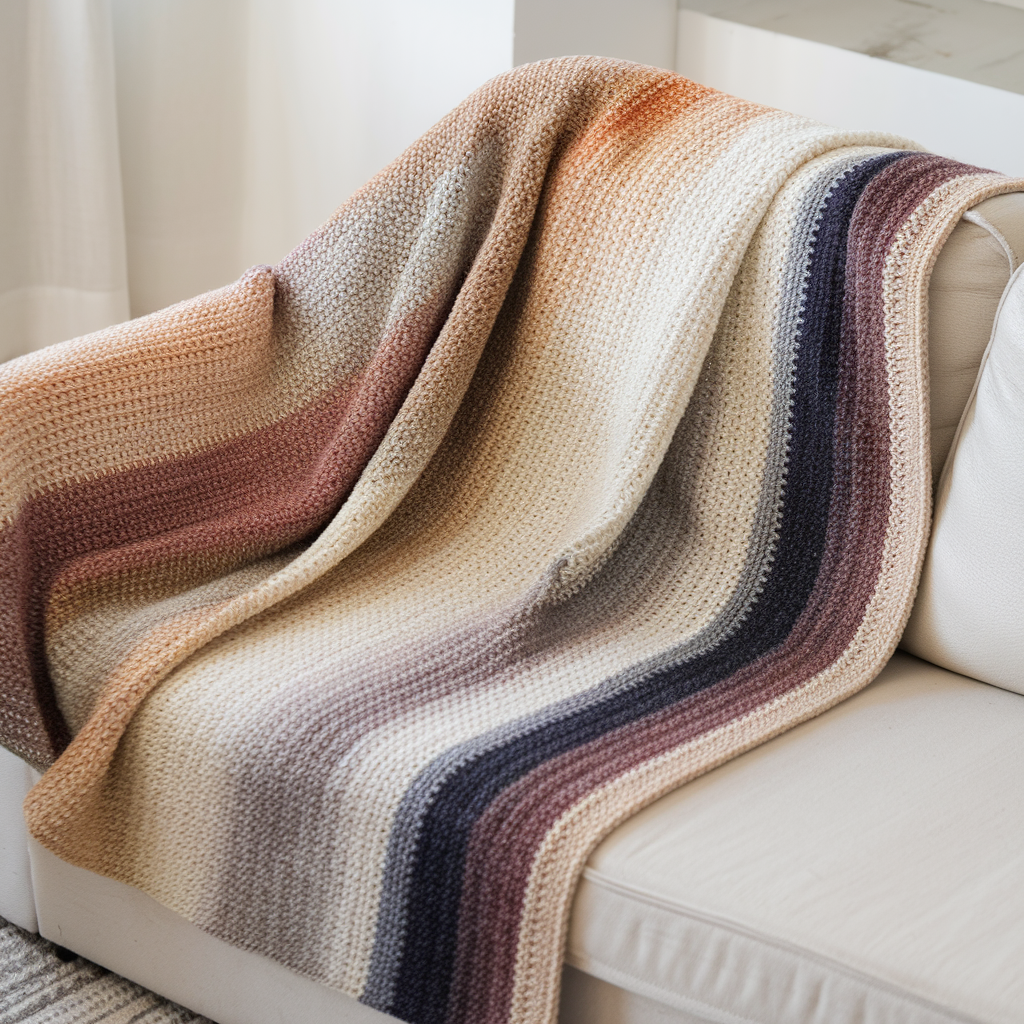
Overview & style: A soft, subtle gradient blanket that mimics the horizon — horizontal color transitions using gradient yarns or carefully planned stripes that shift tone slowly. Very calming visually.
Skill level: Confident beginner — simple stitches but requires color planning.
Materials (throw sample ~50 × 60 in):
- Several skeins in a gradient set OR yarn cake that graduates (estimate 1500–2500 yds depending on yarn and size).
- Hook: 4.0–5.0 mm, depending on desired drape.
Construction concept: Work a simple stitch (dc, hdc, or linen stitch) in long horizontal bands; shift color slowly by alternating rows of adjoining colors to blend.
Step-by-step blending & stripe technique:
- Choose 4–6 hues arranged from darkest to lightest for the “horizon” progression.
- Work 8–12 rows in Color A, then create a blended section: alternate rows A/B for 4 rows, then work 8–12 rows in Color B. Repeat the transition sequence across the full height. This creates soft gradients instead of harsh stripes.
- Stitch choice: Linen stitch (sc in alternating ch-1 spaces) or hdc gives a rubbed, woven look. Linen stitch is exceptionally good at hiding harsh stripe lines when alternating colors.
- Border: narrow single round in the lightest or darkest color to frame.
Design tips & variations:
- For a sunrise/sunset effect pick a warm palette (peach → pink → purple). For seascapes use sea-tones.
- Use variegated cakes as the mid-band for painterly transitions.
Troubleshooting:
- If color transitions look abrupt, increase the number of alternating rows.
- If the blanket seems uneven in width across color transitions, check tension and block after each major color change.
Finishing & care: Gentle wash recommended; line dry to maintain gradient clarity.
7. Crochet V-Stitch Blanket Pattern
Overview & style: The V-stitch is an airy, lacy repeat made from (dc, ch1, dc) clusters — it gives a classic openwork blanket that’s light but warm with the right yarn. Versatile and lovely for baby blankets and lightweight throws.
Skill level: Confident beginner — straightforward repeat and easy to scale.
Materials (throw sample ~48 × 60 in):
- DK or worsted yarn depending on how open you want the fabric; sample uses worsted for a balance — ~1400–2000 yds.
- Hook: 4.0–5.5 mm depending on yarn weight.
Gauge & swatch: Make a 4 in swatch in the V-stitch to calculate repeats.
V-stitch repeat & step-by-step:
- Foundation chain: Ch an odd number of stitches + 2 (this accommodates V-stitches across the row). Alternatively chain to desired width matching your swatch.
- Row 1 (foundation row): Dc in 4th ch from hook (counts as dc + ch1?), skip 1 ch, (dc, ch1, dc) into next ch across; end with dc in last ch. Turn. (This establishes the V-stitch pattern.)
- Row 2: Ch 3 (counts as dc), dc into ch-1 space of next V, ch1, dc into same ch-1 across; end with dc in top of turning chain. Repeat Row 2 until desired length.
- Colorwork: change colors at the beginning of a row for stripes; carry color inside long side border or fasten off for clean color breaks.
- Border: single crochet around to stabilize; for a delicate finish work a picot round or shell border.
Design tips & variations:
- Use variegated yarn for painterly V-stitch texture.
- For a denser blanket, work V-stitch in a heavier yarn or use smaller hook.
Troubleshooting:
- If the blanket skews: check that you are placing final dc at the end of each row consistently into the top of turning chain and that your foundation chain has the correct odd/even count.
- If holes are too big for your purpose, tighten tension or substitute hdc V clusters (hdc, ch1, hdc) for a lighter open fabric.
Finishing & care: Block lightly; wardrobes with more open stitches dry faster. Follow yarn care.
Borders, Blocking & Final Finishing Notes
- Choosing a border: Simple options: one or two rounds of single crochet for clean frame; decorative options: shell round, crab stitch (reverse sc), scallop, or rope rounds made from FPdc/BPdc. For modern minimalist blankets a small ribbed border (BLO rows in hdc) looks refined.
- Blocking: Wet-block or steam-block on a flat surface. Pin corners evenly and measure to get a square/rectangular edge. Block especially important for lace (V-stitch).
- Weaving ends: Use a tapestry needle to weave each tail in at least 2–3 in under stitches, ideally along the direction of stitch rows; for colorwork weave back into same color areas.
- Backing & lining: If you want a neat, warm backing, sew on fleece or quilt backing to the wrong side after blocking — a great option for heavy baby blankets and throws that will be laundered often.
- Care labels: If gifting, include fiber content and care instructions: e.g., “Machine wash gentle, cold. Lay flat to dry. Do not bleach.”
Conclusion
These seven blanket patterns — from a bold modern chevron through a fast chunky stripe, nostalgic retro squares, globally textured panels, beachy Sanibel hues, dreamy horizon gradients, to the breezy V-stitch — give you a wide palette of techniques, stitches and styles. Each design is adaptable: alter yarn weight, hook size, stripe widths and color palettes to make a piece that’s uniquely yours. Start with the beginner-friendly chunky stripe or V-stitch for quick gratification, or choose the textured world blanket if you want meditative stitch variety.


raja slot365 Càng tham gia lâu dài và tích cực, người tham gia sẽ càng được hưởng những ưu đãi lớn hơn. Các thành viên VIP của nhà cái thường nhận được phần quà đặc biệt, tỷ lệ hoàn tiền cao hơn, cả những ưu đãi cá nhân hóa như quản lý tài khoản riêng, hỗ trợ ưu tiên cùng nhiều quyền lợi khác.
Để tạo thêm động lực cho hội viên tham gia cá cược thì nhà cái đã thiết lập vô 66b mới nhất chương trình ưu đãi đặc sắc. Thương hiệu không ngần ngại đầu tư một khoản tiền rất lớn để tổ chức nhiều sự kiện tri ân nổi bật dành cho mọi đối tượng. Một trong những món quà tặng đặc biệt nhất là hoàn tiền khi thua cược.
I don’t think the title of your article matches the content lol. Just kidding, mainly because I had some doubts after reading the article.
I don’t think the title of your article matches the content lol. Just kidding, mainly because I had some doubts after reading the article.
Your article helped me a lot, is there any more related content? Thanks!
Thank you for your sharing. I am worried that I lack creative ideas. It is your article that makes me full of hope. Thank you. But, I have a question, can you help me?
Your article helped me a lot, is there any more related content? Thanks!
I don’t think the title of your article matches the content lol. Just kidding, mainly because I had some doubts after reading the article. https://www.binance.info/sl/register?ref=GQ1JXNRE
Thank you for your sharing. I am worried that I lack creative ideas. It is your article that makes me full of hope. Thank you. But, I have a question, can you help me?
Your point of view caught my eye and was very interesting. Thanks. I have a question for you.