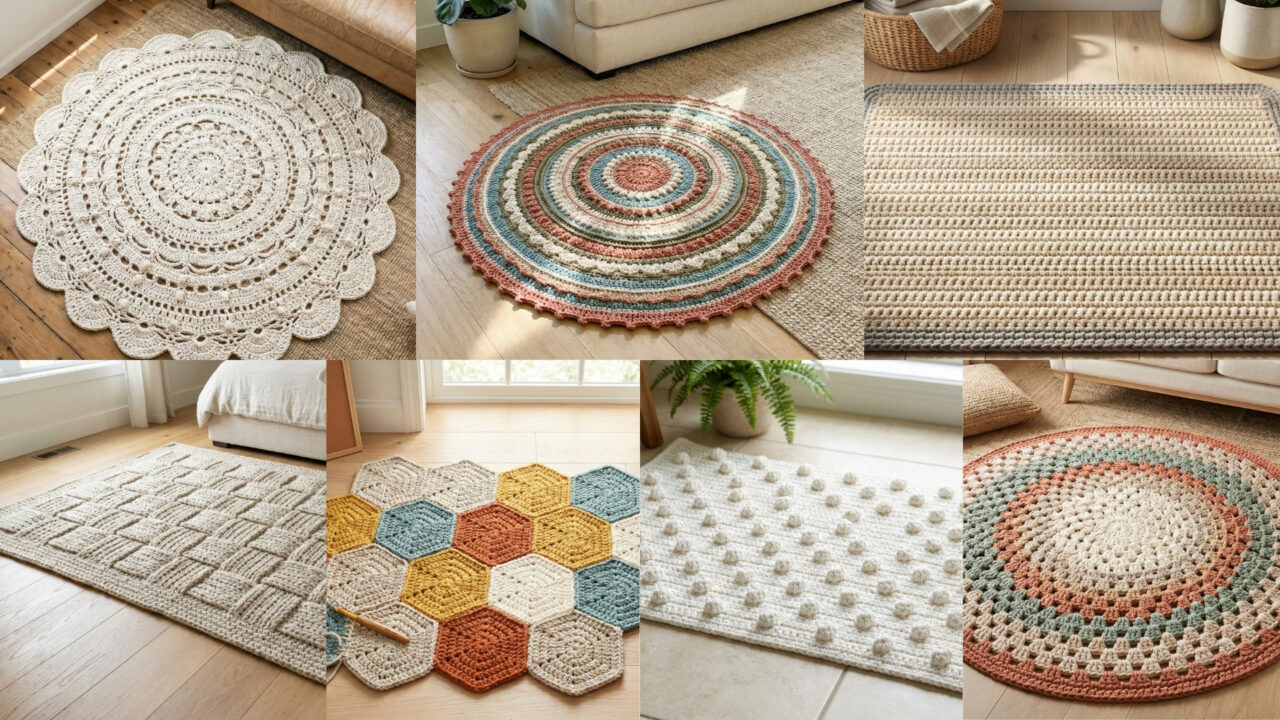
Handmade rugs add instant personality to a room. They’re practical underfoot, forgiving of heavy traffic when made with sturdy yarns, and they’re an easy way to introduce color, texture and scale. Below are seven complete rug patterns — rectangle, chunky basketweave, bobble, giant doily, granny circle, mandala, and hexagon — each with materials, skill level, gauge where applicable, step-by-step construction, finishing instructions, variations and care notes. Sizes and stitch counts are given as examples you can scale; clear math and tips are included so you can adapt any design to fit a hallway, bath, kitchen, or living room.
Quick essentials (tools, materials, safety)
Recommended yarns
- T-shirt / ribbon yarn: soft, thick, perfect for low-pile rugs and bath mats.
- Chunky/bulky cotton or cotton blends: durable and washable; good for living-room rugs.
- Chenille/velvet yarn: plush and cozy but may be slippery — best used with a non-slip backing.
- Jute or rope (with cotton blend): rugged, natural look; use thick hooks and sturdy stitches.
Choose washable, sturdy yarn for high-traffic areas. Avoid very slippery microfibers for entryway rugs unless you’ll add a backing.
Hooks & notions
- Large hooks 8 mm–15 mm depending on yarn thickness; for t-shirt yarn or bulky, 10–15 mm.
- Tapestry needle for weaving ends and sewing panels.
- Scissors, measuring tape, stitch markers.
- Non-slip rug pad or shelf liner (cut to rug shape) for safety.
Safety note
- Always use a non-slip pad under rugs in high-traffic areas or on hardwood floors to prevent slipping. For bath mats, choose a rubber-backed pad or add a thin, washable rubber backing.
1. Crochet Rectangle Rug Pattern

Vibe: classic rectangular rug — versatile for hallways, bedside, kitchen runner.
Skill level: confident beginner.
Sample finished size: 24″ × 36″ (runner and larger sizes easy by adding foundation chains).
Materials (sample 24″ × 36″)
- Bulky cotton or t-shirt yarn ~700–1,000 yd (depends on thickness).
- Hook 10–12 mm (adjust for yarn and desired drape).
Gauge / planning
- Make a small swatch to measure stitches per inch with chosen yarn and hook. Example: 4 sc = 1″ in bulky yarn. For 24″ width at 4 sc/in → chain foundation = 24 × 4 = 96 sts (plus turning chain if your stitch requires it).
Stitch choice
- Single crochet (sc) or half double crochet (hdc) for a dense, wipeable rug surface. For a slightly more textured look, use moss/linen stitch or herringbone half double crochet.
Step-by-step (sc rectangular example)
- Foundation: chain the number of foundation chains to reach width (example 96 ch + 1 turning ch).
- Row 1 (setup): sc in 2nd ch from hook and across. Turn.
- Rows 2–X: ch 1, sc across; repeat until rug reaches desired length (36″). If your rows per inch = 3, need 36 × 3 = 108 rows.
- Edge finishing: work 1 round sc evenly around the entire rectangle, placing 3 sc in each corner to keep it flat. For a neater frame, add 1–2 additional rounds of sc or hdc in a contrasting color.
- Weave in ends and block on a flat surface if needed.
Variations
- Striped runner: change color every 8–12 rows.
- Textured center panel: work a panel of basketweave (see pattern 2) in the middle and surround with sc edges.
- Two-color geometric: use tapestry crochet colorwork in sc to create stripes, chevrons or squares.
Finishing & care
- Machine wash gentle if yarn label allows; otherwise hand wash and dry flat. Use a non-slip rug pad underneath.
2. Crochet Basketweave Chunky Rug Pattern
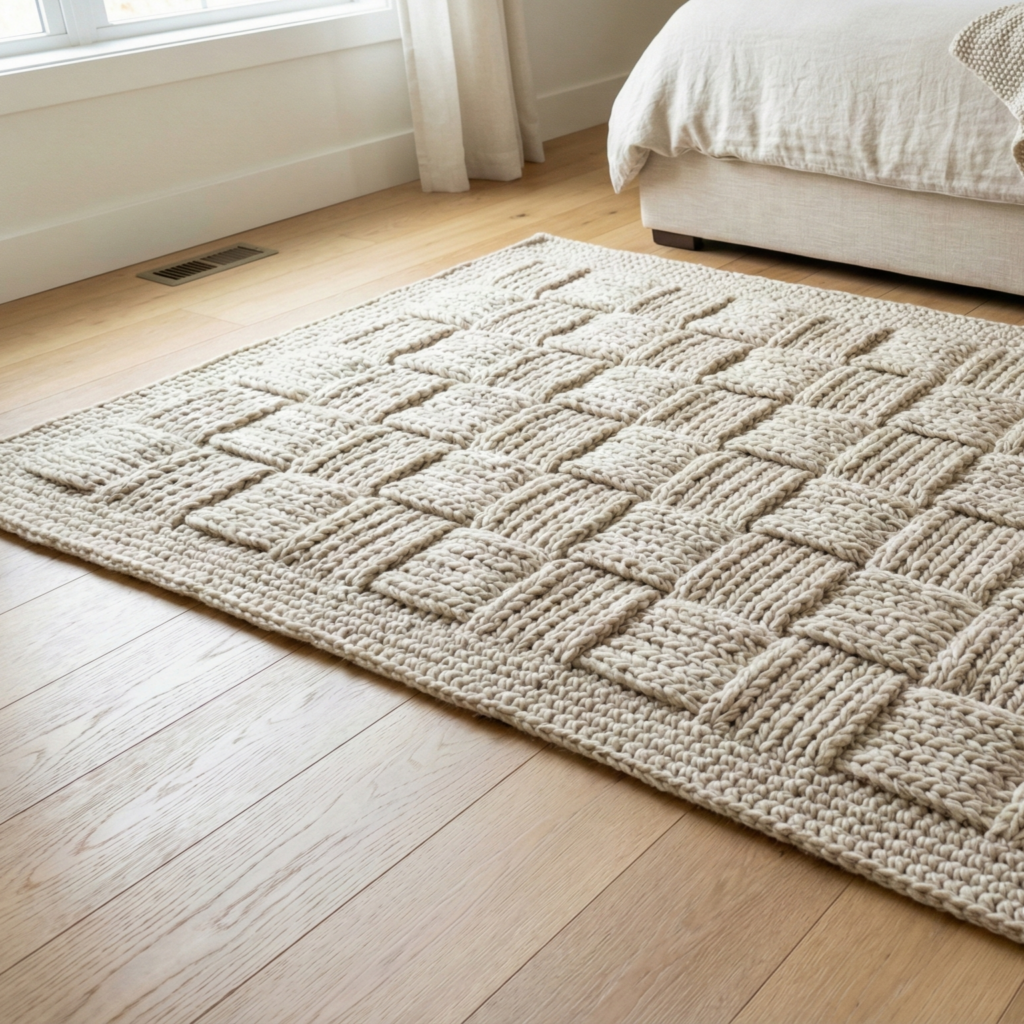
Vibe: rich woven texture, thick and cushioned underfoot. Perfect as a statement or cozy bedside rug.
Skill level: intermediate (post stitches or front/back loop work).
Sample finished size: 30″ × 40″.
Materials
- Super bulky yarn or two strands of bulky held together ~900–1,200 yd.
- Hook 12–15 mm.
Stitch & pattern notes
- Basketweave effect uses front post and back post stitches (or repeated BLO/FLO hdc) arranged in blocks to create woven squares.
Sample repeat (worked in rounds or rows)
- Multiple of 8 sts + 1 (for symmetry). Example foundation for 30″ wide at 2.5 sts/in = 75 sts (round to 80 for multiple of 8).
Step-by-step (rowed basketweave)
- Foundation: chain desired width (e.g., 80 ch). Row 1: hdc across. Turn.
- Setup row: ch 2, hdc across in back loop only (BLO) to create a defined base. Turn.
- Basketweave block repeats (8 rows high):
- Rows 1–4: front post hdc (fphdc) for 4 sts, back post hdc (bphdc) for 4 sts across.
- Rows 5–8: offset by 4 sts: bphdc 4, fphdc 4 across.
- Repeat these 8 rows to build woven blocks.
- Continue until rug reaches desired length.
- Edge finish: 2 rounds sc to tidy.
Alternative method (without post stitches)
- Use hdc BLO for one block and hdc FLO for the next block, switching every block of 4 sts — same visual effect and easier for beginners who prefer not to do post stitches.
Variations
- Make a circular or oval version by working basketweave in joined rounds using increases in the usual locations (this requires planning to keep block pattern balanced).
Finishing & care
- Weave in ends and block lightly. Use a non-slip pad. Machine wash on cold gentle if yarn is machine-washable; line dry to retain shape.
3. Crochet Bobble Rug Pattern
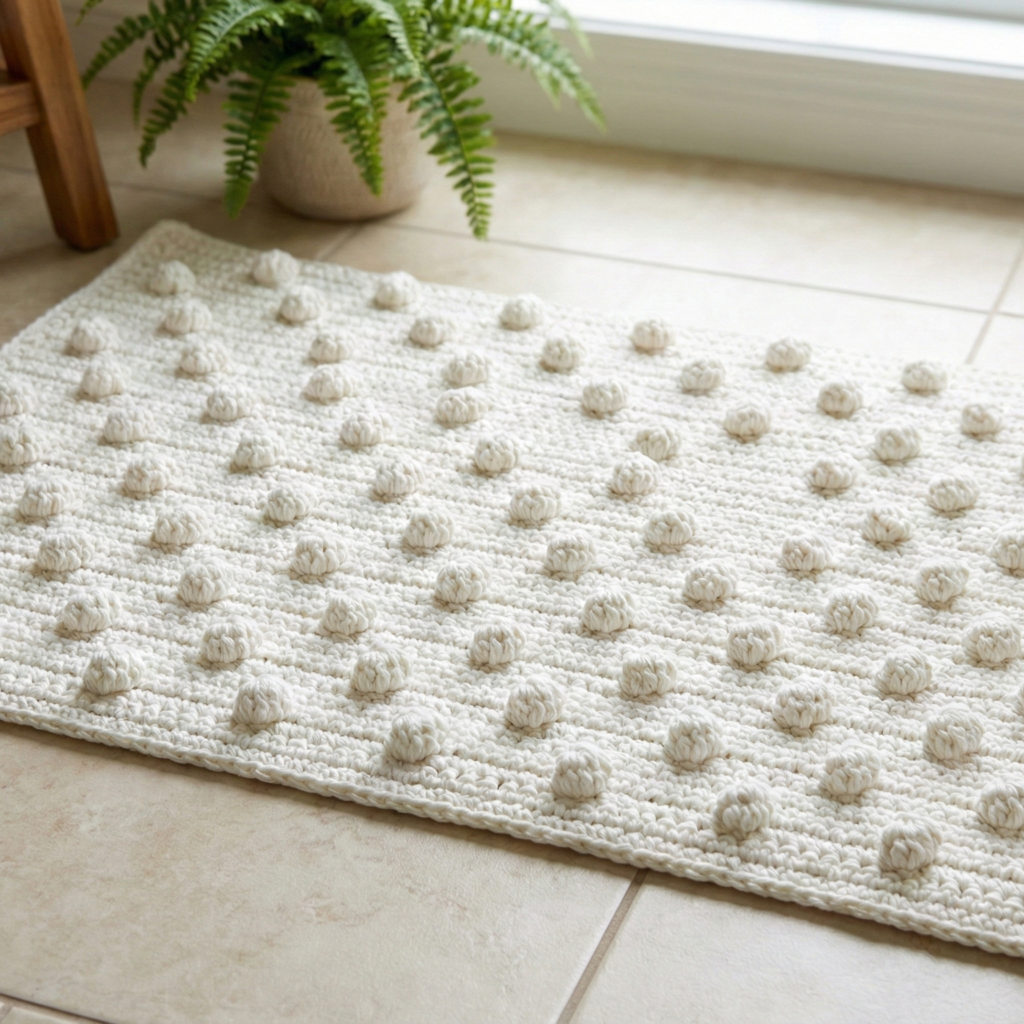
Vibe: tactile bobble clusters make a playful, spa-like bath mat or cozy lounge rug. Bobbles add grip and plushness when made with sturdy cotton.
Skill level: intermediate (bobble stitch clusters).
Sample size: 20″ × 30″ bath rug.
Materials
- Bulky cotton ~400–600 yd.
- Hook 10–12 mm.
Stitch used
- Bobble (cluster) stitch: typically 5 dc cluster or 3–5 hdc clusters depending on yarn. Bobbles sit above the fabric, so use a dense ground stitch like sc or hdc.
Step-by-step
- Foundation: chain to desired width (example 60 ch). Row 1: sc across. Turn.
- Row pattern: establish a grid pattern so bobbles are staggered:
- Row A (ground): sc across.
- Row B (bobble row): sc in next st, bobble in next st, sc in next 2 sts repeat across.
- Row C: sc across to set bobbles.
- On next bobble row, offset bobbles by starting with sc in first 2 sts then bobble to create a staggered grid.
- Repeat rows until rug reaches length. Finish with a sc border.
Tips for neat bobbles
- Keep bobbles consistent by making the same cluster height each time. If bobbles feel floppy, tighten the bobble stitch (use fewer yarn overs) or work the bobbles with hdc clusters instead of dc clusters.
Variations
- Mixed bobble sizes (alternate 3-st and 5-st clusters) for a varied texture.
- Use color-blocked bobble rows for a dotted design.
Finishing & care
- Carefully weave in ends behind bobbles to avoid bulk on the right side. Block lightly; bobble yarn may flatten slightly with washing. Add a rubber non-slip pad underneath.
4. Crochet Giant Doily Rug Pattern
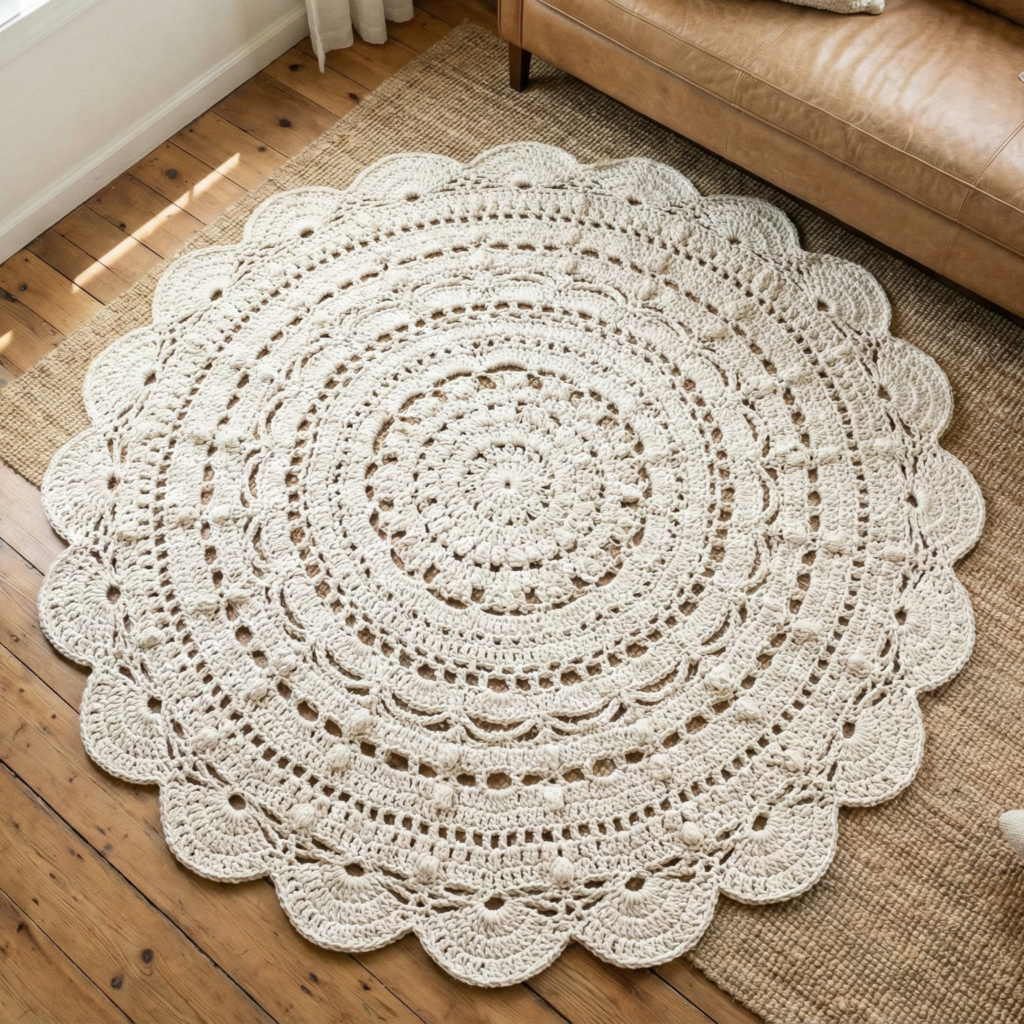
Vibe: oversized lace (doily) made sturdy with bulky yarn — dramatic and airy for a boho living room or layered over another rug.
Skill level: intermediate → advanced (lace charts or complex repeats).
Sample finished size: 48″ diameter (scale up or down by adding rounds).
Materials
- Bulky cotton, chenille, or t-shirt yarn ~1,200–2,000 yd depending on diameter.
- Hook 10–15 mm (match yarn).
Pattern approach
- Doily rugs are worked in rounds from center out. Use chains, shells, double (dc) or treble clusters to create lacy motifs. To make lace practical for rugs, stick with cotton or bulky yarn and limit very open lace — aim for medium openness so the rug holds shape.
Step-by-step (round generic)
- Center: MR, ch 3 (counts as dc), work 11 dc in MR; sl st to join (12 dc).
- Round 2: ch 4, sk 1 dc, dc in next repeat to form chain spaces.
- Lace rounds: Build a repeating motif sequence — shell rounds, chain arches, and cluster rounds — increasing each round evenly to keep flat (add increases in shells or increase counts in pattern repeats). Example: every round that adds shells increase the number of shells by evenly placing additional shells between existing ones.
- Keep it flat: work a test section to ensure the rug doesn’t ruffle (too many increases) or cup (too few increases). If edges ripple, add an extra increase round. If it ruffles, reduce increases on following rounds.
- Outer rounds: finish with a sturdy border of sc or hdc 2–4 rounds to strengthen the edge. If you want scallops, work shells on the final round.
Construction tips
- Plan increases with multiples that match your lace repeat. For example, if the motif is a 12-st repeat, increase by 12 stitches when you need to grow circumference.
- Work in joined rounds or spiral joined rounds; for clarity, place a stitch marker at the start of each round.
Variations
- Make a layered look by using two complementary colors in alternating rounds.
- Combine a lace center with a dense outer border to create a non-slip perimeter.
Finishing & care
- Because doily rugs are lacy, add a backing (non-slip pad trimmed to shape) or line the underside with sturdy fabric in high-traffic areas. Hand or machine wash according to yarn label; block flat.
5. Crochet Granny Circle Rug Pattern
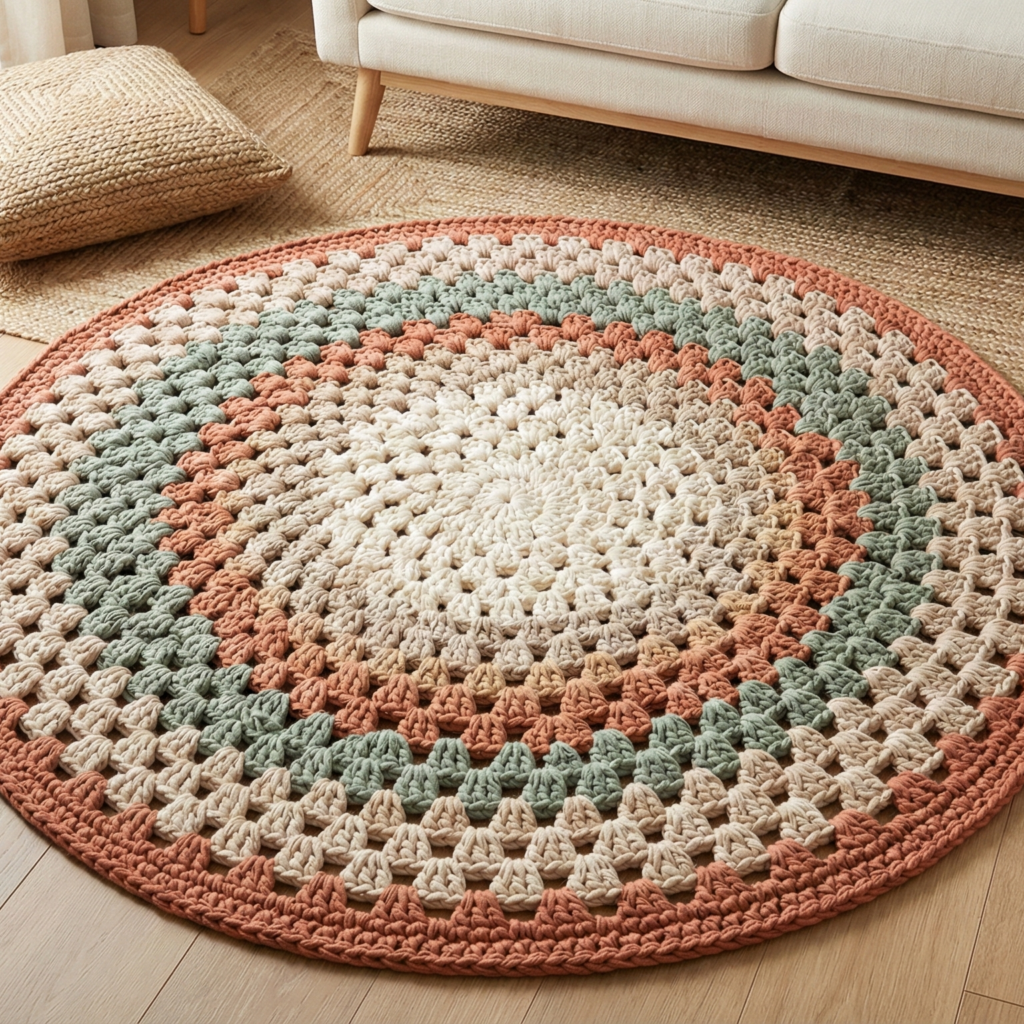
Vibe: retro-meets-modern — concentric granny rounds in colorful palettes for a classic round rug.
Skill level: confident beginner.
Sample finished size: 36″–48″ diameter.
Materials
- Multiple colors of bulky cotton or t-shirt yarn ~800–1,600 yd depending on size.
- Hook 10–12 mm.
Stitch choice
- Classic granny clusters: groups of 3 dc separated by chain spaces, worked in rounds.
Step-by-step (classic granny circle)
- Center ring: MR, ch 3 (counts as dc), work 2 dc, ch 2, 3 dc in MR; this creates the first corner for the circular granny. Pull ring tight and sl st to top of ch3. (One corner made.)
- Round 2: ch 3, 2 dc in same space, ch 1, (3 dc, ch 2, 3 dc) in next ch-2 space, ch 1 repeat around; sl st to join. This builds the first round of granny shells.
- Subsequent rounds: To keep the rug flat while growing round, you’ll add clusters in each chain-1 space between shells and treat chain-2 corners as the places to add (3 dc, ch 2, 3 dc). For circular growth, add one extra cluster (or 2 dc) in some chain-1 spaces every other round to maintain flatness — a standard granny in the round will produce a flat circle if you follow established circular granny increase rules (increase evenly, adding extra clusters every round as required by circumference).
- Color changes: change colors at the start of rounds for bold rings or at every round for rainbow stripes.
- Edge: finish with two rounds of sc for durability.
How to keep granny flat
- If the rug cu ps, add more increases on the next round (i.e., add an additional 3 dc cluster in some chain-1 spaces).
- If the rug ruffles, reduce increases by skipping some increase points.
Variations
- Combine granny rounds with solid rounds of sc or hdc for texture bands.
- Work an outer round of dense hdc to create a firm perimeter.
Finishing & care
- Machine wash gentle if yarn allows; use a non-slip pad. For very large sizes, make in sections and seam together with mattress stitch for a tidy join.
6. Crochet Mandala Rug Pattern
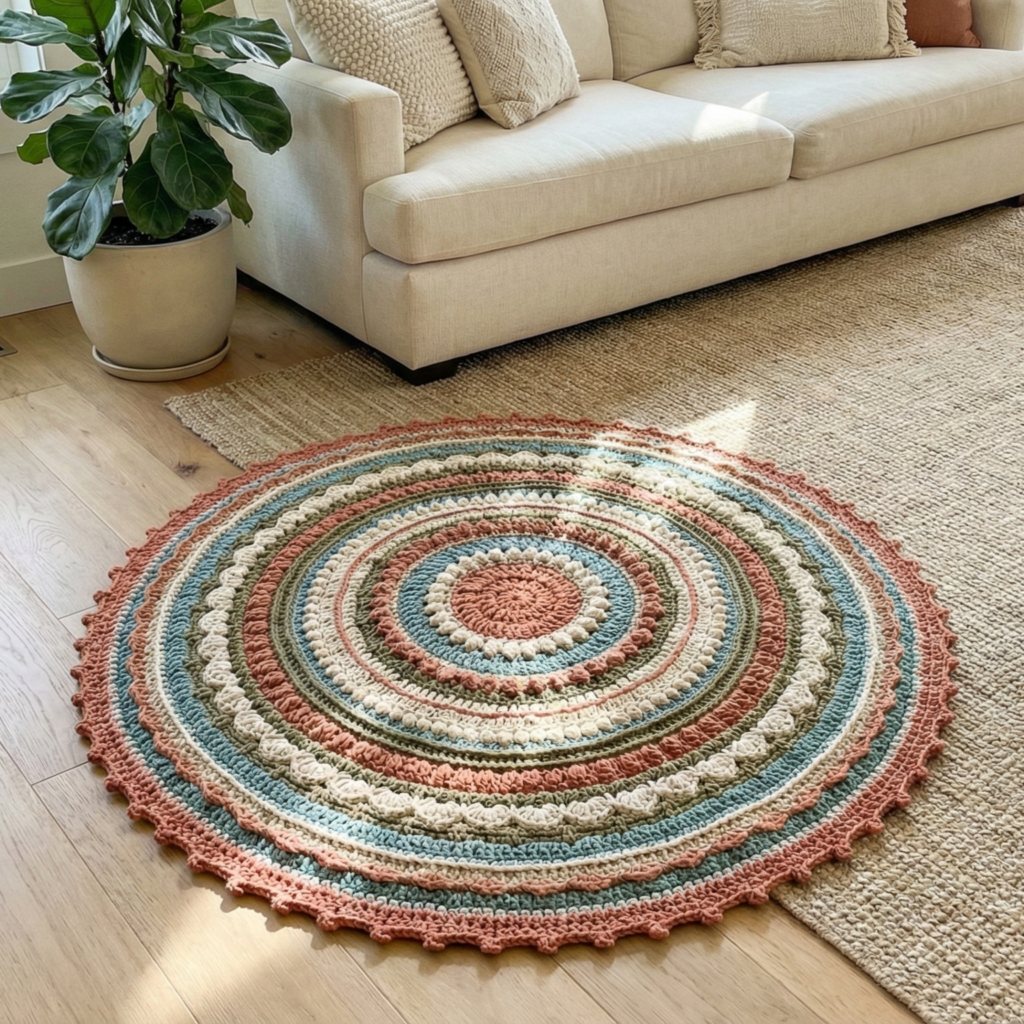
Vibe: colorful, ornate concentric motifs with repeating mandala rounds — ideal as a centerpiece rug or layered over solids.
Skill level: intermediate → advanced (pattern reading, round increases).
Sample size: 48″ diameter (scale by adding rounds).
Materials
- Multiple colors in bulky cotton or wool-blend ~1,200–2,000 yd.
- Hook 10–15 mm.
Design approach
- Mandala rugs are worked in rounds; each round introduces a new stitch family (shells, clusters, bobbles, popcorns, clusters, picots) to create visual interest. Use charted rounds or written round instructions. Keep the center small and build outward.
Step-by-step (conceptual)
- Start small: MR, 8–12 dc to form the center.
- Build texture: alternate rounds of shells and dense rounds to add contrast: e.g., round 1 dc, round 2 chain arches, round 3 shells, round 4 cluster round, round 5 bobble round, etc. Increase carefully to maintain a flat plane (increase counts must match circumference growth).
- Color rhythm: change colors every 1–3 rounds to emphasize mandala rings. Use a color palette for harmony (three to five colors repeated at intervals).
- Edge finish: end with 2–4 rounds of sc/hdc for stability, or a decorative scallop.
Tips for flatness
- Work increases in multiples matching your stitch pattern. For a shell round with shells of 5 dc, increases of 5 sts per repeat may be necessary early on.
- Test a small sector for flatness every few rounds — if it cups or ruffles, adjust the next round’s increases.
Variations
- Add a final heavy border of basketweave or cables (if yarn and hook permit) for a tailored frame.
- For durability, make inner rounds dense (sc/hdc) for high footfall and outer mandala rounds more decorative.
Finishing & care
- Because mandala rugs can be intricate, weave in ends carefully on the wrong side. Use a non-slip backing. Wash per yarn label; block flat.
7. Crochet Hexagon Chunky Rug Pattern
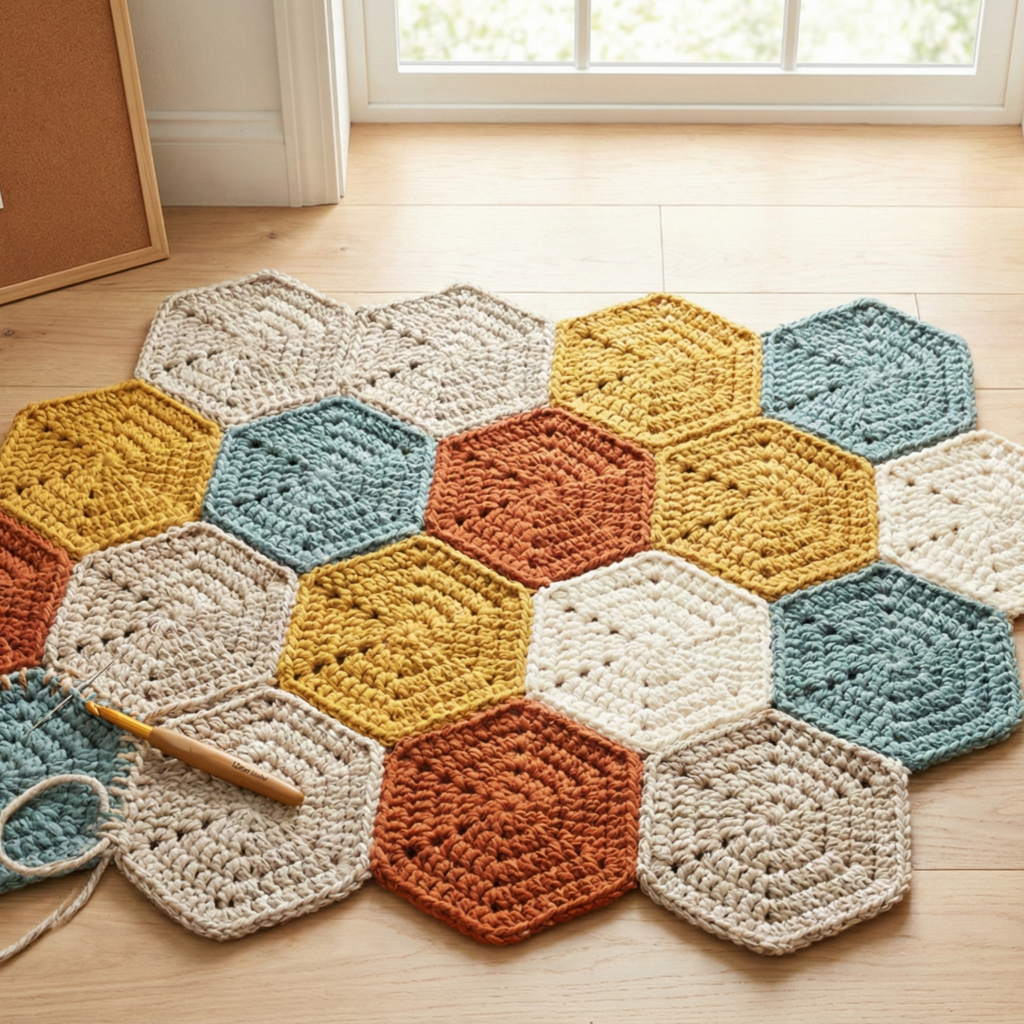
Vibe: modular hexagons joined into geometric rugs — great for custom shapes and color play.
Skill level: confident beginner → intermediate (joining motifs).
Sample size: each hexagon 10″ across; join 12–20 hexes into a 36″–48″ rug.
Materials
- Bulky yarn ~800–1,600 yd depending on hexagon count.
- Hook 12–15 mm.
Hexagon motif (worked in rounds)
- Center: MR, ch 3, 11 dc in MR, sl st join (12 dc).
- Round 2: (ch 3, 3 dc) in next dc, ch 1 repeat to form six petals/points (this may be modified to create flat hex).
- Subsequent rounds: build six sides by working increases at six points to form a flat hex — standard hexagon increase structure is to work clusters in each corner with straight edges in between. Example: Round n: (3 dc, ch 2, 3 dc) into corner space; dc in next X sts repeat for 6 corners. Increase X appropriately each round to keep flat.
Joining hexes
- Whipstitch / mattress stitch: sew hexes together through outermost rounds for a flat join.
- Join-as-you-go: join hexes by slip-stitch method on last round for seamless joins.
Rug assembly
- Arrange hexes in desired shape (rectangle, honeycomb, heart, runner). Join row by row. For added stability, after joining, pick up loops around entire rug and work 2–3 rounds of sc.
Variations
- Make a gradient rug by using shades of a color family.
- Mix hexagon sizes for an organic layout — seam smaller hexes into gaps.
Finishing & care
- Back with a non-slip pad if used on smooth floors. Large hex rugs can be made in panels for easier washing: seam sections, launder separately if needed.
Final finishing, backing and care tips (applies to all patterns)
Non-slip backing
- For safety and longevity, always use a non-slip rug pad or shelf liner cut to the rug’s size. For bath mats, consider a rubber backing or a washable skid-resistant mat.
Seaming and finishing
- Weave in ends tightly and hide tails inside the rug’s fabric. For large rugs made in panels, use mattress stitch to produce flat seams. For modular motifs, join-as-you-go produces the neatest joins.
Washing & maintenance
- Check the yarn label for washing instructions. Most cotton and t-shirt yarns can be machine washed gentle cold and air-dried or tumbled low; chenille and velvet yarns often require gentle cycles and air drying.
- For large, heavy rugs, spot clean or take to a laundromat with large washers, or wash in sections. Always air dry flat to prevent distortion.
Durability
- For high-traffic areas, choose dense stitches (sc, hdc, basketweave) and sturdy yarns (cotton or cotton blends). Reinforce edges with extra rounds to prevent fraying.
Conclusion
A handmade rug transforms a room. Whether you choose a dense rectangular mat for everyday wear, a plush bobble bath rug, a dramatic lace doily-style centerpiece, or a modular hexagon runner, these seven patterns provide a full range of styles and techniques. Use the gauge math and planning tips to resize each design for your space, select durable yarns for longevity, and always secure the finished rug with a non-slip pad for safety. Handcrafted rugs reward the maker with texture, color and lasting utility — enjoy making one that fits your home.