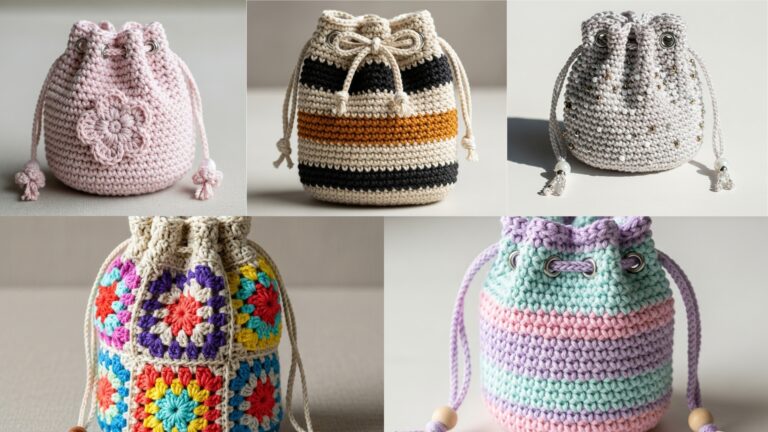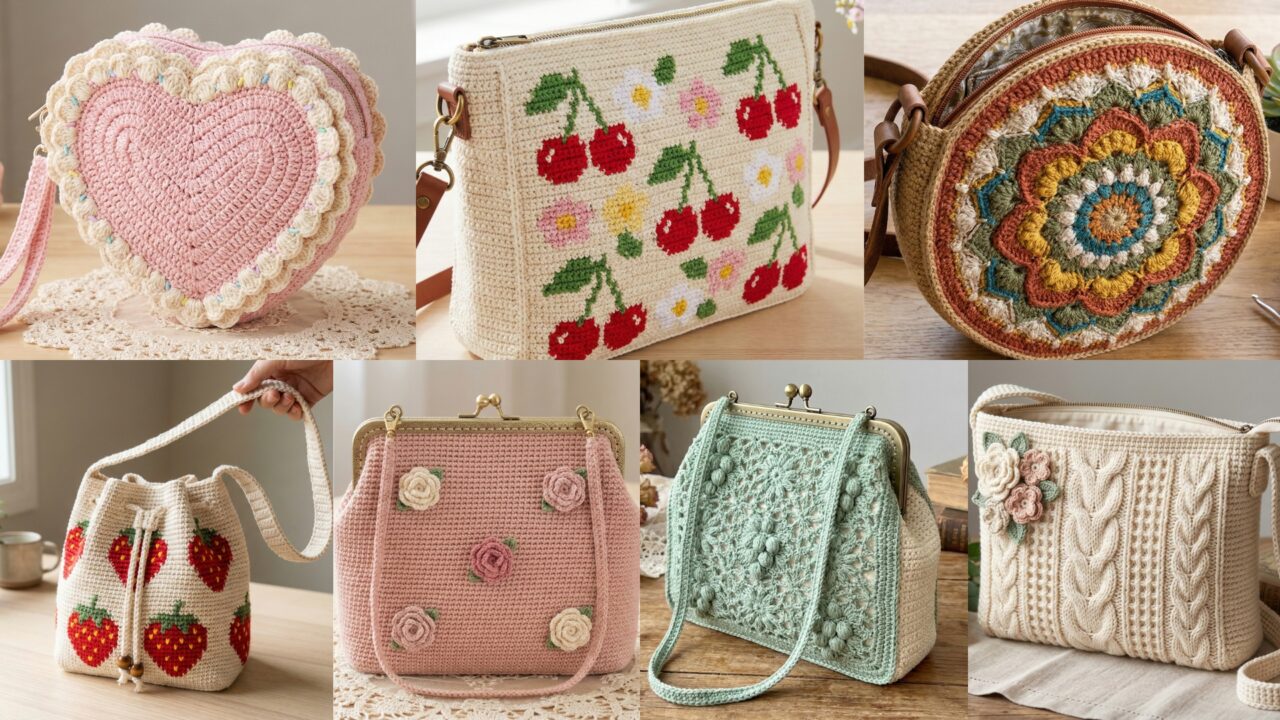
Handmade crochet purses are the perfect blend of fashion and craft — they let you express color, texture and personality while making functional pieces you’ll actually use. Below you’ll find a single practical introduction that covers materials, hardware, sizing, construction approaches and best practices — followed by seven full, detailed pattern blueprints you can paste straight into your blog: Boho Mandala Purse, Strawberry Drawstring Purse, Spring Cherries Yarn Purse, Cottagecore Lolita Green Grape Floral Lace Purse, Romantic Rose Purse, Heart Cake Purse, and Flower-Inspired Knit-Look Purse.
Each pattern includes: skill level, suggested materials & hardware, sample finished size, gauge guidance, construction overview, step-by-step instructions, lining/closure/strap options, variations, finishing & care, and styling tips. The tone is clear, friendly and practical — written so an enthusiastic confident-beginner or intermediate crafter can follow and customize.
materials, tools, sizing & construction approaches
Yarn and fiber choices
- Cotton & cotton blends (DK / worsted): ideal for structured bags that keep shape, easy to wash and wear. For firm stitch definition (tapestry or colorwork) use mercerized cotton.
- Wool / acrylic blends (worsted): warmer look, softer hand; pair with interfacing or lining for structure.
- T-shirt / bulky yarn: great for basket-style or chunky boho purses.
- Ribbon yarn or tape yarn: pretty for summer bags; mind that thinner fabric may need lining.
Hooks & notional tools
- Crochet hook sized for the yarn (often one size smaller than label for firm fabric): e.g., 3.5–5.5 mm.
- Stitch markers, tapestry needle, scissors, measuring tape.
- Optional: fabric stiffener, rotary cutter & mat for precise lining, sewing machine for lining.
Hardware and finishing
- Straps: crocheted strap, leather strap (buy-ready), chain strap, or wristlet.
- Closures: zipper, magnetic snap, button + loop, drawstring.
- Feet & reinforcements: bag feet, rivets, or small leather patches at handle joins for longevity.
- Lining: lightweight cotton or quilting fabric with fusible interfacing for structure. Sew once you’ve finalized bag dimensions.
Construction approaches
- One-piece body (worked in the round): seamless, quick for baskets and slouchy bags.
- Panel + lining: crochet front/back panels and join sides & base with slip stitches or mattress stitch; insert lining.
- Motif assembly: make mandalas, squares, or appliqués then join into a bag shape.
- Tapestry / colorwork: use for pictorial motifs (strawberries, cherries, hearts). Work tight tension to avoid gaps or line with fabric.
Sizing & grading basics
- Decide finished dimensions: sample sizes below are suggestions (width × height × depth). To change size, use your gauge (stitches per inch). For example, if your pattern foundation is 60 sts = 12 in, each +5 sts adds ~1 in.
- Depth is achieved with extra rounds for base or by crocheting an oval base.
Abbreviations (US)
- ch — chain
- sc — single crochet
- hdc — half double crochet
- dc — double crochet
- tr — treble crochet
- sl st — slip stitch
- st(s) — stitch(es)
- inc — increase (2 sts in same st)
- dec — decrease (sc2tog etc.)
- BLO / FLO — back loop only / front loop only
- MR — magic ring
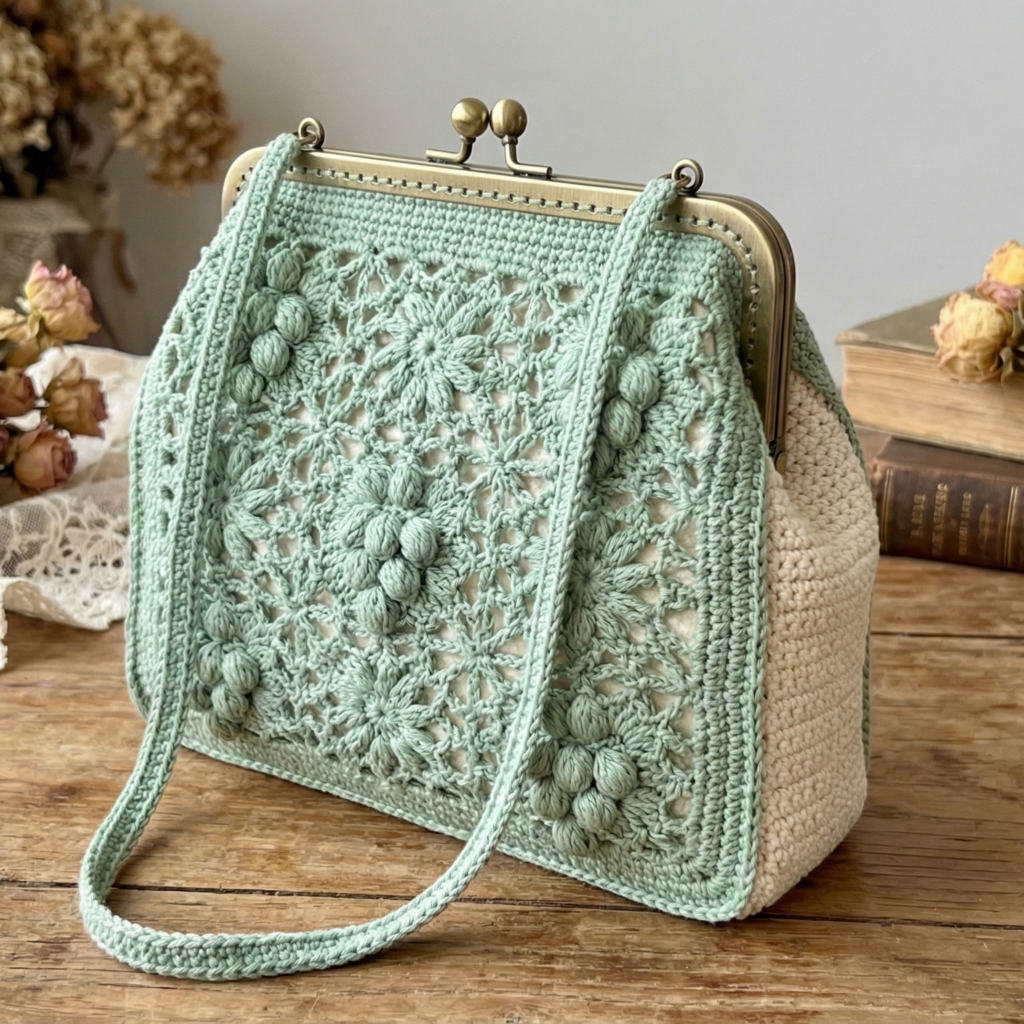
1. Crochet Boho Mandala Purse Bag Pattern
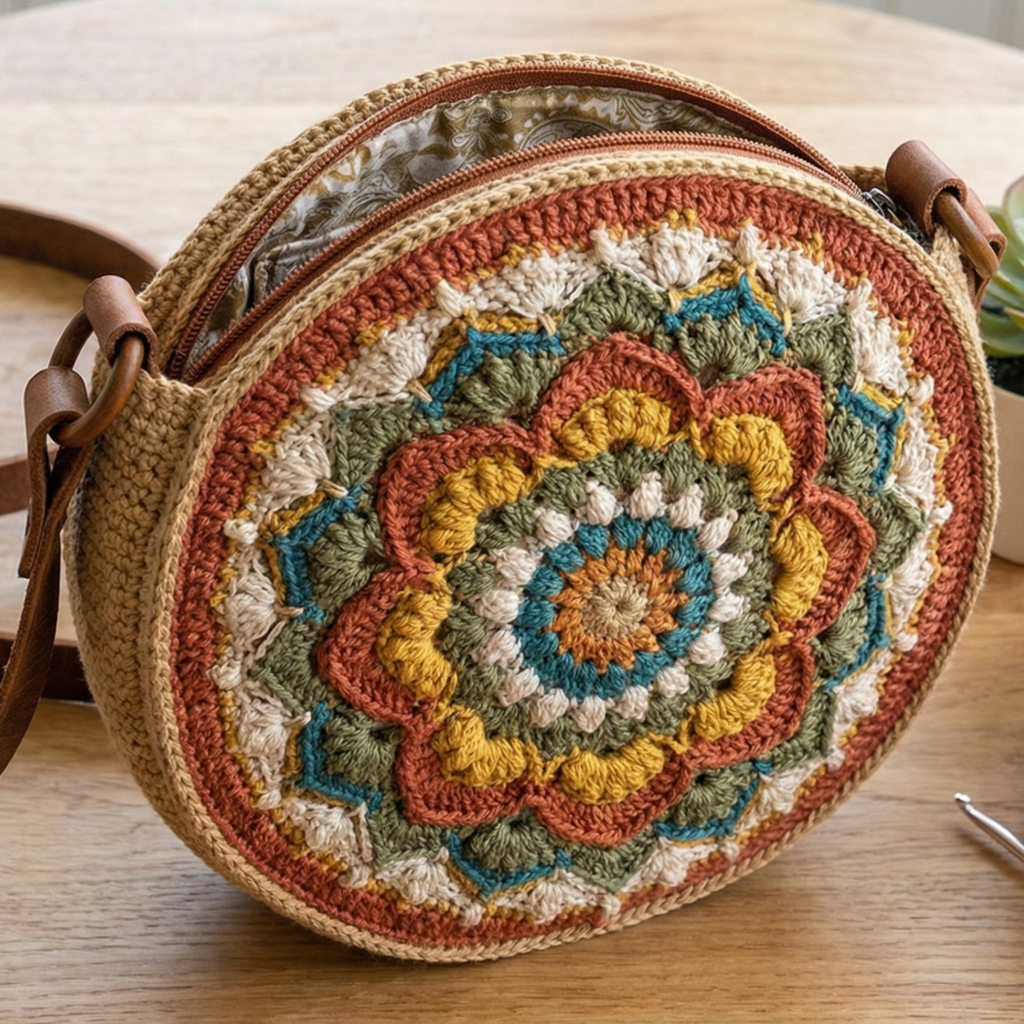
Vibe: Boho, colorful, artistic — a round mandala front panel turned into a chic crossbody or clutch.
Skill level: Intermediate (motif-work, joining, lining)
Suggested finished size (sample): Round mandala 9–10 in diameter. Bag with base depth 3–4 in when assembled.
Materials & hardware
- DK cotton in multiple colors (main ~300–400 yd total across colors).
- Hook: 3.5–4.0 mm.
- Lining fabric ~10 × 12 in, light fusible interfacing.
- Zipper (9–10 in) or magnetic snap, leather or crocheted strap (drop 20–22 in).
- Wooden rings (optional) for strap attachments, tapestry needle.
Gauge example: gauge not critical — aim for a firm texture so motif doesn’t sag. Swatch: 16 sc = 4 in in the round (hdc or sc gauge depends on pattern).
Construction overview
- Crochet a round mandala motif using color changes and textured stitches (shells, popcorns, picots) to create interest.
- Make a second identical mandala for back or work a plain panel.
- Crochet side band and base (join mandalas with a band in the round to form bag cylinder) or seam panels and add rectangular base.
- Line bag and add closure and strap.
Step-by-step
A. Mandala (front) — sample rounds (adjust colors and rounds to taste)
Work in the round; change color frequently for contrast.
- MR, R1: ch1, 8 sc in MR; pull tight — place marker (8)
- R2: ch3, 2 dc in same st, ch1, sl st (creates petal init) — OR use simple inc, sc rounds depending on desired texture.
- R3–R6: alternate textured rounds (shells, clusters, V-stitches) with rounds of sc or hdc to stabilize. Add picot edgings or popcorn clusters in contrast color for boho texture. Increase evenly to reach target diameter (~9–10 in).
Tip: after each color change carry color behind or cut ends if you want crisp reverse.
B. Back panel
- Option 1: replicate mandala for back.
- Option 2: make a simple sc/hdc round to same diameter for a plainer back (faster).
C. Join with side band (forming the body)
- With right sides facing, join mandala edges with a band: join yarn to edge of front mandala and work sc in ends around to create a neat edge. Then chain the number of rounds required for bag depth: work in rounds of sc (or hdc for taller walls) until band height = desired bag height (e.g., 7–8 in). If you prefer a base, crochet an oval/round base and seam sides with band.
- When you reach the back panel, seam edges with sc through both panels to close the cylinder.
D. Base (if using oval base)
- Crochet an oval base separately: ch foundation length for width, work increases at ends to round into an oval. Continue even rounds for depth of ~3–4 in. Attach to bottom edge by sc join.
E. Lining & closure
- Make a fabric lining: cut lining to same interior dimensions leaving seam allowances. Fuse interfacing to fabric pieces for extra structure. Sew side seams and bottom.
- Slip lining into bag and hand-sew along top edge to the inner edge or across a folded top band.
- Add zipper across top, or add magnetic snap at center.
F. Strap & finishing
- Attach leather strap or crochet strap: chain foundation strap or make a thick strap in sc row then sew/rivet to bag. Reinforce strap attachments with extra stitches or small leather patches.
Variations & styling
- Make a clutch (no strap) and add tassel.
- Use a single color mandala for minimalist statement.
- Add fringe along bottom for boho look.
Finishing & care
- Weave in ends; block mandala flat before assembly to ensure symmetry.
- Machine wash gentle if yarn allows; remove hardware before wash or use spot cleaning.
2. Crochet Strawberry Drawstring Purse Bag Pattern
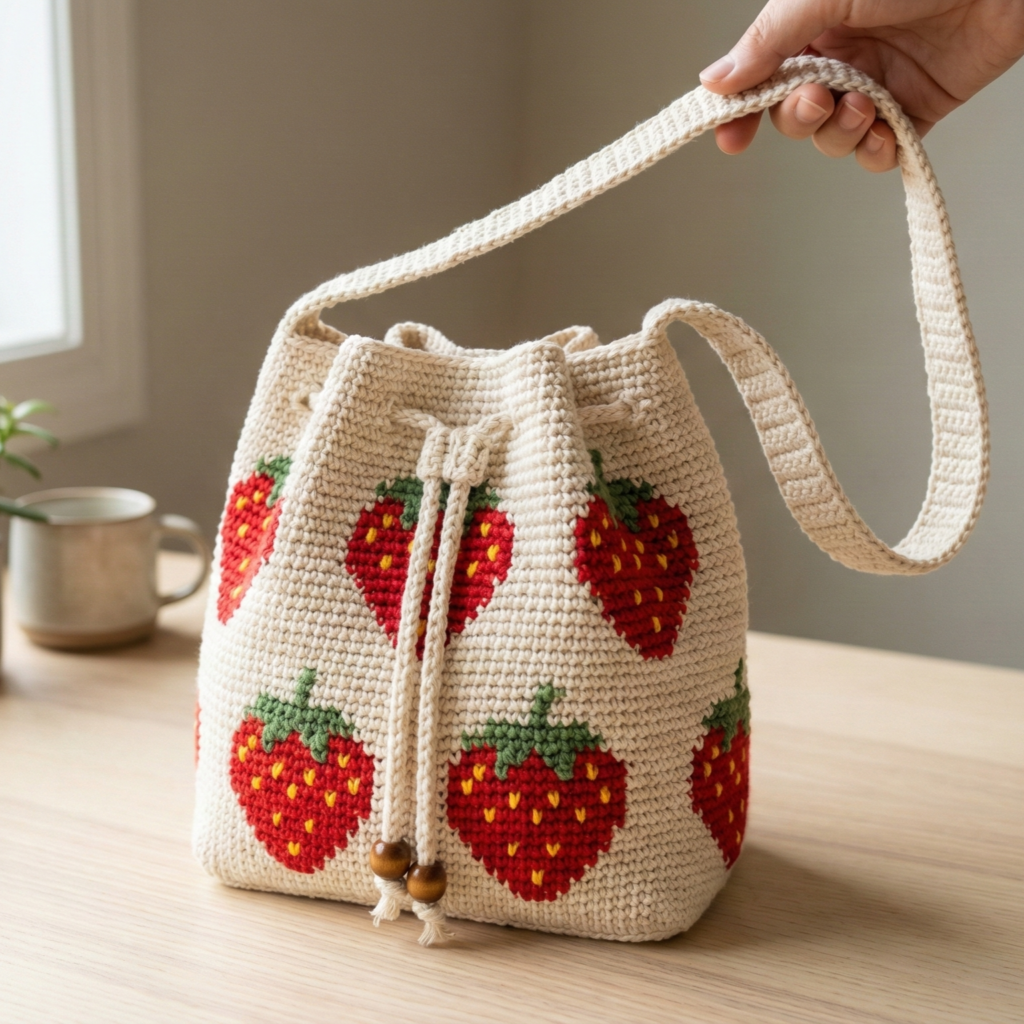
Vibe: Cute, whimsical, compact drawstring pouch with strawberry motif — perfect for phone, coins or as a gift bag.
Skill level: Confident beginner (tapestry colorwork or appliqué + simple finishing)
Suggested finished size (sample): 7 in tall × 6 in wide (body, before drawstring).
Materials & hardware
- DK cotton: red ~100 yd, green ~25 yd, small black/white for seeds.
- Hook: 3.5–4.0 mm.
- Cotton cord or crocheted cord for drawstring.
- Lining optional (light cotton) for neat interior.
- Small wooden bead on drawstring ends optional.
Gauge example: 16 sc = 4 in in sc for dense fabric.
Construction overview
- Work a strawberry-shaped body in tapestry or single color with shaped increases/decreases to form strawberry silhouette.
- Add surface seeds or worked-on small beads.
- Add green leaf top (crown) and eyelets for drawstring.
- Lining optional; add drawstring cord and finish.
Step-by-step
A. Base & body — worked bottom-up in continuous rounds
- MR, R1: 6 sc in MR (6)
- R2: inc around — 12
- R3: sc 1, inc around — 18
- R4: sc2, inc around — 24
- R5–R9: sc around even to build height (24 sts). Stuff lightly as you work for pouch base shape.
- Begin decreasing rounds in a way that produces the tapered top (for a classic strawberry shape): R10: sc2, dec around; R11: sc around; R12: sc1, dec around until you have ~12–14 sts. Continue even rounds for a narrow neck (this allows you to later add the green crown).
B. Color & seeds
- If you want white/yellow “seeds,” either do small surface embroidery stitches spaced evenly after body completed, or carry a contrast color in tapestry as you work R5–R9 to introduce small single-stitch seeds (e.g., slip an alternate color stitch in every 4th stitch). Surface embroidery (satin stitch) is easiest and charming.
C. Crown (leaf top)
- Join green at top. Ch 4, sl st back into same st to make a pointed petal, or: ch6, sc back along chain to make leaf shape. Make 5–7 leaves evenly spaced. Work them directly onto top edge or crochet a small ring, then attach leaves around ring to form crown.
- Work an eyelet round below crown for drawstring: sc 3, ch3 (eyelet), sc next repeat.
D. Drawstring
- Chain cord (or make i-cord) of length ~40–45 in, thread through eyelets, tie wood beads on ends.
E. Lining (optional)
- Create a small fabric lining from lightweight cotton to protect interior and keep shape. Sew to top edge and hide raw edges in top fold.
Variations & tips
- Make a mini coin pouch by reducing rounds and skipping a lining.
- Use special stitch texture (puff or popcorn) in red rounds to emulate strawberry surface (but avoid too many holes if storing small items — then line).
Finishing & care
- For longevity, reinforce eyelet band with a narrow folded sc band.
- Hand wash or machine wash in laundry bag on gentle.
3. Crochet Spring Cherries Yarn Purse Bag Pattern
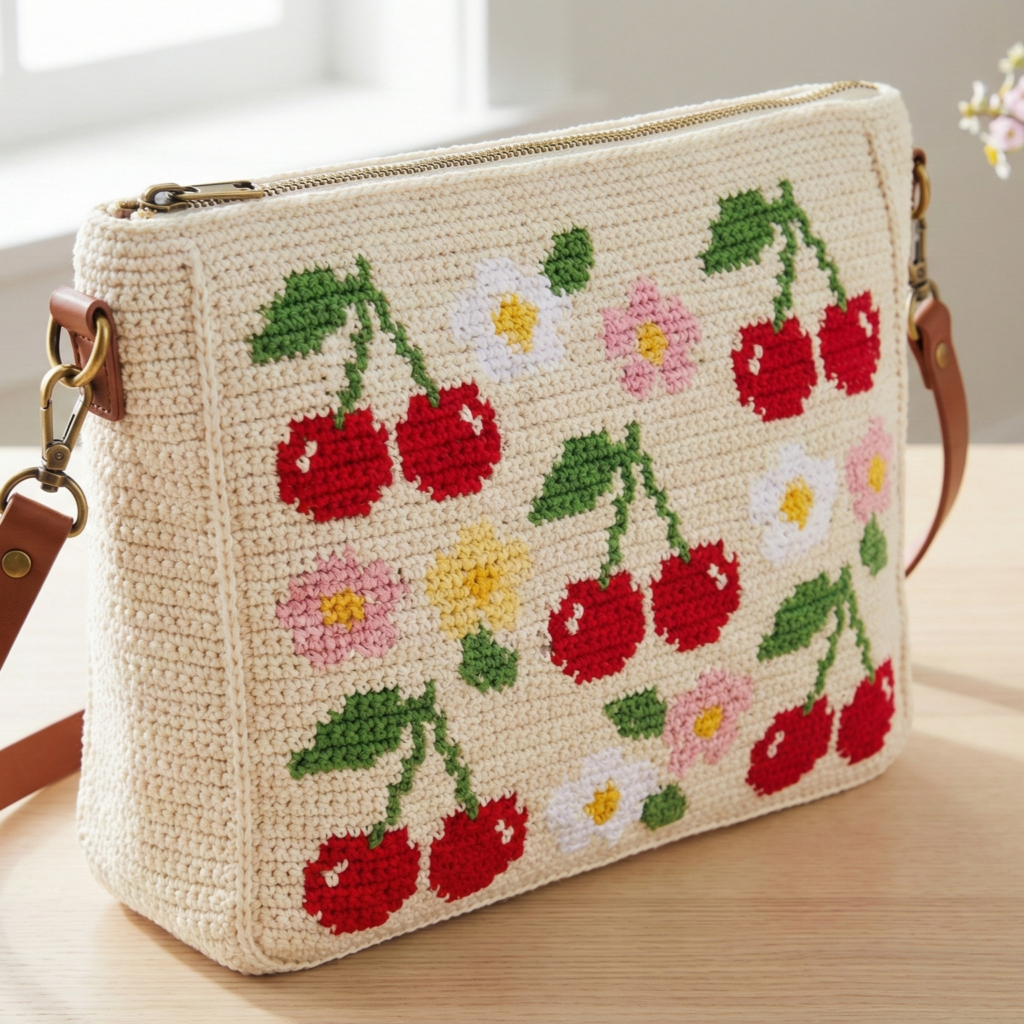
Vibe: Playful, fresh, retro-inspired with cherry motifs in tapestry crochet or appliqué; ideal for spring/summer styling.
Skill level: Intermediate (tapestry colorwork or applique + bag assembly)
Suggested finished size: 9–10 in wide × 7–8 in tall × 2–3 in deep.
Materials & hardware
- DK cotton: background neutral ~200 yd, cherry red ~50 yd, green small amount.
- Hook: 3.5 mm for tight tapestry work.
- Zipper (9–10 in) or flap with snap; lining fabric; optional short handle or crossbody strap.
- D-rings or swivel clasps if using detachable strap.
Gauge: aim for dense tapestry fabric: ~18 sc = 4 in.
Construction overview
- Work two rectangular panels using tapestry single crochet (sc) that includes cherry motifs charted into the colorwork.
- Crochet a narrow side & base band and join panels to form bag body.
- Add zipper and lining; attach strap or handle.
Step-by-step
A. Chart & swatch
- Design a simple cherry motif chart (two red circles with small green stems) sized to your panel. For example, a 48 × 36 stitch panel fits many cherries spaced across.
B. Front & back panels (tapestry sc)
- Foundation: ch width + 1 for sc. R1: sc across in background color.
- Follow chart row by row: for each stitch in row work sc in appropriate color; carry unused color behind and catch floats every 4–5 sts. Keep tension even. Continue until panel reaches desired height. Make two panels.
C. Side band & base
- With background color, join to edge and work rounds of sc around the perimeter to create seams and depth. Work even rounds until band width = desired depth (2–3 in). Seam final edge to other panel carefully, using sc through both panel edges for a neat join.
D. Lining & zipper
- Sew fabric lining panels to match interior. Install zipper across top using standard sewing techniques; optionally sew the zipper into the lining first then slipstitch or hand-stitch lining to crochet top edge so seam is neat.
- If using a flap, crochet flap in background color, edge with scallop, and attach snap.
E. Strap & hardware
- Attach short handles or longer crossbody strap: add D-rings sewn into lining and then riveted or sewn to bag top; or crochet strong tabs and sew with reinforcement to attach strap clips.
Variations & styling
- Embellish with small crochet cherries appliquéd on corners or add a tassel charm.
- Make a gingham background behind cherries with mosaic crochet for retro vibe.
Finishing & care
4. Crochet Cottagecore Lolita Green Grape Floral Lace Purse Bag Pattern
Vibe: Cottagecore/Lolita: delicate lace, small grape motif clusters and soft vintage greens; elegant as a mini shoulder bag or evening piece.
Skill level: Intermediate → advanced (lacy crochet, motif assembly, delicate finishing)
Suggested finished size: 8–9 in wide × 6–7 in tall × 1.5–2 in deep.
Materials & hardware
- Fine DK / light worsted cotton (vintage green / cream) ~250–350 yd.
- Hook: 3.0–3.5 mm (for fine lace).
- Lining fabric (linen/cotton) and light fusible interfacing, small metal clasp or kiss-lock frame (6–8 cm) if you want a vintage frame.
- Thin chain strap or crocheted ribbon strap (~22–24 in drop).
Gauge: lace patterns vary; key is consistent tension and blocking to shape.
Construction overview
- Work front panel with lacy floral lace stitch or motif clusters forming subtle grape-like bobbles (use small popcorn/puff stitches as grapes).
- Make back panel plain or matching.
- Add narrow gusset (fabric interfaced or crocheted) and assemble.
- Fit lining and attach clasp/frame.
Step-by-step
A. Lace panel (front)
- Choose a lace repeat: e.g., V-stitch rows alternating with small puff cluster rounds to simulate grape clusters.
- Chain foundation to match desired width in multiples of stitch repeat. Work lace stitch for required height (~6–7 in). Block to open lace.
B. Back panel
- Work a matching panel in the same lace or a simple sc panel to give privacy to contents. Optionally do a solid back to highlight lace front.
C. Gusset & base
- Crochet a long narrow band (hdc or sc) that, when attached around the edges, forms the bag depth (~1.5–2 in). If you have a frame, make band width to accommodate frame fitting.
D. Frame / closure
- If using a kiss-lock frame: finish top edge carefully — fold and stitch a narrow band to inside to insert frame; follow frame instructions to attach by sewing or gluing with sturdy fabric glue and reinforcing stitches.
- For a soft closure: attach magnetic snap with reinforcement or crocheted button loop and button.
E. Lining & interfacing
- Cut lining pieces with interfacing to match interior shape; sew lining with neat seams and turn right side out, press.
- Sew lining into bag interior by hand, concealing top raw edges within the frame or top folded seam.
F. Strap & accents
- Use a delicate chain strap threaded through small crocheted tabs at bag sides or create a thin crocheted strap sewn and reinforced into side seams. Add tiny crochet roses or leaf appliqués for extra Lolita charm.
Variations & tips
- For evening bag, add a small pearl or crystal accent in grape clusters.
- Use a vintage metal frame for authentic cottagecore look.
Finishing & care
- For lined lace, hand wash gently in cool water and reshape on towel to dry. Avoid wringing.
- Block lace before assembly to achieve clean edges.
5. Crochet Romantic Rose Purse Pattern
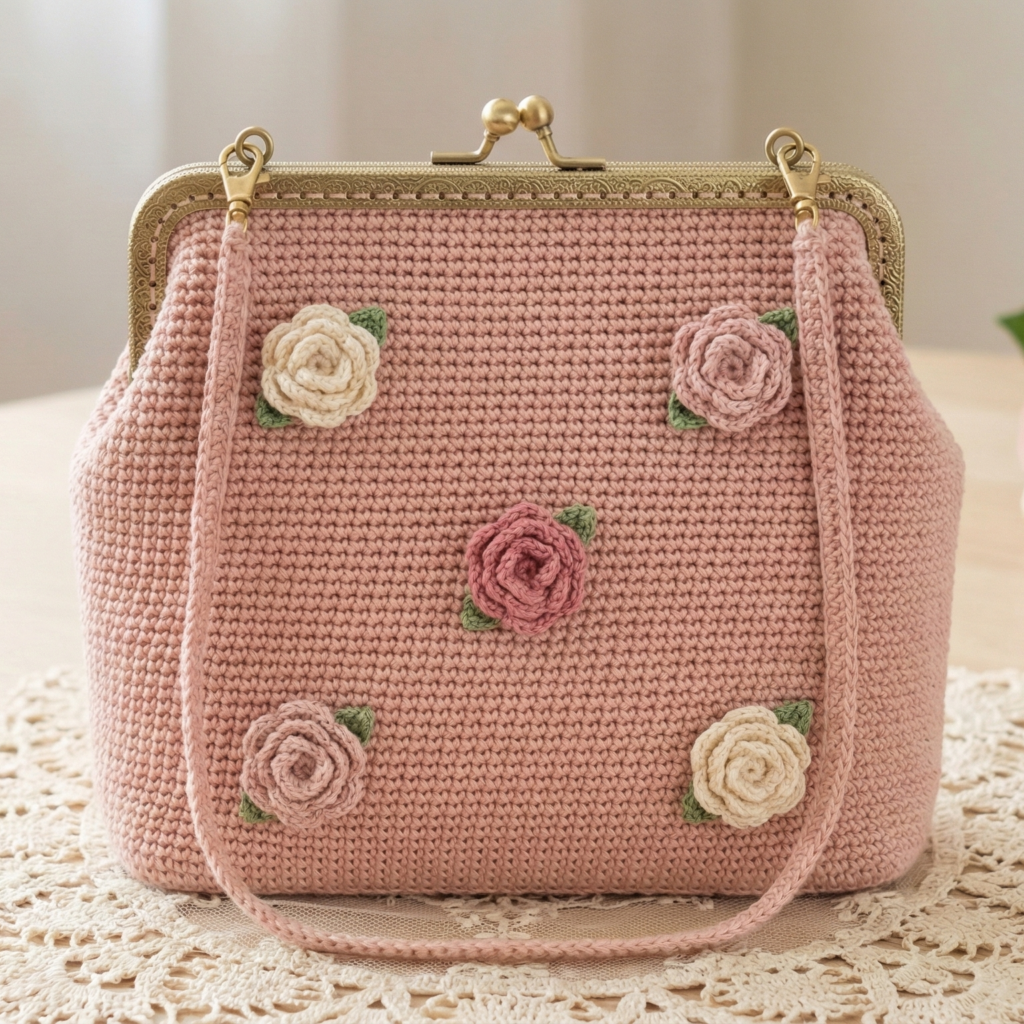
Vibe: Feminine, romantic — rose appliqués or 3D roses across a structured rectangular purse. Elegant for daytime or evening.
Skill level: Intermediate (appliqués, assembly, structured lining)
Suggested finished size: 10 in wide × 6–7 in tall × 2 in deep.
Materials & hardware
- DK cotton/wool blend for body ~300 yd; contrast yarn for roses ~100 yd.
- Hook: 3.5–4.0 mm.
- Rigid frame (optional) or zipper; lining fabric; strap leather or chain.
Construction overview
- Crochet front and back panels in a dense stitch (hdc or sc) for structure.
- Make 3D rose appliqués (spiral rose technique) and leaves; sew to front.
- Add base band and attach lining and closure.
Step-by-step
A. Panels
- Work two rectangles in sc or hdc: foundation chain for desired width. Example: ch 44, R1 sc across. Work rows until panel height = 6–7 in.
- Make a base band in sc for depth ~2 in and join panels with sc around edges.
B. Roses (3D spiral method)
- Make a long strip: ch 40 (or length for rose size). R1: sc in 2nd ch and across. R2: ch3, turn, sc across — make 3–4 rows to add bulk. Alternatively, work a long strip of dc width.
- Roll strip into a spiral, seaming the inner edge with whipstitch to secure as you roll to form rose. Vary strip widths/lengths for different rose sizes.
- Make small leaves (ch6, sc back) and attach under roses for realism.
C. Assembly
- Arrange roses on front panel, stitch securely with long passes through panel and rose base for a robust hold. Add a stiff interfacing patch under each rose inside bag if heavy.
D. Closure & strap
- Add zipper across top or attach metal frame for vintage look. Attach strap with D-rings or sew leather tabs into side seams for chain clasp attachment.
Variations & styling
- Make all-over rose texture for a statement bag, or cluster three roses at one corner for subtlety.
- Use gradient yarn for ombré roses.
Finishing & care
- For appliqué-heavy bags, hand-wash and reshape. Reinforce rose bases by securing stitches into lining where possible.
6. Crochet Heart Cake Purse Bag Pattern
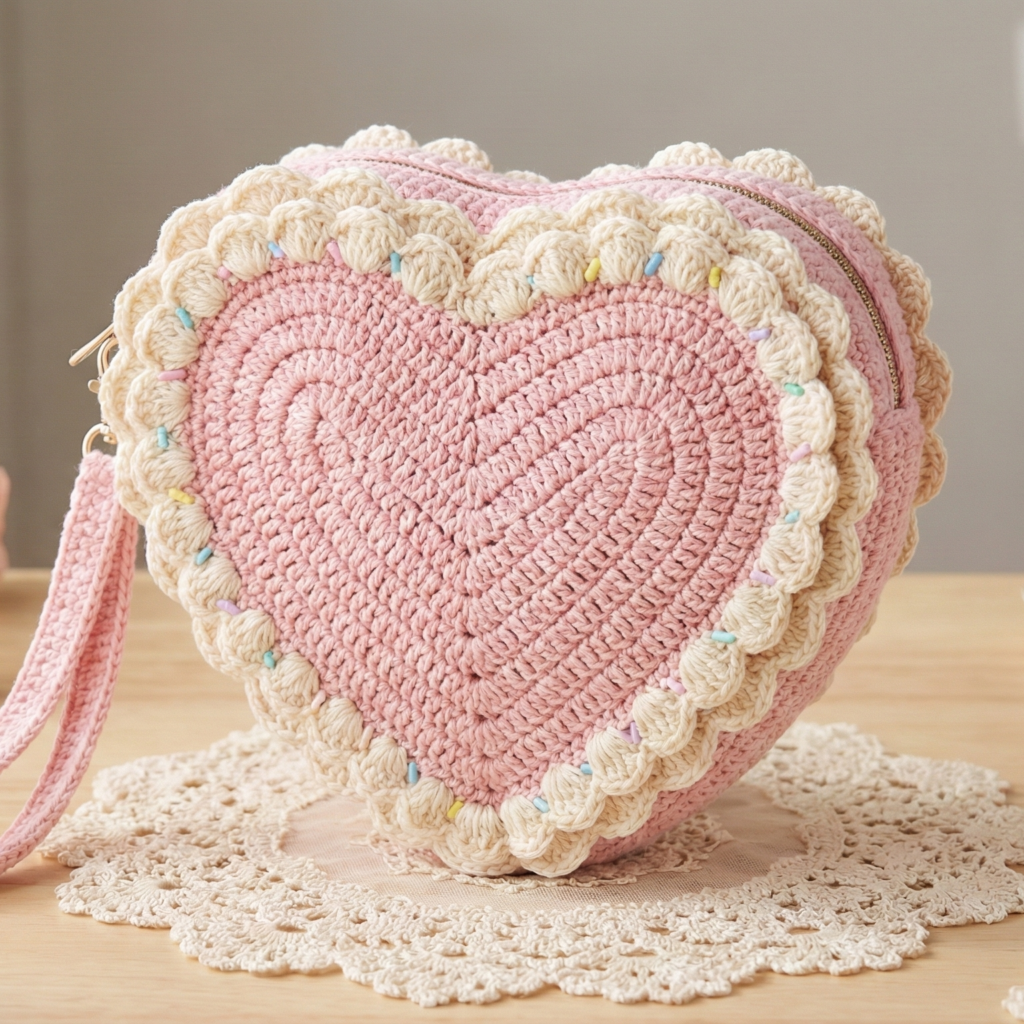
Vibe: Cute, whimsical — heart-shaped bag with cake-like layered edge; playful accessory for dates or gift bags.
Skill level: Confident beginner → intermediate (shaping heart, joining, lining)
Suggested finished size: Heart 8–9 in wide × 8 in tall (smaller or larger by gauge).
Materials & hardware
- DK cotton: main color for heart, contrast for “icing” ~200–300 yd.
- Hook: 3.5–4.0 mm.
- Small zipper or magnetic snap at top, short strap, lining fabric.
Gauge: 16 sc = 4 in.
Construction overview
- Crochet two identical heart-shaped panels using increases & decreases to form heart lobes.
- Join panels with a side band for depth forming a heart-shaped pouch.
- Add decorative scalloped icing rounds and small appliqué “sprinkles.”
- Line and add strap.
Step-by-step
A. Heart panel (worked flat) — schematic method
- Start with a magic ring and make two lobes then build base. An easy method is to work a circle and then shape into heart by working more rounds on two opposite sections (lobes) and decreasing at the bottom to create point, but clearer is to follow a known heart chart. Example quick chart:
- Make two small circles (lobes), join at center, then add V-shaped decreases to form point below.
- More explicit: Ch 24. Row 1: sc across 23. Row 2–6: increase at positions to make lobe shapes and then decrease down to a single point to create heart silhouette. (Provide a chart for precise stitch counts for your chosen width.)
B. Second panel & join
- Make second identical panel. Join with sc around (or whipstitch) leaving top opening for zipper or drawstring. Work a side band to desired depth (2 in) by sc in rounds around panel edges.
C. Icing & decoration
- With contrast color, add scalloped rounds along top half of heart to simulate icing: R: sc, ch3, 3 dc in next st, ch3, sc to create puffed scallops. Add bobble stitches for sprinkles or small embroidered French knots in different colors.
D. Lining & closure
- Sew in lining and insert small zipper across top or use snap closure near top. Attach short chain or wristlet ring.
Variations & tips
- Make multiple small hearts linked as a decorative clutch.
- Add a small inner pocket for cards.
Finishing & care
- Spot clean when possible; hand-wash delicate shaped bags.
7. Crochet Flower Inspired Knit-Look Purse Bag Pattern
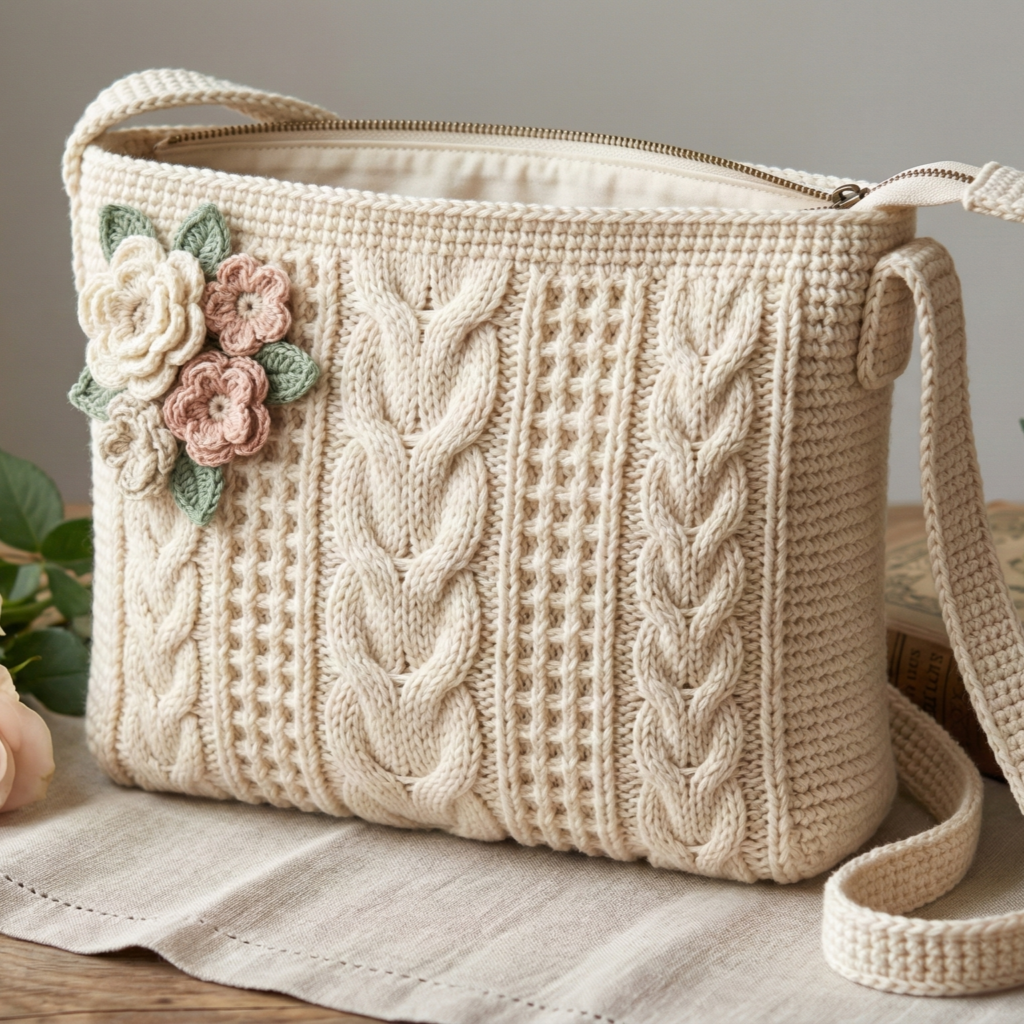
Vibe: Knit-look textured sacs with floral panels — modern, textural, and richly tactile.
Skill level: Intermediate (post-stitch texture + panel assembly)
Suggested finished size: 11 in wide × 8 in tall × 3 in deep.
Materials & hardware
- Worsted cotton or cotton blend ~350–450 yd.
- Hook: 4.5 mm for knit-like drape.
- Zipper (10–12 in), lining, optional wooden handle or leather strap.
Technique: use front/post stitches, moss stitch and waffle or knit-look combinations to mimic knitted fabric.
Construction overview
- Work front panel in knit-look stitch (e.g., waffle or knitted braided stitch) and add decorative floral appliqués (crochet flowers) arranged asymmetrically.
- Make back panel plain or textural to match.
- Crochet base & sides; join, line and install zipper/strap.
Step-by-step
A. Knit-look panel
- Foundation ch for width. Work stitch pattern: e.g., Row 1: sc across; Row 2: (fpdc, bpdc) columns to create rib; Row 3: sc across. Repeat to establish textured, dense fabric. Waffle stitch (alternating dc/dc clusters and front/back posts) also gives knit-like depth.
- Work to desired height (8 in).
B. Floral appliqués
- Make small rosettes and layered petals: spiral or small petal motifs using dc shells and sew them onto one corner for an organic accent. Make leaves with ch6, sc back forming pointed shapes.
C. Assembly
- Add side band in sc to create depth and seam to back panel. Make base rectangular or oval for structured bottom.
D. Lining and zipper
- Sew lining with interfacing and stitch into the top seam. Hand-sew zipper into lining and top edge for tidy finish.
E. Strap & handle
- Attach wooden handles using short crocheted tabs riveted to bag or use a long crocheted strap sewn to sides.
Variations & styling
- Monochrome knit-look with tone-on-tone flowers for a refined look.
- Chunky yarn and large wooden handles for market/tote style.
Finishing & care
- Block panels gently before assembly to keep edges neat. For structured bags, fuse interfacing to lining pieces to keep shape.
conclusion
Final assembly tips
- Block panels before assembly. This makes edges sit straight and motifs align.
- Reinforce strap attachment points (extra rows, small leather patches, or rivets) — carry load safely.
- Lining adds professionalism and increases durability; interface where necessary. Sew lining first then attach zipper to lining and slip-stitch lining into bag interior for a clean finish.
Styling & photography for your blog
- Photograph each bag: (1) hero shot on neutral background; (2) lifestyle shot (modeled or hung); (3) close-up of stitch and hardware; (4) interior/lining detail. Use natural light and consistent framing for a cohesive blog gallery.
- Include a printable materials list and a small “what you’ll need” shopping link list for convenience.
Care & user notes
- Cotton & blends: machine wash gentle in laundry bag or hand wash; reshape and air dry. Avoid machine drying heavy hardware.
- Leather accents: spot clean leather and treat per leather care.
- Give readers simple alternatives (zipper vs magnet, strap options) so they can adapt patterns to materials on hand.