

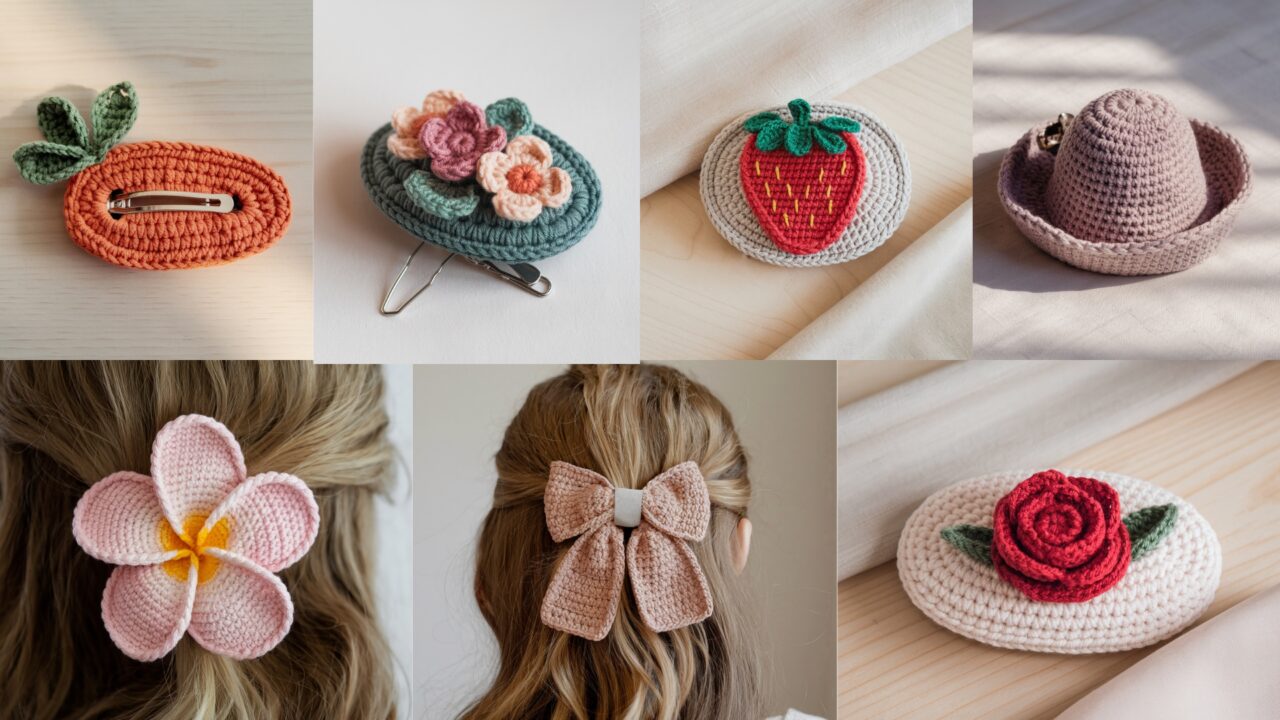
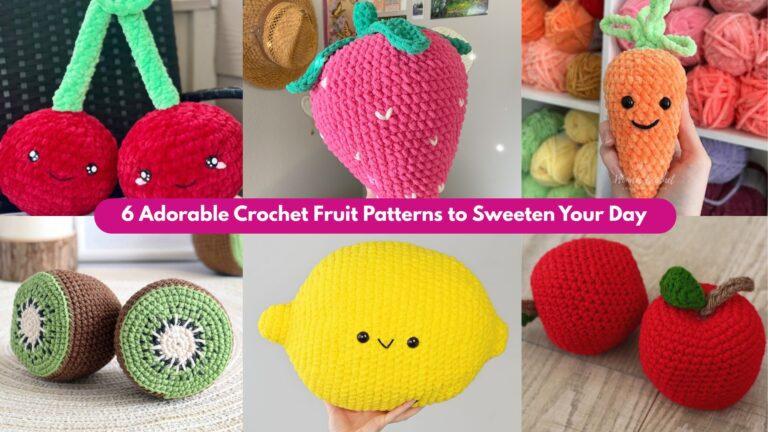
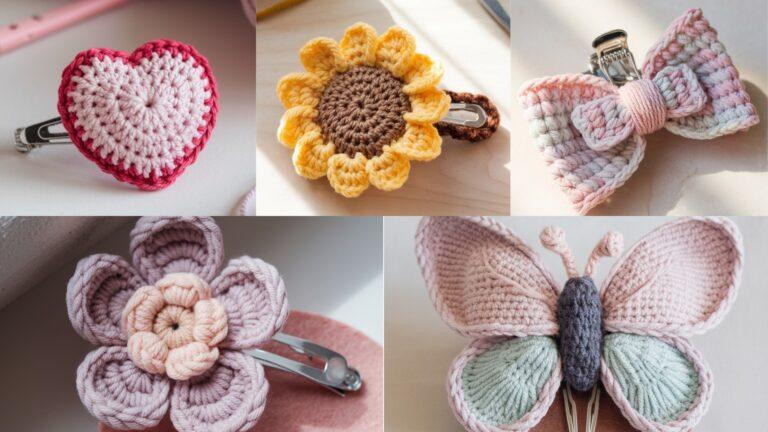
Handmade crochet hair clips are tiny canvases: they’re fast to make, use small yarn scraps, and instantly upgrade an outfit. This collection gives seven modern, wearable designs you can make today — thoughtful, professional-feeling patterns with full materials lists, skill notes, exact step-by-step construction (including how to make the required oval-shaped base for every clip except the Plumeria), attachment/finishing instructions, styling ideas, and care tips. Each pattern uses US crochet terms.
Before you begin, read the general notes below — they’ll keep the pieces uniform, secure, and long-lasting.
General notes (read first)
- US crochet terms are used throughout (ch, sc, hdc, dc, tr, sl st, st(s), inc, dec, MR = magic ring, BLO/FLO = back/front loop only).
- Oval base (standard for all clips except Plumeria): I give a single reliable oval base recipe you can re-use for five of the clips; where a different size is needed I’ll show the adjusted counts. The oval provides a neat platform to sew motifs to and hides clip hardware cleanly.
- Yarn & hook: I recommend cotton or cotton-blend DK/worsted for hair accessories — it holds shape, washes well, and looks crisp. Use a hook 0.5–1 size smaller than yarn label for a firm fabric (e.g., worsted: 3.75–4.0 mm).
- Stitch tension: A firm, dense fabric prevents the hair clip from sagging. If the fabric is loose, switch to a smaller hook.
- Hardware: Alligator clips, French barrettes, or snap hair clips work. Use metal hardware and sew through the fabric and a felt reinforcement for durability. For a flat look, use a low-profile snap clip inside the oval base.
- Safety: If making clips for small children, avoid small loose beads and secure decorations; prefer embroidered details.
- Finishing: Weave tails, use a small felt disc behind the hardware to spread stress, and sew through the felt/hardware multiple times. Add a final row of slip stitches around the oval to make a tidy frame.
- Blocking: Light steam blocking sets petals and flattening motif edges—test on scrap first.
Oval Base (standard method — use for every pattern except Plumeria)
Make an oval base in single crochet — this is the platform you’ll sew decorations to. The sample oval below fits a standard 2–2.25 in (5–6 cm) alligator clip; adjust chain length for larger clips.
Materials for oval base: cotton DK or worsted scrap, 3.5–4.0 mm hook, yarn needle, small felt disc.
Sample oval base (approx. 2.25 in long × 1.25 in wide):
- Ch 9. (Change this number to lengthen/shorten oval; keep an odd number for symmetrical shaping.)
- R1: Sc in 2nd ch from hook and across to last ch; work 3 sc in last ch; working on the opposite side of foundation chain, sc across to last ch; work 2 sc in last ch (counts depend on chain length). Join with sl st to first sc. (You’ve worked around the chain ends to create the oval.)
- R2: Ch 1, sc in same st, sc across across front, 3 sc in center end, sc across opposite side, 2 sc in last — join. (This forms a neat edge.)
- R3–R4: Sc around evenly — work 1 sc in each st across, and 1 sc in each end stitch to maintain the oval shape. Add or remove rounds until the oval is about 1¼ in wide and 2–2¼ in long for standard clips. For a larger barrette, start with ch 11 or 13 and use the same rounding logic.
- Finishing row: Work one round of sl st around (or crab stitch for a visible edge), fasten off leaving a long tail for sewing to felt/hardware.
Mounting note: Cut a felt disc slightly smaller than the oval and glue or baste it to the underside; you will sew the metal clip through the felt and oval to hide stitching and spread stress.
1. Crochet Flower Garden Hair Clip Pattern
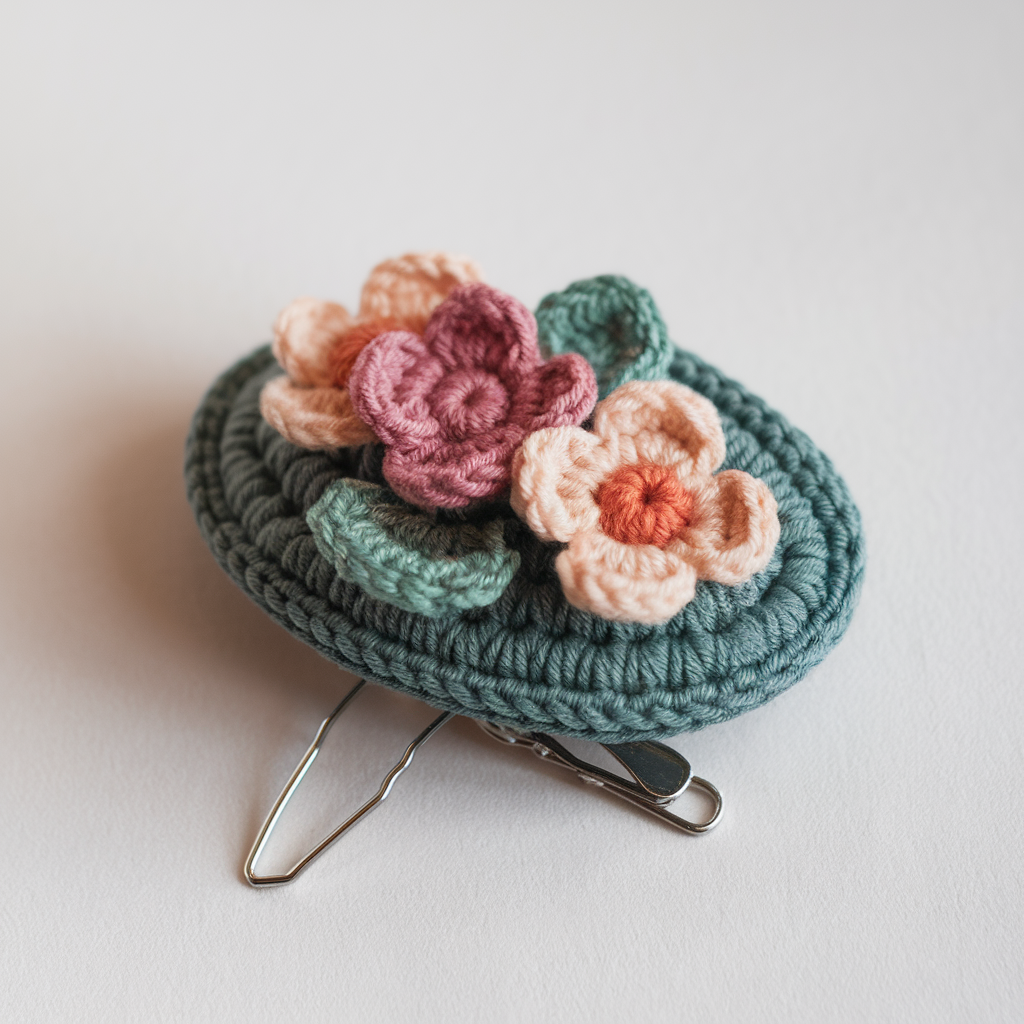
A tiny flower garden: layered tiny blooms and leaves grouped on the oval base. Feminine, colorful, and excellent for using yarn scraps.
Skill level: Confident beginner — basic motifs, sewing, layering.
Materials
- DK/worsted cotton scraps in 3–5 colors (petals, centers, leaves)
- 3.5–4.0 mm hook
- Oval base from above, felt disc, alligator clip (2–2.25 in)
- Yarn needle, small scissors, optional fabric glue
Finished size: Oval base ~2.25 × 1.25 in; cluster extends minimally beyond oval.
What you’ll make
- 2 small 5-petal flowers (about 0.9–1.0 in diameter)
- 1 medium layered flower (1.2–1.4 in)
- 2–3 tiny leaves (0.6–0.8 in)
Small 5-petal flower (make 2)
- MR; ch 1, work 6 sc in MR; sl st to join. (6)
- Ch 3, sl st into next st repeat around to form 6 loops; join.
- Into each ch-3 loop work: sc, hdc, 2 dc, hdc, sc — fasten off and weave ends. Block petals gently to open.
Medium layered flower (single-layer + second round)
- MR; ch 1, 8 sc in MR; sl st.
- Ch 3, sl st next repeat to make 8 loops.
- Round of petals: in each loop work (sc, hdc, dc, hdc, sc). Join.
- Add an outer ruffle: with contrast color join to base between petals, ch 2, work 3 dc in same space, ch 2, sl st in next space — repeat around for a frilly outer ring. Fasten off.
Tiny leaf (make 2–3)
- Ch 6. R1: sc in 2nd ch from hook, hdc in next, dc in next, hdc in next, sc in last. Turn and sl st to base to curve leaf. Fasten off.
Assembly
- Sew felt disc under oval base; place metal alligator clip on felt and baste through felt and base to hold position.
- Arrange motifs — medium flower off-center, two small flowers clustered beside it, leaves tucked between blooms. Tack each piece with a few secure stitches to the base, then stitch around the motif base to anchor. Pull stitches to hide under petals, not visible on the front.
- For a clean finish, add a tiny French-knot seed bead or embroidered knot at the center of each bloom (optional; for children, prefer a stitched center instead of beads).
- Trim stray ends and sew felt to base perimeter with small whipstitches.
Variations
- Use monochrome whites/ivory for a bridal clip.
- Make a linear garden of three small blooms for a slender barrettes set (increase oval length to ch 11–13).
Care & styling
- Wear in half-up styles, side-swept looks, or on a low bun. Hand-wash gently, reshape, air dry.
2. Crochet Coquette Bow Hair Clip Pattern
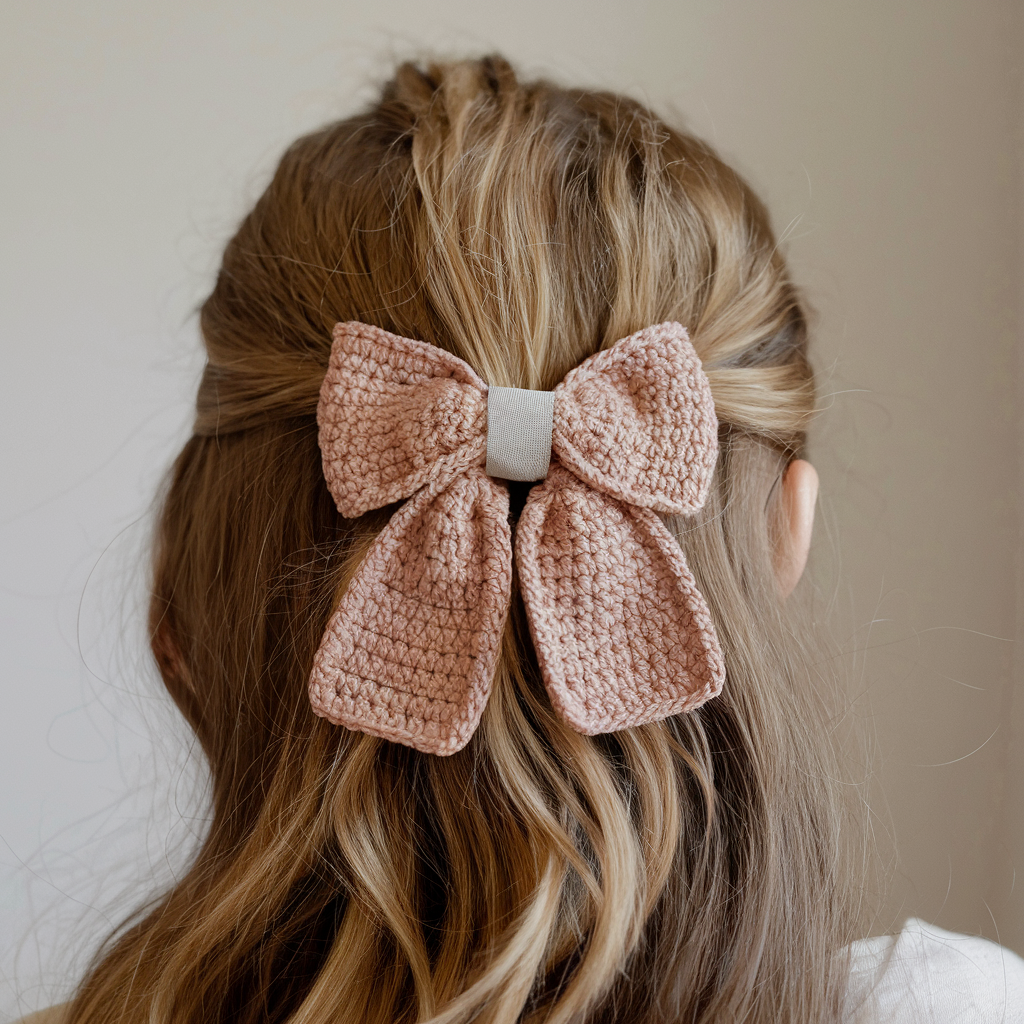
A chic coquette bow set on an oval base gives a modern vintage feel — great in neutral linen yarn or for bold hues.
Skill level: Beginner — easy shapes and assembly.
Materials
- DK/worsted yarn (main bow color + small contrast for centre wrap)
- 3.5–4.0 mm hook
- Oval base (see above), felt disc, 2–2.25 in alligator clip
- Yarn needle, optional small snap (if you want detachable bow)
Finished size: Oval base 2.25 × 1.25 in; bow approx. 2 in wide.
Bow (main piece)
- Ch 20 (or adjust for desired bow width). R1: sc in 2nd ch and across — 19 sc. Turn.
- R2–R4: sc across (3 rows total or until band height ~0.6–0.8 in). Fasten off leaving long tail. Fold rectangle into bow shape by gathering the center (pinch with your fingers) and wrapping the center with the contrast yarn or a crocheted narrow band.
Center wrap (narrow band)
- Ch 10; sc in 2nd ch from hook and across; fasten off leaving long tail. Wrap around center of gathered bow several times and sew ends to the underside, or secure with a discreet knot and weave in.
Assembly
- Sew felt disc to base and attach clip as described. Place bow centered on oval, stitch through underside so stitching is hidden. For a removable option, sew a snap to the bow wrap on the back and the matching snap to the oval/felt — then the bow can be detached.
- For slightly more structure, add a layer of interfacing inside the bow when sewing for a crisp look.
Variations
- Make a double-layer bow: two rectangles (one slightly smaller) stacked for a fuller look.
- Add a small central pearl or embroidered monogram for personalization (avoid beads for kids).
Styling & care
- Pair with minimalist outfits for a retro-chic accent. Gently hand-wash, reshape the bow center before drying.
3. Crochet Rose Hair Clip Pattern
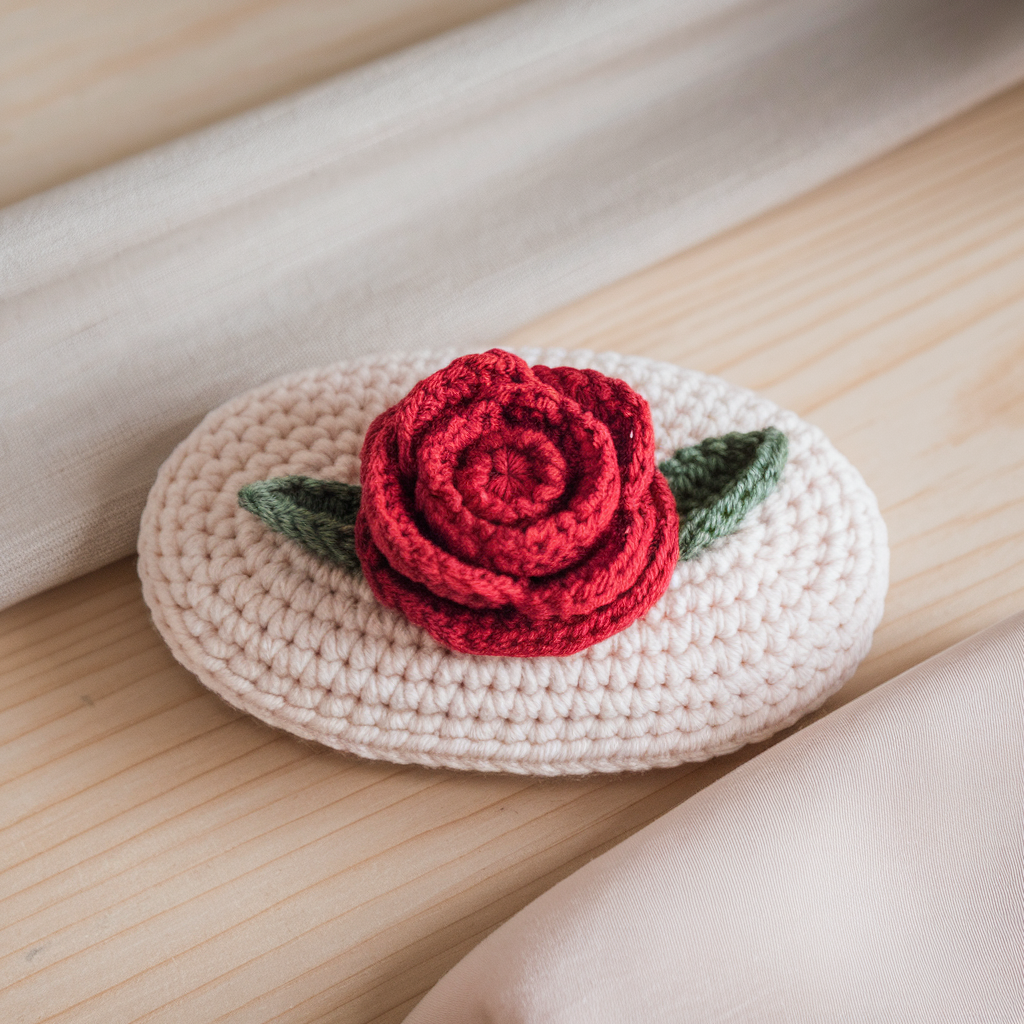
An elegant spiral rose mounted on the oval base — classic, feminine, and surprisingly simple to crochet.
Skill level: Confident beginner — spiral shaping and sewing.
Materials
- Worsted or DK cotton in rose color, 3.5–4.0 mm hook
- Oval base as platform (rose sits slightly off-centre), felt disc, clip
- Yarn needle
Finished size: Rose bloom ~1.6–2.0 in diameter (depending on yarn and rounds).
Rose (spiral rose method)
- Ch 31. R1: sc in 2nd ch from hook and across (30 sc). Turn (this long strip will become the spiral).
- R2: Work a row of dc along the strip but increase spacing to create petal points: dc in next 2 sc, 2 dc in next sc repeat across to add slight ruffles — OR keep dc even for smaller petals. Fasten off leaving long tail.
- Assembly into rose: Starting at one short end, roll the strip tightly for the center, then continue rolling more loosely and tilt petals outward as you go, stitching the strip base to itself occasionally to hold spiral form. Secure with running stitches along the base.
- For a fuller rose, make the strip longer (ch 45) or add a second outer strip and attach.
Leaves (2)
- MR; ch 1, 6 sc in MR; R2: sc across to make a small oval leaf, or ch 6 and shape as earlier leaf pattern.
Mounting
- Sew felt disc to underside of oval base and anchor clip. Place rose slightly off-center and stitch through the rose base firmly into the oval. Sew leaves to the underside edge of rose to peek out. Reinforce with multiple passes through felt.
- Weave ends and trim.
Variations
- Make mini rosebuds by using ch 15–20 and fewer petal rounds.
- Use gradient yarn for tonal roses (creates natural shading).
Care
- Reshape petals by hand after wash; lay flat to dry.
4. Crochet Cute Little Carrot Hair Clip Pattern
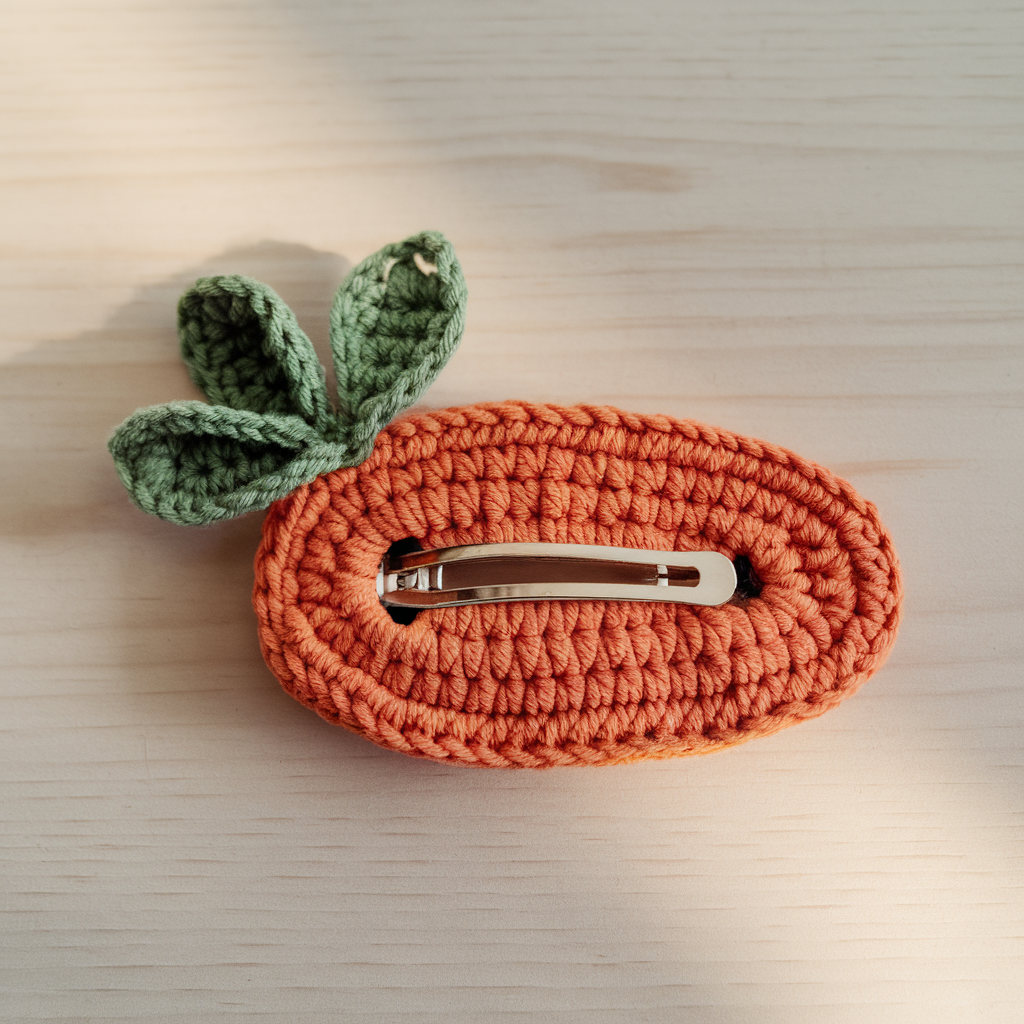
Playful and modern — a stylized tiny carrot sits on the oval base. The carrot is slightly tapered and the leafy top is dainty.
Skill level: Beginner
Materials
- Orange and green cotton yarn, 3.5–4.0 mm hook
- Oval base, felt disc, small clip
- Yarn needle
Finished size: Carrot approx. 1–1.25 in long; full clip ~2.25 in with oval.
Carrot body
- MR; ch 1, 6 sc in MR. (6)
- R2: (sc, inc) ×3 — 9. (9)
- R3: (2 sc, inc) ×3 — 12. (12)
- R4–R5: sc around — 12 (2 rounds).
- R6: (2 sc, dec) ×3 — 9. (9)
- R7: (sc, dec) ×3 — 6. Stuff lightly and close with decs; leave tail to sew base closed and to attach to oval.
Carrot top (greens)
- Ch 6; sc in 2nd ch and across (5 sc). Join to make small leaf; make 3–4 small leaflets and sew them to the carrot top opening.
Assembly
- Sew felt disc to base and anchor clip. Position carrot slightly diagonal on the oval and stitch through the carrot base into the oval felt. Add a tiny embroidery accent or a stitched “shine” line on one side using lighter orange yarn for depth.
- For a modern design, keep the carrot very simple and angular (no leaflets) — the silhouette reads well against the oval.
Variations
- Make a bundle of three tiny carrots on a single long oval (use ch 11 or 13 oval) for a playful cluster.
- Use textured stitch on the carrot (linen stitch) for a rustic look.
Care
- Hand wash gently; press green leaflets flat if they curl.
5. Crochet Plumeria Flower Hair Clip Pattern
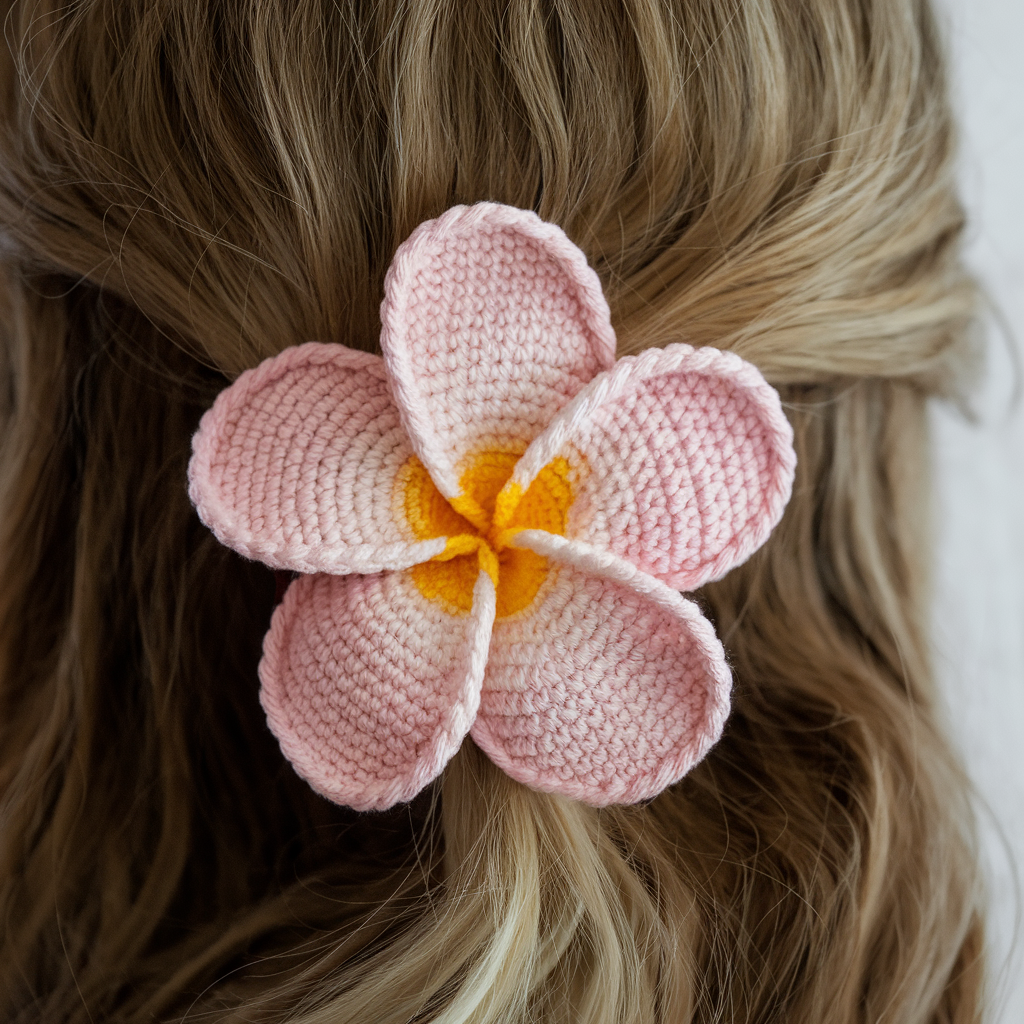
Plumeria is the one exception: it’s a star-like 5-petal bloom that benefits from a round backing (not an oval). The petals are broad, slightly cupped and the classic plumeria shape reads beautifully in a single standout color or a white with yellow centre.
Skill level: Intermediate — shaping petals and joining.
Materials
- DK cotton in main petal color + small yellow contrast for center, 3.5–4.0 mm hook
- Small felt circle (to mount on a round hair barrette or a 1.5–2 in snap clip)
- Round clip or small french barrette (preferably 1.8–2 in for stable hold), yarn needle
Finished size: Petal span ~2.25–2.5 in diameter.
Plumeria petal (make 5)
- MR; ch 1, 6 sc in MR; sl st — (6).
- Join new yarn at each ch-space to create a petal loop: ch 6, sl st in next repeat to get 5 loops (alternate method: work petals directly from rounds).
- Into each loop work (sc, hdc, dc, tr, dc, hdc, sc) to make a tapered cupped petal. Fasten off and block each petal with a slight curve (pin petal edges up to create cup shape) — steam lightly to set.
- Assembly: Overlap petal edges slightly in a spiral and stitch bases together from the underside. Add a small yellow spiral or 3-round tiny disk at centre (MR, 8 sc, add 1 round of tiny dc clusters to raise center).
Mounting
- Sew felt circle to barrette and then hand-stitch flower base to felt, catching both felt and barrette so the heavy stitches secure the hardware. Use a second row of stitches through felt if required.
- For a more finished look, stitch the petals to each other from the underside and then sew the flower base to the felt.
Variations
- Use ombré yarn with yellow centre for a tropical look.
- Make mini plumeria (smaller ch loops) to create a cluster of tiny blooms on a single barrette.
Care & styling
- Plumeria holds shape best if lightly starched before drying; avoid crushing when storing.
6. Crochet Mini Hat Hair Clip Pattern
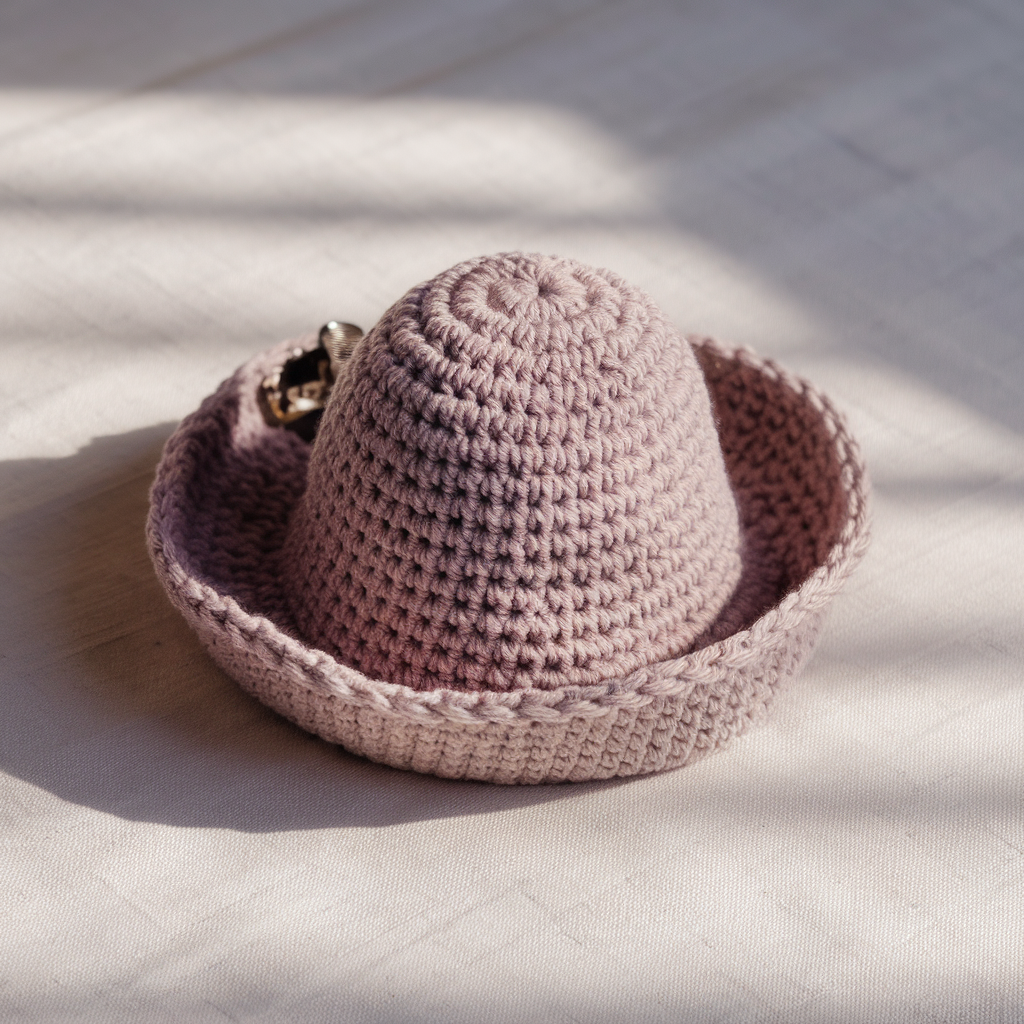
A whimsical miniature hat perched on the oval base — playful and perfect for doll-like styling.
Skill level: Confident beginner — working small rounded shapes and brims.
Materials
- DK or worsted yarn, 3.5–4.0 mm hook, small felt disc, clip hardware
- Yarn needle, optional tiny ribbon or feather trim
Finished size: Tiny hat diameter ~1.5–1.8 in; sits neatly on the oval.
Mini hat (top + crown + brim)
- Top (small flat circle): MR; R1: 6 sc in MR. R2: inc around → 12. R3: (sc, inc) ×6 → 18. R4: sc around to desired small dome diameter (1.0–1.2 in).
- Crown (short tube): Work 3–4 rounds sc even (no increases) to form a shallow crown height.
- Brim: Switch to smaller hook if you want a firmer brim. In the next round work sc, ch2, skip 1 around to create a looser edge, then work 1–2 rounds of sc or single dc in back loops only to create a flared brim. Optionally add a narrow bobble/trimming round (shells) for decoration.
- Fasten off and block the brim to maintain a slight curve.
Decoration
- Sew a tiny ribbon band or small crocheted bow to the hat base; add a faux feather or tiny button (avoid for toddler clips; use embroidered dot instead).
Assembly
- Sew hat to felt-bound oval base; anchor with a few extra stitches through crown and felt. For a top-heavy hat, create a short hair-pin or small felt tab under the hat and glue/sew to oval for extra stability.
- If you want detachable hats, sew a snap under hat and matching snap on oval.
Variations
- Make a top hat (taller crown + straight brim) for a vintage look.
- Add tiny pompom on top for a playful pom hat.
Care
- Hand wash and reshape brim while damp.
7. Crochet Strawberry Hair Clip Pattern
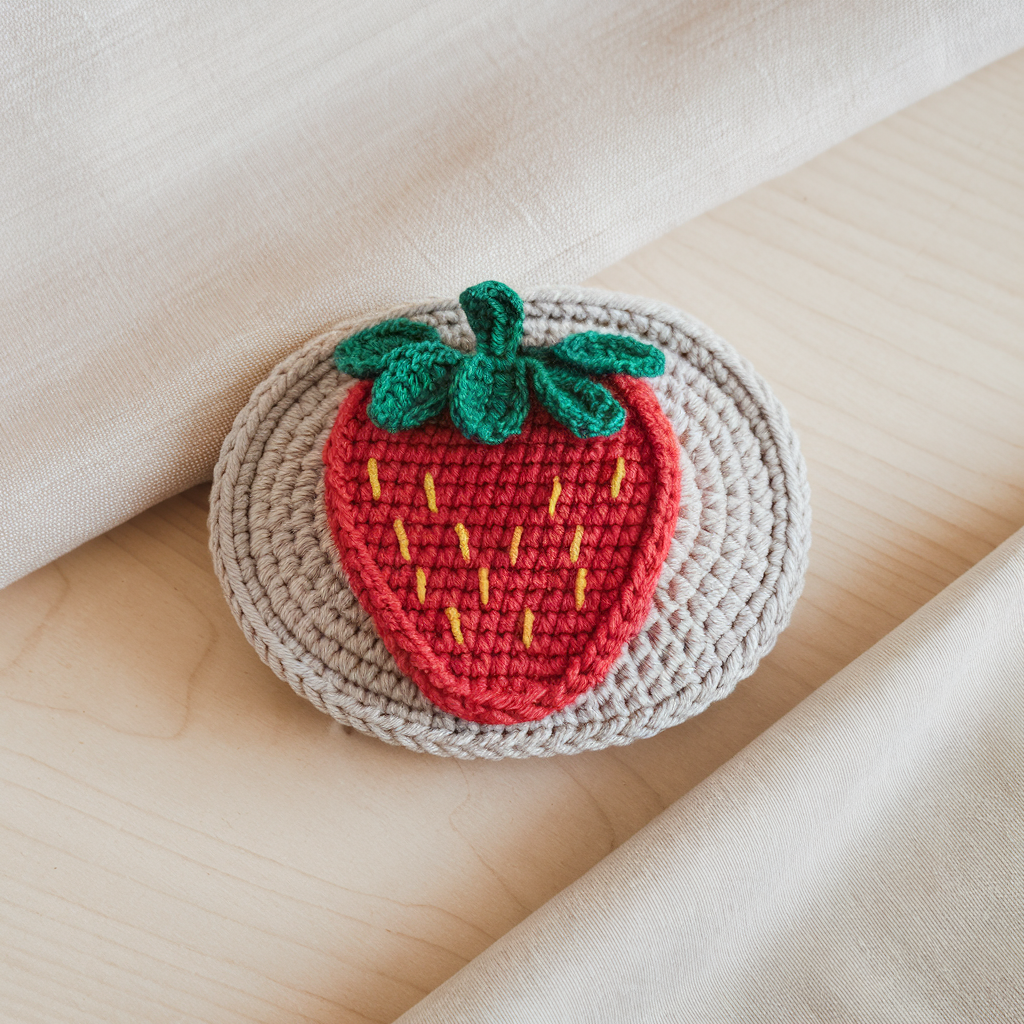
A classic, cute strawberry with embroidered seeds and a leafy green cap — bright and youthful.
Skill level: Beginner–Confident beginner
Materials
- Red yarn for berry, green for leaves, small yellow yarn for seeds (contrasting)
- 3.5–4.0 mm hook, oval base, felt disc, clip
- Yarn needle, embroidery floss or small yarn for seeds
Finished size: Strawberry ~1–1.25 in tall, sits over the oval.
Berry body (worked in continuous rounds)
- MR; R1: 6 sc in MR. R2: inc around → 12. R3: (sc, inc) ×6 → 18. R4: (2 sc, inc) ×6 → 24. R5–R6: sc around — 24 (two rounds for fuller body).
- R7: (2 sc, dec) ×6 → 18. R8: (sc, dec) ×6 → 12. Stuff firmly. R9: dec around → 6; close and fasten off. Flatten base slightly when sewing to oval so berry sits naturally.
Leaf cap (green, make 3–4 small leaves and join)
- Ch 6, sc in 2nd ch from hook and across (5 sc). Turn. Work sc across, then sl st at base to create a small curved leaf. Repeat to make 3–4 leaves and join into a ring by sewing bases together into a cap that fits the berry top. Add a small stem of ch 4 attached at center for realism.
Embroidered seeds
- Use small yellow embroidery floss or yarn end to make French knots or small straight stitches evenly across the red body after stuffing and closure. Space seeds regularly and avoid dense clustering to maintain cute scale.
Assembly
- Sew felt disc to oval, anchor clip. Position strawberry slightly off-center. Sew the leaf cap to the berry top and then stitch the berry base to the oval through the felt. Reinforce with multiple passes.
- Optionally add a small embroidered highlight on one side (tiny white stitch) for dimension.
Variations
- Make a basket of three strawberries on a longer oval base for a cutesy cluster.
- Use variegated reds for natural shading.
Care
- Hand wash gently; reshape leaves and plump berry stuffing as it dries.
Attachment & finishing best practices (applies to all clips)
- Felt reinforcement: Always use a felt disc behind the crochet base; cut the disc slightly smaller than the crochet base so it’s hidden. The felt spreads the forces from the clip when the accessory is used.
- Sew through felt + crochet + hardware: Position the clip on the felt underside and sew through the clip holes (if present) or loop clip through stitches, then stitch through felt and crochet repeatedly. Use strong thread or doubled yarn for extra durability.
- Hide stitches: Bring sewing stitches through the underside or inside decorative seams so they’re not visible on the front.
- Weave and secure tails: Weave ends into fabric for at least 1 in; use a sprinkle of textile glue on knots for extra security (test first).
- Edge finish: Work a final round of slip stitches around the oval base to clean the edge. For a decorative finish, work a small picot or crab stitch.
- Testing: After assembling, gently tug at attachments and clips; if any give, sew additional reinforcing stitches.
Styling, photography, and marketing tips
- Styling: Smaller ovals read well on side-swept hair; large ovals or plumeria are statement centerpieces for buns. Mix and match colors to create seasonal sets (spring pastels, autumn earthy tones).
- Photography: Use a neutral background, show clip in hair on a model and on a flat-lay, and include a close-up of the attachment underside to prove sturdiness for buyers.
- Gift sets: Group three small themed clips (garden, fruits, bows) on a card and tie with ribbon for handmade-market appeal.
Care instructions for customers
- Spot clean or hand wash in cool water with mild soap; reshape while damp and air dry flat.
- Avoid twisting metal clips in heat; remove before swimming or bathing.
- For long life, store flat or on a small card so shapes don’t get crushed.
Conclusion
These seven modern crochet hair clip patterns — all created to sit on a tidy oval base (except the Plumeria) — give you a balanced mix of quick makes (carrot, strawberry, coquette bow), slightly advanced shaping (rose, plumeria), and charming clusters (flower garden). Each design is customizable in scale and color, and the oval-base system keeps your workflow consistent: make an oval, prepare motifs, sew, reinforce with felt and clip hardware, and finish with a neat edge.
Điểm nổi bật của xn88 gaming không chỉ nằm ở giao diện thân thiện, tốc độ xử lý mượt mà trên cả điện thoại và máy tính, mà còn ở công nghệ bảo mật tiên tiến, giúp người dùng yên tâm sử dụng dịch vụ mọi lúc mọi nơi. Đặc biệt, deegarciaradio.com hoạt động hợp pháp dưới sự cấp phép của tổ chức PAGCOR – Philippines, đảm bảo yếu tố minh bạch và ổn định trong quá trình vận hành.
khuyến mãi 188v Sảnh game xổ số, lô đề tại đây nổi tiếng với độ uy tín và trả thưởng sòng phẳng, xanh chín. Do vậy mọi người hoàn toàn có thể yên tâm tin tưởng tham gia cá cược thỏa mãn niềm đam mê của mình. Đồng thời tất cả các game đều được chúng tôi sử dụng thuật toán RNG ngẫu nhiên đảm bảo tính công bằng 100%.