

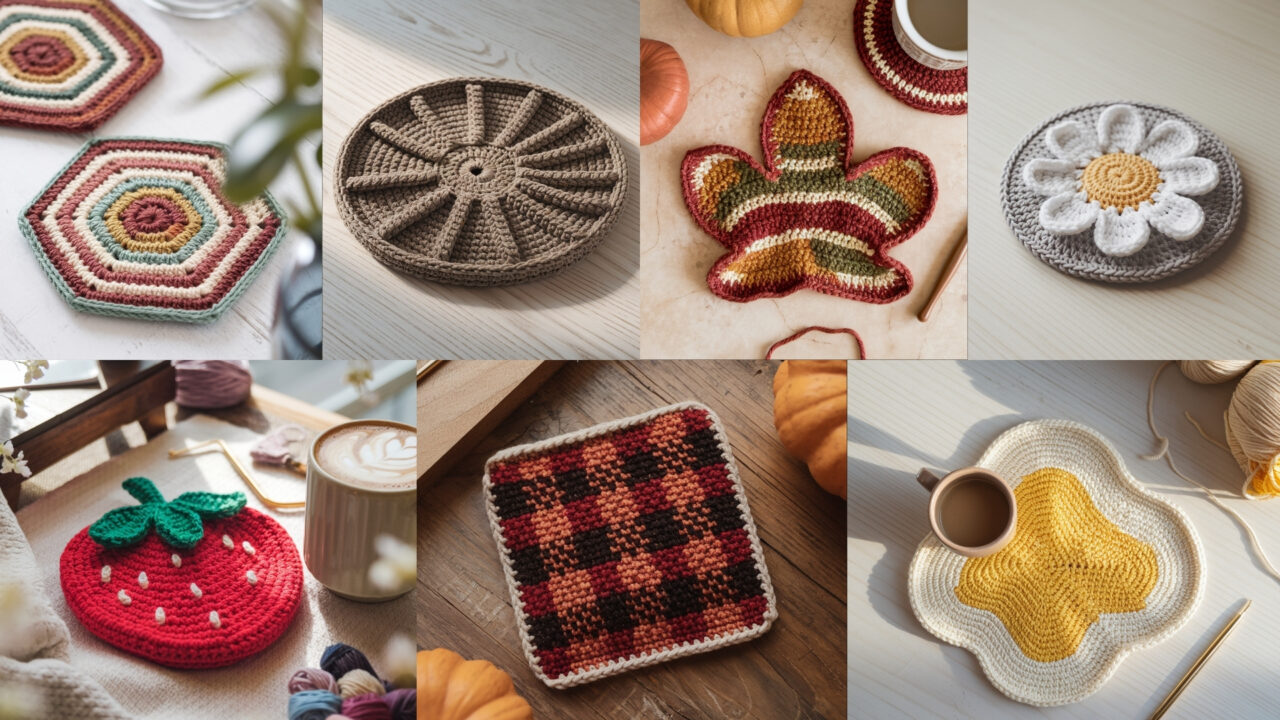
A set of handmade coasters is one of the fastest, most satisfying projects you can make: small, practical, and perfect for trying new stitches, colorwork or tiny motifs. Below you’ll find seven modern coaster patterns — each with a clear materials list, skill level, precise step-by-step rounds (US terms), finishing tips, variations, troubleshooting and care notes. Most use cotton or cotton-blend yarn for heat and moisture resistance. Make single coasters, match them into sets, or mix patterns for a playful table.
Quick reference — tools, yarn and abbreviations
Recommended yarn & hooks (unless otherwise noted)
- Yarn: 100% cotton or cotton blend (worsted weight / Aran / Category 4 is a good default). For smaller, firmer coasters you can use cotton thread (size 10) and a smaller hook — but instructions below assume worsted cotton.
- Hooks: 4.0 mm (G) or 4.5 mm (7) depending on how tight you crochet and how firm you want the coaster. Use a smaller hook for tighter fabric.
- Notions: tapestry needle, scissors, blocking mats & pins (or heavy object for shaping), stitch marker (optional).
Abbreviations (US)
- ch — chain
- sl st — slip stitch
- sc — single crochet
- hdc — half double crochet
- dc — double crochet
- tr — treble (tr)
- st(s) — stitch(es)
- inc — 2 sc/dc/etc. in same stitch (increase)
- dec — sc2tog or dc2tog (decrease)
- BLO / FLO — back/front loop only
- MR — magic ring
If you prefer a printable PDF or chart of any pattern below, tell me which one and I’ll format it for you.
1. Crochet Daisy Flower Coaster Pattern
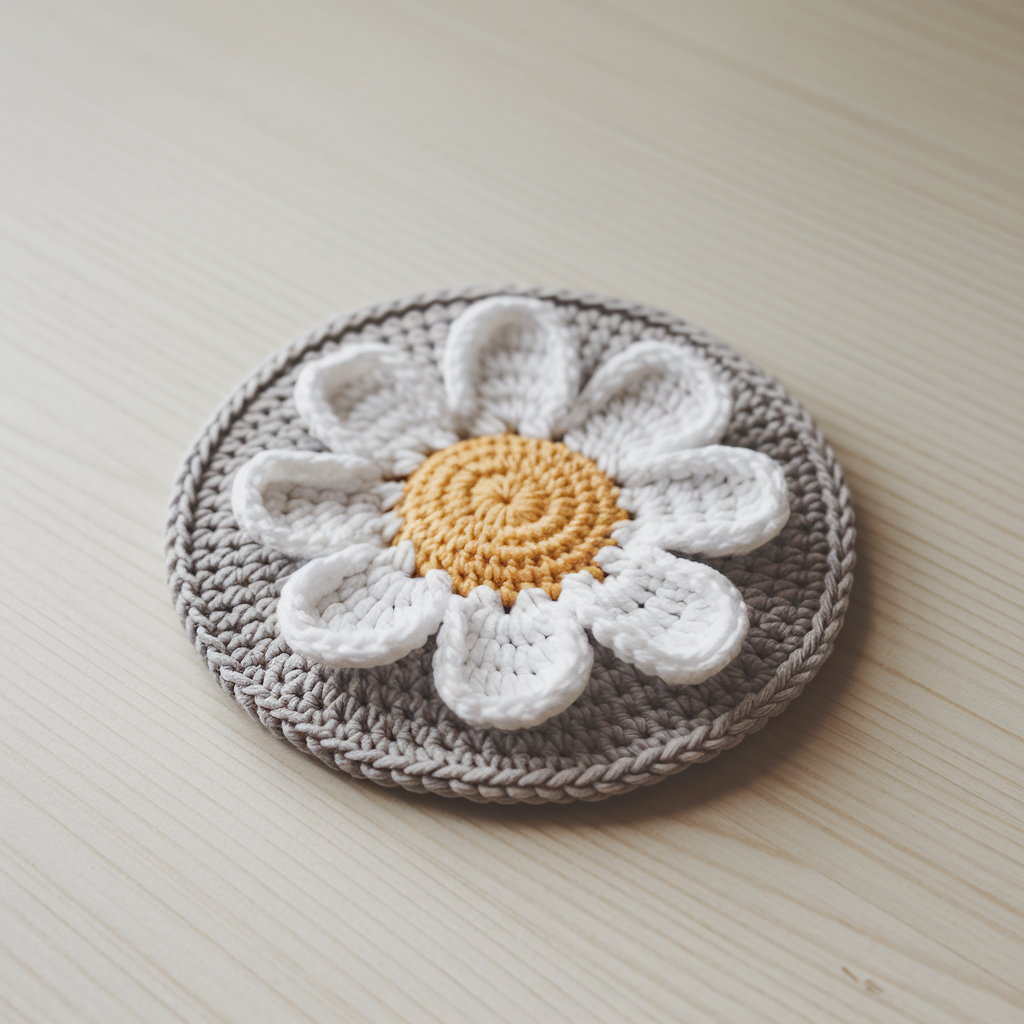
Skill level: Beginner → Confident beginner
Finished size: ~4.5 in (11.5 cm) diameter with worsted cotton + 4.0 mm hook
Materials: cotton yarn (main: white or cream for petals; center: yellow; optional background: green or neutral)
Gauge: not critical; aim for tight stitches so the coaster lies flat.
Concept
A solid circular coaster with raised daisy petals worked on top so the coaster doubles as a decorative accent. Construction: worked flat from center outward, then petals are formed in a petal round and anchored.
Step-by-step (US terms)
Round 1 — center: MR, ch 1, work 10 sc into ring. Pull tight; join with sl st to first sc. (10 sc)
Round 2 — increase round (color A for center): ch 1 (does not count), sc in same st, inc in next around — repeat exact sequence until end. You should end with 15 sc. (15 sc)
(If your count is off because of tension, adjust to end with an odd number that divides evenly for the petal anchors.)
Round 3 — base circle (switch to background color if using): ch 1, sc in each st around. Join with sl st. (15 sc)
Round 4 — expand: ch 2 (counts as hdc), hdc in same st, hdc in next 2 sts, 2 hdc in next st — repeat around. Join. (20–22 hdc depending on start — your goal: a smooth circle ~3.5–4 in)
Round 5 — even round: ch 1, sc around all stitches to create a tidy base edge. Join and fasten off if you plan to do petals in a contrasting petal color.
Petal round (petal color — white):
Attach yarn to a stitch on the last sc round. Ch 2, (3 dc, ch 2, sl st) into the same stitch — that is one petal formed as a fan. Move forward 1–2 sts (depending on spacing) and repeat across to make 10–12 petals spaced evenly. Aim for petals that slightly overlap for full coverage. After last petal, join and weave ends.
Anchoring round (optional): With the base color, work sc into each gap behind petals to anchor petals down and make the coaster flat. Work one round of sc around whole coaster and finish with a small picot or neat sc border: sc, ch 2, sl st in first ch every 3–4 sts for a delicate edge.
Finishing & blocking
- Block on a flat surface, pinning each petal to shape if you want perfectly even petals. Spritz lightly with water and let dry.
- Weave in ends and trim.
Variations
- Make a monochrome daisy (all white) for a crisp modern look.
- Work more or fewer petals; make petals smaller (2 dc fans) for a subtle texture.
- For a sturdier coaster, work an extra round of single crochet or hdc to thicken.
Troubleshooting
- If petals flop over: use a slightly smaller hook for the petal round or add an anchoring sc round beneath them.
- If center puckers: add or remove an increase in Round 2 to even the tension.
Care
- Cotton coasters can be machine washed on gentle; reshape and air dry. Avoid hot dryer heat if you want to preserve shape long-term.
2. Crochet Boho Hexagon Coaster Pattern
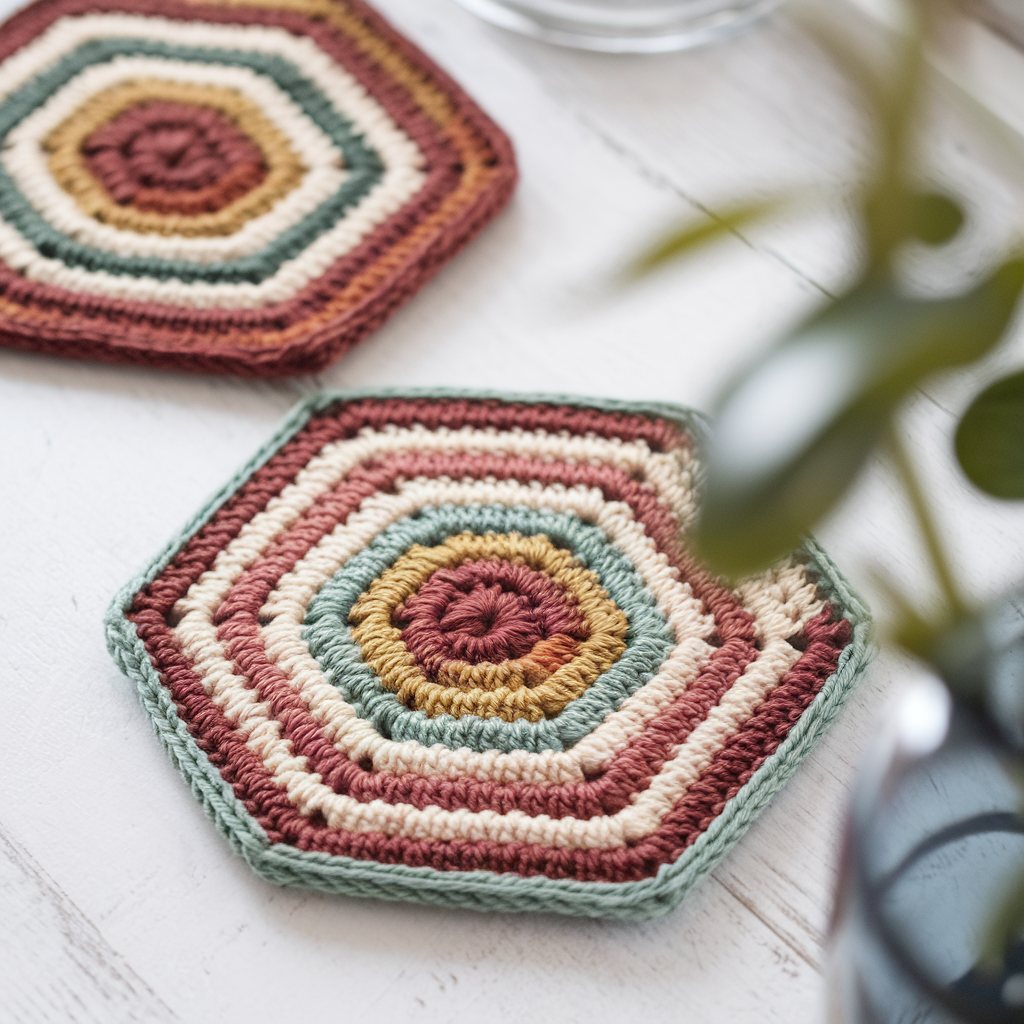
Skill level: Confident beginner → Intermediate
Finished size: ~4.25–4.75 in (11–12 cm) across flats (depends on yarn & hook)
Materials: cotton yarn (2–3 colors for boho stripes), 4.0–4.5 mm hook
Concept: a flat hexagon with textured rows and color stripes, great for mixing neutrals + an accent color.
Step-by-step
Round 1 (center): MR, ch 1, work 6 sc in ring; join. (6 sc)
Round 2 — create 6 points: ch 2, (dc, ch 1, dc) in same stitch (creates a small point), ch 1, slip to next stitch and repeat — actually for a neat hexagon do increases evenly: ch 2, 2 dc in each st around separated by ch 1 to form spacing — join. Better approach below.
Reliable hexagon method (recommended):
R1: MR, ch 1, 6 sc in ring. (6)
R2: sc in next st, 2 sc in next st around — (9 sc).
R3: sc in next 2 sts, 2 sc in next st around — (12 sc).
R4: sc in next 3 sts, 2 sc in next st around — (15 sc). — At this point you have a circular expansion. To turn it into a hexagon, introduce corner increases spaced evenly every N stitches so you have 6 increase points (corners). For worsted yarn, aim to make increases at 6 equally spaced points by counting.
Practical hexagon layout using 6 corners:
Work rounds increasing with a pattern: on each round place an inc group (3 sc in same st) at the corner points, with even spacing of sc between corners. Example counts (this is a pattern you can follow):
R1: MR, 6 sc.
R2: (2 sc in each st) → 12 sc (this gives 6 corner points).
R3: sc in next 1, 2 sc in next around → 18 sc.
R4: sc in next 2, 2 sc in next around → 24 sc.
R5: sc in next 3, 2 sc in next around → 30 sc. By strategically stopping and adding corners you’ll get a hex shape.
Add texture / stripes: After you reach the flat size (~4 in), switch colors and work 1–2 rows of hdc or dc for stripe bands. To create boho texture, alternate rounds of puff stitch: make 3-loop puff, ch 1, sc to anchor etc., in a single round for contrast band.
Final border: Round of sc in contrast color, then sc, ch 2, sl st in next sc every 3–4 sts for a scalloped boho finish.
Design note
Hexagon geometry is forgiving — if one side ends slightly longer, block to even edges. The visual hex works best when you place 6 evenly spaced increase points (corners) from early rounds.
Variations
- Use 3 colors—neutral, rust, and cream—for a modern boho palette.
- Make a set of hexagon coasters, then join into a placemat or table runner.
Troubleshooting
- If the hexagon becomes wavy: you’ve probably increased too often; rip back a round and re-space increases evenly into 6 corners.
- If it curls: add one more outer round of sc to flatten.
Care
- Machine washable on gentle; press flat after washing.
3. Crochet Wheelie Coaster Pattern
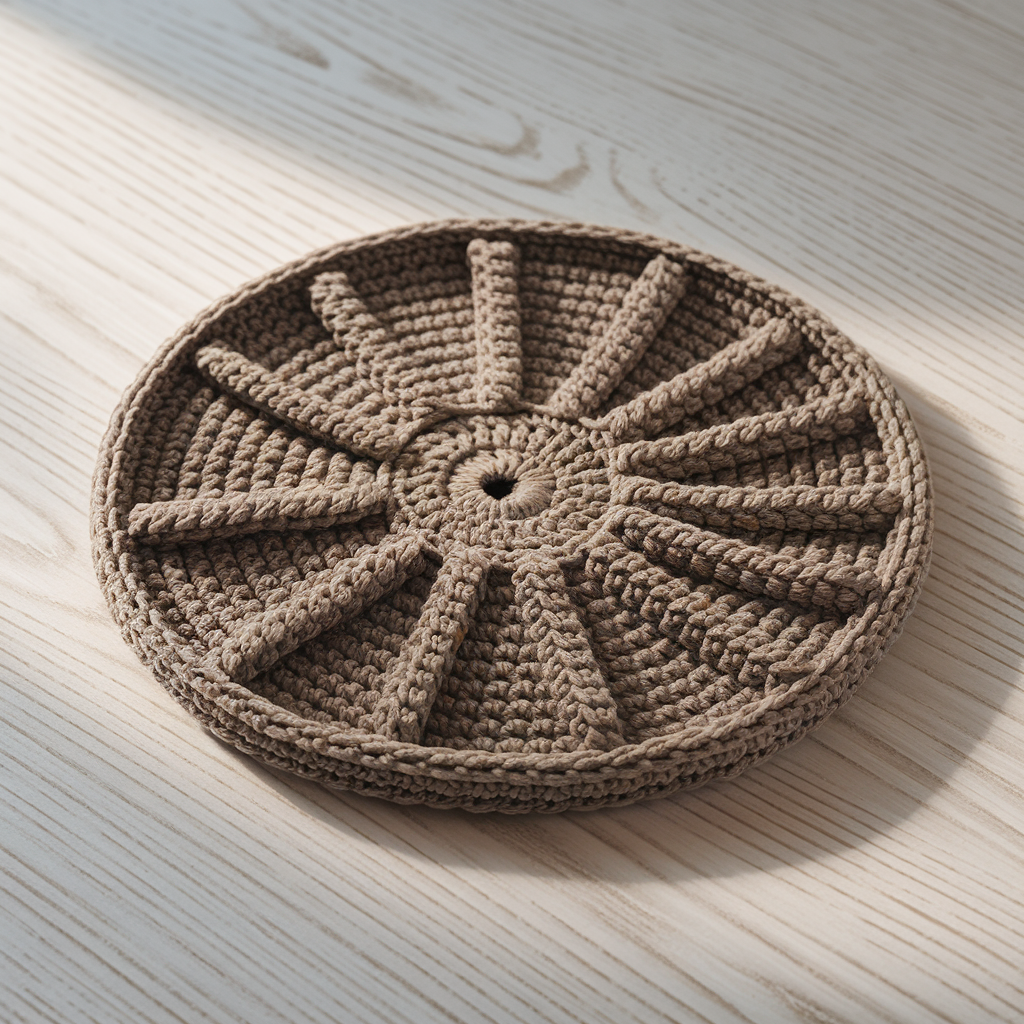
Skill level: Beginner → Confident beginner
Finished size: ~4 in (10 cm) diameter
Materials: Cotton yarn, 4.0 mm hook
Concept: A round coaster with concentric raised ridges (wheel spokes), made by alternating rows of sc and front/post stitches to create tactile rings.
Step-by-step
Round 1: MR, ch 1, 8 sc in MR. Join. (8)
Round 2: ch 1, 2 sc in each st around. Join. (16)
Round 3: ch 1, sc in next st, inc in next around. Join. (24)
Round 4 — base: ch 2, dc in each st around. Join. (24 dc)
Round 5 — first ridge (FPDC): ch 1, FPDC around post of next st, sc in next st — alternate FPDC and sc around to create a raised rib every other stitch. Join.
Round 6 — even round: ch 1, sc in each st around. Join.
Repeat rounds 5–6 twice more (or until coaster reaches desired diameter) to build concentric ridges — the FPDC creates raised rings; sc rounds stabilize.
Final round — tidy edge: ch 1, sc around; sc, ch 2, sl st in next sc every 3–4 sts to create a small scallop if desired.
Variations
- Make the ridges closer together by doing FPDC in every stitch for a very textured wheel.
- Use two colors alternating by round for striped wheel.
Troubleshooting
- If the FPDC rows pull in too tightly, use a hook 0.25–0.5 mm larger for those rounds.
- If the coaster cups: add more sc rounds between FPDC ridges or block flat.
Care
- Cotton coasters withstand washing; press into shape when wet.
4. Crochet Autumn Leaf Coaster Pattern
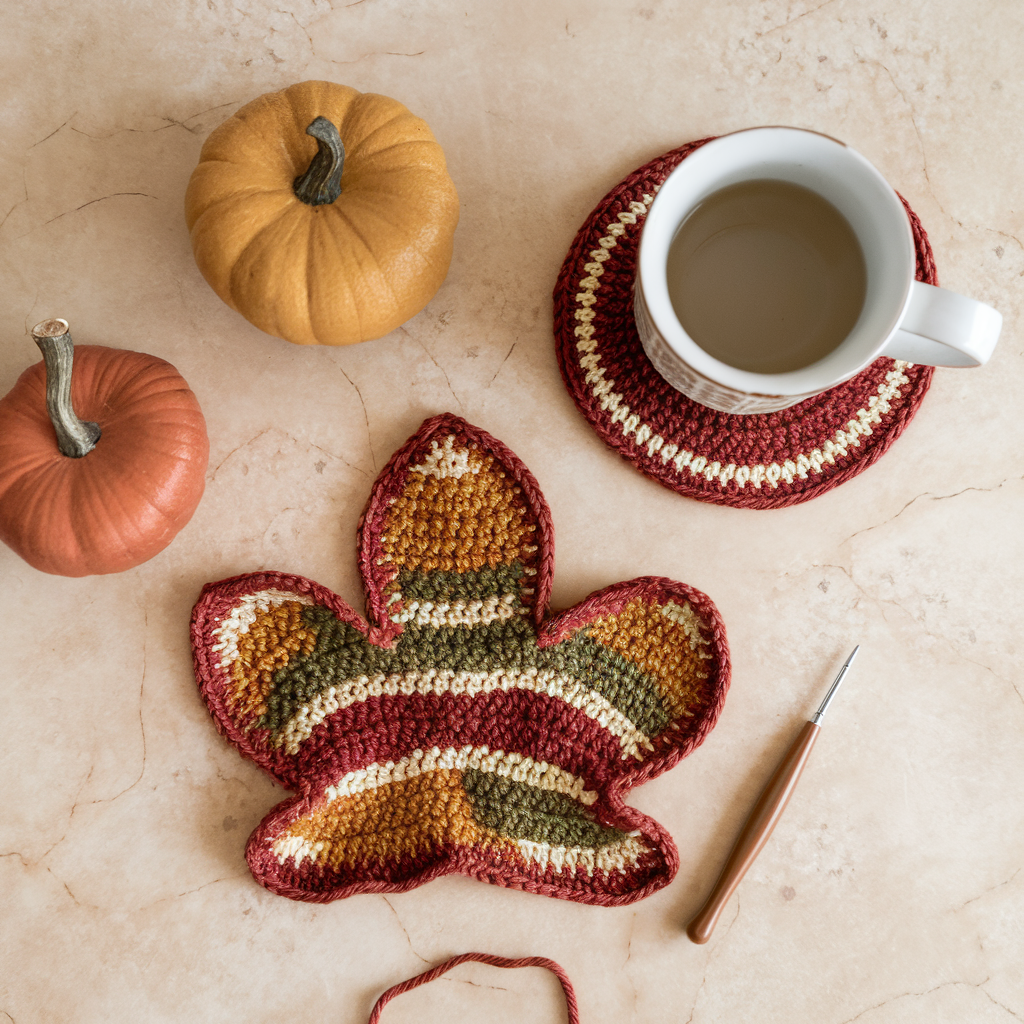
Skill level: Intermediate (working shaped motifs)
Finished size: about 4–4.5 in long (leaf length) and ~3 in at widest point
Materials: cotton in autumn colors (rust, mustard, olive), 4.0 mm hook, tapestry needle
Concept: A flat leaf-shaped coaster worked from center spine outward to create leaf lobes; works well as seasonal decor.
Step-by-step (leaf worked flat)
Leaf center (spine): ch 14 (or odd number for longer leaf). Working on both sides of chain will form the leaf.
Right side (round 1): In 2nd ch from hook work: sc, hdc, dc, dc, hdc, sc, sl st into next chain—you are forming half-leaf. Continue along chain to end and then work across opposite side of chain to mirror shape.
A clearer method: work symmetrical increases along a central chain as follows:
- Ch 8 (short sample) — make longer chain for longer leaf.
- Row 1: sc in 2nd ch from hook, sc next 4, sc in last ch. Now rotate and work along underside: sc in next 4, sc in last stitch. (This produces a small oval base.)
- On subsequent rows, increase at the tip and base to form a leaf point using increases (sc inc at ends) and occasional dc clusters to make lobes.
But for consistent, repeatable instructions, try the following tested leaf pattern:
Round 1 (foundation loop): ch 10, join with sl st to form a ring. (This is a small leaf; increase ch count for larger leaf.)
Round 2: ch 1, 8 sc in ring. Join. (8)
Round 3 (shape): sc in next 2, inc in next repeat across to form slight oval. Join. (10)
Round 4 (pointing): sc in next 3, inc around — (12)
Round 5: On one side only begin to form tip: sc2, hdc, dc, tr, dc, hdc, sc across midline; repeat mirrored for other side — this round creates the lobed tip. Fasten off and weave.
Better alternative (explicit leaf pattern widely used): Use a known leaf chart (center spine: chain, then increase on both sides with DC shell tips). If you want, I can give a fully charted row-by-row leaf for your chosen leaf size — say 12 ch long for a 4.5 in leaf.
Embellishing (veins & texture)
- Embroider veins with contrasting yarn (stem down center and side ribs).
- Add a small picot edge for crisp leaf outline.
Finishing
- Block and pin the shape on a board to open lobes. Starch lightly to keep shape if using natural cotton.
Variations
- Work in gradient autumn yarn for natural shading.
- Make a set of leaves in different sizes and colors for a seasonal platter.
Troubleshooting
- If tip is too blunt, add a few dc/tr in the center to create a sharper peak.
- If too floppy, use a denser yarn or add a backing fabric.
5. Crochet Buffalo Plaid Coaster Pattern

Skill level: Intermediate (colorwork/alpha or tapestry)
Finished size: ~4 in square
Materials: cotton in two colors (e.g., black and red), small amount of cream for intersection tone if desired, 4.0 mm hook
Concept: mimic buffalo plaid via small color squares (pixel style) using tapestry crochet (carry floats) or mosaic technique.
Method — Tapestry crochet (recommended for small square)
Choose pixel grid — 8 × 8 pixels makes a compact plaid. Each “pixel” is 1 sc stitch. For a 4 in coaster, 8 sc across = gauge ~2 sc/inch; adjust counts accordingly.
Setup: Cut two yarns A (red) and B (black) and work sc rows, switching colors according to the plaid grid. Carry the unused color across the wrong side with floats no longer than 4–5 stitches to avoid snagging.
Example 8×8 plaid chart (concept):
- Rows alternate solid red rows with red/black stripe rows. Where red and black meet, you can use cream (A+B twist or simply pick one color for crossings).
Row-by-row (sample simplified):
Row 1 (right side): sc across in color A following your pixel pattern (e.g., 2 A, 2 B, 2 A, 2 B).
Row 2: follow next pixel row, changing colors where chart indicates. Continue until 8 rows. Fasten off and weave ends.
Finishing: Work 1–2 rounds of sc in a contrast neutral around the square to give a tidy frame.
Variations
- Use 10×10 grid for finer plaid; for bigger coasters, increase pixels.
- For an easier look, make broad stripes (horizontal + vertical) and overlap them to suggest plaid rather than pixel accuracy.
Troubleshooting
- Carrying floats too long causes snagging: always catch floats every 4 stitches by twisting colors or cut and rejoin yarn.
- Uneven edges: work sc border catching the first and last stitches to square up.
Care
- Cotton is robust — machine wash gentle and reshape.
6. Crochet Strawberry Coaster Pattern
Skill level: Confident beginner → Intermediate (small shaping + embroidery)
Finished size: about 4 in round (strawberry motif sits on round background)
Materials: cotton: red (berry), green (calyx), cream (seeds), 4.0 mm hook
Construction concept
Work a round coaster base, then crochet a small flattened teardrop strawberry motif separately and sew onto base. Embroider seeds and add green leaf top.
Strawberry motif (small teardrop)
Round 1: MR, ch 1, 6 sc in ring. (6)
Round 2: inc in each st → 12 sc.
Round 3: sc, inc around → 18 sc.
Round 4: sc in next 2, inc around → 24 sc — this gives a rounded teardrop. Fasten off leaving tail. Shape into a teardrop by folding one side and sewing a short seam to taper the bottom; flatten slightly so it sits on the base.
Calyx (green leaf crown): With green, join to top and ch 4, SL ST into same point repeat 4–5 times to make leaf loops; into each loop work small cluster: (sc, hdc, dc, hdc, sc). Fasten off.
Base coaster: Work simple R1 MR 8 sc, R2 inc every st to 16, R3 sc, inc → 24, R4 sc around to form flat disc ~4 in.
Assemble: Sew strawberry to base positioned off-center; embroider small cream or white French knots for seeds across berry. Sew in calyx snug.
Finishing & variations
- Add a small face (kawaii style) with tiny French knot eyes and a stitched smile for a playful coaster.
- Make a set of fruit coasters with lemon, orange, kiwi patterns.
Troubleshooting
- If strawberry flattens poorly, stuff very lightly with fiberfill then sew closed; for coasters you want it mostly flat so it stacks well—use minimal stuffing.
Care
- Spot clean or machine wash gentle; lay flat to dry.
7. Crochet Omelette Coaster Pattern
Skill level: Intermediate (shaping + short rounds)
Finished size: ~4–4.5 in diameter (organic round)
Materials: cotton in two or three colors, 4.0 mm hook
Concept: an abstract “omelette” or freeform oval/round coaster with two-tone swirl created by working short rounds and intentional shaping to mimic a sunny-omelet shape — contemporary and fun.
Construction idea (short-round method)
- Start with MR and work a small circle (R1 6 sc; R2 inc to 12).
- Work normal rounds increasing until you have a 3–3.5 in disc. Then to create an “omelette” bulge, start short rounds: join in a spot and work a sequence that stops before completing the round and turns back (similar to creating an oval or ear shaped element). The short rounds create a raised bulge and slight ovalization.
Example sequence (concrete):
R1: MR, 6 sc. (6)
R2: 2 sc in each st (12)
R3: sc 1, inc → 18
R4–R5: sc around (18) — even rounds for solid base
R6 (bulge start): sc around but stop at 3/4 of round, turn and work back in sc 6 sts (short round), then rejoin and continue full round. This creates a thicker band on one side. Repeat selective short rounds in the same sector to build a slightly raised “omelette” area. Finish with a round of sc around to tidy edge.
Variations
- Make a two-tone swirl by switching color mid-round where you work short rounds — creates a sunny center and egg-white base.
- Use boucle or slightly textured cotton for an organic look.
Troubleshooting
- Short rounds can leave a visible seam where you stop/start — hide by offsetting the stop points slightly each short round, or work an even sc round over the end to blend.
Care
- Shape while damp and dry flat.
Final finishing tips (applies to all coasters)
- Blocking: Cotton often benefits from light wet blocking to flatten and square edges — pin to mat and let dry fully. This is especially helpful for motif coasters (leaf, daisy, strawberry).
- Stiffening (optional): If you want very rigid coasters, brush on diluted fabric stiffener or starch on the wrong side and dry flat. Test on a scrap first.
- Backing: For drink protection, you can glue a thin cork backing (cut to shape) to the coaster underside using strong craft glue; this adds non-slip and insulation. Only attach backing when coaster is fully dry.
- Sets & presentation: Make sets of four or six in matching colorways; tie with a ribbon and include care instructions (machine wash gentle; reshape & air dry).
Conclusion
These seven modern coaster patterns span floral, geometric, textured, seasonal, and playful motifs — perfect as quick gifts, pattern practice, or to elevate your home table. Each coaster is compact, stash-friendly and highly customizable: change yarn weight for different sizes, pick contrast colors for bold modern looks, or keep things neutral for minimalist homes.

I don’t think the title of your article matches the content lol. Just kidding, mainly because I had some doubts after reading the article.
66b uy tín không ngừng nỗ lực để mang đến cho người chơi những ưu đãi hấp dẫn và giá trị. Các chương trình khuyến mãi đa dạng là một trong những lý do cơ bản nhất giúp chúng tôi thu hút đông đảo người đặt cược.
66b chính thức áp dụng công nghệ bảo mật tiên tiến, trong đó có công nghệ mã hóa SSL 128 bit. Đây là tiêu chuẩn bảo mật hàng đầu, thường được sử dụng bởi các ngân hàng và tổ chức tài chính lớn, giúp mã hóa toàn bộ thông tin cá nhân, giao dịch của người chơi. Nhờ đó, các dữ liệu quan trọng của bạn sẽ được bảo vệ khỏi nguy cơ bị xâm nhập hoặc đánh cắp bởi đối tượng xấu.
Your point of view caught my eye and was very interesting. Thanks. I have a question for you.
Thanks for sharing. I read many of your blog posts, cool, your blog is very good. https://accounts.binance.com/ro/register-person?ref=HX1JLA6Z
Thanks for sharing. I read many of your blog posts, cool, your blog is very good.
Your point of view caught my eye and was very interesting. Thanks. I have a question for you.
Thank you for your sharing. I am worried that I lack creative ideas. It is your article that makes me full of hope. Thank you. But, I have a question, can you help me?
Your point of view caught my eye and was very interesting. Thanks. I have a question for you. https://accounts.binance.com/es/register-person?ref=RQUR4BEO
Your article helped me a lot, is there any more related content? Thanks!
I don’t think the title of your article matches the content lol. Just kidding, mainly because I had some doubts after reading the article. https://www.binance.com/register?ref=IHJUI7TF
Your point of view caught my eye and was very interesting. Thanks. I have a question for you.