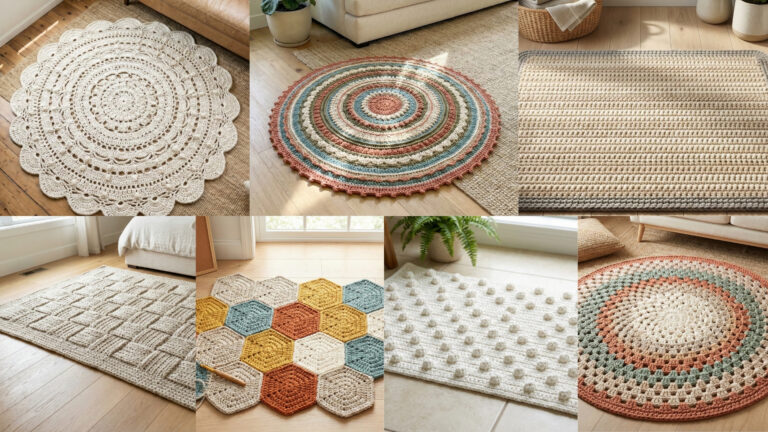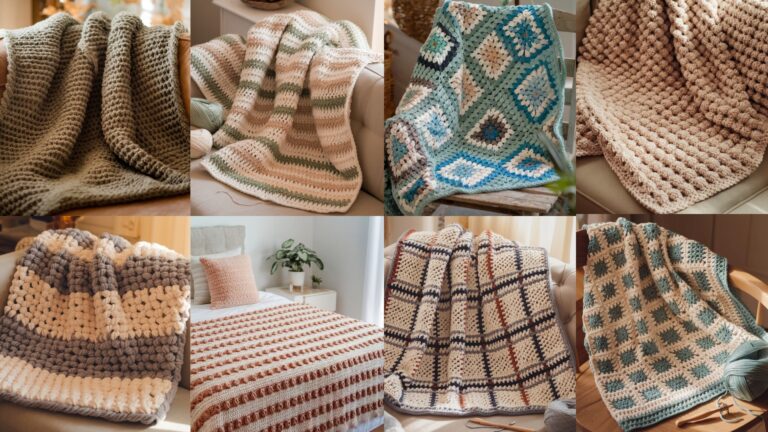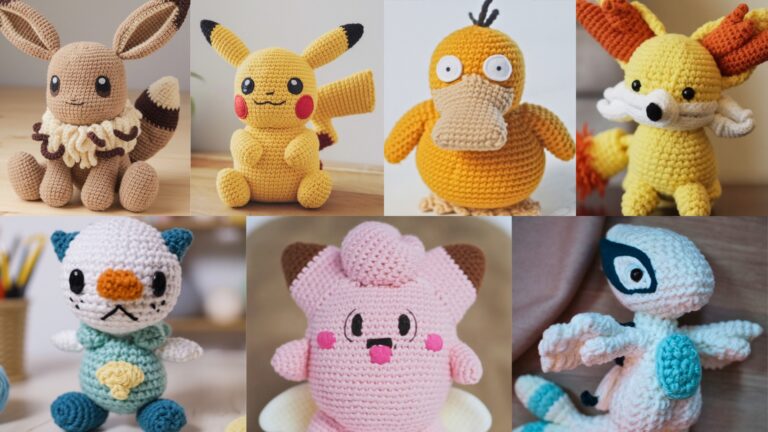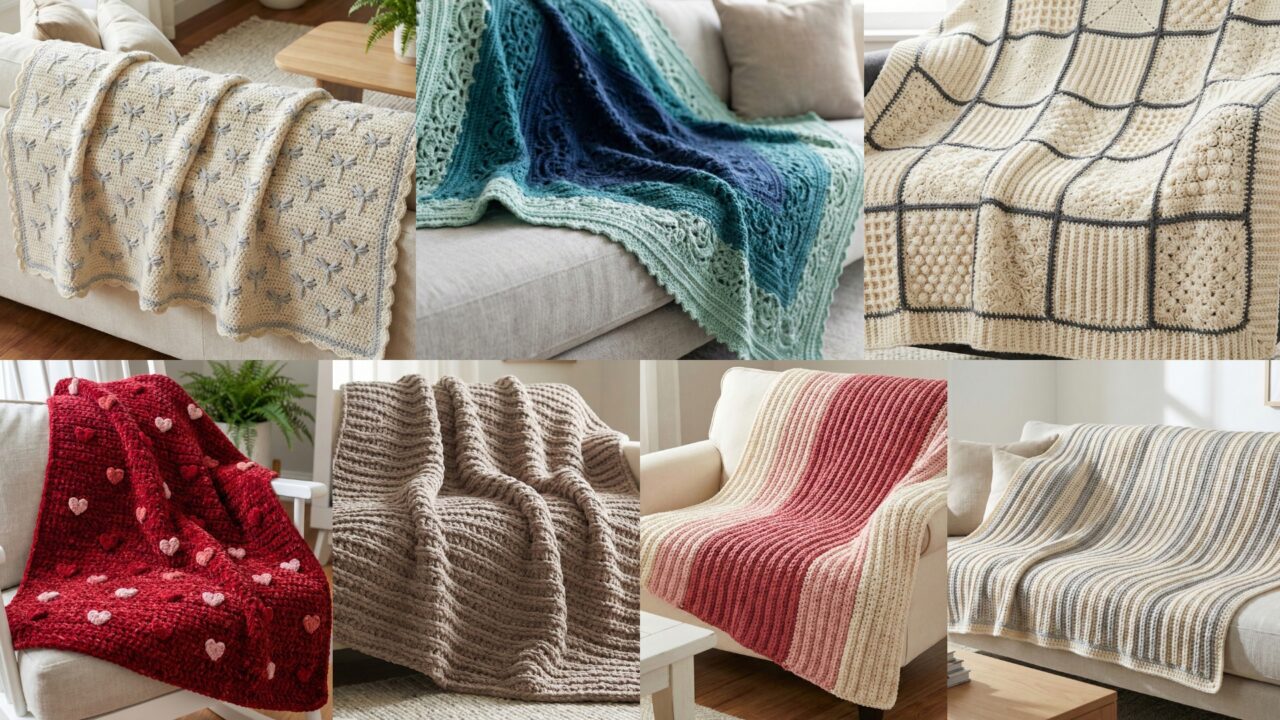
Blankets are the coziest way to change the feel of a room — they’re practical, decorative, and one of the most satisfying projects to make. Below you’ll find a warm, thorough introduction (materials, sizing, gauge, finishing and care) and seven modern blanket patterns with long, very-detailed, step-by-step instructions so you — and your readers — can actually make them. Each pattern includes materials, sample finished size, suggested gauge, construction notes, the exact sequence to make it, finishing tips, and ideas for customizing the design.
quick Introduction — yarn, hooks, sizing, gauge, finishing & care
Choose the right yarn
- Chunky / super bulky (5–7 wpi) — works up fast, gives dense, modern texture and great for 3-hour or quick blankets. Best for 3-hour Chunky Blanket and chenille heart blankets.
- Worsted / aran (medium) — versatile, balanced drape and warmth. Good for textured and ribbed blankets.
- DK / sport / cotton-blend — lighter, good for year-round throws (better for machine-washable home use).
- Chenille / velvet — ultra-soft luxe feeling, but can be heavy and may require delicate care.
Tip: use the same yarn brand/color lot for the whole blanket to keep color consistent.
Hooks & tools
- Hook sizes depend on yarn. For chunky blankets: 10–15 mm hooks; for worsted: 5–6.5 mm; for DK: 3.5–5.0 mm. The pattern below recommends hooks per design.
- Notions: tape measure, tapestry needle (large-eyed for chunky yarn), stitch markers, blocking mat (for textured blankets), scissors.
Blanket sizes (common)
- Baby: 30″ × 36″ (76 × 91 cm)
- Lap throw / stroller: 36″ × 48″ (91 × 122 cm)
- Throw / couch: 50″ × 60″ (127 × 152 cm)
- Twin: 66″ × 90″ (168 × 229 cm)
- Queen/bed sizes are larger — adjust yardage.
Unless stated otherwise, example patterns below will target a throw size ~50″ × 60″ and include notes for scaling.
Gauge — why it matters
Make a small swatch in the main stitch to check stitches/rows per inch. Use the gauge to calculate foundation stitches and estimate yardage. Example math: if gauge = 4 sc = 1″ and you want 50″ wide, you need 4 × 50 = 200 foundation sc. When in doubt, make the blanket a little wider — edging and blocking can refine size.
Finishing & care
- Weave in ends as you go for chunky yarn using a large tapestry needle.
- For heavy/chenille yarns, hand-wash or machine-wash on gentle; air-dry flat. Check manufacturer.
- Block textured stitches lightly (spritz + pin) to open lace and reset shape.
- Consider a sewn fabric backing for drapey blankets or to stabilize a scalloped/lacy blanket.
1. Crochet 3-Hour Chunky Blanket Pattern
Perfect for beginners and last-minute gifts — big hook + super bulky yarn = instant cozy. This uses a simple, repetitive stitch for speed.
Skill level: beginner
Finished size (throw): ~50″ × 60″ (adjust by adding/subtracting foundation chains)
Materials
- Super bulky / jumbo yarn (Category 6/7), approx 800–1,200 yd depending on thickness and final size (for throw aim for ~900 yd with very chunky).
- Hook: 12–15 mm (or recommended for yarn label)
- Tapestry needle for ends
Gauge (example)
- With your yarn on a 12 mm hook: ~2.5 sts × 3 rows = 1″ in hdc (sample gauge will vary). Don’t stress gauge — thickness determines speed.
Construction — practical tested approach (worked flat in rows)
A. Simple stitch choice: Half Double Crochet (hdc) ribbed worked in back loop only (BLO) gives warmth and a neat bath-towel texture.
B. Foundation & math
- Decide width: e.g., 50″. Make a 6-stitch multiple for ease of pattern. If your sample shows 2.5 hdc = 1″, then 2.5 × 50 = 125 stitches. Round to nearest multiple (e.g., 126). Chain 126 + 1 turning ch.
C. Rows
2. Row 1: hdc in 3rd ch from hook and across (or hdc in each ch across). Turn.
3. Row 2: ch2 (counts as hdc), work hdc BLO across. This creates horizontal ridges. Repeat Row 2 until blanket length measures ~60″ (or desired length). Keep counting rows — quick method: each row adds ~0.4–0.5″ in height depending on yarn. For a 60″ length you may need ~150–200 rows depending on gauge.
D. Border (optional but neat)
4. Work 2 rounds of hdc around blanket edge: one round even in all stitches (work 3 hdc in each corner), then second round in BLO or regular hdc for a tidy finish. For extra polish add crab stitch (reverse sc) for a rope-like edge.
E. Finishing
5. Weave in ends, steam-block lightly if desired.
Yardage & time
- With jumbo yarn this works up very fast — many crocheters report 3–8 hours for throw depending on speed. If you truly want a 3-hour make, aim for smaller lap version or use super-bulky jumbo yarn and huge hook.
Variations
- Alternate two colors in wide stripes for modern graphic look.
- Use simple fringe on two shorter ends.
Tips
- Use a large tapestry needle to weave ends through thick yarn.
- Keep consistent tension — very loose tension will create an uneven edge.
2. Crochet Victoria’s Gs Rectangle Blanket Pattern
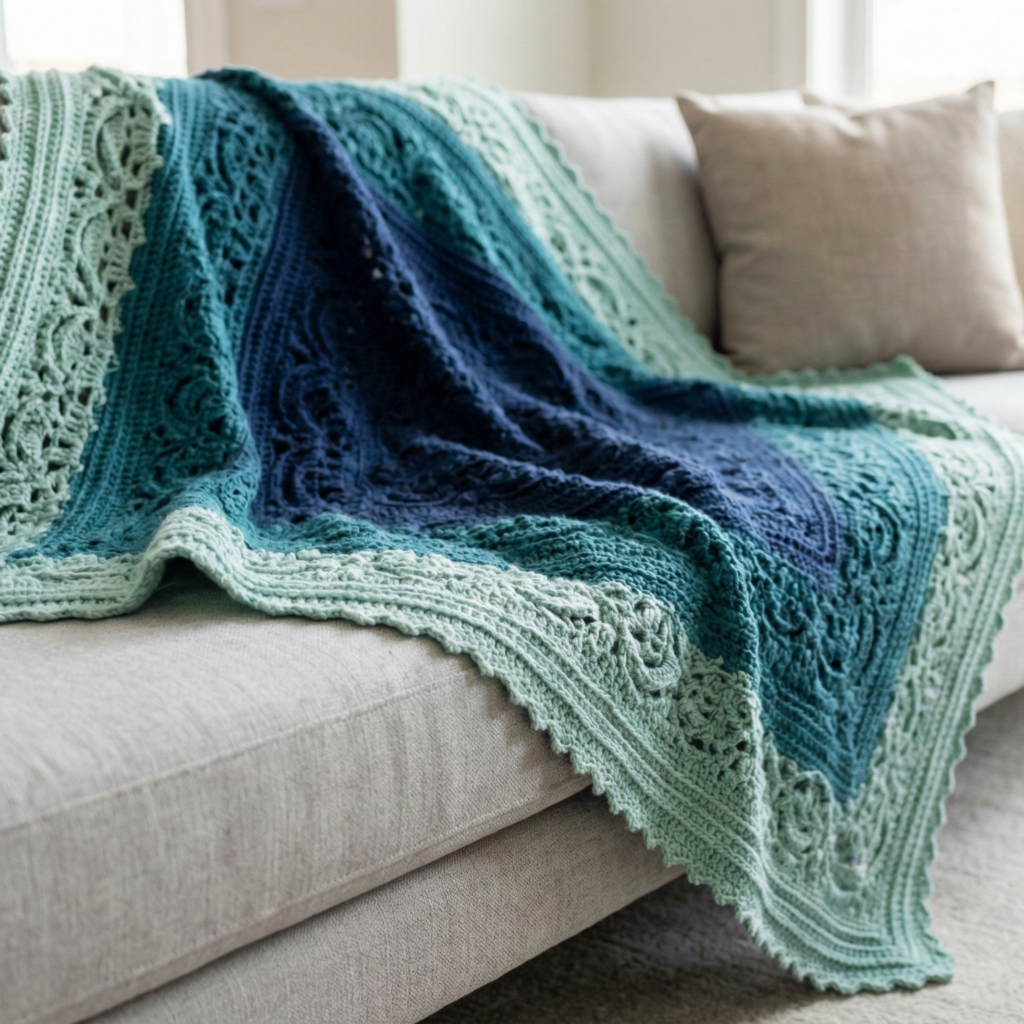
A refined, modern take on a classic stitch pattern (inspired by girlish G-lace ideas): subtle lacy “G” or looped motifs arranged in rectangles — great for an elegant living room.
Skill level: intermediate
Finished size (throw): ~50″ × 60″
Materials
- Worsted weight yarn (approx 1,200–1,500 yd) — choose high-quality acrylic/cotton blend or soft wool.
- Hook: 5.0–5.5 mm
- Tapestry needle, blocking supplies
Gauge (example)
- 14 sts × 16 rows = 4″ in pattern stitch (swatch to calculate).
Stitch used
- Alternating clusters and chain arches create a repeating “G” or loop motif; we’ll simplify to a G-like cluster + open arch repeat.
Construction — rectangle built from repeats (worked flat)
A. Swatch & repeat
- Make a 10×10″ swatch in the motif. Establish how many repeats across make your desired width. Example motif width = 6 sts; for 50″ at gauge 14 sts/in: 14 × 50 = 700 sts — dividing by 6 gives number of repeats; refine by swatching smaller sample to get realistic numbers. (If this sounds math-heavy, you can simply work to desired width and finish edge.)
B. Foundation
2. Chain a multiple of the motif + turning ch. Example: multiple of 6 + 2.
C. Pattern (example motif)
3. Row 1: dc, ch2, skip2, dc across to form arches.
4. Row 2: ch3, (3 dc cluster) in arch space, ch3, sl st to make a “G”-like filled space.
5. Row 3: Repeat Row 1 offset so clusters sit between arches. Continue alternating Row 1 & 2 to build rectangular field.
D. Borders & framing
6. When desired length is reached, work 4 rounds of sc to frame: 1 round sc even, 1 round sc in BLO for subtle ridge, 1 round picot scallop if you like delicate edge.
E. Blocking
7. Wet-block carefully to open lace (pin to true rectangle). Blocking will make stitches uniform and pattern pronounced.
Customization
- Use two-tones: a tonally darker/ lighter for the “Gs” to make the pattern pop.
- Add a simple woven stripe at intervals for modern contrast.
Finishing & care
- If using wool, hand-wash and dry flat. For acrylic blends, gentle machine wash may be OK.
3. Crochet Textures Squared Blanket Pattern
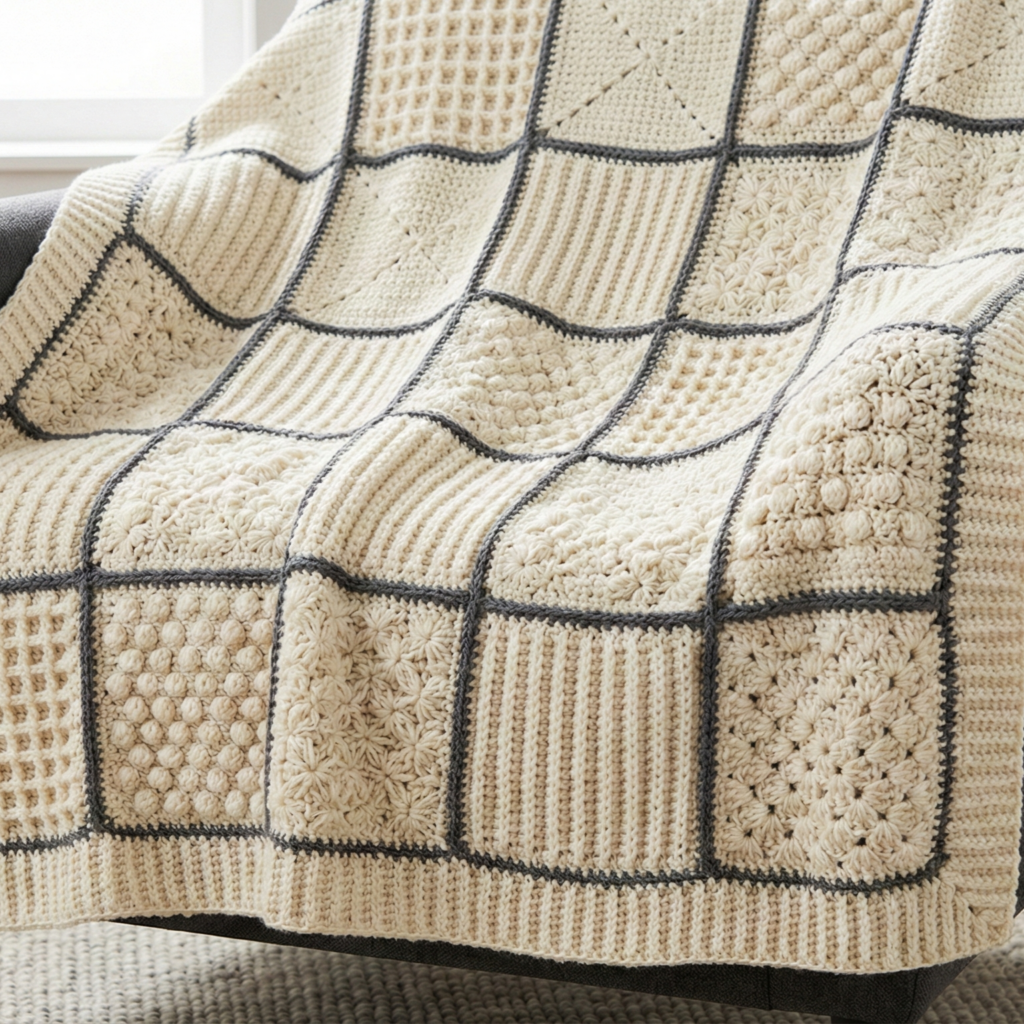
A cozy blanket built of textured squares — each square uses a different tactile stitch (waffle, bobble, shell, cable-mimic) and is joined into a modern patchwork.
Skill level: intermediate
Finished size (throw): make 16 squares (4×4 grid) of 12″ squares → 48″ × 48″; to reach 50×60 make 4×5 grid or increase square size to 13″.
Materials
- Worsted weight yarn; choose a single color for texture emphasis or multiple coordinating tones (approx 1,500–2,000 yd for throw depending on size).
- Hook: 5.0 mm
- Tapestry needle, blocking mats for each square
Square stitch ideas (each square ~12″)
- Waffle stitch square (fpdc/bpdc textured)
- Bobble square (bobble clusters)
- Baker’s rib (fpdc rows creating ribbed look)
- Star stitch square (small star clusters)
- Textured shell square (small shell clusters worked tightly)
Construction — make individual squares and join
A. Make squares
- Work each square pattern in the same hook and yarn so they all finish the same size (block if needed). For a 12″ square, swatch count might be 20 sts across and 20 rows depending on yarn. Each square pattern’s repeat must be adjusted to match the required width (use turning chains and add or skip repeats as needed).
B. Block squares
2. Block each square to exact 12″ size — pin and steam-spray if allowed by yarn.
C. Layout & join
3. Arrange squares into a pleasing grid (alternate textures so heavier bobble squares are between lighter patterned squares). Join with mattress stitch or join-as-you-go slip stitch for a flat seam. For a contemporary look, join in a contrasting yarn color.
D. Border
4. Add a 4–6 round border in a coordinating color: sc round for firmness, one round of crab stitch to finish. Or make a wide ribbed border by working hdc rounds to frame the blanket.
E. Finishing touches
- For warmth, add a sewn lining or a thin fleece backing (tack and topstitch through border).
- For a modern look, use neutral yarn and let texture do the talking; for a playful look use color-blocks for each square.
Tips
- Keep stitch tension consistent across squares.
- Use stitch markers to check row counts.
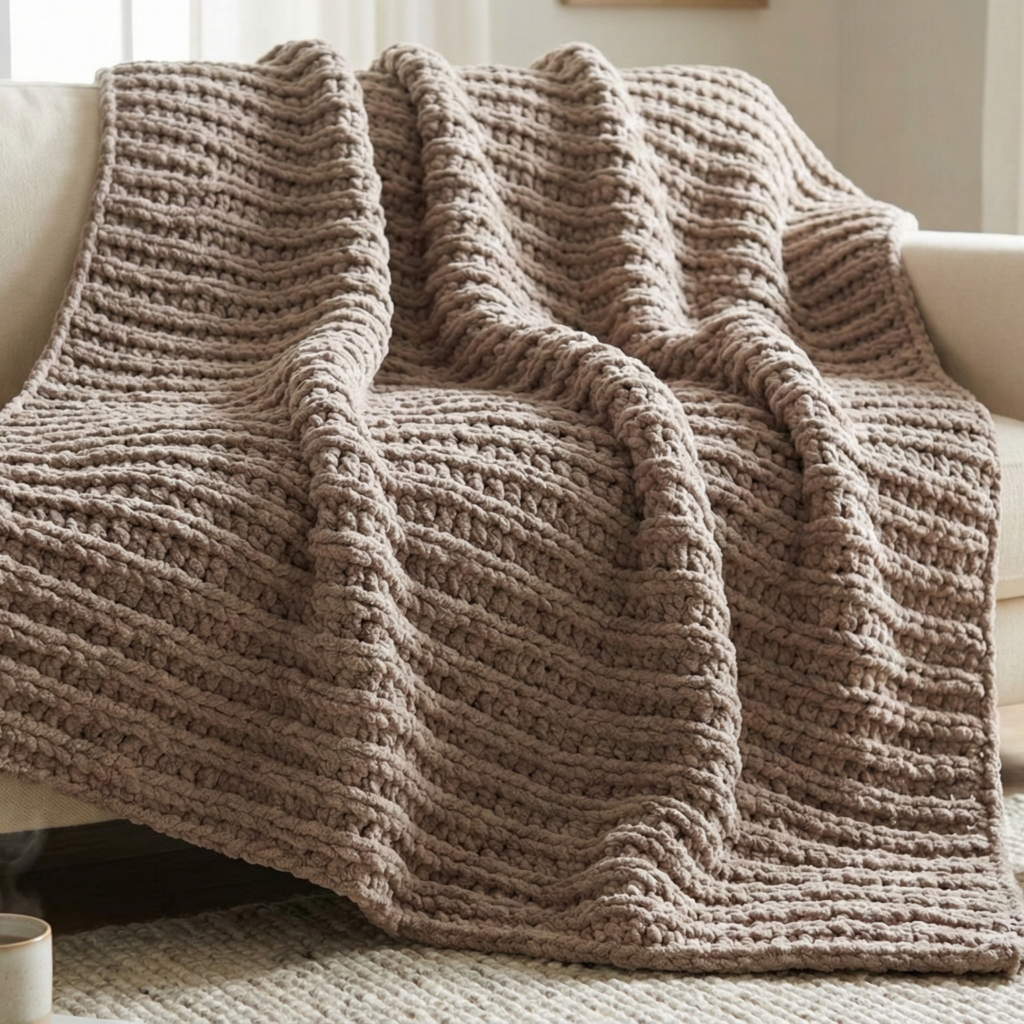
4. Crochet Two-Row Repeat Ribbed Blanket Pattern
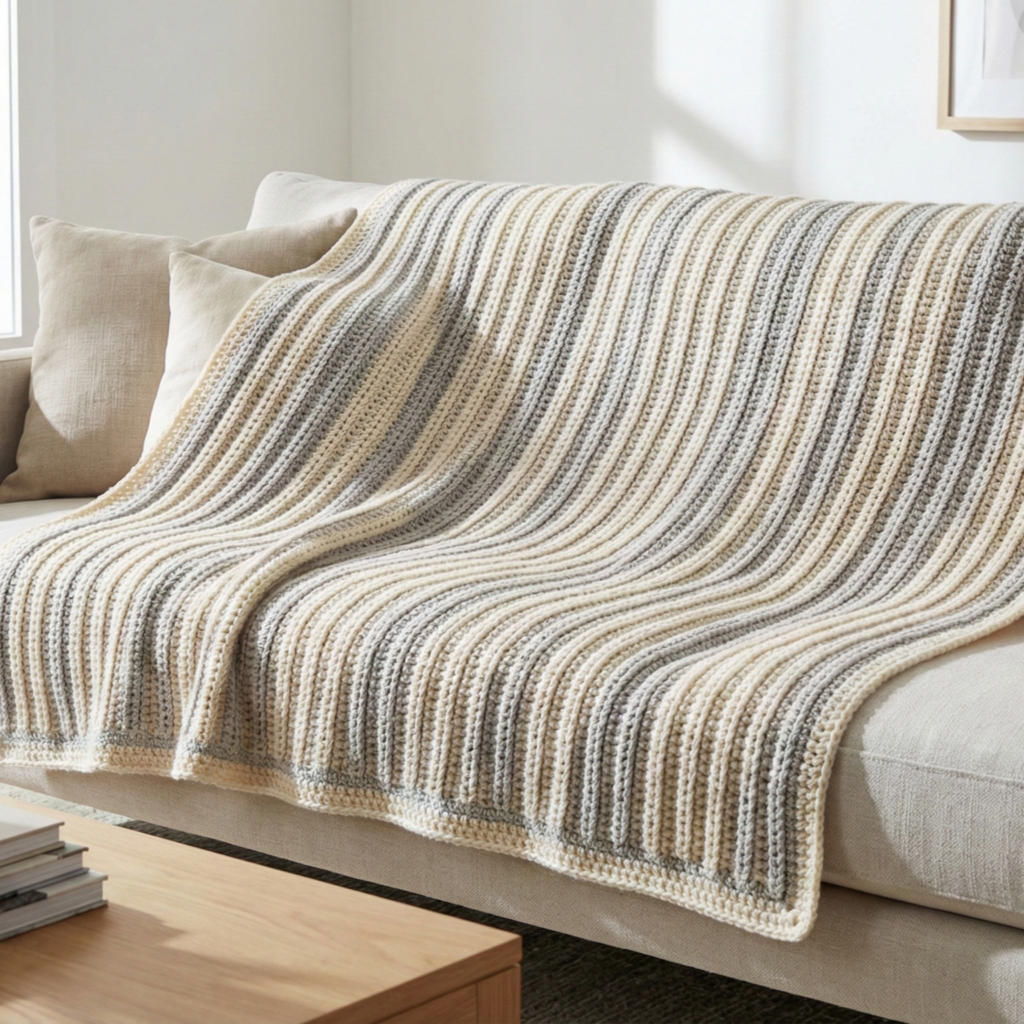
A sleek, contemporary blanket made with a two-row rib that looks knit-like — great for modern spaces and for people who prefer minimal geometry.
Skill level: confident beginner → intermediate
Finished size (throw): ~50″ × 60″ (repeat pattern until desired dimensions)
Materials
- Worsted or aran yarn (approx 1,200–1,500 yd)
- Hook: 5.5–6.5 mm (or slightly larger than label for drape)
- Tapestry needle
Stitch idea
- The two-row repeat uses alternating post stitches (fpdc/bpdc) to create vertical ribs that read like knitted ribs.
Construction — worked flat in rows
A. Foundation
- Chain foundation width in an even number of stitches to match desired width. For a 50″ width and gauge (e.g., 14 sts = 4″), compute: 14/4 = 3.5 sts per inch? Better to swatch. For instruction, chain foundation of the number that matches swatch × desired width.
B. Pattern (2-row repeat)
2. Row 1 (setup): hdc across in BLO to create a base. Turn.
3. Row 2 (rib row A): ch2, fpdc around next st, bpdc around next st repeat across. Turn.
4. Row 3 (rib row B): ch2, fpdc around the fpdc of previous row, bpdc around the bpdc — maintains ribs. Work Row 2 & Row 3 alternately. The finish is deeply ribbed and reversible.
C. Repeat & finish
5. Continue until blanket height ~60″. Add 3–4 rounds sc around for a neat edge or a 2-row moss stitch border to echo texture.
Variations
- Use color stripes every N rows for accent.
- Use two neutral shades alternating every 12 rows for a tonal rib effect.
Finishing & care
- This stitch produces a warm, dense fabric; little to no lining needed. Block lightly.
5. Crochet Valentine Striped Chunky Ribbed Blanket Pattern
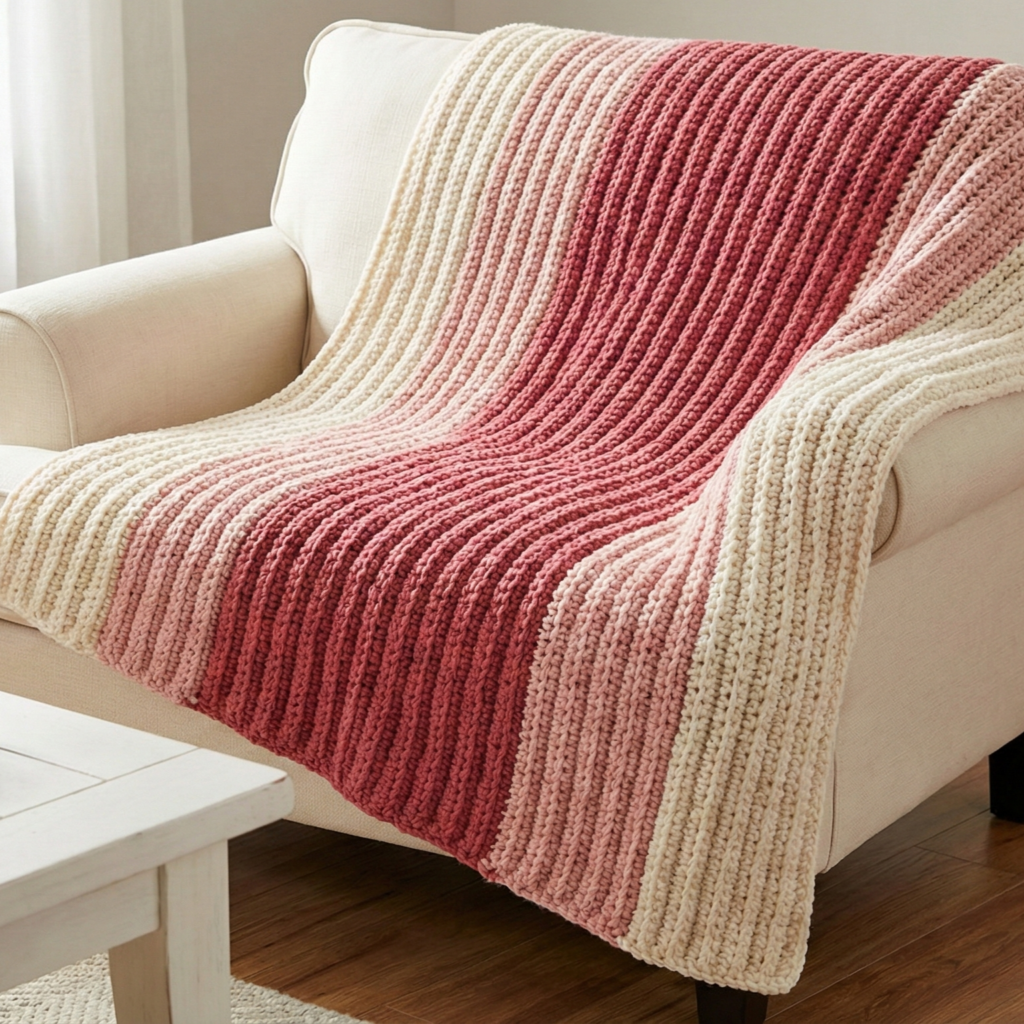
A romantic, modern throw that uses chunky yarn, ribbed texture and gentle Valentine stripes — great for gifting in February or as a pink-accented decor piece.
Skill level: beginner → confident beginner
Finished size: ~50″ × 60″
Materials
- Super bulky yarn in three colors: blush pink, cream, deep rose (approx 900–1,200 yd total)
- Hook: 10–12 mm
- Tapestry needle
Construction idea
- Worked in horizontal stripes; each stripe 6–10 rows; ribbed texture via BLO hdc or fpdc rows.
Step-by-step
A. Foundation & plan stripes
- Decide stripe order (e.g., blush 20 rows, cream 8 rows, rose 8 rows alternating). Chain foundation width per gauge to reach 50″. Example: if 3 sts/in with bulky yarn → 3 × 50 = 150 ch.
B. Base & rib
2. Row 1: hdc across in regular loops.
3. Row 2: ch2, hdc BLO across to create ribbed look. Continue repeating Row 2 until desired stripe height achieved, then change color.
C. Color joining
4. Join new color with a standing stitch or carry yarn up side if you prefer minimal ends. Keep tension even at color changes.
D. Striped repeat
5. Repeat stripe pattern until reaching length. For a modern Valentine style: make the center part deep-rose wide stripe as a focal point, then mirrored blush/cream stripes outward.
E. Edging
6. Finish with one round of sc in cream for a clean frame or a wider rib border in blush.
F. Finishing
7. Weave ends; for chunky yarn bury ends into fabric using large tapestry needle. Block lightly.
Styling & gifting
- Fold in a matching ribbon and include a note — perfect gift. Add small embroidered hearts on one corner if desired.
6. Crochet Dragonfly Stitch Blanket Pattern
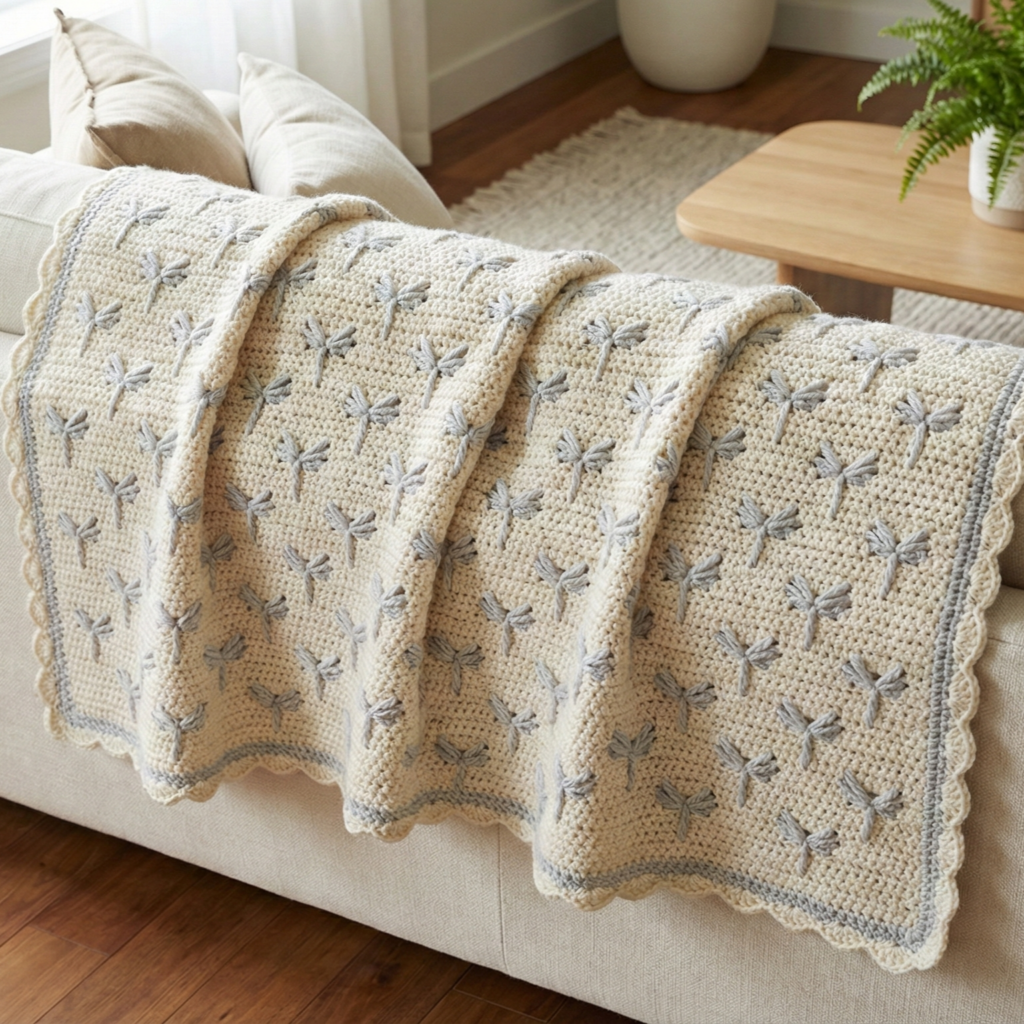
Dragonfly stitch gives a whimsical and modern texture — small V-shaped clusters that create a surface of tiny flying motifs. This pattern is a great stitch sampler blanket for living rooms and nurseries.
Skill level: intermediate (pattern counting)
Finished size: 50″ × 60″ (adjust by number of repeats)
Materials
- DK or worsted yarn (approx 1,200–1,500 yd)
- Hook: 4.5–5.5 mm
- Blocking supplies
Stitch — simplified dragonfly repeat
- The dragonfly stitch is typically a 6- or 8-stitch repeat that creates a little V-shaped motif with chains and clusters. We’ll use a simplified repeat that reads well at blanket scale.
Construction — repeat panel
A. Foundation
- Chain a multiple of 6 + 2. For example, to get 50″ width at gauge X, compute as earlier, then adjust to nearest multiple of 6 + 2.
B. Pattern rows (example)
2. Row 1: sc across to set base.
3. Row 2: ch4, sk 2, dc in next, ch2, dc in same st (dragonfly body), ch1, sk 2, sc in next repeat across.
4. Row 3: Work into chain spaces to form little wings: in each ch4 space work sc, hdc, 3 dc, hdc, sc — this forms small petal/wings.
5. Row 4: Repeat Row 2 offsetting if needed so wings sit between bodies. Continue alternating Rows 2–3 as main body until desired length.
C. Border
6. Work one round sc and a final shell round for a soft frame: sc, ch3, sl st in first ch every few stitches for scalloped edge.
Blocking
- Wet-block to open wings and give crisp dragonfly shapes.
Variations
- Use variegated yarn for a subtle color change that emphasizes the pattern without manual color changes.
- Make a baby-sized Dragonfly blanket by reducing repeat count and length.
7. Crochet Red Chunky Chenille Little Hearts Blanket Pattern
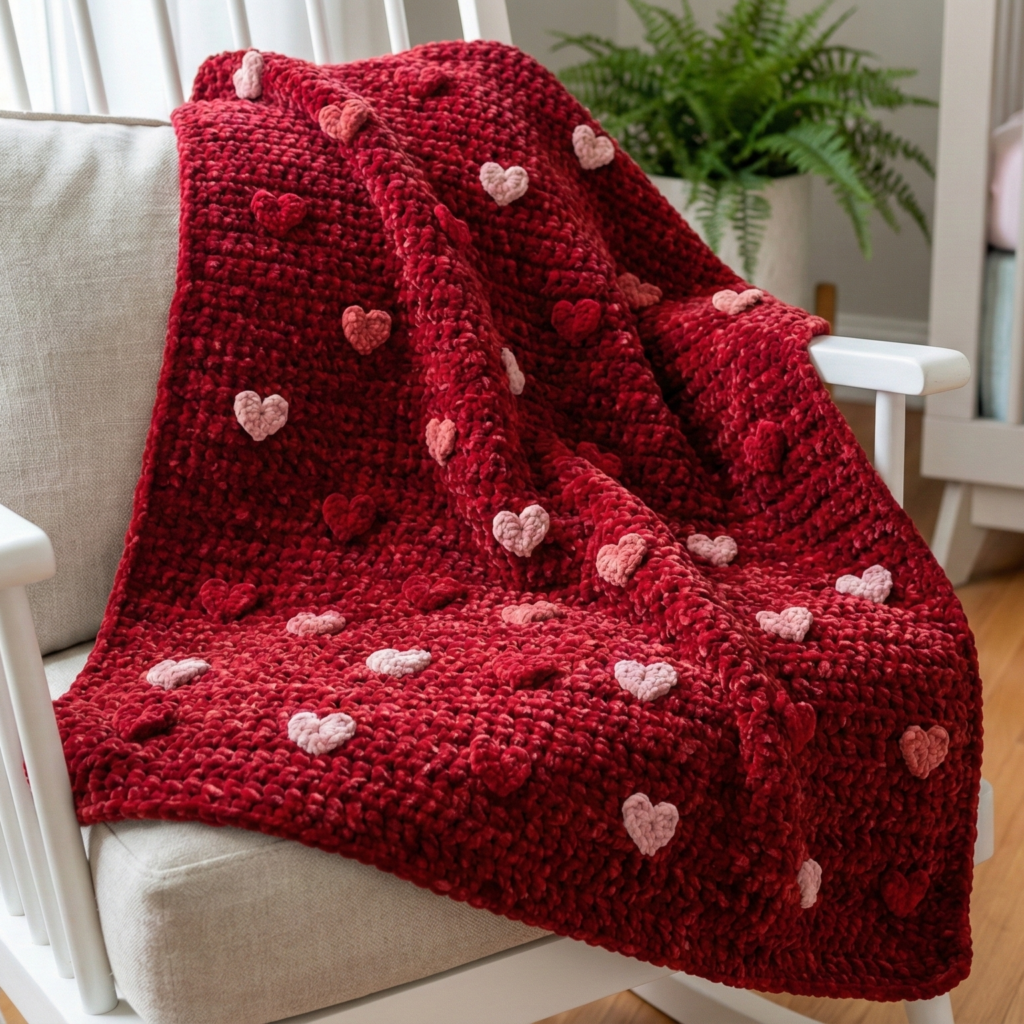
Ultra-soft chenille blanket with tiny heart appliqués worked or sewn on — irresistible for nursery or romantic decor.
Skill level: confident beginner → intermediate
Finished size: baby ~30″ × 36″; for throw scale up by adding more panels or increasing square size
Materials
- Chenille yarn (velvet) in deep red or blush (approx 600–1,000 yd depending on size)
- Contrasting thin yarn for little hearts (sport/ fingering) — small amount
- Hook: 10–12 mm for chenille body; smaller hook for hearts (2.5–3.5 mm)
- Tapestry needle (large, smooth eye), blocking not recommended for chenille (gentle shaping only)
Construction idea
- Make a simple textured chenille ground (hdc or dc in rows) then add many tiny crocheted hearts sewn on.
Step-by-step
A. Chenille background
- Chain a width for baby blanket (e.g., 70 ch for 30″ width depending on gauge). Row 1: hdc in 3rd ch from hook and across. Continue hdc rows until blanket reaches 36″ length. Because chenille is plush, this fabric will be thick and dreamy.
B. Heart appliqués (make dozens depending on coverage)
2. Tiny heart pattern (worked in fingering):
- MR: ch1, 6 sc into MR, pull tight (6 sc). R2: (ch3, sl st in next) × 3 to make loops. R3: In each loop (sc, hdc, 3 dc, hdc, sc) to make tiny petals — immediately shape into heart by folding and sewing the bottom together. These hearts should be small (~1″). Alternatively, a simpler heart: ch5, sc in 2nd ch, hdc, dc, hdc, sc; fold and seam to create heart shape. Make desired number (~40–80 hearts).
C. Placement & sewing
3. Lay out hearts across the blanket in a scattered or grid pattern. Pin with safety pins or use small stitches. Sew hearts to chenille with strong thread: pass needle through heart base and chenille backing many times to anchor. Avoid using hot glue on chenille.
D. Edge finishing
4. Work 2 rounds of sc in matching chenille at blanket edge to tidy. A final round in a contrasting cotton color creates a neat border but be mindful that chenille and cotton react differently to washing.
E. Care notes
- Chenille often needs gentle handling: hand wash or machine wash in mesh bag on gentle; avoid tumble heat; reshape and dry flat.
Styling
- A stunning baby shower gift or romantic throw for a pink-accented room.
Final finishing notes & pro tips (applies to all patterns)
- Weave in ends as you go — for large blankets this saves hours at the end. Use a tapestry needle and bury ends along stitch lines.
- Edge treatment — a 3–6 round sc border stabilizes and neatens. For lacy blankets choose a scallop or shell border; for chunky blankets a crab stitch gives a finished rope-look.
- Lining & backing — if you want a reversible look or a warmer throw, consider sewing a polar fleece backing or quilted cotton lining. This also stabilizes delicate lace blankets.
- Shrinkage & blocking — woolen blankets may shrink slightly on first wash; pre-wash a small swatch if you’re unsure. Block lace blankets to final measurements.
- Label & care card — include fiber content and care instructions if gifting or selling.
conclusion
These seven modern blanket patterns give you a range of styles: instant-gratification warmth with the 3-Hour Chunky Blanket, timeless elegance with Victoria’s Gs Rectangle, tactile interest with the Textures Squared patchwork, clean modern lines with the Two-Row Ribbed, seasonal charm in the Valentine Striped Chunky Ribbed, whimsical detail with the Dragonfly Stitch, and luxe snuggles with the Red Chunky Chenille Little Hearts.