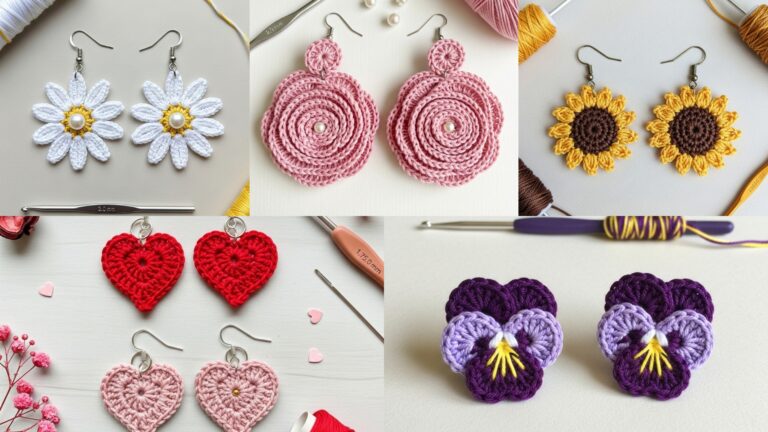
Earrings are one of the most rewarding small crochet projects: fast to make, great for using tiny scraps of yarn, and perfectly giftable. This post gives a full introduction (materials, hooks, findings, finishing and safety) followed by seven complete earring patterns with skill level, materials list, finished-size guidance, stitch notes, and step-by-step instructions you can follow exactly. Each pattern finishes into a wearable pair — lightweight, comfortable, and pretty.
Quick introduction — tools, yarn, findings, sizing, and care
Why crochet earrings?
They’re portable makes, tiny canvases for color and texture, and they’re easy to personalize. Because earrings sit close to the face, choose soft, hypoallergenic materials where possible and keep weight very low (light yarn, small beads).
Materials & tools (general)
- Yarn: Fingering, sport, or light DK cotton/bamboo blends are ideal. Cotton gives crisp stitch definition; bamboo/silk blends add soft sheen. Avoid bulky yarns — they create heavy earrings. Typical amount per pair: 2–10 yd of each color.
- Hook: 1.75–3.5 mm depending on yarn (finer hooks for fingering — 1.75–2.5 mm; 2.5–3.5 mm for light DK). Use a hook that makes a neat, slightly firm fabric.
- Findings: hypoallergenic earring hooks (sterling silver, surgical steel, gold-filled), jump rings, small eye pins or head pins if adding beads. For dangles, use small leverbacks for security.
- Notions: sharp scissors, tapestry/embroidery needle for weaving ends, small round-nose pliers for jewelry hardware, blocking pins & surface for shaping, tiny beads/seed beads (optional), thin lightweight glue (clear fabric glue) if you attach metal backs.
- Backing reinforcement: if you want to add weightless durability, a tiny felt circle glued to the wrong side protects threads and keeps posts from snagging. For pierced-ear posts (studs) you can glue a small felt or leather disc on the back and stitch through it to hold a post stud.
Sizing & weight
- Most lightweight crochet earrings measure 1–2.5 in (2.5–6 cm) from hook to bottom. Keep them under ~6–7 g per earring for comfort. Test with a kitchen scale if you want precision.
- For larger statement shapes, use open lacy stitches to minimize yarn weight.
Safety & comfort
- Use hypoallergenic metal for hooks if the wearer has sensitive ears.
- Avoid long dangling heavy beads — water from face washing or sweat can weigh them down.
- Always sand any rough hardware edges and test glued attachments for security.
Finishing & care
- Weave ends neatly and trim close. For cotton pieces, lightly wet-block to set shape and dry flat on pins. If you used metal studs glued to fabric, avoid machine washing; spot clean. For fully yarn + metal earrings, hand-wash gently and reshape.
1. Crochet Butterfly Earrings Pattern
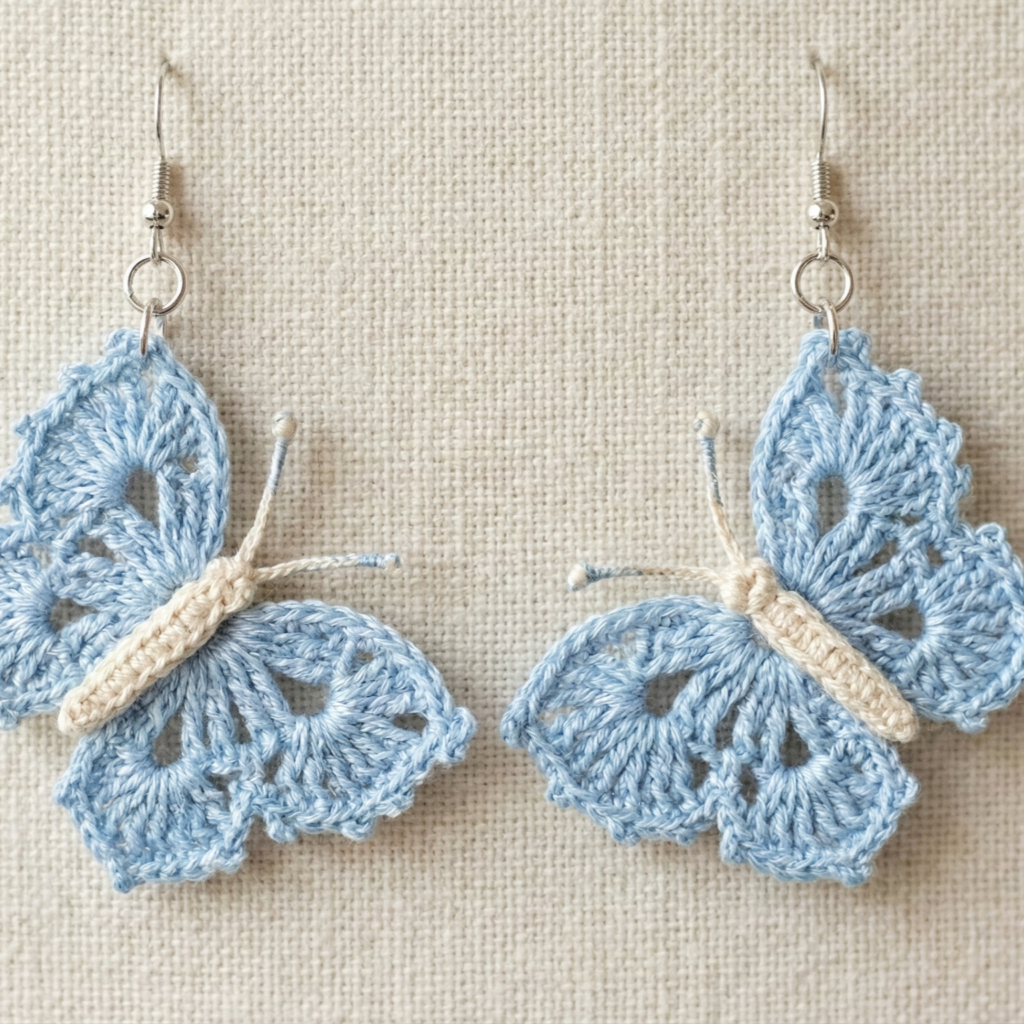
Delicate little butterflies that flutter at the ear — lacy, lightweight and endlessly giftable.
Skill level: intermediate (small shaping + picots)
Materials (per pair)
- Fingering-weight cotton in two colors (A for body, B for wings) — ~6–8 yd each.
- Hook: 2.25 mm.
- 2 small jump rings, 2 earring hooks.
- Tapestry needle, blocking pins.
Finished size: ~1.5 in (4 cm) wide × 1.25 in (3 cm) tall.
Stitch notes (abbreviations US)
- ch, sc, hdc, dc, tr, picot (ch3, sl st into first ch), sl st.
Step-by-step (make 2 butterflies)
Wing halves (make 4 — two left/right per butterfly)
- With color B, ch 8. Row 1: sc in 2nd ch from hook, sc across (7 sc). Turn.
- R2: ch 1, sc in first 2 sts, hdc in next 2 sts, dc in next 2 sts, sc in last st. Turn.
- R3: ch 3, dc in next 2 sts, hdc in next, sc in next — shape tapers; fasten off leaving long tail for joining. Make mirror image for the opposite wing by either reversing starting chain or crocheting matching wing and flipping orientation.
Body (make 2 small tubes for each butterfly)
4. With color A, MR, ch 1, 6 sc in MR, sl st to join to make a small round — this will be the center knot. Work 2 rounds even if you want a thicker center. Fasten off leaving long tail.
Assembly
5. Arrange two wings opposite each other with two smaller wings on bottom (if preferred). Use the long tails to sew the wing bases together across the center, wrapping and stitching through the small tube (body) so the wings sit flush. Pull tight to cinch center; weave tail inside.
Antennae (optional)
6. With A, ch 6 and thread through the top center; tie a small knot at ends or make a tiny picot at each end to act as tips; trim leaving tiny tails tucked inside body.
Finishing & blocking
7. Lightly spray-block the butterflies onto a foam pad to open wing curves; pin and dry. Attach jump ring through the center of the body ring and then attach earring hook.
Variations
- Add tiny seed beads along wing edges by pre-stringing beads onto yarn and working them into the dc row for sparkle.
- Make a pair with different color wings for playful mismatched sets.
2. Crochet Lacy Heart Motif Earrings Pattern
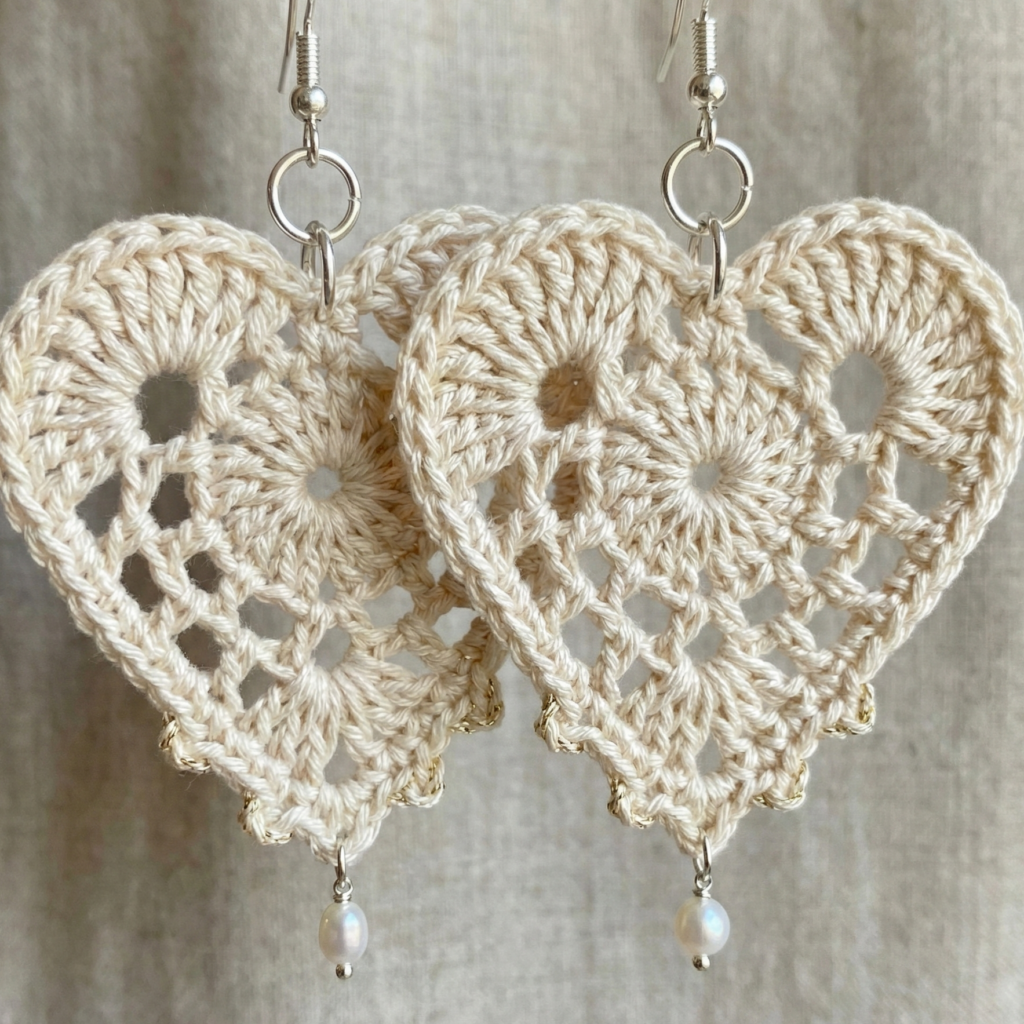
Romantic and lacy hearts that work as both everyday and special-occasion earrings.
Skill level: confident beginner → intermediate
Materials (per pair)
- Sport or fingering cotton ~6–10 yd per color.
- Hook: 2.5–3.0 mm.
- 2 jump rings, 2 earring hooks.
- Blocking surface and small pins.
Finished size: ~1.25–1.75 in tall.
Stitch notes
- Uses chains, dc clusters and picot edging for lace.
Step-by-step (make 2 hearts)
Heart motif (worked flat)
- MR, ch 2, (3 dc, ch 2, 3 dc) in ring — first lobe. Sl st into ring to anchor. Repeat a second lobe right next to it with sl sts so ring has two lobes. After two lobes, sl st to space and work a third small lobe if you want a fuller heart top. Tighten center.
- R2: Join and work lace bridging rounds: ch 3 (counts dc), ch 3, sl st into the base to create airy arches across the top to make a scallop shape; on the side points work short chains to start forming the heart point.
- R3: Work around arcs placing dc clusters into chain spaces to produce a delicate net. Add a picot on the outermost tip for a decorative point.
Alternative simpler heart (compact):
- Ch 8, 3 dc in 2nd ch from hook, 3 dc in next, 2 dc in next, sc next, ch 3, sl st to form heart outline — sew base neatly.
Finish & attach
4. Block hearts flat on foam to open lace. Sew a small jump ring through the top center of the heart (or into a tiny picot loop you left for attachment). Add earring hook. Weave ends.
Variations
- For subtle shimmer, work the picot edge in metallic thread held with cotton — one round only so weight stays low.
- Attach a tiny freshwater pearl on a short head-pin and dangle it beneath the heart for bridal-ready earrings.
3. Crochet Beautiful Shamrock Earrings Pattern
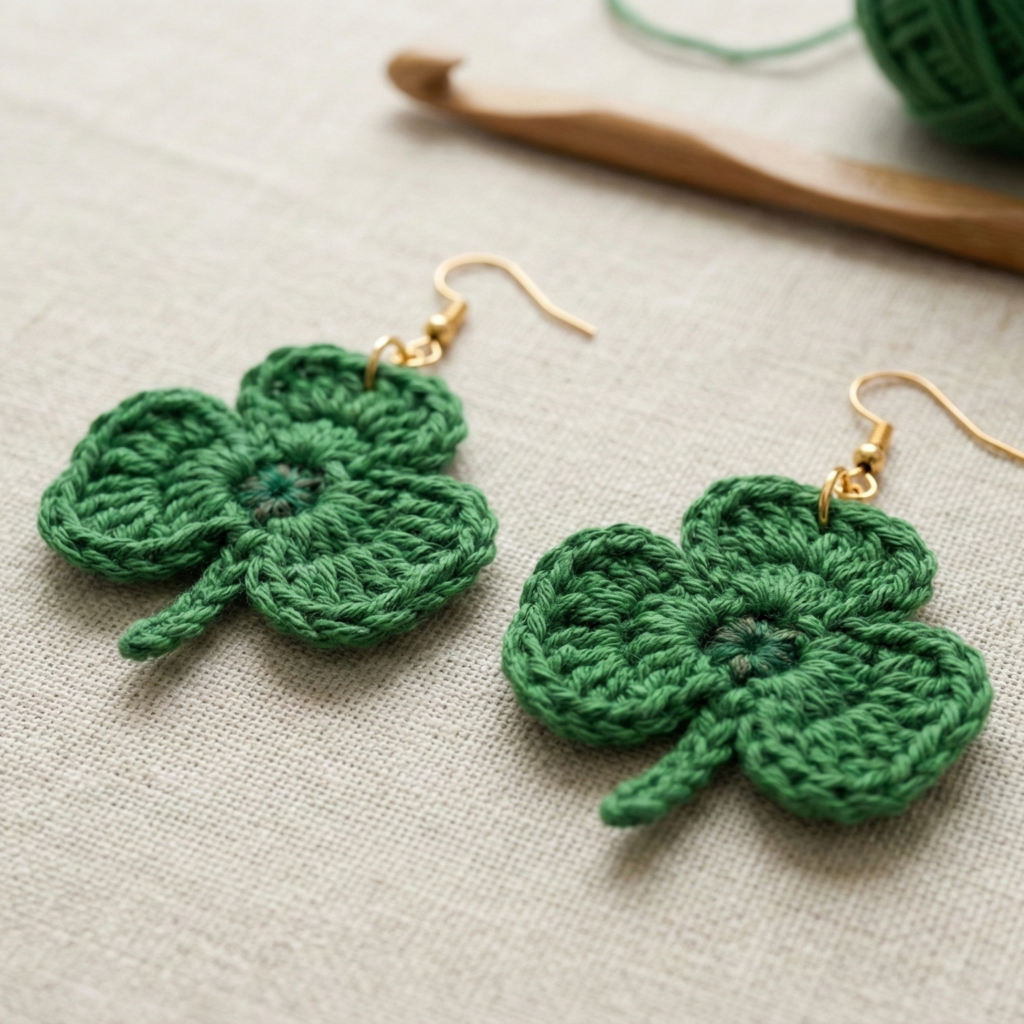
Tiny three-lobed shamrocks made from clustered petals — cute, lightweight, and symbolic.
Skill level: confident beginner
Materials (per pair)
- Fingering cotton green ~6–8 yd; optional light green for stem.
- Hook: 2.25–2.75 mm.
- 2 jump rings, 2 hooks.
- Small beads for center accent optional.
Finished size: about 1–1.25 in across — compact and light.
Stitch notes
- Each shamrock leaf is a small shell (5 dc cluster) worked around a center.
Step-by-step (make 2 shamrocks)
Single shamrock (make 2)
- MR, ch 1. Round: ch 2, (5 dc) in ring, ch 2, sl st — repeat 3 times leaving small spaces between shells. Pull ring tight so shells form three rounded petals.
- Make a tiny stem: from base, ch 6, sl st back to base or fasten off and sew small stitched tail to look like stem. Optionally embroider vein lines on each petal with running stitches using slightly darker green floss.
- Add a small bead at center: either sew through the MR center to secure bead (tiny seed bead) or embroider a French knot.
Finish & attach
4. Block lightly to puff petals. Insert small jump ring into top loop formed by one shell or into center ring if there’s tail to accept ring. Add earring hook.
Variations
- Make a cluster earring (two shamrocks per earring) for bold look; keep them small to avoid weight.
- Use variegated green for a mossy effect.
4. Crochet Peppermint Candy Earrings Pattern
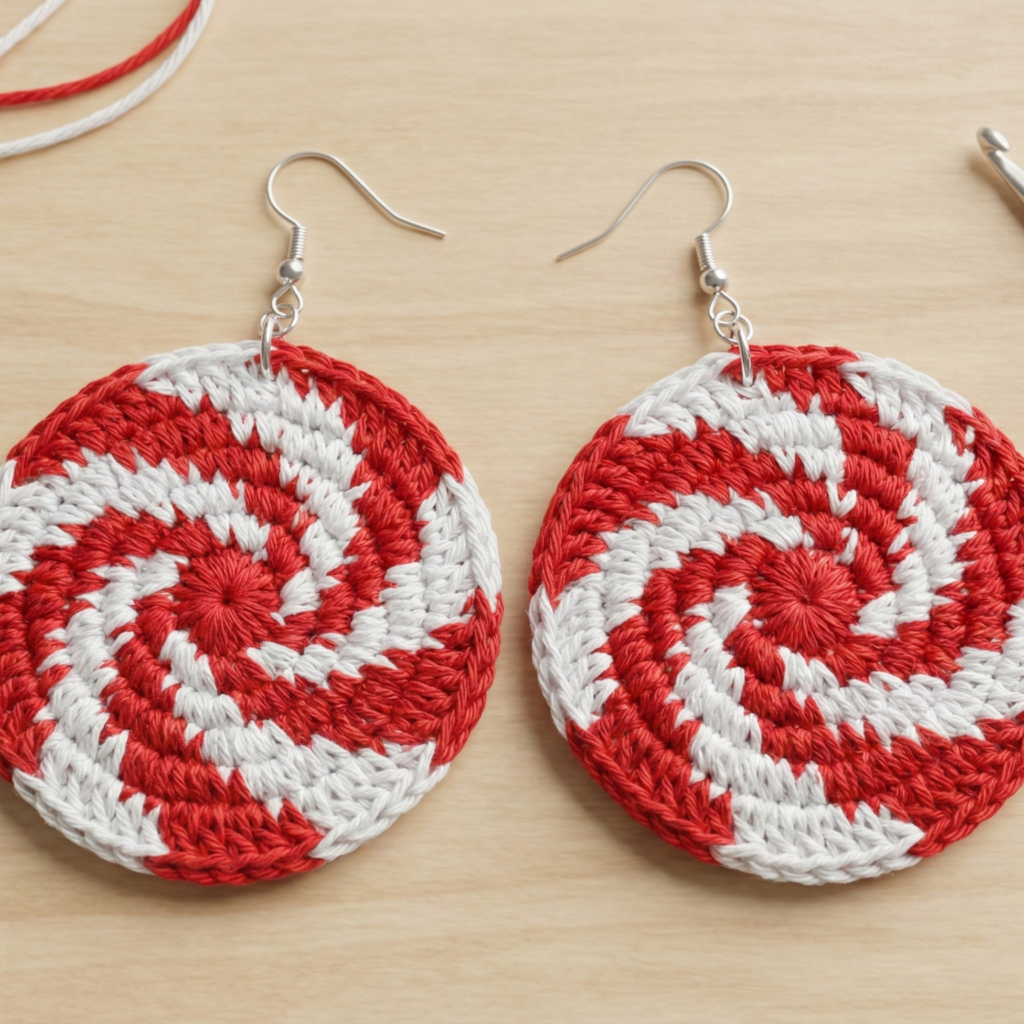
Graphic, round coasters-mini — striped swirl earrings that are surprisingly light and modern.
Skill level: confident beginner
Materials (per pair)
- Fingering or sport cotton in two contrasting colors (white and colored) ~8–12 yd each.
- Hook: 2.5–3.0 mm.
- 2 jump rings, 2 hooks.
Finished size: 1.5–2 in diameter.
Stitch notes
- Worked in flat rounds with quick color changes creating spirals or pinwheel look.
Step-by-step (make 2 candy discs)
Base swirl
- MR, ch 1, 6 sc in MR with color A (e.g., mint). (6)
- R2: join color B (white) and sc 2 in each st around (12). R3: switch back to color A and work sc 1, inc around → 18. Continue alternating colors each round, making increases evenly so disc stays flat. To create the classic spiral stripe, change colors every 2–3 stitches rather than full rounds: finish the stitch with the new color (last yarn over pulls through new color) for seamless color changes.
Edge & cleanup
3. When disc reaches ~1.75 in, work 1 round sc in one color to tidy. Fasten off and weave ends to wrong side.
Attach & finish
4. Add tiny bead at center for shine or leave plain for minimal look. Sew jump ring into topmost st and attach hook.
Variations
- Use three colors for tri-color swirl (red/white/green for holiday theme).
- Make them slightly larger for pendants on thin chains.
5. Crochet Granny Square Earrings Pattern
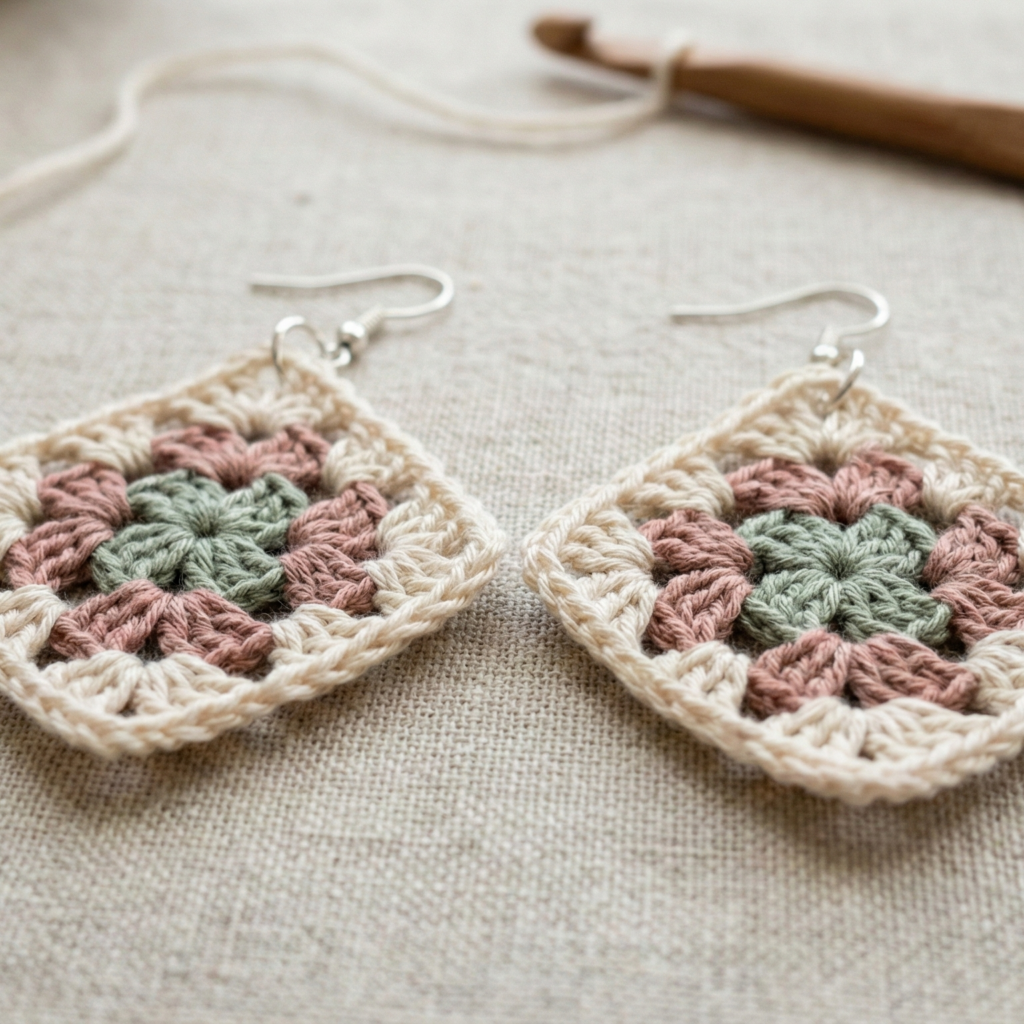
Mini granny squares for classic, retro vibes — lightweight and stackable.
Skill level: confident beginner
Materials (per pair)
- Sport or fingering cotton in 3 colors ~6–10 yd total.
- Hook: 2.5–3.0 mm.
- 2 small jump rings, 2 hooks.
Finished size: ~1.0–1.25 in square.
Stitch notes
- Tiny granny squares worked in rounds, joined to a small tassel or border.
Step-by-step (make 4 small squares — 2 per earring)
Mini granny square
- MR, ch 3 (counts as first dc), 2 dc in ring, ch 2 — this forms first corner. Repeat 3 dc, ch 2 three times to have 4 clusters. Sl st to top of starting ch 3. (This is a 1-round micro granny.) Fasten off, weave ends.
Make two squares per earring
2. For a layered look, make a second slightly larger round in contrasting color: join color 2 in a ch-2 corner, work (3 dc, ch 2, 3 dc) in corner spaces and ch 1, 3 dc along sides as needed so the square grows to ~1.25 in. Fasten off.
Assembly
3. Option A: Stack two squares (smaller on top) and sew at center. Attach jump ring to top corner chain-2 space; add hook. Option B: hang one square, and below it a tiny tassel or bead using a head-pin for movement.
Finish & blocking
4. Lightly steam-block tiny squares on a foam pad to square up. Attach findings.
Variations
- Use metallic thread in the outer round for subtle shimmer.
- Make micro fringe from leftover yarn for bohemian look.
6. Crochet Sunburst Earrings Pattern
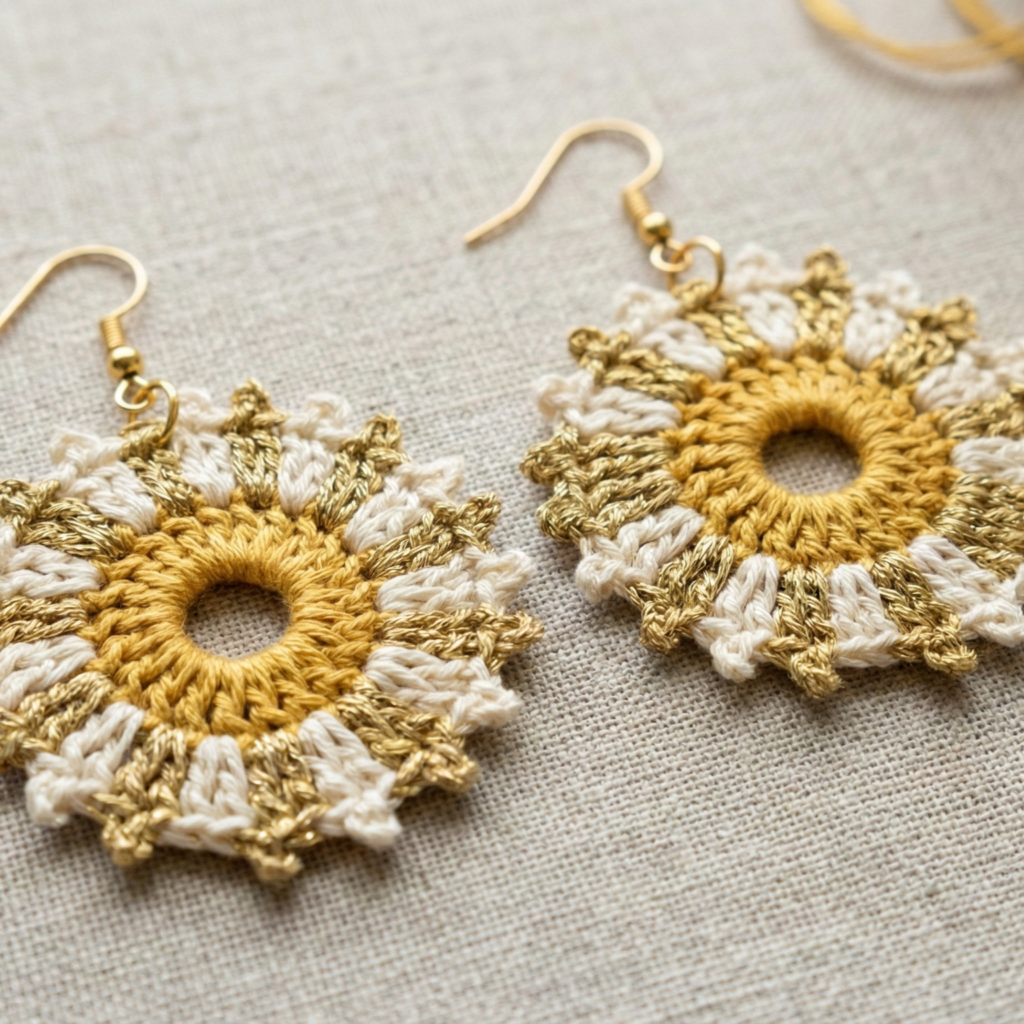
Radiant round medallions with a sunburst of stitches — bold but still lightweight if made with thin yarn.
Skill level: intermediate (combination of stitches and picots)
Materials (per pair)
- Fingering cotton in 2 colors ~8–12 yd each.
- Hook: 2.25–2.75 mm.
- 2 jump rings, 2 hooks.
Finished size: ~1.5–2 in diameter.
Stitch notes
- Central ring, followed by alternating rounds of dc clusters and picot edging for rays.
Step-by-step (make 2 sunbursts)
Center
- MR, ch 1, 8 sc in ring; sl st to join. (8 sc)
Sunrays
2. Join color B: ch 3, (3 dc in same st), ch 3, sl st in next st — repeat around to create petal-like rays. Space rays by working through every other sc. This yields a flared sunburst.
Ray detail & picot edge
3. Round: ch 1, sc across, in each chain-loop (ch3) work a picot or a small 3-dc shell to give spike. Work one last round sc to tidy edge.
Attach findings
4. Block flat, sew a tiny jump ring through the top picot area, and attach earring hook.
Variations
- Use a metallic thread held together with cotton to give subtle glow without extra weight.
- Add a small faceted bead at center with a short head-pin drop.
7. Crochet Tri-Color Earrings Pattern

A modern vertical strip earring using three stacked color panels — graphic and very giftable.
Skill level: confident beginner
Materials (per pair)
- Fingering or sport cotton in three contrast colors ~8–12 yd total.
- Hook: 2.5–3.0 mm.
- 2 small jump rings, 2 hooks, small head-pins if you want beads between panels.
Finished size: stacked panels total ~1.75–2.5 in long.
Stitch notes
- Work three tiny rectangle/oval panels, join vertically with slip-stitch or sew, and attach a single top jump ring.
Step-by-step (make 2 sets of 3 panels)
Panel (make 6 total)
- Ch 6. R1: sc in 2nd ch from hook and across (5 sc). Turn.
- R2–R6: ch 1, sc across for 5 rounds (this makes a small rectangle about 0.5–0.75 in tall). Fasten off leaving tail.
Assemble vertical stack
3. Stack three panels in chosen color order. Use tapestry needle and yarn tail to whipstitch small invisible joins between panels at backs so the front shows uninterrupted color blocks. Alternatively join panels with a short chain loop and sl st to keep tiny gaps for movement.
Add bead separators (optional)
4. Between panels slide a tiny bead onto a head-pin and thread through joining point before sewing — adds elegant spacing and slight swing.
Attach finding
5. At top of topmost panel, secure a small jump ring through the top-most chain loop or a tiny picot you left for this purpose; attach hook.
Finishing
6. Block stacked earrings on a foam pad to even edges; trim tails.
Variations
- Make ombré stacks or bold color-block combinations.
- For a longer statement, increase panel height slightly (add more rows) while keeping width narrow.
Final finishing & packaging tips
- Blocking: always block lace and motif earrings on a small foam pad with pins to set shape; use a tiny amount of water or spray and let dry overnight.
- Securing findings: when using glue to attach studs, use very small amounts of clear fabric glue and clamp until dry; sewing through a felt backing is often more secure.
- Weaving ends: bury tails into stitches and trim flush with no knots left on the front side.
- Test wear: put the pair on for a few minutes to ensure balance and comfort; adjust length or remove heavy beads.
- Gift presentation: package on a small card with hole punch for the hooks, or tuck into kraft boxes with tissue for a handmade-gift look.
conclusion
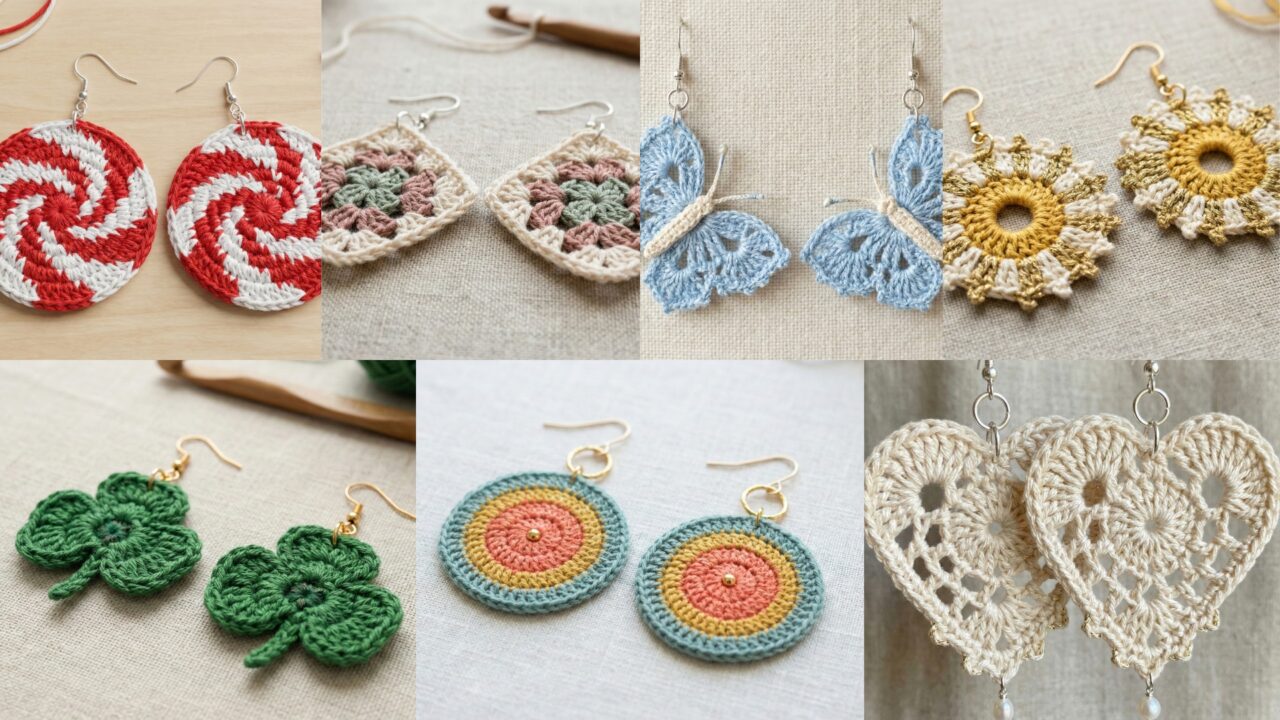
These seven crochet earring patterns cover a wide range of styles — from delicate lace hearts and sunbursts to playful donuts and peppermint swirls — and they’re all designed to be lightweight, wearable, and quick to make. Use fingering or sport cotton, fine hooks, and hypoallergenic findings to keep ear comfort top priority. Make sets in coordinating colors, mix-and-match motifs for quirky gift packs, or create seasonal variations (holiday reds and greens, spring pastels). The step-by-step instructions here will get you from yarn to finished pair with minimal fuss and maximum charm.
Happy crocheting — pick a pattern, make a swatch, block neatly, and you’ll have a polished pair ready to gift in an afternoon.