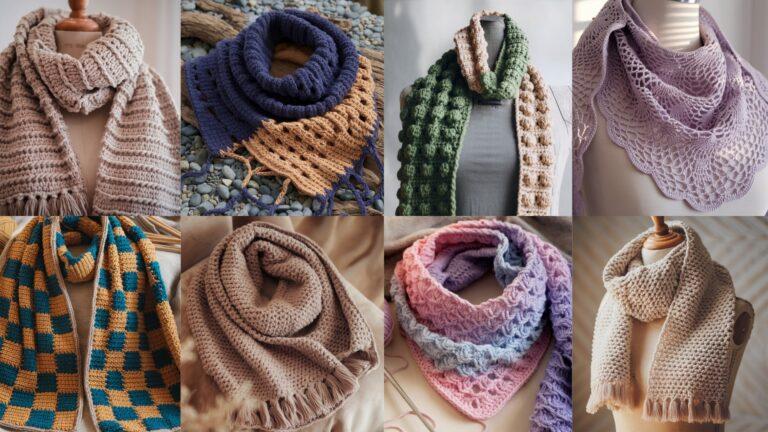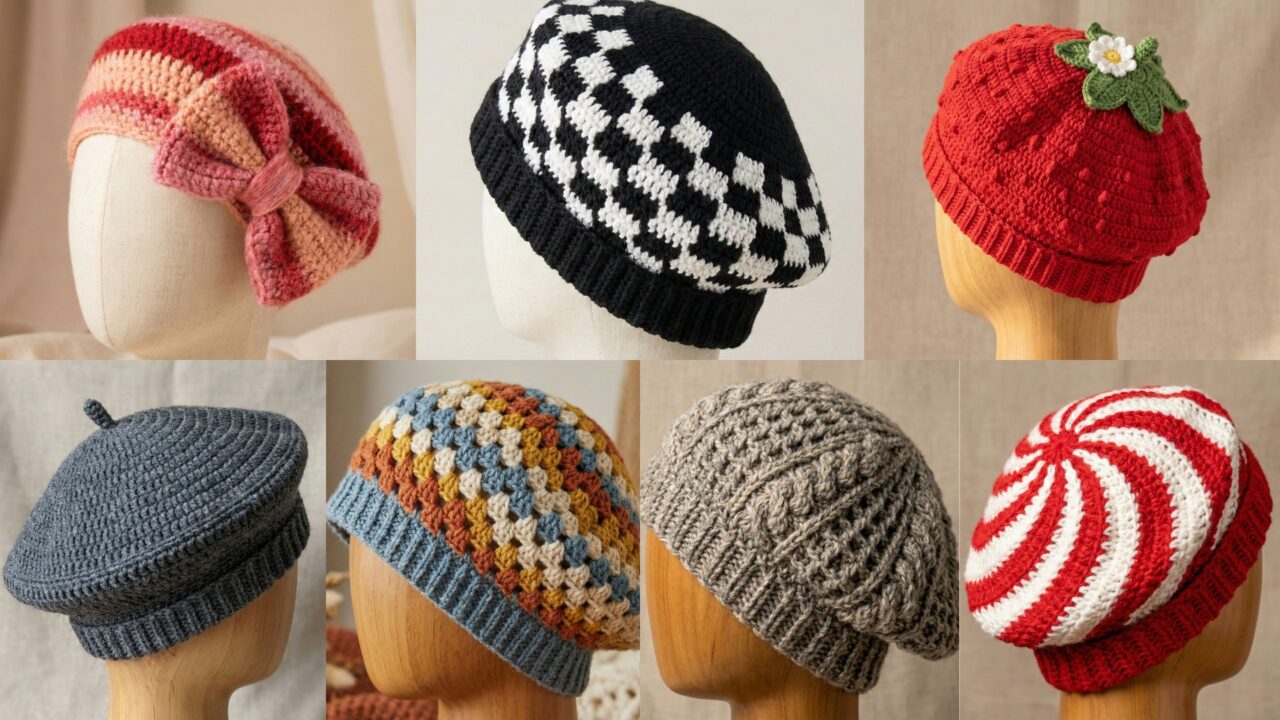
Berets are a timeless accessory — chic, easy to style, and quick to make. They also show off stitch texture beautifully: a smooth French beret, a slouchy granny beret, a playful bow-topped beret, or a festive peppermint swirl. Below you’ll find a full blog-ready post with a practical introduction (tools, sizing, gauge and common abbreviations), followed by seven long, detailed beret patterns. Each pattern includes skill level, materials and yardage, sample finished measurements, stitch notes, a step-by-step construction guide (a tested, practical method you can follow right away), fitting/grading tips, finishing ideas, and care instructions. Tone is friendly, clear, and human — written so readers can follow the pattern and tweak to their style and size.
Quick essentials — tools, yarn, sizing, gauge & abbreviations
Tools & notions
- Crochet hooks: most berets use 3.5–6.5 mm hooks depending on yarn weight. I’ll list a suggested hook per pattern.
- Yarn: popular choices are DK / light worsted (Category 3) for a delicate beret or worsted / aran (Category 4) for a chunkier cozy. Natural fibers (wool, wool blends, alpaca blends) give great drape; cotton is fine but makes a firmer beret. For a classic drape use a yarn with some halo (wool mohair blend) or a smooth wool for crisp stitches.
- Notions: tapestry needle, stitch markers, measuring tape, small elastic (optional for band), blocking tools (pins + mat), small decorative items (bow, button, appliqué).
- Optional: lining fabric (for warmth/structure), hair clip or snap (to secure bow), lightweight interfacing.
Sizing & finished measurements
- Beret geometry is simple: a crown (flat circle) + skirt (the sloping portion) + band (fitted headband). Target finished circumference for adult head: 22–23.5 in (56–60 cm) for women/average; shorter for small heads. Beret sits slightly loose: crown diameter typically 9–11 in (23–28 cm) depending on style. Length from band to crown center (depth) often 7–9 in for classic slouch, less for shallow beret. I provide a Medium example; grading notes included.
Gauge & swatching
- Make a 4 in (10 cm) swatch in the main stitch after blocking. Record stitches per inch (spi) and rows/rounds per inch. Use your swatch to calculate how many stitches to make for the crown initial circle and how many rounds to get the right diameter. If you want a looser drape, use a larger hook or lighter yarn; for more structure, use a smaller hook.
Basic construction overview (common to these berets)
- Crown circle: typically worked flat in rounds with increases (start with MR or small ring and increase evenly to make a flat disc). Count increases to reach target crown diameter.
- Skirt / sloping section: stop increasing and work even rounds, or use gentle decreases to create curve, sometimes using post stitches for texture.
- Band: worked in firm stitches (hdc or sc) or ribbing (BLO or post stitches) to fit the head; optionally make a folded casing for elastic.
- Finishing: block to shape (very important for classic beret look), weave ends, attach any embellishments.
Common abbreviations (US)
- ch = chain
- sl st = slip stitch
- sc = single crochet
- hdc = half double crochet
- dc = double crochet
- tr = treble crochet
- st(s) = stitch(es)
- sp = space
- inc = increase (work 2 sts in same st)
- dec = decrease (work 2 sts together)
- BLO / FLO = back loop only / front loop only
- RS / WS = right side / wrong side
- MR = magic ring
- rep = repeat
1. Crochet Fruity Big Bow Beret Hat Pattern
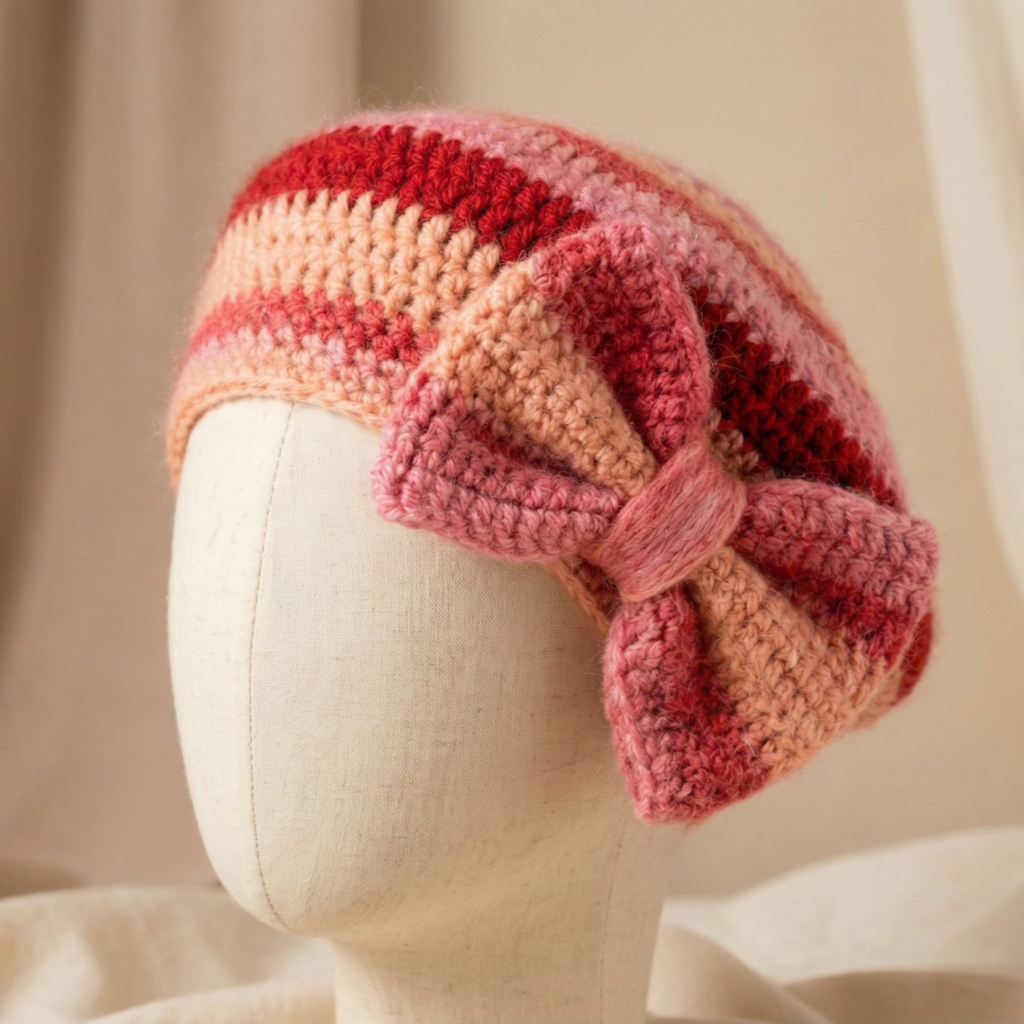
A playful, fashion-forward beret with a large bow (detachable if you prefer). Great as a gift and perfect for adding a cheeky, feminine accent.
Skill level: confident beginner → intermediate
Materials (Medium)
- DK wool or wool blend — ~200–250 yd. (If you want a fluffy look, carry a mohair lace strand held with DK.)
- Hook: 4.0 mm (adjust to get a soft drape).
- Tapestry needle, stitch marker, small snap/clip for bow attachment (optional).
Sample finished measurements (Medium)
- Crown diameter (flat): ~10 in (25 cm)
- Band circumference (unstretched): ~21.5 in (55 cm) — will stretch to ~23.5 in.
Stitch highlights
- Crown: worked in dc cluster rounds for a smooth, drapey disc.
- Skirt: expanded dc rounds with a few FLO rounds to create a slouch.
- Band: hdc in BLO to create foldable rib casing.
- Big bow: worked separately as a wide rectangle and cinched in center.
Construction — step-by-step
A. Swatch & compute
- Swatch in dc: e.g., 12 dc = 4 in → 3 dc/in. For a 10 in crown: goal ≈ 30 dc across diameter. For a flat disc using rounds, count increases rather than direct stitch math — the increase scheme below yields ~10 in on sample yarn and hook.
B. Make crown (flat disc)
- MR, ch 3 (counts as dc), work 11 dc into MR; sl st to top of ch 3. (12 dc total — Round 1)
- R2: ch 3, dc in same st, dc in next st, inc (2 dc in next) repeat around — pattern alternates to increase evenly. Join. (18 dc)
- R3: ch 3, dc in next 2 sts, inc repeat around. (24 dc)
- R4: ch 3, dc in next 3 sts, inc around. (30 dc)
- Continue increasing rounds in this pattern (i.e., add one more dc between increases each round) until flat disc measures ~5–6 in (center circle). At this point switch to smaller increases to maintain flatness — aim for overall crown diameter ~10 in when later sloping section is included.
C. Skirt / slouch section
6. After your last increase round, work 4–6 rounds of dc even (no increases) to start the sloping brim. For a softer drape, work one round in FLO dc (dc in front loop only) to slightly angle stitches and create a floppy edge. Work additional rounds until skirt depth (from underside of crown to edge) measures ~7–8 in depending on desired slouch.
D. Band (rib casing)
7. Switch to hdc: pick up around base edge; ch 1, hdc in each st around in BLO for 6 rounds to create a rib that can be folded. For a firm band, use smaller hook for these rounds. Measure to match underbust/head circumference; if making a casing for elastic, leave a small opening to insert elastic (elastic length = head measurement minus 1/2–1 in depending on snugness).
E. Big bow (separate piece)
8. Bow rectangle: ch 30 (or width ~10–12 in depending on desired bow size). Row 1: sc across. Row 2–8: ch 1, sc across — make about 6–8 rows to build a thick rectangle. Fasten off. Fold in half lengthwise and stitch ends to form a loop, or leave flat and cinch center with a narrow yarn wrap to form bow shape. Attach a small snap or clip to the back of bow so it can be detachable.
F. Finishing
9. Weave tails inside band; block beret on a flat round form (a large bowl or head-shaped block) to set shape: dampen lightly and pin into classic beret silhouette (center shallow curve, slight slouch). Let dry. Attach bow with snap.
Fit & grading notes
- For smaller heads, decrease crown increases earlier (stop increasing one or two rounds sooner) and shorten band rounds. For larger heads do one extra increase round at the crown and lengthen band accordingly. Always try on or measure before final band closure.
Styling & variations
- Bow can be made contrasting color; add a small faux-pearl at bow center for glam.
- Make the beret with a mohair strand held together for a fuzzy, romantic effect.
Care
- Follow yarn label — wool: hand wash cold, reshape flat to dry. If lined, handwash only.
2. Crochet Granny Slouchy Beret Hat Pattern
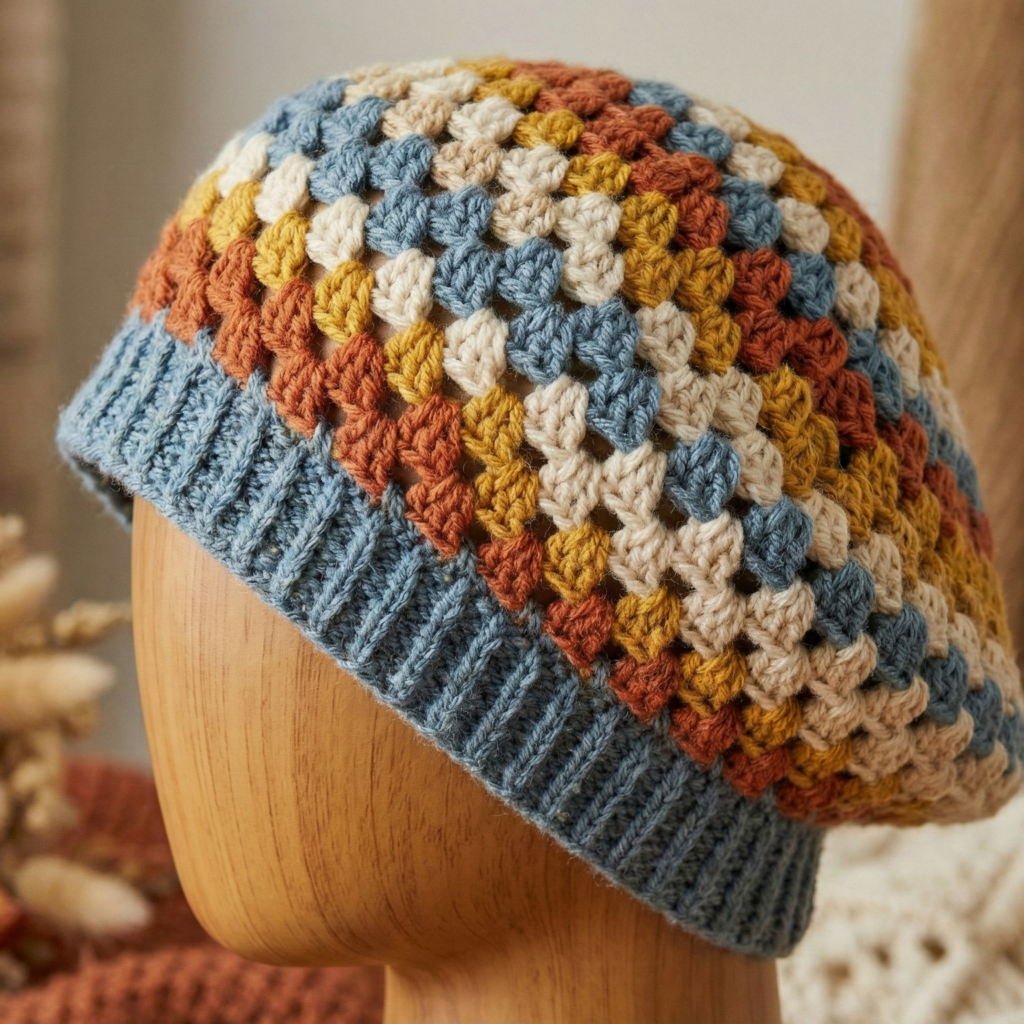
A relaxed, boho slouch built with granny-cluster texture — works beautifully with multi-colored yarn or scrap party palettes.
Skill level: confident beginner
Materials (Medium)
- Worsted weight cotton/wool blend ~220–300 yd.
- Hook: 5.0 mm (larger hook gives slouchy granny look).
- Tapestry needle, stitch marker.
Sample finished measurements (Medium)
- Crown diameter (flat): ~9.5 in
- Band circumference: 21.5–22.5 in unstretched
Stitch highlights
- Classic granny clusters: (3 dc cluster) forming rounds that shape into a granny-disc tailing into a slouch.
Construction — step-by-step
A. Crown (granny circle)
- MR, ch 3, (2 dc, ch 2, 3 dc) in MR (one corner cluster). ch 1 between corners? For a circular granny, use four corner clusters to create the square-to-round granny aesthetic, but for a round slouch we’ll use star-of-clusters method:
Alternate simple method:
- MR, ch 3, work 12 dc into MR, join (12).
- R2: ch 3, dc in next st, but to get granny texture convert to cluster pattern: work clusters in groups of 3 separated by ch 1 across Round 2: (3 dc in next st, ch 1) repeat around. Continue expanding clusters with increases spaced evenly to keep a flat disc until crown center measures ~5–6 in.
B. Transition & slouch
3. After desired disc diameter, begin working granny-cluster rounds without increasing for 3–6 rounds. This converts flat disc into a sloping crown/side. For deeper slouch, work additional rounds with slight increases spaced far apart (e.g., add one increase every other round) to preserve fullness.
C. Band
4. Work 4–6 rounds of hdc or sc in BLO to create a foldable band. Optionally work one round of sc then switch to BLO hdc to form a casing. If desired, insert a narrow elastic (optional) for extra hold.
D. Finishing
5. Weave ends, block lightly on flat form to open granny clusters and set slouch. If you like an oversize slouch, use a larger hook for the crown only (then make band smaller with a smaller hook for fit).
Fit & grading notes
- To size up, add extra increase rounds at the crown or increase the number of clusters per round. For smaller, stop increasing earlier.
Styling & variations
- Make a two-color stripe grand granny by changing color every 2 rounds.
- Add a small pom-pom at top for a playful look.
Care
- Machine wash gentle if yarn allows; reshape.
3. Crochet Strawberry Themed Daisy Beret Hat Pattern
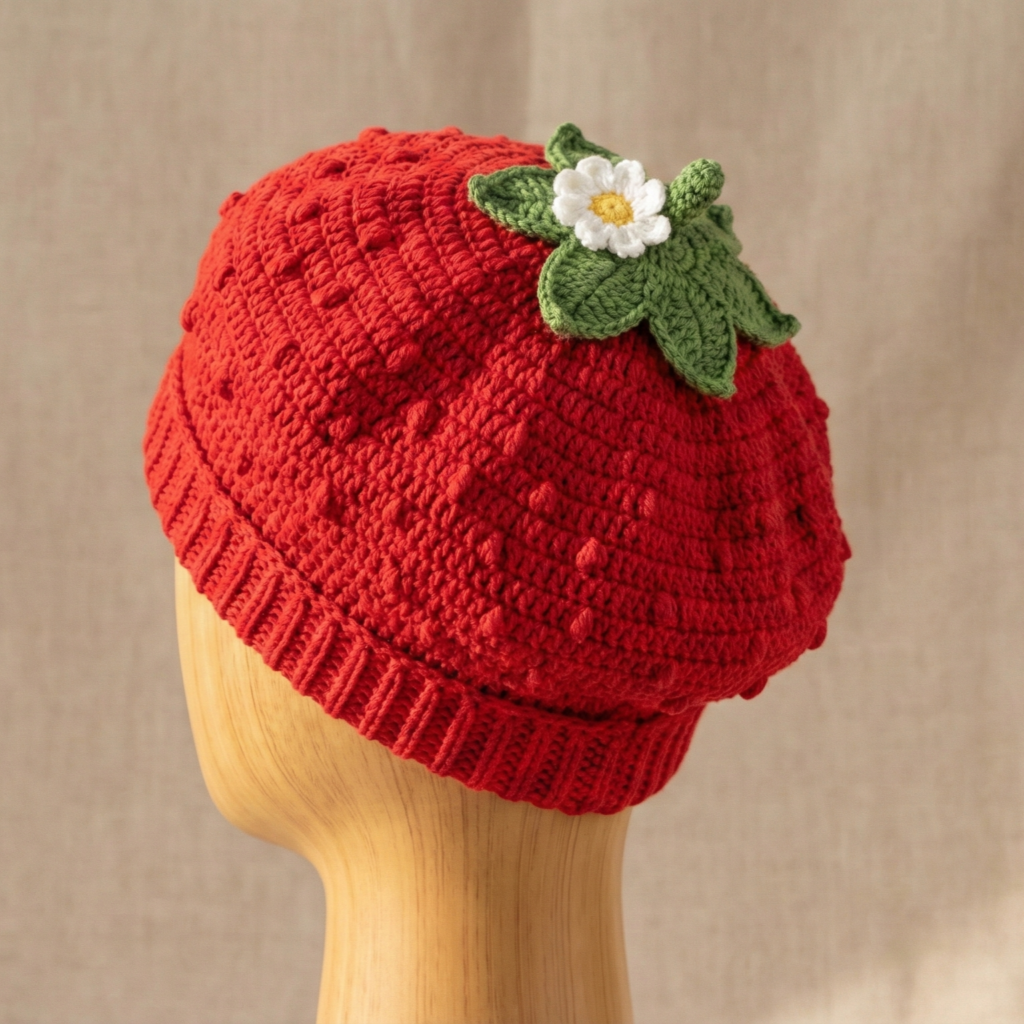
A sweet summer-ready beret topped with tiny daisy motifs and a strawberry motif appliqué — feminine and fresh.
Skill level: intermediate (appliqués + neat seaming)
Materials (Medium)
- DK cotton (body) ~220 yd, small amounts red & green for strawberry & blossoms.
- Hook: 4.0 mm.
- Tapestry needle, small safety pin or snap if you want detachable strawberry.
Sample finished measurements (Medium)
- Crown diameter ~10 in; band ~22 in unstretched.
Highlights
- Main beret: worked in smooth dc rounds for clean backdrop.
- Daisies: small 5-petal appliqués sewn on.
- Strawberry: small 3D appliqué (oval body + tiny circle seeds) sewn or snapped in place.
Construction — step-by-step
A. Beret base
- Work crown exactly as in Pattern 1 up through slouch rounds (MR start, increase rounds in dc until disc ~5–6 in, then 4–6 rounds of even dc for slope).
- Band: 5 rounds hdc in BLO for neat foldable band; block to shape.
B. Daisy appliqués (make several)
- MR, ch 1, 6 sc in MR, sl st join. Round 2: ch 3, (3 dc, sl st) in each of 6 sc spaces to form small petals. Make 6–8 daisies in white with small yellow centers (embroider). Fasten off.
C. Strawberry appliqué
- Body: MR or small oval — MR, ch 1, 8 sc into ring, 2 rounds of sc increase along one side to elongate into heart/oval. Change to red; finish off leaving tail.
- Seeds: tiny french knots with white or beige thread or single little embroidered specs. Add green leaf cap: small ch 4 looped cluster and attach to top.
D. Attachments
- Arrange daisies around crown and place strawberry at side front; sew securely using matching yarn. If you want the strawberry detachable, sew a snap or small safety pin to back. Weave ends inside and block.
Fit & grading notes
- For a child size, stop increases earlier and shorten band. For a larger adult, add one increase round.
Styling & variations
- Group daisies in a ring for a “flower crown” effect.
- Use variegated yarn for body to mimic strawberry speckles.
Care
- Cotton: gentle wash; reshape.
4. Crochet French Beret Hat Pattern
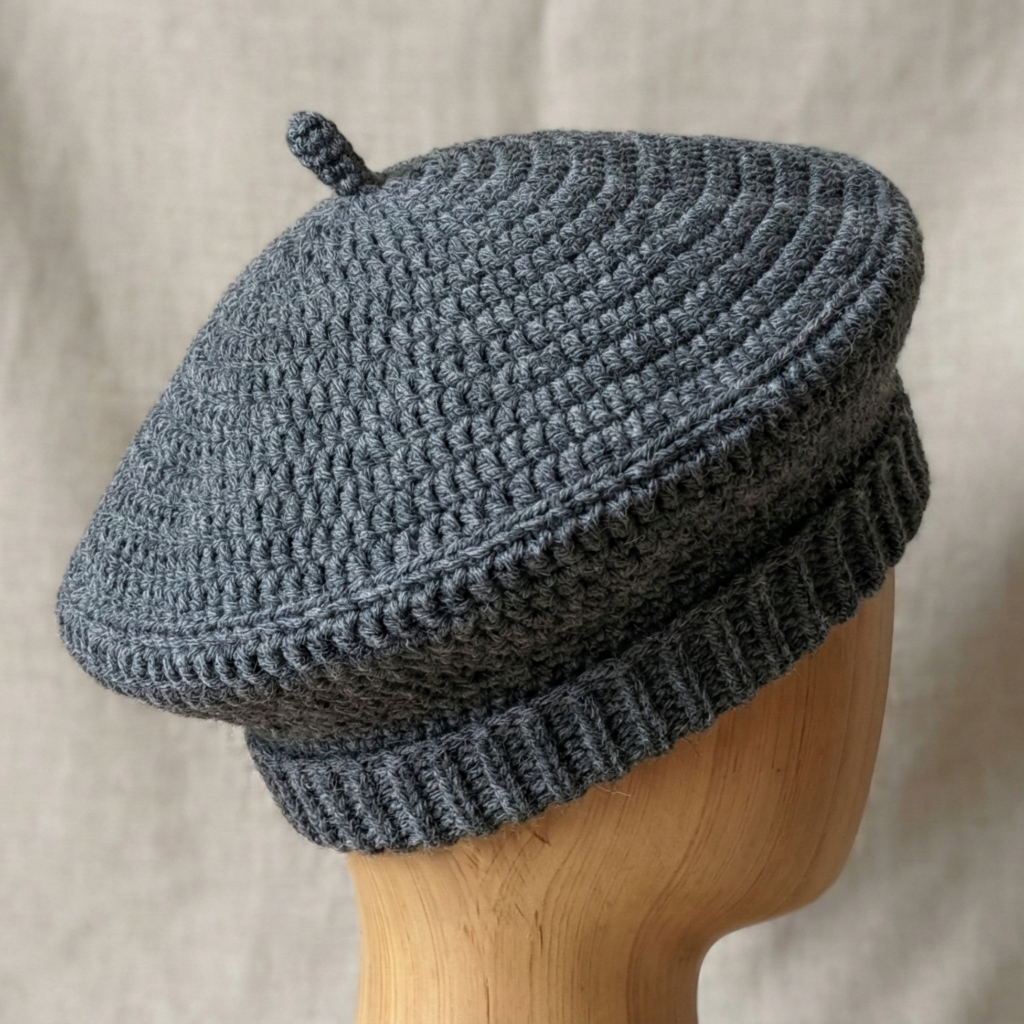
A classic, minimalist beret with a gentle slant and neat band — elegant and wearable for everyday chic.
Skill level: confident beginner
Materials (Medium)
- DK wool or wool-blend ~200–250 yd.
- Hook: 4.5 mm.
- Tapestry needle, blocking tools.
Sample finished measurements (Medium)
- Crown diameter ~10–11 in; band ~21.5–22.5 in unstretched.
Stitch highlights
- Smooth dc rounds, occasional BLO rounds to create slanted brim. A small stem (short post) at top is optional for classic French look.
Construction — step-by-step
A. Crown circle (flat)
- MR, ch 2, 9 hdc into MR, sl st join (10 hdc). (Hdc yields a low-profile crown suitable for a sleek beret.)
- R2: ch 2, 2 hdc in each st around (20).
- R3: ch 2, hdc 1, inc repeat (30). Continue increasing rounds evenly until disc measures ~6 in across (this will be the top/flat part of beret).
B. Flared skirt & slope
4. Work 4–6 rounds of hdc even (no increases). To achieve a French slant (more crown left to one side), in the first of these rounds work 1 round in BLO only; this makes a slight fold and angle when beret is blocked. Optionally make one round where you work hdc 2, dec across to gently angle the skirt.
C. Band
5. Pick up stitches for band and work 6–8 rounds of hdc in BLO or hdc BLO & then fold to make a neat double-thickness band; making a narrower, snug band helps the beret sit correctly on the head.
D. Top stem (optional)
6. Crochet a short i-cord or 4 ch with sl st back and sew to center as a tiny stem.
E. Finish & blocking
7. Block beret on a round form or bowl to set the slant; once dry, the beret looks crisp and classic.
Fit & grading notes
- For a snugger fit, choose a smaller hook for the band rounds. For larger, add more rounds in the crown increase stage.
Styling & variations
- Add a tiny leather label near band for high-end look.
- Make monochrome for Parisian minimalism or use stripes for modern twist.
Care
- Wool: hand wash cold or dry-clean depending on yarn instructions.
5. Crochet Peppermint Swirl Beret Hat Pattern

A festive, graphic beret with a spiral swirl pattern reminiscent of peppermint candy. Color changes make a striking statement.
Skill level: intermediate (color changes, working with two colors)
Materials (Medium)
- Worsted weight wool or wool blend in two colors (MC = white/cream, CC = candy red) ~250 yd total.
- Hook: 4.5 mm.
- Tapestry needle; blocking tools.
Sample finished measurements (Medium)
- Crown diameter ~10 in; band ~22 in unstretched.
Stitch highlights
- Spiral effect achieved by carefully planned color changes across rounds; main body in dc for smooth optical swirl.
Construction — step-by-step
A. Crown with spiral color plan
- MR with MC, ch 2, 10 hdc in MR, sl st join. (10)
- R2: ch 2, work hdc increases to make flat circle (20). Plan color changes so that CC is carried up at one point and popped in at certain clusters to create a diagonal “spoke.” The easiest visual approach: work alternating color rounds but offset the change point each round by one or two stitches to create a spiral seam (carry MC floats inside or twist each change to avoid long floats).
Practical method:
- Work round 1–2 in MC to form base.
- R3: join CC at the end of a chosen stitch and work one round in CC.
- R4: switch back to MC but start the MC round one stitch later than previous MC round (i.e., shift join point) which visually creates a spiral seam where CC rounds meet MC rounds.
- Continue alternating colors every round or every two rounds and shift the starting point by one stitch each time. This produces a spiral banding.
B. Skirt & band
4. After sufficient disc rounds (disc ~6 in), continue in alternating colors with even dc rounds to build slouch until depth ~7–8 in. Work band in hdc in BLO in MC only to give clean rim.
C. Finish & block
5. Pin and block to set spiral; arrange colors so spiral radiates neatly from center.
Fit & grading notes
- More contrast and narrower stripe spacing gives sharper swirl. Increasing yarn weight or hook size enlarges final beret.
Styling & variations
- Use soft pink + cream for subtle swirl, or high-contrast red + white for holiday look.
- Make a smaller swirl as a headband by omitting deep slouch.
Care
- Wool: gentle hand wash and reshape.
6. Crochet Checkered Beret Hat Pattern
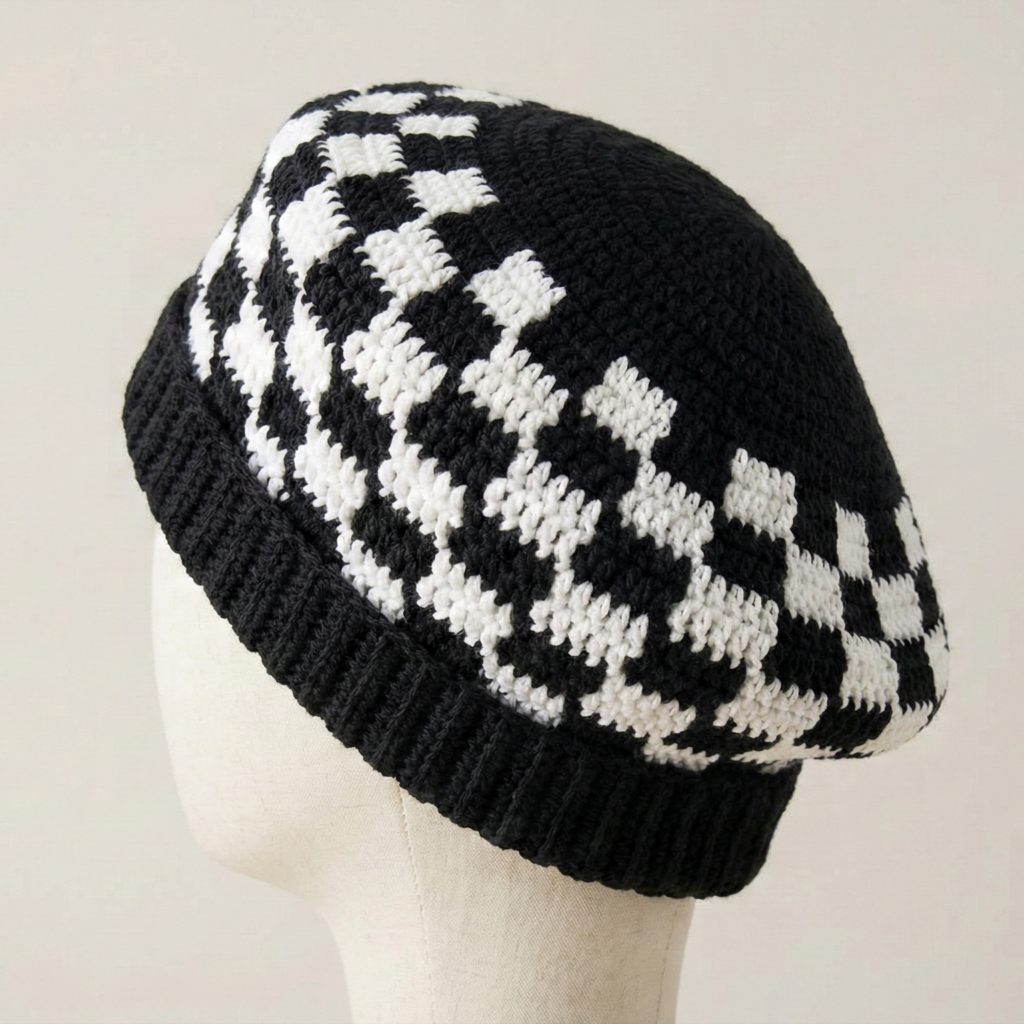
A bold, retro checkered motif worked in tapestry or mosaic technique for a modern mod beret.
Skill level: intermediate (colorwork / mosaics)
Materials (Medium)
- DK/worsted cotton or wool in two colors (A & B) ~250–300 yd total.
- Hook: 4.0–4.5 mm.
- Tapestry needle.
Sample finished measurements (Medium)
- Crown diameter ~10 in; band ~22 in.
Stitch highlights
- Tapestry single crochet or mosaic single crochet creates sharp check blocks. Work in rounds — be mindful of carried floats (tapestry) or mosaic slip-stitch technique for easier floats.
Construction — step-by-step (mosaic / easier approach)
A. Planning & chart
- Design a small check chart for your crown and skirt: e.g., blocks of 6 sts × 6 rounds per square. Decide how many blocks across the crown to fill. For a crown-disc, a spiraling check is tricky — easiest approach: work crown in MC until disc is about 70% sized, then start working check band rounds on side area.
B. Crown (plain)
2. MR, ch 2, 10 hdc, increase rounds until disc ~6–7 in in MC.
C. Check band (mosaic)
3. Switch to mosaic crochet method to work the check pattern using one color per round and using slipped stitches to create the squares without carrying floats. Example mosaic round sequence (A rounds and B rounds):
- Round A (MC): work sc and sl st to fetch pattern.
- Round B (CC): work pattern complement. Repeat sequence following chart to create check blocks around the skirt. Mosaic allows crisp color blocks while keeping floats short.
D. Band & finishing
4. After desired check height, work band in hdc BLO in MC to unify edge. Block flat.
Fit & grading notes
- Tapestry/mosaic tightens fabric — adjust band circumference for stretch (make band slightly larger if tapestry tightens). Try on before finishing.
Styling & variations
- Use high-contrast B&W for strong mod look or earthy neutrals for subtle retro.
- Add an embroidered border at the band for contrast.
Care
- If using cotton, machine wash gentle; if wool, hand wash.
7. Crochet Textured Beret Hat Pattern
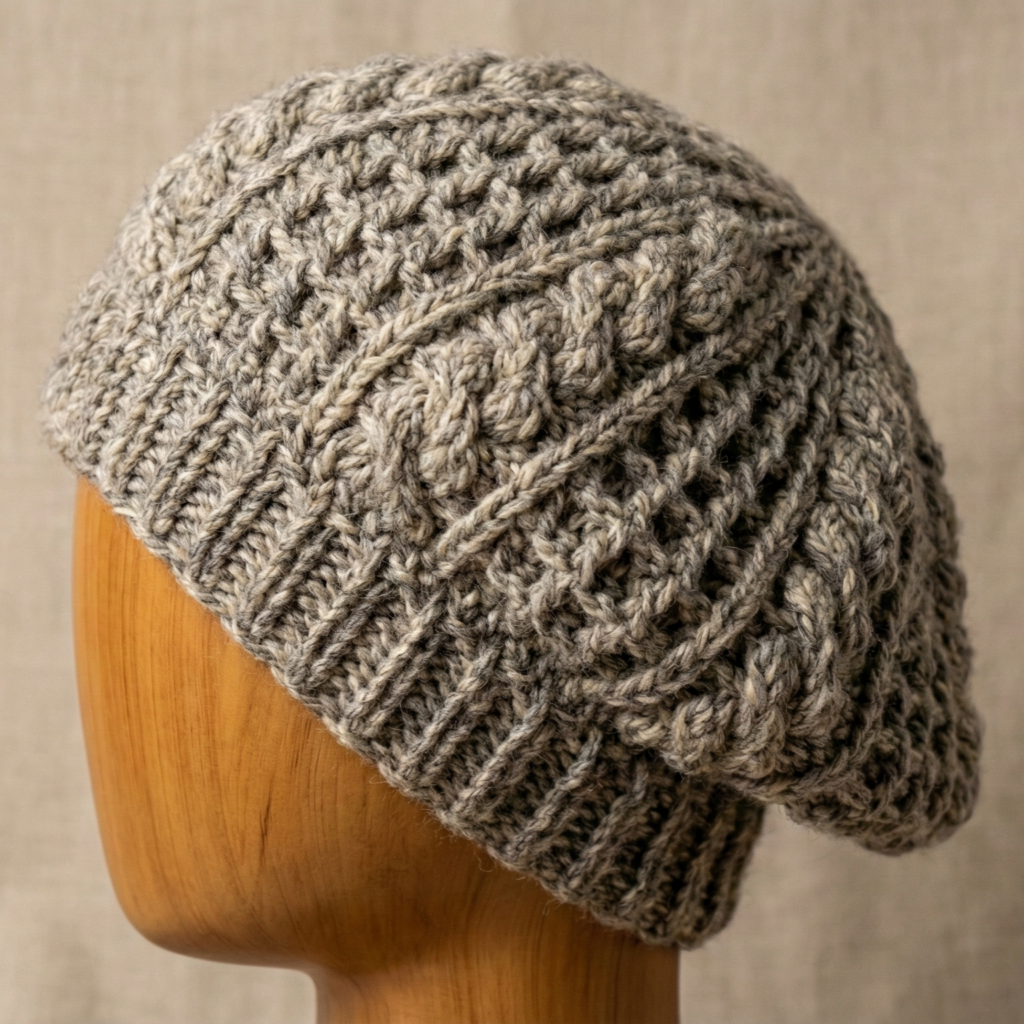
A cozy, tactile beret that showcases texture stitches — waffle, cable-ish post stitches, or popcorn rows — ideal for winter warmth.
Skill level: intermediate (post stitches or textured repeats)
Materials (Medium)
- Aran / worsted wool blend ~250–300 yd for warmth.
- Hook: 5.0 mm (for larger texture).
- Tapestry needle, blocking tools.
Sample finished measurements (Medium)
- Crown ~9.5–10 in diameter; band ~22 in unstretched.
Stitch highlights
- Textured rows: front/post double crochet columns (for rib & cable effect), waffle stitch segments, or staggered puff clusters for depth.
Construction — step-by-step (waffle + rib band example)
A. Crown disc (foundation)
- MR, ch 2, 8 hdc in MR, join. R2: ch 2, hdc inc across (16). Continue increasing to make a flat circle ~5–6 in.
B. Waffle texture skirting
2. Work several rounds of waffle stitch (Tunisian waffle is an option, but here we simulate with post stitches):
- Round: dc in next st, fpdc around next st repeat across to form textured columns. Alternate with rounds of dc or hdc to lock texture. Waffle look: (dc in next 2, fpdc in next, bpdc in next) — repeat to create grid-like waffle.
- Continue texture rounds until skirt depth ~6–7 in.
C. Band
4. Work 6–8 rounds of fpdc/bpdc ribbing (fp = front post, bp = back post) to make a snug, structured band that folds under for a neat edge.
D. Finish & block
5. Block lightly to open texture and set shape. For waffle, steam or wet-block to relax fibers.
Fit & grading notes
- Textured stitches can add bulk; plan band circumference accordingly — maybe add extra 1 in in head circumference to offset thickness.
Styling & variations
- Use two-tone textured stripes.
- Make a matching textured muffler or set (beret + cowl).
Care
- Wool: hand wash; if heavily textured, avoid aggressive agitation.
Final finishing & blocking notes (applies to all berets)
- Blocking is essential for classic beret shape — pin beret on a round surface (bowl, plate, foam head block) and shape gently. Wet-block or steam per yarn instructions. Hold pins away from delicate fibers.
- Band fit — If the beret feels loose on the temple, add a narrow elastic inside the band (stitch ends securely) or work an extra round of sc in a tighter hook to reduce circumference. If it’s too tight, remove one or two band rounds.
- Lining — For warmth and comfort, cut a soft cotton/jersey lining slightly smaller than internal circumference and hand-stitch into band. This also protects delicate hair.
- Attachments — Sew bows/appliqués with small, secure stitches. Make detachable embellishments with snaps for versatility.
- Weaving ends — Bury tails in the last band rounds into the inside of the beret so they don’t show.
Conclusion
These seven beret patterns cover the full mood spectrum: playful bows and strawberries, minimal French chic, bold checkerboards and peppermint spirals, and textural winter warmers. The same basic structure (crown → sloping skirt → band) underlies every design — the difference is stitch choice, embellishment, and small shaping adjustments. Key tips for success: swatch for your yarn and hook, block to set the beret’s silhouette, and try the band as you go to perfect fit.