Small projects, big charm. These mini food plushies are designed for fingering–DK weight yarns and small hooks so you get dense, tidy shapes. If you want them larger, swap yarn to worsted and increase hook size — but keep the same rounds and ratios and the shapes will scale.
Quick universal notes (read first; then skim if you’re impatient)
- Yarn: fingering / sport / DK recommended for minis. Use cotton or cotton blends for crisp stitch definition; acrylic is fine and cheaper.
- Hook: 2.0–3.5 mm depending on yarn and how tight you crochet. Use one size smaller than recommended so your stuffing doesn’t show.
- Stuffing: polyester fiberfill. Use small amounts and pack evenly.
- Notions: tapestry needle, stitch marker (very helpful), small scissors, optional safety eyes (6–8 mm) or embroidery thread for faces, felt & glue for tiny details, keychain findings if making charms.
- Common stitches / abbreviations (US):
- MR = magic ring
- ch = chain
- sc = single crochet
- inc = 2 sc in same stitch
- dec = single crochet two together (sc2tog)
- sl st = slip stitch
- BLO / FLO = back/front loop only
- st(s) = stitch(es)
- Gauge & size: minis here are roughly 5–10 cm (2–4 in) tall/diameter depending on yarn/hook. Use tighter tension for smaller, neater toys.
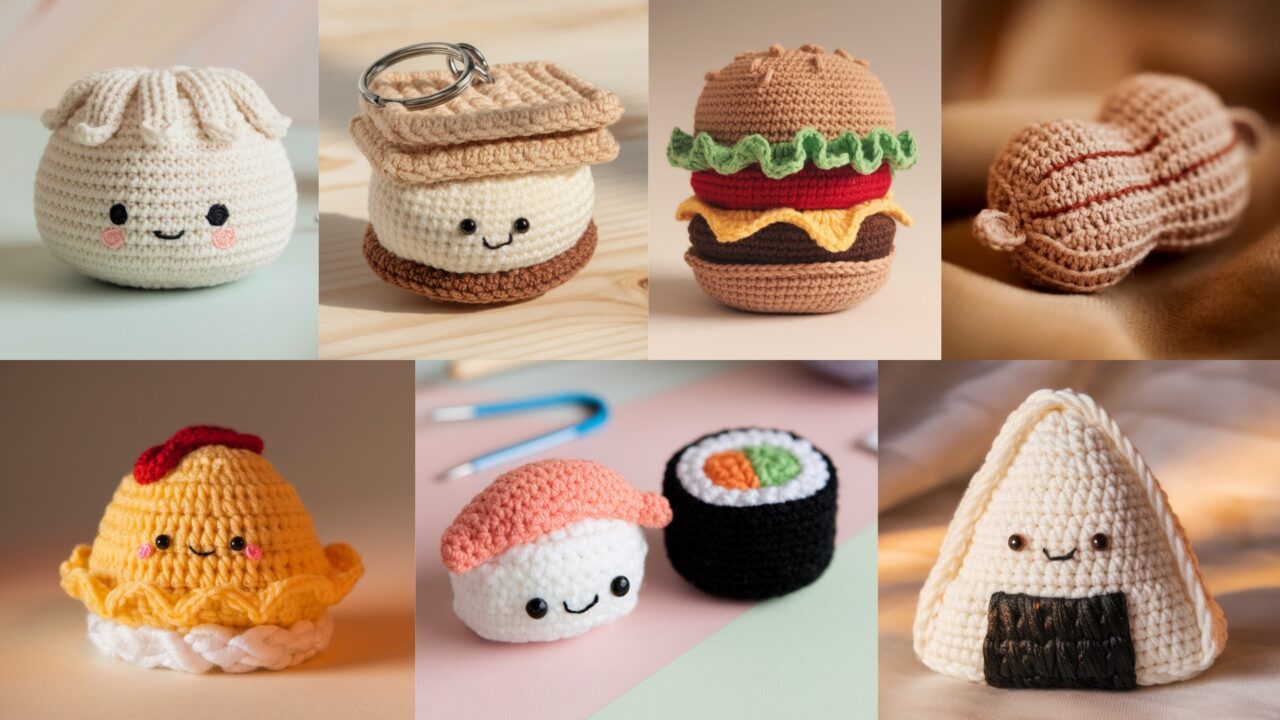
1. Crochet Mini Amigurumi Sushi (Nigiri or Maki) Pattern
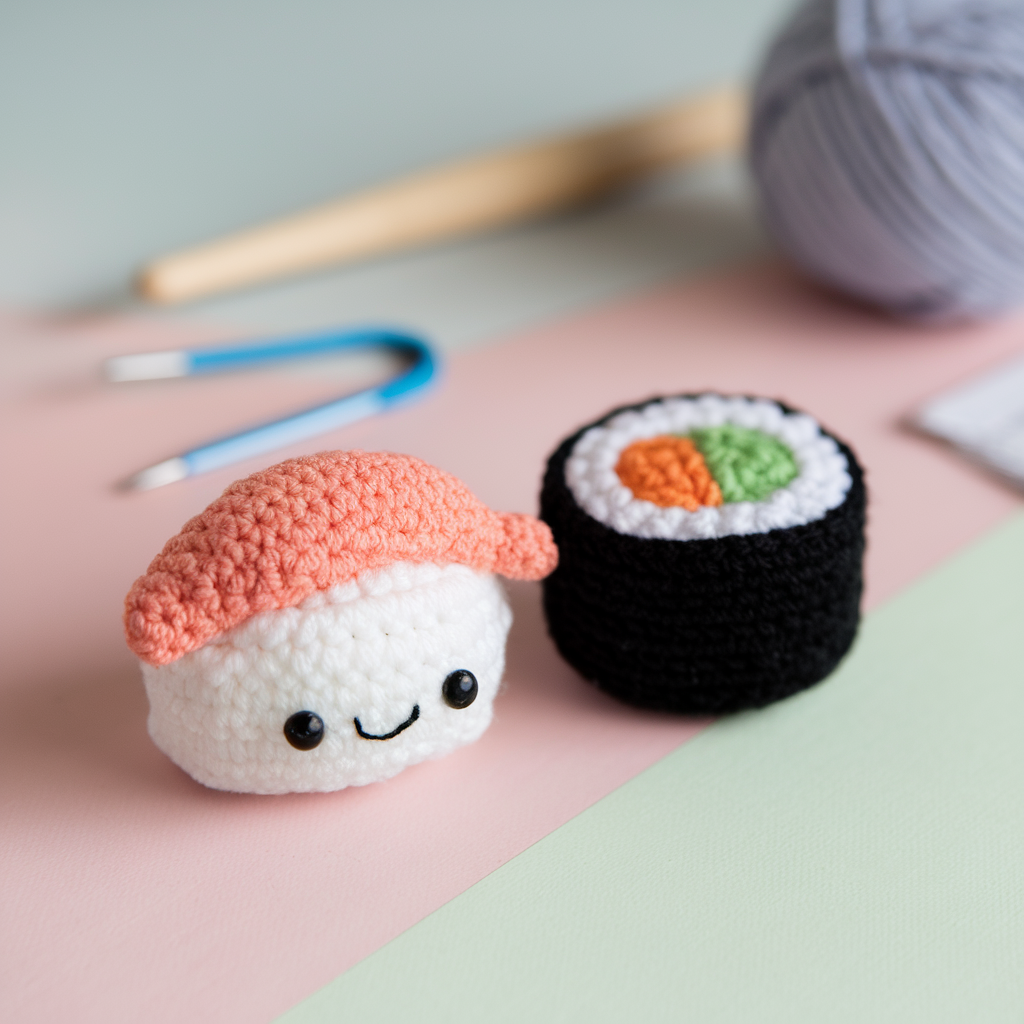
Two versions: Nigiri (rice + fish strip) and Maki (rolled sushi). Both are tiny, fast, and adorable.
Materials
- Off-white (rice), salmon/pink (fish), black (nori) DK/fingering yarn
- Hook 2.5–3.0 mm
- Small amount fiberfill, tapestry needle, optional safety eyes 6 mm or embroider eyes
Finished size
- Nigiri: ~6 cm long × 3 cm tall
- Maki: ~4 cm diameter
Stitches used
MR, sc, inc, dec, sl st.
A — Nigiri (rice mound + fish topper)
Rice mound (oval)
- MR, 6 sc into ring. (6)
- inc around (12).
- (sc, inc) ×6 → 18.
- (sc ×2, inc) ×6 → 24.
- Sc around (24).
- Sc around (24).
- (sc2, dec) ×6 → 18.
- (sc, dec) ×6 → 12. Stuff firmly but not bulging.
- dec around → 6. Fasten off, leave tail and close hole. Shape the rice mound slightly flattened (oval) with fingers.
Fish topper
- With salmon yarn ch 7. Row 1: sc in 2nd ch and across (6 sc). Turn.
- Row 2–4: ch1, sc across (6 sc) — 3 rows total (creates a small rectangle). Fasten off leaving long tail.
- Fold rectangle over the rice mound and sew edges to rice base to create the fish strip with slight overlap. You can make the strip slightly wider or shape edges with a round of sc into the short ends so it curves.
Nori/seaweed band (optional)
- With black yarn, ch about 10–12 (measure around rice mound width), join ends with sl st to form a thin belt, sew to the nigiri base or attach as a decorative band under the fish.
Face option
- Sew 2 tiny French knots or embroider eyes and a blush (tiny stitched dots) on the rice face area before attaching fish.
Finishing
- Hide tails, steam-block slightly to press fish flat if using cotton.
B — Maki (rolled sushi)
Inner (rice + filling) — make a small cylinder
- MR, 6 sc (6)
- inc around → 12
- sc, inc ×6 → 18
- sc around ×3 rounds (18) — adjust for desired height
- sc, dec ×6 → 12
- dec around → 6. Stuff lightly and close.
Nori wrapper (outer)
- With black yarn, ch enough to wrap the cylinder’s circumference +1 (you’ll wrap and seam). For a 4 cm cylinder you may chain ~20 depending on gauge. Join into ring (don’t twist).
- R1: sc around ring. R2–R3: sc around (two rows to make a band). Slip this band over the rice cylinder and sew bottom edges together so the black band forms the outside. Leave top open to show filling.
Filling
- Small strip of orange (salmon), green (avocado) or yellow (egg) crocheted as tiny rectangles (ch6, sc across 1–2 rows) and place inside the cylinder before sewing top closed so the filling peeks out.
Finishing
- Use a little white embroidery (tiny dots) to mimic rice grains on top if you wish.
2. Crochet Mini Amigurumi S’mores Pattern
Tiny toasted marshmallow + chocolate + graham cracker — great as a keychain.
Materials
- Beige/tan (graham), brown (chocolate), cream/white (marshmallow) yarn; small amount black embroidery thread for eyes; hook 2.5–3.0 mm
Finished size
~5 × 3.5 cm (assembled sandwich)
Parts & Steps
Graham cracker (2 identical squares)
- ch 6, sc in 2nd ch from hook and across (5 sc). Turn.
- Repeat sc rows for 5 total rows (a 5×5 mini square). Fasten off. Make two pieces.
Chocolate (thin rectangle)
- ch 6, sc across for 2 rows (5×2 rectangle). Fasten off.
Toasted marshmallow (little cylinder with slightly rounded top)
- MR, 6 sc (6)
- inc around → 12
- sc, inc ×6 → 18
- sc around ×2 (18)
- sc, dec ×6 → 12
- sc around ×1. Stuff lightly. Flatten top by squashing marshmallow slightly so it looks soft and toasted. Optional: with a small amount of brown yarn or tea-light spray, add “toasted” specks by dabbing yarn/glue or lightly brushing with felt-tip for color (test materials for safety).
Assembly
- Layer: graham, chocolate, marshmallow, graham. Sew edges through all layers on three sides and leave one small side open if you want marshmallow shape to stick out a little; otherwise sew closed for neat sandwich. Add small embroidered eyes on marshmallow for cuteness.
Variation
- Slightly melt the chocolate by pulling a few strands over the marshmallow with glue for a drippy look.
3. Crochet Mini Amigurumi Momo (Dumpling) Pattern
A tiny, pillowy momo/dumpling — very forgiving shape; good for beginner amigurumi shaping practice.
Materials
- Off-white or pale dough color yarn, 2.5–3.0 mm hook, small stuffing, tapestry needle
Finished size
~4–6 cm (depends on stuffing + stitch tension)
Stitches used
MR, sc, inc, dec, sl st. Optional short rows for pleats.
Body (rounded dumpling, pleated top)
- MR, 6 sc into ring (6).
- inc around → 12.
- sc, inc ×6 → 18.
- sc around ×3 (18). This gives the midsection.
- Now create a tapered top for pleats:
- sc in next 2, dec ×4 → 12.
- Stuff lightly.
- sc in next 1, dec ×4 → 8.
- Fasten off leaving tail.
Pleated rim (fold + stitch)
- To give a momo seam/pleat look, do one of the following:
- Option A: Before closing fully, fold the top edge down and use short whipstitches to create 5–6 small pleats around the top — pinch and stitch to anchor each pleat downward toward the body.
- Option B (crocheted pleats): With a separate strand, chain 5 at evenly spaced points around top, sl st back to base to make little loops that look like dumpling folds. Arrange 6–8 pleats.
Face
- Embroider two tiny eyes and a blushing cheek or attach micro safety eyes if desired.
Finish
- Weave in ends, lightly shape with fingers.
4. Crochet Mini Amigurumi Burger Pattern
Classic layered burger: bun top, lettuce, tomato, cheese, patty, bun bottom. Make each layer thin so the stack reads.
Materials
- Light brown/tan (bun), dark brown (patty), yellow (cheese), green (lettuce), red (tomato), DK yarn, hook 2.5–3.0 mm
Finished size
~5–7 cm tall depending on number of layers
Parts & Steps
Bun top (dome)
- MR, 6 sc (6)
- inc around → 12
- sc, inc ×6 → 18
- sc 2, inc ×6 → 24
- sc around ×2 (24)
- sc2, dec ×6 → 18 (start shaping down)
- sc around ×1 (18) — leave open enough to sew bottom into stack later. Stuff lightly when assembled.
Bun bottom (shallow dome)
- MR, 6 sc (6)
- inc around → 12
- sc, inc ×6 → 18
- sc2, inc ×6 → 24
- sc around ×1 then do dec, sc2 to give flat bottom or simply ch a small circle to make flattening seam. Fasten off leaving tail.
Patty (flat disc)
- ch4, sl st to form ring, ch1.
- 8 sc in ring. (8)
- inc around → 16
- sc around ×1. Fasten off leaving tail to sew.
Cheese (square slice)
- ch6, sc across (5 sc). Turn.
- 4 rows sc for thin slice. Fasten off with long tail and fold diagonally if you want melted cheese look. Sew one corner over the patty for drip.
Lettuce (ruffled strip)
- ch20. R1: starting in 2nd ch from hook: sc, ch3, sc to make loops across or work shells: 5 dc in next st, skip 1 to make a ruffle. Fasten off and sew around burger edge.
Tomato slice
- Small circle: MR, 6 sc, inc to 12, sc round; small flat circle with stitch count 6, 12, and finish. Sew into stack.
Assembly
- Stack sewn pieces: bun bottom → patty → cheese (tacked on one corner so it flops) → tomato → lettuce → bun top. Sew through center to secure the stack so it doesn’t slide. Add embroidery seeds (sesame) to top bun with tiny stitches of cream yarn.
Finishing
- Add a loop and a toothpick (optional: a short piece of embroidery floss folded) through center to mimic a burger skewer.
5. Crochet Mini Amigurumi Onigiri (Rice Ball) Pattern
The triangular rice ball with a little nori patch — super fast and iconic.
Materials
- White/off-white yarn, black yarn for nori, hook 2.5–3.0 mm, stuffing
Finished size
~5–6 cm (triangular)
Triangle body (worked in rounds / shaping)
- MR, 6 sc (6)
- inc around → 12
- sc, inc ×6 → 18
- sc2, inc ×6 → 24
- sc around ×1 (24)
- sc2, dec ×6 → 18
- sc, dec ×6 → 12 — at this point you’ll start shaping into a slight triangle by flattening and sewing a few stitches on corners. Stuff lightly.
- dec around → 6. Fasten off and close.
Form triangle
- Pinch three sections of the completed sphere and make 3 small stitch seams (use tapestry needle to fold and sew) to make a triangular-ish pyramid shape. Pull gently and secure to form onigiri shape (flat bottom, triangular sides).
Nori (seaweed) strip
- With black yarn, ch enough to wrap the base (approx 8–10 ch), join; sc one or two rounds to make a band. Sew band to base or front bottom.
Face option
- Embroider tiny eyes and mouth on front center.
Variation
- Make a little sprinkle of “furikake” by embroidering colored spots on the top using bright yarn bits.
6. Crochet Mini Amigurumi Peanut Pattern
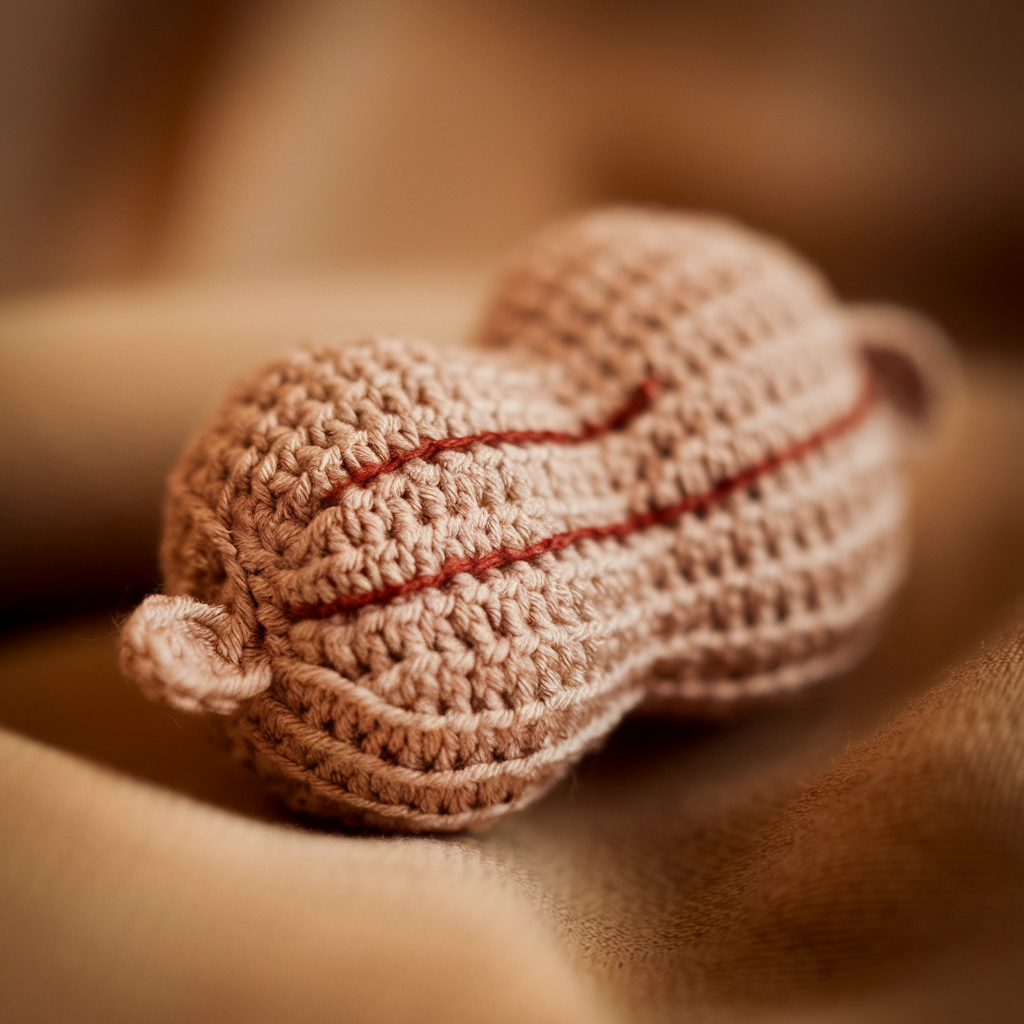
Tiny peanut in shell — two little lobes joined with a textured ridged shell.
Materials
- Light brown tan yarn, hook 2.5–3.0 mm, stuffing
Finished size
~4–5 cm long
Shell two-lobe body
Lobe (make 2)
- MR, 6 sc (6)
- inc around → 12
- sc, inc ×6 → 18
- sc around ×2 (18) — leave open and repeat for second lobe. Don’t stuff fully yet.
Join lobes & create peanut shape
- Place two lobes side by side and sc together along the touching edge to form a single peanut with a slight central constriction. After joining, sc around whole shape to blend seam.
- To add shell texture, work 1–2 rounds of BLO sc so the front loops create ridges, or do a round of fpdc (front post double crochet) around to create longitudinal ridges.
Finish
- Stuff to firm shape before final closing. Close with dec and weave tail inside. Add a few embroidered “veins” across shell for realism.
7. Crochet Mini Amigurumi Omelette
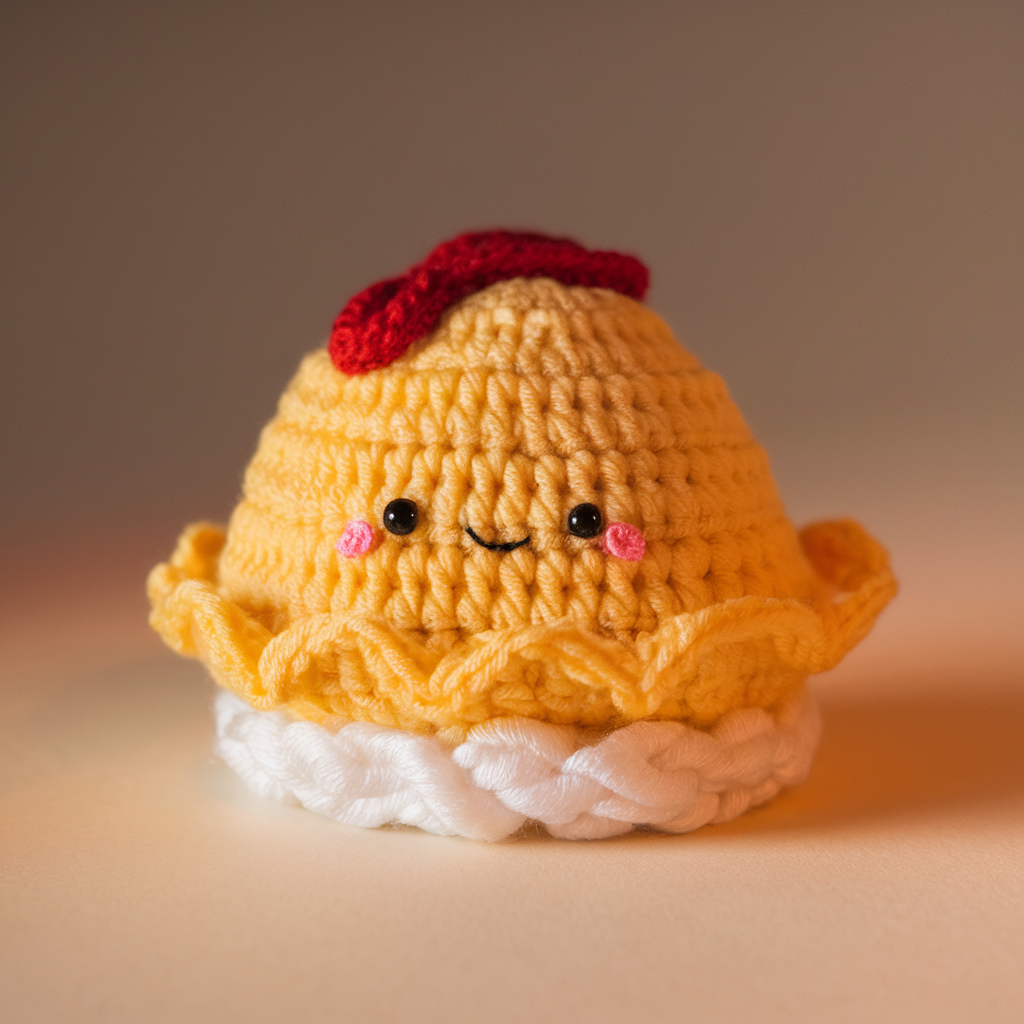
A fluffy omelette shape — simple curved pillow with a drizzle.
Materials
- Yellow yarn (omelette), small amount red or brown for ketchup drizzle, hook 2.5–3.0 mm
Finished size
~5–6 cm long and slightly domed
Omelette body (oval pillow)
- MR, 6 sc (6)
- inc around → 12
- sc, inc ×6 → 18
- sc2, inc ×6 → 24
- sc around ×2 (24) — lengthen by working more rounds for a longer omelette (repeat sc rounds).
- sc2, dec ×6 → 18
- sc, dec ×6 → 12. Stuff firmly.
- dec around → 6. Fasten off.
Optional “Rice” base (if making omurice)
- Small flat oval: ch6, sc across in rows for 3 rows, fasten off, sew under omelette.
Ketchup drizzle
- Using red embroidery floss or thin yarn, stitch a zig-zag drizzle across the top. Alternatively, use a thin crocheted chain (ch30) and sew it in place.
Finish
- Flatten slightly to create the fluffy folded look. Add embroidered grin or eyes for cuteness.
Assembly, Faces, Blocking & Care (applies to all)
- Stuffing: Use small amounts; overstuffing makes seams pop; understuffing makes the toy look limp. Aim for firm but squeezable.
- Seams: Use ladder stitch or whipstitch to close openings invisibly.
- Faces: Embroidered safety is the safe route for giftables with children — tiny French knots for eyes, an upside down V for mouth. If using safety eyes for adults-only items, place them before stuffing and attaching the final rounds.
- Blocking: Cotton toys can be lightly steam-blocked to even the fabric. Avoid soaking stuffed toys.
- Attaching keychain hardware: Add a small loop at the top (ch 6, join) and attach a split ring or keychain. Reinforce with several stitches.
- Care: surface wash spot clean; for more thorough cleaning, hand wash and dry flat. Avoid machine drying (it can distort shape). Polyester stuffing tolerates hand washing; cotton yarn may shrink slightly.
Variations & Gift Ideas
- Color swaps — make sushi in multiple flavors, burgers with different toppings, or s’mores with dark or milk chocolate.
- Sets: package 3–5 mini food plush as a gift set (breakfast set, sushi set, dessert set).
- Magnet option: glue a small disc magnet inside the back with fabric & glue reinforcement — fridge buddies!
- Keychains & Zipper pulls: attach small lobster clasps for bag charms.
- Personalize: embroider initials on the underside (e.g., the burger bun) for a custom gift.
Conclusion
There you go — seven compact, portable amigurumi food patterns that are quick to make, easy to customize, and perfect for batch-producing gifts. Start with the onigiri or momo if you want the fastest win; try the burger or sushi when you’re in the mood for fiddly layers. Make a set, add a keyring, and you’ve got a charming, handmade present that actually gets used instead of collecting dust.