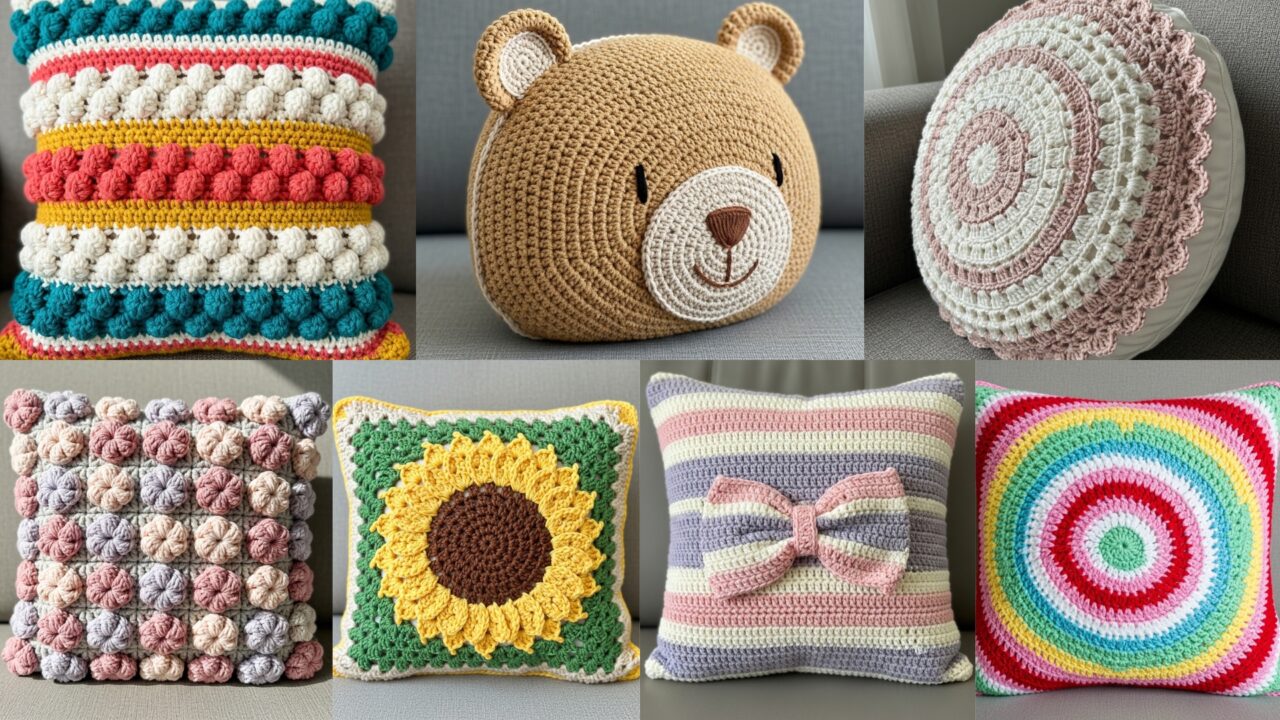
Pillows are one of the fastest and most rewarding home-decor projects — they’re tactile, instantly update a room, and let you show off color, texture and stitch skills. Below you’ll find a full blog-ready post: a practical introduction (materials, sizing, stuffing, gauge, finishing, care), then seven complete pillow patterns with materials, finished-size examples, stitch notes/abbreviations, and step-by-step construction and assembly for each design: Puff Flowers, Stripy Cushion with Giant Bow, Swirly Candy, Bear Head, Sunflower Granny Square, Round Granny, and Bobble Stitch Striped. The tone is friendly and clear — everything written so you (and your readers) can follow it and customize easily.
quick Introduction — materials, sizing, stuffing, gauge, finishing & care
Yarn & fiber choices
- Cotton / cotton blends: great for crisp definition, daytime use, and easy care.
- Acrylic / acrylic blends: soft, warm, forgiving, machine-washable; good for bobbles and textured stitches.
- Wool / wool blends / alpaca: cozy and luxurious; best for cold-season pillows (check care).
- Velvet / chenille / plush yarn: gorgeous for luxe pillow faces (avoid fuzzy yarn for very textured stitches because detail hides).
Choose a yarn recommended for your hook and consider how the pillow will be used — heavy-use couch pillow? pick durable washable yarn.
Hook & notions
- Hook sized to yarn: common ranges 3.5–6.5 mm depending on yarn.
- Notions: tapestry needle, stuffing tool (or blunt pencil), pillow form or low-loft stuffing, matching thread & sewing needle (to sew panels), stitch markers, measuring tape, scissors, pins for blocking.
Pillow builds & sizes
- Square throw pillow (standard): 16×16″, 18×18″, 20×20″ — choose a pillow insert that’s 1–2″ larger than the cover for a plump finish.
- Rectangular lumbar: 12×18″, 14×20″.
- Round / decorative cushions: diameters 12–18″.
Patterns below give example finished sizes; scale by changing yarn/hook or adding rounds/rows.
Construction options
- Worked as two panels (front/back) then seamed around a pillow insert or stuffing — easiest and common.
- Worked in the round for seamless covers (e.g., round granny pillow).
- Envelope opening (lapel) or zippered closure — both are covered in finishing notes below. Envelopes are fastest; zippers look neat for heavy-use cushions.
Stuffing & inserts
- Pillow inserts (polyfill + down alternatives): buy a ready insert (recommended +1–2″ larger for a full look). Polyester inserts are inexpensive and washable; down/feather inserts are luxe but need more care.
- Polyfill stuffing: fine for small pillows or shaped motifs; add stuffing in layers and shape carefully. Use a small stuffing tool to get into corners.
Gauge & measurement
- Gauge matters less for pillow size than for garments, but stitch density affects how well the cover sits over an insert and whether stuffing shows through.
- Make a 4″ swatch in your intended stitch. Measure stitches per inch and rows per inch, then compute foundation chains or motif counts for desired finished size. For motifs (granny squares, hexes), block to final size before joining.
Edging & finishing
- Use a tidy final round of sc or crab stitch (reverse sc) to frame pillow. For heavier edges, add a piping round (work sc into a narrow cord) or a decorative scallop.
- Closures: envelope back (overlapping flaps) is simple; for insert-friendly clean finish add zipper along one edge. Sew zipper into lining or crochet pick-up row and whipstitch.
Care
- Include care instructions based on yarn: many acrylics and cottons are machine wash gentle; luxury yarns may need hand wash. If you use glued or embroidered embellishments, recommend spot cleaning or gentle hand washing.
1. Crochet Puff Flowers Pillow Pattern
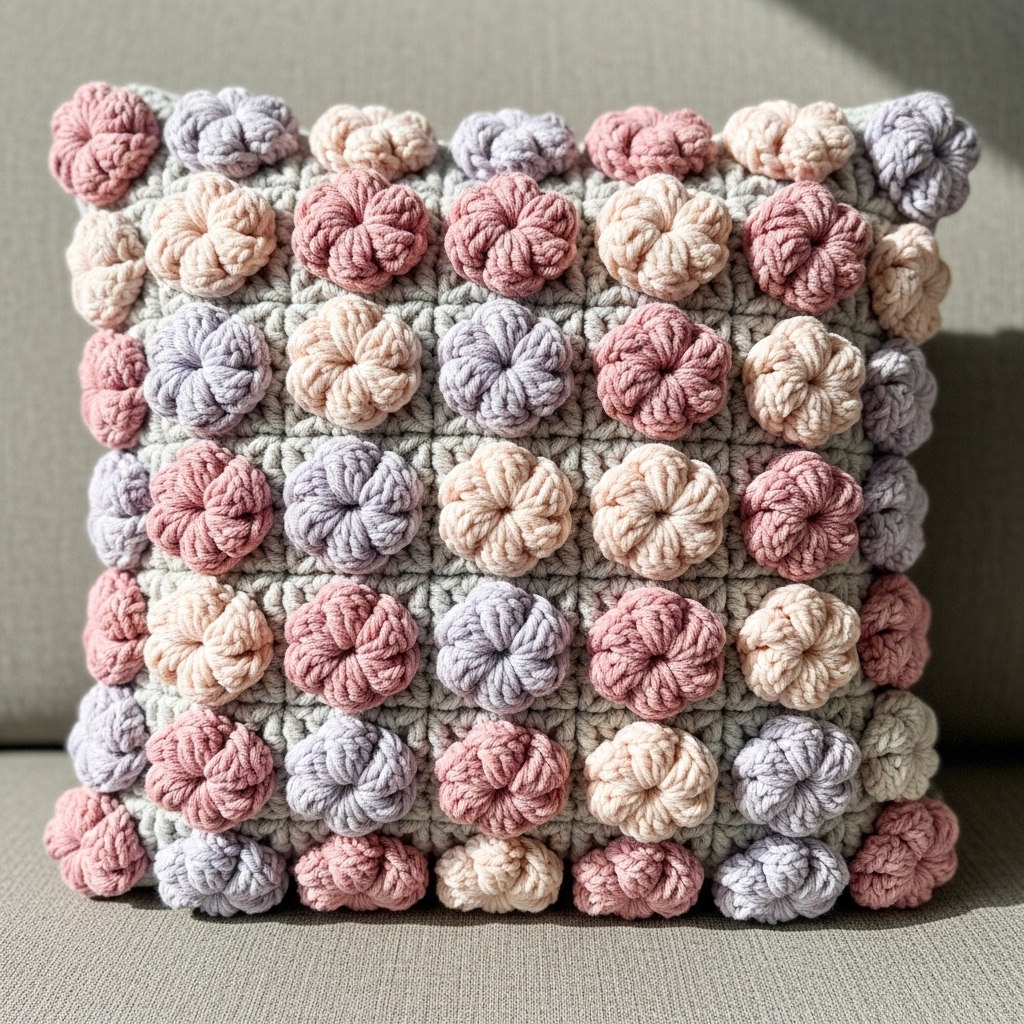
Soft, romantic pillow covered with 3-D puff-flower appliqués.
Skill level: confident beginner → intermediate
Finished example: 16 × 16 in square pillow cover (front entirely covered in puff flowers)
Materials
- Main background yarn: worsted-weight cotton or acrylic — ~600 yd.
- Accent yarn for puffs (same weight or a slightly fluffier yarn): ~200–300 yd.
- Hook: 4.5 mm (or as needed for fabric density).
- 16 in pillow insert (or stuffing), tapestry needle.
Abbreviations (US)
- ch, sc, hdc, dc, tr, FLO/BLO, puff st (see notes), sl st.
Puff stitch quick how-to
- Puff stitch (standard): yo, insert hook, yo, pull up loop repeat 3–4 times (total 4–5 loops on hook), yo and pull through all loops, ch 1 to close puff.
Plan
- Work a dense base panel in sc or hdc in size for 16 in square, then work rows of small puff-flower motifs sewn or crocheted onto the base. Alternatively create a repeated working of flower motifs joined as you go.
Step-by-step
A — Make base panel (front)
- Swatch gauge: in sc with your yarn you get e.g. 14 sc = 4 in. For 16 in width: (14/4)*16 = 56 sc. Chain 57.
- Row 1: sc in 2nd ch from hook and across (56 sc). Turn.
- Rows 2–28 (or until panel is square ~16 in): ch1, sc across. Fasten off.
B — Back panel
4. Repeat for back panel; for envelope back make two pieces: top flap 9 in height and bottom flap 9 in height with overlap (or just one panel with zipper edge).
C — Puff flowers (make many)
5. Puff flower motif (small): MR, ch1, 6 sc in ring (6). R2: ch2, (puff st) in next st, ch2, sl st in same st repeat to make 6 puff petals spaced by sl sts. Alternatively make slightly larger puffs: in each base st make 3–4 puff loops. Finish with a small sc round to secure.
- Make enough flowers to cover front panel in a grid (e.g., for 16 in panel, 6 × 6 = 36 flowers if each flower ~2.5 in). Make more smaller flowers for denser look.
D — Attach flowers to base
7. Pin flowers in a pleasing arrangement on base panel. Sew through flower center and base with matching yarn; secure with multiple passes. Make sure each puff is firmly anchored (pulling through the center with yarn). Trim tails.
E — Seaming
8. Place front and back panels RS together (if using envelope back, overlap back flaps) and single crochet or whipstitch three sides, insert pillow, and join last side leaving gap to insert pillow if needed, otherwise add zipper.
F — Finishing touches
9. Fluff puff petals with a yarn needle and gently steam-block puffs into shape if using cotton. For plush yarn, just shape by hand.
Variations
- Use ombré yarn for tone-on-tone puffs.
- Make a central medallion of larger puffs and smaller puffs around edge for focal design.
2. Crochet Stripy Cushion Pillow with a Giant Bow Pattern
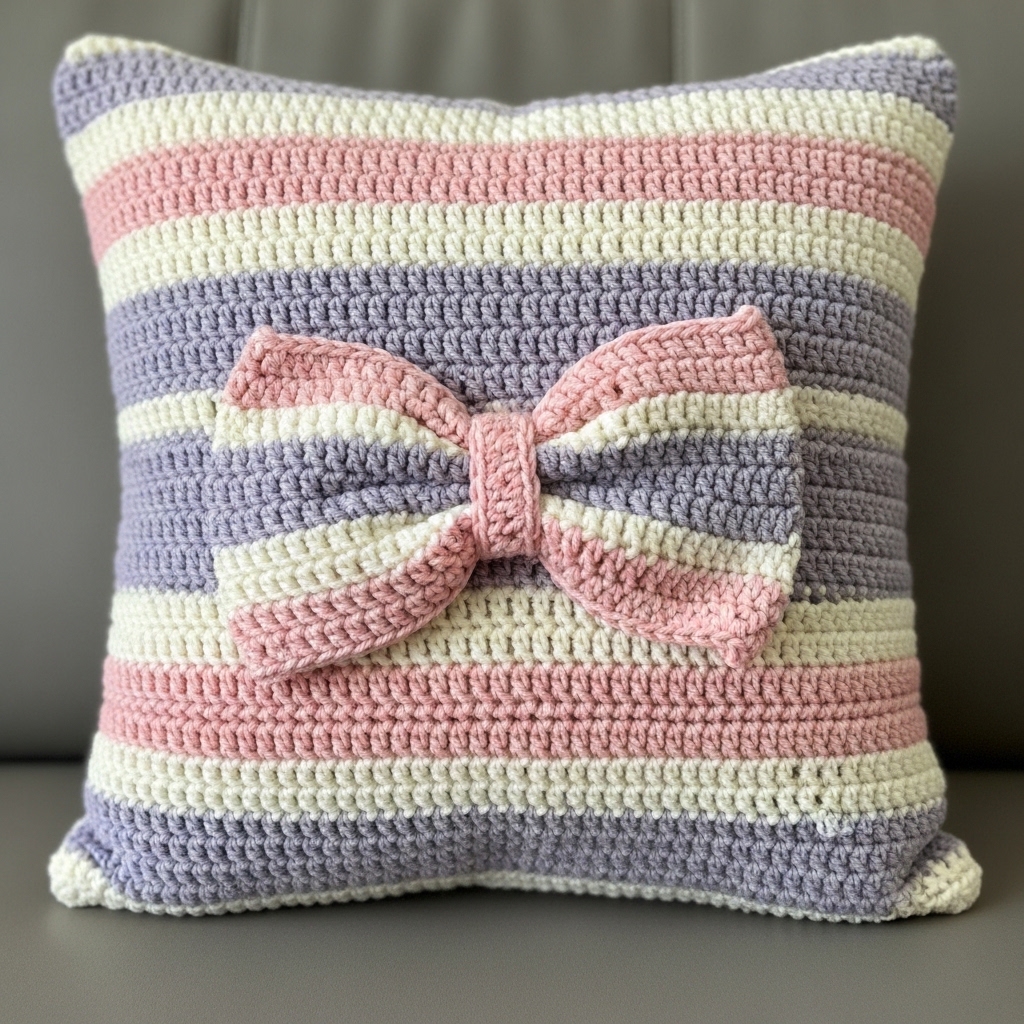
Playful stripey pillow with a big bow sewn to the front — perfect for girlish decor.
Skill level: confident beginner
Finished example: 18 × 18 in square pillow cover, with a removable central bow
Materials
- Main yarn: DK cotton or acrylic in 3 colors (A, B, C) — total ~700 yd.
- Hook: 4.0 mm.
- 18 in pillow insert, tapestry needle, sewing needle.
- Extra yarn (contrast) for bow ~50 yd.
Plan
- Make 2 striped panels (front/back). Work a giant bow separately and attach with snap or sewn ties so it’s removable.
Step-by-step
A — Panel (striped)
- Choose stripe widths: e.g., rows of 3 rounds color A, 3 rounds B, 3 rounds C, repeat.
- Compute foundation: gauge e.g. 14 sc = 4 in → for 18 in width: (14/4)*18 = 63 sc. Chain 64. Join carefully for seamless striping or work flat rows and seam.
- Row work: ch1, sc across switching colors after the appropriate number of rows to create stripe bands until panel reaches 18 in height. Fasten off.
- Make back panel in one color or same stripes.
B — Giant bow (detachable)
5. Bow base: Ch 40 (adjust width to taste). Row 1: sc across; Rows 2–6: sc across to create a 2-in wide strip. Fold strip into a bow shape and wrap middle with a long tail (yarn) tightly to cinch center. Secure by sewing tail to bow backside.
- Make a small long strip (loop) to stitch to back of bow and slip over a small sew-on snap sewn to pillow center. This makes bow removable.
C — Assembly
7. Seam panels three sides (sc seam or mattress stitch), insert pillow, then finish final edge. Sew snap onto pillow front center and attach matching snap piece to bow loop.
D — Finishing
8. Block panels lightly to even stripes; ensure the bow is centered and straight.
Variations
- Make the bow in velvet or plush yarn for luxe look.
- Add piping or fringe to edges.
3. Crochet Swirly Candy Cushion Pillow Pattern
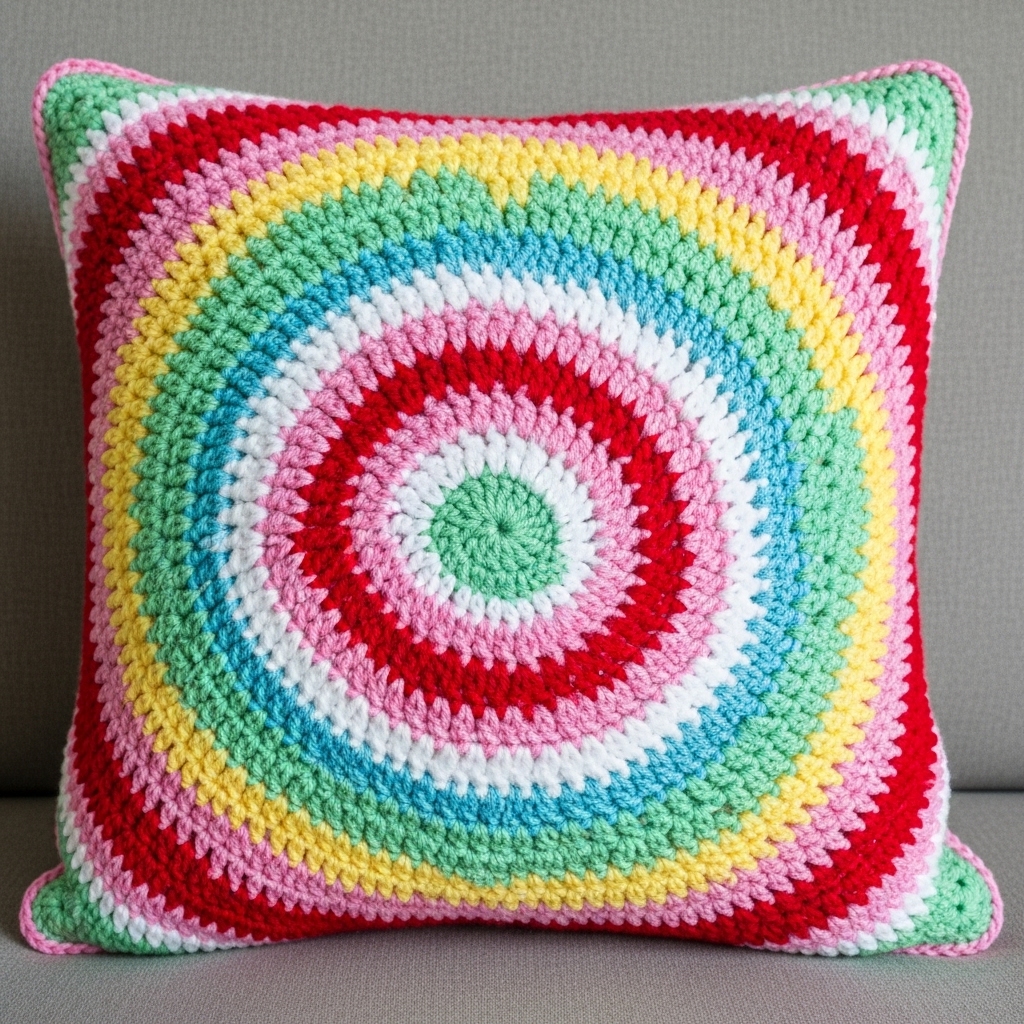
Bright, spiral-piped cushion that looks like a swirled candy — eye-catching centerpiece.
Skill level: intermediate (colorwork + shaping)
Finished example: 16 × 16 in square pillow (spiral motif centered)
Materials
- Several DK/fingering yarns in bright colors — total ~600 yd.
- Hook: 4.0 mm (or adjust).
- 16 in insert, tapestry needle.
Concept
Work a central spiral medallion in continuous rounds using color changes that create a candy swirl. Join rounds into a square or work medallion as front and make back panel separate.
Step-by-step
A — Central spiral motif
- MR, ch1. R1: 8 sc in MR (8). Pull tight.
- R2: inc around → 16.
- R3: sc 1, inc around → 24.
- R4 onward: increase evenly (sc 2 inc → sc 3 inc etc) to create a flat circle; change color in the middle of a stitch every few stitches to create stripes radiating outward. To make a spiral rather than concentric rings, change color at staggered points on each round (carry color or fasten off and join new color at chosen point).
- Continue until medallion reaches ~12 in across (to be centered on 16-in pillow with border). Fasten off.
B — Square frame or add rounds
6. Work extra rounds of single color sc until medallion is large enough to square off: to turn circle into square, you can add rounds of alternating increases at four equidistant points to create corners; or you can applique medallion onto a square base.
C — Base panel & join
7. Option 1: make a separate square back panel (sc rows) and sew medallion centered onto the front square. Option 2: continue crocheting a square border by working a rectangular expansion.
D — Assembly
8. Seam edges or add zipper. Insert pillow and finish.
E — Finishing
9. Make sure the spiral swirl is visually centered and vivid — block medallion carefully.
Variations
- Use variegated yarn for unexpected swirls.
- Add a piped edging (i-cord or crocheted tube) around pillow for candy-ribbon look.
4. Crochet Bear Head Pillow Pattern
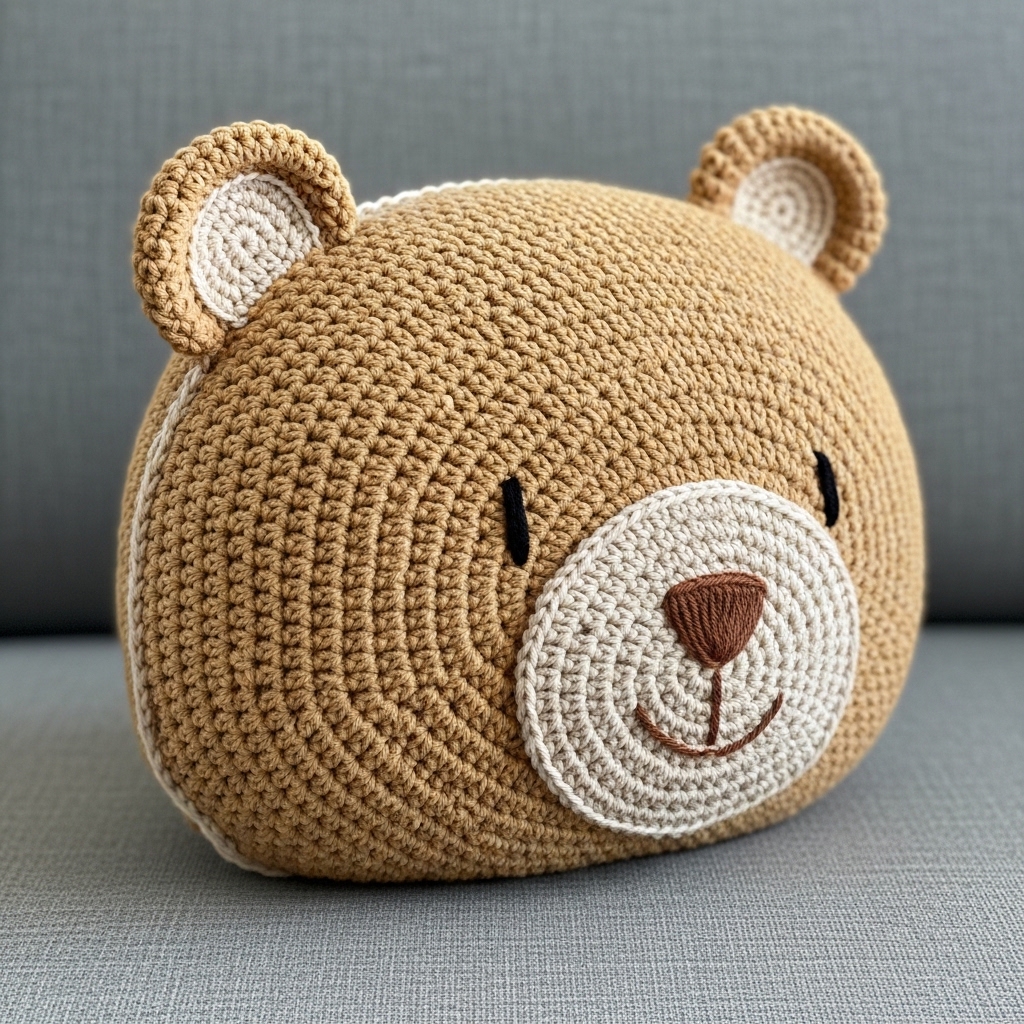
Adorable bear-face shaped cushion — great for kids’ rooms or whimsical decor.
Skill level: intermediate (shaping + appliqué)
Finished example: bear head approx 14–16 in tall × ~14 in wide (slightly oblong)
Materials
- Worsted yarn for main color (tan/brown) ~400 yd; contrast for muzzle/ears/eyes ~100 yd.
- Hooks: 4.5 mm.
- 16 in round pillow form or stuffing, safety eyes or embroidered eyes (for child-safe consider embroidered eyes).
Plan
Work an oval head shape in the round or as two panels shaped with increases/decreases; make ears & muzzle appliqués sewn on.
Step-by-step
A — Head (oval)
- Make an oval base: ch 30 (example). Row 1: sc in 2nd ch and across (29), then sc 3 in last ch, work along opposite side of chain sc (29), sc 2 in last ch to make an oval. Turn and work rounds (or work in joined rounds) increasing at oval ends until desired width, then work even rows to build height. Alternatively: crochet a circle and add length by working more rounds on two opposite sides.
- Continue until panel measures target height; make two identical panels and seam around leaving opening for stuffing, or work one seamless oval front and sew back panel.
B — Ears (make 2)
3. Small ear: MR, 6 sc. R2: sc 1, inc around → 9. R3: sc around 9–12 (depending on desired ear size). Fasten off leaving tail. Fold base slightly and sew to head top to create upright ear shape.
C — Muzzle & nose
4. Muzzle appliqué: MR, 6 sc; R2: sc, inc around to form small round; R3: sc around. Flatten slightly and sew at lower center of face. Embroider nose and mouth with darker yarn: a small triangle nose and a short line down plus two curve stitches for smile.
D — Eyes
5. Use safety eyes or embroider two ovals above muzzle. If using safety eyes, secure properly and add felt backing inside to be safe.
E — Assembly
6. Sew muzzle and ears to face using matching yarn; stuff head firmly for plumpness. Sew back panel closed.
F — Finishing touches
7. Add blush with fabric-safe paint or wool-dilution method, or sew a small bow under one ear.
Variations
- Make different animals by changing ear shapes: rounded for bear, pointed for fox, floppy for dog.
- Make a smaller pillow for nursery by scaling pattern down.
5. Crochet Sunflower Granny Square Pillow Pattern
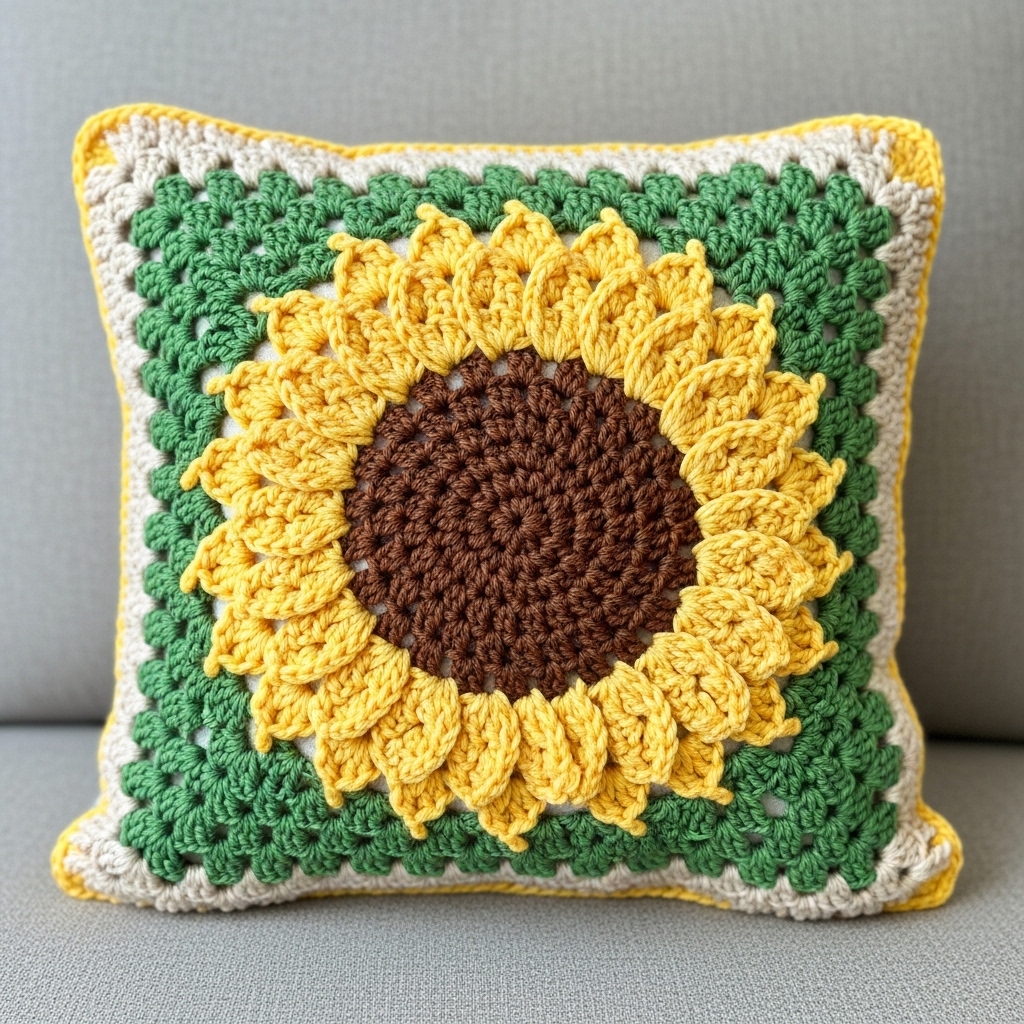
Classic granny-sunflower motif in the center of a square — perfect farmhouse chic.
Skill level: confident beginner → intermediate
Finished example: 18 × 18 in square pillow built from 1–4 large sunflower granny squares and surrounding frames
Materials
- Worsted cotton in yellow, brown, green, and background color ~800 yd total.
- Hook: 4.5 mm.
- 18 in insert, tapestry needle.
Plan
Make a large sunflower granny square (sunflower center, petal rounds, green leaf round, then join into background rounds to reach 18 in). Option: 4 smaller sunflower granny squares joined into one pillow.
Step-by-step
A — Sunflower centre (solid round)
- MR, ch 1, 8 sc in MR. R2: inc around → 16. R3: sc 2, inc → 21 or work until center is desired size.
B — Petal round
2. Switch to yellow: in designated stitches make petal clusters: ch 2, (5 dc) in next st, ch 2, sl st to create 8 or 12 petals depending on base st count. This forms the sunflower petals popping from center.
C — Green leaf round & background
3. Add a green round: sc between petals and work small chains to create a leafy impression. Then change to background color and work rounds of granny clusters to square off the motif and enlarge to target size. Every round: work granny cluster sets and corner ch-2 spaces to create squares. Continue until square reaches ~18 in (or make 4 smaller squares and join).
D — Joining & backing
4. If using 4 squares, join-as-you-go or whipstitch them into a larger panel. Make back panel in single color or repeat motif. Block motifs first.
E — Assembly
5. Sew front and back together, stuff or insert pillow form, and close. For a decorative touch, add a fringe of green between petals.
F — Finishing
6. Steam-block to flatten petal rims. For extra durability, add a fake suede backing inside or a fabric liner on the wrong side for stability.
Variations
- Make the center brown with puff-stitch bobbles for a textured seed head.
- Use variegated yarn for petals for a painterly sunflower.
6. Crochet Round Granny Pillow Pattern
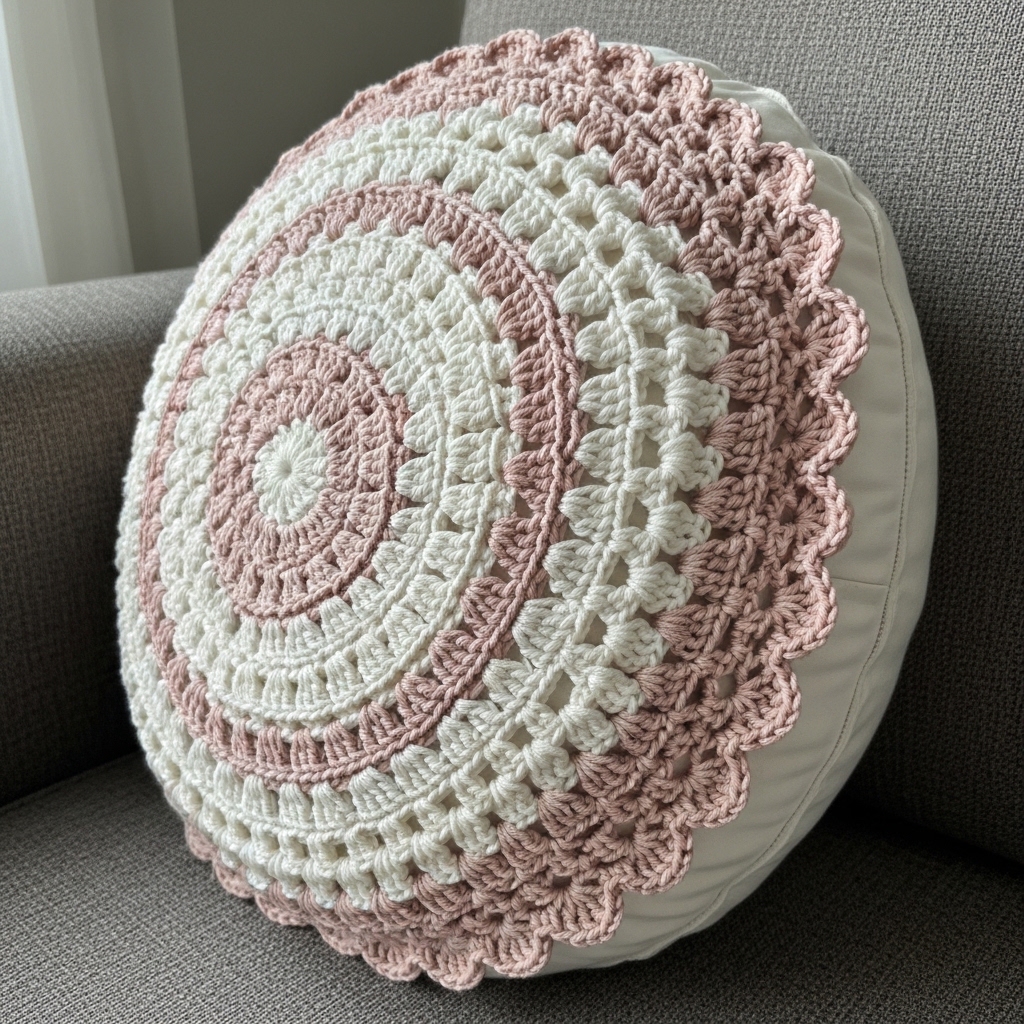
A round granny medallion pillow — lovely centerpiece with a scalloped edge.
Skill level: confident beginner → intermediate
Finished example: 14–16 in round pillow (diameter adjustable)
Materials
- Sport/DK yarn or thread depending on look: ~400–600 yd.
- Hook: 3.5–4.5 mm.
- Scissors, tapestry needle, 16 in round insert or stuffing.
Plan
Work a large circular granny medallion in rounds; join final round with dense scalloped edge; make a plain back panel (circle) and sew together with zipper or slip-stitch.
Step-by-step
A — Medallion (front)
- Center rounds: MR, ch 3, 11 dc in ring (12 dc). sl st to join.
- Round 2: ch 3, dc in same st, ch 2, (2 dc) in next st repeat for 12 clusters; sl st to join.
- Round 3: into chain spaces work shells: (3 dc, ch 3, 3 dc) to create larger petals/points; continue rounds, alternating shell rows and cluster rows to add depth. Increase stitch counts as needed to keep circle flat (increase by adding extra dc between clusters).
- Continue until medallion reaches desired diameter (e.g., 14 in).
B — Scalloped edging
5. Work one or two rounds of sc for reinforcement, then a scalloped final round: sc 2, skip 1, 5 dc in next st, skip 1, sc 2 around.
C — Back circle
6. Work a simple circle in sc that matches medallion diameter (compute scaffold: ch 4, join to ring, sc 12, then increase rounds evenly). Block both pieces.
D — Assembly
7. Join right sides together with sc seam leaving small gap or install zipper. Insert pillow and finish seam. Alternatively join with slip-stitch and then add a decorative cord hiding seam.
E — Finishing
8. Give a final block with pins to even scallops. Add tufting or center button if desired.
Variations
- Use gradient yarn for hypnotic mandala look.
- Add a pompom trim around scallops for playful effect.
7. Crochet Bobble Stitch Striped Pillow Pattern
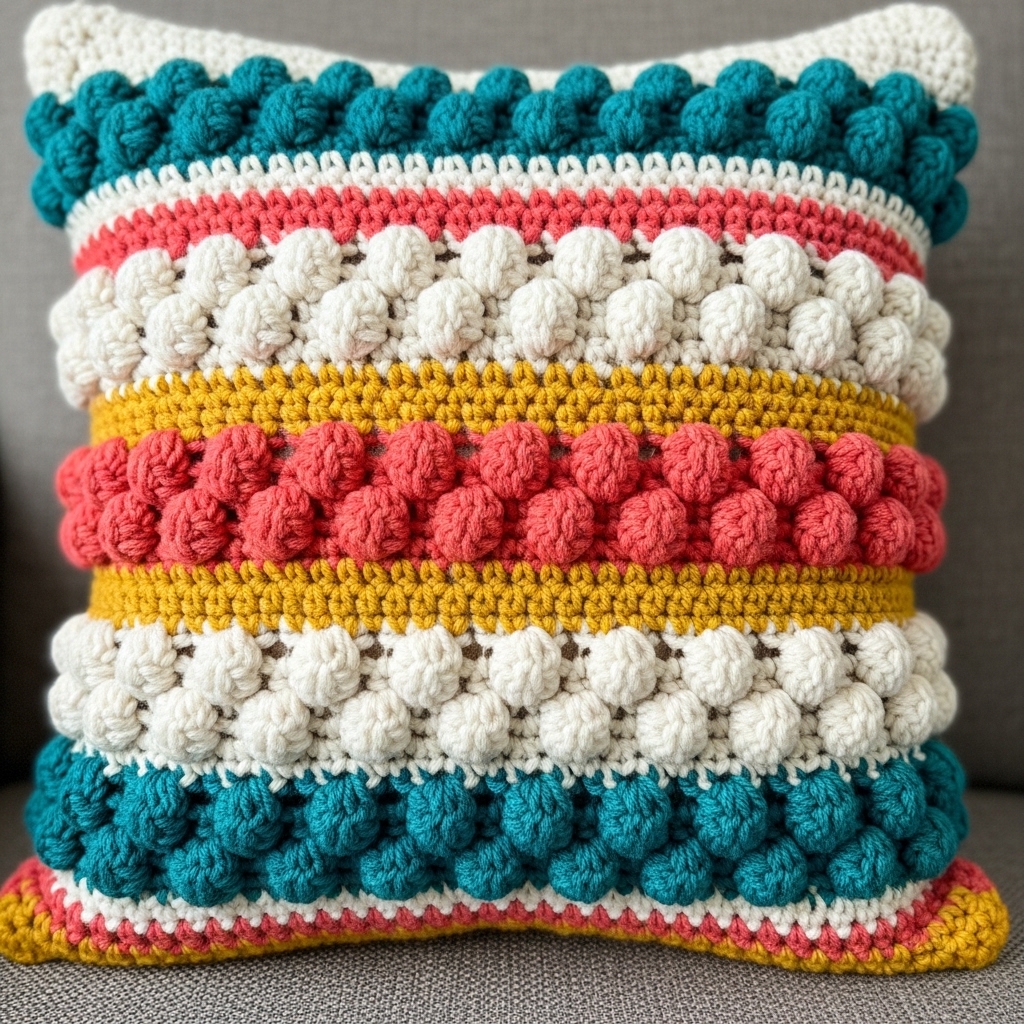
A tactile striped pillow with large bobble rows for texture and cozy visual interest.
Skill level: confident beginner → intermediate
Finished example: 20 × 20 in pillow cover (bold stripes and bobbles)
Materials
- Bulky/Aran yarn for bobbles + DK for stripes — total ~900–1,200 yd depending on size.
- Hook: 5.5–6.5 mm for bulky bobbles.
- 20 in pillow insert.
Bobble stitch refresher
- Bobble (5-dc bobble): yo, insert, pull up loop repeat 5 times to have 6 loops on hook, yo and pull through all loops, ch1 to close.
Plan
Work horizontal stripes; every Nth stripe is a row of bobble clusters (bobble row). Repeat stripes until cover reaches target height. Make two panels and seam.
Step-by-step
A — Panel foundation
- Gauge: e.g., 3 sc = 1 in in bulky yarn. For 20 in: 3×20 = 60 sc. Chain 61.
- Row 1: sc across foundation. Turn.
B — Stripes & bobble rows
3. Decide stripe pattern (e.g., 4 rows color A, 2 rows color B, 1 bobble row color C). For bobble rows: work bobbles spaced evenly across — e.g., sc 2, bobble, sc 4, bobble repeat. Ensure bobbles sit centered by planning counts.
- Continue stripes until panel reaches 20 in height. Make second back panel (either matching stripes or solid).
C — Seaming & insert
5. Seam panels with sc or whipstitch; for extra durability use an interior lining and sew panels to lining. Insert pillow and finish seam or add zipper.
D — Finishing
6. Gently steam bobbles to even them (if yarn allows). Fluff insert for full-looking bobbles.
Variations
- Add fringe along one edge for boho look.
- Make the bobble row in a metallic yarn for a glam accent.
Closing & styling suggestions
- Mix & match sizes: make a trio of 16, 18, and 20 inch pillows in the same color theme for layered couch styling.
- Color combos: neutrals + one accent color create elegant looks; bright palettes suit kids’ rooms.
- Gift idea: pair a pillow with a homemade throw or matching mug for sweet presents.
- Durability: if you expect heavy handling, add a fabric lining or sew a removable cover with zipper so the pillow is machine-washable.
conclusion
These seven pillow patterns span whimsical (Bear Head, Puff Flowers), playful (Stripy Bow, Swirly Candy), classic (Sunflower Granny, Round Granny), and textural (Bobble Striped) styles — so there’s something for every room in your home. Start by choosing the size and yarn that matches your decor needs, swatch your stitch to confirm gauge, and pick a finishing method (envelope or zipper) that suits your use.