

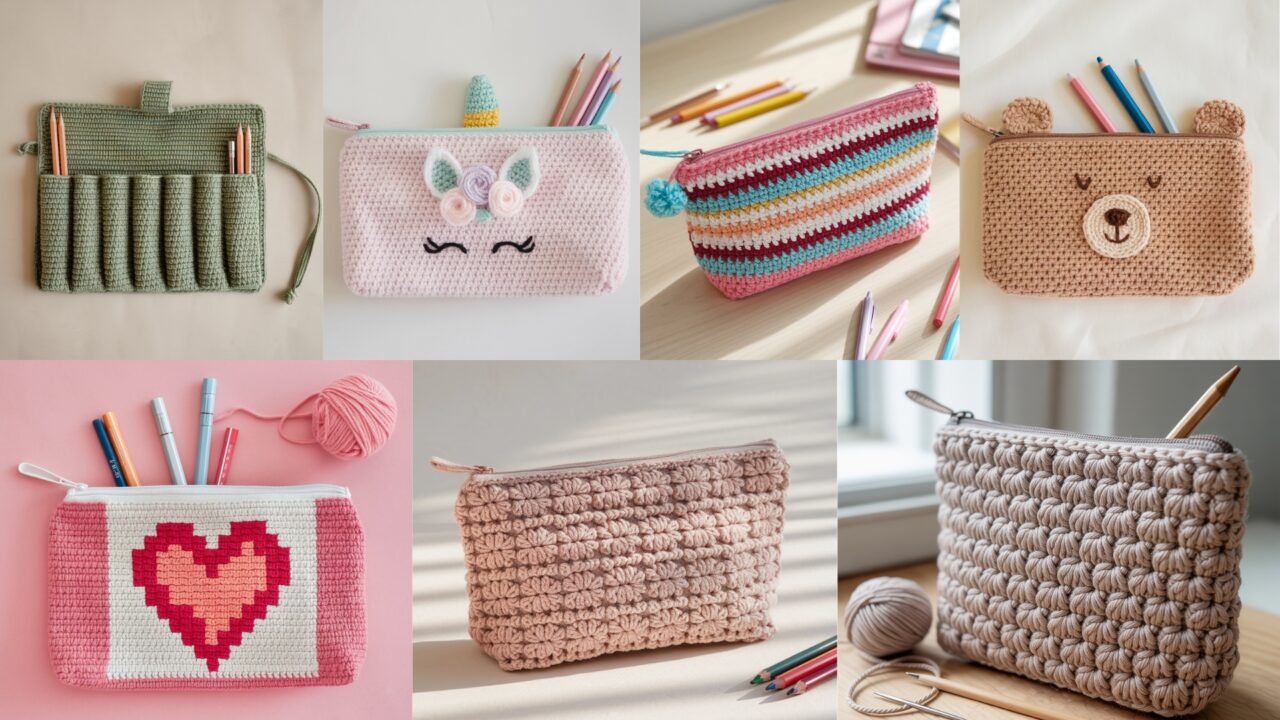
A handmade pencil pouch is a practical, fast, and satisfying crochet project — perfect for gifting, school, or keeping your craft tools organized. This post gives seven distinct pouch designs (roll-up, unicorn, tapestry heart, bear zipper, granny stitch, star stitch, and candy stripes). Each pattern section includes: skill level, materials and tools, finished size, gauge guidance, a step-by-step construction method you can follow, finishing and closure advice, variations, and helpful troubleshooting/care notes so you can actually make them. Follow the swatch advice at the start and pick the style that excites you.
Quick common notes (read first)
- US crochet terms used: ch, sc, hdc, dc, tr, sl st, st(s), inc, dec, BLO/FLO, MR (magic ring).
- Yarn choice: For pencil pouches pick cotton, cotton-blend, or sturdy acrylic — cotton gives structure and washes well. Use DK/worsted depending on whether you want a soft or firm pouch. For tapestry or colorwork use cotton or mercerized cotton for crisp color edges.
- Hook recommendation: Use the hook the yarn label suggests, minus one size if you want denser fabric. Denser fabric makes the pouch hold shape better and prevents pens from poking through.
- Lining & hardware: For durability and a professional finish add a fabric lining and a zipper or metal snap. If you prefer a quick project, use a crocheted flap with button/snap closure.
- Swatch: Make a 4 in × 4 in swatch in the main stitch to determine stitches per inch (SPI) and rows per inch (RPI). Use those numbers to calculate the foundation chain so your pouch fits desired pens/pencils.
- Finished sizes: I include sample finished sizes. Adapt by changing foundation chain length (width) and number of rows (height). Always measure a pen or pencil and allow ½–1 in extra height for ease.
1. Crochet Roll-up Pencil Pouch Pattern
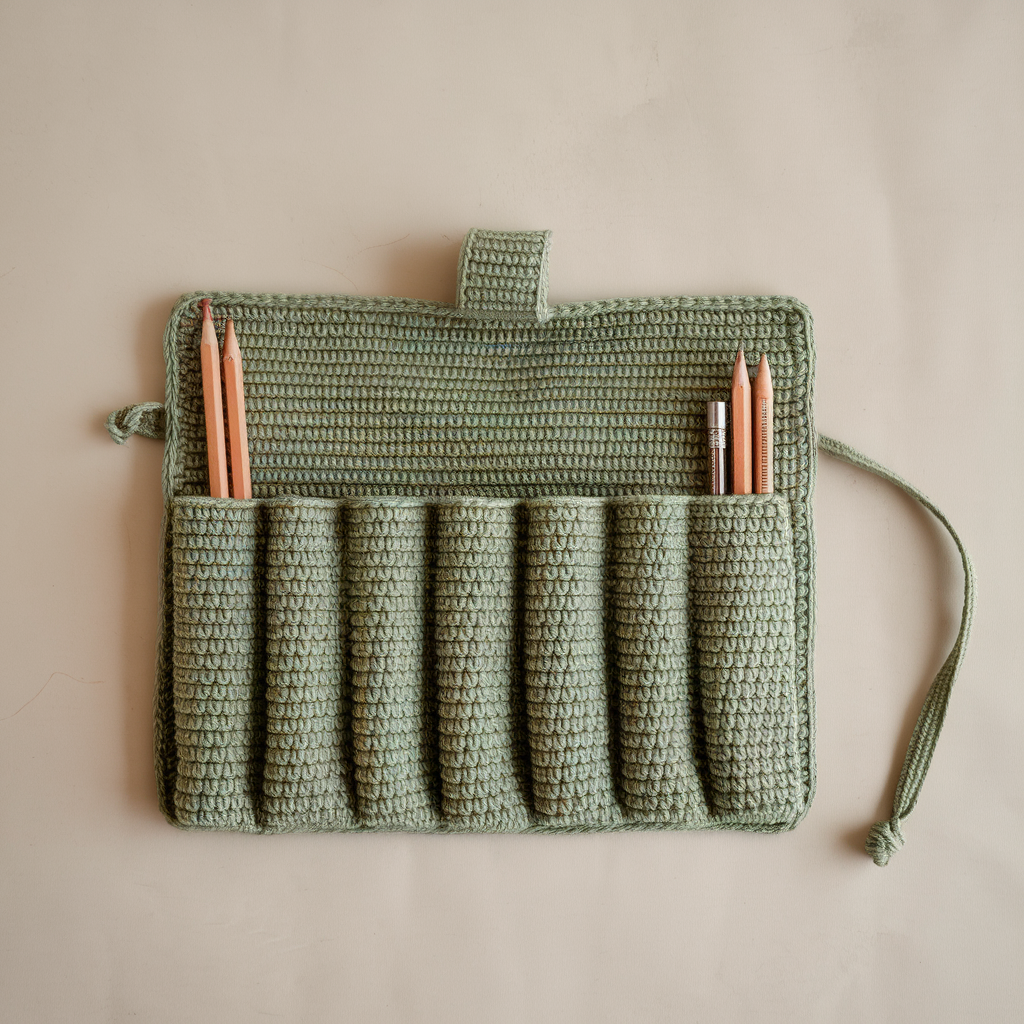
Overview: A functional roll-up pouch holds multiple pencils or brushes in stitched pockets and rolls up for compact storage — great for artists and students.
Skill level: Confident beginner — basic stitches and simple pocket construction.
Materials
- DK or worsted cotton yarn (sturdy): ~150–250 yds
- Hook: 4.0 mm (G) for DK, 4.5–5.0 mm for worsted depending on gauge
- Yarn needle, tapestry needle, scissors
- Button and yarn loop or ribbon for tie, optional small felt for pocket reinforcements
- Optional lining fabric and sewing needle if you want a fabric interior
Finished size (rolled flat): panel width ~10 in, height ~9 in (each pocket height ~1.25–1.5 in); roll length depends on number of pockets.
Gauge (example): 18 sc = 4 in (use your swatch)
Construction — step-by-step
- Decide layout & pocket count. Example: 7 pencil pockets across panel (each pencil approx 0.35–0.5 in wide plus 0.25 in seam allowance). For a 10 in width and 7 pockets you have ~1.25 in per pocket. Using your SPI, calculate foundation stitches:
foundation_st = desired_width_in_inches × SPI. Round to even number. - Foundation row (panel base). Chain foundation length for
width(e.g., ch 45 if 45 sts ≈ 10 in at your gauge) + 1 turning ch. Row 1: sc in 2nd ch from hook and across. Turn. - Build back panel. Work even sc rows until panel height equals total roll height (e.g., 9 in). This will be the rear of the pockets. Keep edges neat — place stitch marker at end of each row.
- Mark pocket boundaries. On the right side of the panel, with safety pins or tail yarn, mark vertical pocket divisions across the panel width (7 even intervals).
- Create pocket rows (worked across width for pocket height). With RS facing, join yarn at left edge. Row A (base of pockets): sc across to first marker, ch 1, turn, sc back across to same marker — stop after pocket height rows (example 2–3 rows per pocket base depending on pencil thickness). A simpler approach: work 1–2 rows of sc across entire panel to create depth; then you’ll form vertical stitch lines to define pockets.
- Define pockets (option two — vertical partitions): Work one row of sc across, then on the next row use surface-crochet or sc in front loop only where markers are to create raised lines between pocket columns. Alternatively, seam a thin strip of felt inside and stitch vertical lines to create pockets.
- Finish top flap. If you want a top flap that folds over pencils when rolled, continue body height 1.5–2 in beyond pocket tops in sc.
- Roll & closure: Fold bottom edge up so pencils sit in pockets; roll from the short end. Add a button sewn to exterior and a cord loop at flap edge (or sew ribbon) to secure roll.
- Optional lining: Cut lining to panel size, sew pocket lines in the lining first if you prefer fabric pockets, then hand-stitch lining into crocheted panel along edges.
Finishing
- Weave in ends; if unlined, consider whipstitching a neat single-crochet border for stability. Press slightly (steam) if yarn allows.
Variations & tips
- Make brush pockets deeper and add elastic loops inside for thin tools.
- For a cleaner finish, stitch pocket partitions on the lining and slip the crocheted shell over it — this reduces visible seams and strengthens pockets.
2. Crochet Unicorn Pencil Pouch Pattern
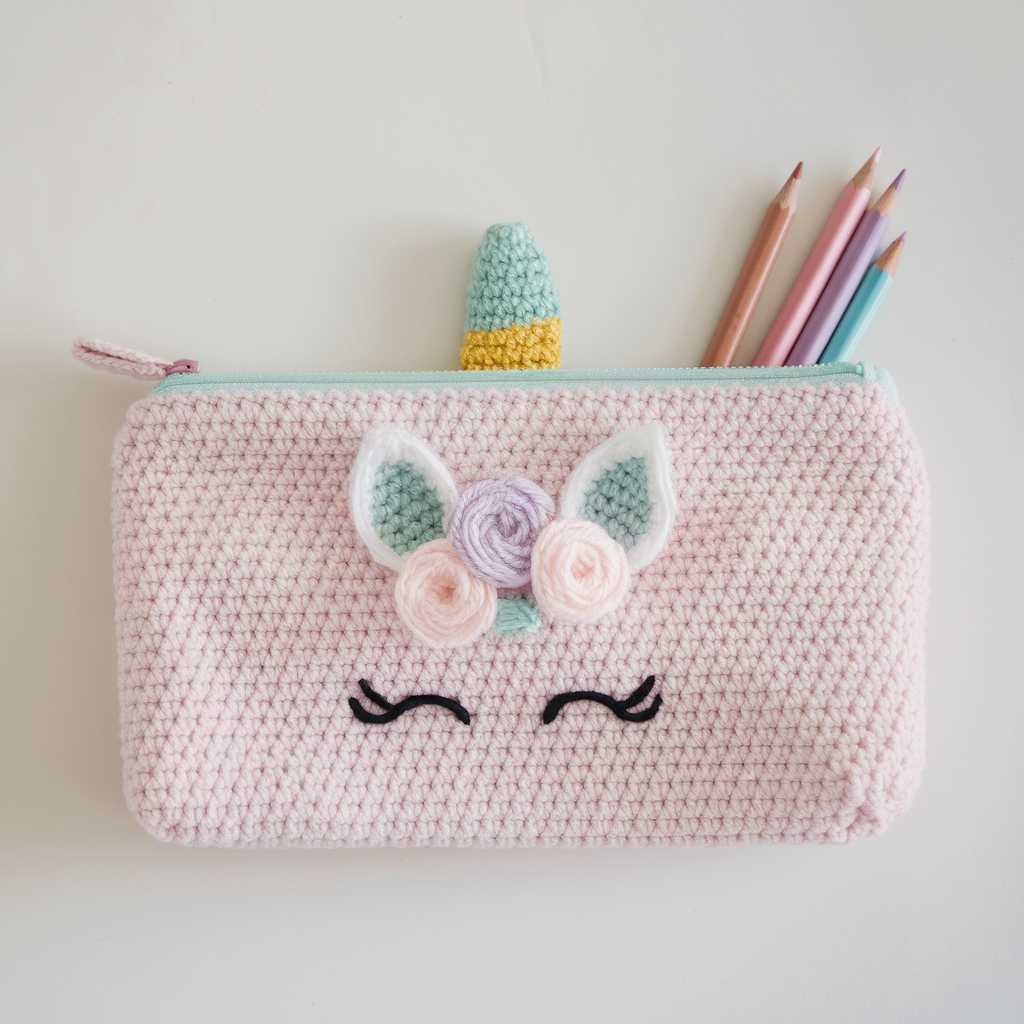
Overview: A whimsical zippered pouch shaped rectangle with a small appliqué unicorn head (or horn + mane stripe) — fun for children and fans of fanciful stationery.
Skill level: Confident beginner — requires applique and zipper insertion (or use snap closure).
Materials
- DK/worsted cotton in main color + rainbow colors for mane, small amount white/cream for horn/face: ~150 yds total
- Hook: 4.0–4.5 mm
- Small zipper (8–9 in) or magnetic snap, yarn needle, tapestry needle
- Small safety eyes/beads are optional — avoid for pouches for very young children; embroider instead.
Finished size: ~8.5 in × 4.5 in (fits standard pencils and pens)
Gauge (example): 18 sc = 4 in
Construction — step-by-step
- Calculate foundation chain for width. Example: for 8.5 in width at 4.5 sc/in → 38 sts. Chain 38 + 1.
- Work main pouch rectangle. Row 1: sc across. Work rows (sc) until height equals half the final pouch height (pouch is worked flat and folded) — for an 8.5 × 4.5 in pouch, work ~2.25 in high, then you’ll fold and seam. Alternatively work full height and seam sides later.
- Make a matching back panel (same size) — you can make one rectangle (front) and one (back). On front, leave space for applique.
- Unicorn applique (simple horn + mane):
- Horn: MR; sc 6 in ring (6). R2: sc 1, inc three times → 9 sc. R3: dec rounds tapering to a point or make a small cone by working 4–6 rounds decreasing gradually; fasten off leaving tail to sew.
- Mane pieces: Make small chain-loops in rainbow colors (ch 10, sl st into base) or make small petal motifs (sc circle + short petals) and sew as mane.
- Attach zipper: With RS up, center zipper along top edges of two panels. Pin zipper to panel edges and hand-stitch zipper to crochet with needle and thread using small, even backstitches. Alternatively sew zipper onto lining fabric first, then slip stitch lining to crochet shell.
- Assemble pouch: Align front and back panels right sides together and seam sides and bottom with whipstitch (leave zipper top open). If you worked full rectangle and folded, sew side seams leaving top open for zipper insertion.
- Sew on unicorn appliqué: Center applique on front panel and stitch through both applique and the panel, securing strongly. Embroider eye/nostril lines rather than using beads for durability. Position mane along top edge of horn.
- Optional lining: Cut lining fabric (two rectangles), sew side seams, insert lining into shell and sew lining to top edge around zipper for a neat interior.
Finishing & variations
- Instead of zipper, make a flap with button or snap.
- Make a full-body unicorn motif for a larger, bolder front panel.
- For a more durable bag, sew an inner pocket into the lining to hold erasers or sharpeners.
3. Crochet Tapestry Heart Pencil Pouch Pattern
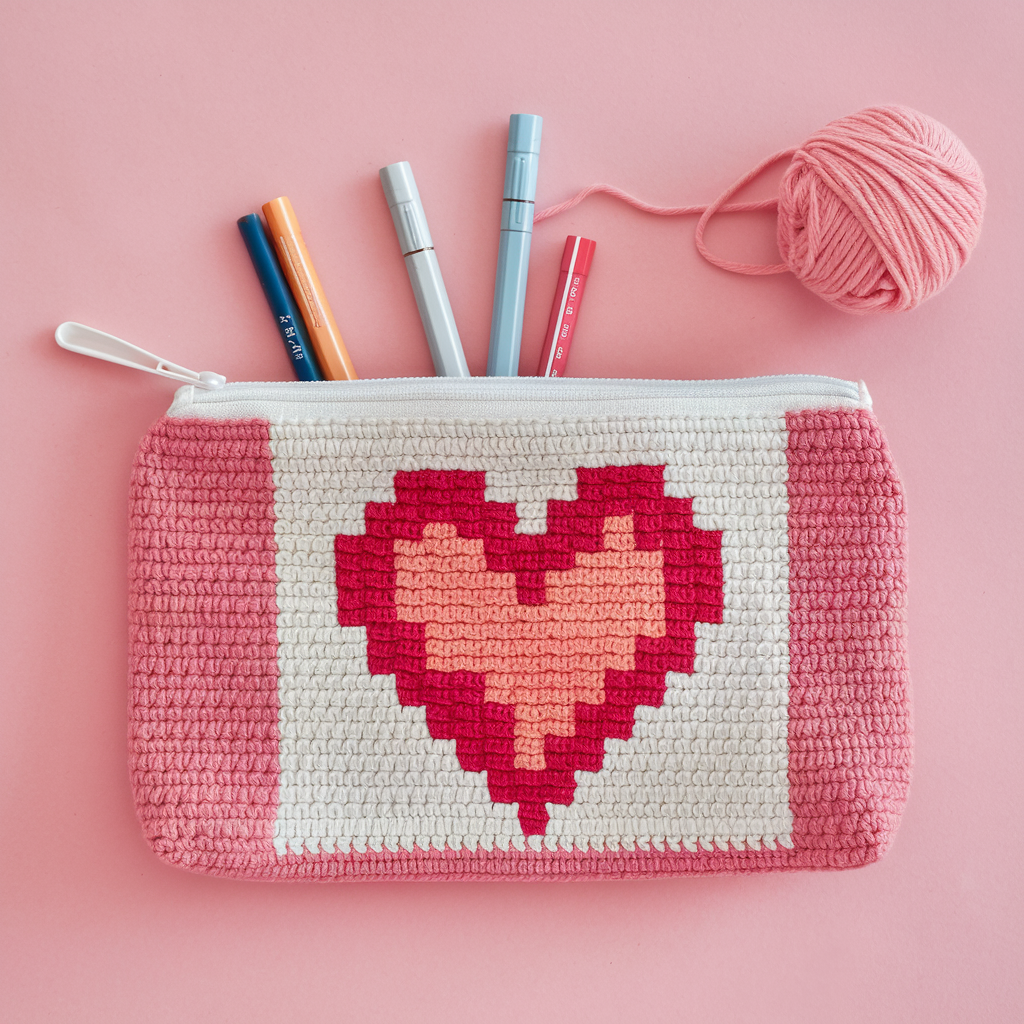
Overview: Crisp tapestry crochet (colorwork) creates a bold heart motif across a zippered or folded pouch. Tapestry work gives precise graphic motifs.
Skill level: Intermediate — requires color changes and carrying floats or working with bobbins.
Materials
- Mercerized cotton or cotton DK in 2–4 colors (high contrast for motif): ~200–300 yds total
- Hook: 3.5–4.0 mm for tighter tapestry fabric
- Zipper (8–9 in), tapestry needle, scissors
- Optional lining fabric
Finished size: ~9 in × 4.5 in
Gauge (example): 20 sc = 4 in in tapestry single crochet (sc in sc on RS, changing color per stitch)
Construction — step-by-step
- Design chart & calculate stitches. Draw or download a small chart of a heart (e.g., 30 × 16 grid fits 9 in × 4.5 in at your gauge). Count width in stitches and height in rows. Foundation chain equals chart width + 1 if using sc turning ch.
- Tapestry single crochet technique. Work sc across following the color chart: insert hook under two loops, pick up the working color, then pull next color through, carrying the unused color(s) along the top of the previous row (catch the floats every 3–4 stitches inside the stitch so floats are tidy). Maintain even tension.
- Work front panel fully following chart. Keep floats short and catch them frequently to avoid snagging.
- Make back panel in a solid color or complementary color using sc rows to same dimensions.
- Assemble zipper & lining as in Unicorn pouch: sew zipper to top of each panel (or attach zipper to lining first). Stitch side seams, insert lining, and finish zipper top.
- Optional: zipperless flap or button closure. If you prefer not to sew zipper, work a flap and button loop — but note tapestry is dense; a zipper is most secure.
Finishing & variations
- Make multiple small motifs (polka hearts) instead of one large heart across the front.
- Use gradient yarn for background and solid color for the heart for a softer look.
4. Crochet Bear Zipper Pencil Pouch Pattern
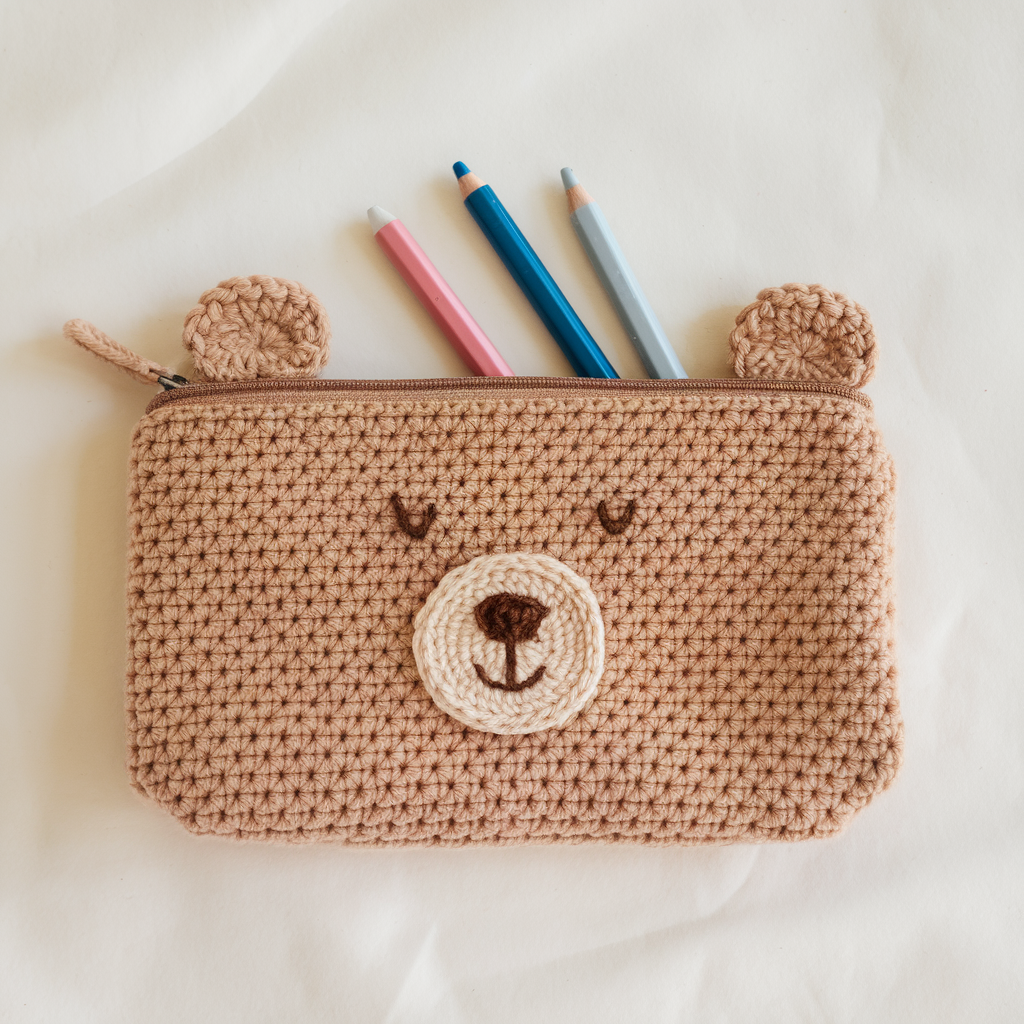
Overview: Cute animal pouch with small sewn-on ears and embroidered face; zipper top for secure storage. Great for kids and animal lovers.
Skill level: Confident beginner — basic amigurumi appliqué + zipper insertion.
Materials
- Worsted cotton in main color + contrast for inner ears/face: ~150–200 yds
- Hook: 4.0 mm
- 8–9 in zipper, yarn needle, embroidery floss for facial features, small button nose (optional; embroider instead for young kids)
Finished size: ~9 in × 4.5 in
Construction — step-by-step
- Work rectangle for pouch shell. Same as Unicorn pouch: foundation chain for width, sc rows for height. Make two identical panels.
- Bear ears (make 2). Small semi-circles:
- MR, ch1; 6 sc in ring; R2: inc around = 12 sc; R3: (sc 1, inc) around = 18 sc; R4: sc around for a small semicurve; finish and leave tail for sewing. Fold slightly and seam base for ear shape.
- Attach zipper & assemble body same technique as Unicorn pouch.
- Sew ears to front panel. Position ears at top edge near zipper — leave a small bit of zipper showing between them for a cute silhouette. Sew ears through panel and, if using lining, through lining for extra security.
- Embroider face. Use satin stitch for eyes and backstitch for smile. Sew small embroidered nose; avoid beads for children. Reinforce all embroidery on wrong side with small piece of felt if desired.
- Optional stuffing. Lightly stuff the ears or add a tiny bit of soft fill for 3D look; sew closed.
Finishing & variations
- Make other animals (cat, bunny) by changing ear shapes and embroidery.
- Add small strap loop to use as wristlet.
5. Crochet Granny Stitch Pencil Pouch Pattern
Overview: A charming pouch using granny-cluster rows for boho texture; works best with a lining and zipper because granny stitch is open by nature.
Skill level: Confident beginner — granny clusters and joining.
Materials
- Worsted cotton or cotton-blend: ~200–300 yds
- Hook: 4.0–4.5 mm
- Lining, zipper (8–9 in), tapestry needle
Finished size: ~9 in × 4.5 in (adjust by repeats)
Gauge (example): granny clusters: ~3 clusters = 2 in (make swatch)
Construction — step-by-step
- Decide motif repeat & panel size. A granny cluster block might be 4 clusters wide per row to achieve ~9 in width. Calculate chain multiple: classic granny cluster worked as clusters into chain or into spaces; use a multiple of 3 or 4 depending on chosen granny variant. Chain foundation accordingly.
- Work front and back panels in granny rows. Example granny row: (ch 3, 3 dc) in space, ch1, skip next 3 sts repeat. Build rows until half the height, add top flap if desired. Make back panel same size.
- Add a denser border for structure. Work 2–3 rounds of sc around panels (or 1 round of sc in BLO) to close some holes and give a stronger seam to sew lining to.
- Insert lining (recommended). Make a fabric lining cut slightly smaller than panels, sew side seams leaving zipper top open. Sew zipper to lining first, then top-stitch lining to crochet around zipper for neat interior.
- Assemble pouch. With zipper attached to lining and crochet, seam side edges by sewing through lining and crochet for neat finish.
Finishing & variations
- Use variegated yarn for a vintage granny look or solid for modern minimalist.
- Add an external pocket by crocheting a small rectangle and sewing onto front panel before adding lining.
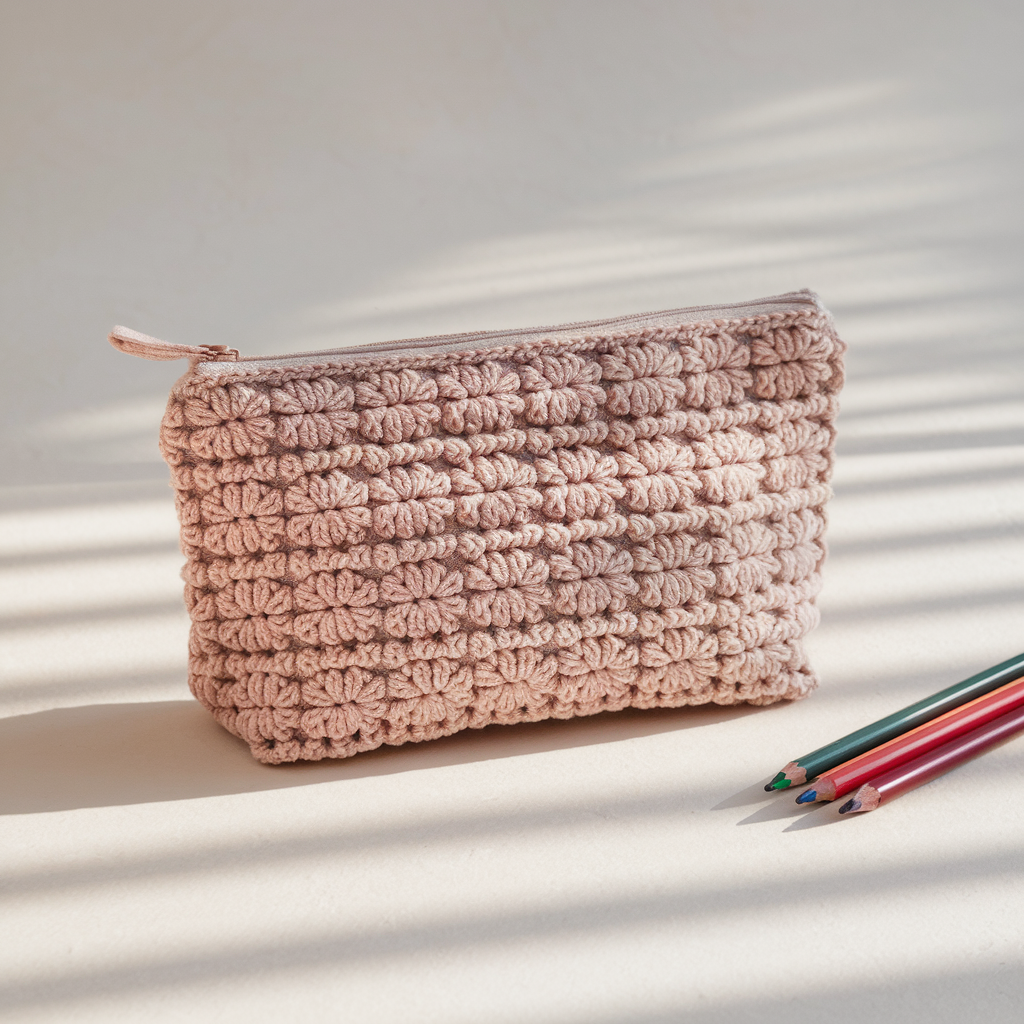
6. Crochet Star Stitch Pencil Pouch Pattern
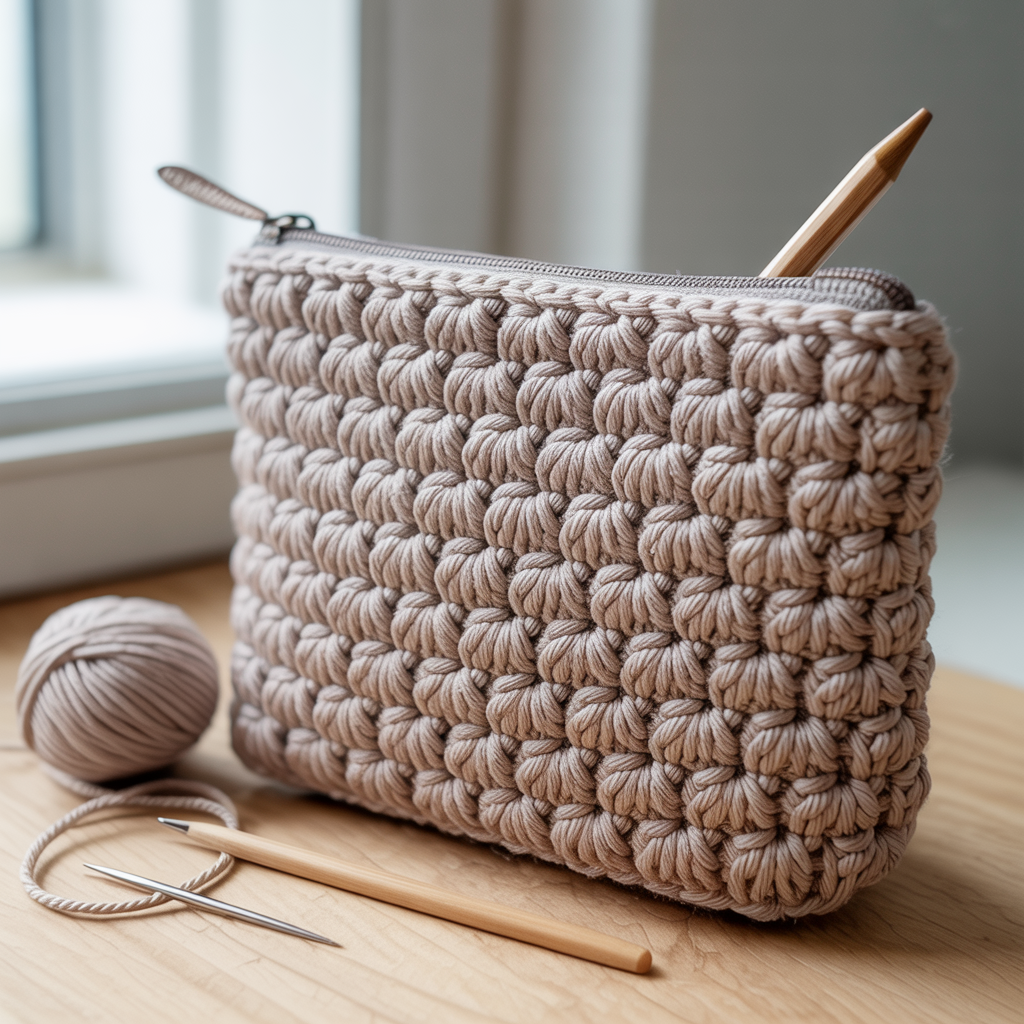
Overview: A textured star-stitch (also called jasmine or daisy stitch) pouch yields a rich, puff-like surface that highlights stitch definition — beautiful single-color or tonal.
Skill level: Intermediate — star/jasmine stitch technique and consistent tension required.
Materials
- DK to worsted cotton or cotton blend: ~200–300 yds
- Hook: 4.0 mm (choose size that gives tight star stitches)
- Zipper or flap closure, lining optional
Finished size: ~9 in × 4.5 in
Gauge (example): star stitch dense — 20 stars = 4 in horizontally (swatch to confirm)
Construction — step-by-step
- Foundation & first row for star stitch. The star stitch is typically worked over two rows: a set of partial stitches gathered together. Use a multiple that fits your width. For example, chain to reach 9 in width at a multiple required by your star stitch pattern (often multiple of 2 + 1).
- Star stitch pattern (basic):
- Row 1: Insert hook in designated stitch, pull up loop, repeat 6 times to have 7 loops on hook, yarn over and pull through all loops, ch 1 to close star. (Technique varies slightly — follow your star stitch variant carefully.)
- Row 2: sc across stars, anchoring them.
- Work panel rows until desired height. Because star stitch leads to dense fabric that shortens with pulling, check your RPI and adjust rows.
- Add border rounds in sc for structure (2 rounds recommended).
- Zipper & lining. Insert zipper as previous patterns — star stitch shows texture beautifully on exterior while lining provides a smooth interior for pens.
Finishing & variations
- Use contrast zipper tape for pop of color.
- Add a small wrist strap crocheted in sc and sewn to side for easy carrying.
7. Crochet Candy Stripes Pencil Pouch Pattern
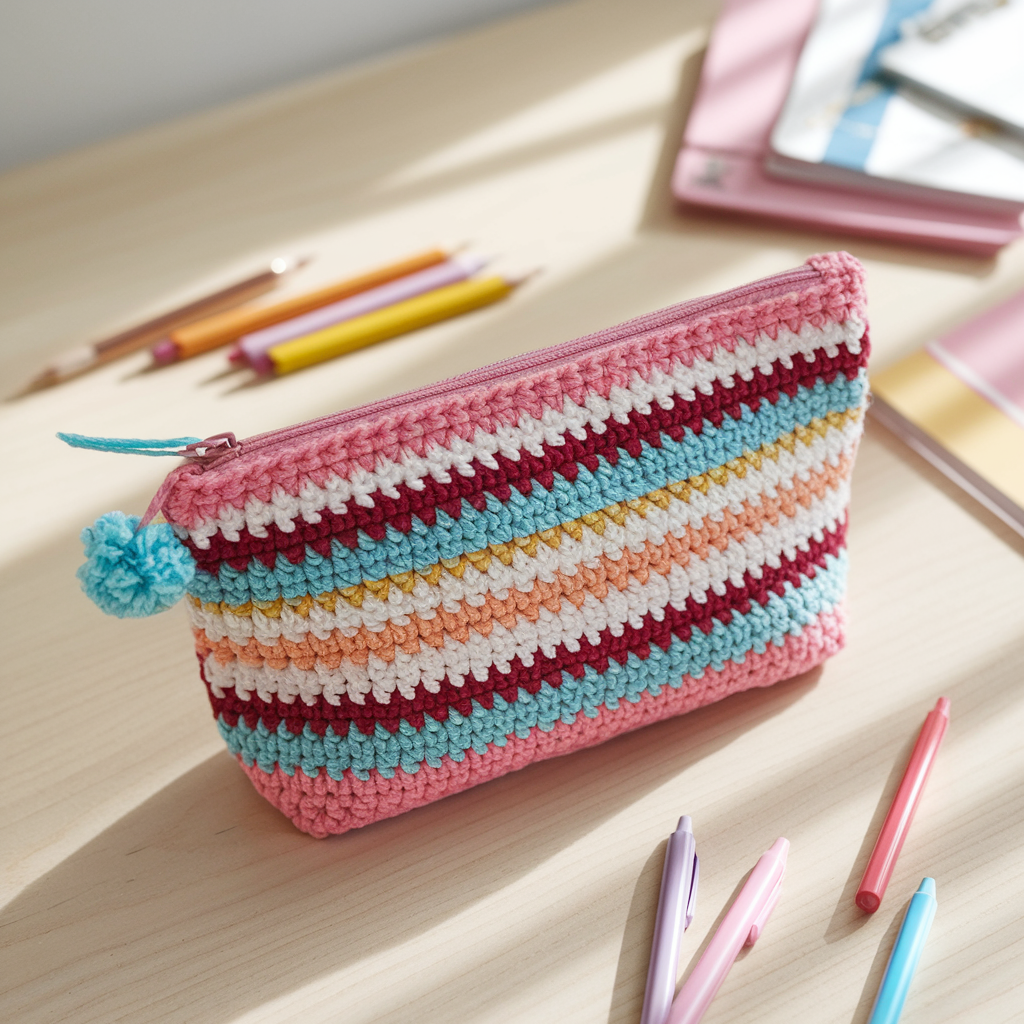
Overview: Quick, cheerful stripes pouch using self-striping yarn or color changes every few rows — fast to make and very giftable.
Skill level: Beginner
Materials
- Worsted or DK yarn in 2–4 colors or self-striping cake: ~150–200 yds
- Hook: 4.0–4.5 mm
- Zipper (8–9 in) or button flap, tapestry needle
Finished size: ~9 in × 4.5 in
Gauge (example): 18 sc = 4 in
Construction — step-by-step
- Chain for width. Example: ch 38 + 1 (for 9 in width). Row 1: sc across.
- Work stripes. Change color every 2–4 rows depending on stripe width. Use standing sc join or carry yarn up the side and catch floats every 3–4 stitches for neat side edges.
- Make back panel in same stripe order so pattern matches at seam (optional).
- Add zipper or flap. Follow zipper insertion instructions from prior designs. If you prefer quick finish, make a flap: fold top edge and work 3 rows of sc across to form a flap, add a buttonhole by chaining 3 and skipping 3 sts, sew a button on other panel.
- Optional lining. For best durability, add a lining sewn to zipper and top edge.
Variations & styling
- Use thicker yarn and larger hook to make a roomy pouch; add tassel or pom-pom zipper pull.
- Make matching sets (pencil pouch + coin pouch) with coordinated stripe widths.
Final finishing, care & troubleshooting (applies to all pouches)
- Seam neatness: For zipper pouches, attach the zipper to the lining and then topstitch to the crochet shell for cleaner finish; this avoids visible machine stitching on crochet.
- Lining tips: Use quilting cotton for lining and add fusible interfacing if you want a firmer interior. Attach lining to zipper first, then insert into shell to avoid visible stitches.
- Weaving ends: Weave tails at least 2 in into fabric and knot where necessary. For colorwork, weave ends into same color sections to hide them.
- Stitch density: If pens poke through, re-make with smaller hook for denser fabric or add a double layer (double crochet body then line).
- Machine washing: Most cotton pouches are machine-washable on gentle; close zipper and wash inside a garment bag; reshape and dry flat. Avoid tumble drying if you used interfacing or leather.
- Snag prevention: When carrying sharp metal pencil tips, place a small slip of fabric or leather inside to protect crochet fabric from punctures.
- Sizing changes: To widen pouch, increase chain by adding foundation chains equal to your SPI × desired extra width; to lengthen add rows.
Conclusion
These seven pencil pouch patterns give a range of styles and techniques — from practical roll-ups and structured zip pouches to textured star stitch and playful unicorn or bear designs. Pick a quick beginner pattern (Candy Stripes, Granny Stitch) to practice sizing and zipper insertion, or try the tapestry heart or star stitch for crisp colorwork and texture. Add lining and a zipper for a professional finish, or make simple flap closures for fast portable gifts.

slot365 com luôn đặt người chơi lên hàng đầu, do đó nhà cái này cung cấp dịch vụ hỗ trợ khách hàng 24/7, giúp giải quyết mọi thắc mắc vấn đề mà thành viên gặp phải trong quá trình tham gia cá cược. Đội ngũ nhân viên tại đây được đào tạo chuyên nghiệp, luôn sẵn sàng giải đáp mọi câu hỏi của người chơi một cách nhanh chóng và chính xác.
slot365 Hiện nay, nền tảng đã phục vụ hàng triệu người đến từ nhiều quốc gia, trong đó có Việt Nam. Sự phát triển này không chỉ chứng tỏ uy tín của nhà cái mà còn khẳng định vị thế vững chắc của sân chơi trong ngành công nghiệp cá cược.