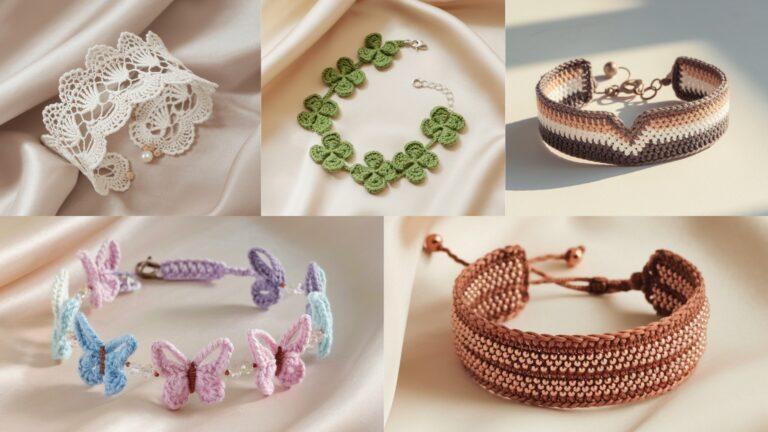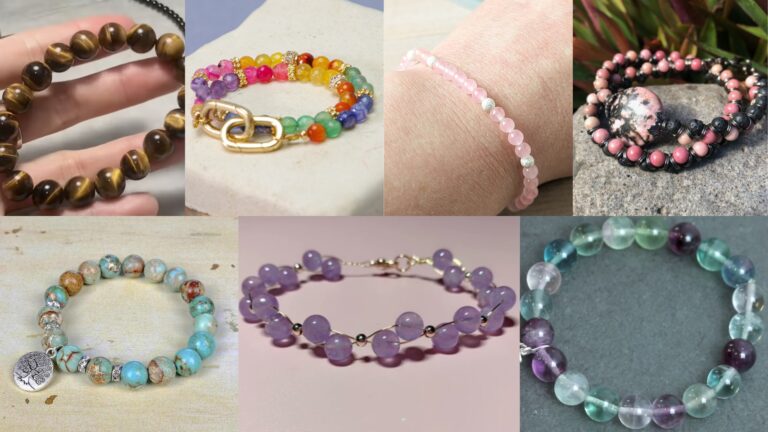
Small, wearable projects are a crocheter’s best friend — they’re portable, quick, and gorgeous to gift. Below is a full blog-ready post you can publish: a helpful introduction that covers tools, sizing and how to calculate stitch counts, then seven long, detailed bracelet patterns (with step-by-step instructions, examples, variations and finishing tips). Each pattern includes an approachable difficulty level and ideas for styling.
tools, yarn, sizing, measuring & abbreviations
Why crochet bracelets?
They’re fast to make, use small amounts of yarn, and let you play with texture, beads and tiny appliqués without committing to a big project. Bracelets can be fitted (button loops), adjustable (sliding knots / cords), or elastic-backed for easy on/off.
Tools & materials
- Yarn: sport / DK / worsted weight are common. Use cotton or cotton-blend for crisp stitch definition and comfort next to skin. For delicate lace bracelets choose fingering or DK; for sturdy cuffs pick worsted or hold two strands.
- Hooks: 2.5–4.5 mm depending on yarn weight and how firm you want the bracelet to be.
- Notions: tapestry needle, small buttons, lobster clasps or jump rings (if using hardware), small beads/seed beads (optional), thin elastic cord (optional), jewelry pliers (optional for attaching hardware).
- Optional: thin ribbon or suede cord for tie closures, a small lobster clasp for a tidy finish.
How to size a bracelet (quick)
- Measure the wearer’s wrist where the bracelet will sit. Common adult wrist sizes: small ~6 in, medium ~6.5–7 in, large ~7.5–8 in. Decide how snug you want the bracelet: for a fitted cuff subtract 0.25–0.5 in; for loose wrists add up to 0.5–1 in.
- Swatch in your chosen stitch and yarn. Count stitches per inch (spi) across a flat 1-inch measure. Use this to calculate foundation stitches:
Formula: stitches per inch × desired finished circumference (in inches) = number of stitches required
Example (work-through): if your swatch gives 6 sc = 1 in, and you want a 7 in finished bracelet, calculate:
6 × 7 = 42 → use 42 stitches (or round to nearest stitch multiple required by stitch pattern).
If a stitch pattern requires a multiple (for example a lace repeat that is a multiple of 4 + 2), adjust to the nearest compatible count and re-measure before seaming.
Closures & adjustability
- Button + loop: classic and easy — make loop by chaining a few stitches or crocheting a small loop.
- Sliding cord / adjustable knot: use thin cord or leather; works best with a lightweight crocheted band.
- Elastic: insert a short length of 1–2 mm clear elastic into a thin casing for a stretch bracelet.
- Jewelry hardware: lobster clasp + jump ring gives a neat store-bought finish (requires pliers).
Common abbreviations (US)
- ch = chain
- sl st = slip stitch
- sc = single crochet
- hdc = half double crochet
- dc = double crochet
- tr = treble crochet
- st(s) = stitch(es)
- rep = repeat
- sp = space
- BLO/FLO = back loop only / front loop only
- sk = skip
- MR = magic ring
1. Crochet Adjustable Bracelet Pattern
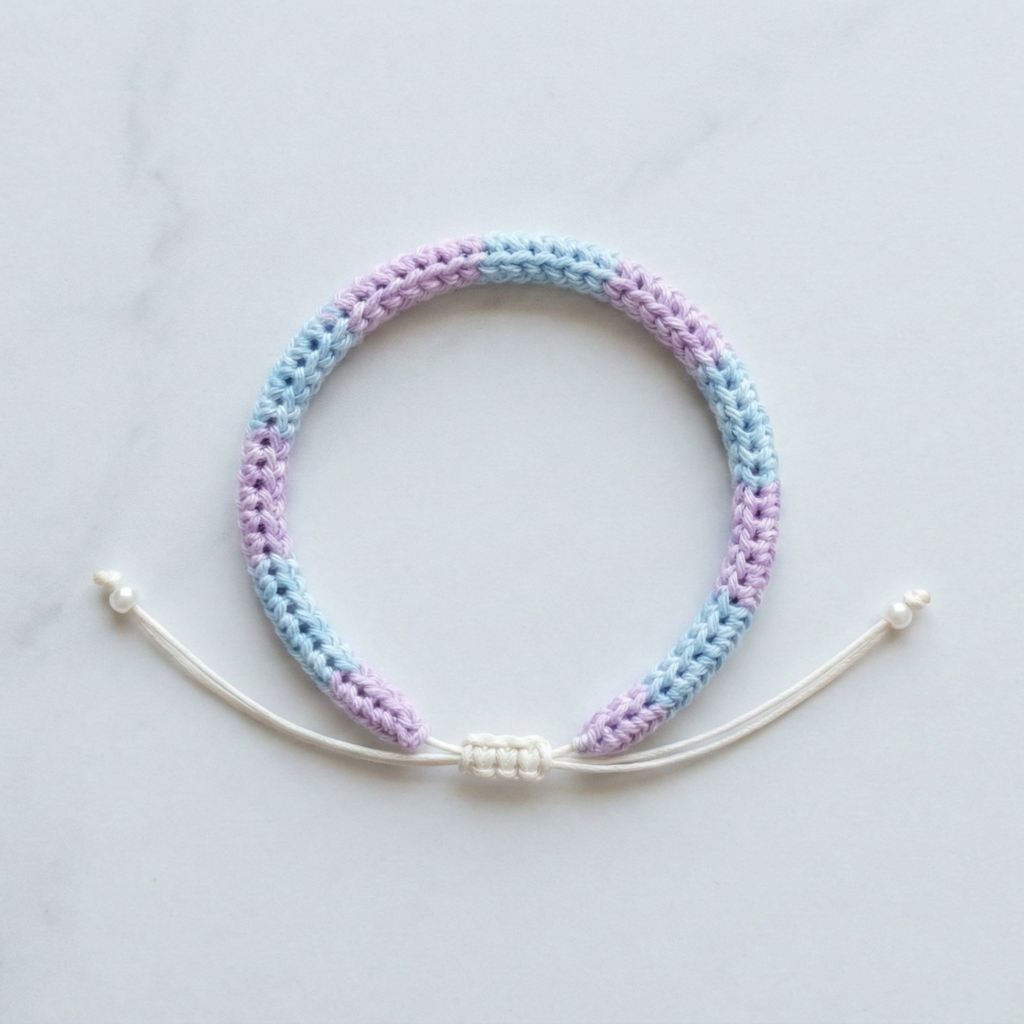
Simple, wearable, and adjustable — a tight single-crochet band with a cord threaded for a sliding closure.
Skill level: confident beginner
Materials (sample, Medium wrist ~6.5 in)
- Sport/DK cotton ~20–30 yd.
- Hook: 3.5 mm.
- Thin cord (waxed cotton or leather) 14–18 in long for sliding knot, or thin ribbon.
- Small bead or toggle for cord ends (optional).
Stitch notes: dense sc tube or flat strip seamed. This pattern uses a flat strip seamed into a tube with a cord threaded through slits or eyelets.
Step-by-step
1) Swatch & compute
- Make a small sc swatch and measure stitches per inch. Example: 6 sc = 1 in. For a target finished circumference of 7 in (adjust for fit), compute: 6 × 7 = 42 sc.
2) Foundation chain
- Ch 42 (example) + 1 turning ch.
3) Row 1 (base): sc in 2nd ch from hook and across (42 sc). Turn.
4) Rows 2–6 (build height): ch 1, sc in each st across. Repeat until piece measures about 0.5 in wide for a slim bracelet or 0.75–1 in for a wider cuff.
5) Make eyelet row for cord
- Next row (eyelets): sc 3, ch 3, sk 3 repeat across. This forms small holes to thread cord through. Adjust spacing to get even holes.
6) Last rows & finish
- Work 1–2 rows sc to stabilize, fasten off leaving long tail. Fold strip so short ends align and whipstitch together or use mattress stitch for a flat seam.
7) Thread cord & adjust
- Weave cord through eyelets. Tie sliding knot (or use a small bead and knot ends) so wearer can tighten or loosen. Trim cord and add beads if desired.
Variations & tips
- Use hdc to create a slightly taller band.
- Add a small charm onto the cord for personality.
- For a neater edge, after seaming work a round of sc around the joined seam.
Finishing
- Weave in ends and block lightly if needed. Slide the knot and show how to tighten for an adjustable fit.
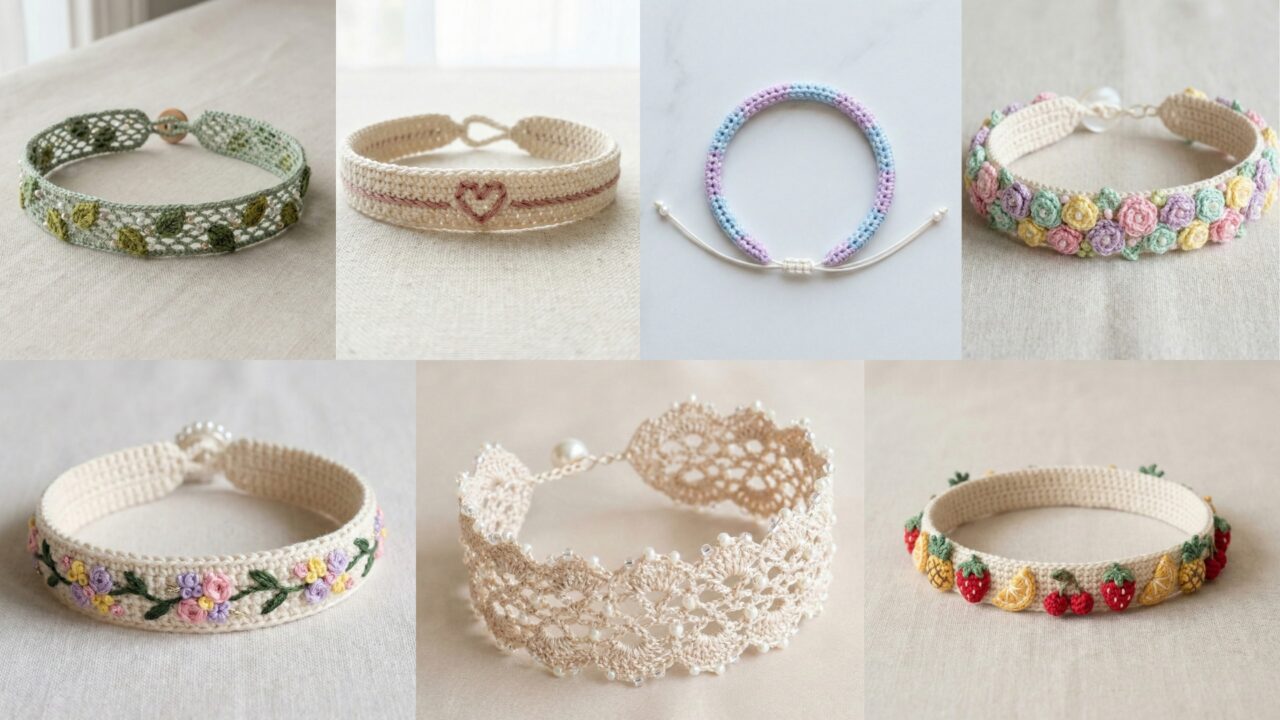
2. Crochet Woodland Whispers Bracelet Pattern
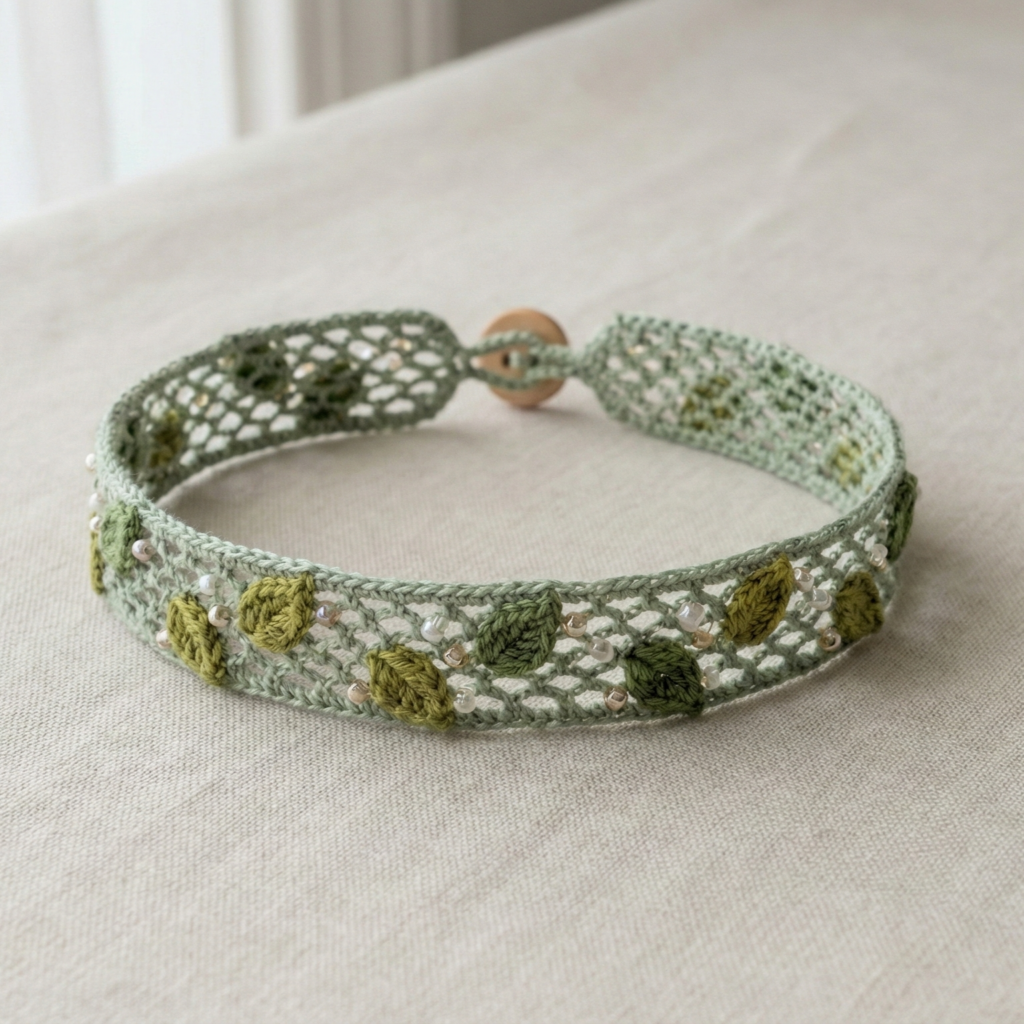
Pretty little leaves and seed-bead details give this band a nature-inspired look. Works as a flat strip or a tube.
Skill level: intermediate (appliqués + beadwork)
Materials (Medium wrist)
- DK cotton in main color + contrast color for leaves — ~30–40 yd.
- Small seed beads (size 6/0 or 8/0) — a pinch.
- Hook: 3.5 mm.
- Tapestry needle and fine beading needle (or thread beads onto yarn before crocheting).
Stitch notes: the bracelet is worked as a narrow mesh with tiny three-stitch leaf appliqués worked directly on the band and beaded accents added to the mesh.
Step-by-step
1) Compute foundation (example)
- Suppose 5 sc = 1 in in your chosen yarn (denser fabric). For a 6.5 in wrist: 5 × 6.5 = 32.5 → round to 33 (or adjust to pattern multiple).
2) Make mesh band
- Ch 33 + 1. R1: sc in 2nd ch from hook and across (33 sc). Join to form a loop. (If you prefer a tube, work rounds instead of rows: ch foundation 33, join, then sc around in rounds a few times to create a tube.)
- R2: ch 1, sc, ch 2, sk 1 repeat around to create airy mesh. This gives spaces to show tiny seed beads and anchor leaves.
3) Add tiny leaves
- Leaves are worked into previously made ch-2 spaces. Make a small leaf: join contrast color into a ch-2 sp: sc, hdc, dc, hdc, sc in the space — small tapered leaf. Fasten off and continue. Make 4–6 leaves spaced evenly.
4) Add beads
- Option 1: Pre-string beads onto yarn before you start and slide beads into place where you want them as you work: on a sc, slide a bead up and sc over it to trap it in the stitch.
- Option 2: Use a beading needle and sew beads onto the finished band in the mesh holes for scattered dew-like sparkle.
5) Edge & closure
- Work one round of sc around top and bottom edges to stabilize. Make a small button loop: ch 6, sl st to join and whipstitch loop to inside of band; sew a small button on opposite edge. Alternatively fold a corner and stitch a small snap.
Variations & tips
- Use metallic beads for early morning dew effect.
- Make the band slightly wider and add a central vine of leaves for a cuff effect.
Finishing
- Weave in ends, trim beads and secure them so they don’t fall off in daily wear. Light block to shape the leaves flat.
3. Crochet Line Heart Crochet Bracelet Pattern
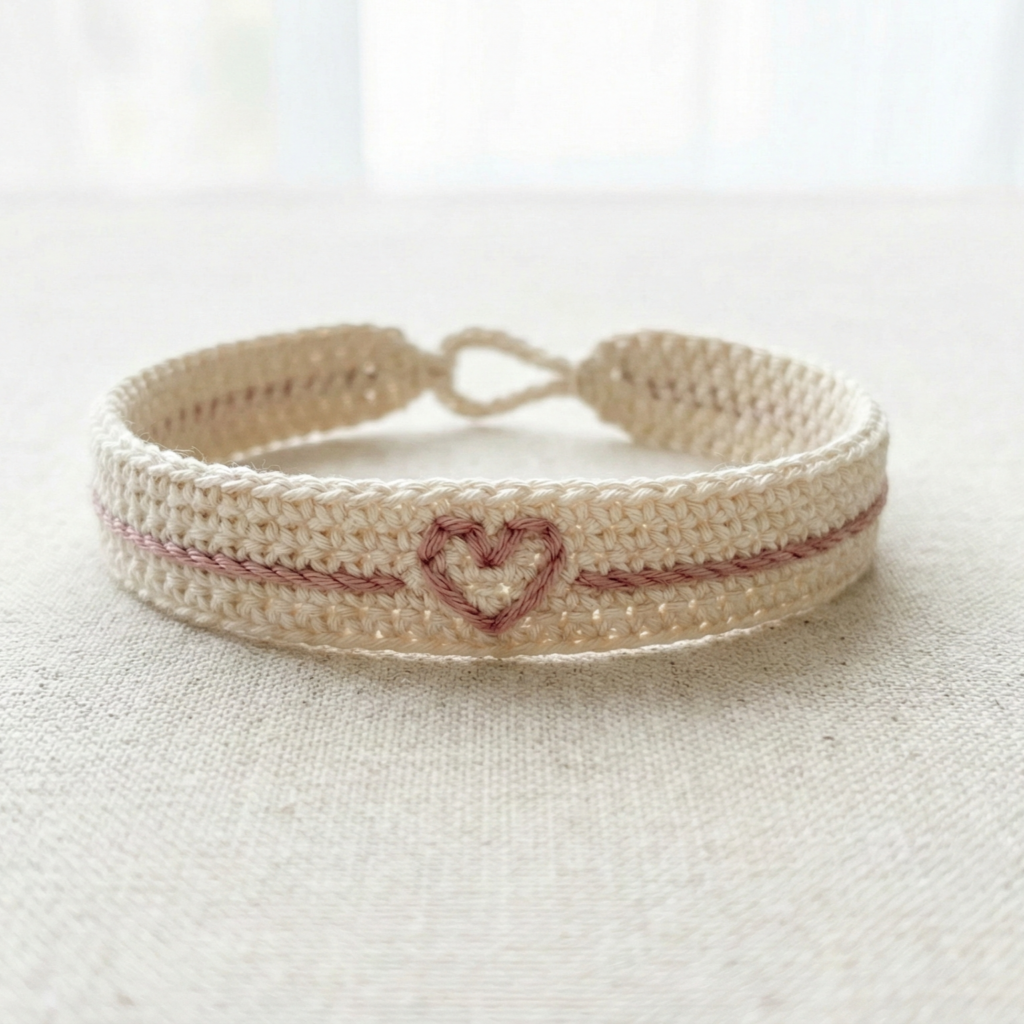
A modern minimalist bracelet that uses a simple centerline heart motif created with surface slip-stitching across a narrow band.
Skill level: confident beginner → intermediate
Materials (Medium wrist)
- Sport/DK cotton main color ~25 yd; contrast color for heart ~5–10 yd.
- Hook: 3.0–3.5 mm for a neat fabric.
- Tapestry needle.
Stitch notes: base is a narrow sc or hdc band; the heart is added as a surface slip-stitch or small appliqué.
Step-by-step
1) Swatch & compute
- Example gauge: 6 sc = 1 in. For 6.5 in wrist compute 6 × 6.5 = 39 stitches. Ch 39 + 1.
2) Make the base
- Row 1: sc in 2nd ch from hook across (39 sc). Join into a loop (or work in rounds). R2–R6: sc around to make a 0.5–0.75 in wide band. Adjust rows for desired width.
3) Draw the heart line
- Using contrast yarn and a tapestry needle, embroider a simple linear heart across the band: mark center of band. The line heart is essentially a continuous surface slip-stitch or backstitch: bring yarn up at center, work short diagonal to top left, back to center, diagonal to top right and back — or pre-crochet a tiny heart appliqué using a MR (small 6-st heart) and sew lightly.
Alternative: use surface slip stitch for clean, slightly raised line: (a) with top side facing, insert hook from bottom to top at start point, ch 1 and sl st along the band surface following heart shape, catching top loops only to make a crisp line.
4) Edge & closure
- Add a neat sc round or a picot edge if you want a dainty look. For closure, sew a small snap or button and make a tiny chain loop, or leave ends as tails and tie with a neat bow at wear time.
Variations & tips
- Use metallic thread for the heart to make it shimmer.
- Make multiple tiny hearts in a row for a pattern.
Finishing
- Secure embroidery stitches by weaving ends and placing a small dot of fabric glue on the knot underside if needed (test to make sure wearer won’t feel it).
4. Crochet Indie Fruits Bracelet Pattern
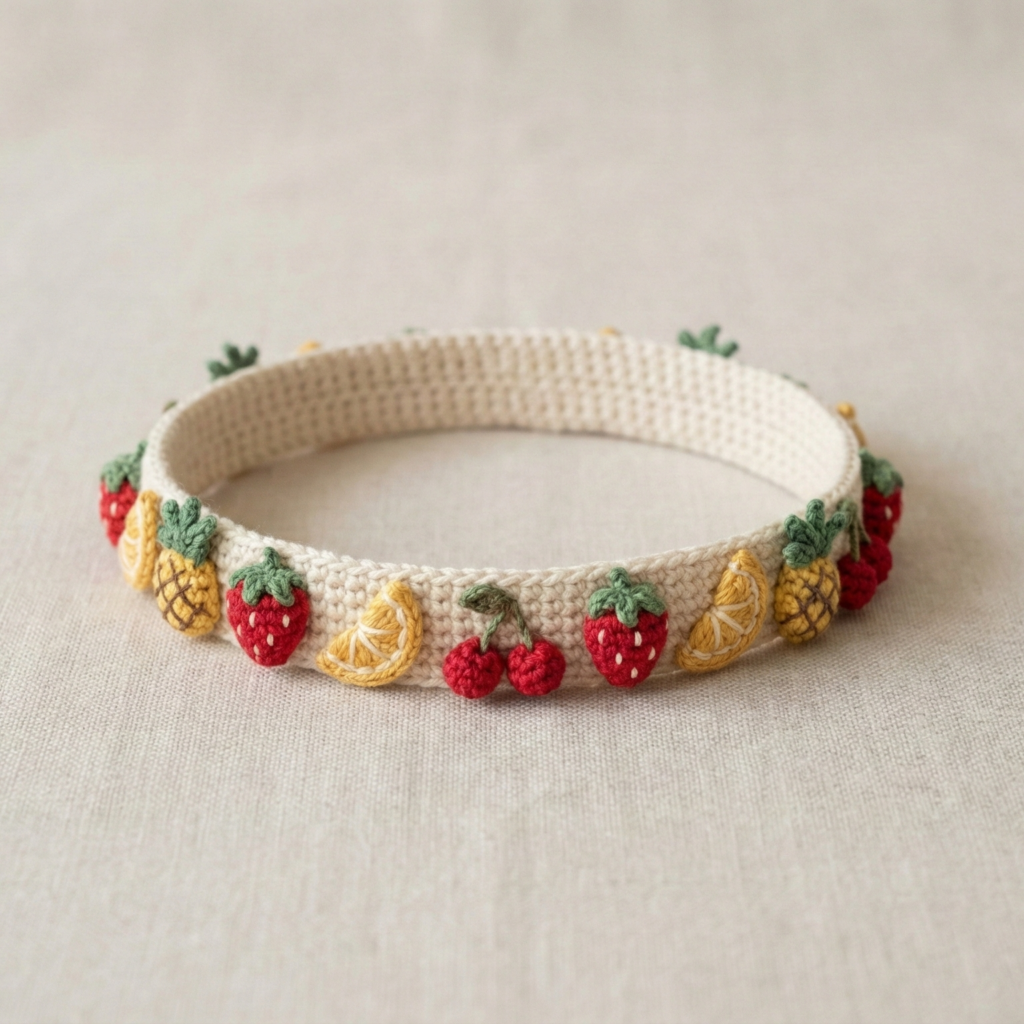
Playful micro-appliqués — tiny cherries, pineapple, lemon or strawberry — sewn onto a band to make a colorful festival bracelet.
Skill level: intermediate (tiny appliqués + assembly)
Materials (Medium)
- DK scrap yarns in fruit colors (red, green, yellow, pink) — small amounts per fruit.
- Hook: 2.75–3.5 mm.
- Thin elastic (optional) for easy slipping on/off if you prefer no clasp.
Stitch notes: the bracelet base is a narrow band (sc); fruit appliqués are tiny MR motifs sewn on.
Step-by-step
1) Base band
- Compute width as before. Example: ch 36 (for a 6 in snug fit at 6 sc/in). Join and work sc in rounds for 6–8 rows to make a slim band.
2) Tiny fruit appliqués
Strawberry (mini):
- MR, ch 1, 6 sc in MR. R2: inc in each → 12 sc. R3: (sc 1, inc) around to shape small oval; shape top by stitching small green leaf cap (ch 5, sc along chain). Embroider tiny yellow seed dashes.
Cherry pair:
- Make two MR 6-st tiny rounds (red), fasten off leaving long tail to stitch both together and add a short green stem (ch 6, sl st back across) and a tiny leaf.
Pineapple (micro):
- Small oval body of 8–10 sc, top with a tight green tuft (short ch and sl st loops).
Make several fruits of your choosing — each is only 1–1.5 in and quick.
3) Arrangement
- Lay out fruits and sew them along the band’s centerline with secure stitches. Make sure the fruits are not too bulky for wrist comfort. If you want a clean interior, sew a small soft felt circle behind each fruit inside the bracelet.
4) Closure
- Option A: sew ends with an overlap and attach a small lobster clasp. Option B: finish with a short elastic casing: fold the band’s ends inward and stitch to make a small tunnel, insert elastic ring and stitch ends; this makes the bracelet slip on.
Variations & tips
- Make a fruit of the month or a themed set (berry set, tropical set).
- Add seed beads as fruit seeds for sparkle.
Finishing
- Weave ends and reinforce stitching under fruits to avoid loosening with wear.
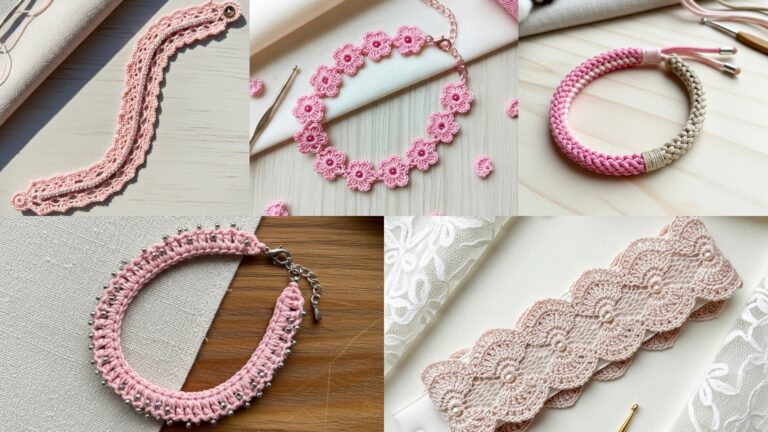
5. Crochet Champagne Lace Bracelet Pattern
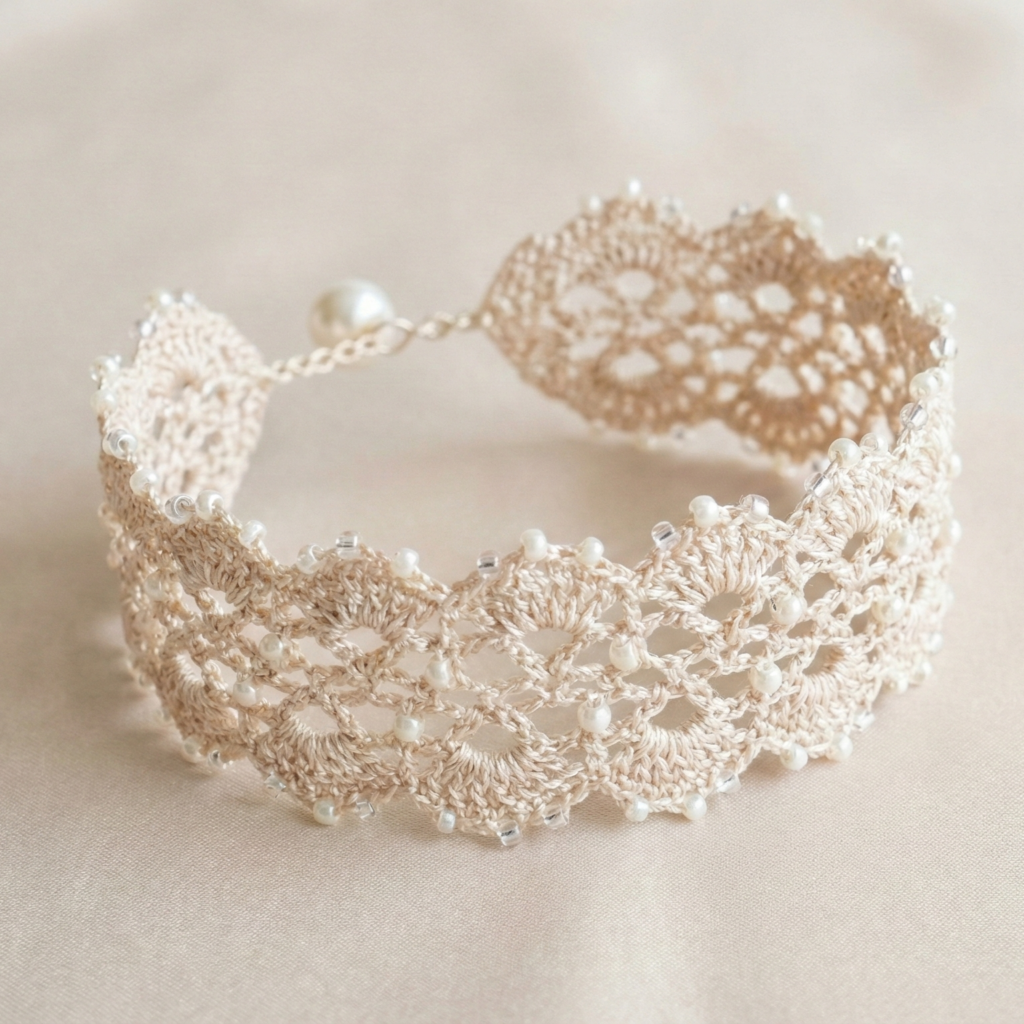
A delicate, beaded lace cuff perfect for wedding gifts or dressed-up looks. Tiny seed beads are worked into the lace as you crochet.
Skill level: intermediate → advanced (beadwork + lace repeats)
Materials (Medium)
- Fingering or light DK cotton or silk blend ~30–50 yd.
- Size 6/0 or 8/0 seed beads ~20–40 pcs.
- Hook: 2.5–3.5 mm (use a smaller hook for a finer lace).
- Optional: small hook to pre-string beads.
Stitch notes: a simple picot-lace repeat (chains + shells) with beads worked into the picots for subtle sparkle.
Step-by-step
1) Pre-string beads
- Thread your seed beads onto the yarn before starting — you’ll slide them down as needed. String about 30–40 beads depending on pattern.
2) Compute foundation
- Lace is stretchier; measure and aim for 0.25–0.5 in negative ease if you want bracelet to sit snugly. Example: 6 sc/in × 6.5 in = 39 sc base (or base measured in lace stitch multiples — adjust to lace multiple, e.g., multiple of 6 + 2).
3) Lace band (sample repeat)
- Ch 40 + 1 and join to form a loop (example). R1: ch 3 (counts as dc), ch 3, sk 2, dc around — this sets small openwork. R2 (bead round): sc into each dc, then ch 3 picot (slip bead onto yarn, slide bead close, ch 3 and sl st into top of previous sc to fix bead) — the picot will hold a bead. Continue lace rows until desired height (1/2–3/4 in wide is common for bracelets).
Alternative specific lacy repeat (shell + picot + bead):
- R1: (sc, ch 3, 5 dc in next st, ch 3, sc) repeating for small shell sections.
- R2: Work into chain spaces and place beads on the ch-3 picots — slip bead up and catch with a sl st to secure.
4) Edge & closure
- Work one or two rounds of sc to stabilize. Make a small chain-loop and sew a tiny decorative button (pearl button looks great) for closure.
5) Finishing
- Block lace gently on a small rounded template to open lace and line up beads. Make sure all bead knots and ends are secured so beads don’t slip off.
Variations & tips
- Use metallic thread for a subtle sheen.
- Stitch beads into the center of shells for a different look.
6. Crochet Flower Fairy Bracelet Pattern

A whimsical band covered with tiny 3-D flowers and picot edges — great for a soft boho look.
Skill level: intermediate
Materials (Medium)
- DK cotton in base + petal color ~40–50 yd.
- Hook: 3.0–3.5 mm.
- Tiny seed beads or small buttons for flower centers.
Stitch notes: small rosette or five-petal flowers worked as appliqués and sewn to band.
Step-by-step
1) Base band
- Ch to desired count (example 38 ch for medium). Join and work sc rounds until band width ~0.5–0.75 in.
2) Tiny 5-petal flowers (make 8–10)
- MR, ch 1, 6 sc in MR, sl st. R2: (ch 3, 3 dc, ch 3, sl st in same st) repeat 6 times to make six tiny petals (or make 5 petals for classic look). Fasten off leaving tail for sewing. Add a bead or French knot center.
3) Attach flowers
- Sew flowers close together across the band’s top; add small leaves or picot dots between flowers. For 3-D effect, use slightly smaller hook for flowers than for the base so they pop.
4) Edge
- Add a picot edge: sc, ch 3, sl st into top sc every 3–4 stitches to make whimsical scallop.
5) Closure
- Make a small button loop and sew a tiny decorative button like a mother-of-pearl or wood button.
Variations & tips
- Use gradient colors for an ombré floral band.
- Make the band wider and add multiple flower rows for a cuff.
Finishing
- Weave ends securely, and for comfort, tuck the flower center knots inside a felt circle inside the band so the wearer won’t feel any rough stitches.
7. Crochet Flower Embroidered Bracelet Pattern
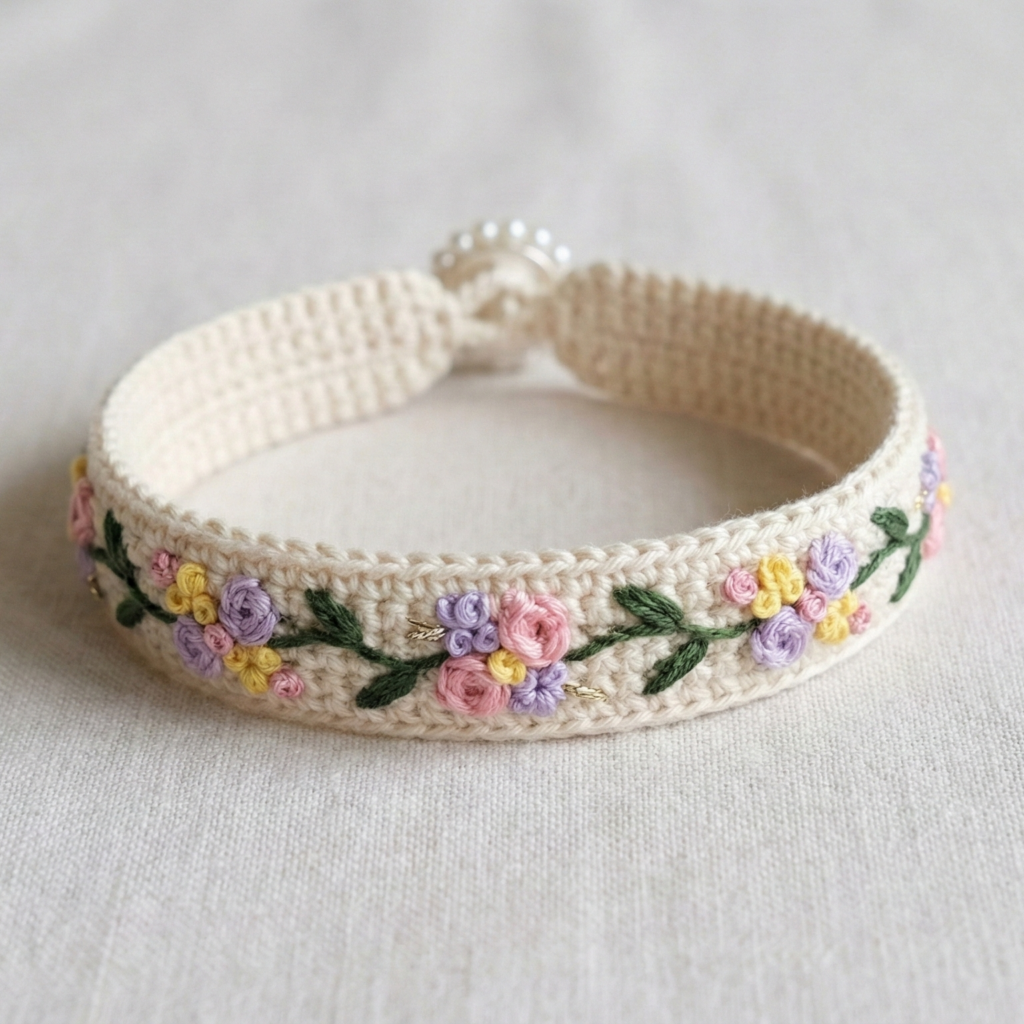
For makers who like crochet + hand embroidery: this pattern uses a simple band and surface embroidery to add flower motifs and vines.
Skill level: confident beginner (basic embroidery + crochet)
Materials (Medium)
- Sport / DK cotton for base ~30 yd, small embroidery floss or thin yarn in 2–3 colors for flowers and leaves.
- Hook: 3.5 mm.
- Embroidery needle and tapestry needle.
Stitch notes: base band worked in sc or hdc; surface slip-stitch embroidery or simple running/backstitch and French knots make flowers.
Step-by-step
1) Base band
- Compute count and ch accordingly (example ch 40). Join and work sc in rounds for 6–8 rounds or until desired width.
2) Embroidery prep
- Using a yarn needle and stranded embroidery floss, mark layout with pins or tail threads so flowers will be evenly spaced.
3) Embroidery stitches
- French knot = tiny flower center; lazy daisy = petal; backstitch = stem. Surface slip-stitch (crochet with contrast color on top of finished fabric) will also look very neat: insert hook from back to front at start point, pull up loop, sl st onto top loops along desired curve to make a slightly raised embroidered line.
4) Example motif (small vine with three blossoms)
- Using dark green floss, make a backstitch vine across the center. Add 3 small lazy-daisy petals in a contrasting yarn with a French knot center. Space motifs every 1–1.5 in.
5) Edge & closure
- Finish edges with a neat round of sc. Make a small button loop and sew a decorative button.
Variations & tips
- Embroider names or initials for a personalized gift.
- Use metallic floss sparingly for highlights.
Finishing
- Secure embroidery knots with a small dab of clear craft glue (inside) if desired for heavy use; always test first.
Final finishing & care tips (applies to all patterns)
- Always weave in ends securely — bracelets are high-use items.
- If you add buttons or beads, stitch them through to the inside band and knot multiple times for security.
- For jewelry hardware (clasp/jump rings) use proper pliers to close jump rings so they don’t open in wear.
- Blocking: small flat blocking helps tidy edges and shape appliqués; don’t overblock elastic or leather.
- Care: Cotton bracelets can usually be machine washed gentle; remove any glued or metal parts or hand wash instead.
Conclusion
Bracelets are one of the most satisfying tiny projects — fast, fun and endlessly customizable. The seven patterns above give you a full range of styles: an Adjustable everyday band; the nature-inspired Woodland Whispers (leaves + beads); clean Line Heart minimalism; playful Indie Fruits appliqués; an elegant Champagne Lace beaded cuff; dreamy Flower Fairy appliqué bracelet; and an embroidered Flower Embroidered design for makers who love mixed media.