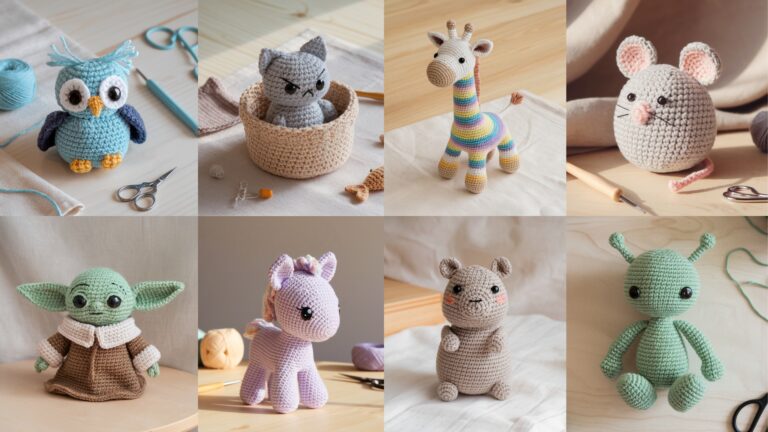
A handmade glasses holder is both practical and delightfully personal — it keeps lenses safe, makes your readers easy to find, and adds a touch of personality to a bedside table or bag. These seven animal-inspired glasses holders are designed to be soft, protective pouches (sleeves) with charming faces so they double as décor. Each pattern below includes: what it is, skill level, materials & finished size, a step-by-step construction (with stitch counts you can adapt), plus variations, finishing & care, and styling tips.
All patterns use US crochet terms and are written so you can adapt size by changing yarn weight, hook size, or number of rounds. For all holders: use tight stitches (slightly smaller hook than yarn label) so the fabric is dense and won’t let lenses rub against rough seams. If you plan to gift for someone who wears glasses often, consider lining the pouch with a soft fabric (microfiber) for extra scratch protection.
Quick common notes (read first)
- Abbreviations: MR = magic ring, ch = chain, sc = single crochet, hdc = half double crochet, dc = double crochet, inc = 2 sc in same stitch, dec = sc2tog, sl st = slip stitch.
- Gauge not critical — match pouch width to the widest frames you want to store. Measure the glasses folded width (temple tip to temple tip) and allow ~0.25–0.5 in extra for comfortable fit.
- For safety: embroidery for eyes is recommended when the holder might be used by children; avoid glued or poorly sewn small embellishments.
- If you’d like any single pattern expanded into printable row-by-row instructions for specific frame sizes (sunglasses vs reading glasses), tell me which one and the frame measurements.
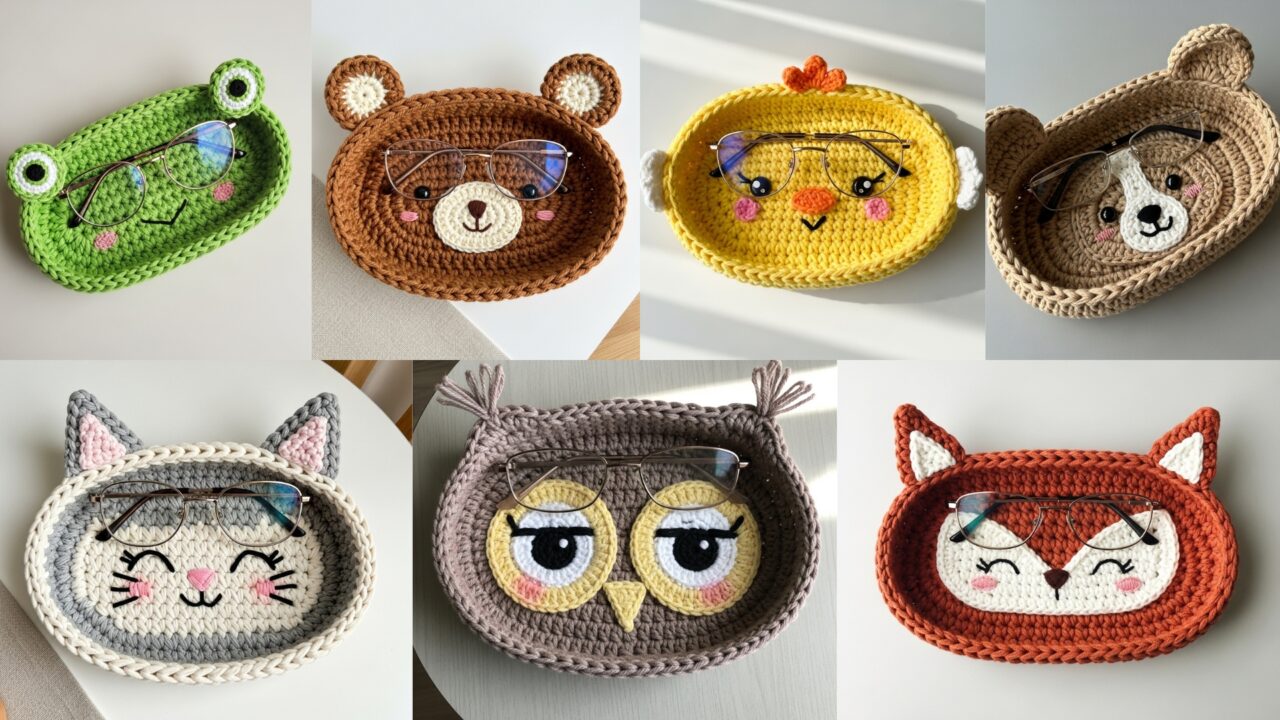
1. Crochet Frog Glasses Holder Pattern
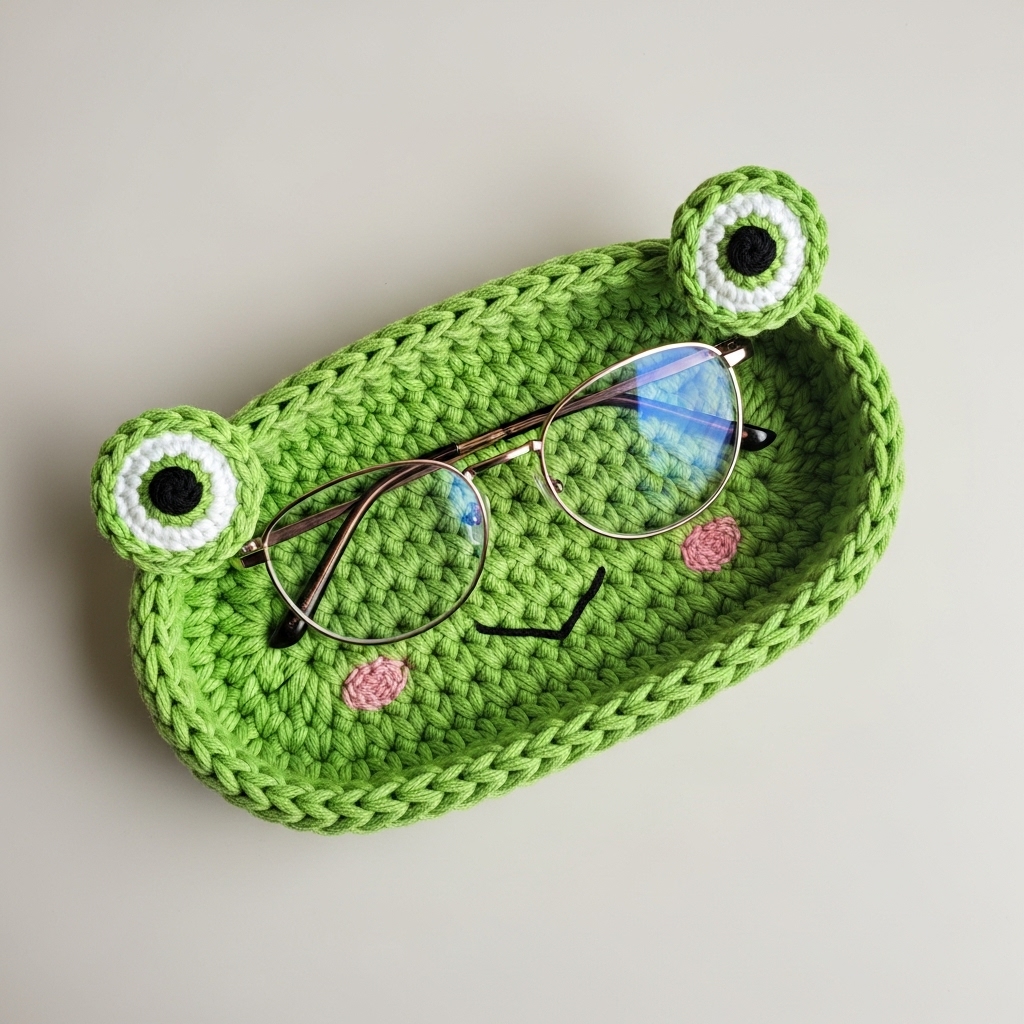
What it is: A soft pouch with a round frog face on the front; top opening holds folded glasses. The frog’s mouth line and big eyes make it instantly recognizable.
Skill level: Confident beginner → intermediate (simple shaping + appliqués)
Materials
- DK cotton or cotton blend in green (main) and pale green or cream (belly/eye highlights).
- Small black yarn for embroidered nostrils and mouth.
- 3.0–3.5 mm hook (or size to make tight fabric).
- Tapestry needle, stitch marker, small amount of polyfill for slight padding under eyes.
- Optional: small microfiber lining fabric, fabric glue (for lining), or a sewing needle & thread.
Finished size (sample): width ~7.5 in (19 cm), height ~4.25 in (11 cm) — roomy for most reading glasses. Adjust by ±1 in as needed.
Step-by-step guide
- Measure & foundation: Measure folded glasses width (W). Make a foundation chain to match W minus ~0.25 in (the cozy will stretch slightly). Example: if W ≈ 7.5 in and your gauge is 5 sc/in, chain 36 (36 / 5 = 7.2 in). Join to form loop, careful not to twist.
- Base tube (body):
- R1–R8: sc in each ch around (work in continuous rounds or join rounds with sl st — continuous tends to make a neater seam). Work until height ≈ (desired pouch height) minus 1 in (reserve for top edging and frog face placement). For the sample, 8 rounds of sc in DK will give ~3 in height; add rounds to reach ~4 in if needed.
- Increase for bottom curvature (optional): If you prefer a flat bottom for more room, work one round of inc every 8th stitch to add slight flare before closing the bottom; otherwise keep even rounds.
- Form pouch base & close bottom: Fold tube in half, sew side seam with mattress stitch leaving top open (or continue in rounds and then decrease top to close — easier to seam for flat pouch). If you want a true sewn pouch with interior seam, turn inside out and whipstitch bottom closed neatly.
- Frog face appliqués:
- Eyes (make 2): MR; R1: 6 sc in MR (6). R2: inc around → 12. R3: sc around. Fasten off white/cream. Add a small green border of sc one round around the white eye to match body. Stuff lightly (tiny amount) to make pop. Sew eyes on top front of pouch spaced for frog look.
- Eye pupils: embroider black yarn dots or sew on small safety eyes if only for adult use (but embroidery recommended).
- Nostrils & mouth: Use black yarn to embroider two small nostrils between eyes and a gentle curved smile under them.
- Top edging & hanging loop: Work one round of sc around top opening for a neat edge. Chain 25–30, sl st back to the opposite side to create small hanging loop; secure and weave in ends. Alternatively sew a small leather loop or metal ring for attaching to bag.
- Optional lining: Cut microfiber slightly smaller than interior, fold and glue/sew inside for scratch protection. Sew carefully around the top edge to hide raw fabric.
Variations
- Make a “water lily” flap closure that tucks over top: crochet a petal shape and sew as a buttoned flap.
- Use variegated green for a textured frog skin.
- Make a mini keychain frog (reduce chain & size) for sunglasses case replacement.
Finishing & care
- Weave all tails securely. Machine wash gentle if yarn permits; remove lining or glue if not machine safe. Air dry to preserve shape.
Styling tips
- Display on bedside table or hang next to a reading chair. A tiny crocheted lily pad coaster pairs nicely.
2. Crochet Chick Glasses Holder Pattern
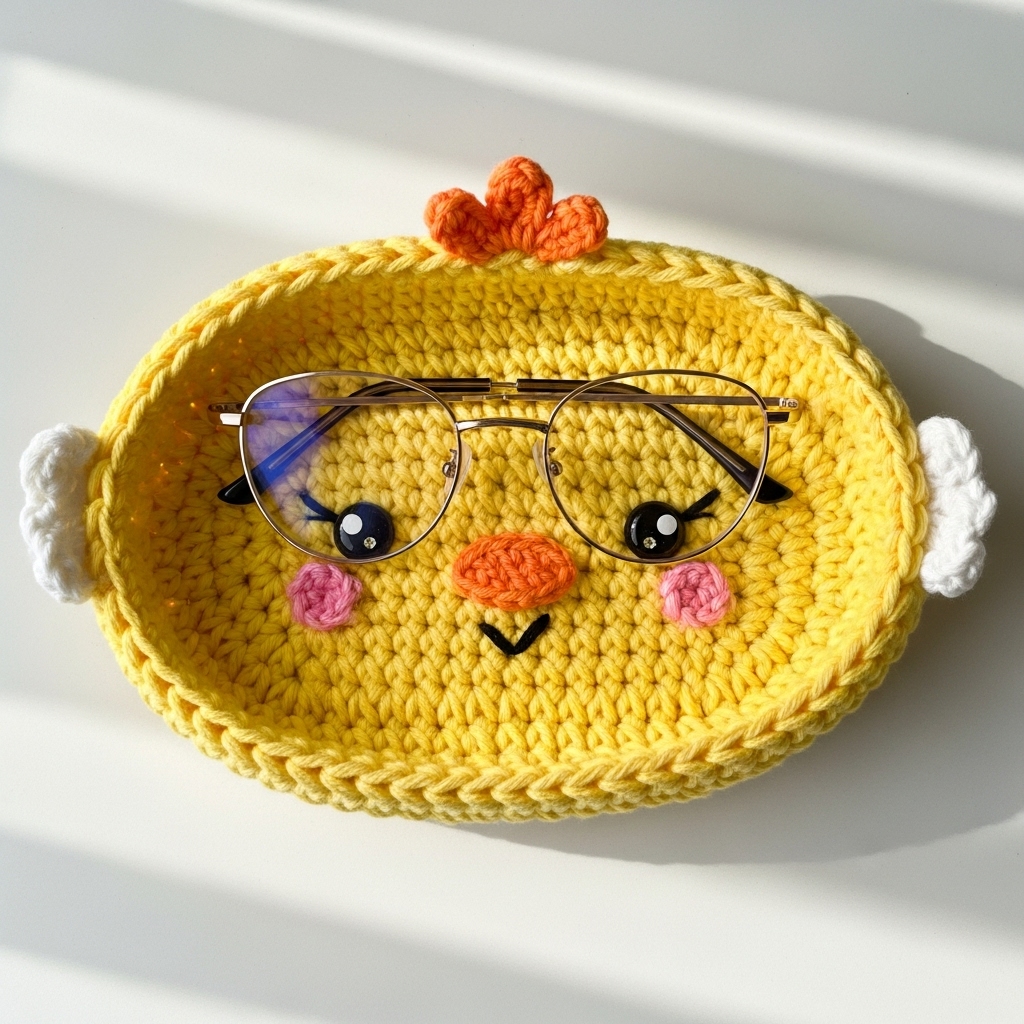
What it is: A bright yellow pouch with a round chick face, small wings sewn to sides, and an optional beak-shaped flap that tucks over the top to close the glasses inside.
Skill level: Beginner → confident beginner
Materials
- DK cotton in yellow (main), orange (beak/feet), and white (eye highlight)
- 3.0–3.5 mm hook, tapestry needle, stitch marker
- Optional small velcro or snap for beak flap
Finished size (sample): width ~7.25 in, height ~4 in
Step-by-step guide
- Foundation & body: Chain to match folded frames width (see frog pattern for guidance). Join and work R1–R7: sc around to form tubular body. For slightly taller pouch, work R1–R10.
- Form pocket: Fold bottom and whipstitch sides to create pouch; leave top open.
- Wings (make 2):
- Ch 6, Row 1: sc in 2nd ch from hook across (5 sc). Row 2–3: sc across for 2 rows. Row 4: decrease one side to taper (sc2tog, sc 1, sc2tog). Fasten off and sew wings to each side seam.
- Beak flap:
- MR with orange yarn, R1: 6 sc. R2: sc, inc around → 9–12 sts depending on desired size. Work 1–2 rounds sc, then flatten and shape into a small triangular flap. Attach one edge to top front (inside) so flap folds down over opening. Add a small snap or sew a single button on the pouch body where the beak tucks.
- Eyes & highlights: Embroider small black eyes; place a tiny white stitched dot in each eye for sparkle.
- Feet detail (optional): Add two small orange chain loops on the bottom front to read like chick feet when pouch is set on table.
Variations
- Make an Easter themed chick with pastel accents.
- Skip flap and add a drawstring cord across top to cinch closed.
Finishing & care
- Crochet pieces are machine washable on gentle; flatten beak and reshape after washing.
Styling tips
- A cheerful gift for spring; pair with a small market bag in matching yellow.
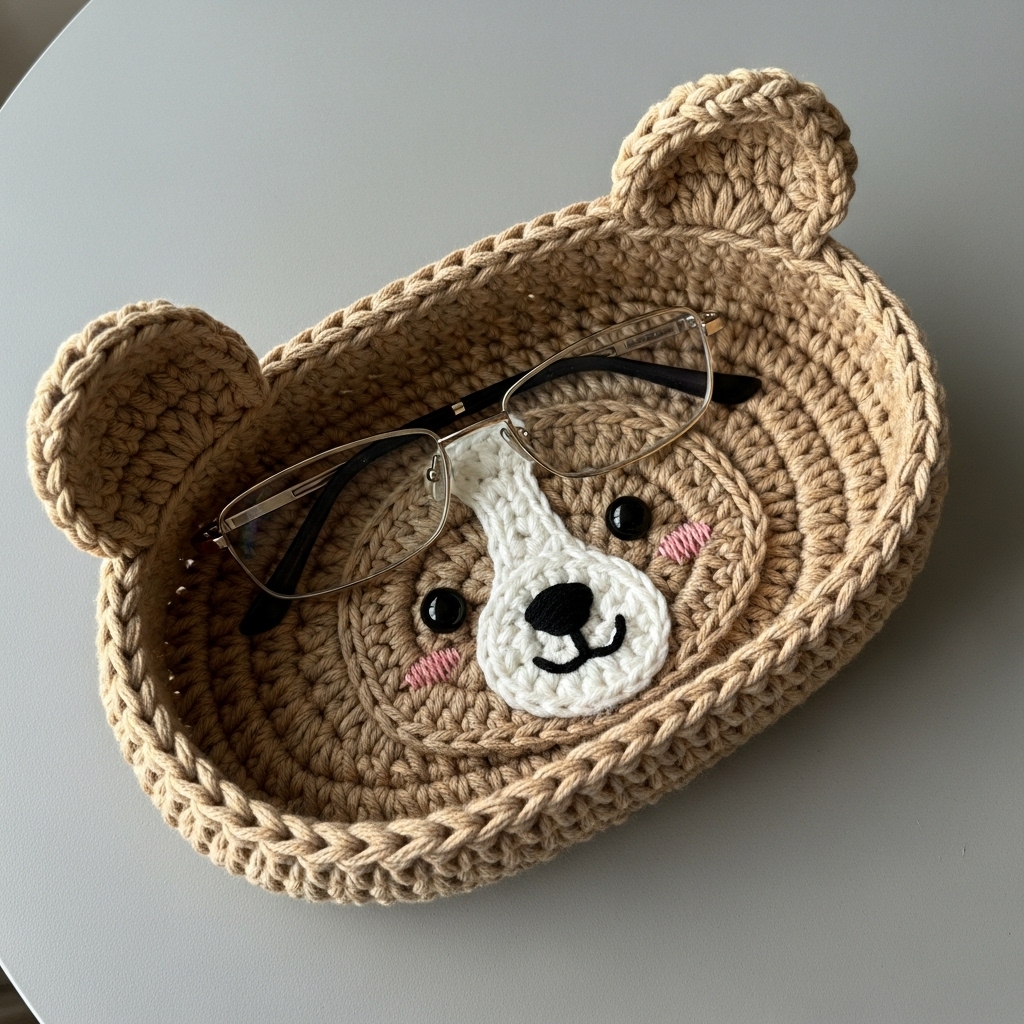
3. Crochet Bear Glasses Holder Pattern
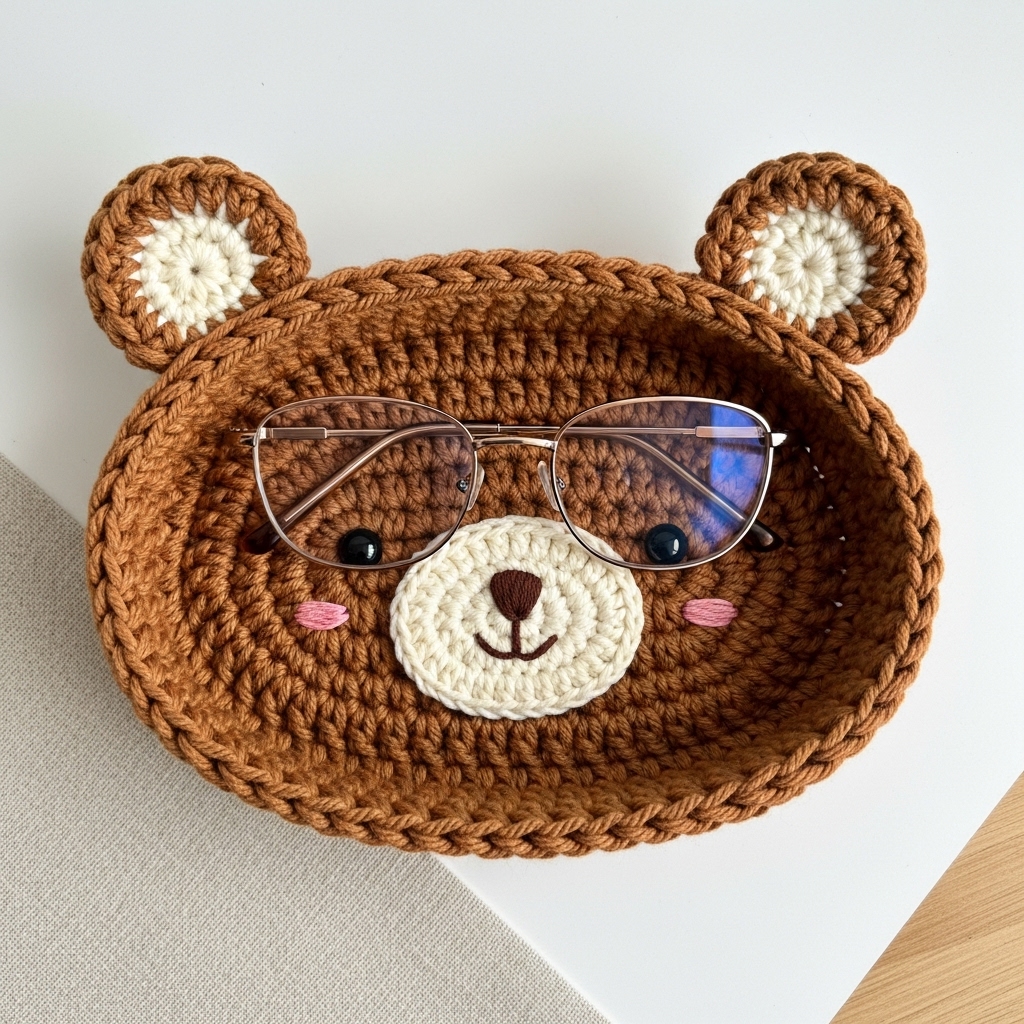
What it is: A cozy pouch with a bear muzzle appliqué and round ears that stick up from top edge — classic, cozy, and gender neutral.
Skill level: Confident beginner → intermediate (appliqués + shaping)
Materials
- DK yarn in warm brown (main) and cream (muzzle/inner ear)
- 3.5 mm hook, tapestry needle, stuffing for slight ear shaping
Finished size (sample): width ~7.5 in, height ~4.5 in
Step-by-step guide
- Base tube: Chain to match width then work R1–R9: sc around (or until desired height). Optionally work a double-height folded cuff by working extra rounds and folding over.
- Bottom seam: Fold and sew bottom with invisible mattress stitch.
- Bear muzzle appliqué:
- MR with cream: R1: 6 sc. R2: inc around → 12. R3: sc 1, inc around → 18. R4 (optional): sc around to enlarge. Flatten and sew centered on front lower half of pouch.
- Embroider nose and mouth in dark brown: a small vertical stitch for the nose and a gentle curve for mouth.
- Ears (make 2):
- MR brown: R1 6 sc. R2: inc around (12). R3: sc around and fasten off, leaving a long tail. Add a small cream inner ear circle (6 sc MR) and sew inside. Fold small amount and sew ear base to allow a slight curve; sew to the top seam of the pouch, filling with a small bit of polyfill to hold shape.
- Top edge & hanging loop: Work round of sc to firm top edge. Add a small chain loop or a fabric loop to hang.
- Optional closure: Add a flap shaped like the bear’s head (slightly larger) and a small snap under chin.
Variations
- Make a panda using black + white color blocks.
- Add a scarf applique around bear neck (cute seasonal gift).
Finishing & care
- Line with microfiber for scratch protection. Wash on gentle and air dry.
Styling tips
- Display on dresser or hang on coat hook near entryway for spare sunglasses.
4. Crochet Cat Glasses Holder Pattern
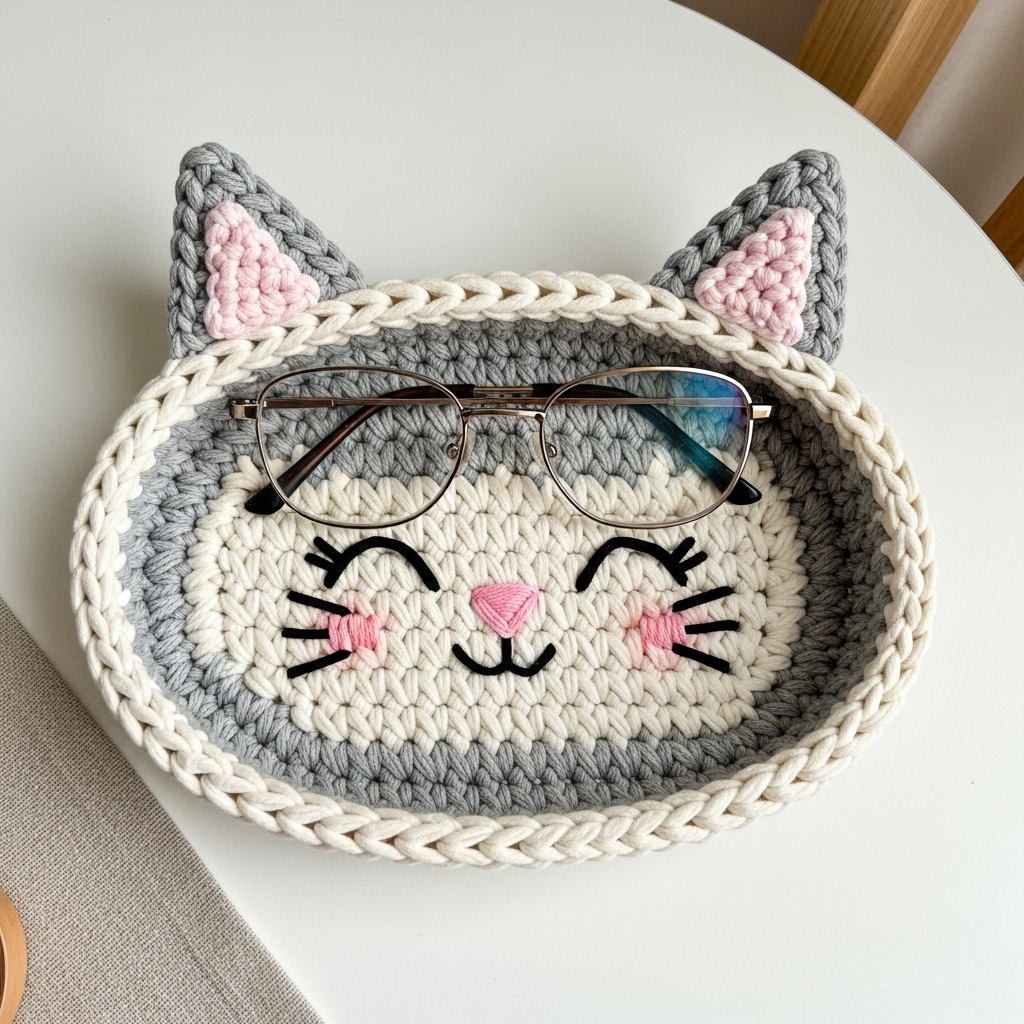
What it is: A svelte pouch shaped like a sleeping or curious cat. Cat ears at top and embroidered whiskers create personality. Because cats and glasses are internet icons, this one is always a hit.
Skill level: Confident beginner
Materials
- DK cotton in your chosen cat color (gray, cream, tabby variegated) and small scrap of contrasting color for inner ear/nostrils.
- 3.0–3.5 mm hook, tapestry needle, stitch marker.
Finished size (sample): width ~7.25 in, height ~4 in
Step-by-step guide
- Body tube: Chain to desired width and work R1–R8 sc to form main body. Fold and seam bottom.
- Cat ears (make 2):
- Ch 6. Row 1: sc 5 across. Row 2: sc 4 (decrease at end). Row 3: sc3 then sc2tog — to form a small triangle. Fasten and sew ears to top edge with base centered slightly in from side edges.
- Whiskers & nose: Embroider a small triangular nose with pink yarn at center front; from the nose sew three short straight stitches each side for whiskers.
- Eye expression variations:
- Open eyes: embroider almond shapes with black; add white dot for highlight.
- Sleeping: work two small curved sl st rows on the front to mimic closed lids for a sleepy cat.
- Top finish: Work a round of sc to tidy top.
- Optional inner pocket: Add a small inside pocket (sewn to interior) to store lens cloth.
Variations
- Add stripes using surface slip stitch to make tabby cat.
- Make a long version for oversized sunglasses.
Finishing & care
- Cotton is easy-care. For delicate embroidered faces, hand-wash and dry flat.
Styling tips
- A purrfect desk buddy! Make matching cat eyeglass charm on a chain for the same set.
5. Crochet Fox Glasses Holder Pattern
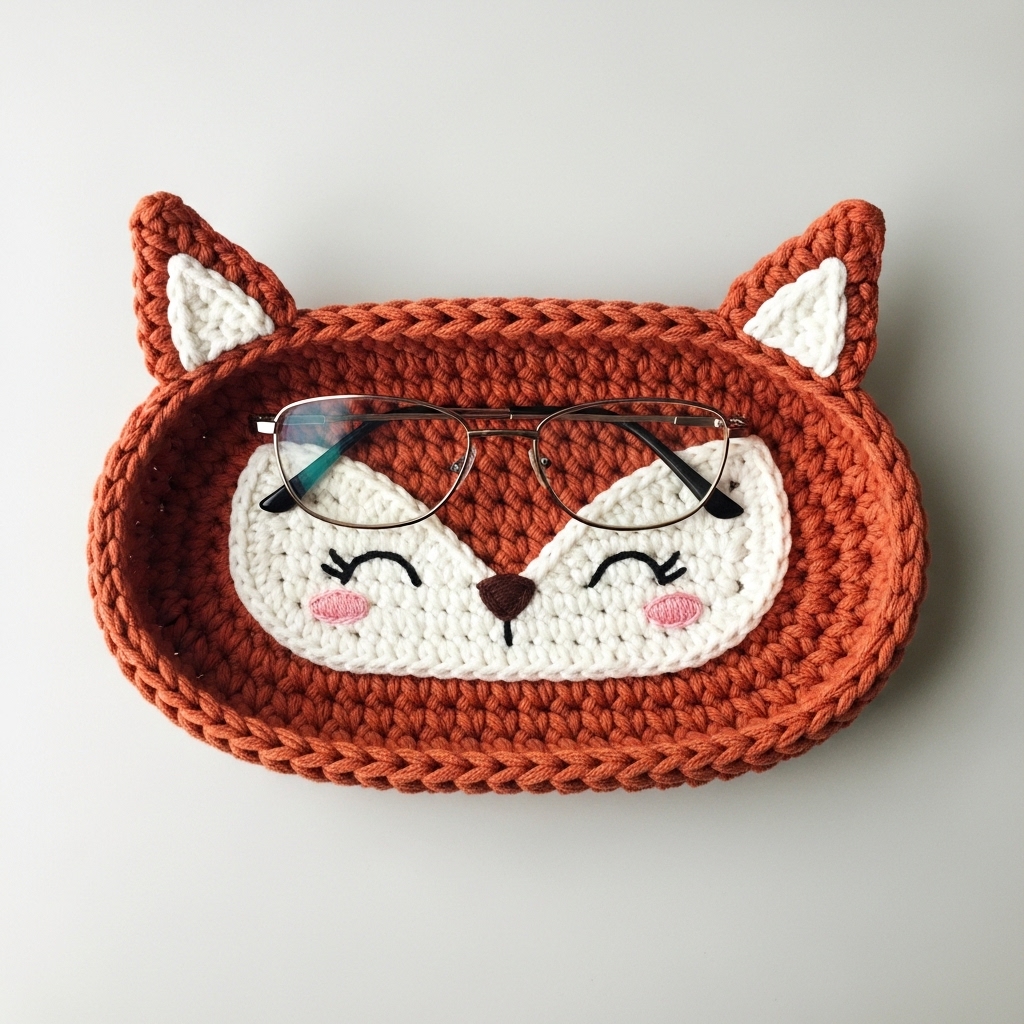
What it is: A sleek fox pouch with pointed ears and the signature white “mask” around the face. Foxes make excellent stylish gift options.
Skill level: Intermediate (color changes + shaping)
Materials
- DK in terracotta orange, white, and dark brown (for nose & accents)
- 3.0–3.5 mm hook, tapestry needle, stitch marker
Finished size (sample): width ~7.5 in, height ~4.25 in
Step-by-step guide
- Base tube: Chain to width then work R1–R8 sc; fold & seam bottom.
- Colorwork face (mask): Using white yarn, embroider or crochet a small oval mask that sits centered on the front: MR white, R1 6 sc, R2 inc around to ~12, flatten and sew to front. Alternatively, work white as an applique following mask shape and stitch on.
- Ears (make 2):
- Terracotta MR: R1 6 sc. R2: (sc1, inc) around → 9. R3: sc around 9. Switch to white at tip and sc 1–2 rounds for inner ear highlight (or sew small white triangle inside). Sew ears to top edge with slight forward tilt.
- Snout & nose: Small cream or white oval (MR 6 sc → flatten) sewn just below mask; use dark brown yarn to embroider nose tip.
- Tail tag (optional): Crochet a small fox tail appliqué and sew on the back as an extra cute detail.
Variations
- Make a minimal geometric fox using surface crochet triangles for mask.
- Try burnt orange + plum for a modern palette.
Finishing & care
- Weave all ends and hand-wash colored items to avoid bleeding of deep orange tones for first wash.
Styling tips
- Makes a clever gift for writers, designers, or anyone with a playful aesthetic.
6. Crochet Owl Glasses Holder Pattern
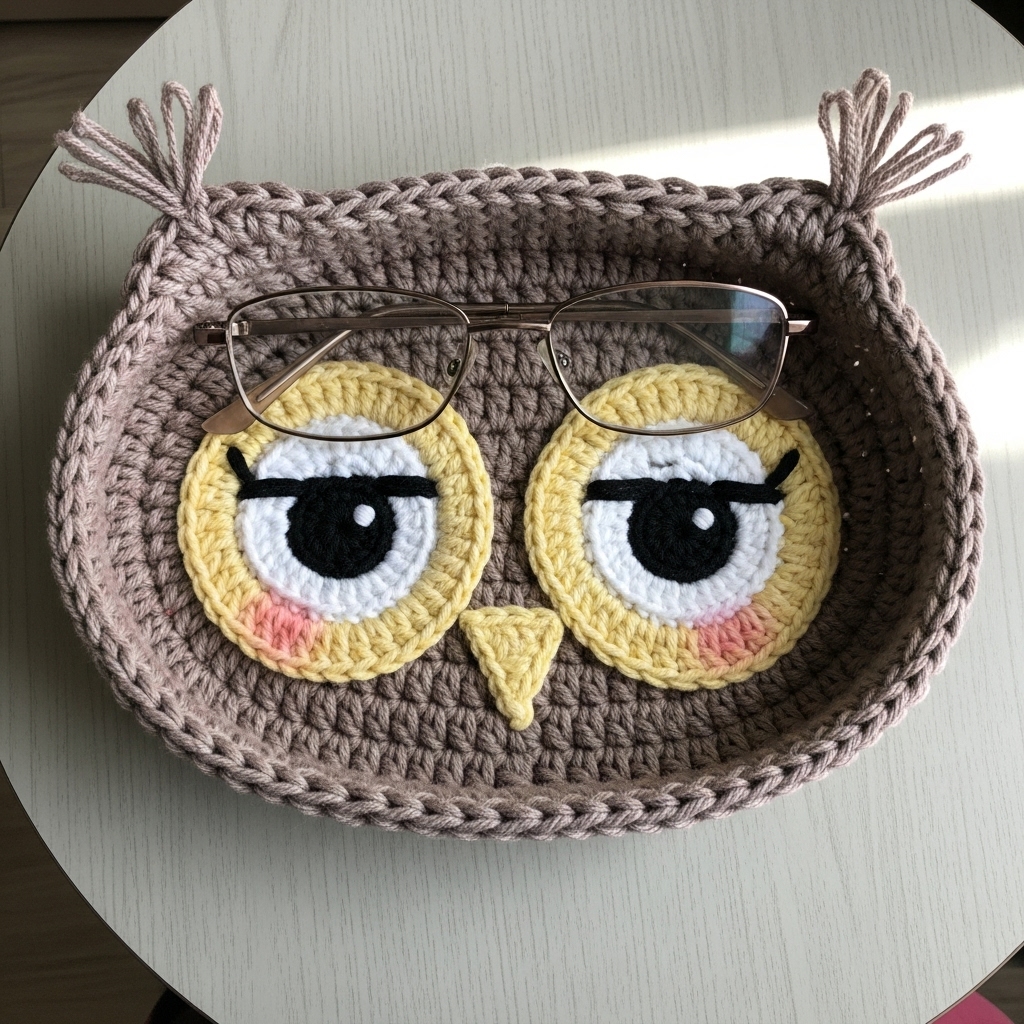
What it is: A wise little pouch with large round eyes and a flap shaped like wings — the flap can tuck under a button or velcro to secure the glasses.
Skill level: Intermediate (large appliqués + flap mechanics)
Materials
- DK yarn in main owl color (brown/gray/cream), plus white or pale for eyes, and yellow/orange for beak.
- 3.5 mm hook, tapestry needle, small button for flap (optional).
Finished size (sample): width ~7.25 in, height ~4.5 in (owl proportions are a little taller)
Step-by-step guide
- Body tube: Chain matching width; R1–R10 sc for a taller body (owls are slightly tall). Fold & sew bottom.
- Eyes (make 2 large):
- White MR R1 6 sc → R2 inc around to 12 → R3 sc around. Make a round pupil of dark color: MR 6 sc and sew onto white disc. Sew eyes spaced close to center.
- Beak: Small triangle: ch 6, sc back across, fold in half and attach under eyes (beak points down).
- Wing flap closure (make 2):
- Make a small triangular wing: ch 8, Row 1 sc across, Row 2 sc decrease one side to shape into wing triangle. Attach wings at top sides so they overlap the front and can be folded across front as a decorative flap. Add a small button on the front center where a wing tucks, or sew a tiny loop on wing tip to fasten to a small button.
- Feet (optional): Add two small orange chain loops humbly tucked under the bottom front for sitting display.
- Top loop/hanger: Sew a loop at the back top for hanging.
Variations
- Make a “night owl” with deep navy body and golden eyes.
- Add tufts (small triangular ears) by sewing extra small triangles on head top.
Finishing & care
- Owl pouches hold sunglasses beautifully and make showpiece gifts. Line the interior for max lens protection.
Styling tips
- Pair with a small notebook—owl + notebook gift set is perfect for students or teachers.
7. Crochet Puppy Glasses Holder Pattern
What it is: A friendly puppy pouch with floppy ears, an embroidered nose, and a collar applique. Puppies are universally loved and make delightful everyday holders.
Skill level: Confident beginner → intermediate
Materials
- DK yarn in puppy color (tan, cream, black markings) and contrasting color for collar (red or blue).
- 3.5 mm hook, tapestry needle, tiny bell optional (attach to collar only if recipient is adult).
Finished size (sample): width ~7.5 in, height ~4.25 in
Step-by-step guide
- Main pouch: Chain foundation and work R1–R8 sc to form body. Fold and seam bottom.
- Floppy ears (make 2):
- Ch 8, Row 1 sc across (7 sc). Row 2 sc across. Row 3: sc decrease at one end to taper. Row 4–5 sc across. Flatten slightly and sew to each side seam near top so they flop down.
- Snout & nose: Make small oval snout: MR 6 sc → R2 sc around 10–12 → flatten and sew to lower center. Embroider nose with black yarn and a little mouth line.
- Collar: Crochet a narrow band (ch 25 join), seam and sew near top to suggest collar; attach small crochet tag (tiny circle) or an embroidered initial for personalization. If sewing a bell, ensure it is securely attached and instruct adult users to remove for infants.
- Eyes & patches: Add embroidered eyes and optional darker patches around one eye for a puppy look.
- Top finishing: Work a neat sc round along top edge and add optional hanging loop.
Variations
- Make dalmatian spots with small black embroidery dots.
- Create a “service pup” with a tiny crocheted bandana around collar.
Finishing & care
- Remove any metal bell before washing. Machine wash gentle if yarn is machine-safe; air dry.
Styling tips
- Tie a matching color microfiber lens cloth to the collar for practical gifting.
Final finishing & fitting advice (applies to all holders)
- Fit check: Always test your pouch with actual glasses (folded) before finalizing seams. If too tight, add a round of sc; if too loose, add a decorative elastic strap inside to gather top slightly.
- Lining: For best lens care, sew in a microfiber lining (cut slightly smaller than interior, machine-fold and hand sew) or glue with fabric glue if you prefer no stitching. Lining also hides seams and makes the inside smoother.
- Closures: For secure closure use small snaps or a tuck flap; if you expect frequent use, elastic top or drawstring can be quicker.
- Attachment options: Add a small loop or D-ring to attach a glasses chain, lanyard, or carabiner for easy carry.
- Gifting notes: Include a small care card advising hand wash or gentle machine wash, remove metal parts before washing, and reshape while damp.
- Safety: For gift items likely to be used around babies/toddlers, use embroidered features and avoid beads or snap substrates that could loosen.
Conclusion
These seven animal-inspired glasses holders combine usefulness with charm. Whether you make a whimsical frog for a friend, a cozy bear for your bedside, or an owl to display on a bookshelf, each pattern is easily customizable — scale it to the exact frames, change colors to match the recipient’s style, and add linings or closures for extra protection.