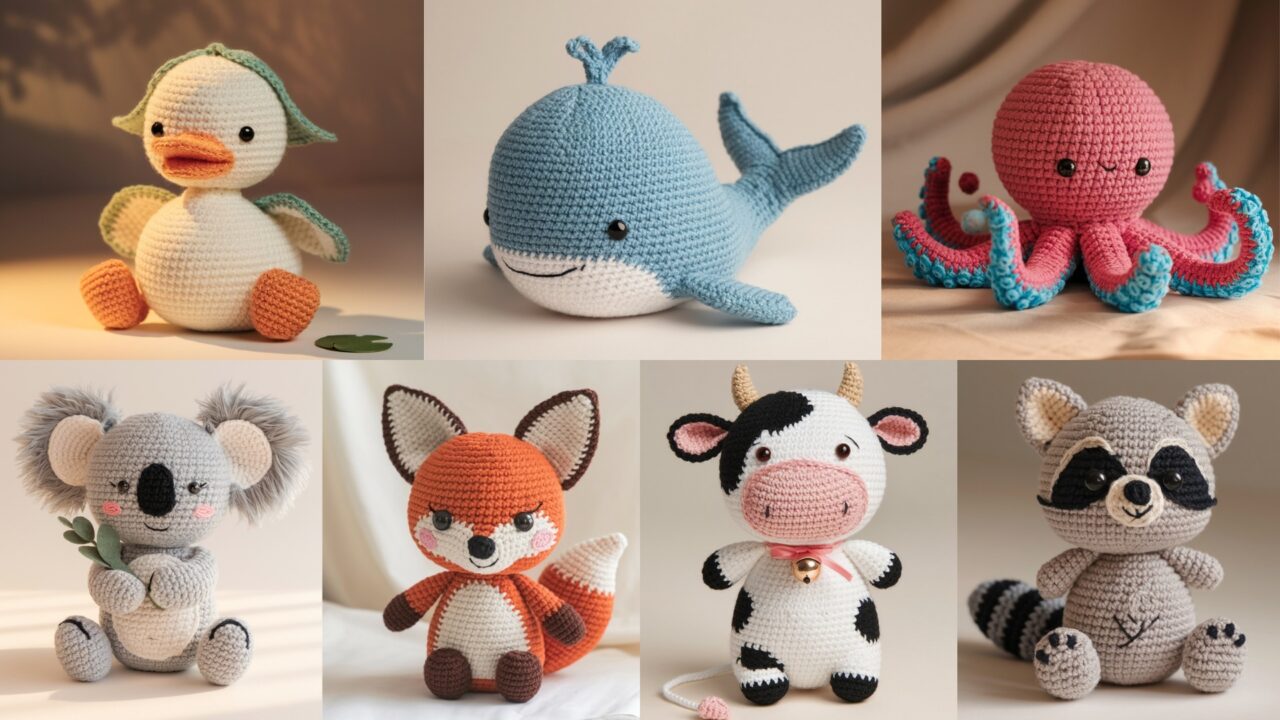
Amigurumi — the Japanese art of crocheting small stuffed toys — is one of the most satisfying ways to turn yarn into something adorable and tactile. These little animals make excellent gifts, baby-safe toys (with precautions), decor, and pattern practice. Below you’ll find seven approachable amigurumi patterns: Cow, Whale, Fox, Raccoon, Koala, Duck (green & white), and Octopus. Each pattern is written so you can make it with common tools and basic stitches. I include assembly notes and safety tips so your finished critters are cute and durable.
Important safety note: for toys intended for babies or very small children, avoid safety eyes or glued embellishments — use embroidered features and sew parts extremely securely. Always test attachments before gifting.
General materials & sizing notes (applies across patterns)
- Yarn: worsted weight (#4) cotton or cotton/acrylic blend is versatile and washable. Use fingering or sport weight for smaller, finer toys. I give yardage per project.
- Hook: typically 2.5–4.0 mm depending on yarn and desired fabric density. Use a size that produces a tight fabric so stuffing does not show through.
- Stuffing: polyester fiberfill (toy stuffing) or eco-fill alternatives.
- Safety eyes: 6–12 mm depending on toy size (optional). For baby toys, embroider eyes instead.
- Tapestry needle, stitch markers, small scissors, pins.
- Optional: pipe cleaners for posable limbs (insert inside limbs before finishing), a small washer or felt disc to reinforce heavy attachments.
Abbreviations (US): ch, sl st, sc, hdc, dc, inc = 2 sc in same st, dec = sc2tog (single crochet decrease), BLO / FLO = back/front loop only, RS/WS, st(s).
When a pattern says “work in continuous rounds” it means do not join each round unless instructed. Place a marker at the first stitch and move it each round.
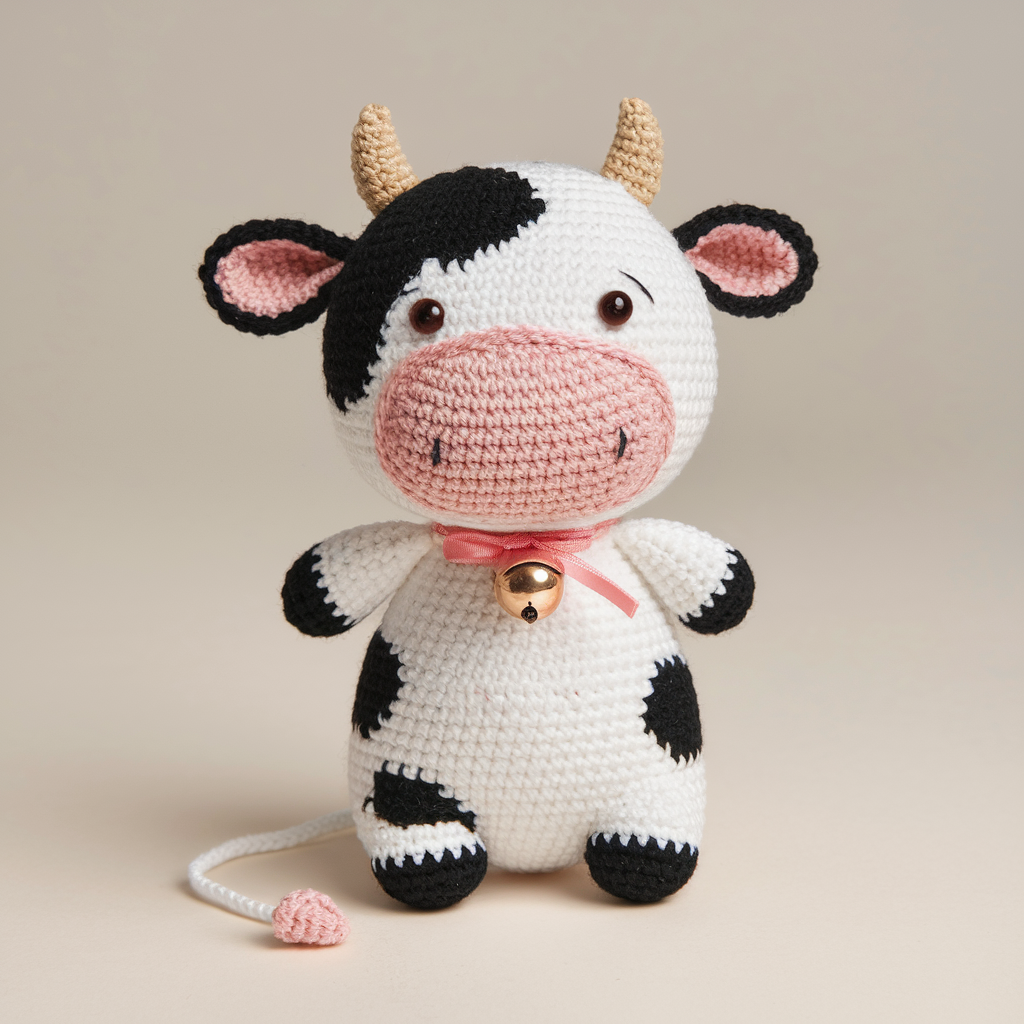
1. Crochet Cow Amigurumi Pattern
Skill level
Beginner → Intermediate (simple color changes, small appliqués)
Finished size
Approximately 6–7 in (15–18 cm) tall when made with worsted weight yarn and a 3.5 mm hook.
Materials
- Worsted weight yarn: White main ~50 g, Black (or brown) accents ~10–20 g, Pink for muzzle ~5–10 g.
- 3.5 mm (E) crochet hook (adjust to gauge for tight fabric)
- 8 mm safety eyes or embroidery floss for eyes
- Polyester stuffing ~50 g
- Tapestry needle, stitch markers, scissors
- Optional: small bell or ribbon for collar
Abbreviations / gauge
- Tight gauge recommended: about 8–10 sc = 1 inch depending on yarn/hook.
Body & head (worked as one piece: classic amigurumi method — bottom-up for body then continue to head; or make body and head separate and sew together)
Below is a version where the body and head are worked separately and joined — easier to stuff neatly.
Body (oval base, worked in continuous rounds)
- Base: magic ring, ch 0. R1: 6 sc in MR (6)
- R2: inc in each st around (12)
- R3: sc 1, inc around (18)
- R4: sc 2, inc around (24)
- R5: sc 3, inc around (30)
- R6–R11: sc around (30) — work even for body height (6 rounds).
- R12: sc 3, dec around (24)
- R13: sc 2, dec around (18)
- R14: sc 1, dec around (12)
- Fasten off leaving long tail for closing later. Lightly stuff base before continuing.
(If you want a longer body for a larger cow, add more even rounds between R6–R11.)
Head (worked in continuous rounds)
- MR, ch 0. R1: 6 sc in MR (6)
- R2: inc in each st (12)
- R3: sc 1, inc (18)
- R4: sc 2, inc (24)
- R5: sc 3, inc (30)
- R6–R10: sc around (30) — for head height (5 rounds)
- R11: sc 3, dec (24)
- R12: sc 2, dec (18)
- Insert safety eyes between R7–R8 spaced about 6–8 sts apart. If embroidered, do it now.
- R13: sc 1, dec (12)
- Begin stuffing firmly. R14: dec around to close (6). Leave tail, close opening with tapestry needle.
Muzzle (pink)
- MR, ch 0. R1: 6 sc in MR (6)
- R2: inc each st (12)
- R3: sc around (12). Fasten off, leave long tail to sew to head across lower front between R10–R12. Add embroidery for nostrils (2 small stitches).
Ears (make 2)
- Ch 4. Row1: sc in 2nd ch from hook and across (3 sc). Turn.
- Row2: ch 1, sc across. Turn.
- Row3: ch 1, sc2tog, sc1 (2 sts). Turn.
- Row4: ch 1, sc across (2), fasten off leaving tail. Fold bottom, stitch to create ear shape. Sew ears to top sides of head.
Horns (make 2, optional)
- MR, ch 0. R1: 6 sc in MR (6)
- R2–R4: sc around (6) — make short horns. Fasten off leaving tail and sew on between ears.
Tail
- Ch 10, sl st back along chain for a cord, or make a narrow tube and add a small tuft using a few strands of yarn knotted at end. Sew to rear.
Spots / patches
- Crochet small patches: ch 5, sc in 2nd ch across (4), sc another row, fasten off. Or surface crochet irregular shapes onto body. Sew or embroider black spots.
Assembly
- Sew head to body using whipstitch: place head centered on top of body and join with consistent stitches. Make sure joins are tight.
- Sew on muzzle, embroider nostrils. Sew ears and horns firmly. Attach tail. Add collar ribbon or bell.
Tips & variations
- Make a baby calf by using smaller hook and thinner yarn.
- Add udders: make 2–4 small pink spheres (MR 6 sc → inc etc.) and sew to underside.
- For safety with small children: embroider eyes and mouth; avoid small bells.
Care & safety
- Hand wash cold or machine wash gentle in mesh bag; air dry.
- If for babies: avoid safety eyes, sew pieces very securely, and consider using felt backed on the inside to reinforce.
2. Crochet Amigurumi Whale Pattern
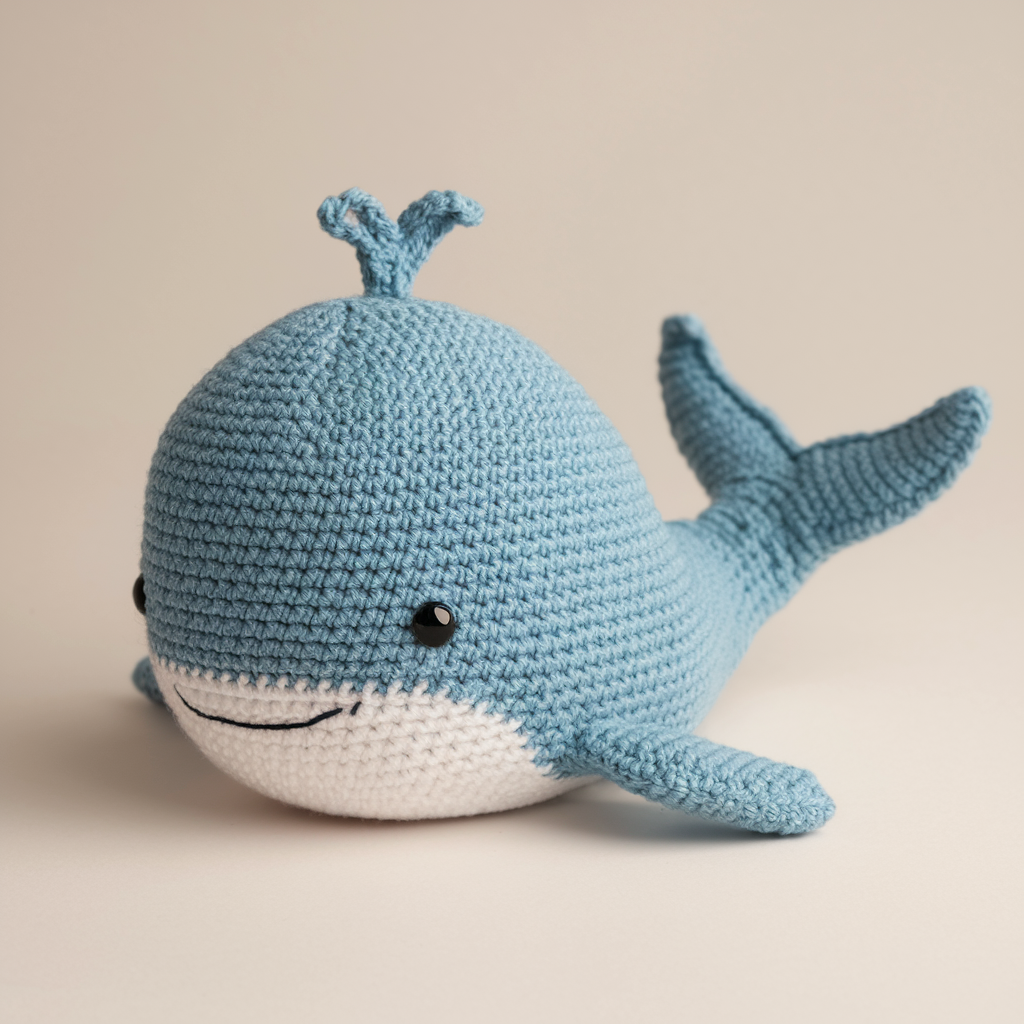
Skill level
Beginner — simple oval body, tail fin, optional spout
Finished size
Approximately 8–9 in (20–23 cm) long from nose to tail when made with worsted yarn and 3.5 mm hook.
Materials
- Worsted yarn: main color (blue) ~70 g, belly color (white/cream) ~20 g
- 3.5 mm hook, stuffing, tapestry needle, safety eyes 6–8 mm or embroidered eyes
Body (worked as one continuous oval — top/bottom shaped)
Bottom / belly (worked first as a long ovoid)
- MR. R1: 6 sc in MR (6)
- R2: inc in each st (12)
- R3: sc 1, inc (18)
- R4: sc 2, inc (24)
- R5: sc 3, inc (30)
- R6–R10: sc around (30) — lengthen for belly length (5 rounds)
- R11: sc 3, dec (24)
- R12: sc 2, dec (18) — do NOT close. Now you’ll start top shell.
Join top/color change for whale back
- Continue working in rounds with main color forming an oval dome that sits above belly; increase again at front to create nose/chin curve:
- R13: sc 1, inc (24)
- R14: sc 2, inc (30)
- R15–R20: sc around (30) — sculpt shape; insert safety eyes between R8–R10; begin stuffing firmly beginning from nose area.
- R21: sc 3, dec (24)
- R22: sc 2, dec (18)
- R23: sc 1, dec (12)
- R24: dec around close to a small hole; finish stuffing and close.
(This gives a horizontally elongated whale shape; adjust rounds to be longer for larger whale.)
Fins & tail
Side fins (make 2)
- Ch 6. Row1: sc in 2nd ch from hook and across (5). Turn.
- Row2: ch1, sc2, sc2tog, sc1 (4). Turn.
- Row3: ch1, sc across 4. Fasten off leaving tail to sew. Flatten and sew to sides between R12–R14.
Tail fin (two halves)
- Make two flukes: ch 7. Row1: sc in 2nd ch and across (6). Row2: ch1, sc2tog, sc2tog (2). Fasten off. Sew flukes to tail base, stuffing lightly.
Belly detail
- Crochet a small oval in the belly color: ch 10, sc rows until oval covers bottom or do surface crochet to create the white belly patch. Sew to underside.
Spout (optional)
- Make a tiny tube: ch 8, sl st back along chain or crochet a tiny puff stitch to mimic water spout. Sew to top of head.
Assembly
- Sew side fins and tail firmly. Place belly oval and sew. Weave in ends. Add embroidered smile.
Tips & variations
- Make a rainbow whale by using variegated yarn.
- For baby-safe toy, embroider eyes and attach no small pieces.
Care
- Machine wash gentle inside mesh bag; reshape while damp and air dry.
3. Crochet Amigurumi Fox Pattern
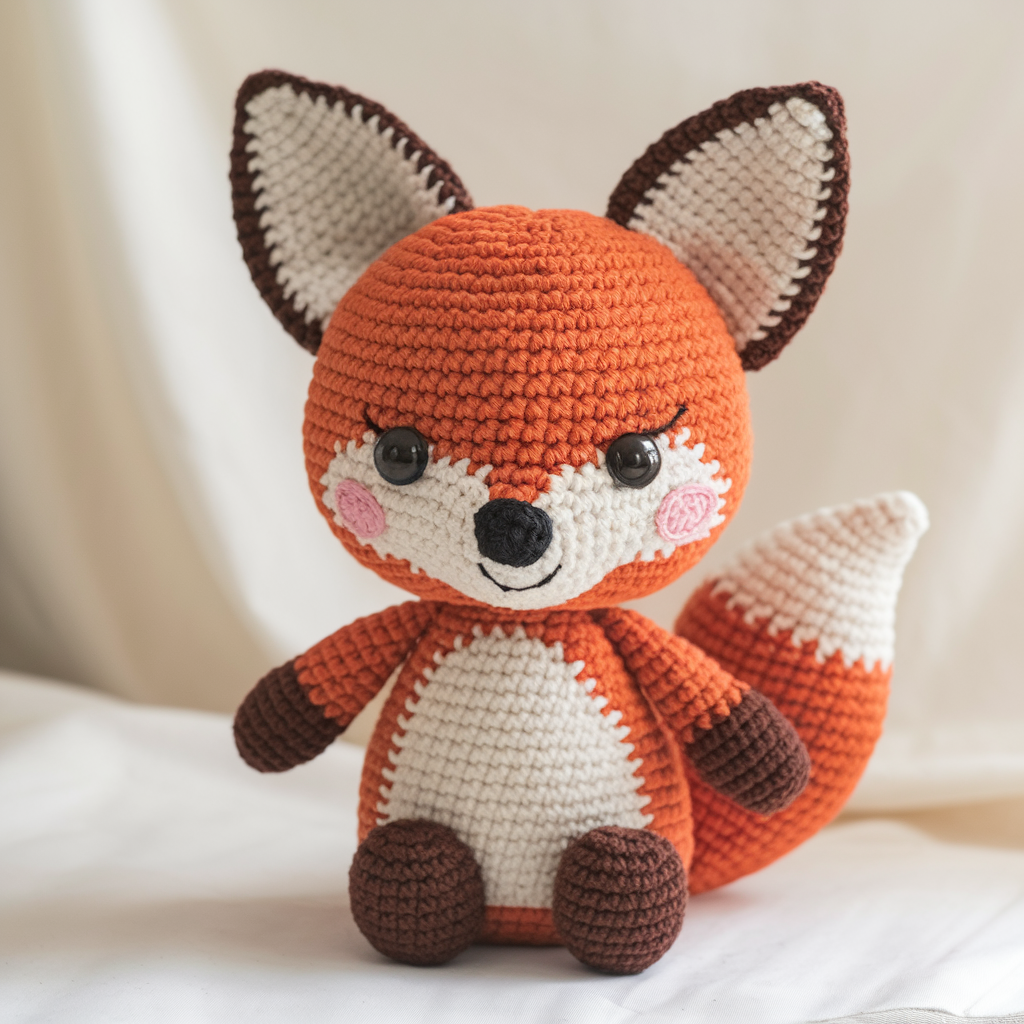
Skill level
Beginner → Intermediate (pointed ears and contrasting face)
Finished size
About 6–7 in (15–18 cm) tall.
Materials
- Worsted yarn: Orange main ~60 g, Cream ~20 g, Brown/black for nose/eye accents ~ small amount
- 3.5 mm hook, safety eyes 6–8 mm (or embroidered), stuffing
Head (worked in continuous rounds)
- MR, R1: 6 sc (6)
- R2: inc each st (12)
- R3: sc 1, inc (18)
- R4: sc 2, inc (24)
- R5: sc 3, inc (30)
- R6–R10: sc around (30)
- R11: sc 3, dec (24)
- Place safety eyes between R7–R8 about 6 sts apart. Insert nose embroidery later.
- R12: sc 2, dec (18)
- Stuff head firmly. R13: sc 1, dec (12)
- R14: dec around (6). Fasten off and close.
Body
- MR, R1: 6 sc (6)
- R2: inc each (12)
- R3: sc 1, inc (18)
- R4: sc 2, inc (24)
- R5–R9: sc around (24) to desired height
- R10: sc 2, dec (18)
- Stuff and leave tail to join to head or sew head to body.
Ears (make 2)
- With orange ch 6. R1: sc in 2nd ch and across (5)
- R2: ch1, sc, sc2tog, sc (4)
- R3: ch1, sc2tog, sc (3)
- Fold base and stitch through to shape triangular ear. Sew to head top.
Muzzle & chest (cream)
- Muzzle: MR, ch0, 6 sc into ring (6), R2 inc each (12). Sew to front center of head and embroider nose & smile.
- Chest patch: crochet a flat oval and sew on body front.
Legs (make 4 — 2 front, 2 back)
- Make small cylinders: MR 6 sc → inc to 12 → sc for 4–6 rounds → stuff slightly → flatten and sew under body. For front legs, sew under front body; for back legs, sew at back allowing fox to sit.
Tail
- Ch 16, sc back along chain or make cone tail: MR 6 → inc to 12 → sc rounds to length, then change tip color to cream for fox tail tip. Make tail moderately stuffed and sew to back.
Assembly
- Attach head to body, sew ears, sew muzzle, embroider details, attach tail. Tuck seam ends inside and secure.
Tips & variations
- Add small white “socks” by changing yarn color on legs.
- Make tiny woodland fox family by reducing hook size & using fingering yarn.
Care
- Machine wash gentle if using acrylic or cotton blend; reshape while damp.
4. Crochet Amigurumi Raccoon Pattern
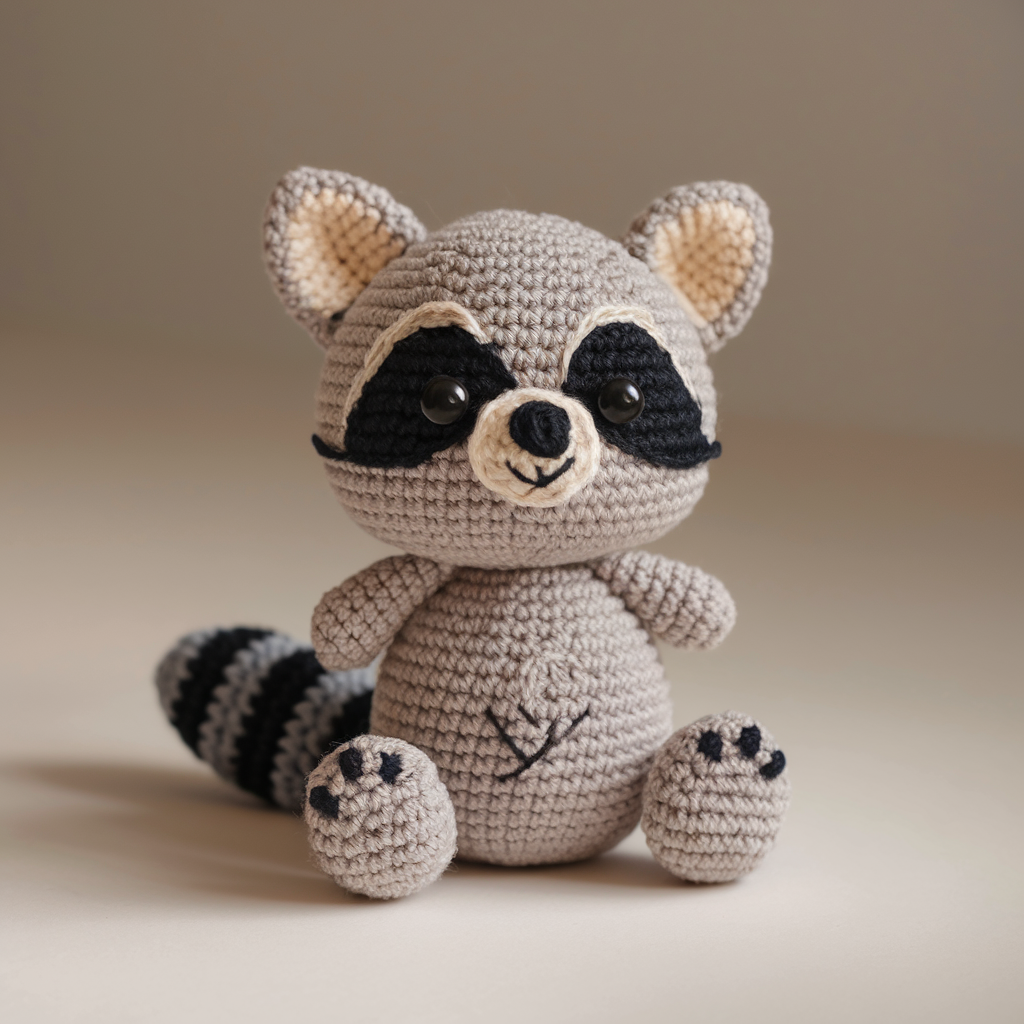
Skill level
Intermediate — surface colorwork for mask and ringed tail
Finished size
Approximately 7–8 in (18–20 cm) tall.
Materials
- Worsted yarn: grey main ~80 g, dark grey/black accents ~20 g, cream ~15 g
- 3.5 mm hook, safety eyes (8 mm) or embroidered — for raccoon, safety eyes add personality but embroider for baby toys.
- Small needle for facial embroidery
Body & head (worked separately)
- Work ball-shaped head and cylindrical body similar to earlier patterns (head about 30 sts round at widest; body slightly longer). Use same increases/decreases as fox/cow patterns.
Mask (surface colorwork)
- After stuffing head to near full, use tapestry needle to surface crochet or embroider the mask: with dark yarn, stitch a rounded mask shape around the eye area between rounds 7–9. If using safety eyes, install eyes before masking so holes are known.
Ears (make 2)
- Small triangular ears: ch 5, sc across, dec row etc. Add inner cream triangle.
Tail (striped — key raccoon feature)
- Make a long tube for tail: MR 6 sc, inc To 12 st round, sc in rounds until tail length ~5–6 in. Stuff lightly.
- Make stripes by surface crocheting dark grey rings around tail or change color every 2 rounds while crocheting tail (easier): work 2 rounds grey, 2 rounds black, etc. End with tapered tip.
Paws (make 4)
- Short cylinders with 6–12 sts round. Add tiny embroidered toes.
Assembly
- Attach head to body, sew ears, attach tail and sew paws. Embroider nose and mouth; add whisker marks with short stitches.
Tips & variations
- For realism, slightly flatten mask edges via felted yarn or surface slip stitch.
- Use fuzzy yarn for a shaggy raccoon but avoid very loose yarns that shed.
Care
- Hand wash recommended for multi-color tails; air dry.
5. Crochet Amigurumi Koala Pattern
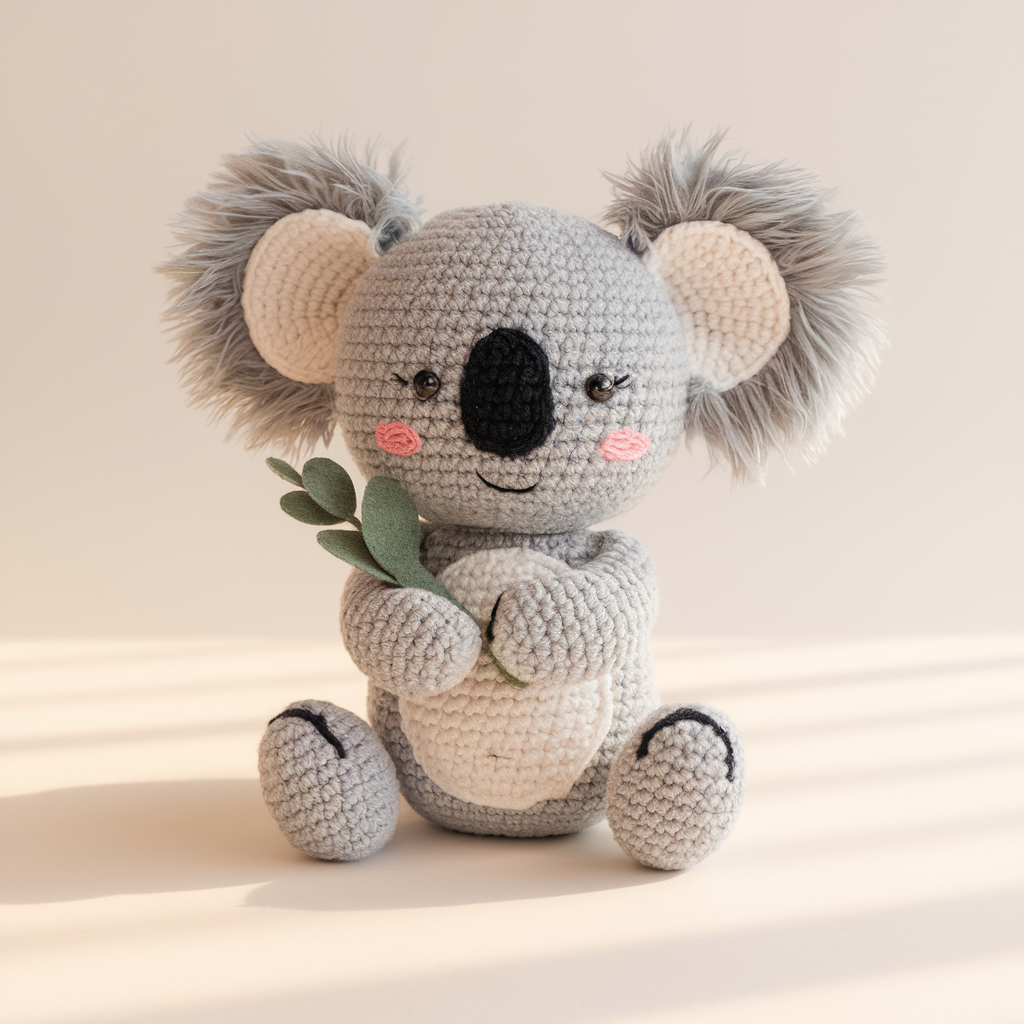
Skill level
Beginner — large round ears and soft grey shapes
Finished size
Roughly 6–7 in (15–18 cm) tall.
Materials
- Worsted yarn: grey ~60 g, white for belly ~20 g, black for nose ~5 g
- 3.5 mm hook, stuffing, black embroidery thread or an oval safety nose (but embroidery recommended for babies)
Head
- Make round head 30 sts wide using same head pattern as fox (R1 6→R5 30→even rounds→decreases).
Ears (big and fluffy — make 2)
- Use a slightly larger hook or hold two strands for fluffy ears if you want more poof. Flat ear: MR 6, inc to 12, work 2–3 rounds sc, then edge with BLO sc for a cupped shape. Alternatively, make a circle and attach to hairier yarn.
Nose (big black oval)
- Ch 6. Row1 sc across, add 2 rows, shape into oval and sew to center of face. Embroider slight smile.
Body & limbs
- Short tube body (as earlier). For cuddly koala make arms a bit rounded and place them near chest to appear hugging. Make small feet oval shaped.
Assembly
- Sew head to body, attach ears nicely fluffed out, sew arms and legs, sew belly patch (white) as round oval.
Tips & variations
- Use fuzzy yarn for ear interiors for softness.
- Add vine leaf accessory (tiny green felt or crocheted) to give koala a eucalyptus vibe.
Care
- Spot clean or hand wash; reshape ears while damp.
6. Crochet Amigurumi Duck Pattern
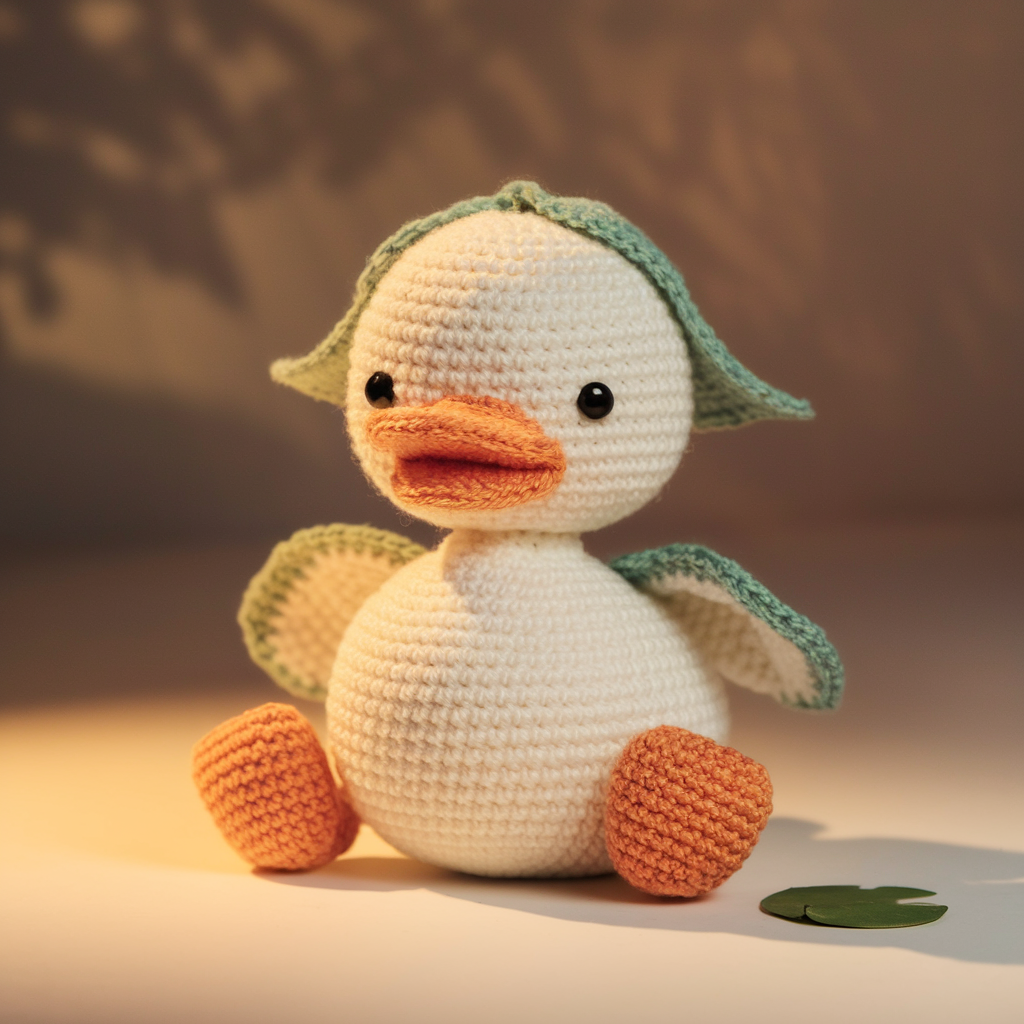
Skill level
Beginner — simple ovoid body and flat bill; color change for green accents
Finished size
Approximately 5–6 in (13–15 cm) tall.
Materials
- Worsted yarn: white main ~60 g, green accents ~10 g, yellow or orange for beak ~10 g
- 3.5 mm hook, safety eyes 6–8 mm or embroidered, stuffing
Body / head (one-piece or separate)
- Work a single oval body similar to whale or small chicken pattern: MR 6 → inc to 30 → even rounds for body → dec and close leaving opening for stuffing.
Bill / beak
- Ch 6, sc across (5), ch 1, turn, sc across 5 for 3–4 rows to make small beak flap. Fold and sew base to front of head. Leave some gap for slight open beak look.
Wings (make 2)
- Ch 6. Row1 sc in 2nd ch across (5). Next row sc, hdc, dc, hdc, sc shape. Sew to sides. Use green as wing tip or body stripe.
Feet (webbed — make 2)
- With orange or yellow: ch 7, sc across 6, then work sl st along bottom to make flat foot shape; or make small 3-toe feet: chain and small loops.
Green accents
- Add green cap: change color for top rounds for a little green cap on head or a green bib (color change rounds at neck). Alternatively, make tiny green bow tie beneath beak.
Assembly
- Attach wings on sides, beak on front, add embroidered nostrils and eyes. Sew feet to underside so duck sits.
Tips & variations
- Make pond friends: add tiny lily pad or crocheted duckling in matching colors.
- For a retro look, use variegated green yarn for mottled wings.
Care
- Machine wash gentle if yarn permits; reshape beak.
7. Crochet Amigurumi Octopus Pattern
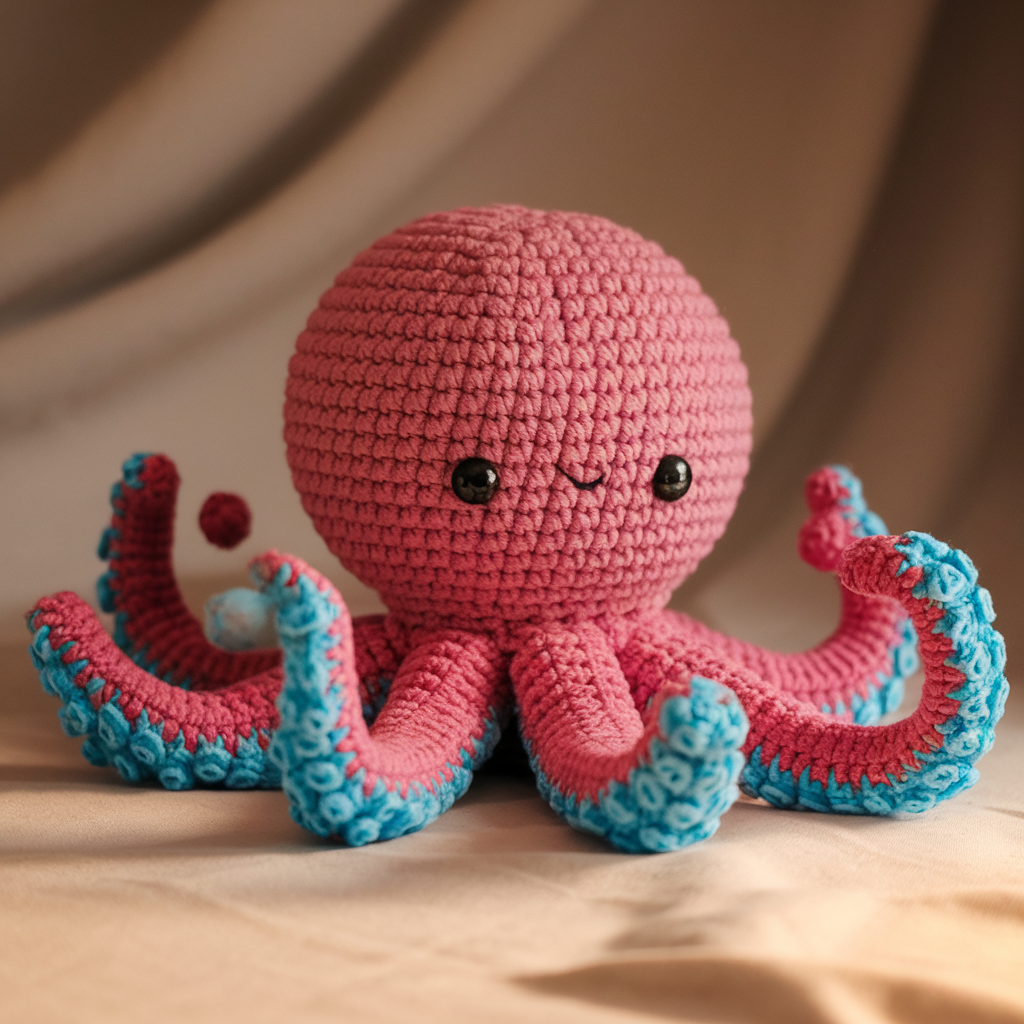
Skill level
Beginner — sphere head and many tentacles (fun to make and fast to sew)
Finished size
Tentacle span ~8–10 in (20–25 cm) including body; body ball about 3–4 in diameter.
Materials
- Worsted yarn ~60 g in main color; contrasting underside color optional ~10 g
- 3.5 mm hook, stuffing, small safety eyes 6 mm or embroidered
Body (round sphere)
- MR, R1: 6 sc (6)
- R2: inc to 12
- R3: sc1, inc (18)
- R4: sc2, inc (24)
- R5: sc3, inc (30)
- R6–R9: sc around (30) to form ball height
- R10: sc3, dec (24)
- R11: sc2, dec (18) — stuff well
- R12: sc1, dec (12)
- R13: dec around close
Tentacles (make 8)
Two easy tentacle styles:
Spiral tentacles (classic)
- Ch 30 (or shorter for smaller octopus). R1: 3 dc in 2nd ch from hook, 3 dc in next ch slip stitch to previous and repeat along chain to create spiral (you will work 3 dc in each chain stitch across). Fasten off and leave long tail for sewing. Curl forms naturally.
Flat tentacles
- Ch 20. Row 1: sc in 2nd ch across; Row2: ch1, hdc across; finish and fringe end if desired.
Sew eight tentacles evenly spaced around base of sphere.
Eyes & expressions
- Sew 6 mm safety eyes between R6–R7 or embroider small circles. Add cute smile with embroidery.
Weighted option
- For a weighted bottom to help octopus sit, insert a small washer or bag of rice inside base (secure inside with extra stitches and a small felt circle).
Tips & variations
- Make one tentacle longer with small pocket to slip finger in — fun finger puppet!
- Use bright summer colors for a kids’ toy; for baby-safe, embroider eyes and use soft cotton.
Care
- Machine wash gentle inside laundry bag; reshape tentacles while damp.
Conclusion
There you go — seven full amigurumi animal patterns that scale from beginner-friendly to gently challenging. Each pattern follows the same logic: build a firm, tight fabric; stuff firmly but evenly; and attach parts securely. A few final cross-pattern tips that make every amigurumi look professional:
- Tight tension matters. If stuffing shows through, switch to a smaller hook or use a firmer yarn.
- Stuff evenly. Use small amounts of stuffing at a time to avoid lumps.
- Reinforce attachments. When sewing limbs/heads, stitch through both pieces and go around multiple times. Hide knot tails inside the body.
- Use stitch markers. Mark round starts and special placement points for eyes/ears.
- Safety first for kids’ toys. Embroider eyes and sew parts extra firmly; avoid beads or small detachable pieces for babies.
- Finishing makes the difference. Block/steam lightly (if yarn allows), trim stray fibers, and use felt backings for small parts when needed.