

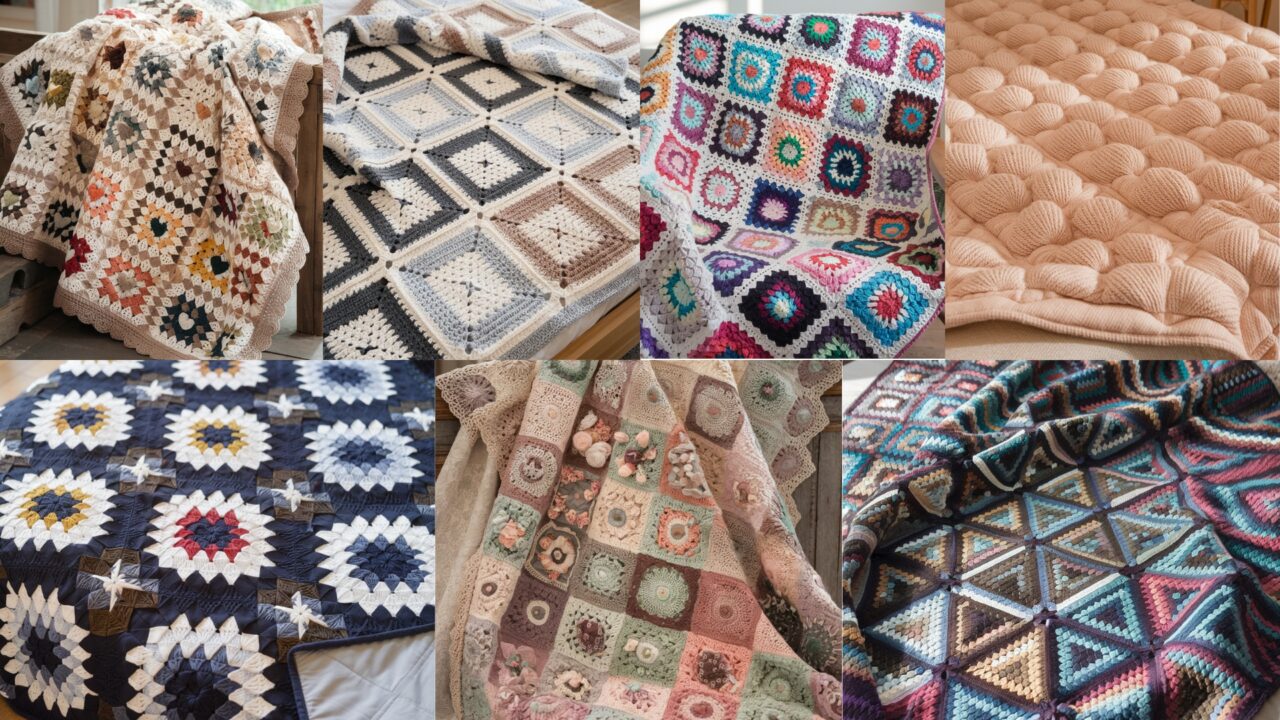
Crochet quilts combine the warmth and texture of crochet with the graphic possibilities of quilting. They can be soft, sculptural, cozy bed-sized blankets or smaller lap/throw pieces that double as statement decor. This collection gives you seven different directions — from simple two–tone geometry to sculpted puff textures, modular grids, country-inspired Caron looks, classic granny quilts, star motifs, and vintage patchwork styling. Each pattern below is written to be adaptable: exact stitch counts and yarn weights are suggestions so you can scale to any bed or sofa size. I include materials, skill level, step-by-step instructions, assembly/joining methods, finishing, and creative variations so you can jump straight into your next crochet quilt project.
Quick notes before you start (tools, terminology, sizing)
Abbreviations (US): CH = chain, SL ST = slip stitch, SC = single crochet, HDC = half double crochet, DC = double crochet, TR = treble crochet, BLO/FLO = back/front loop only, ST(S) = stitch(es), INC = increase (2 sts in same st), DEC = decrease (sc2tog, dc2tog), MR = magic ring.
Tools & notions: yarn (see each pattern), crochet hook(s) recommended by yarn label (often 4.0–5.5 mm for worsted), tapestry needle, stitch markers, blocking mats and pins, sewing needle & thread for lining/attaching, scissors, measuring tape, optional sewing machine for lining.
Yarn choices: Cotton/ cotton-blend gives structure and crisp stitch definition, acrylic is soft and machine-washable, wool / wool-blends give warmth and drape. For quilts, worsted (medium) is common; DK gives lighter quilts; bulky makes very warm, speedy pieces. When mixing yarns, match care instructions where possible.
Sizing reference (desktop cheat):
- Baby quilt ≈ 36” × 45” (approx 3 × 4 motif grid of 6” motifs)
- Throw ≈ 48” × 60” (8 × 10 grid of 6” motifs)
- Full/Queen lap quilt adjust by adding rows / motifs.
Construction approaches covered: make-many-motifs and join, large panel folded/seamed, modular folding (origami-style), and fully joined-then-blocked. I also cover lining and quilting/ backing options.
1. Crochet a Two-Tone Square Quilt Pattern

Skill level: Beginner → Confident beginner
Why you’ll love it: Fast, graphic, beginner-friendly. Two colors create striking geometry with minimal stitch techniques.
Materials (sample throw):
- Worsted weight yarn (MC = Color A and CC = Color B), approx 2000–3000 yds total depending on size
- 5.0 mm (H) hook (or hook that gives desired fabric)
- Tapestry needle, blocking pins, sewing needle for joining
Gauge & motif size (example):
Work a 6” square as target motif. If your gauge differs, adjust chain accordingly. A 6” square often equals ~18–20 DC across with worsted & 5 mm hook.
Pattern concept
Each square is worked in two tones stacked (e.g., top half Color A, bottom half Color B) or side-by-side in vertical halves — alternating orientation when assembling yields checkerboard, diagonal or brickwork effects.
Step-by-step — Two-Tone Square (6” sample, medium-size throw guidance)
- Foundation: CH 19 with Color A (gives ~18 DC across). Turn.
- Row 1 (setup): DC in 4th CH from hook (counts as DC), DC across to end — 18 DC. Turn.
- Rows 2–6: Continue DC rows in Color A (5 rows total of Color A) to create top half height (measure to 3” high for a 6” square). Fasten off Color A leaving tail.
- Join Color B: Attach Color B at the first st of next row. Work Rows 7–12 in DC to reach overall square height (~6”); fasten off. Weave ends.
- Option: To create vertical halves, CH 10 with Color A (9 DC), CH 10 with Color B in same row and join next rows by carrying color or switching mid-row. Carry carefully or always cut and weave ends for neatness.
- Make required number of squares for your quilt layout (e.g., 8 × 10 grid for a throw = 80 squares).
Joining
- Whipstitch (invisible, sturdy): Place squares RS facing up and whipstitch through back loops only to create a ridge that emulates knitting seams.
- Join-as-you-go DC join: When finishing last row of a square, slip-stitch into previous square’s corresponding stitch to join seamlessly. Works great for large quilts to avoid sewing later.
Edging & border
Once the grid is assembled, work 2 rounds of SC around whole quilt in Color A, then 2 rounds of HDC or a decorative shell edge: (SC, CH 3, SL ST in same) every 4–6 sts.
Finishing & backing
- Block quilt flat. For durability, sew a cotton backing and quilt by hand or machine with batting sandwiched inside. Alternatively use a no-sew fusible fleece lining for a softer finish.
Variations & ideas
- Alternate orientation so some squares are flipped — creates diagonal chequerboard.
- Use gradient yarn for Color A to create soft stripe effect across the quilt.
- Make squares rectangular (6×8) to build a modern brick pattern.
2. Crochet Puff Quilt Pattern
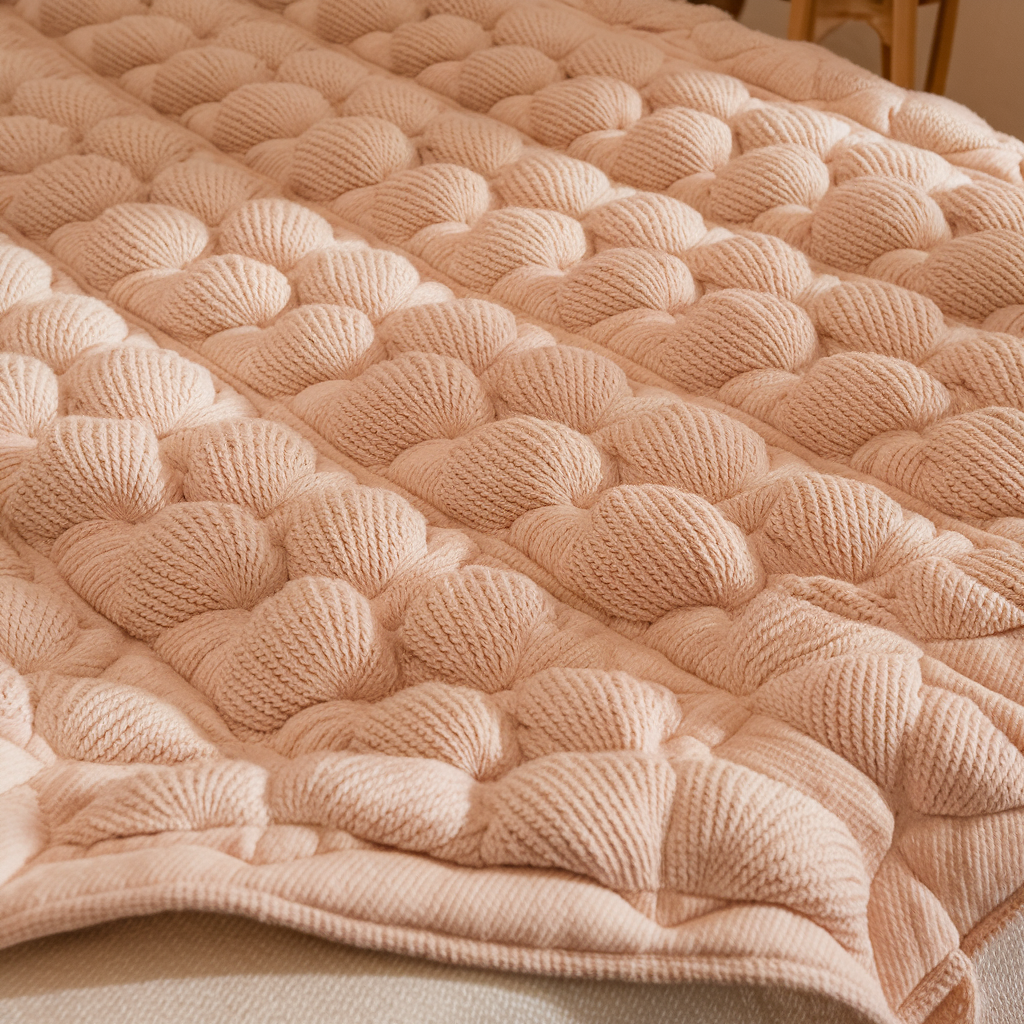
Skill level: Intermediate (texture & shaping)
Why you’ll love it: Puff stitches create deep, tactile texture — the quilt feels sculptural and cozy.
Materials (sample baby quilt):
- Worsted weight yarn (soft acrylic or wool blend) — 1200–1800 yds
- 5.5 mm hook (or as required to get nice puffy but closed stitches)
- Tapestry needle, blocking tools, optional fabric backing & batting
Puff stitch basics: For this quilt, we use 4-loop puff: YO, insert hook in stitch, pull up loop; repeat 4 times (you have 9 loops on hook), YO pull through all loops, CH 1 to close puff. Anchor with SCs between puffs.
Pattern concept
Work panels of puff stitch arranged in square motifs or continuous panel. Option to make a grid of puff squares joined by SC sashing for structure.
Step-by-step — Puff Square (sample 6” square)
- Foundation: CH 16, turn.
- Row 1: SC in 2nd ch from hook and across (15 SC). Turn.
- Row 2 (puff row): Make a puff in next st, SL ST or SC into next repeat across (this pattern alternates puffs and anchors). Turn.
- Row 3 (anchor row): SC across in the tops of puffs and anchors. Turn.
- Repeat: Repeat rows 2–3 until you reach square height (~6”); finish with SC row. Fasten off. Make grid of squares.
Alternate continuous panel approach: Work a wide foundation row of appropriate length and work puff/anchor rows back and forth until desired width/height. This produces a ribbed texture without join seams.
Assembly & sashing
- Join squares with SC sashing: join squares into strips with SC seams, and then join strips with 1–2 rows of SC between them to create “grout lines” of plain texture that highlight puffs.
Finishing & lining
Because puff fabric is voluminous, quilting with batting is recommended for a flatter, stable surface — use thin batting to avoid excessive thickness. Sew a cotton backing and quilt with large basting stitches or machine quilt through all layers along sashing lines.
Care & wear
- Puff stitches trap air and insulating fibers; consider a removable quilt cover or gentle wash cycles to maintain puff shape. Reshape and re-block puffs after washing.
Variations
- Use cluster puffs to create floral-like motifs.
- Alternate puff stitch sizes (3-loop vs 5-loop) for a quilted mosaic effect.
3. Crochet MODular Quilt Pattern
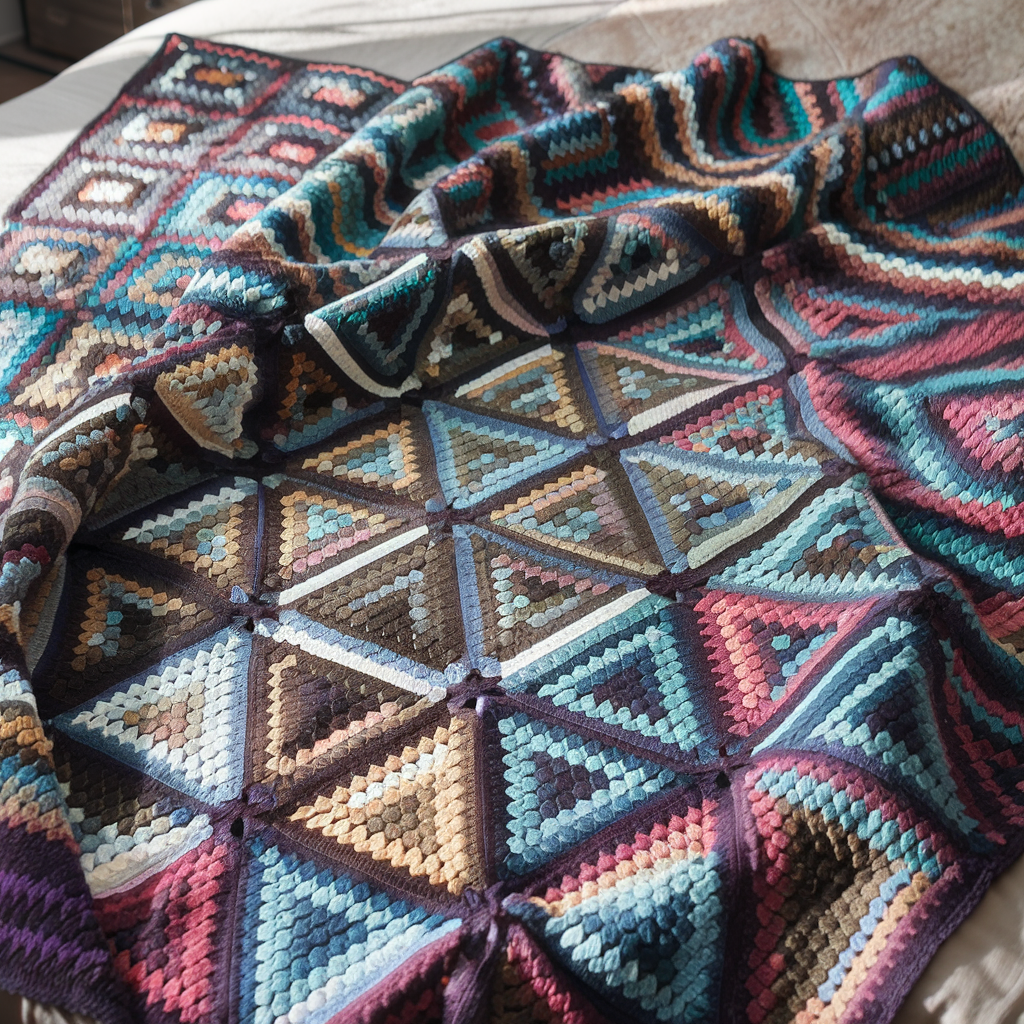
Skill level: Intermediate → Advanced (planning & joining)
Why you’ll love it: Modular quilts are highly customizable and ideal for pattern play — make blocks that fold or interlock like modular origami.
Materials (sample throw):
- DK or worsted yarn in several colors (5–8 colors if you want a patchwork look) — 2000+ yds depending on size.
- 4.5–5.5 mm hooks, tapestry needle, blocking tools.
Design principle
The “MODular” approach uses unique shaped modules (squares, trapezoids, triangles) you assemble like puzzle pieces. One popular method is an equilateral-triangle module that, when joined in sets, produces hexes or star motifs.
Example module — Trapezoid block (works into brick-like modular quilt)
- Make trapezoid panel: CH 18. Row 1: DC across. Row 2–8: DC rows forming a parallelogram (trim to height). Taper one short side with decreases to form trapezoid. Each trapezoid can join to its neighbor forming zigzag modular pattern.
Step-by-step — Modular assembly
- Plan your layout on a graph or spreadsheet. Determine number of modules per row and the resulting dimensions. Draw or pin your color plan.
- Work modules in batches by color to keep yarn momentum. Use stitch markers to mark orientation.
- Join modules with a flat, invisible seaming method (mattress stitch) or use crochet slip-stitch joining for decorative ridges. For complex seams, join-as-you-go (JAYG) is efficient: when completing the last round of a module, slip-stitch into finished module edges to connect.
Backing & quilting
For modular quilts with many seams, apply a fabric backing and thin batting to unify texture and prevent seam stretching. Sew backing and quilt across the grid lines (seam lines as quilting channels), which stabilizes modular joins.
Variations & tips
- Use gradient color sets for ombré modular quilts.
- Create modular blocks that fold — e.g., fold one module into pocket for small storage.
- For a modern look, use high-contrast colors and negative space (lots of neutral modules).
4. Crochet Caron Country Quilt Pattern
Skill level: Beginner → Confident beginner
Why you’ll love it: Inspired by Caron’s country/colorwork style—simple motifs (diamonds, hearts, stripes) with a cozy, homespun palette. Great for stash-busting and heirloom pieces.
Materials (sample bed quilt):
- Worsted weight yarn in 4–6 complementary colors (neutrals + accent colors), large yardage (3000–6000 yds depending on bed size)
- 5.5 mm hook, tapestry needle, blocking tools
Pattern idea
Use a repeating block of small motif squares (hearts, diamonds) in a balanced color palette. Blocks are easier to replace or repair.
Step-by-step — Example diamond block (approx 6” motif)
- Foundation: MR, CH 3, 10 DC in MR (10). Join and flatten to small disk.
- Round 2–5: Use DC increases to square off into a small 6×6 block, switching yarn colors to create diamond insets (use tapestry technique or mosaic slip st-stitch).
- Make many blocks and shuffle colors for rustic, country appeal.
Joining & finishing
- Join blocks with an exposed ridge using SC through back loops to create a quilt-grid effect.
- Finish with a wide border in a neutral (e.g., cream) and a fluffy fringe or scalloped edge.
Backing & quilting
- Quilt by hand or machine across seam lines, or add tufting (stitch through all layers at regular intervals) to secure.
Variations
- Add crocheted appliqués like tiny barns, stars, or leaves per block for a true country vibe.
- Use Caron simply soft or similar yarns for soft sheen.
5. Crochet Granny Quilt Pattern
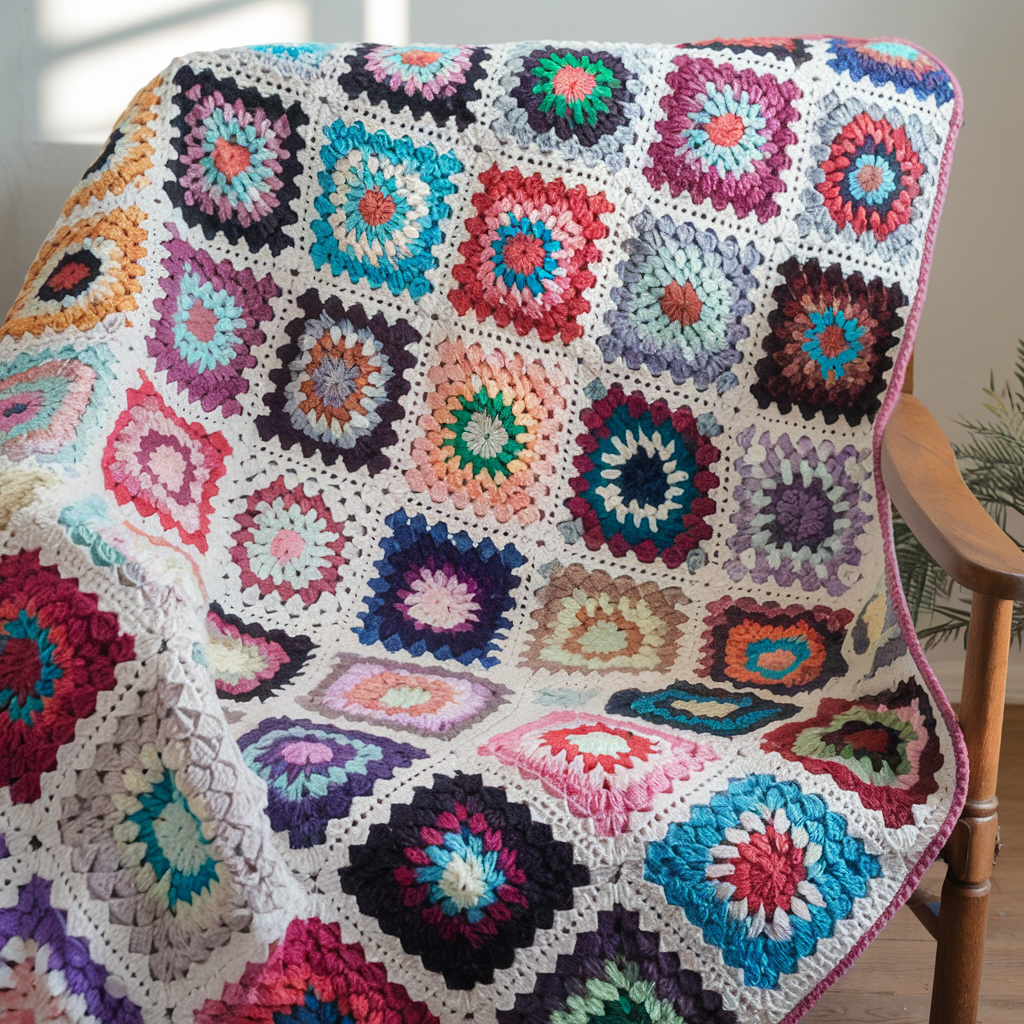
Skill level: Beginner → Confident beginner (granny technique)
Why you’ll love it: The granny square is classic and endlessly versatile — patchwork style, colorplay and nostalgia.
Materials (sample throw):
- Worsted yarn in many colors (scrap friendly) — 1500–3000 yds
- 5.0 mm hook, tapestry needle, blocking tools
Granny square basics
Classic granny: 3 DC cluster, ch 2 at corners, repeat in CH-2 spaces. Make squares in varied palettes: monochrome, two-tone, variegated or center-heavy gradients.
Step-by-step — Classic granny square (6” motif)
- Round 1: MR, CH 3, 2 DC in ring, CH 2, 3 DC, CH 2 repeat 3 more times; SL ST to top of CH 3.
- Round 2: In each corner CH-2 space make (3 DC, CH 2, 3 DC); between corners CH 1 (or 0 for denser). Continue rounds until square measures 6”. Fasten off.
Layout & assembly
- Random join: Lay squares in a pleasing color arrangement and join with single crochet or whipstitch.
- Join-as-you-go: When finishing each square, use JAYG to connect to previously-made squares — efficient for large quilts.
Border & finishing
- Add multi-round border with shells, picots or a ribbed HDC band. Block squares to even size before joining for crisp lines.
Quilting & backing
- For warm blankets add batting and backing and machine-stitch along granny rows. Use quilting stitches through the centers to secure bulk.
Variations & inspiration
- Make “sunburst” granny by varying center colors.
- Combine with modern negative-space panels to make a contemporary granny quilt.
6. Crochet Star Quilt Pattern
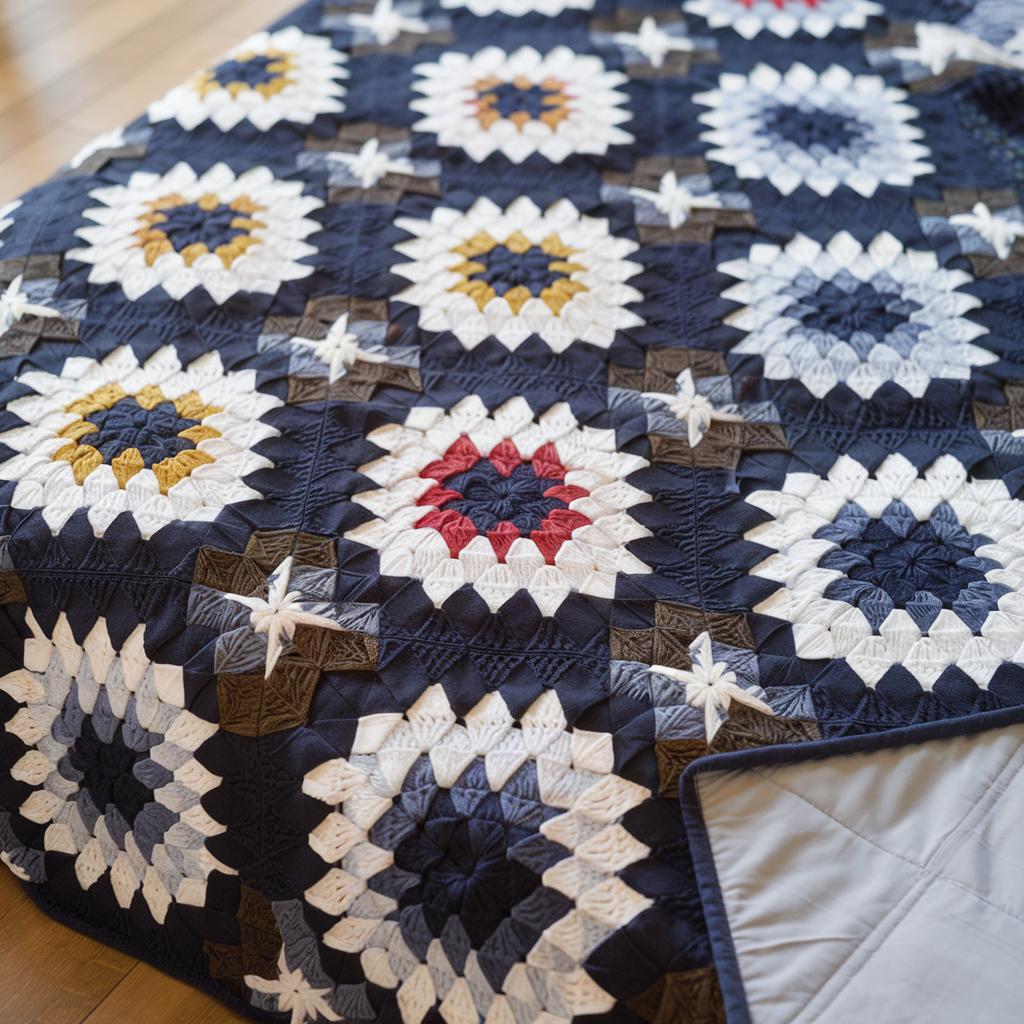
Skill level: Intermediate (chart following & colorwork)
Why you’ll love it: Stars are timeless — they read as graphic, modern, or vintage depending on yarn and color contrast.
Materials (sample queen):
- Worsted weight yarn in 3 main colors (background, star, accent) — 4000–7000 yds depending on size
- 5.5 mm hook, tapestry needle, blocking tools
Pattern concept
Make star blocks (e.g., 12” star square) using corner-to-corner (C2C) crochet, tapestry crochet, or granny-star hybrid. C2C is especially effective for pixel-like star graphics.
Step-by-step — C2C star block (12”)
- Create pixel graph: Map star on graph of 20 × 20 pixels for a 12” block (pixel = C2C square). Choose colors: star color, background color, accent for star points.
- Work C2C: Start with corner pixel and increase to the diagonal peak then decrease — change color according to graph. C2C uses cluster of 3 DCs per pixel and creates diagonal rows — easy to follow graph patterns widely available.
- Make multiple star blocks and join using a simple SC seam for clean negative spaces.
Assembly & finish
- Add a wide border in dark or light color to frame stars. Consider sashing rows between star blocks in neutral for a quilted grid. Add backing and quilt along star outlines for a stitched effect.
Variations
- Use textured star centers (puff or popcorn stitches) for 3D stars.
- Create an entire starry sky with different sized stars.
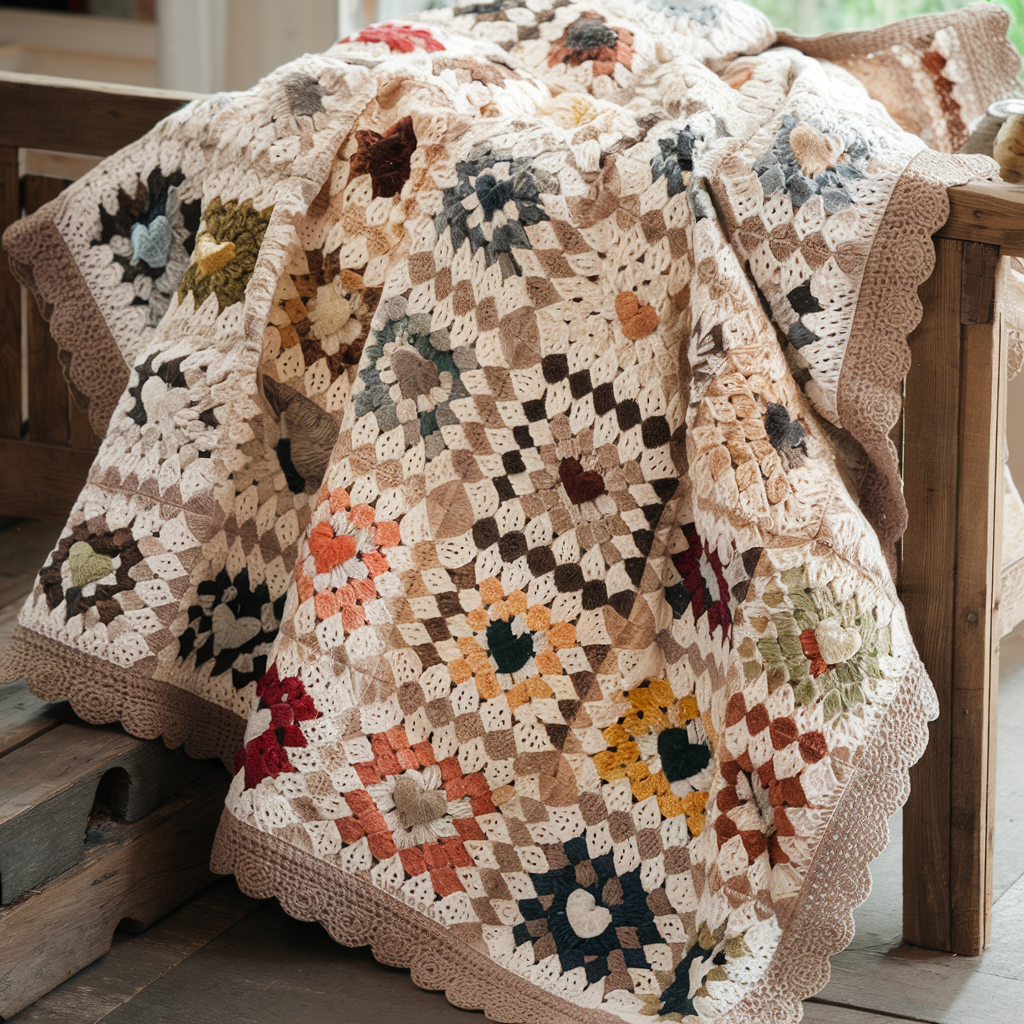
7. Crochet Vintage Patchwork Quilt Pattern
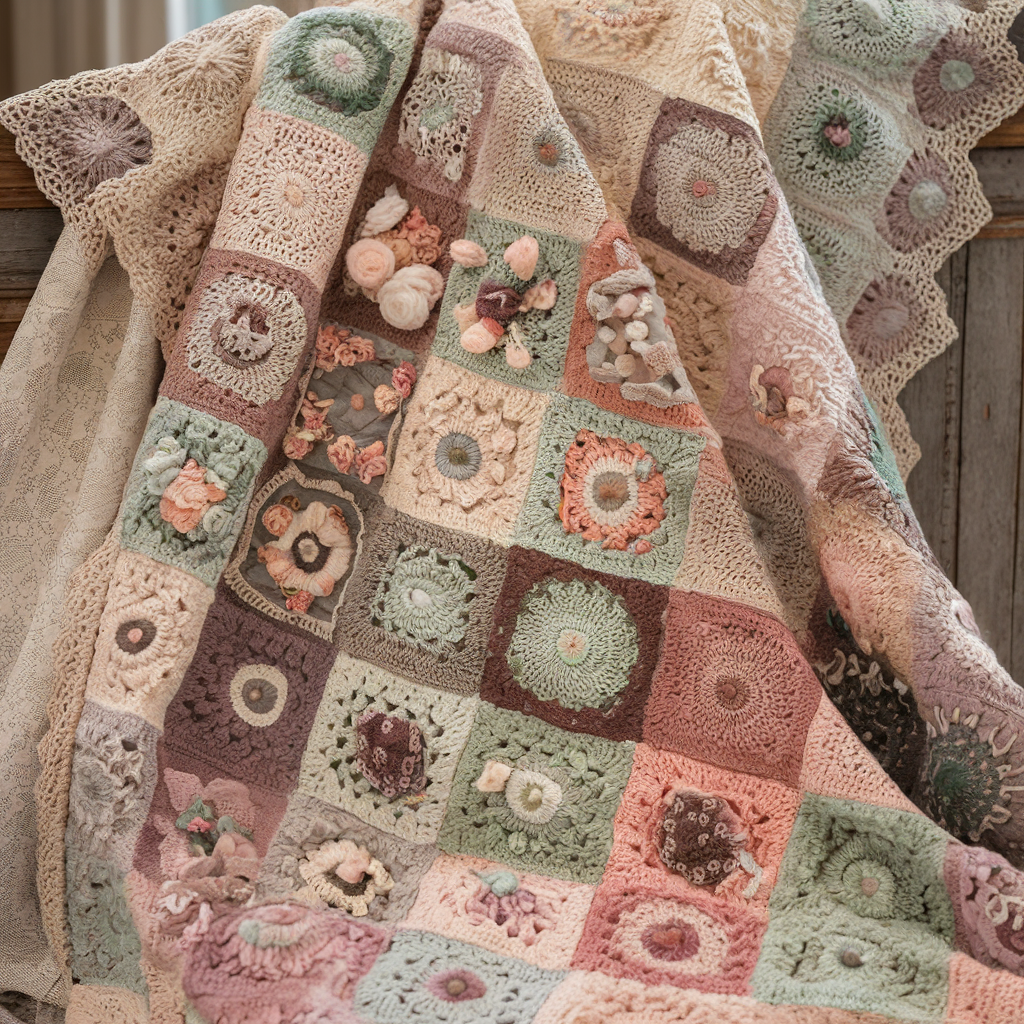
Skill level: Intermediate → Advanced (many motifs & color matching)
Why you’ll love it: Vintage charm — combines small motifs, floral medallions, and lacy details into a nostalgic heirloom.
Materials (sample queen):
- Mix of fingering to worsted yarns in vintage palette (muted pastels, creams, sage, rose) — 4000–8000 yds
- Several hook sizes (2.5–5.5 mm) to make motive scale consistent, tapestry needle, blocking supplies
Design principle
Combine medallion motifs (doilies, lace squares), small granny blocks, and appliqué florals into a single quilt. Work motifs in similar final size by adjusting hook or stitch rounds.
Step-by-step — Building a vintage quilt
- Select motifs: 12 small medallions, 40 small granny squares, 18 lacy squares — plan layout into rows and clusters.
- Standardize size: Block each motif to a uniform size (e.g., 6”), trimming or adding rounds as needed with neutral borders.
- Join motifs: Use a soft join like whipstitch with matching thread so seams are less visible, or crochet a lacy join to maintain vintage lacy look.
- Assemble into panels: join rows into panels, then combine panels into whole quilt.
Backing & quilting
- Vintage quilts look beautiful with a linen or floral cotton backing. Use thin batting and hand-quilt with large running stitches along motif outlines (visible on the front as charming quilting lines).
Embellishment & finishing
- Add embroidered accents, tiny crocheted flowers sewn on, or vintage buttons at junction points for added charm. Edge with a scalloped lace border or scallop picot.
Care
- Hand wash or gentle machine wash on delicate with mild detergent; air dry. For heirloom projects, recommend dry-cleaning.
Final finishing, backing & care tips (applies to all quilts)
- Blocking: Block motifs individually for crisp edges and consistent size before assembly. Use pins and steam/wet blocking appropriate to yarn fiber.
- Backing options: cotton fabric + thin batting (quilt sandwich), or make a full crocheted reverse (less insulating). For washable quilts, sew a removable fabric backing with zipper or button closure.
- Quilting: Hand-stitch (running/quilt stitch) along seams or follow decorative lines. Machine quilting gives long-term stability. For lightweight quilts use thin polyester batting.
- Seam reinforcement: When joining many small motifs, reinforce joins with extra passes and a backing fabric strip where seams will be stressed.
- Care instructions: Label your quilt with fiber content and washing directions. Most acrylic/worsted pieces are machine washable on gentle; natural fibers may require hand wash. Avoid high heat for blocking if fiber sensitive.
- Storage: Fold with acid-free tissue for long-term storage; avoid plastic airtight bags which can trap moisture.
Conclusion
Each of these seven crochet quilt concepts gives you a different creative playground: crisp two-tone geometry, cozy puff textures, puzzle-like modular assemblies, country-chic Caron motifs, timeless granny style, bold star graphics, and romantic vintage patchwork. Pick a technique that matches your comfort level and tools — or mix and match motifs to create a truly original quilt. If you want, I can now:

Nếu bạn đang tìm kiếm một sân chơi giải trí trực tuyến ổn định, hiện đại và đa dạng trò chơi, đăng nhập 188v chính là lựa chọn đáng để trải nghiệm. Với hệ thống trò chơi phong phú như: Bắn Cá Đổi Thưởng, Mini Game Đá Gà, Xổ Số Ba Miền, Thể Thao Điện Tử,… Tại đây mang đến không gian giải trí sống động, phù hợp với nhiều đối tượng người dùng.
Hơn 1.000+ kèo cược thể thao tốt nhất thị trường sở hữu tỷ lệ thưởng cạnh tranh đang được 3 NPH Sportsbook cập nhật mỗi ngày tại trang chủ 66b. Bạn có thể thử sức với 40+ bộ môn khác nhau như: Bóng đá, bóng rổ, bóng chuyền, khúc côn cầu, Boxing, võ tổng hợp MMA,…
Thanks for sharing. I read many of your blog posts, cool, your blog is very good. https://accounts.binance.com/ru-UA/register?ref=JVDCDCK4
Thanks for sharing. I read many of your blog posts, cool, your blog is very good. https://accounts.binance.com/zh-TC/register?ref=DCKLL1YD
Your point of view caught my eye and was very interesting. Thanks. I have a question for you. https://www.binance.com/cs/register?ref=OMM3XK51
I don’t think the title of your article matches the content lol. Just kidding, mainly because I had some doubts after reading the article. https://www.binance.info/register?ref=IXBIAFVY
Can you be more specific about the content of your article? After reading it, I still have some doubts. Hope you can help me. https://www.binance.com/lv/register?ref=SMUBFN5I
Your point of view caught my eye and was very interesting. Thanks. I have a question for you.
Thank you for your sharing. I am worried that I lack creative ideas. It is your article that makes me full of hope. Thank you. But, I have a question, can you help me?
Your article helped me a lot, is there any more related content? Thanks!
Your point of view caught my eye and was very interesting. Thanks. I have a question for you.
I don’t think the title of your article matches the content lol. Just kidding, mainly because I had some doubts after reading the article.
Thanks for sharing. I read many of your blog posts, cool, your blog is very good.