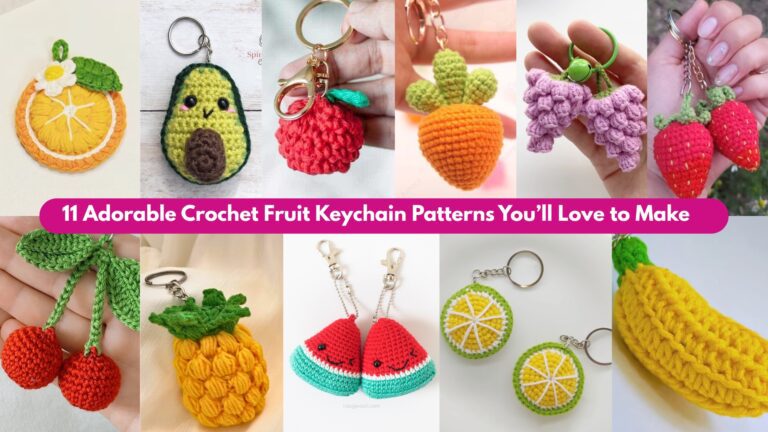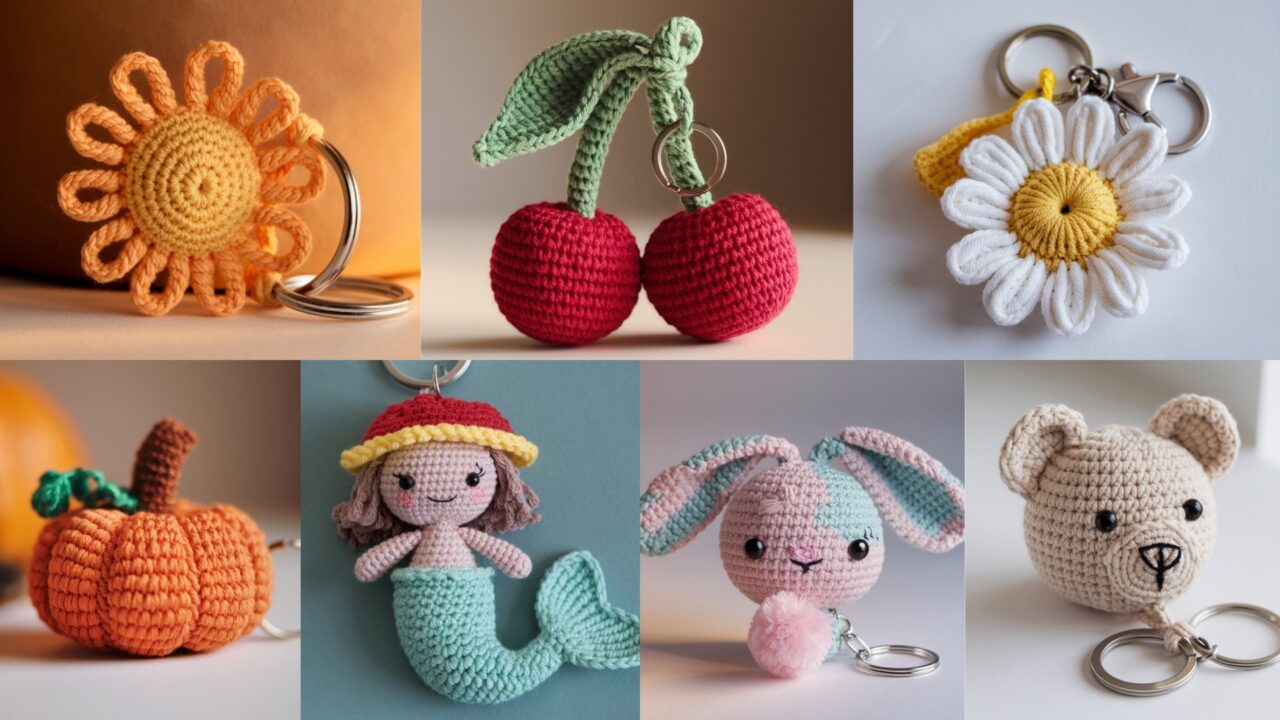
A crochet keychain is a one-skein victory lap: fast, portable, and ridiculously satisfying. They make perfect gifts, zipper charms, bag bling, and tiny practice projects for new stitches. Below you’ll find seven patterns — sun, bear head, mermaid, daisy, bunny, mini pumpkin, and cherries — written to be durable and adorable. Read the general notes, then pick one and get to hooking.
General notes (read this, it matters)
- Yarn: Sport to DK weight cotton or cotton-blend recommended. Acrylic works, but cotton wears better for hardware friction.
- Hook: 2.5–3.5 mm depending on yarn and desired density. Use a smaller hook than recommended on the label for firmer fabric.
- Stuffing: Toy stuffing (polyfill) or scrap yarn. Don’t overstuff — keychain charms need some give.
- Hardware: 25–40 mm split key ring or a small lobster clasp with jump ring. Use metal hardware to survive the real world.
- Eyes: Embroidered eyes are safest for kids; safety eyes are fine for adult charms but sew them in tightly.
- Abbreviations: MR = magic ring; sc = single crochet; hdc = half double crochet; dc = double crochet; sl st = slip stitch; ch = chain; inc = 2 sc in same st; dec = sc2tog; BLO/FLO = back/front loop only. Work in joined rounds unless specified.
- Gauge/size: These are small projects — finished sizes are approximate and given for the sample yarn/hook combos. Adjust by changing hook or yarn, but keep tension tight.
- Durability tip: Reinforce the yarn loop or attachment point by sewing through the body multiple times and adding a dab of clear fabric glue under the knot if you’re nervous. Don’t be sloppy.
1. Crochet Mini Sun Keychain Pattern
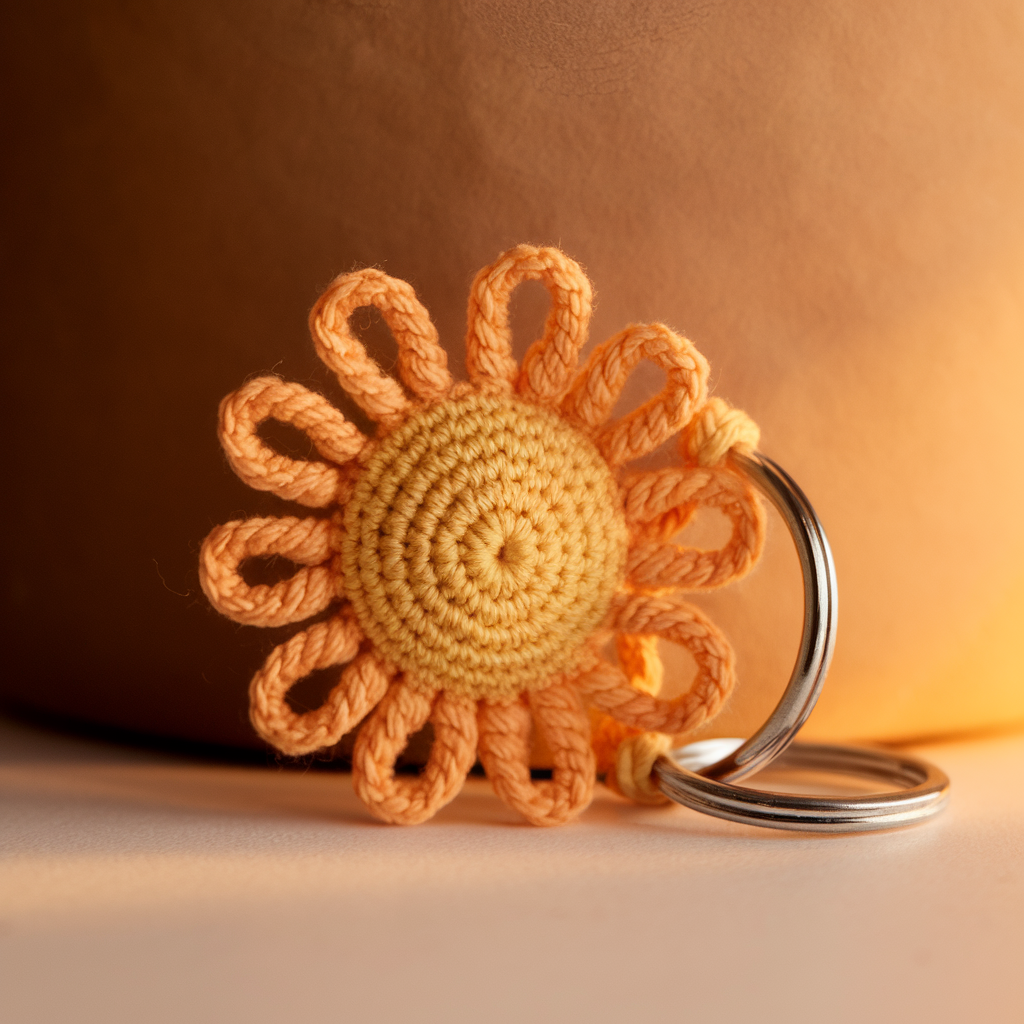
Sunny, flat charm with a little puff center and rays. Great for backpacks and mood-boosting.
Skill level: Beginner
Materials: small amount DK cotton (main yellow, accent orange), 3.0 mm hook, polyfill, 25 mm split ring, tapestry needle, stitch marker.
Finished size: ~1.75–2.0 inches (4.5–5 cm) diameter.
Stitch plan
Flat circle center worked in sc, then rays made as short picot rays or small bobble clusters worked around edge.
Steps
- Center (flat circle): MR, R1: ch1, 6 sc into MR (6). Pull ring tight.
- R2: inc around — 12 sc.
- R3: sc, inc around — 18 sc.
- R4: 2 sc, inc around — 24 sc. Fasten off yellow, weave tail to center and leave long tail for sewing if you want to attach contrast ring later. Don’t stuff center — keep flat or very slightly stuffed for puff.
- Rays (worked into round edge): Rejoin contrast color in any st. Ch3, sl st in next stitch repeat around every other stitch to form small looped rays. Alternatively, for pointed rays: (ch2, 3 dc all in same st, ch2, sl st in same st) skip 1 st around. Make 12 rays to match 24-edge; adjust spacing if needed.
- Assembly: Flatten center slightly and tack the rays down with a few stitches if they flop. If you want a puffed center, add a tiny bit of stuffing before final sl st join.
- Attachment loop: From the back center, fold a 2″ length of yarn doubled to form a loop and secure by stitching through the back fabric 4–6 times, knotting securely. Slip the split ring onto the loop or attach via a small jump ring. Weave ends. Add a drop of clear fabric glue at knot and hide inside body.
Finishing & Variation
- For a sunburst look, alternate two shades of yellow for rays.
- Use metallic thread for a sparkle ray — subtle and surprisingly legible in sunlight.
2. Crochet Bear Keychain Pattern
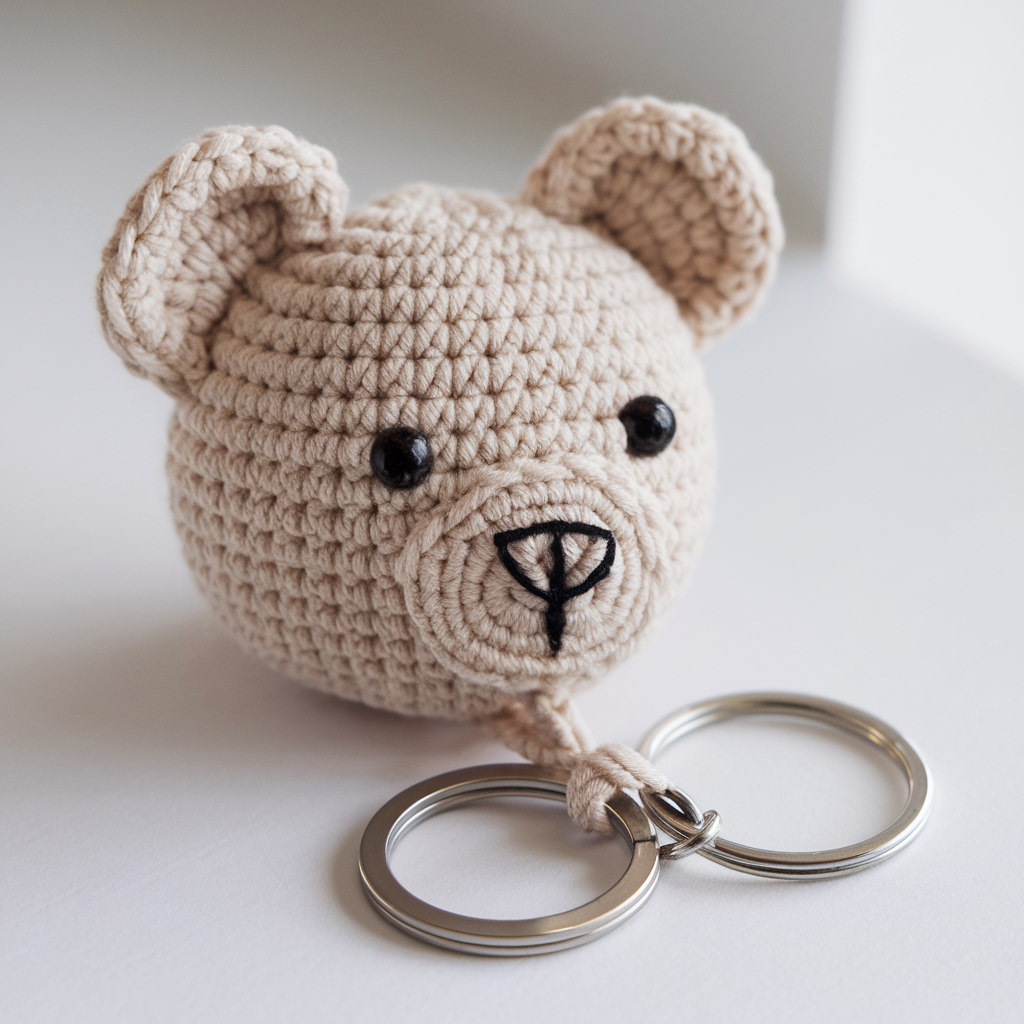
A simple rounded bear head — cute, squashy, no tiny limbs, fewer pieces to sew. You can embroider eyes or use tiny safety eyes.
Skill level: Confident Beginner
Materials: DK cotton (main color), 3.0 mm hook, small stitch marker, 6 mm safety eyes or embroidery thread, polyfill, split ring, tapestry needle.
Finished size: ~2.0–2.25 inches (5–5.8 cm) across.
Steps
- Head (amigurumi sphere worked in rounds, joined): MR, R1: 6 sc (6).
- R2: inc around → 12.
- R3: sc, inc → 18.
- R4: 2 sc, inc → 24.
- R5: 3 sc, inc → 30.
- R6–R10: sc around (5 rounds) — makes the main body height.
- Begin decreases: R11: 3 sc, dec → 24.
- R12: 2 sc, dec → 18.
- Insert safety eyes between R6 and R7 spaced about 6–8 sts apart (or embroider eyes now). If using safety eyes, install before stuffing.
- R13: sc, dec → 12. Stuff firmly but not overstuffed.
- R14: dec around → 6. Fasten off, thread tail through remaining loops, pull closed, and weave in.
- Ears (make 2): MR, R1: 6 sc. R2: sc, inc → 9. R3: sc around 9. Fasten off leaving tail. Fold ear flat and sew to top corners of head — secure with multiple passes.
- Muzzle (optional): Small oval: ch6, sc across, turn and work 2 rows of sc to make short oval. Sew centered under eyes and embroider nose.
- Attachment: Stitch a short doubled yarn loop onto the top center of head between the ears; run the split ring through or attach with jump ring. Reinforce with many stitches and a small dab of clear glue hidden inside.
Finishing & Variation
- Use fluffy yarn for a plush look but keep the hook small for density.
- Make a tiny bow or scarf as an accessory.
3. Crochet Little Mermaid Keychain Pattern
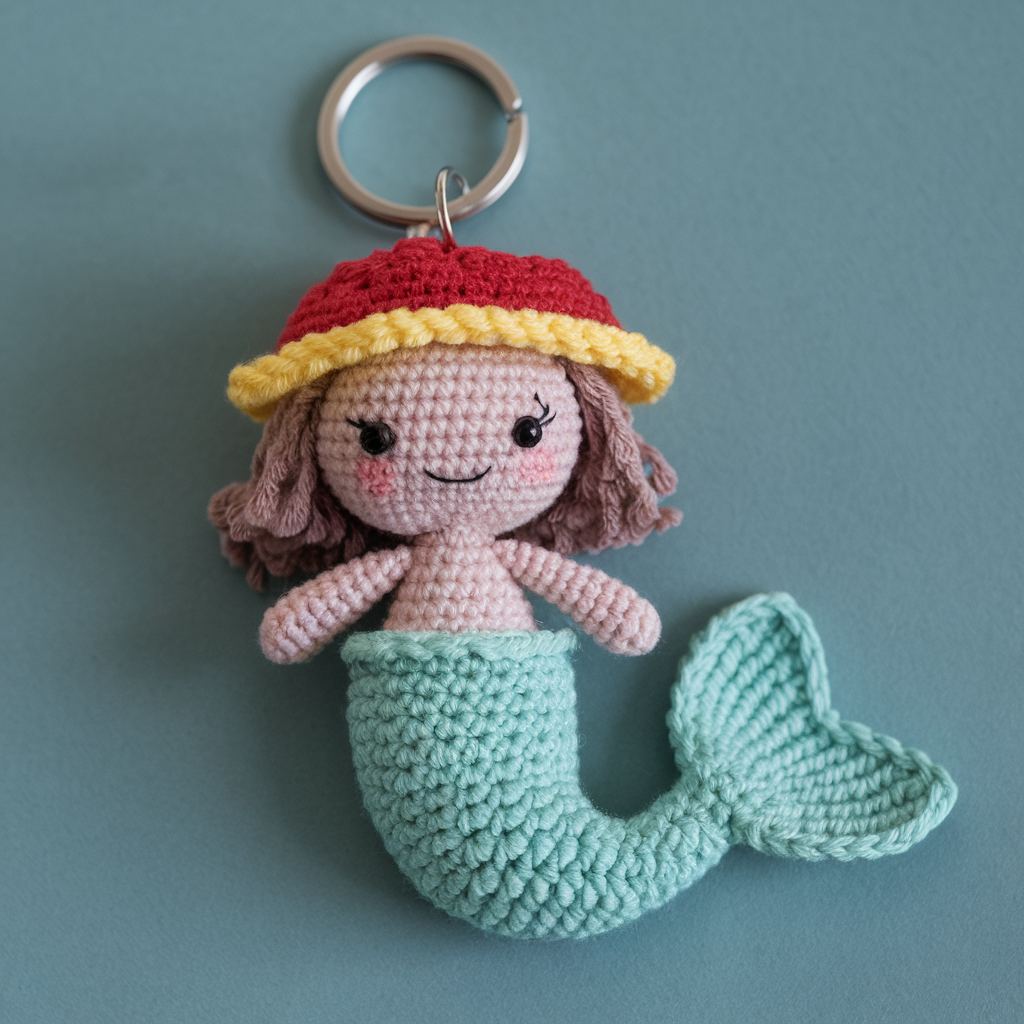
A tiny mermaid torso + tail keychain — whimsically detailed but still quick. Will have a small flat hair/face piece and a crocheted tail.
Skill level: Intermediate (small shaping, color changes)
Materials: DK yarn in skin tone, hair color, tail color; 2.5–3.0 mm hook; embroidery thread for face; polyfill for tail; 25–30 mm split ring; tapestry needle.
Finished size: ~2.5–3.0 inches (6.5–7.5 cm) from crown to tail tip.
Structure
Make head/upper torso as small amigurumi bulb, then continue into a flared tail worked flat and folded or worked in rounds for a tube with flared fins.
Steps
- Head/torso: MR, R1: 6 sc. R2: inc → 12. R3: sc, inc → 18. R4–R5: sc around (2 rounds). At the end of R5, switch to tail color? No — we need a slim torso. R6: sc, dec → 12. Stuff lightly. R7: sc around 12. Leave a small opening to join to tail. Fasten off torso yarn but keep tail yarn attached to work tail seamlessly.
- Tail tube: With tail color, pick up stitches along the lower edge of torso by working sc evenly around for about 10–12 stitches forming the top of the tail tube; join and work 6–8 rounds sc to create the tube section.
- Tail fin (flat flared): Make two fan fins and sew them to the tube bottom or work a large fan directly: ch 12, Row1: sc in 2nd ch, hdc, dc, tr, tr, dc, hdc, sc (fan), turn and repeat across multiple fans to create fullness. Sew fan(s) to bottom of tail tube and shape with slight gathers.
- Hair & face: Create a flat stitched hair cap in hair color — ch 10, sc rows shaping by decreasing slightly to form a cap; sew to the top of head. Embroider eyes with dark thread (two tiny stitches) and a small mouth. Avoid safety eyes for this small charm; embroidery is safer.
- Attachment: For durability, sew a secure loop of yarn at the top center of hair cap and attach split ring or a small lobster clasp. Reinforce by sewing through head and hair a few times. Weave and tuck ends.
Finishing & Variation
- Add a tiny sequin or sequin bead to tail for shimmer.
- Make multiple color tails — gradient looks great if you fade colors across rows.
4. Crochet Daisy Keychain Pattern
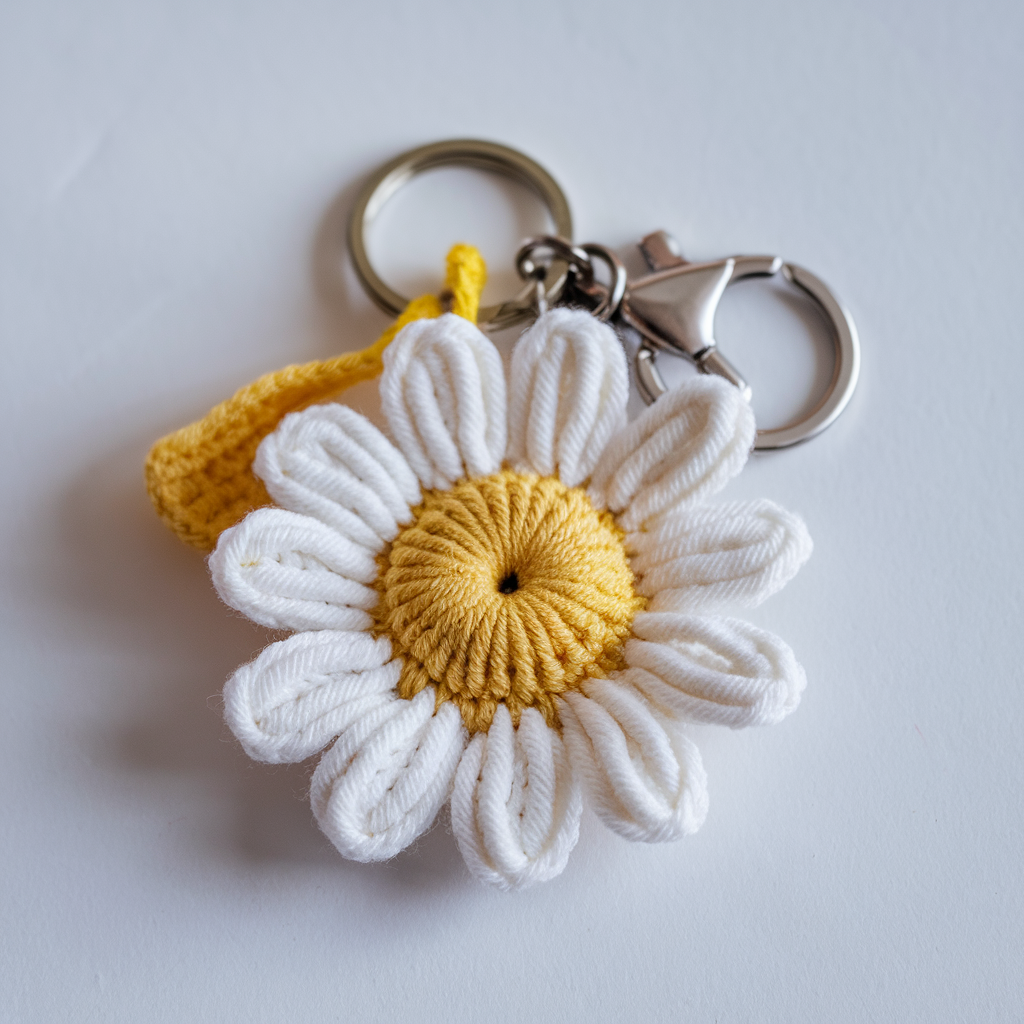
Flat daisy motif with a tiny puff center — super-fast and satisfying. Works in one flat round; perfect for keychains and zipper pulls.
Skill level: Beginner
Materials: small amount DK cotton in white and yellow, 3.0 mm hook, split ring, tapestry needle.
Finished size: ~1.5–1.75 inches (4–4.5 cm).
Steps
- Center (yellow puff): MR, R1: ch1, 6 sc in MR (6). R2: inc around → 12. Optionally add a tiny bit of stuffing and fasten off leaving long tail. Or make the center a little puff: join yellow, (yo, insert, yo, pull loop) 3 times into same stitch and finish puff as your yarn allows; 6 puffs around.
- Petals (white): Join white into any st. Ch3, sl st into next st around to create 12 small looped petals; OR for fuller petals: (ch3, 3 dc in same st, ch3, sl st into next) repeat around to create 6 larger petals. Make petals match center count.
- Backing & attachment: For sturdiness, make a second identical simple circle (sc rounds 6–8) in yellow or white, then sew both pieces together around the edge leaving small opening for a thin foam or cardboard insert if you want a stiff charm. Stitch a small doubled yarn loop to back center and attach split ring. Hide knot inside seam.
Variation & Tips
- Add a tiny bead center for sparkle, sew it through center from back and knot inside.
- Use variegated yarn for playful petals.
5. Crochet Bunny Keychain Pattern
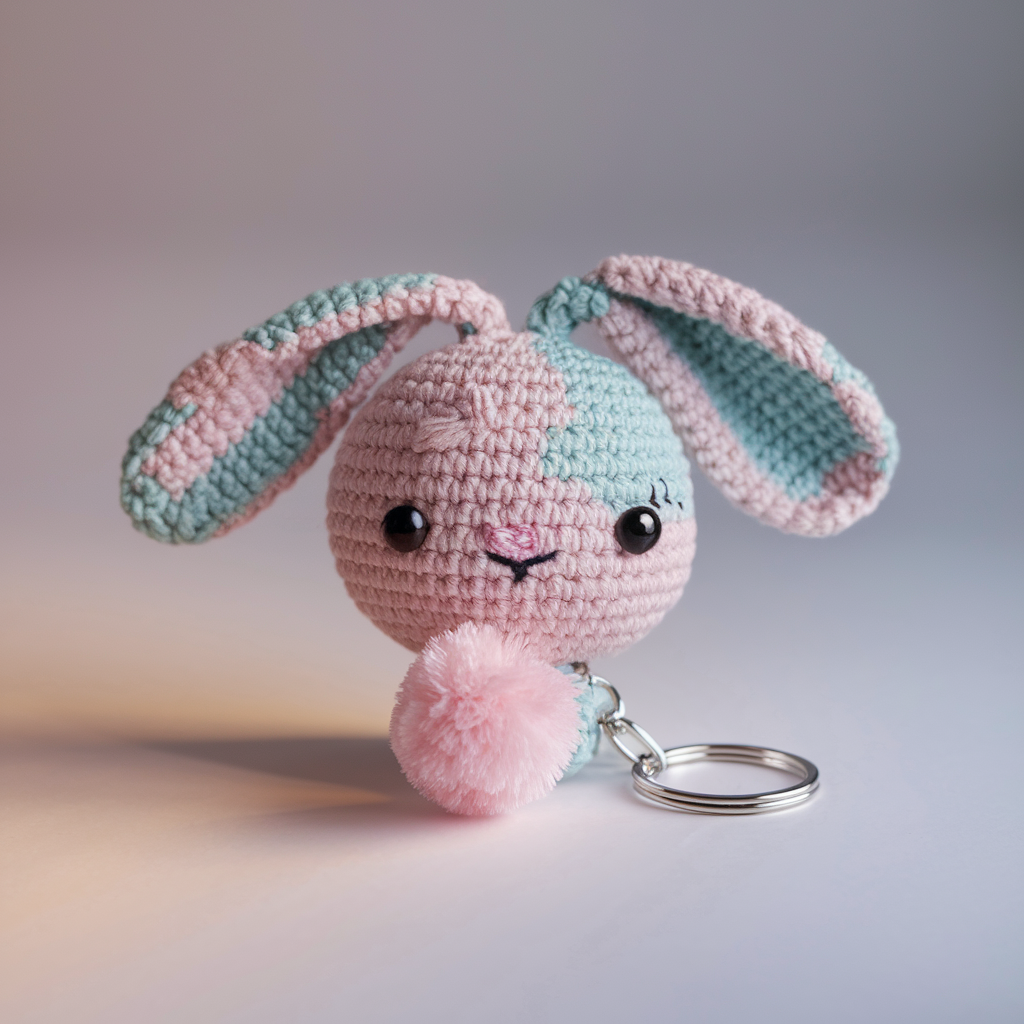
Small head + floppy ears. Cute, squeezable, and great in pastel yarns.
Skill level: Confident Beginner
Materials: DK yarn, 3.0 mm hook, embroidery thread for face, stuffing, split ring, tapestry needle.
Finished size: ~2.25–2.75 inches (5.5–7 cm) head to ear tip when ears folded; head diameter about 1.75–2″.
Steps
- Head: MR, R1: 6 sc. R2: inc → 12. R3: sc, inc → 18. R4: 2 sc, inc → 24. R5–R8: sc around (4 rounds). R9: 2 sc, dec → 18. R10: sc, dec → 12. Insert eyes/embroider before final stuff. R11: dec around to 6, close and hide tail.
- Ears (make 2): Ch 8, Row1: sc in 2nd ch from hook and across (7). Row2: inc, sc 5, inc (9). Row3–Row6: sc across 9. Row7: dec, sc 5, dec (7). Fasten off leaving tail. Fold ear lengthwise and sew base to top of head so ears flop forward. Sew on firmly with multiple passes.
- Face: Embroider nose and mouth with contrast yarn. For eyes, small French knots or tiny embroidered ovals are ideal.
- Attachment: Add a yarn loop at top of head (between ears) and attach split ring. Reinforce by sewing through head several times and knotting well. Tuck knot into head and dab clear glue if desired.
Variation
- Add a tiny pompom tail at the back using fur yarn or a small tuft of yarn.
- Make the inner ear a contrasting color by sewing a small oval piece into the folded ear.
6. Crochet Mini Pumpkin Keychain Pattern
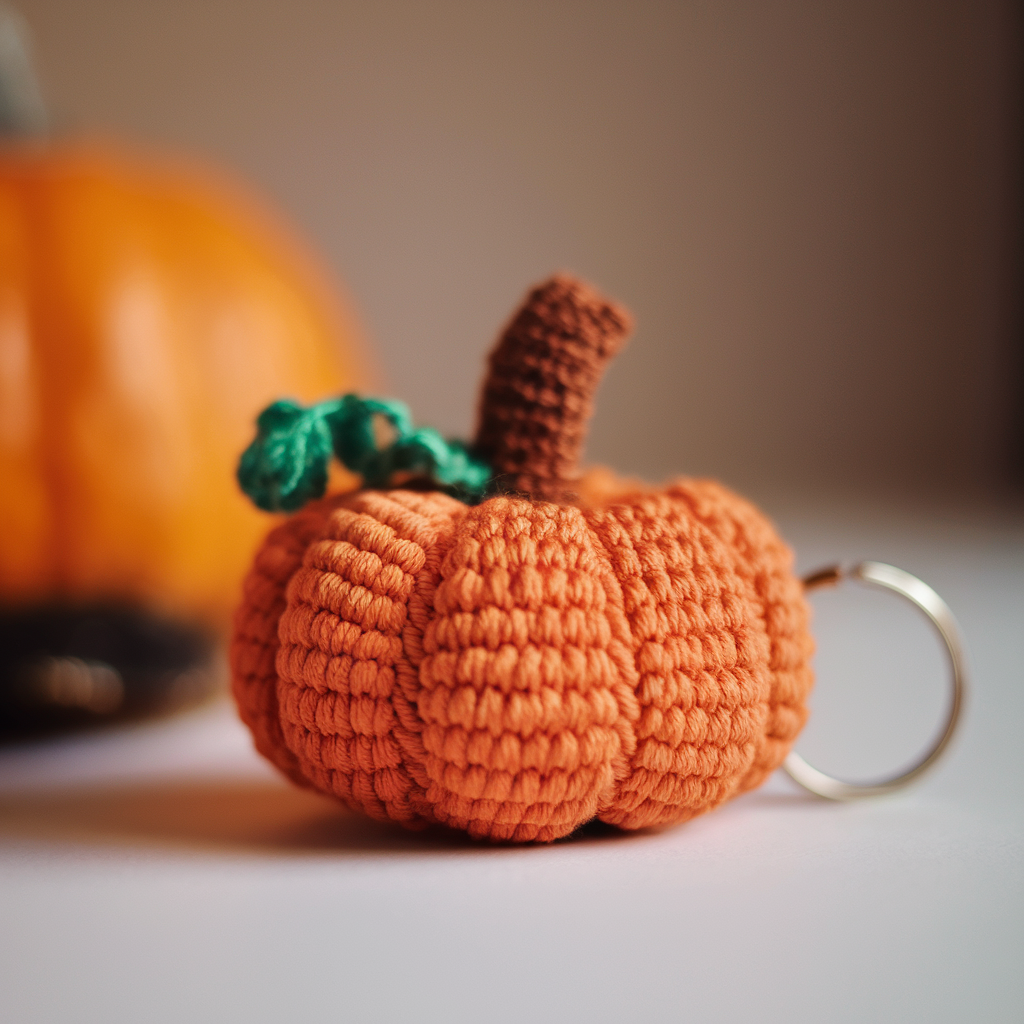
Perfect for fall, Halloween, or people who like squash. Tiny pumpkin shape with ridges and a crochet stem.
Skill level: Advanced Beginner
Materials: DK yarn orange + brown/green for stem, 3.0 mm hook, small stuffing, split ring, tapestry needle.
Finished size: ~1.75–2.25 inches (4.5–6 cm) diameter.
Steps
- Base/body (amigurumi ball but stop early): MR, R1: 6 sc. R2: inc → 12. R3: sc, inc → 18. R4: 2 sc, inc → 24. R5: 3 sc, inc → 30. R6–R7: sc around (2 rounds). R8: 3 sc, dec → 24. R9: 2 sc, dec → 18. Stuff lightly. R10: sc, dec → 12. R11: dec around → 6. Close and leave long tail.
- Create ridges: With yarn needle and a long length of contrasting or same yarn, run a thread from top to bottom and back several times through the pumpkin, spacing about 6 ridges evenly to create the pumpkin segments. Pull each thread gently to form ridges and knot at top and bottom; hide knot inside. Use multiple passes to deepen ridge.
- Stem: Make a small short tube: ch 4, join, sc rounds for 3–4 rounds in brown/green; stuff slightly and sew to top center.
- Attachment: Sew a small stiff loop into top near stem and add split ring. Reinforce seam well with extra stitches and a dab of craft glue if you want extra confidence.
Variation
- Make mini gourds in different shades and hang them as a cluster keychain.
- For a plush pumpkin, add a tiny leaf crocheted in green and tack to stem.
7. Crochet Cherry Keychain Pattern
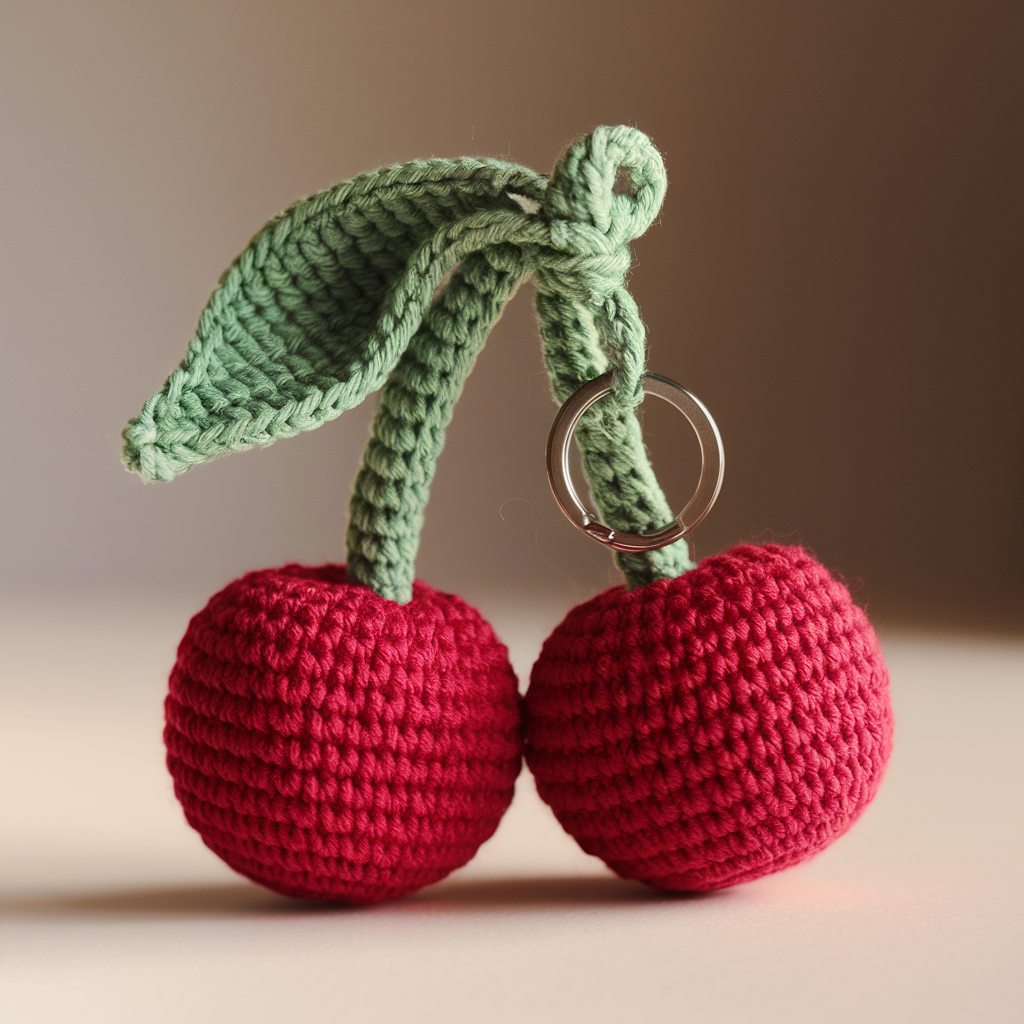
Pair of cherries joined by stem — cheerful, compact, and surprisingly lovely dangling off a tote.
Skill level: Intermediate (two small spheres + stem join)
Materials: DK yarn red for cherries, green for stem/leaves, 2.75–3.0 mm hook, polyfill, small split ring or lobster clasp, tapestry needle.
Finished size: each cherry ~1.25–1.5 inches (3–4 cm) diameter; total hang ~3.5–4 inches (9–10 cm) including stem.
Steps
- Cherry (make 2): MR, R1: 6 sc. R2: inc → 12. R3: sc, inc → 18. R4: 2 sc, inc → 24. R5–R6: sc around 2 rounds. R7: 2 sc, dec → 18. R8: sc, dec → 12. Stuff firmly. R9: dec around → 6. Close and fasten off leaving long tail for sewing. Repeat for second cherry.
- Join cherries: Hold two cherries side-by-side and sew their top loops together with a few tight passes so they sit adjacent. Don’t over-stitch — leave a natural small valley where the stem attaches.
- Stem and loop: With green, ch 12 (or length you want for drop), sl st back along chain to make a thicker stem or make a 3–4 round i-cord for sturdiness. Fold stem in half over the top seam between cherries and sew securely through the top of both cherries multiple times. Leave 1–1.5″ at the folded top to make a loop; pass split ring onto this loop before closing and sewing extra passes.
- Leaf (optional): Small leaf: ch 6, sc in 2nd ch from hook, hdc, dc, hdc, sc — fasten off and sew near stem.
- Attachment: Make sure the stem loop is stitched through the body of both cherries for strength. Add a dab of glue inside the core of stitches as insurance.
Variation & Tips
- Make a single cherry by reducing to one ball and a short stem.
- Use glossy yarn or a small bead sewn into the cherry top to simulate the glossy highlight.
Final finishing & longevity checklist (because you will test them)
- Stitch tight. Use a slightly smaller hook than the yarn label to reduce gaps where stuffing can shift or hardware can rub.
- Reinforce loops. Sew through the charm’s body (not just surface stitches) multiple times when securing the loop. A sewn-through path plus a small dab of clear fabric glue inside the knot is a good safety combo.
- Embroider, don’t glue prominent facial features unless you mean it — glue and friction do not play nicely over time.
- Lining for thin yarns. If your yarn is soft and prone to pilling, sew a tiny fabric backing behind motifs to avoid long-term wear.
- Washing: Hand wash cold for charms with beads or safety eyes. Cotton charms are usually machine washable on gentle if hardware is removed.
conclusion
There. Seven practical, publish-ready keychain patterns: sun, bear head, mermaid, daisy, bunny, mini pumpkin, and cherry. Each is designed to survive real life (briefcase crush, sticky pocket, distracted owner) and to be finished quickly so you can make a herd of charms before you lose interest. Pick your favorites, tighten your tension, reinforce the loops, and make something that will actually last longer than your phone’s battery.