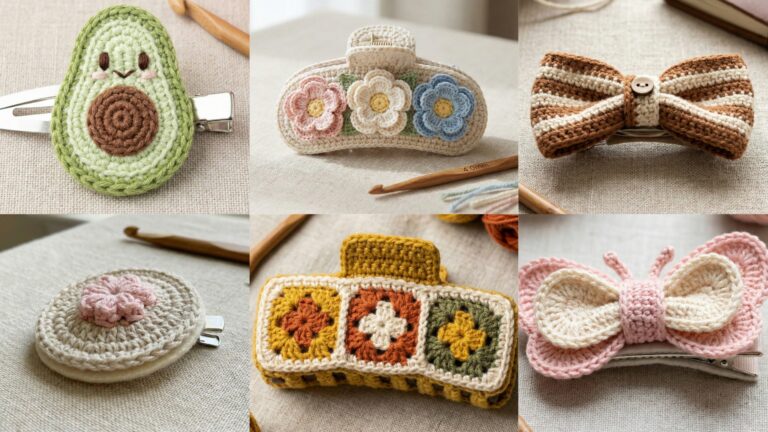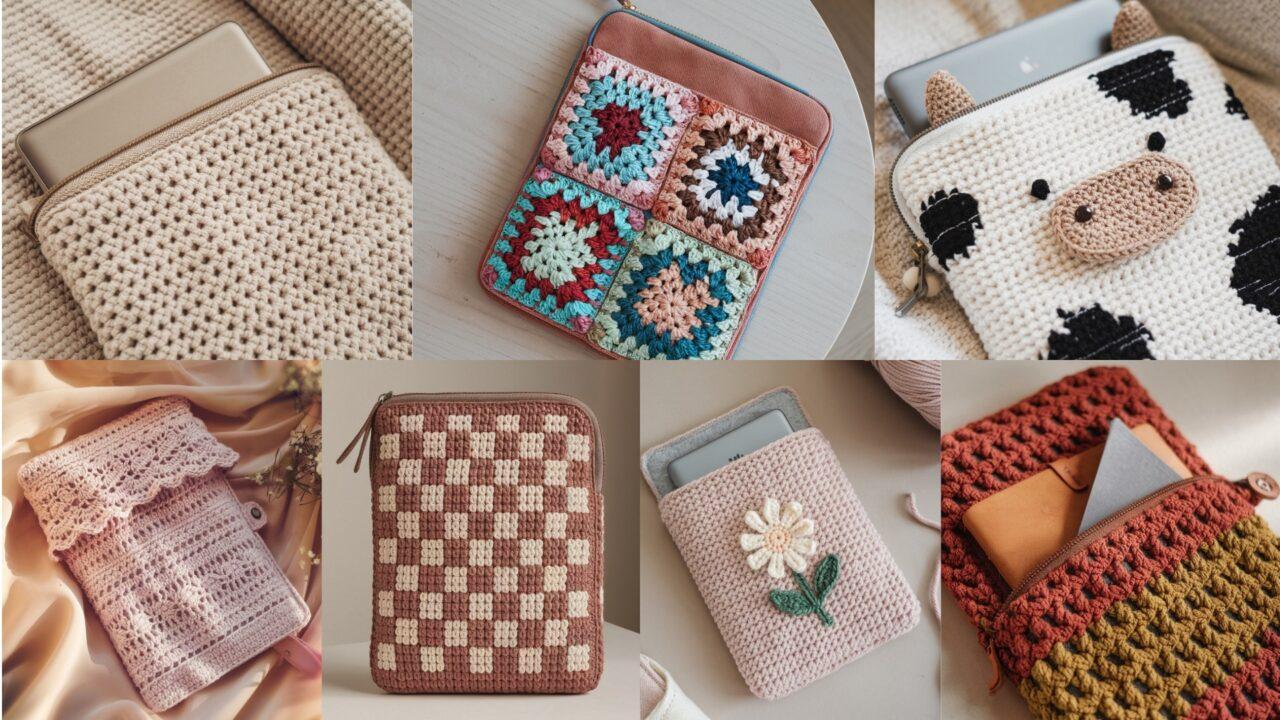
A handmade Kindle sleeve is one of those small projects that delivers big satisfaction: fast to make, super-useful, and endlessly giftable. Below you’ll find seven distinct sleeve patterns — from delicate daisies to playful cow motifs — each with full materials, stitch notes, step-by-step construction, finishing and styling ideas. I designed these so you can make a snug sleeve for most standard e-readers (approx 6–7″ tall × 4–5″ wide), but I also include notes for resizing. Pick a favorite and make it tonight.
Quick notes (read before starting)
Abbreviations
- ch = chain
- sl st = slip stitch
- sc = single crochet
- hdc = half double crochet
- dc = double crochet
- tr = treble
- BLO / FLO = back/front loop only
- st(s) = stitch(es)
- inc = 2 sts in same stitch
- dec = decrease (sc2tog unless specified)
- MR = magic ring
- RS/WS = right side / wrong side
Sizing
Most patterns yield a sleeve for a 6–7″ tall Kindle (paperwhite-size). Measure your device (height × width × thickness) and adjust by changing hook or stitch count: tighter hook = smaller sleeve; add/subtract stitches in multiples indicated per pattern.
Yarn & hook
- I recommend cotton/ cotton-blend (durable, washable) or worsted acrylic for cushy feel. For very snug, protective sleeves, consider holding two strands or using bulky yarn.
- Hooks range 4.0–6.0 mm depending on pattern. Use what gives the correct feel and gauge.
- Add light padding (felt or thin fleece lining) for more protection.
Finishing
- Most sleeves are worked flat and seamed or worked in the round. Sew a hidden zipper or make a flap closure with button, snap, or envelope-style overlap.
- Blocking: a light steam/wet block will even stitches and make join/embellishment neater.
1. Crochet Daisy Delight Kindle Sleeve Pattern
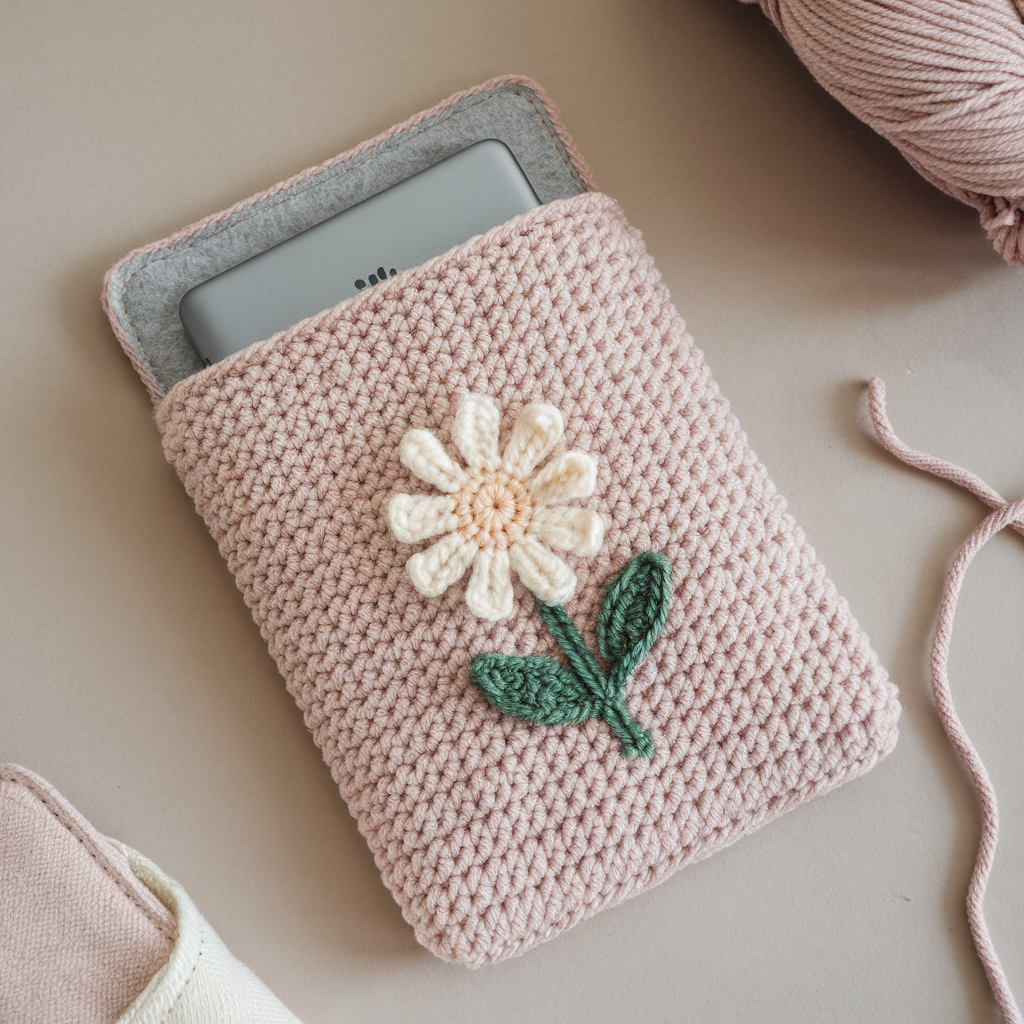
Fresh, floral and lightly textured — a slim sleeve with a daisy panel on the front.
Skill level: Beginner → Intermediate
Finished size: ~7.0″ × 5.0″ (adjustable)
Materials: worsted weight cotton yarn (main color for body + contrast yellow/white for daisies), 4.5 mm hook, tapestry needle, 6–7″ zipper or button + flap, small piece of felt for backing (optional).
Construction concept
A simple rectangular sleeve (worked flat) with an appliquéd daisy panel centered on the front. You can line the sleeve with felt or fabric for extra structure.
Step-by-step
Body — rectangle
- Ch 32 (adjust to desired width; finished width ≈ 5″ with 4.5 mm hook).
- Row 1: sc in 2nd ch from hook and across — 31 sc. Turn.
- Rows 2–38: ch 1, sc across. (Make number of rows to reach device height + 1″ for seam/closure; ~38 rows for 7″ tall). Fasten off leaving long tail for seaming.
Daisy motif (make 3–5 daisies depending on layout)
- MR, ch 1, 8 sc into MR. Pull tight and join. (8)
- Ch 4, sl st into next st x8 around to make 8 loops. Join.
- Into each loop: (sc, hdc, dc, hdc, sc) — forms a petal. Fasten off and weave ends. For center, use yellow: MR, 6 sc, join, fasten off and sew into middle of petal ring.
Assembly
- Arrange daisies on the front panel, pin in place. Sew daisies down with matching thread/yarn, burying tails neatly.
- Attach a felt or fabric lining cut slightly smaller than crochet panel; hand-sew lining into place.
- Fold panel RS together and whipstitch sides to create sleeve, leaving top open for zipper or flap. For a flap: fold 1″ inward and add a button and loop.
Finishing
- Block lightly to flatten daisies and panel.
- Add small strap or tassel on zipper pull for style.
Variations
- Make the entire front in a daisy-granny pattern (repeat motif to cover the whole front).
- Use pastel yarns for a soft look or bright primaries for a cheerful cover.
2. Crochet Classic Kindle Sleeve Pattern
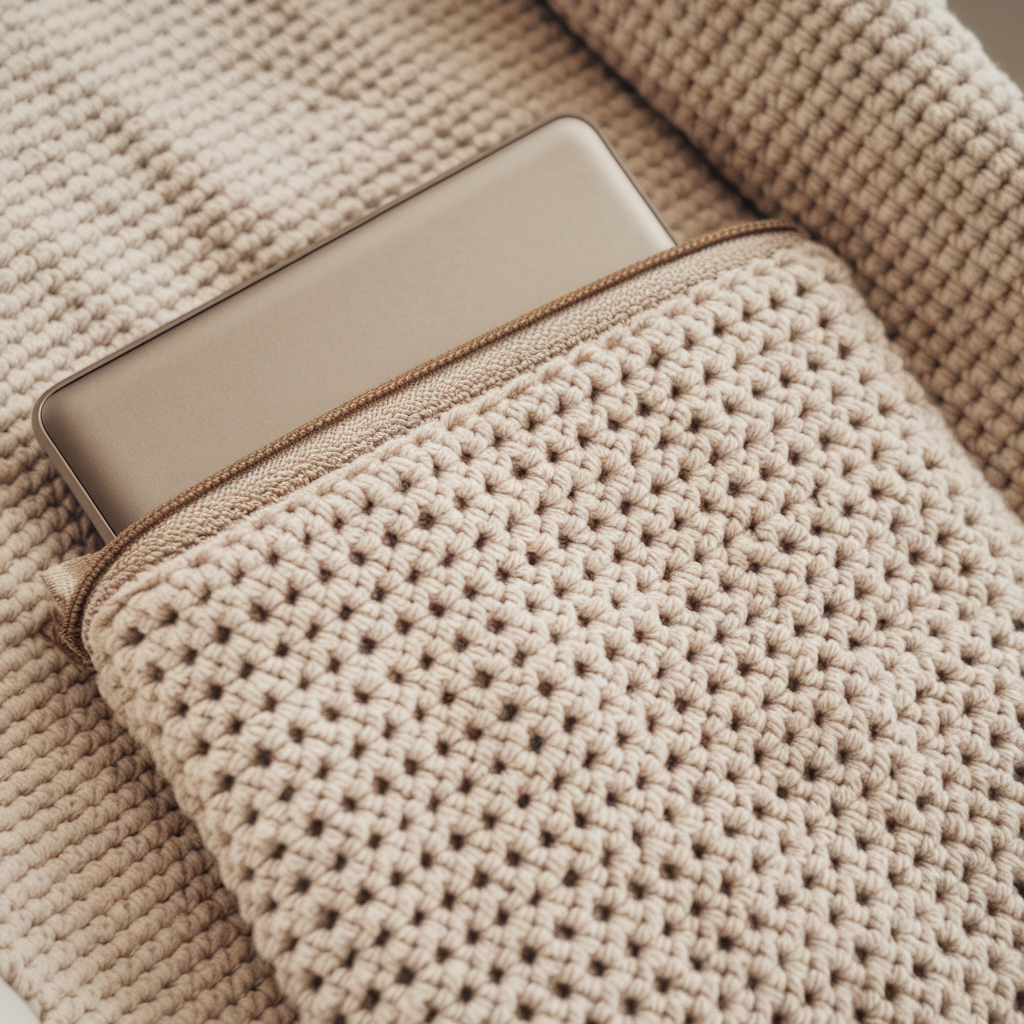
Clean, minimalist, and very fast. A simple, dense stitch gives a protective, modern sleeve.
Skill level: Beginner
Finished size: ~6.75″ × 4.75″
Materials: worsted cotton, 5.0 mm hook, 6–7″ zipper or flap, tapestry needle.
Construction concept
A thick, dense fabric using hdc in BLO for a faux-knit look; worked flat into a long rectangle and seamed. Very durable and office-appropriate.
Step-by-step
Foundation
- Ch 30 (or width to fit device + seam allowance). Turn.
- Row 1: hdc in 3rd ch from hook and across (counts ch2 as first hdc). Turn.
- Row 2: ch 2, hdc in BLO across. Turn.
- Repeat Row 2 until piece measures device height + 1″ (~36–40 rows). Fasten off.
Assembly
- Fold RS together; whipstitch sides leaving top open. For a boxed bottom, create tiny corner triangles and sew across to give depth.
- Attach zipper: either sew zipper to lining and slip into crochet or hand-stitch zipper to top edge. Alternatively create a flap: crochet 8 extra rows then fold over and fasten with a snap.
Finishing
- Add a slim inner lining for extra protection; stitch in by hand.
- Top-edge finishing: sc around the top edge in contrasting color.
Variations
- For extra padding, hold two strands or use bulky yarn and larger hook for a plush sleeve.
- Add a monogram with surface crochet.
3. Crochet Sorrel Kindle Sleeve Pattern
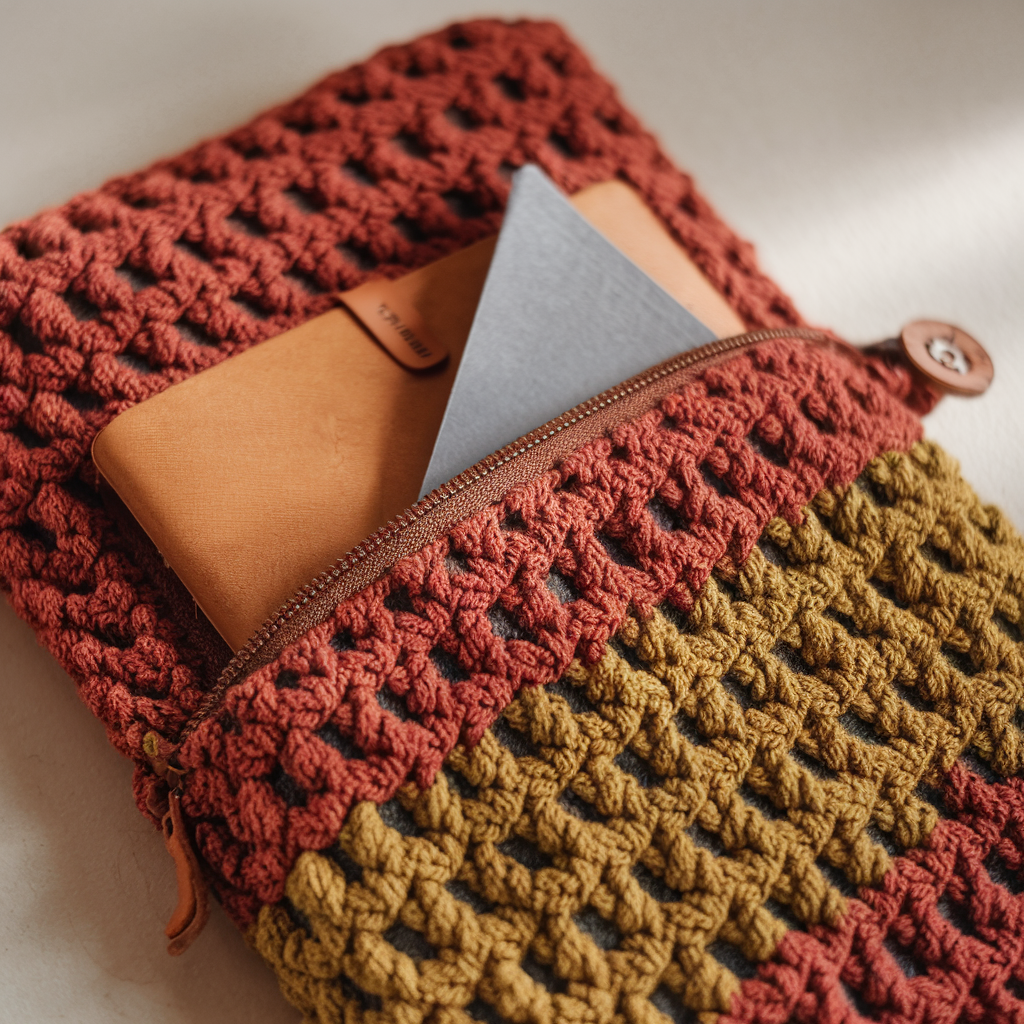
Textured stitches and warm tones — Sorrel is about raised patterning (waffle or seed stitch effect) for an artisanal look.
Skill level: Intermediate (textured stitch)
Finished size: ~7.25″ × 5.0″ (with a slightly roomy fit)
Materials: worsted yarn, 4.5 mm hook, zipper or button flap, tapestry needle, felt lining optional.
Construction concept
Use waffle stitch or seed moss to create tactile depth. Waffle stitch gives grid texture and nice thermal padding.
Waffle stitch refresher (pattern)
- Waffle stitch commonly uses front post treble (FPtr) alternating with dc rows. For a simpler waffle: Row A: dc across. Row B: ch 1, fpdc around next dc, dc in next dc rep.
Step-by-step (simpler waffle-like using hdc & fpdc)
- Ch 32. Row 1: hdc in 2nd ch from hook and across. Turn.
- Row 2: ch 2 (counts), fpdc around next st, hdc in next st repeat across. Turn.
- Row 3: ch 2, hdc across pulling through both loops only. Turn.
- Repeat Rows 2–3 until desired height (~38 rows). Fasten off.
Assembly & finishing
- Fold and seam sides. Add zipper or fold-over flap. For a more finished interior, sew in a cotton lining with a bit of interfacing at the top for structure.
Styling
- Sorrel looks great in autumnal yarns: rust, deep mustard, olive. Add leather label or wooden button for a rustic finish.
4. Crochet Granny Square Kindle Sleeve Pattern
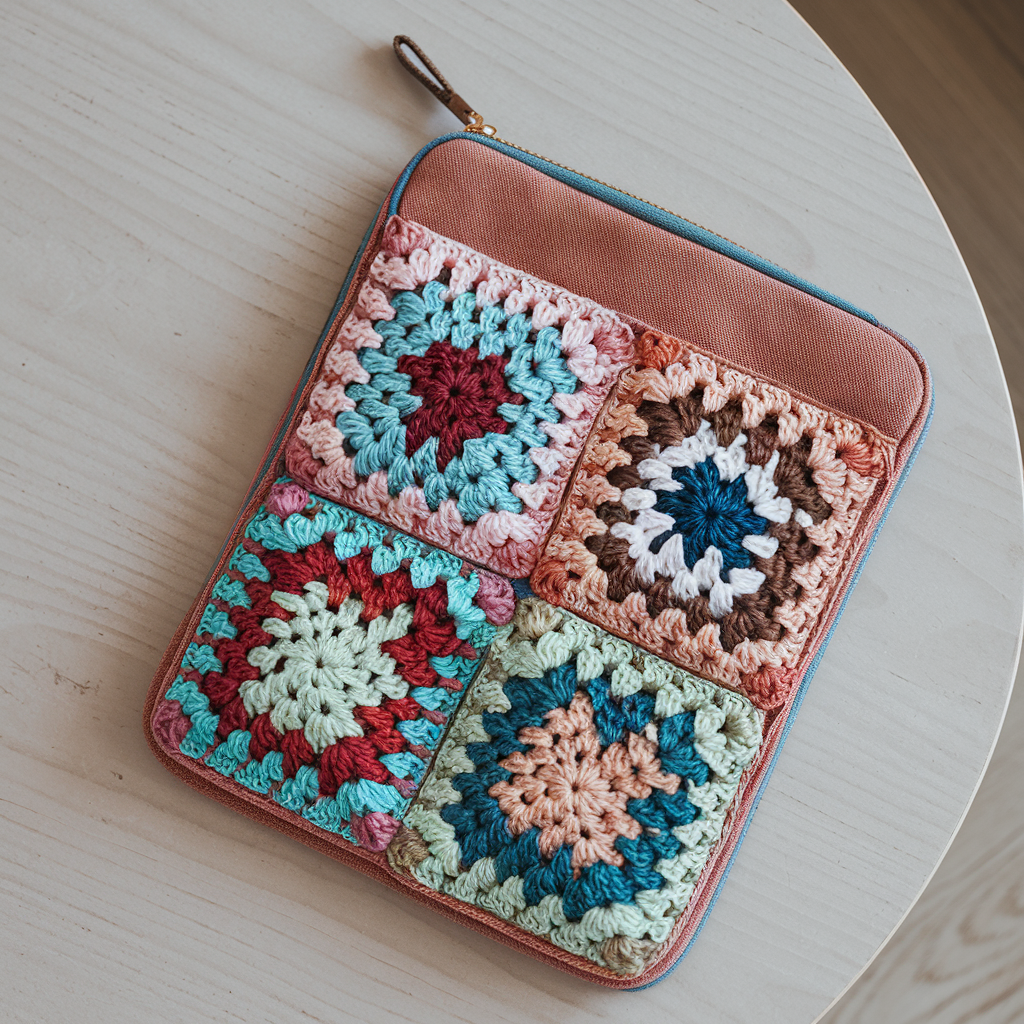
Classic granny squares arranged into a rectangle — playful and customizable.
Skill level: Beginner → Intermediate (motif joining)
Finished size: depends on square sizes. Example: 6 squares (2 × 3) each 3.5″ → ~7″ × 10.5″ folded (make 2 × 2 for smaller sleeve).
Materials: scrap yarns, 4.0–4.5 mm hook, fabric for lining, zipper.
Construction concept
Make granny squares (or any motif), join them into a front panel and back panel or make a continuous tube using join-as-you-go (JAYG).
Step-by-step
Granny square (3-round mini)
- MR, ch 3 (counts as dc), 2 dc in MR, ch 2, 3 dc in MR, ch 2 repeat 4 times total. Pull tight and join. You now have 4 corner clusters.
- R2: join color, (3 dc, ch 2, 3 dc) into each corner ch2 space, ch 1 between clusters along sides until square grows. Join and fasten off. Make required number of squares (e.g., 6 for a 2×3 layout).
Joining
- Block squares to equal size. Lay out 2×3 grid. Join squares using slip-stitch or single crochet join for visual contrast. For a flat join, whipstitch on WS.
Assembly
- After making front and back panels, seam sides and bottom. Add lining with zipper sewn into top. You can also join squares as you make them directly to form a tube using JAYG to save steps.
Variations
- Use monochrome granny squares for a modern look; multi-color for boho.
- Add a long strap by crocheting a narrow strap and sewing it inside seam.
5. Crochet Checkered Kindle Sleeve Pattern
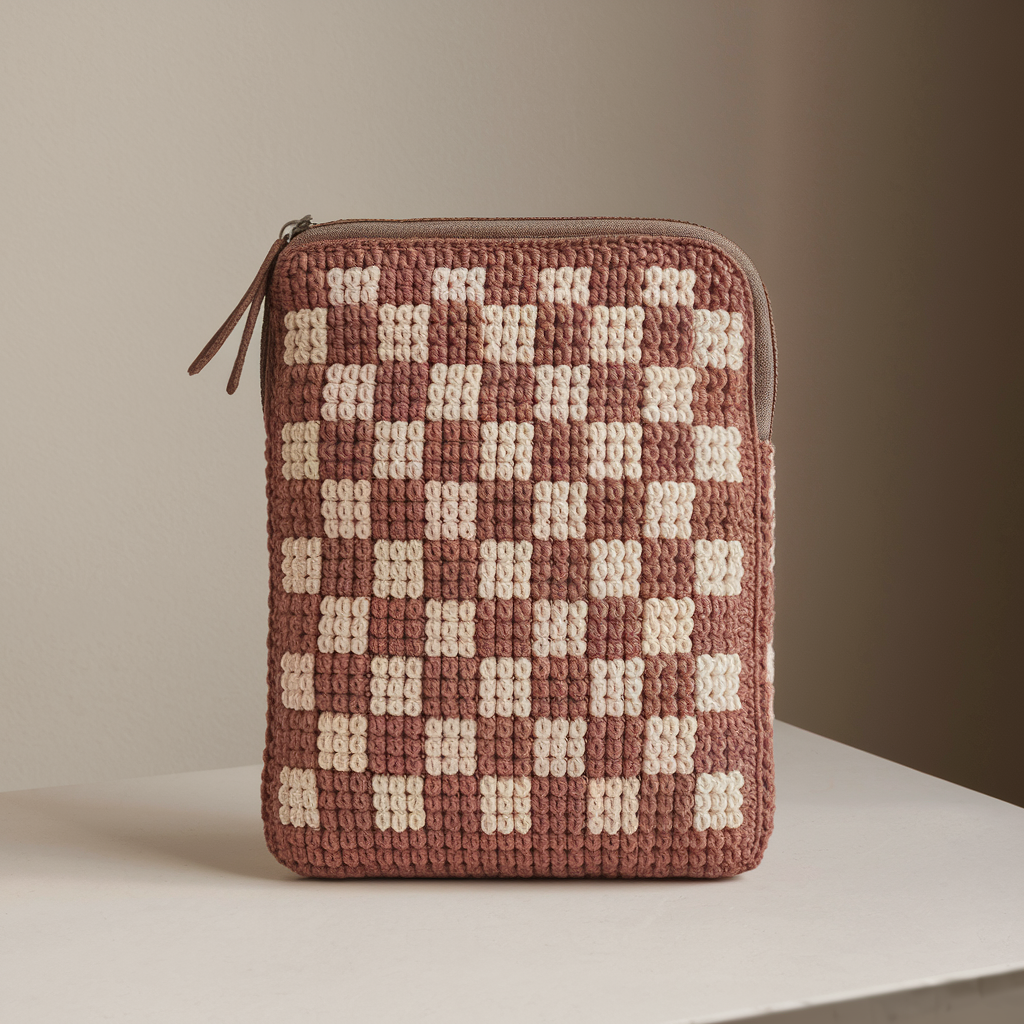
A crisp, modern checkered or plaid look using tapestry crochet (or simple color blocks).
Skill level: Intermediate (colorwork / tapestry)
Finished size: ~7″ × 5″
Materials: two contrasting cotton yarns, 4.0–4.5 mm hook, tapestry needle, zipper/closure, lining.
Construction concept
Work a panel in tapestry crochet, carrying the unused color along the WS. A simple 4×4 block check works well.
Step-by-step (simple block check)
- Make a 4″ gauge swatch to determine sts per inch. Plan block size (e.g., 4 sts × 4 rows per block). Calculate the number of blocks across to match device width.
- Ch foundation to required total stitch count. Row 1: dc (or sc depending on density preference) across in Color A. Turn.
- Row 2–X: Follow check chart switching colors by finishing the last stitch of old color with the new color (wrap new color on final yarn-over). Carry the unused color along the WS and catch it every 3–5 stitches to keep floats short. Continue until the rectangle reaches device height.
- Fasten off and weave in ends.
Assembly
- Fold and seam sides; add lining and zipper as before. The tapestry fabric is dense — you can skip lining unless you want a softer interior.
Tips
- Use a smaller hook for dense fabric to prevent gaps and snags.
- For an easier non-tapestry method, create stripes in two colors and then surface-crochet a grid on top.
6. Crochet Frilly Kindle Sleeve Pattern
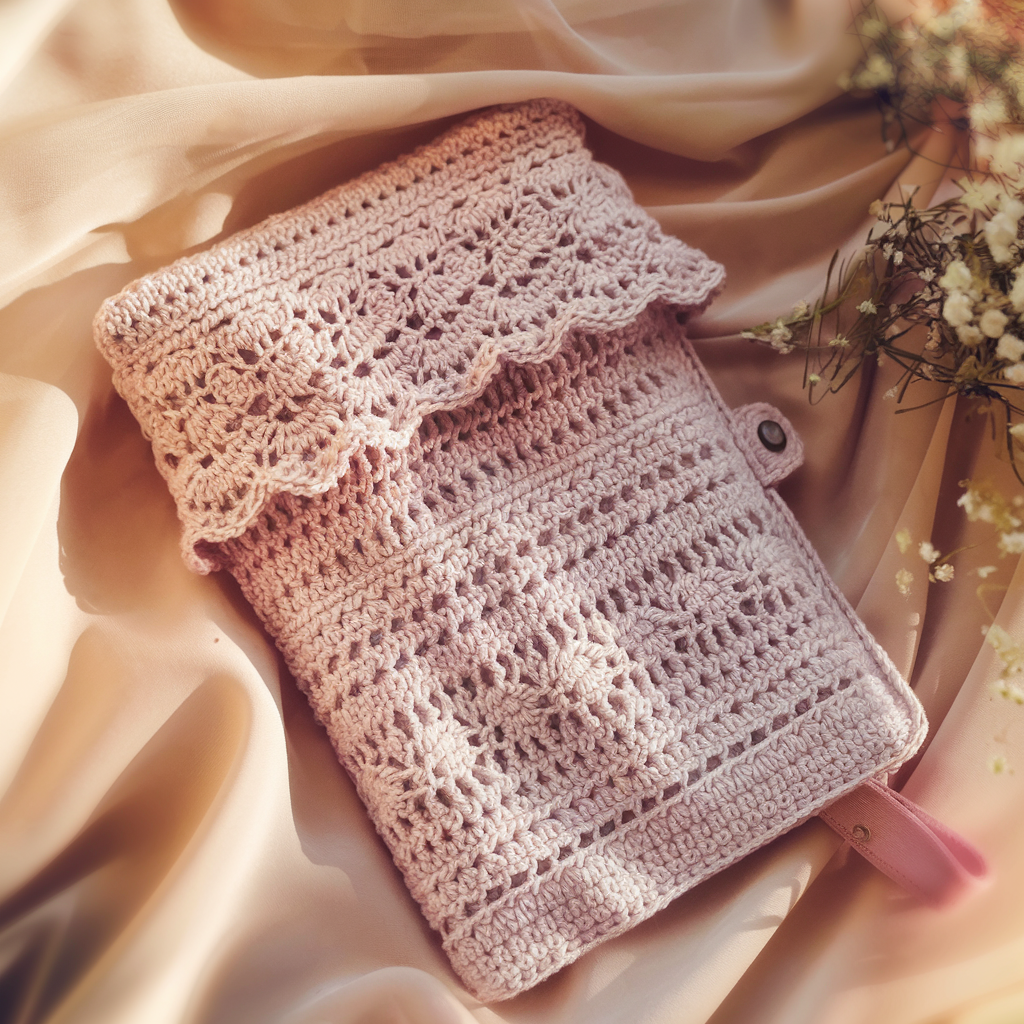
Girly, dramatic and lacy — a sleeve with a ruffled or scalloped flap and delicate texture.
Skill level: Intermediate (lace stitches)
Finished size: ~7″ × 5″
Materials: DK or sport cotton for delicate drape, 3.5–4.0 mm hook, button or magnetic snap for flap, lining recommended.
Construction concept
A basic body in shell stitch with a deeply scalloped flap. Frilly sleeves are lightweight — use a lining for protection.
Step-by-step
Body (shell stitch)
- Ch 34. Row 1: sc in 2nd ch and across. Turn.
- Row 2: ch 3, skip 2 sts, 5 dc in next st, skip 2, sc in next repeat across. Turn.
- Row 3: ch 1, sc across shells into shell centers and sc spaces. Repeat Rows 2–3 until you reach device height minus flap length (~5–6″ of body, leaving 1–2″ for flap fold).
Flap (scallop)
- Continue the shell pattern for additional rows to form flap that will fold over the top (approx 2–3″ longer than device width to create deep scallop).
- For a dramatic frill, in the last row work picots along shell edges or double shell rows to make frillier scallops: (ch 3, sl st in 3rd dc of shell) across.
Assembly
- Fold and seam sides carefully along shell pattern to align shells. Add lining and sew in. Attach a small button or sew magnetic snap so flap stays closed. If using a button, add a loop of ch 8 and sl st to create a decorative loop closure.
Finishing
- Block the flap to open scallops. Add a tiny crocheted cord as wrist strap for a feminine carry option.
Variations
- Use a contrasting color for scallop edge for drama.
- Make a shorter flap and add a tassel for boho-chic.
7. Crochet Cow Kindle Sleeve Pattern
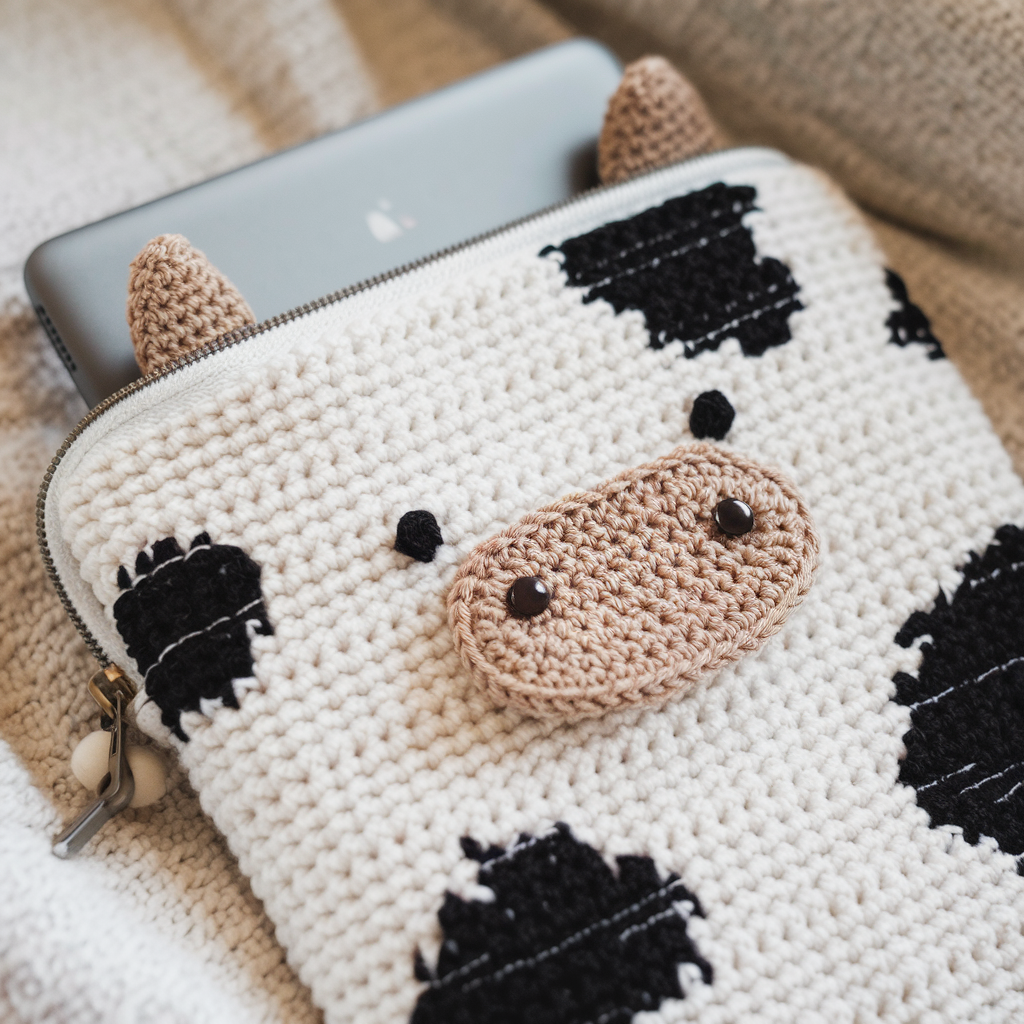
Playful, modern and very giftable — a blackout-and-white cow-spotted sleeve with appliqué face or simple colorwork spots.
Skill level: Beginner → Intermediate
Finished size: ~7″ × 5″
Materials: worsted cotton in white (main) and black (spots), 4.5 mm hook, tapestry needle, lining and zipper optional.
Construction concept
Work the body in white then add black spots as appliqués or surface crochet. Add ears and a tiny snout appliqué for a character sleeve.
Step-by-step
Body
- Ch 32. Row 1: sc in 2nd ch from hook across (31 sc). Turn.
- Rows 2–36: ch 1, sc across. (Make length to match device + seam). Fasten off.
Spots (make several sizes)
- Small spot: MR, ch 1, 6 sc into MR, pull tight, join and fasten off leaving tail.
- Medium spot: MR, 8 sc into MR; Round 2: sc, inc around = 12 sc. Fasten off.
- Place spots randomly, varying sizes for a natural look. Sew down neatly.
Optional face & ears
- Ears: ch 6, sc back across for small triangles; sew at top corners.
- Snout: small oval (ch 6, sc across 4 rows) and embroider nostrils with two short vertical stitches.
Assembly
- Sew spots, ears and snout in place. Add lining if desired. Fold and seam sides; add zipper or flap closure.
Finishing
- Add an interior pocket for a stylus/charging cable. Sew a small loop on one side for a wrist strap.
Variations
- Make a full-on cow print by alternating black and white stripes, or create a Dalmatian with rounder spots.
- For kids, add safety features: embroidered eyes rather than buttons, secure seams well.
Lining, Closure & Extras (unified advice)
Lining
- Cut cotton or flannel lining ¼″ smaller than crochet outer piece. Sew lining into a tube, insert into crochet shell and hand-stitch top edge with ladder stitch for a neat finish. If you add a zipper, attach zipper to lining first and then attach lining into crochet.
Closures
- Zipper: most secure, clean look. Attach to lining with zipper foot or hand-sew to crochet top.
- Flap + button/snap: faster — fold over flap and sew a button and loop or magnetic snap.
- Envelope overlap: crocheted flap tucks into front pocket — no hardware.
Padding
- For extra protection, cut a piece of thin fleece or felt and insert between crochet and lining. Secure by basting lining edges.
Care and Washing
- Cotton/acrylic sleeves: machine wash gentle in a mesh bag, air dry flat to avoid stretching.
- For fuzzy or delicate yarn: hand-wash in cool water and reshape on a towel.
- Avoid high heat when drying; block lightly if shape is distorted.
Conclusion
These seven Kindle sleeve patterns give you a wide range: from clean minimalism to playful personality. Each pattern is designed to be approachable, quick to make and easily customizable by color, yarn choice and closure style. Whether you want the floral charm of Daisy Delight, the dense protection of Classic, the rustic Sorrel texture, granny-square charm, modern checks, frilly romance, or a cow-print grin — there’s a sleeve here for every reader.